
A violin looks fussy at first, with all those curves and little pegs. The secret is that it's perfectly symmetrical: once you have a center line, every curve on one side gets copied on the other. Here is how to draw a violin step by step, from a line and two circles to a glowing orange instrument with its bow. I'd take the body slowly; the rest goes quickly.
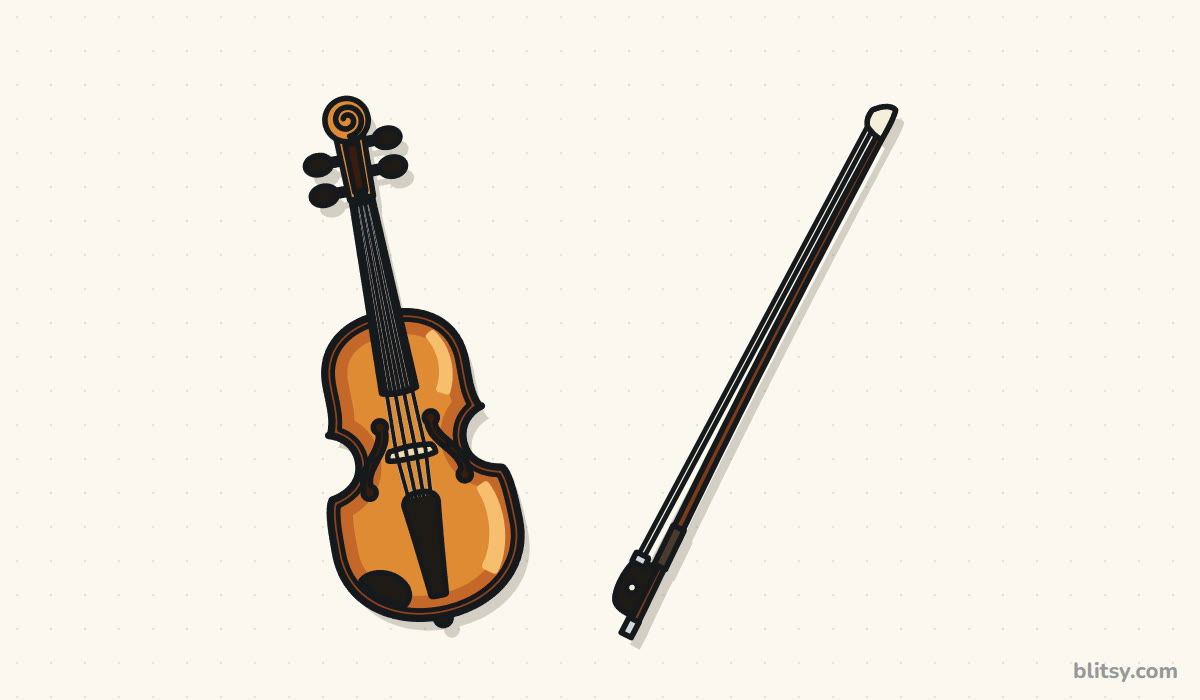
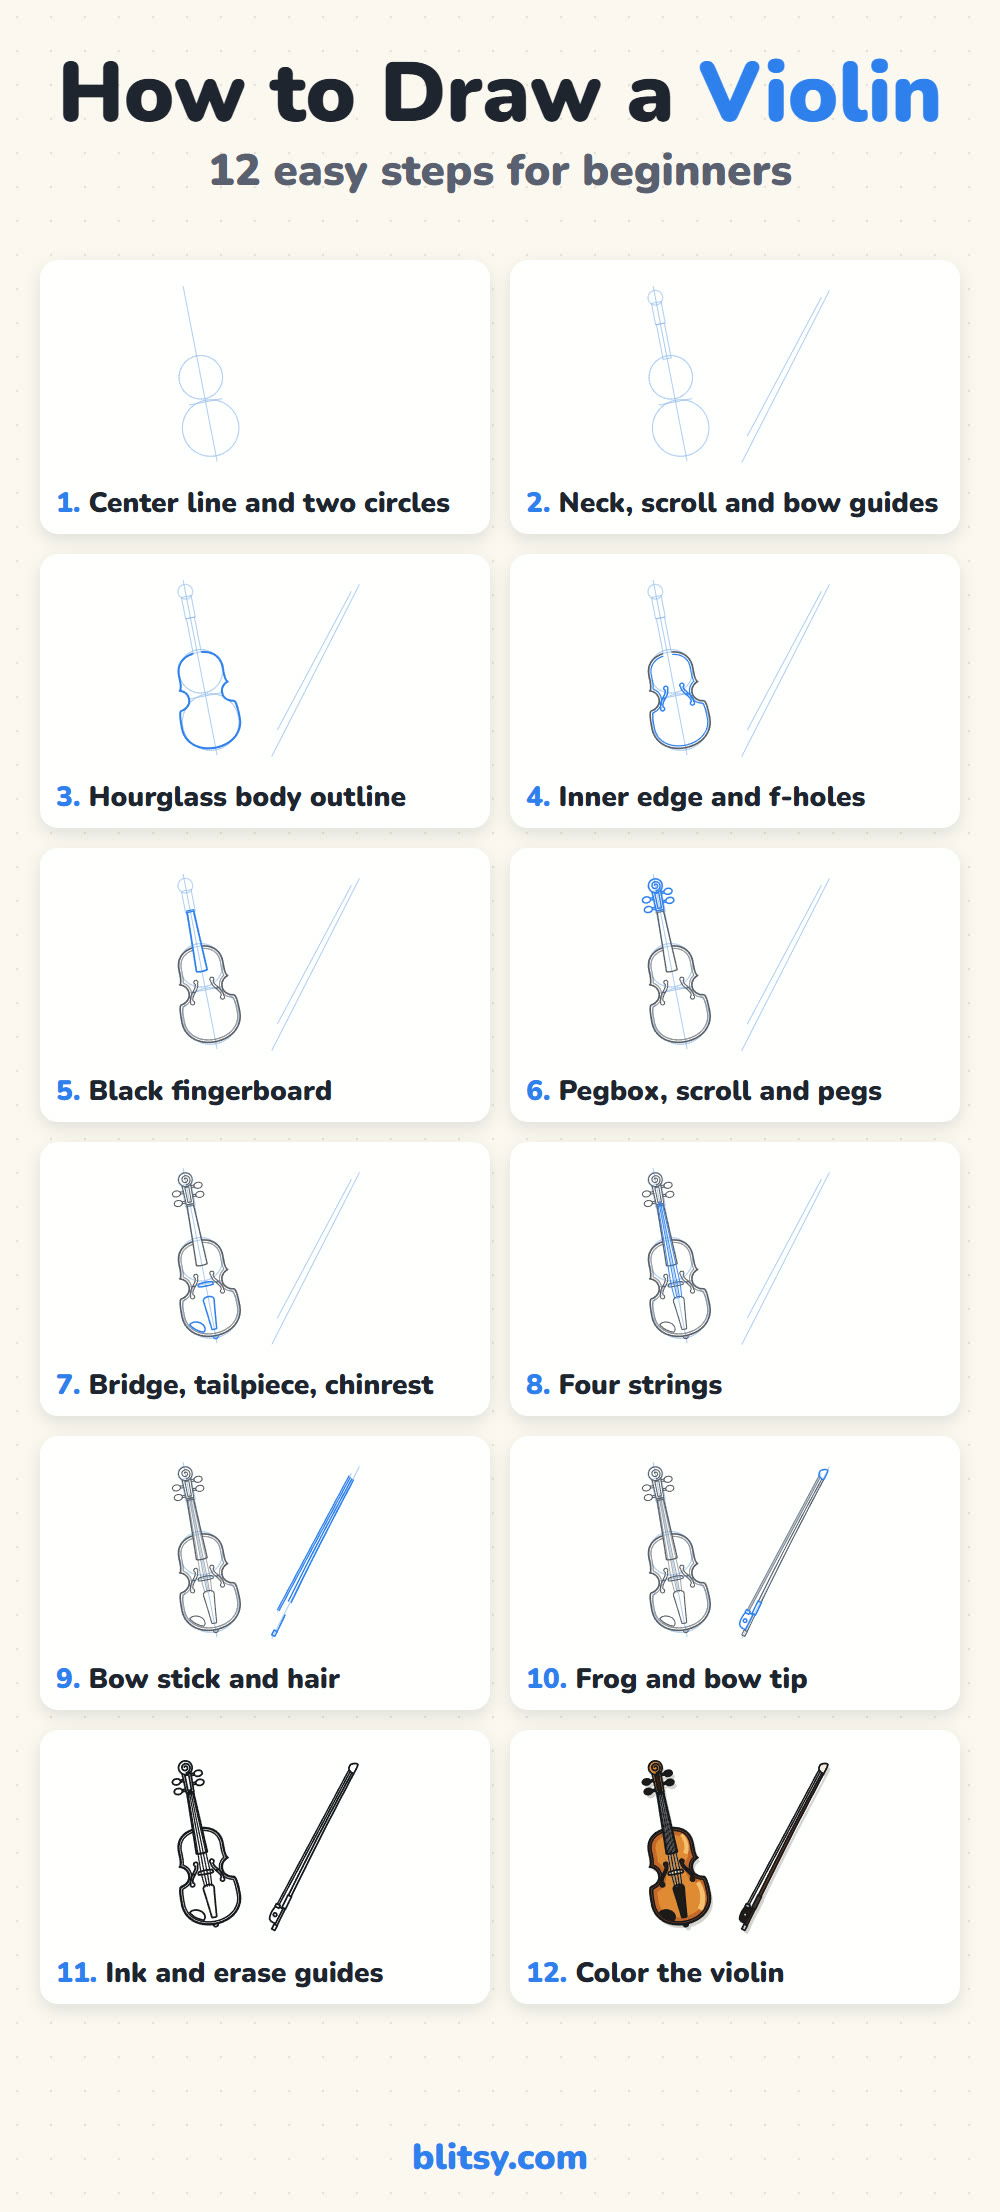
In every picture, today's new lines are blue and older ones gray. Pale blue guides vanish in step 11, so I sketch them with almost no pressure.
Quick overview
⏱️ Time: about 40 minutes, coloring included
🎯 Level: easy to medium, best for kids about 8 and up
✏️ Steps: 12
🎻 You'll draw: a violin with f-holes, a curly scroll and four strings, plus its bow
Violin Sketching Kit for Beginners
- A pencil you can press lightly, HB or 2B
- An eraser that lifts pencil cleanly
- A ruler for the center line, the strings and the bow
- A black fineliner or thin marker
- Colored pencils in orange, light orange, browns and black, plus cream and gray
- Plain white paper, held upright
The ruler matters most for the bow, because a long freehand line almost always wobbles.
How to Draw a Violin Step by Step
Step 1: Draw a center line and two circles
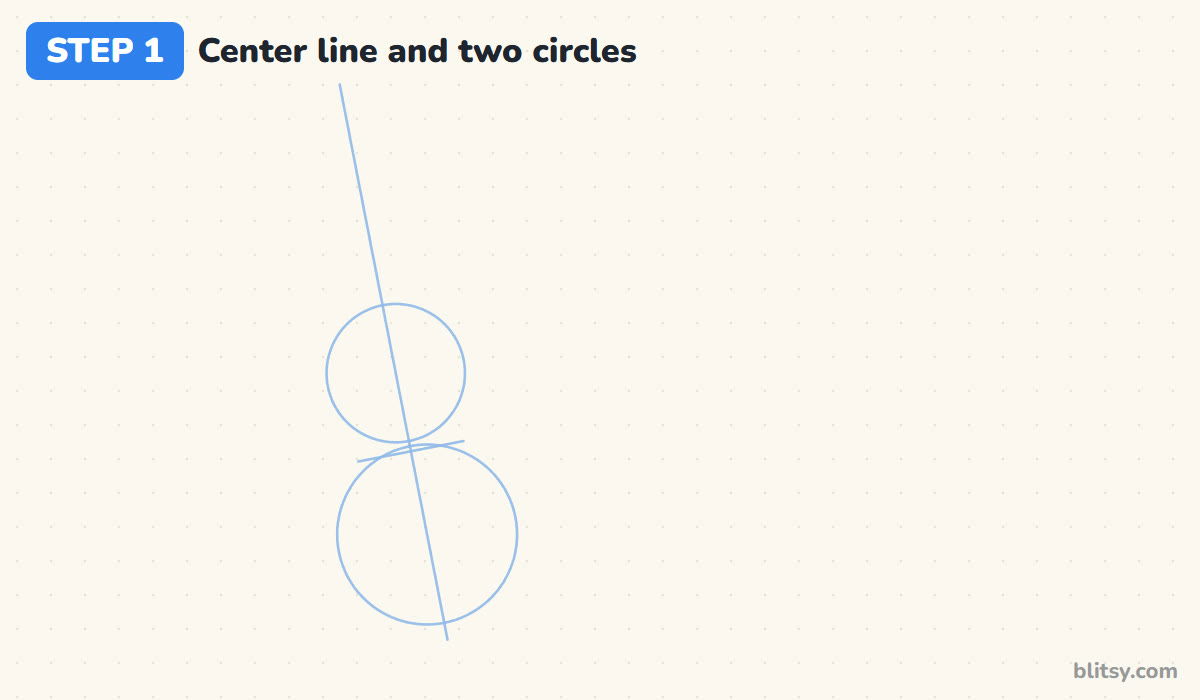
Draw a long, light line leaning a little to the left. Everything is built around it. Near the bottom, draw a big circle on the line for the lower body, and right above it a smaller circle for the upper body, overlapping slightly. A short line across where they meet marks the waist.
💡 Tip: Make the top circle clearly smaller. On a real violin the lower half is the wider one.
Step 2: Sketch the neck and scroll guides plus the bow line
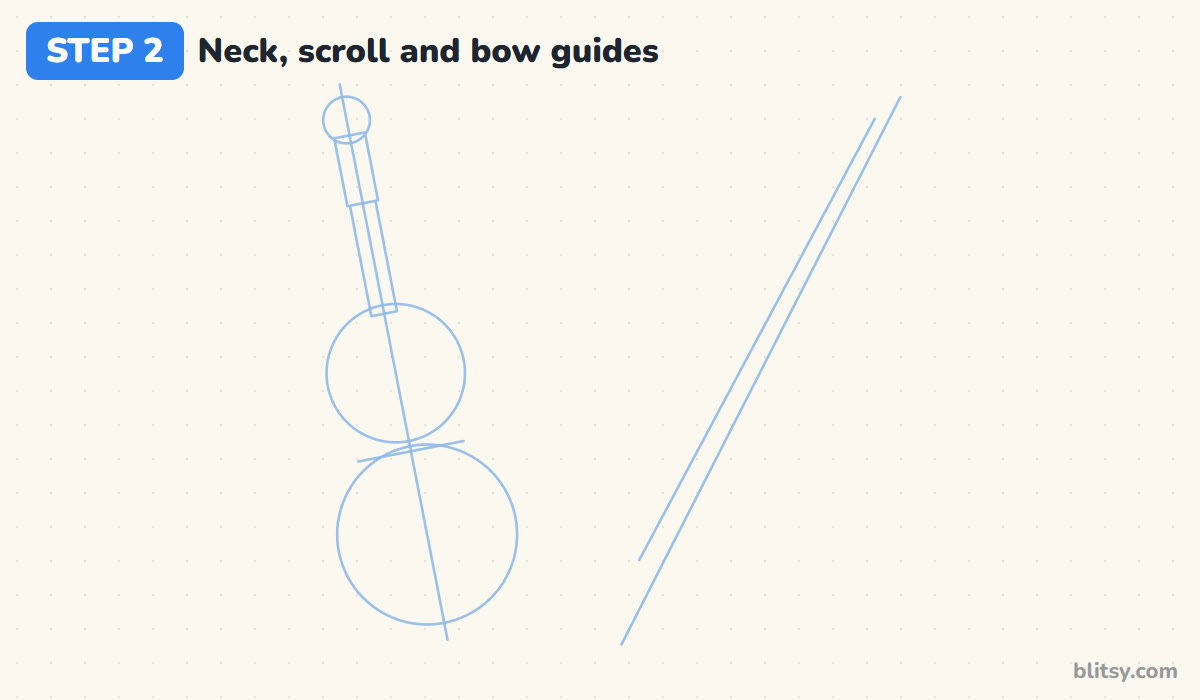
Above the top circle, draw a long thin box for the neck and a shorter one for the pegbox. Finish with a small circle at the very top for the scroll. To the right, rule a long line leaning the other way for the bow, plus a second line beside it for the hair.
💡 Tip: Leave a gap of about one body width between the violin and the bow so they don't crowd each other.
Step 3: Outline the hourglass body
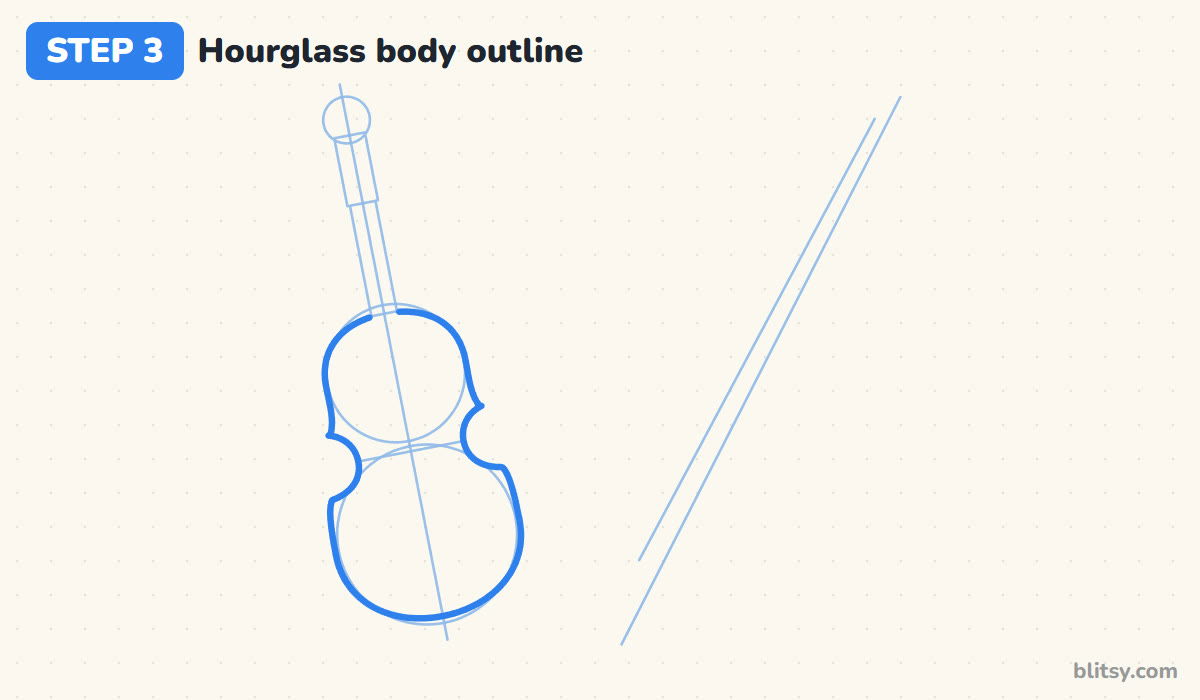
Now draw the real body over the circles. Follow the round bottom up to a small pointed corner, curve sharply inward for the C-shaped waist cut, then push back out to a second corner and round off the top. I draw the right side first, then copy each bump on the left while checking its distance from the center line.
💡 Tip: Measure the waist on both sides with your pencil. If one cut is deeper, the violin looks bent.




Step 4: Add the inner edge and the f-holes
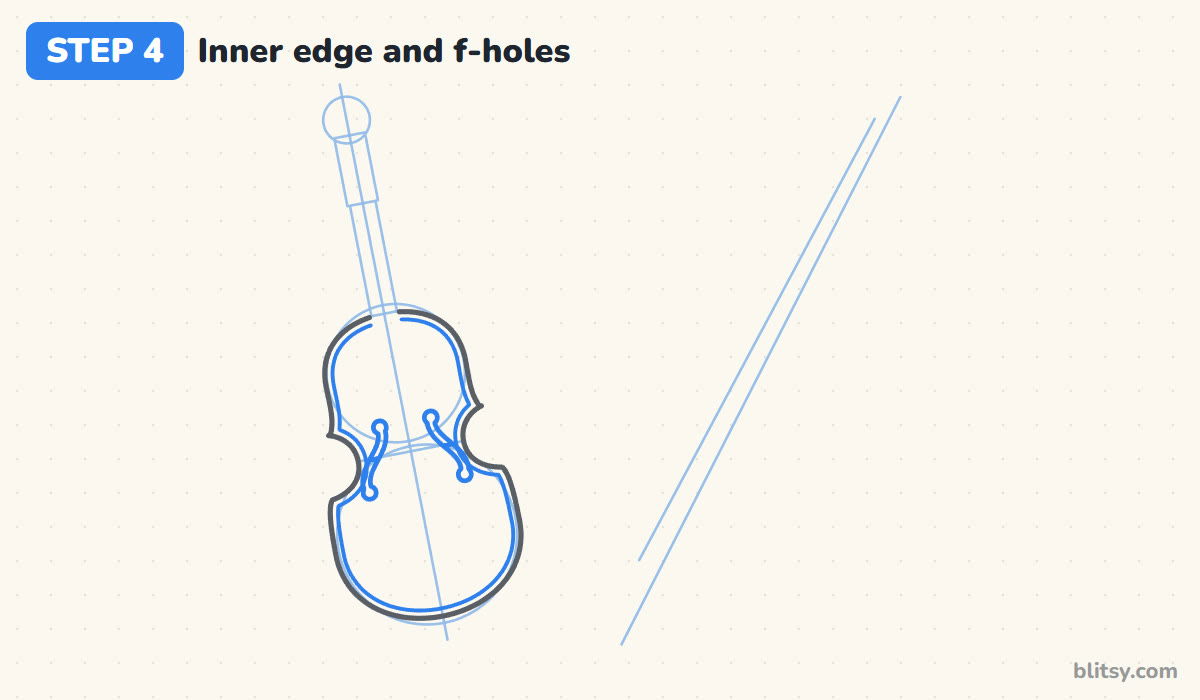
Draw a second outline just inside the first. This thin border is the edging that runs around a real violin. Then add an f-hole on each side of the waist: a slim S-shaped line with a round dot at each end. The top dot sits closer to the center, and a tiny notch in the middle shows where the bridge will stand.
💡 Tip: Draw one f-hole, then turn the paper upside down to check that the second one mirrors it.
Step 5: Draw the long fingerboard
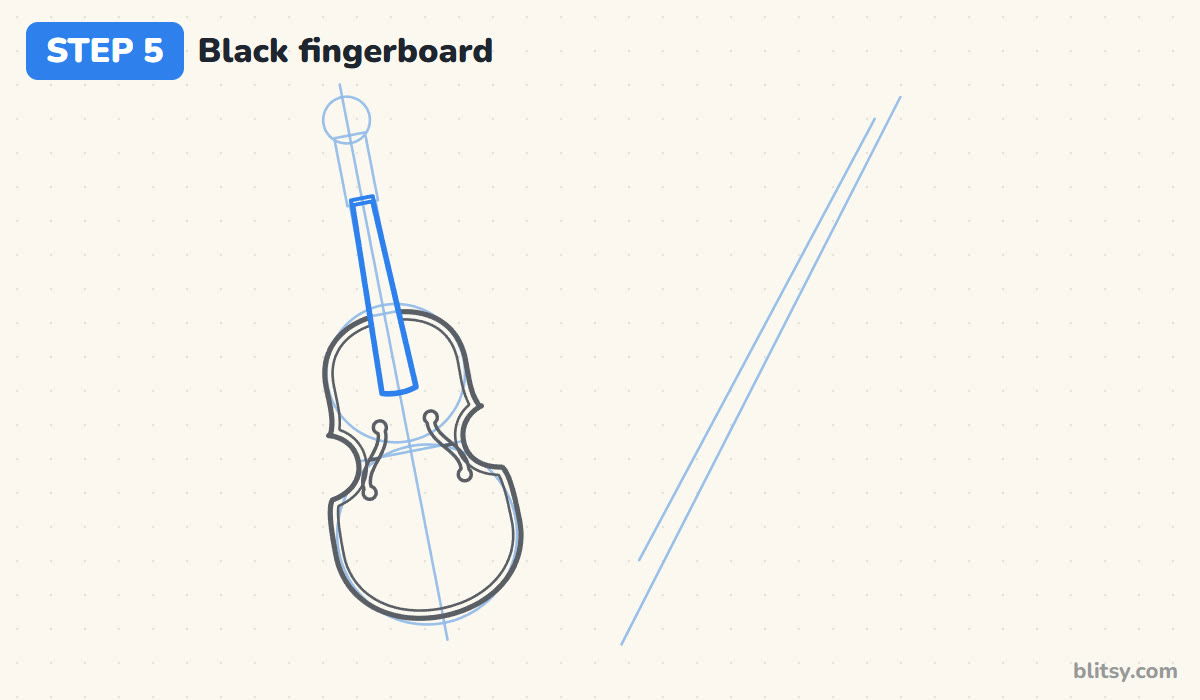
The fingerboard is a long strip from the top of the neck guide down over the body, wider at the bottom and slightly rounded there. Stop it about halfway between the body's top edge and the f-hole notches. Add a small bar across its top end for the nut.
💡 Tip: Keep the fingerboard short of the f-holes. If it runs all the way down, there's no room for the bridge.
Step 6: Add the pegbox with its scroll and four pegs
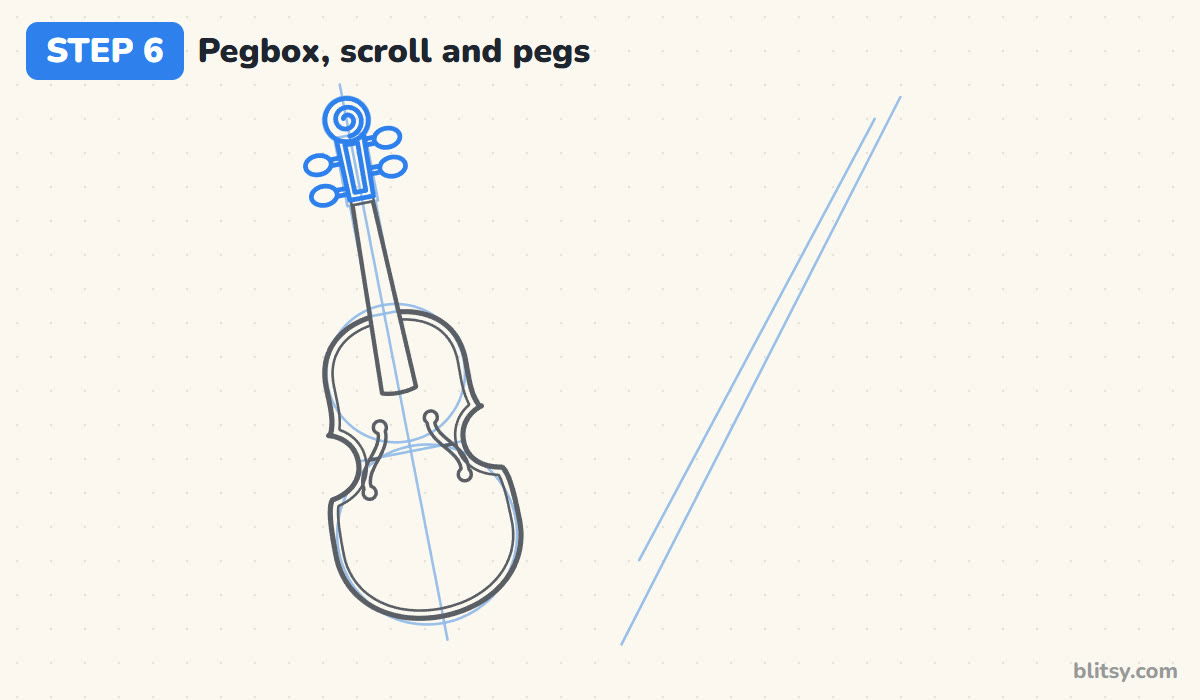
Above the nut, outline the pegbox as a narrow rounded box with a slot down the middle. Trace the scroll circle and draw a spiral inside, curling in like a snail shell. Then add four pegs, two per side, each a short stem with an oval knob. I stagger them so the pairs aren't at the same height, just like on a real violin.
💡 Tip: Draw the spiral from the outside in, slowly. Two turns are plenty.
Step 7: Draw the bridge, then the tailpiece and chinrest
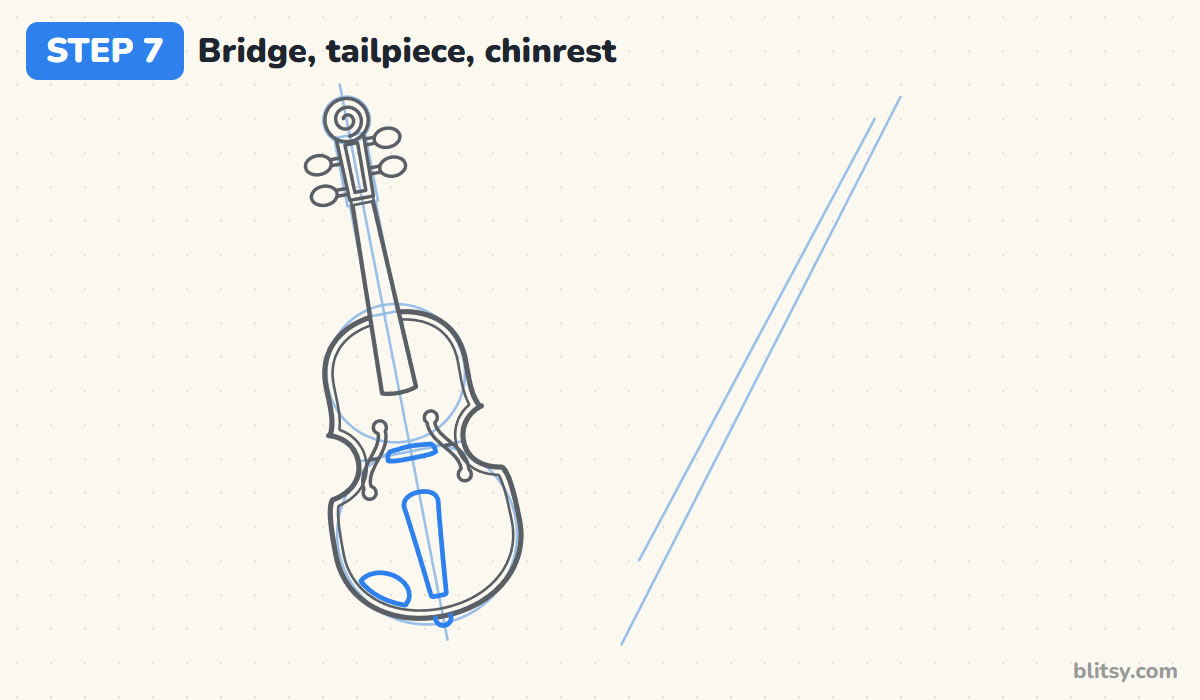
Draw a small flat bridge across the center line, right between the f-hole notches. Below it comes the tailpiece, a tapered shape that's wide near the bridge and narrow at the bottom. Add a little half circle at the bottom edge for the end button, then a rounded chinrest to the left of the tailpiece.
💡 Tip: The bridge goes between the notches, not above them. That one spot makes the violin look correct.



Step 8: Draw four strings
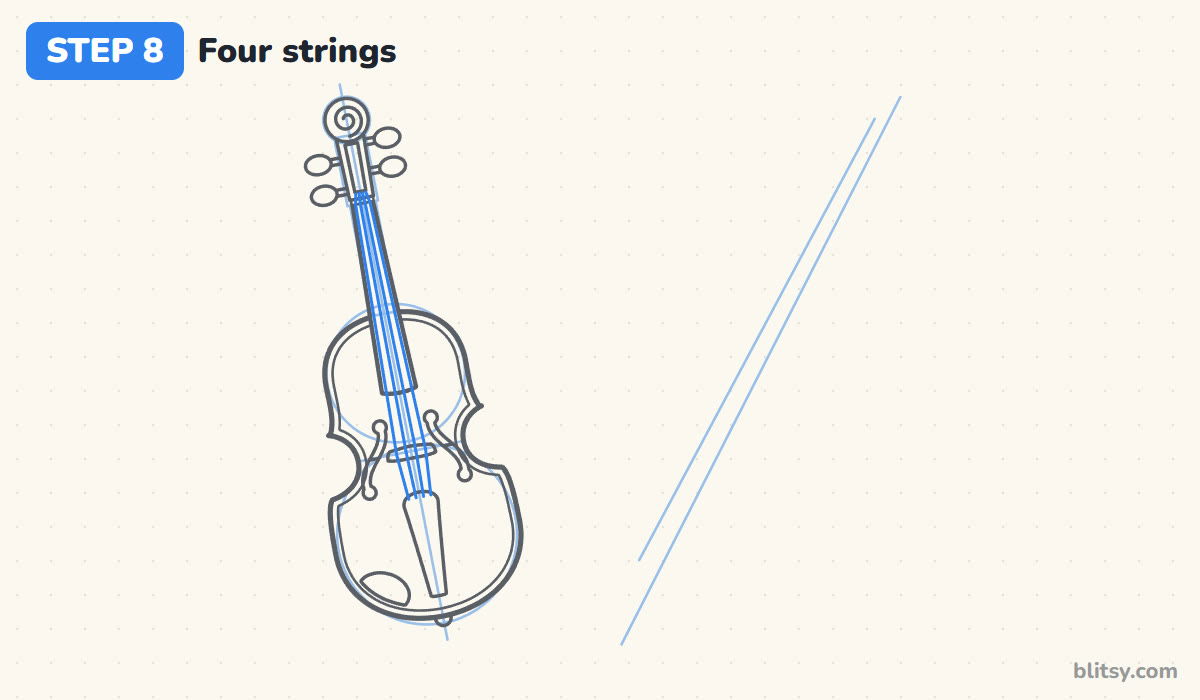
With a ruler, draw four thin lines from the tailpiece over the bridge and up to the nut. They spread out at the bridge and come closer at the nut. Count them before moving on; an extra string sneaks in more often than you'd think.
💡 Tip: Mark four dots on the bridge and four on the nut first, then connect them.
Step 9: Draw the bow stick and hair
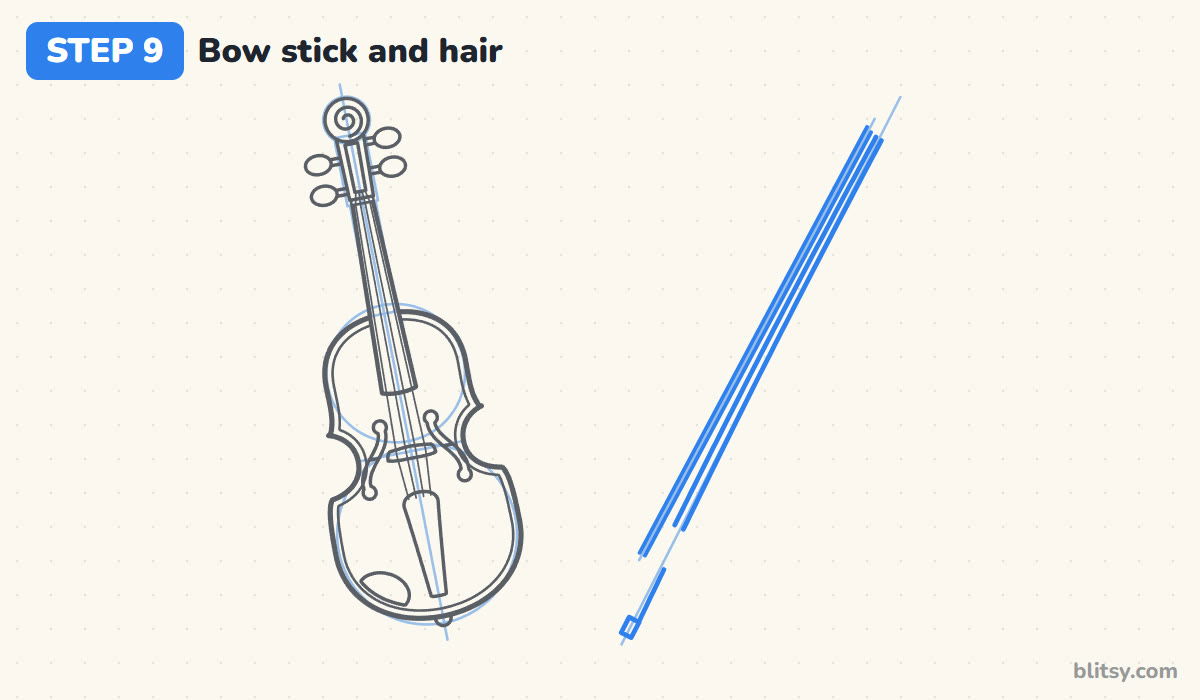
Go over the bow guide with two close lines for the stick, getting thinner toward the top. Leave a short gap near the bottom, because the frog covers it next. Then draw the hair as a narrow ribbon along the second guide, slightly apart from the stick.
💡 Tip: Slide the ruler along instead of drawing freehand. Bow lines show every wobble.
Step 10: Add the frog and the bow tip
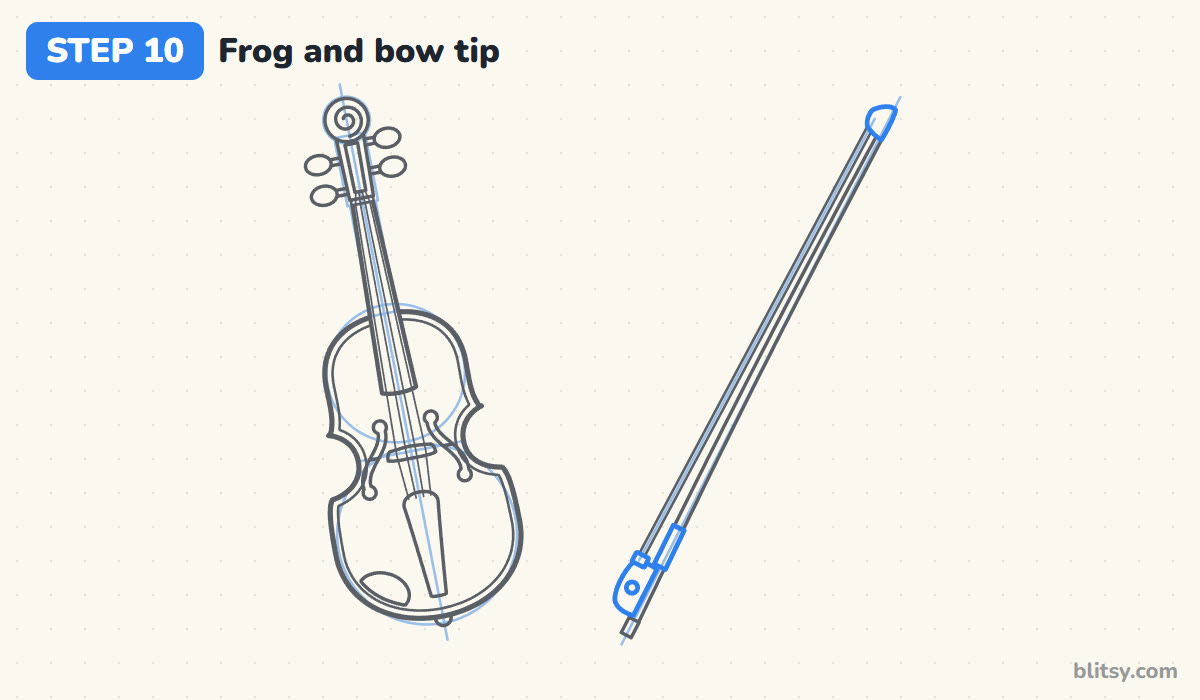
At the bottom, draw the frog, the block a player holds, as a rounded shape under the stick with a small circle eye. Add a short band where the hair leaves it, a wrap on the stick above it and a tiny button at the end. At the top, the tip is a small hatchet shape.
💡 Tip: Keep the frog small. If it grows bigger than the scroll, the bow looks like a tool instead of an instrument part.
Step 11: Ink the violin and erase the guides
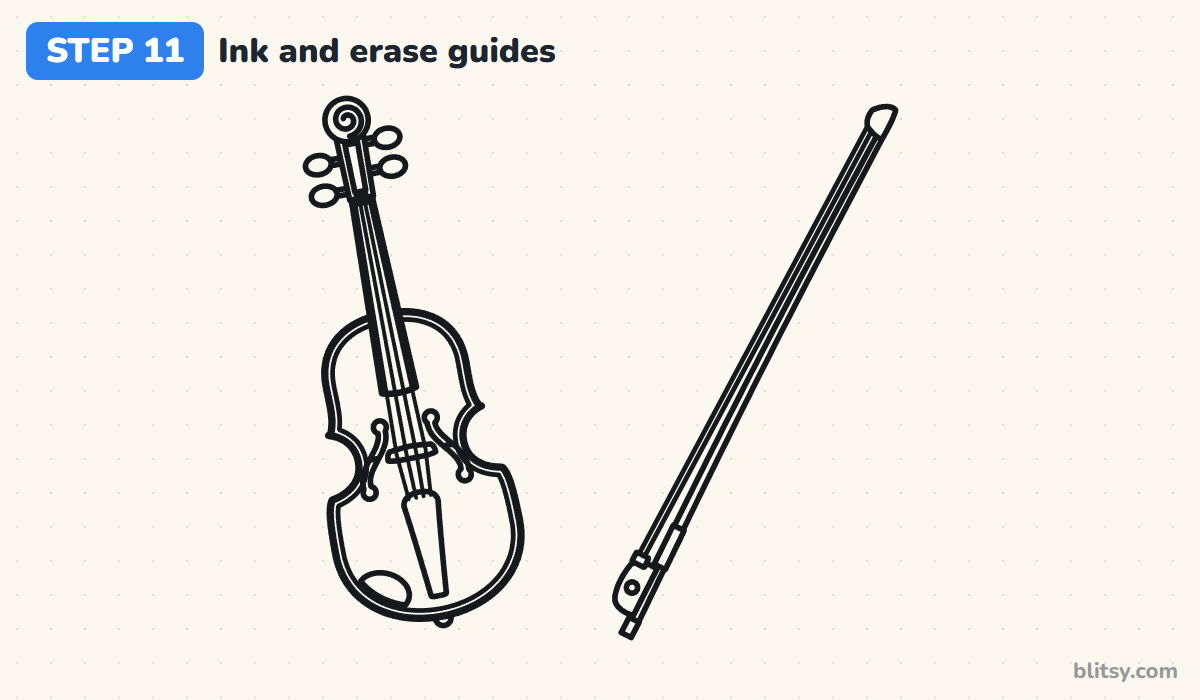
Trace the keeper lines with your black pen. I do the body outline first in one calm pass, then the small parts. Let the ink dry, then erase every guide, center line included. The symmetry stays, even without the guides.
💡 Tip: Use the ruler again for the strings and the bow when you ink them.


Step 12: Color the violin and bow
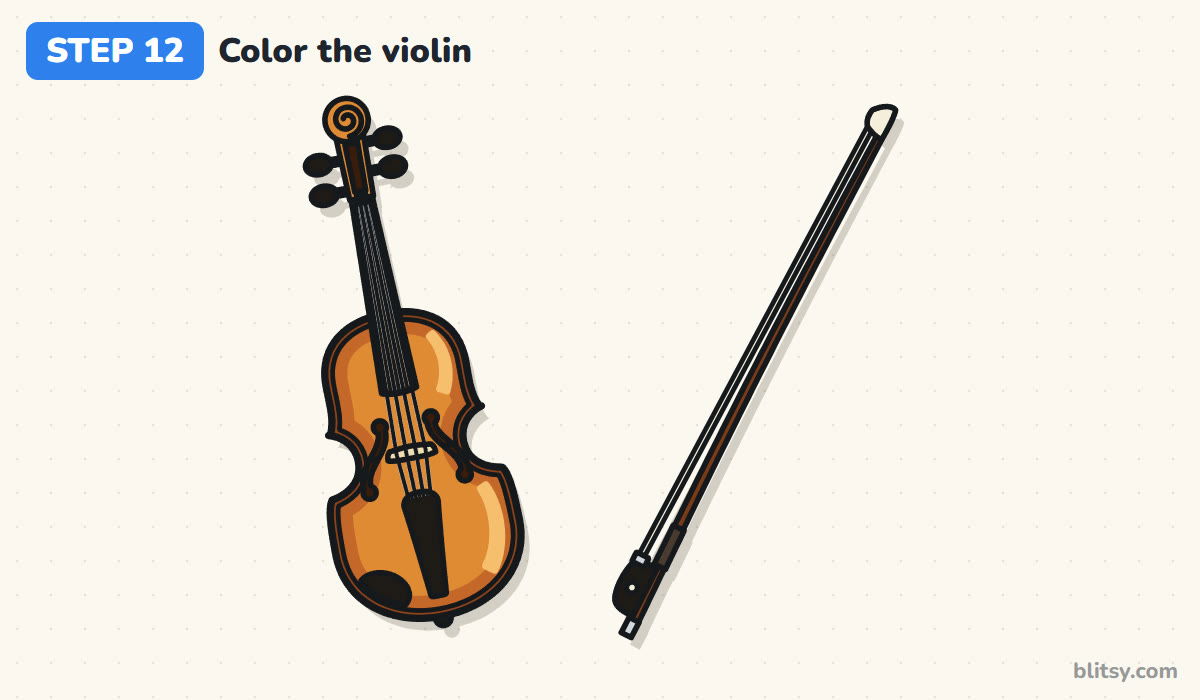
Color the body orange, along with the pegbox and scroll. Go darker with brown along the outer edge so the middle seems to bulge, and leave a light orange stripe on the right of each bout for shine. Black goes on the fingerboard and pegs, the frog, the tailpiece and the chinrest. Use cream for the bridge and hair, red brown for the stick and gray for the strings.
💡 Tip: Blend the brown edge into the orange with light circles. A hard border looks painted on.
Where Violin Sketches Go Out of Tune
- Both halves of the body are the same size. The lower part must be wider than the upper part. Check the two guide circles before you outline.
- Lopsided waist cuts. If one C-curve is deeper, the whole violin leans. Measure the distance from the center line on both sides.
- A fingerboard that reaches the bridge. Leave a gap of bare wood between its end and the bridge, or the strings have nowhere to rise.
- Five or six strings. That's a guitar habit. A violin has four, spread a little wider at the bridge.
- A wiggly bow. The stick is almost straight. Use a ruler and keep the hair parallel to it.
Ways to Turn This Violin into a Music Scene
When my violin is done, I like to fill the empty corners with floating notes from this music notes drawing tutorial, so the page looks like it's playing. Draw it bigger with a short spike at the bottom and you have a cello, or color the wood dark red for an antique look. Younger kids can skip the inner edge line and the chinrest. If you enjoyed the center line trick, the guitar drawing step by step lesson uses it for a wider body.
Free Violin Coloring Page and Printable Steps
The free violin coloring page has a colored example on top, a color key and a large outline to fill. The step-by-step PDF guide puts all 12 steps with pictures and tips on paper. Both print on Letter or A4.
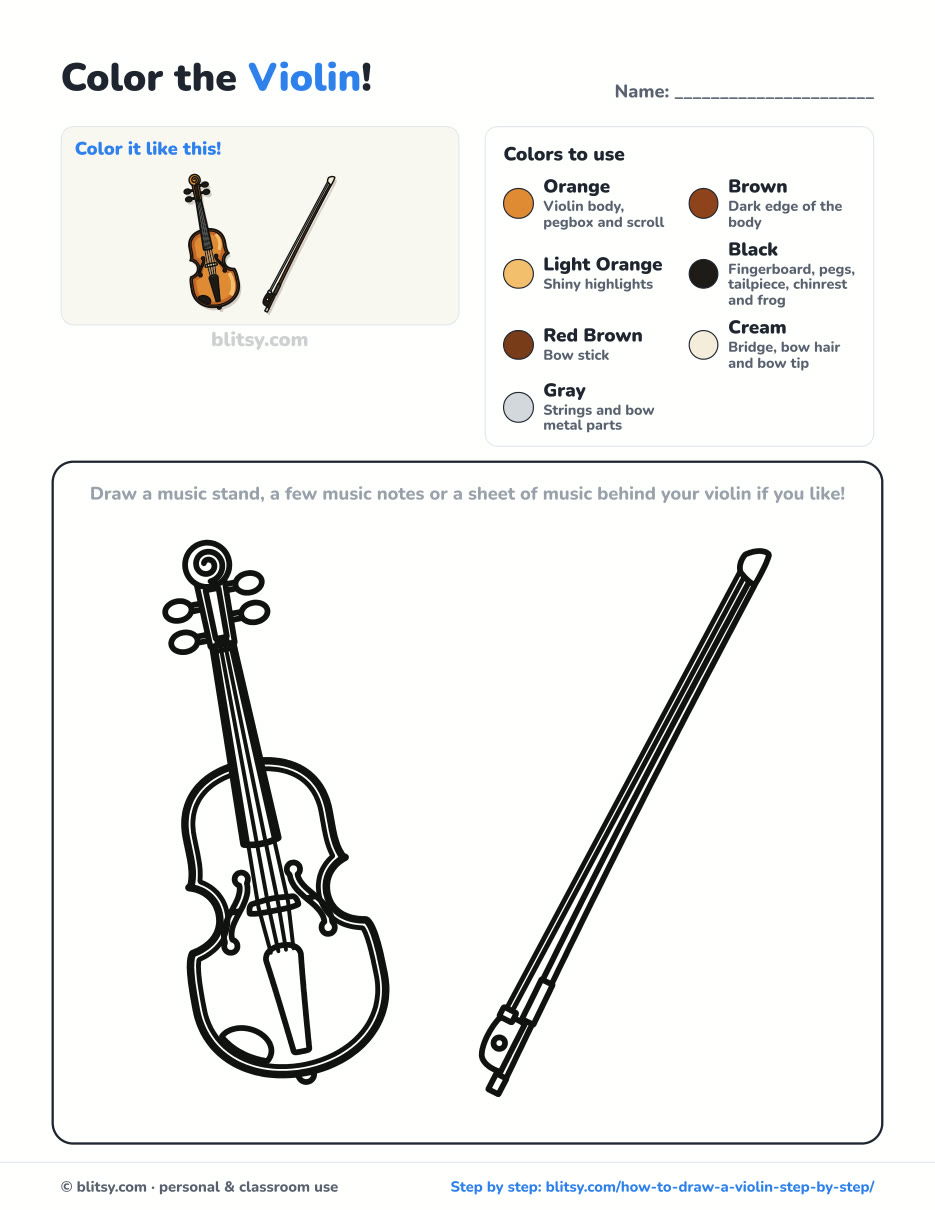
Black outlines with a colored example and the color names at the top. Ready to print and color.
⬇️ Download Coloring PageEvery step picture with its instructions and tips, to keep beside your paper while you draw.
⬇️ Download Drawing Guide📱 On a phone? Tap a download button, then open the file and choose Share → Save to Files or Print. On a computer, the PDF opens or saves straight to your Downloads folder.
Pin the Violin Lesson for Practice Day
More Step-by-Step Lessons After the Violin
These tutorials follow the same picture-per-step method, so it's easy to pick the next one.
- Music Notes Drawing: A purple treble clef with a ribbon of bright notes, drawn with real stem and flag rules, in this music notes drawing tutorial.
- Guitar Drawing: An acoustic guitar built from a center line and two circles, with frets and tuning pegs, in this how to draw a guitar step by step lesson.
- Light Bulb Drawing: An old-style bulb with a curly filament grows from one circle and a box in this light bulb drawing tutorial.
- Baseball Bat Drawing: A wooden bat with a taped handle starts from one slanted line in this baseball bat drawing step by step guide.
- Umbrella Drawing: A red and yellow umbrella with curved ribs and a hooked handle tilts in the rain in this umbrella drawing tutorial.
Violin Drawing Questions Kids Often Ask
What is the easiest way to draw a violin?
Draw a center line with two circles on it, a big one below and a smaller one on top. Join them with inward curves for the waist, then add a long neck with a scroll.
How many strings does a violin have?
Four. They run from the tailpiece over the bridge and up to the pegs, two pegs on each side.
What is the difference between drawing a violin and a guitar?
A violin has sharp C-shaped waist cuts, two f-holes instead of a round sound hole, a scroll and only four strings. It also comes with a bow.
What colors do you use for a violin drawing?
Orange or reddish brown for the wood with darker edges, black for the fingerboard and pegs, cream for the bridge and gray for the strings.
Set your violin next to its bow on the page, add a few notes if you like, and it's ready for its first concert on the fridge. 🎻✏️
Related posts:
 How to Draw a Car Step by Step (Easy Drawing for Beginners)
 How to Draw a Whale Step by Step (Easy for Beginners)
 How to Draw an Arctic Fox Step by Step (Easy for Beginners)
 How to Draw a Shark Step by Step (Easy for Beginners)
 How to Draw a Chicken Step by Step (Easy for Beginners)
 How to Draw a Snowman Step by Step (Easy for Beginners)
 How to Draw an Airplane Step by Step (Easy Jet for Beginners)
 How to Draw a Mouse Step by Step (Easy for Beginners)
 How to Draw a T-Rex Step by Step (Easy for Beginners)
 How to Draw a Pig Step by Step (Easy for Beginners)
 How to Draw a Minion Step by Step (Easy for Beginners)
 How to Draw a Yorkie Step by Step (Easy for Beginners)

