
A brown bear is mostly one big, heavy body, which makes it a kind animal to practice on. If the hump and the snout are right, everyone will know what you drew. Below I'll walk you through how to draw a bear step by step, from a plain oval to a walking brown bear with tan snout and cream claws.
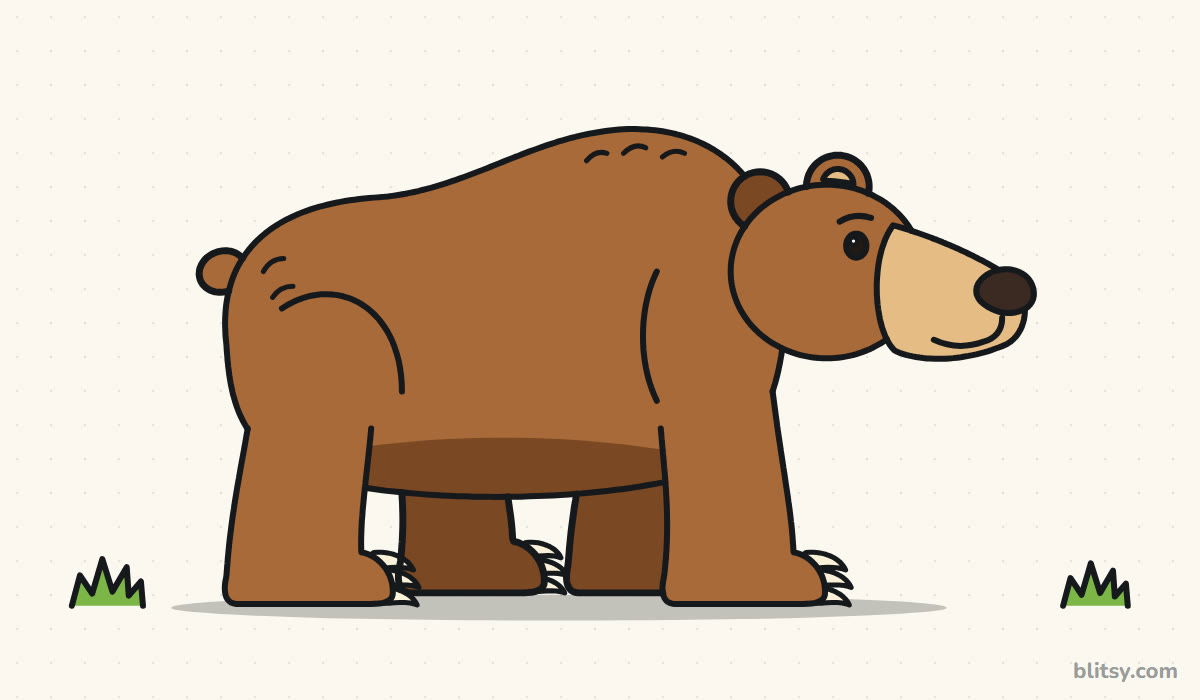
Blue marks the lines you're adding in that step. Gray shows what you drew earlier, and the pale blue guide shapes disappear once the outline is inked.
Quick overview
⏱️ Time: roughly 30 to 45 minutes with coloring
🎯 Level: easy to medium, fine for kids about 7 and up
✏️ Steps: 12
🐻 You'll draw: a brown bear walking on all fours, seen from the side
Brown Pencils and Other Bits for a Bear Sketch
- A pencil you can press lightly with
- A soft eraser
- A black fineliner or marker for the outline
- Colored pencils or crayons with two browns, a tan, black, cream and green
- Plain paper laid sideways, since the bear is long
If you only own one brown, press harder with it for the darker parts instead of buying a second color.
How to Draw a Bear Step by Step
Step 1: Draw a ground line, a body oval and a head circle
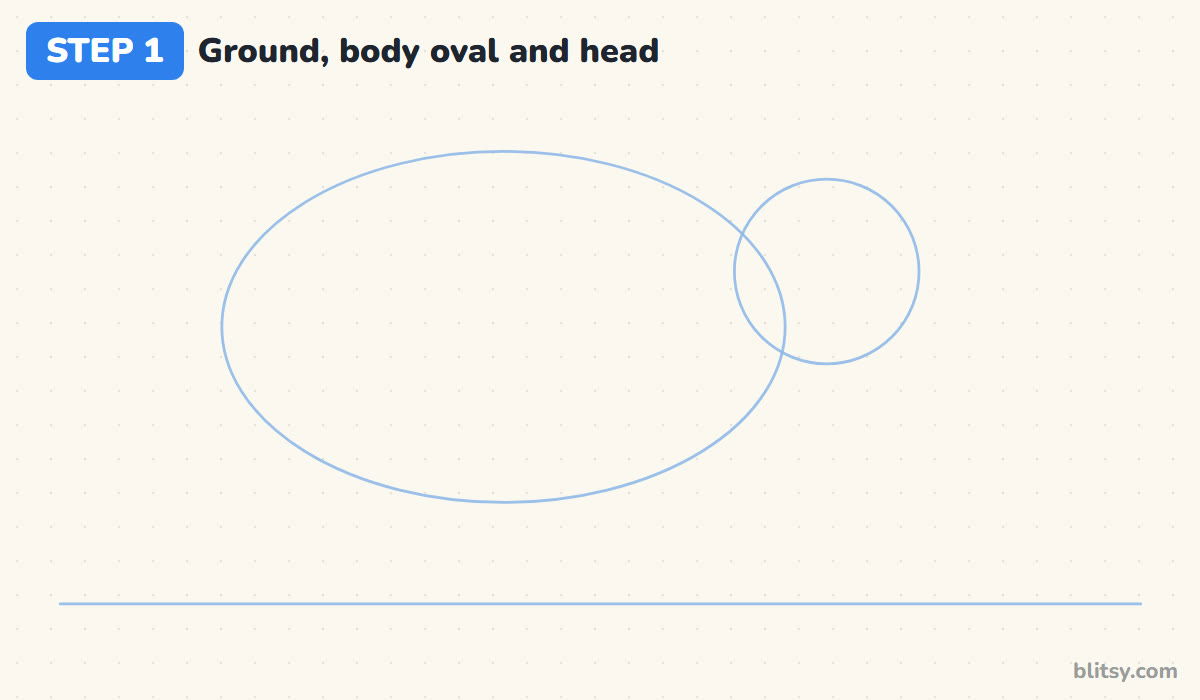
Begin with a long, flat ground line close to the bottom of the page. Above it, sketch a wide oval for the body and leave room underneath for the legs. Then place a circle at the right end of the oval, overlapping it a little and sitting lower than its top, because a bear carries its head below its shoulders.
💡 Tip: Press so lightly that you can barely see the lines. They're only scaffolding.
Step 2: Add a snout box and a hump curve
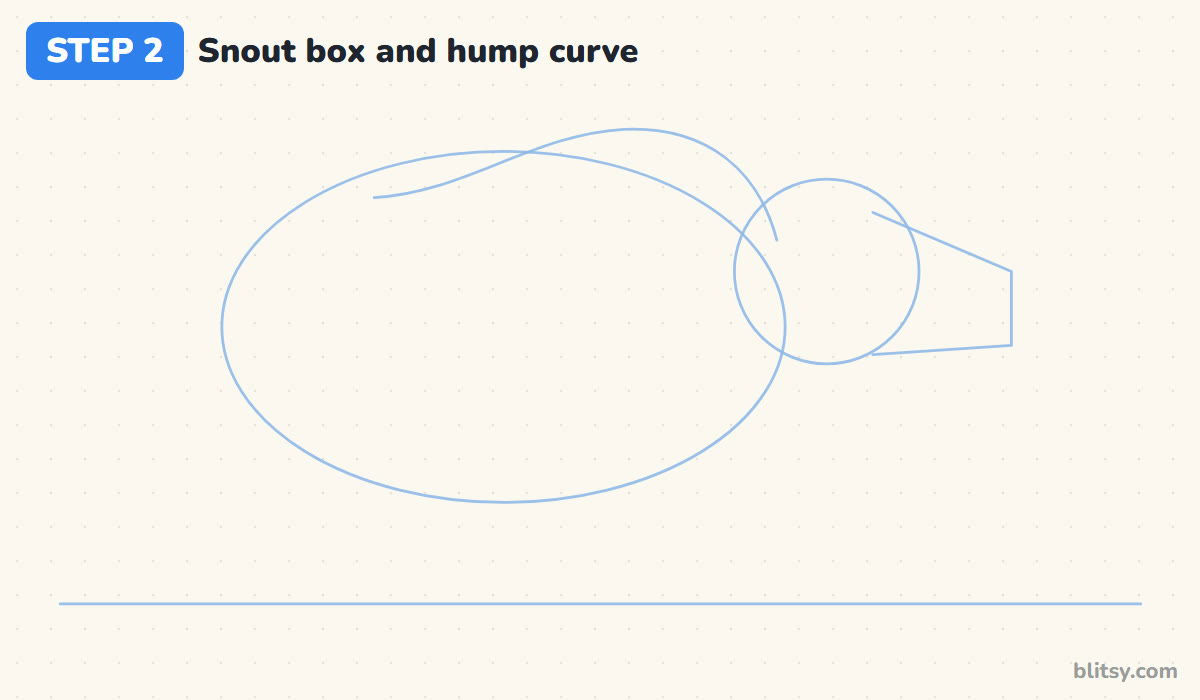
From the front of the head circle, draw a long box that narrows toward the end, like a wedge pointing right. That's the snout, and on a brown bear it's longer than most people expect. Next, run a curve along the top of the oval that rises into a bump above the front legs. That shoulder hump says brown bear right away.
💡 Tip: Put the highest point of the hump above the front legs, not in the middle of the back.
Step 3: Sketch four leg lines and two paw ovals
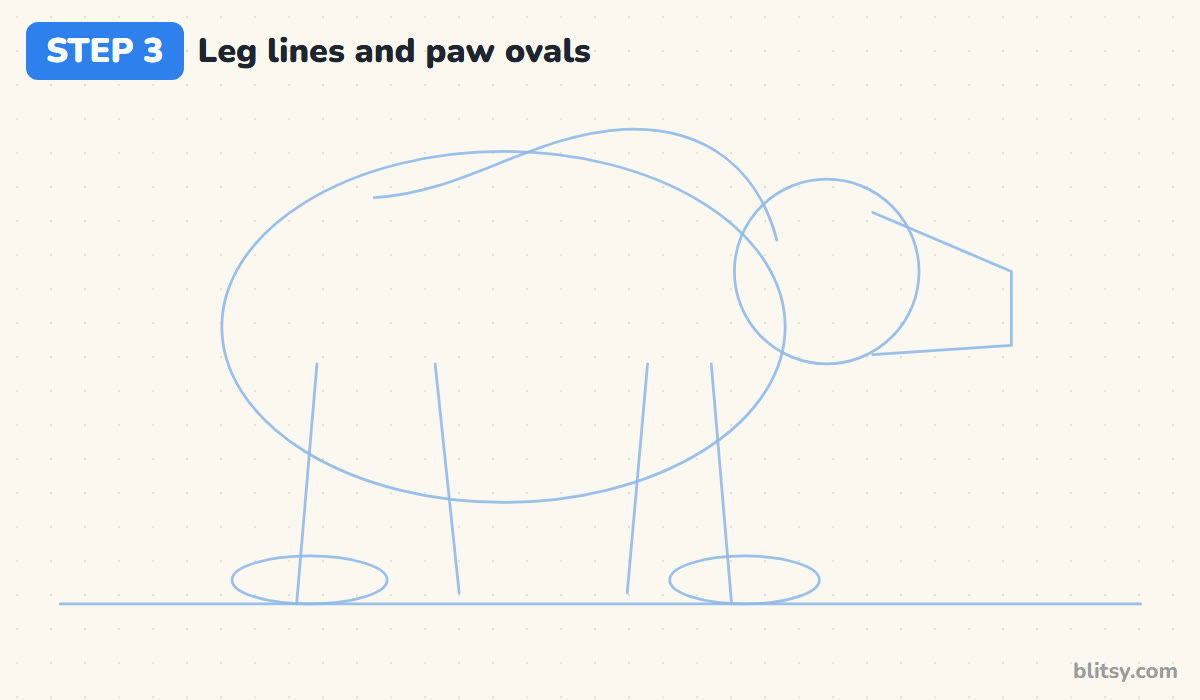
Bears walk with their legs wide apart, so draw two lines near the back of the oval and two under the front. I slant them a little in opposite directions, which makes the bear look like it's walking rather than standing still. At the bottom of the two outside lines, add flat ovals on the ground for the near paws.

💡 Tip: Leave some space between each pair of lines, or the far legs will have no room later.
Step 4: Outline the round head, the long snout and the nose
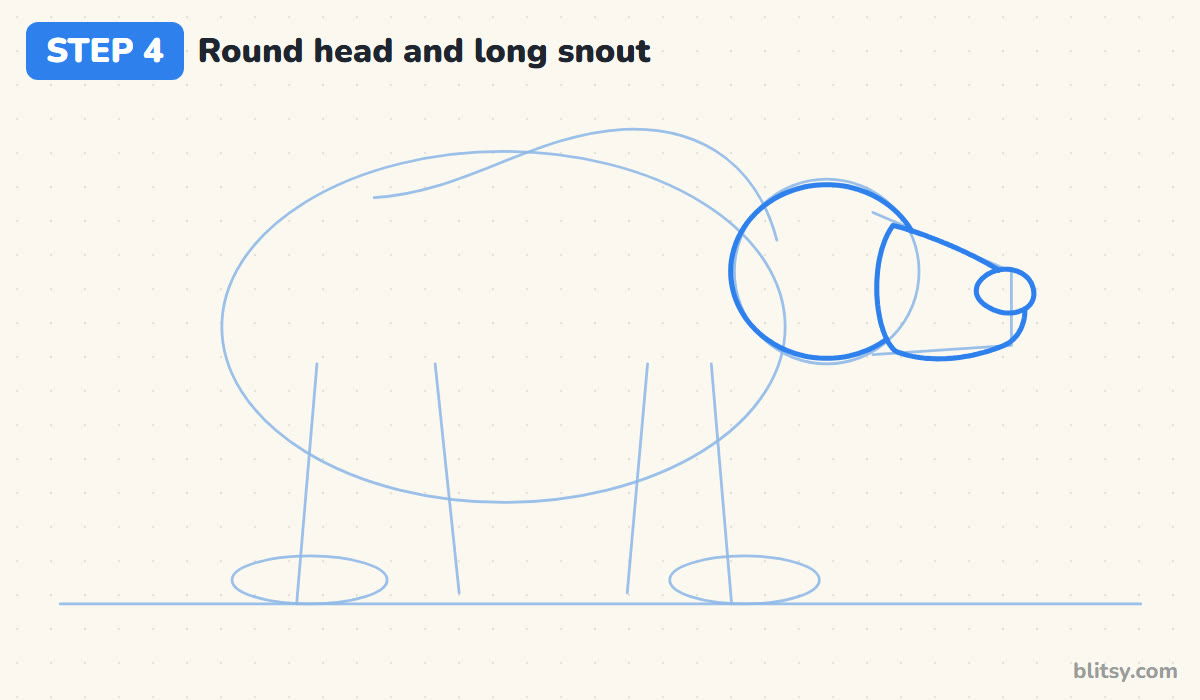
Trace the head circle with a firm line. Now follow the snout box: a gentle slope down from the forehead, a rounded tip, then a chin curving back under the face. Draw the back edge of the snout as a soft curve on the cheek, and finish with an oval nose right on the tip.
💡 Tip: Round every corner of the snout box. Sharp corners turn the bear into a dog.
Step 5: Put two small round ears on top
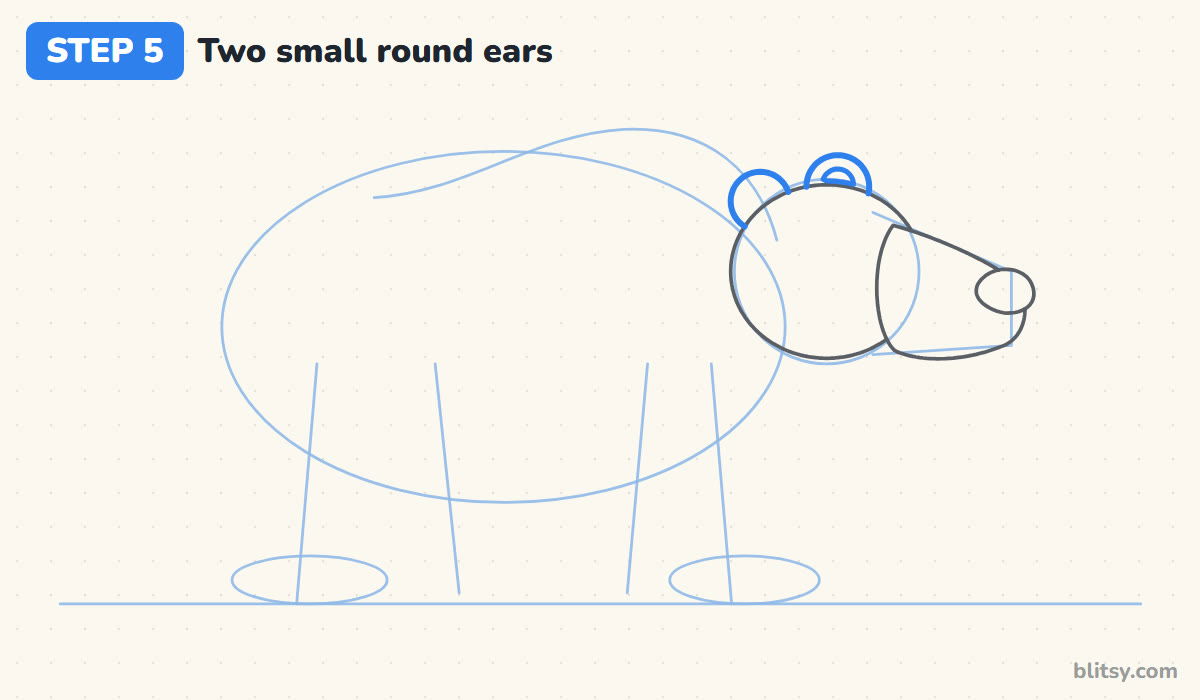
Bear ears are small and round, like half circles poking out of the fur. Add one toward the back of the head and one nearer the front, both sitting on top of the circle. Inside the front ear, draw a smaller curve for the inner ear. Small ears make the head look big and strong.
💡 Tip: Keep each ear about a third as wide as the head circle, no bigger.
Step 6: Draw the back with its shoulder hump
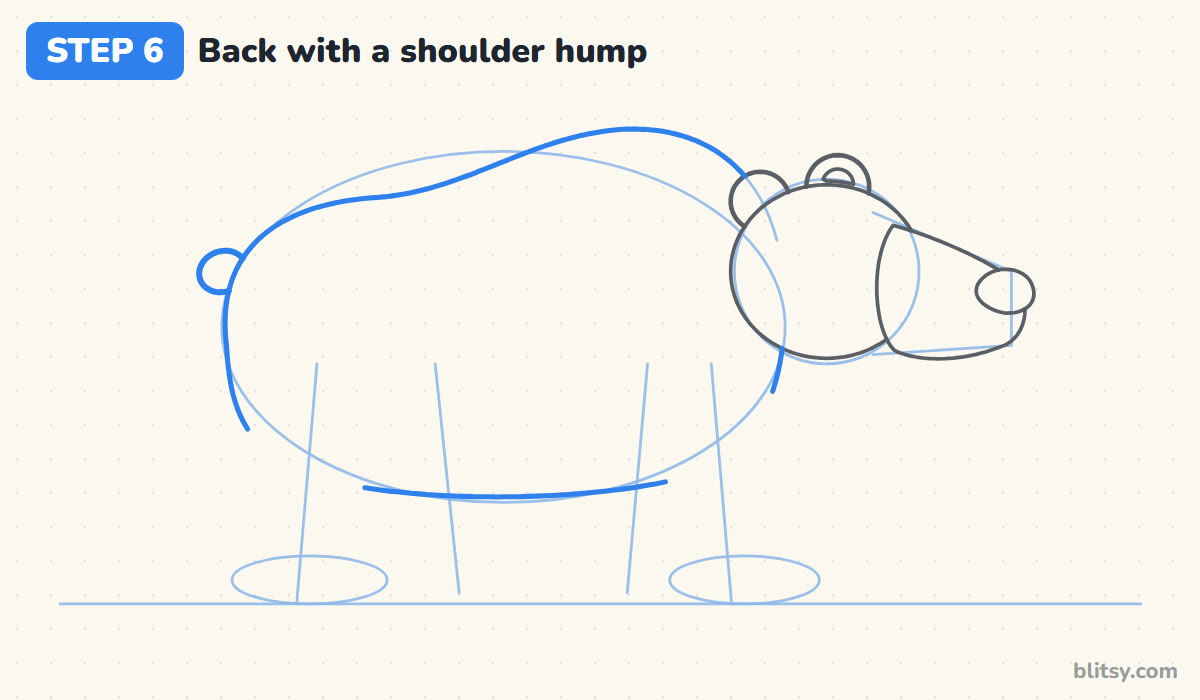
Go over your hump curve with a firm line, from the rump up over the shoulders and down behind the head. Round off the rump and add a short belly line between the legs, skipping the parts where the legs will go. Last, add a tiny round tail on the rump. It really is that small on a bear.
💡 Tip: Draw the long back line in two or three strokes, lifting your pencil between them.
Step 7: Build the two thick near legs and paws
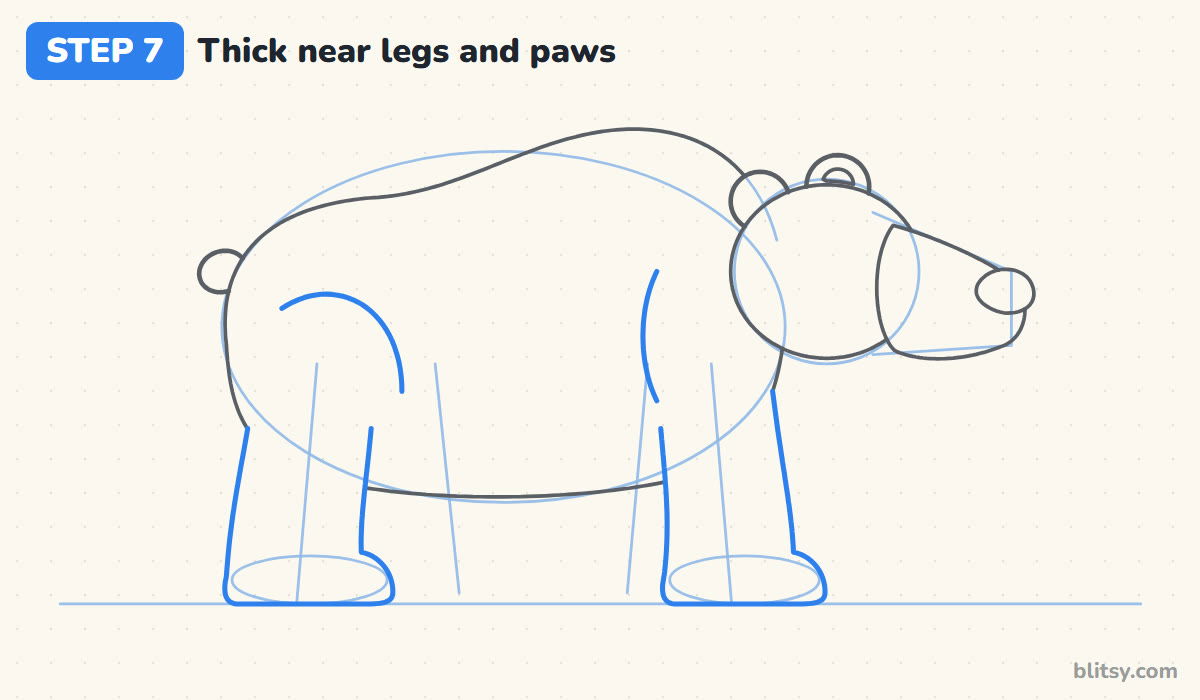
Use the outside leg lines to draw two thick legs, each almost as wide as the gap between them. Let the paws stretch forward with rounded toes and a little heel at the back, sitting flat on the ground. Then add a curved line on the rump for the big back thigh and a shorter one on the chest for the shoulder.



💡 Tip: Make the legs wider than feels natural. Thin legs are the fastest way to lose the bear.
Step 8: Add the two far legs
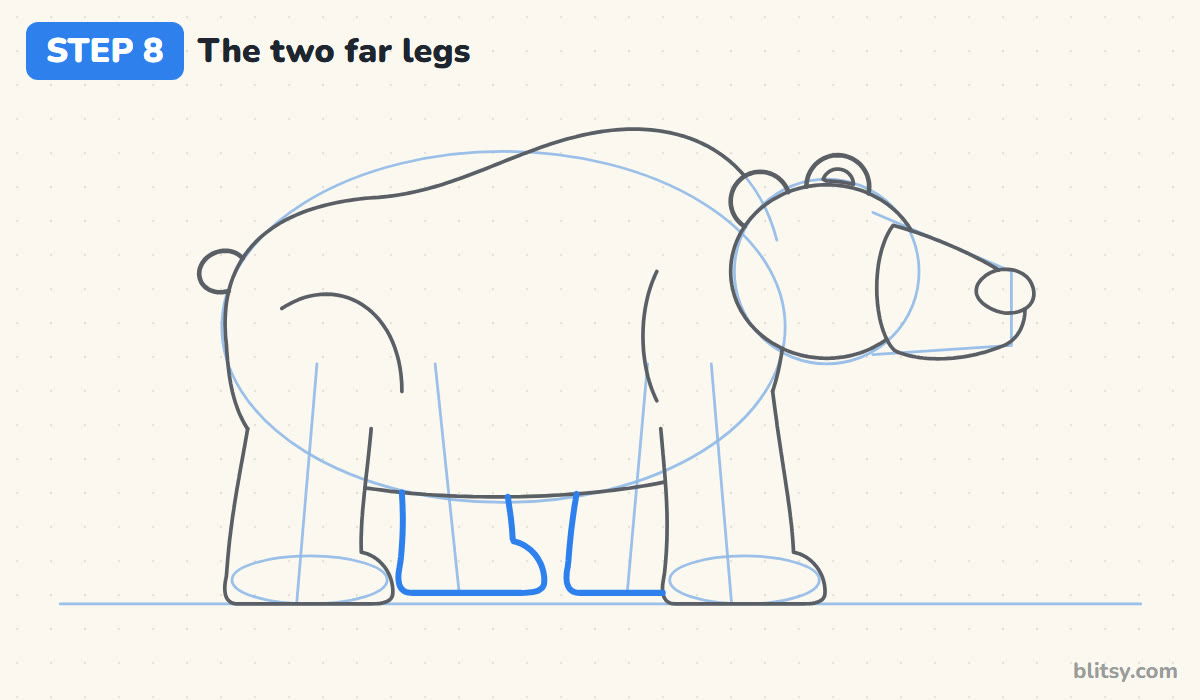
The far legs peek out between the near ones, under the belly. Draw only the lower part you can see, starting at the belly line and ending in a paw just above the ground line. I keep them slightly shorter than the near legs. That small difference is what puts them behind the body.
💡 Tip: Stop the far leg lines where they meet the near legs instead of drawing through.
Step 9: Give your bear a small eye and a smile
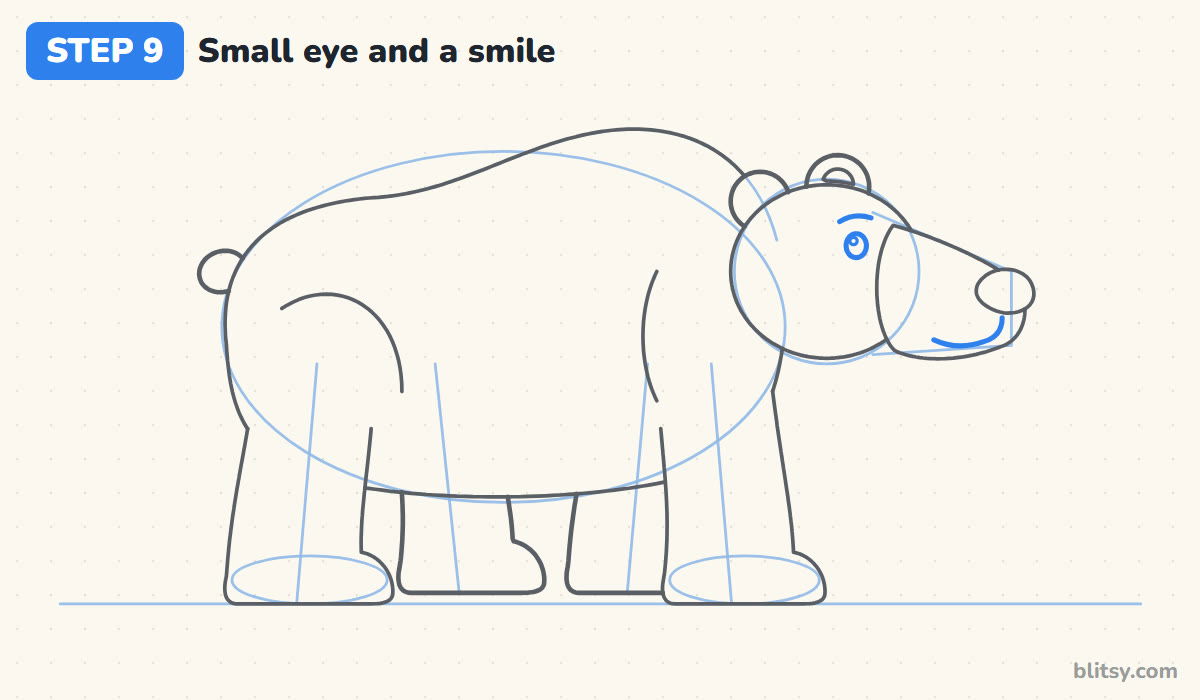
Place a small oval eye on the head circle, just behind where the snout starts. Leave a white dot inside for a shine and draw a short brow above it. Then add a smile under the nose that runs back along the snout. A tiny eye keeps the face gentle.
💡 Tip: Tilt the brow up a touch at the back end for a calm, happy look.
Step 10: Draw claws, fur marks and some grass
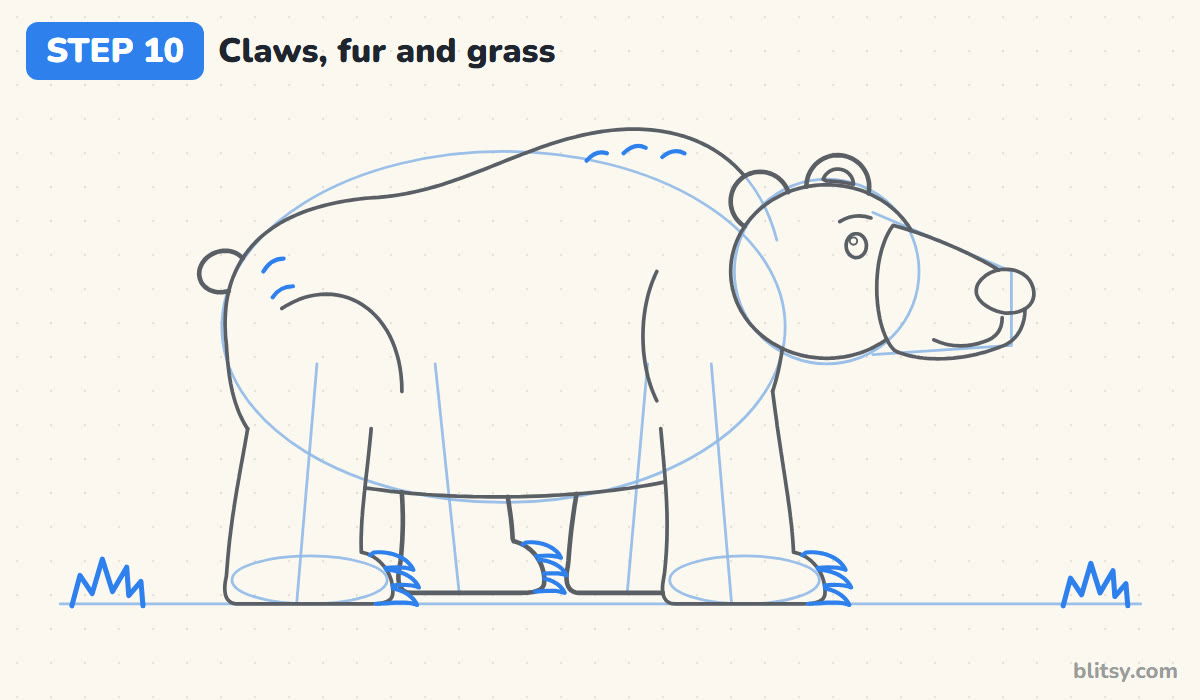
On the front of each paw, draw three short hooked claws stacked on top of each other. Brown bears have long claws, but short ones read better at this size. Add a few little curved fur marks on the hump and the rump. Finish with two spiky grass tufts on the ground line, one on each side of the bear.
💡 Tip: Three fur marks per spot is plenty. More starts to look like scratches.
Step 11: Ink the outline and erase the guides
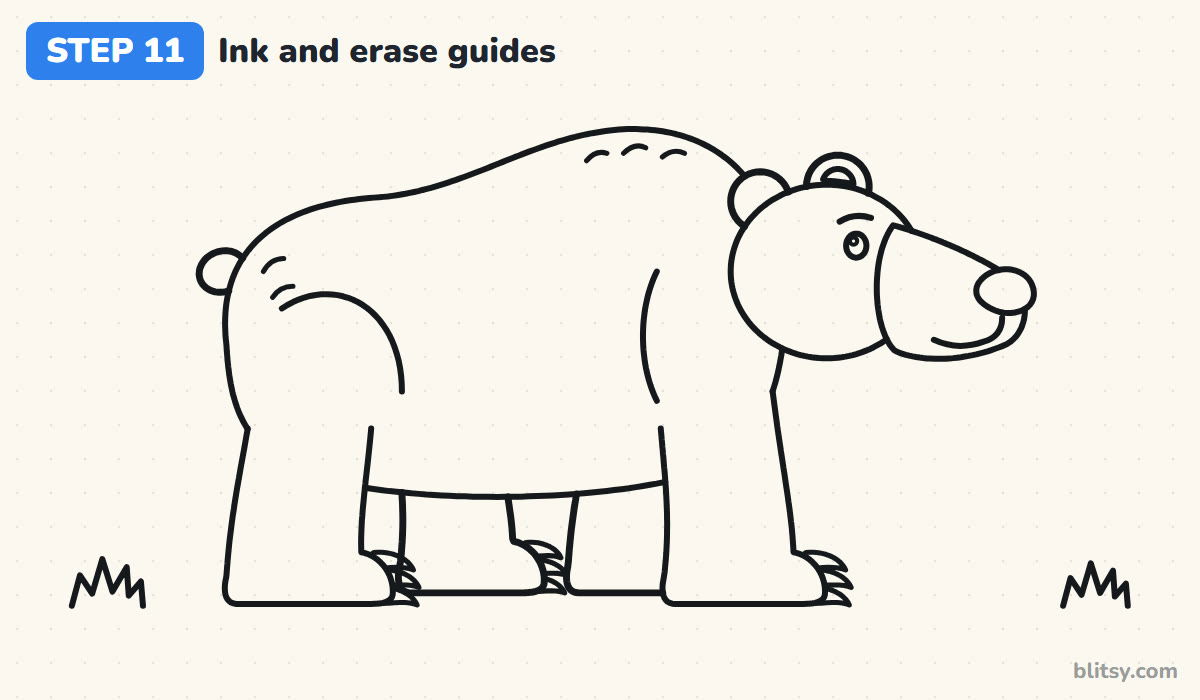
Trace every line you want to keep with a black fineliner. I go head first, then the body and legs, then the claws and grass, moving away from my hand so I don't smudge wet ink. Skip the oval, the circle, the snout box and the leg lines. Wait a minute for the ink to dry, then erase all the pencil guides.
💡 Tip: Ink the hump in one smooth stroke if you can. It's the line people notice first.
Step 12: Color your bear
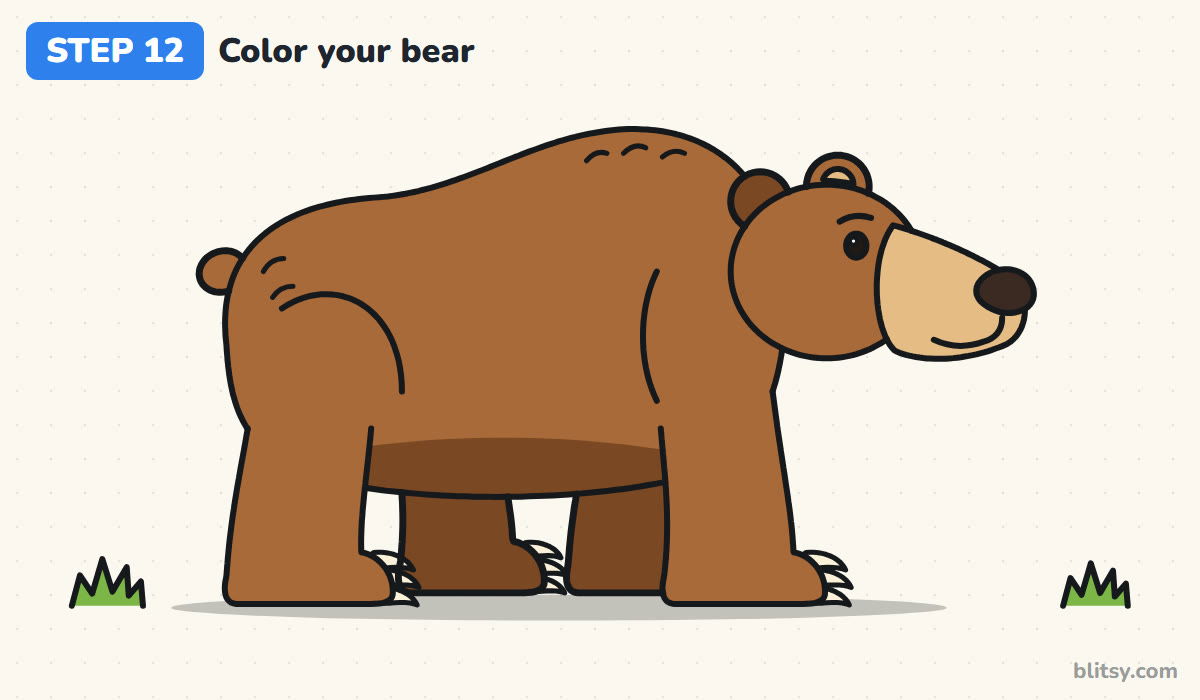
Fill the head, body, near legs and front ear with a warm brown. A darker brown goes on the far legs, the back ear and a band along the belly, which pushes those parts back and gives the body weight. The snout and inner ear get tan, the nose and eye black, and the claws cream. Green on the grass finishes it.
💡 Tip: Color the big brown body in short strokes that follow the direction of the fur.
Bear Drawings That End Up Looking Like Dogs
- A flat, straight back. Without the shoulder hump a bear can look like a big dog. Push the top of the back up above the front legs.
- A short, round snout. That gives you a teddy bear. A brown bear's snout sticks out well past the head circle.
- Big, pointed ears. Pointed ears belong to foxes and dogs. Keep bear ears small and round, like coins sitting on the head.
- The head held high. Walking bears carry the head lower than the hump. Lower the head circle so it hangs in front of the shoulders.
- Skinny legs with tiny feet. Bears walk on wide, flat paws. Make each leg thick and let the paw reach forward on the ground.
Fishing Bears, Cubs and Other Ways to Change It Up
Once this pose feels easy, turn it into a cub: make the head circle bigger compared with the body and shorten the legs. You could also draw a small fish hanging from the bear's mouth, or a bush of red berries in front of the snout. To try the same shapes in white fur, the polar bear drawing tutorial is a natural next step, and the raccoon drawing step by step lesson makes a good forest friend for your bear.
Printable Brown Bear Coloring Page and 12-Step PDF
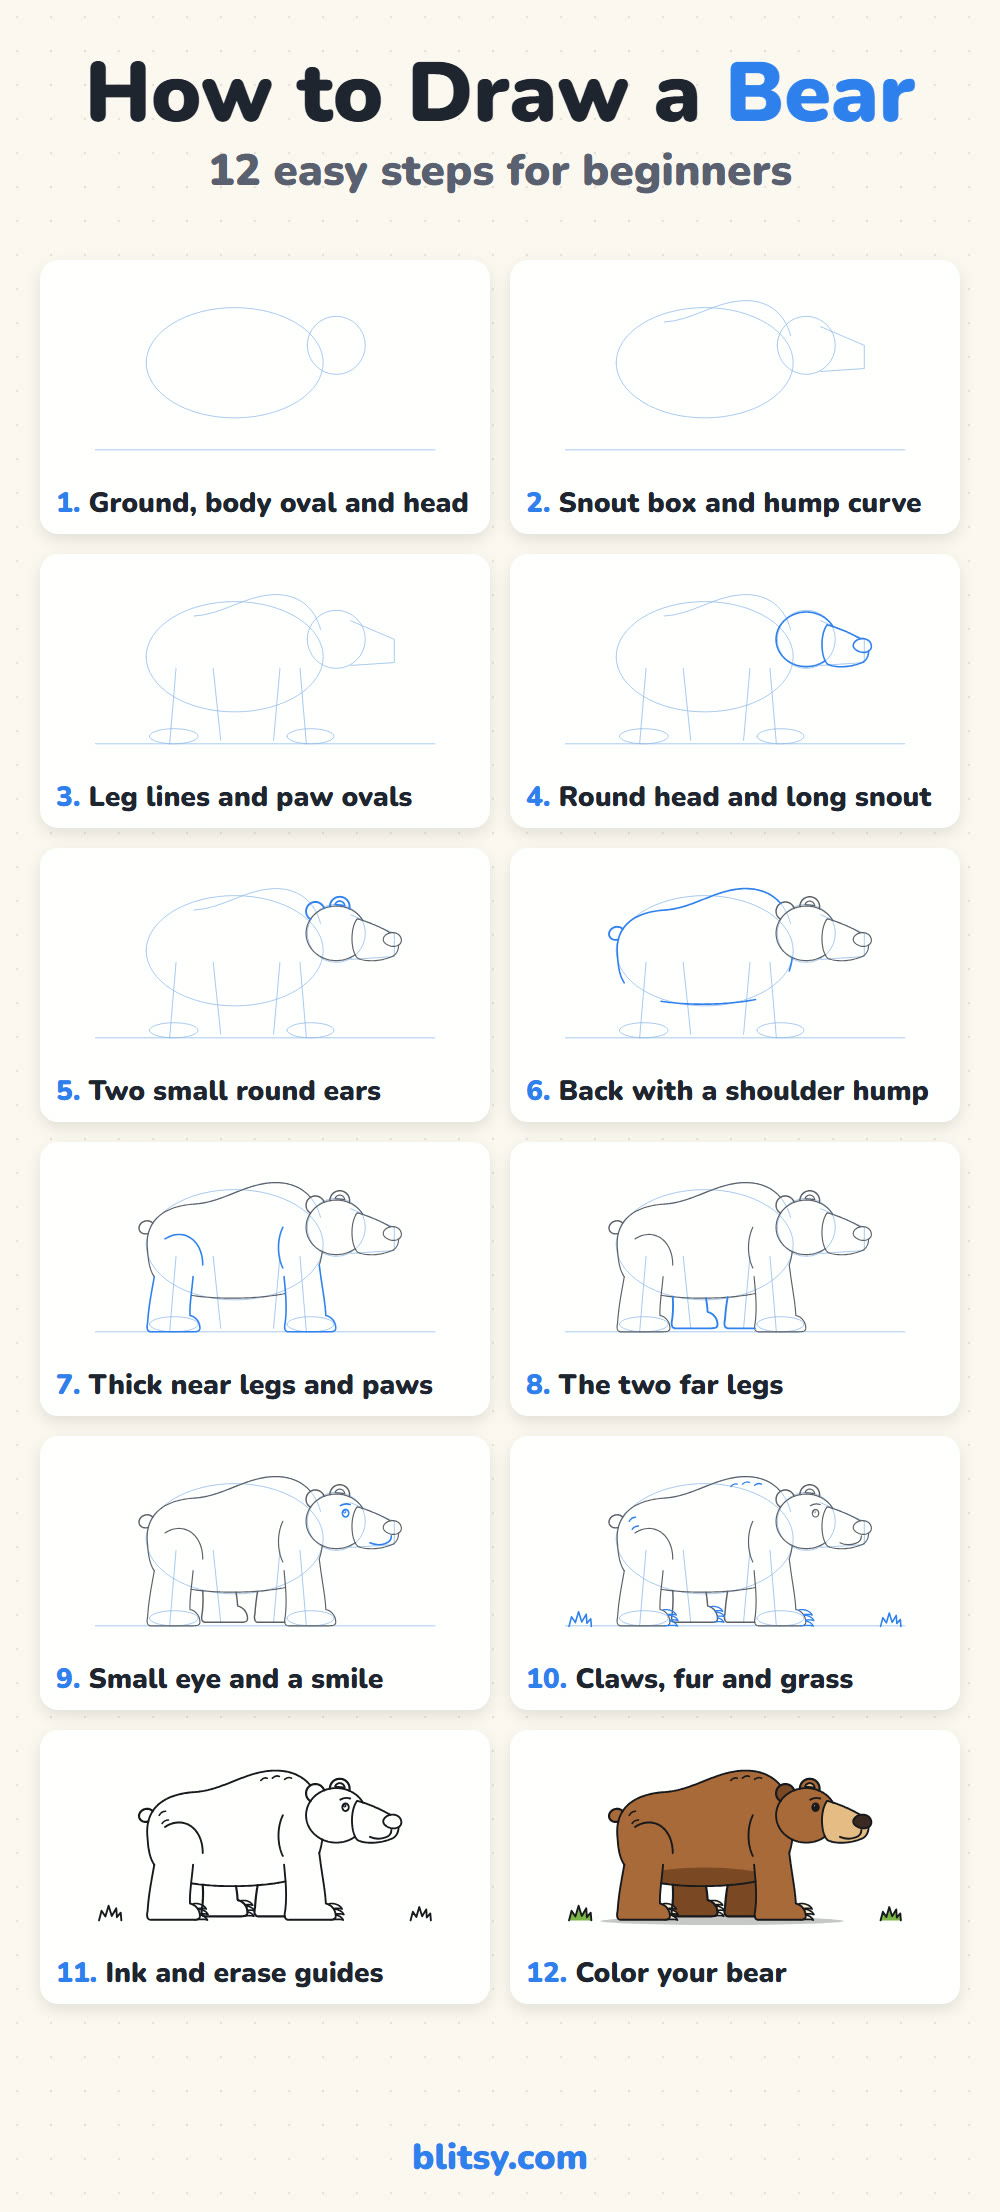
The free bear coloring page has a colored bear at the top to copy, a color key that names every part, and a big outline with room for trees or a river. The step-by-step PDF guide holds all 12 steps with their pictures and tips. Both print on Letter or A4 paper.
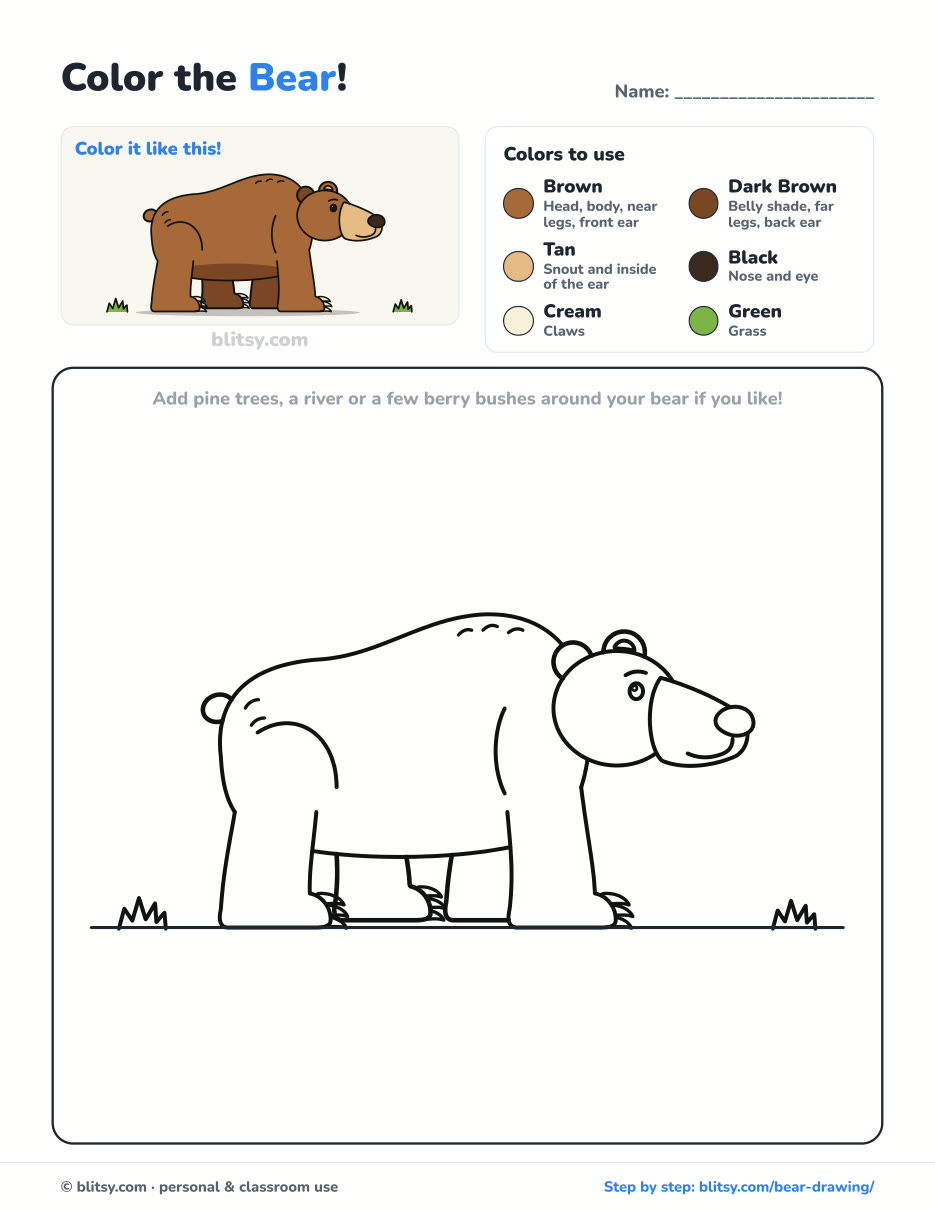
Black outlines with a colored example and the color names at the top. Ready to print and color.
⬇️ Download Coloring PageEvery step picture with its instructions and tips, to keep beside your paper while you draw.
⬇️ Download Drawing Guide📱 On a phone? Tap a download button, then open the file and choose Share → Save to Files or Print. On a computer, the PDF opens or saves straight to your Downloads folder.
Pin the Bear Steps for a Rainy Day
Forest, Farm and Sea Animals for Your Next Page
Every one of these is a step-by-step tutorial in the same beginner style, built from simple shapes with a picture for each step.
- Chicken Drawing: A brown hen and her little yellow chick stand on a strip of grass in this chicken drawing tutorial.
- Ladybug Drawing: Draw a seven-spot ladybug on a big leaf, with a tiny friend flying past, in this how to draw a ladybug step by step lesson.
- Cardinal Drawing: Red feathers, a black mask and an orange beak come together on a winter branch in this cardinal drawing step by step guide.
- Spider Drawing: A friendly purple spider hangs from its thread beside a round web in this spider drawing tutorial.
- Dog Drawing: Three circles and stick legs turn into a beagle-style dog in side view in this dog drawing step by step lesson.
- Dove Drawing: Draw a white peace dove in flight, olive branch in its beak, with this dove drawing tutorial.
- Shark Drawing: A friendly great white with five gills and a smile of tiny teeth fills this how to draw a shark tutorial.
- Elephant Drawing: The same oval-and-circle start you used here makes a cheerful elephant with a raised trunk in this elephant drawing step by step guide.
- French Bulldog Drawing: A sitting Frenchie with bat ears and a red bow tie takes 11 steps in this French bulldog drawing tutorial.
- Fish Drawing: A plump goldfish with a fan tail and scallop scales starts from one oval in this how to draw a fish lesson.
- Lion Drawing: A sitting lion with a big scalloped mane and a tufted tail is built from light circles in this lion drawing tutorial.
Bear Drawing Questions Kids Often Ask
What is the easiest way to draw a bear?
Start with an oval for the body and a circle for the head, placed a bit lower than the top of the oval. Add a wedge for the snout and four lines for the legs, then draw your real lines around those shapes.
How do you make a drawing look like a bear and not a dog?
Give it a shoulder hump, small round ears and thick legs with wide paws. A dog has a flat back and longer, thinner legs.
How long does it take to draw a bear?
Plan on 30 to 45 minutes with coloring. The snout and the legs take the most care.
Is this bear drawing good for kids?
Yes. Kids around 7 and up can follow it on their own, and younger ones can do it if a grown-up draws the guide shapes. Small artists can skip the fur marks and the claws.
Go find your browns and send your bear for a walk. Maybe yours will be carrying a fish home! 🐻🌲
Related posts:
 How to Draw a Polar Bear Step by Step (Easy for Beginners)
 How to Draw Cute Animals Step by Step (Cat, Bear & Bunny)
 How to Draw a Care Bear Step by Step (Cute Fan Art for Kids)
 How to Draw a Car Step by Step (Easy Drawing for Beginners)
 How to Draw a Whale Step by Step (Easy for Beginners)
 How to Draw an Arctic Fox Step by Step (Easy for Beginners)
 How to Draw a Shark Step by Step (Easy for Beginners)
 How to Draw a Chicken Step by Step (Easy for Beginners)
 How to Draw a Leopard Step by Step (Easy for Beginners)
 How to Draw a Light Bulb Step by Step (Easy for Beginners)
 How to Draw a Crow Step by Step (Easy for Beginners)
 How to Draw an Eagle Step by Step (Easy for Beginners)

