
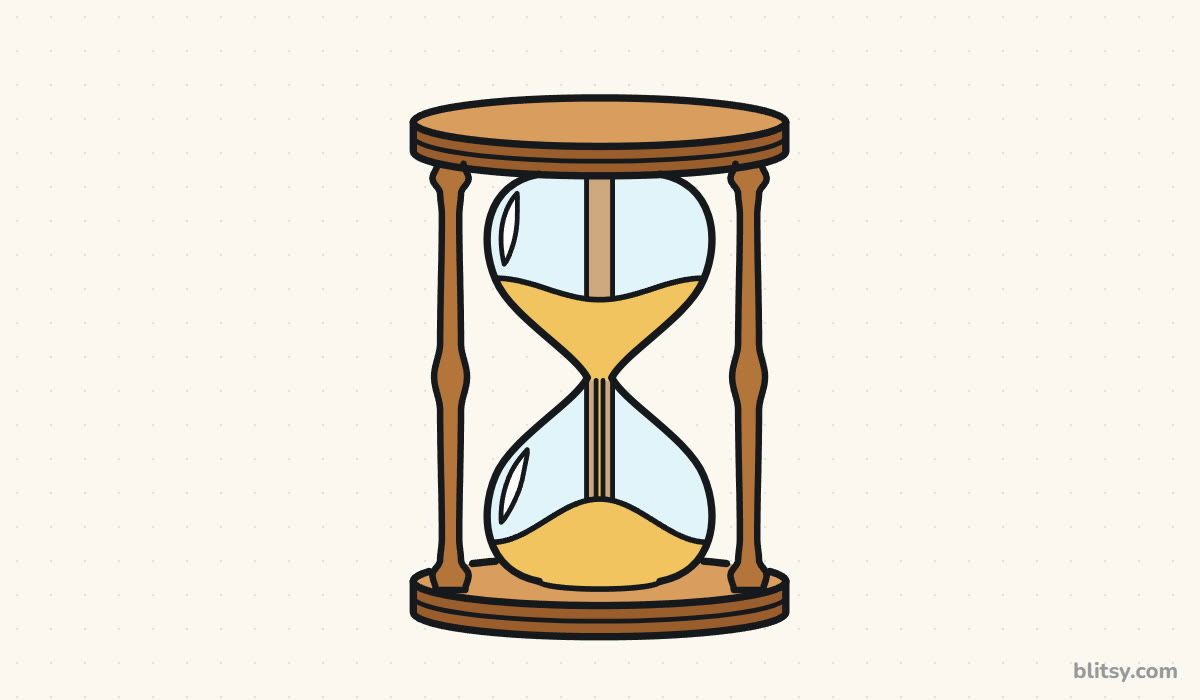
An hourglass looks fussy at first glance, with curvy glass, carved posts and sand in two places. Underneath, though, it is one of the most symmetrical things you can draw. This lesson shows you how to draw an hourglass step by step, starting from a single center line and two flat ovals, and finishing with a colored wooden sand timer that looks like it could flip over and start counting.
Blue marks what is new in that picture; gray is the work from earlier steps. Copy only the blue, compare, then carry on.
Quick overview
⏱️ Time: around 30 minutes, coloring included
🎯 Level: easy, fine for kids around 8 and up
✏️ Steps: 12
⏳ You'll draw: a wooden hourglass with sand running through it
Hourglass Sketching Kit
- A pencil you can press lightly with
- An eraser that lifts pencil cleanly
- A ruler for the center line (optional, but it helps here)
- A black marker or fineliner for the final outline
- Colored pencils or crayons: light brown, dark brown, tan, light blue and golden yellow
- Plain white paper, held upright
Turn the paper tall, because this drawing is taller than it is wide and the base needs room at the bottom.
How to Draw an Hourglass Step by Step
Step 1: Draw a center line and two end ovals
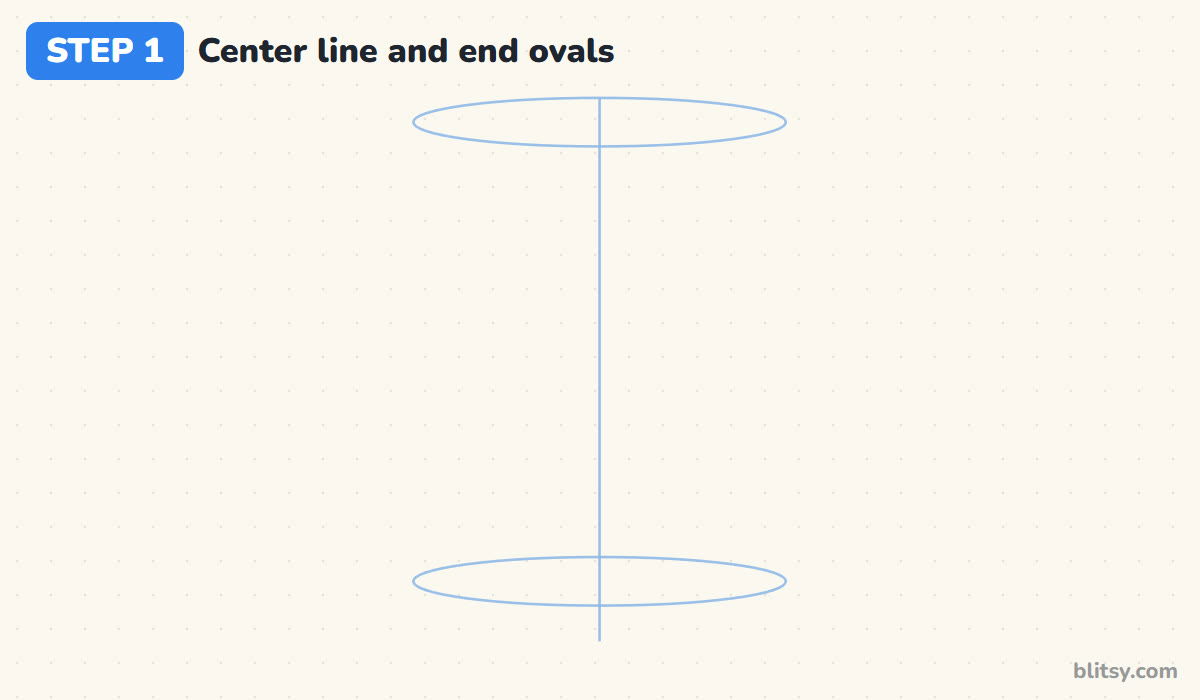
Draw one straight vertical line down the middle of the page. Near the top, cross it with a wide, flat oval, and near the bottom draw a matching oval of the same size. When I teach this, I call the center line the boss of the drawing, because every shape after it gets copied from one side to the other.
💡 Tip: Use a ruler for the center line if your hand drifts. A tilted line makes the whole timer lean.
Step 2: Add two bulb ovals and the post lines
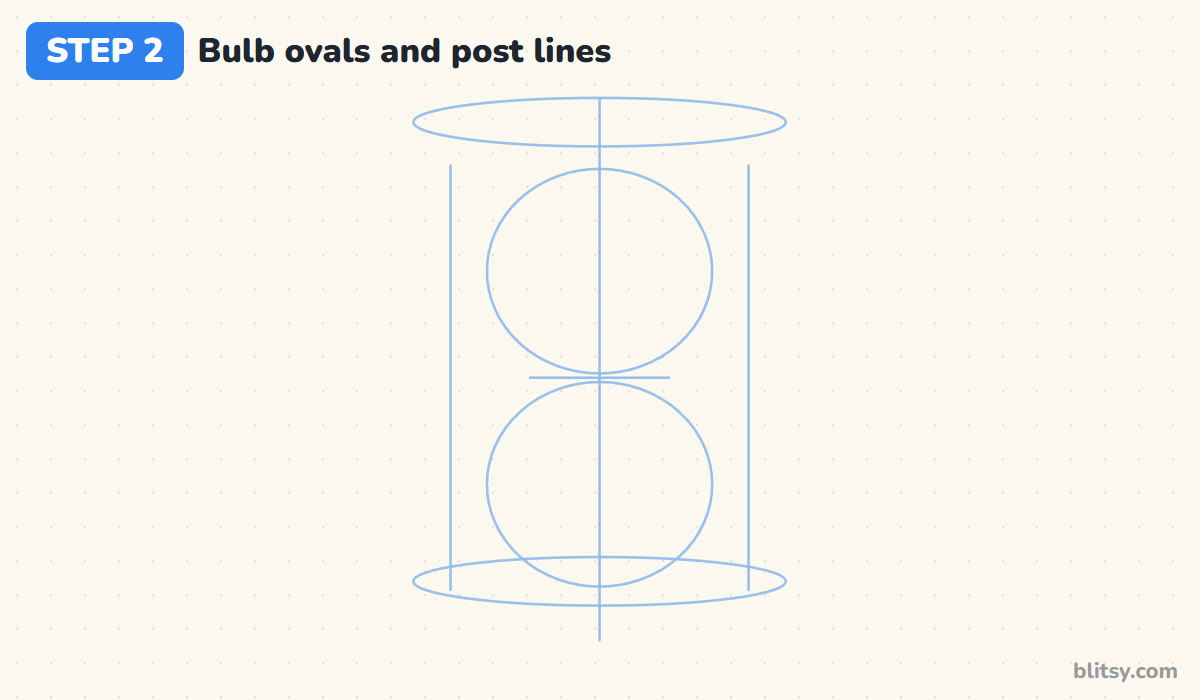
Stack two tall ovals between the end ovals so they just touch at the middle of the center line, and mark that point with a short cross line for the neck. Then draw a vertical line on each side, a little inside the ends of the big ovals. Those mark where the front posts stand.
💡 Tip: Make both bulb ovals the same size, or the hourglass starts to look like a snowman.
Step 3: Give the top cap some thickness
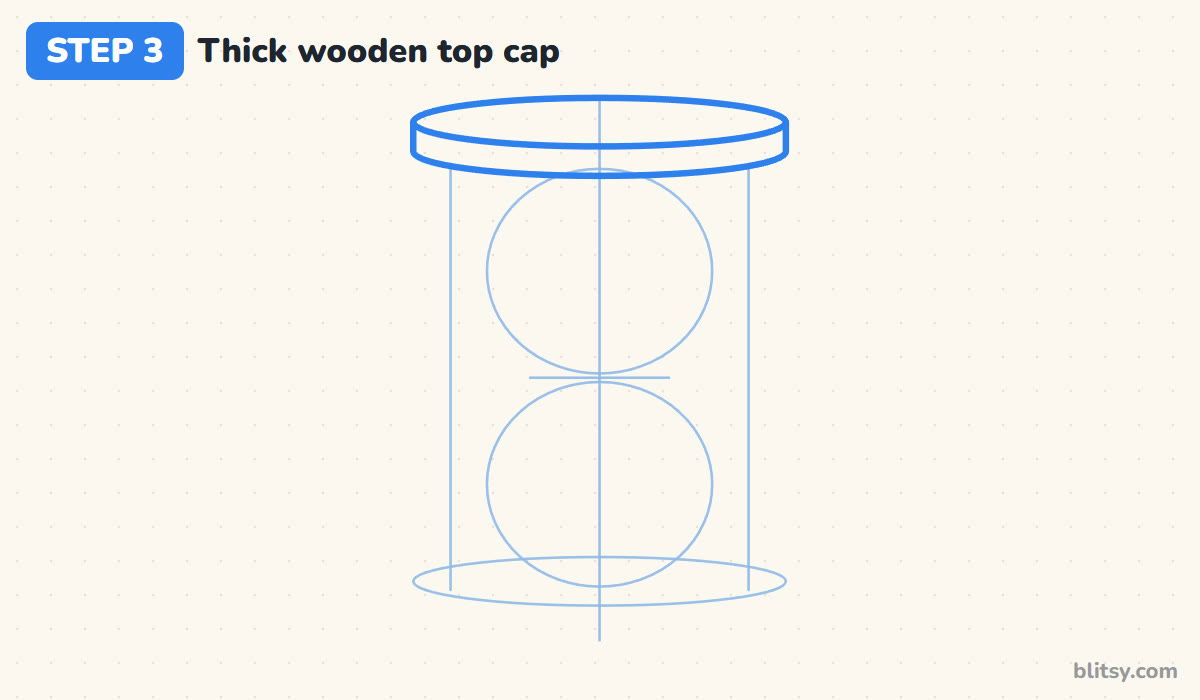
Trace the top oval with a firm line. From its two ends, drop short straight lines down and join them with a curve that copies the front half of the oval. That band is the side of the wooden disc. Without it, the top looks like a flat plate floating in the air.
💡 Tip: The lower curve should bend exactly like the oval above it, just moved down.




Step 4: Draw the wooden base the same way
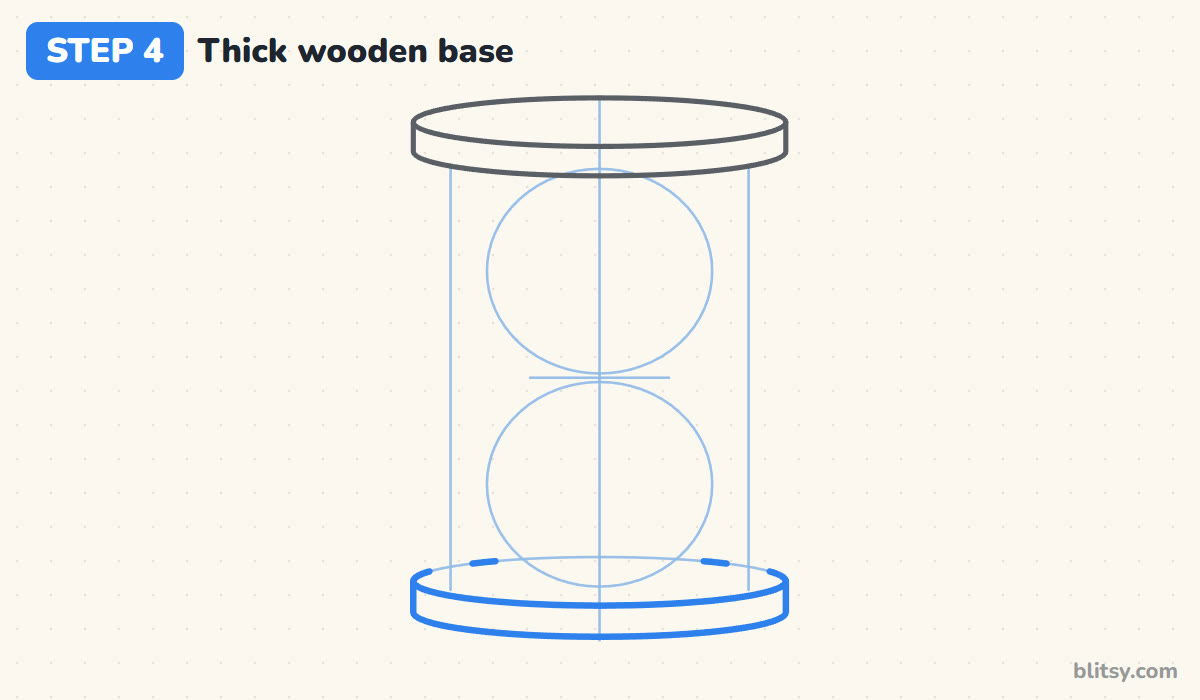
The base is built just like the cap: the oval, two short sides and a curved bottom edge. I make the base band a touch thicker so the timer feels steady. Posts and glass will hide parts of the back edge, so leave little gaps there or erase them later.
💡 Tip: Keep the base the same width as the cap. A wider base looks like a cake stand.
Step 5: Outline the glass bulbs and the thin neck
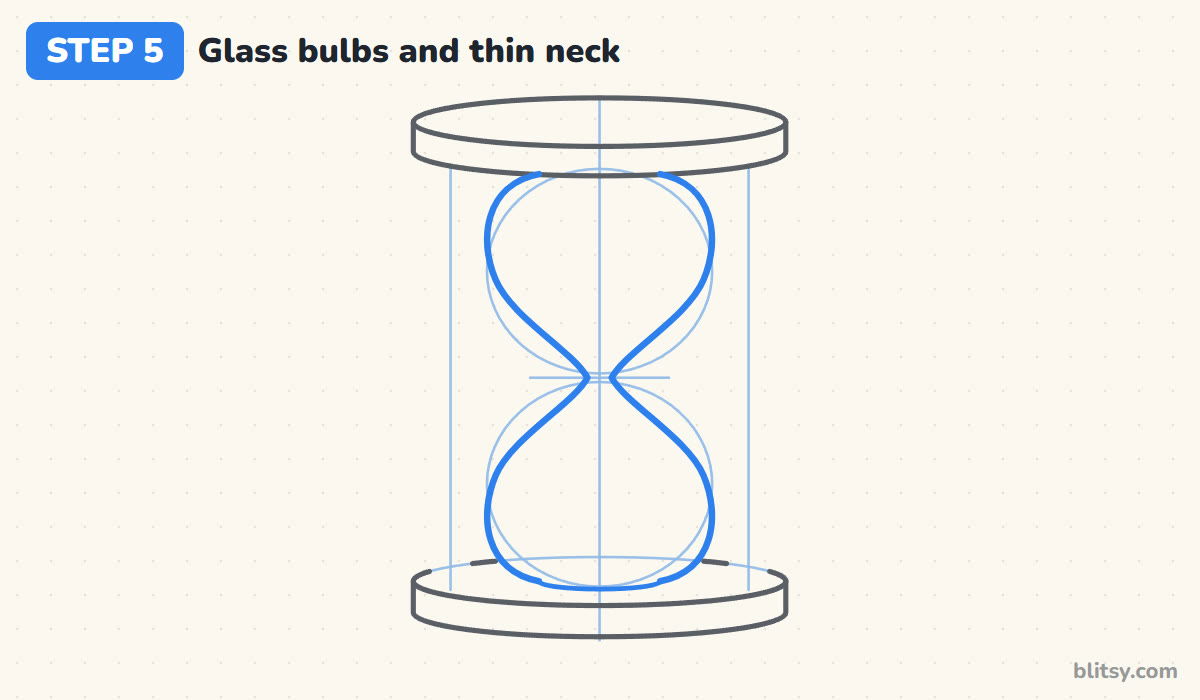
Start just under the cap, swing a line out around the right side of the top bulb oval, then curve it in sharply to the neck mark. From there it flares out around the bottom oval and tucks in to meet the base. Copy that S-shaped curve on the left, then add a short curve where the glass sits on the base. This is the step where I slow down the most.
💡 Tip: Keep the neck narrow, about as wide as a pencil tip on paper. A thin neck is what makes it read as an hourglass.
Step 6: Draw two turned front posts
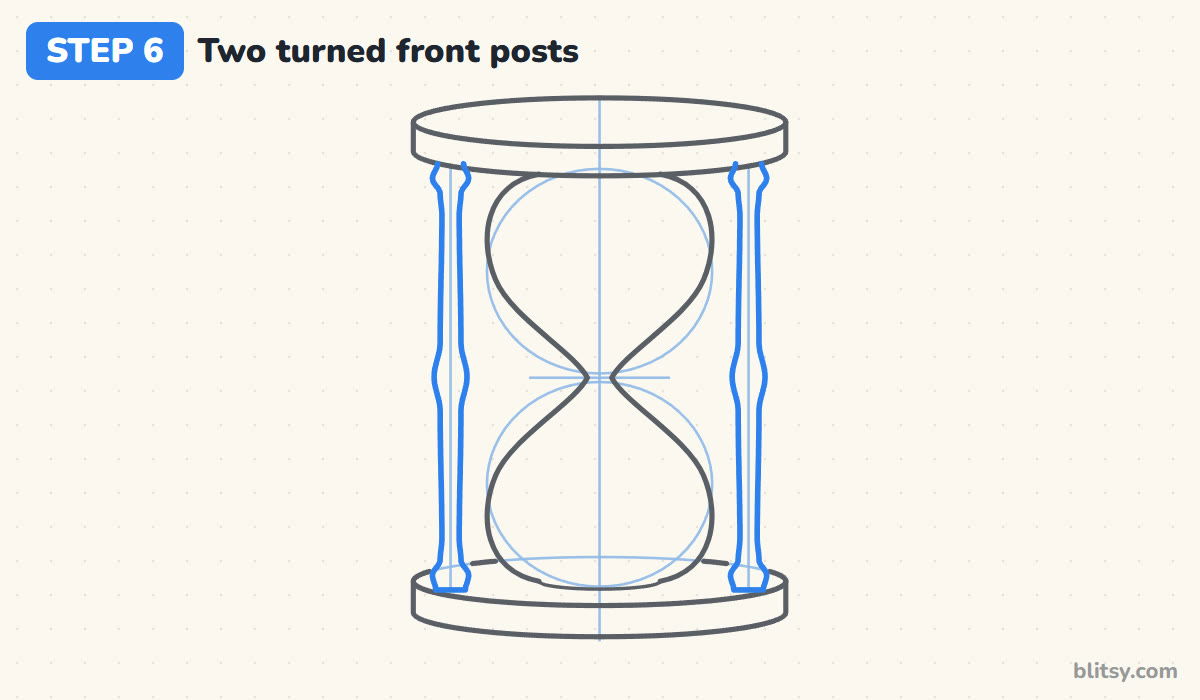
Over each post line, draw a slim post from under the cap down to the base. Give it a round bead at the top, another at the bottom and a bulge in the middle, with thin stretches between them. Real turned posts are carved on a lathe, which is why both sides of each one match.
💡 Tip: Draw the left post first, then copy its bumps at the same heights on the right one.
Step 7: Add the third post behind the glass
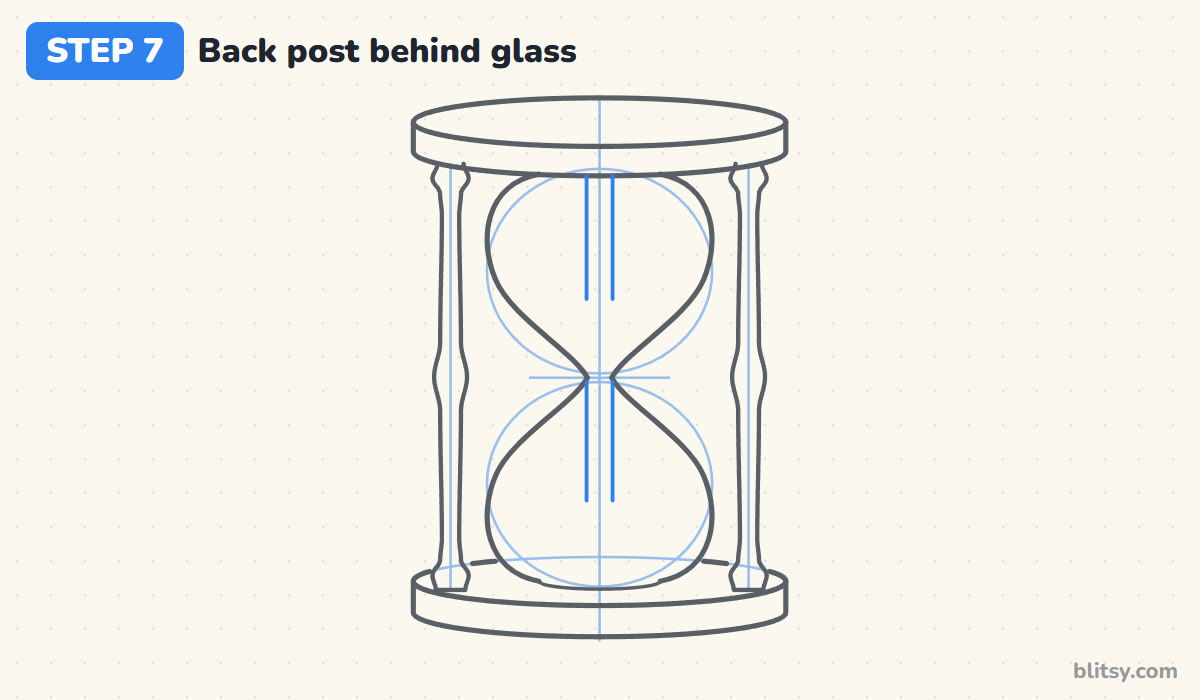
Most hourglasses have three posts, and the third stands at the back. You see it through the glass, so draw just two thin parallel lines down the center, one pair in each bulb. Small kids can skip this step. I like it because it quietly tells the eye the glass is clear.
💡 Tip: Keep these lines thinner and lighter than the front posts. Things farther away should look quieter.


Step 8: Fill the top bulb with sand
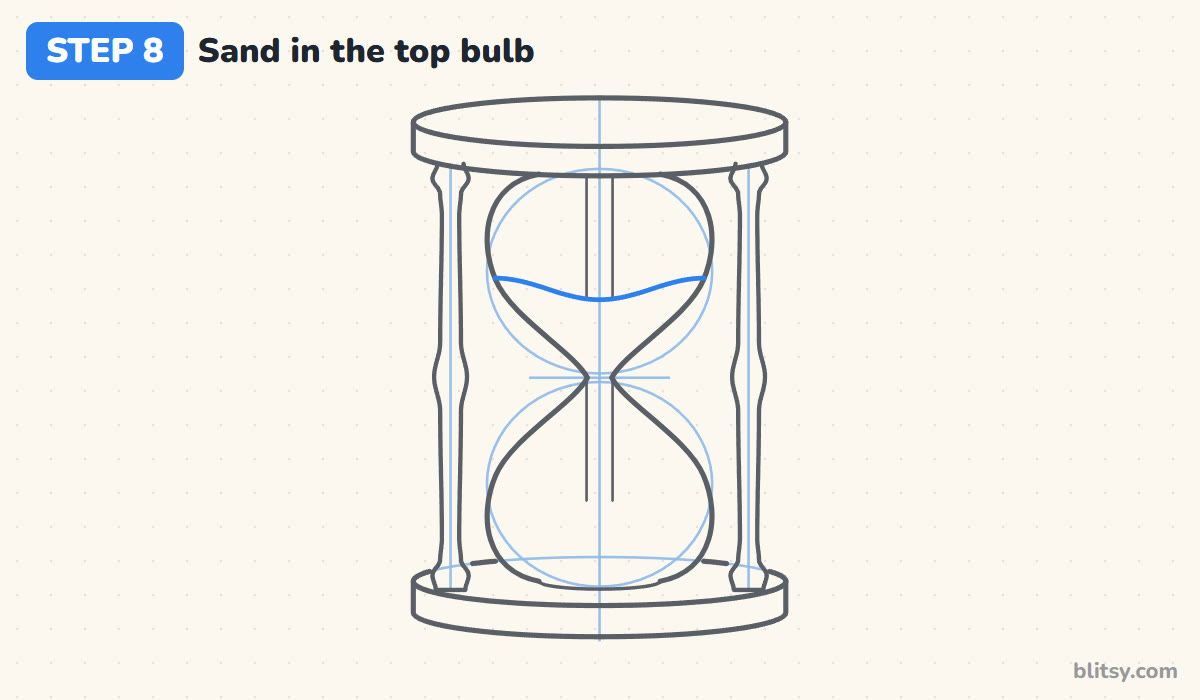
Draw a wavy line across the top bulb, a bit above its widest point, dipping slightly in the middle. Everything below it, down into the neck, is sand. The little dip shows the sand sinking as it drains.
💡 Tip: Stop the sand line right at the glass on both sides so it doesn't poke through the walls.
Step 9: Draw the falling stream and a sand mound
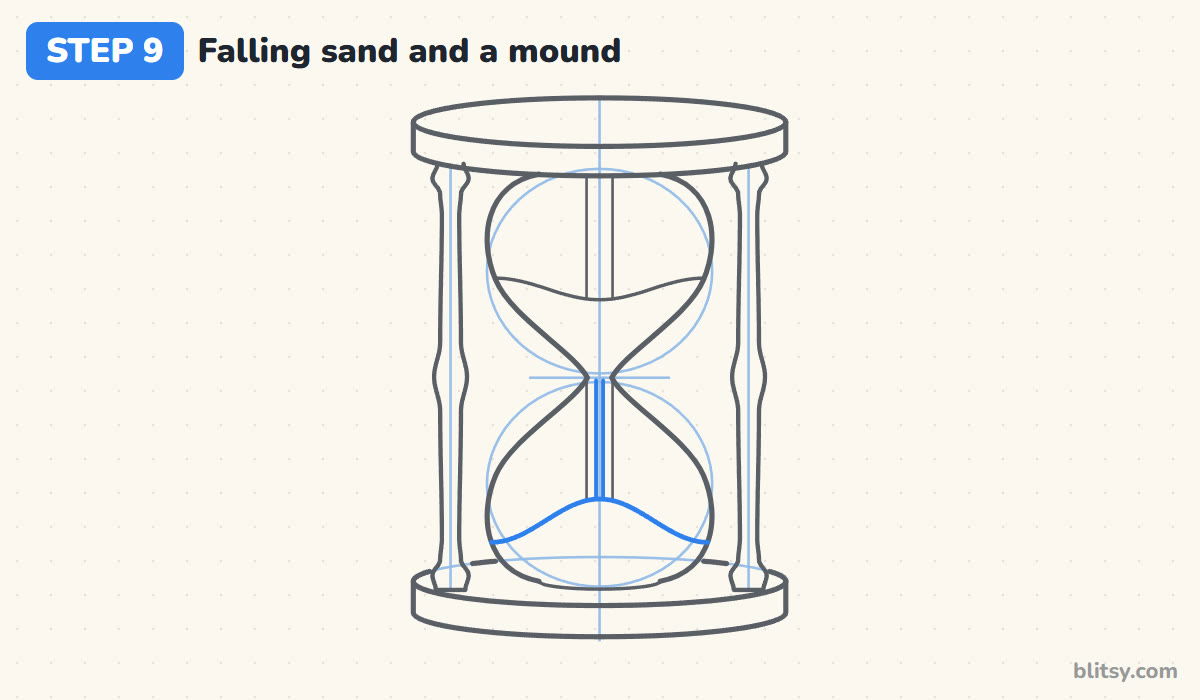
From the neck, draw two close parallel lines straight down for the stream. Stop them on a soft hill in the bottom bulb: low at the glass walls and highest in the middle, where the stream lands. That mound is how sand really piles up.
💡 Tip: Keep the stream very thin. A wide stream looks like a pipe instead of falling sand.
Step 10: Add glass shine and wooden grooves
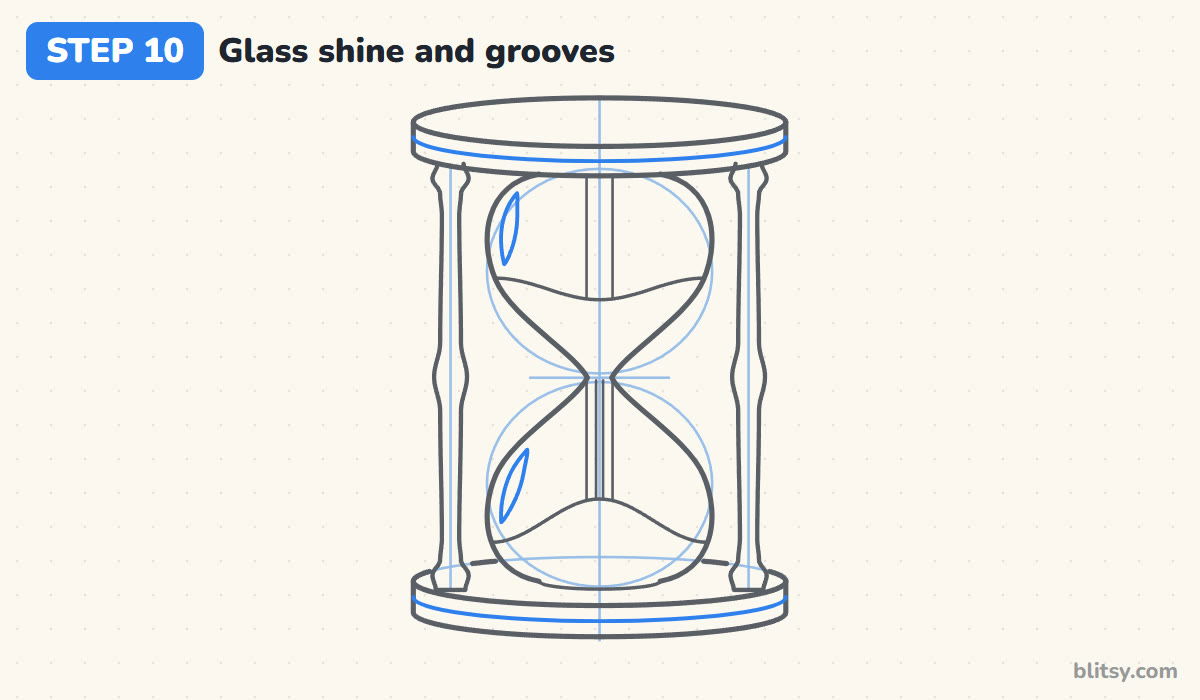
Inside the upper left of each bulb, draw a slim curved sliver that follows the glass. In my experience this tiny shine mark does more than anything else to make glass read as glass. Then add one curved groove around the middle of the cap band and one around the base band.
💡 Tip: Put both shine marks on the same side. Light comes from one direction, so the shine should too.
Step 11: Ink the outline and erase the guides
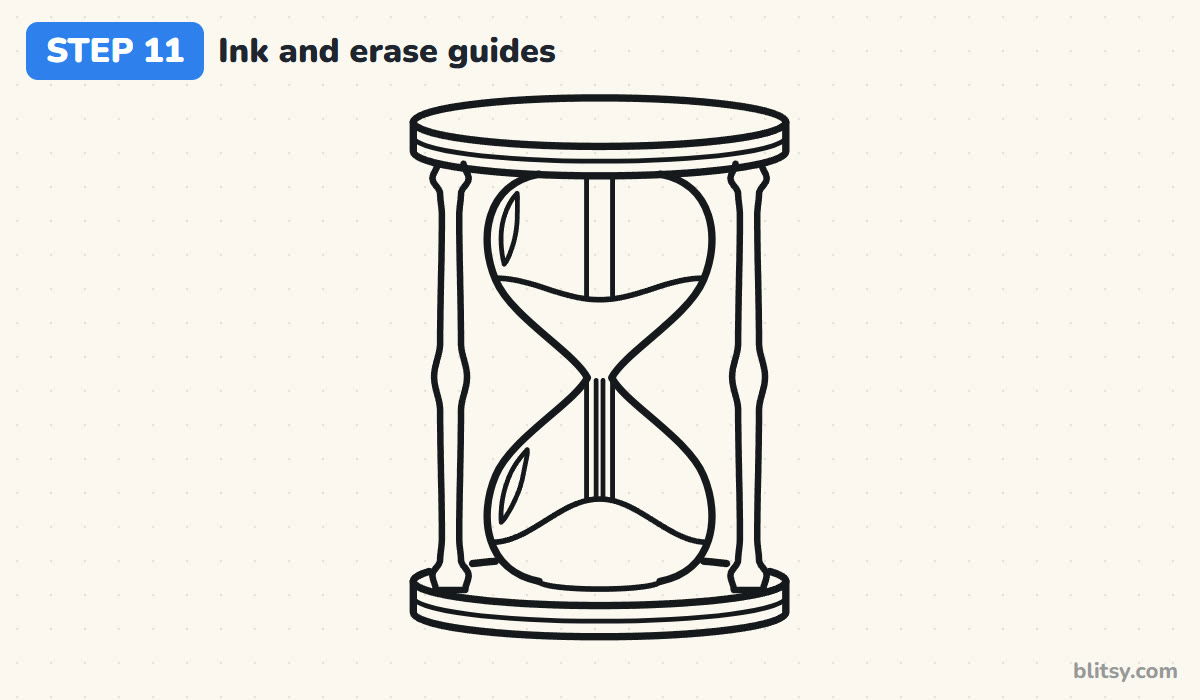
Trace every keeper line with a black marker. I start with the cap and base, move to the glass and finish with small lines like the stream and the shine. Skip the center line, bulb ovals and post lines. Once the ink is dry, erase the pencil.
💡 Tip: Wait a full minute before erasing. Smudged marker on glass lines is hard to hide.


Step 12: Color your hourglass
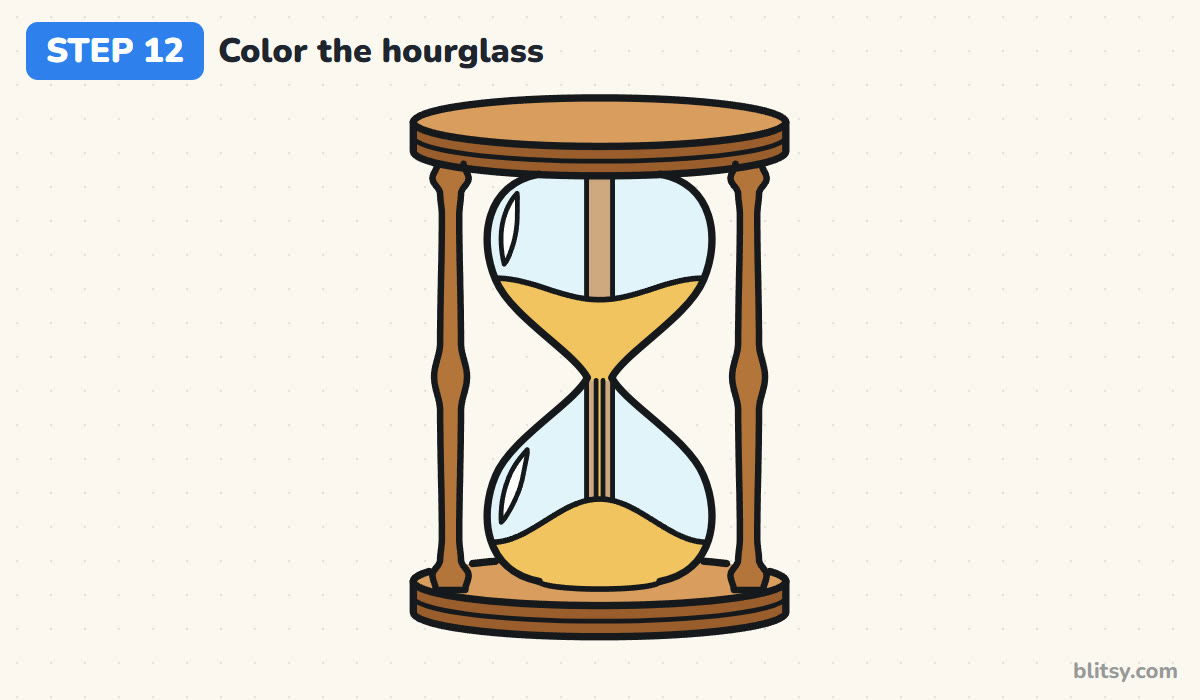
Color the tops of the cap and base light brown and their sides dark brown, so the discs look thick. The front posts are a middle brown and the back post a soft tan. Glass gets a very light blue, the sand golden yellow. Leave the shine marks white.
💡 Tip: Press lightly with the blue. Glass should look clear, so a pale wash works better than a solid color.
Why Sand Timers Come Out Lopsided
- Bulbs of two different sizes. One fat bulb and one thin one throws off the whole object. Check the two guide ovals against each other before you outline.
- A neck that is too wide. Wide necks make it look like a vase or a figure eight. Pinch the middle in until the two sides nearly touch.
- Flat, paper-thin ends. A single oval for the cap looks like a lid with no body. Always add the side band so the wood has thickness.
- Posts touching the glass. If the posts rub the bulbs, everything looks squashed. Leave a small gap of empty space between them.
- Sand floating in the middle of a bulb. Sand always rests at the bottom, so keep the top sand by the neck and the mound on the base.
Sand Colors, Shapes and Other Timer Twists
Once the basic shape feels easy, swap the golden sand for pink, purple or blue, or make the wood dark like walnut. Flip the timer in your head and draw the sand mostly in the bottom bulb, as if time is nearly up. My favorite twist is a tall, thin version with extra beads on the posts, which looks old and a little magical. Glass objects all use the same tricks of an outline plus one shine mark, so this light bulb drawing tutorial makes a good next step. For more practice with symmetry and shine, try this diamond drawing step by step lesson, and if you want to place your hourglass in a story scene, the castle drawing tutorial gives it a wizard's tower to live in.
Free Hourglass Coloring Page and Printable Steps
The free hourglass coloring page has a colored model at the top with a key that matches each color to a part, plus a large outline underneath. The step-by-step PDF guide holds all 12 steps with pictures and tips for drawing away from the screen. Both print on Letter or A4.
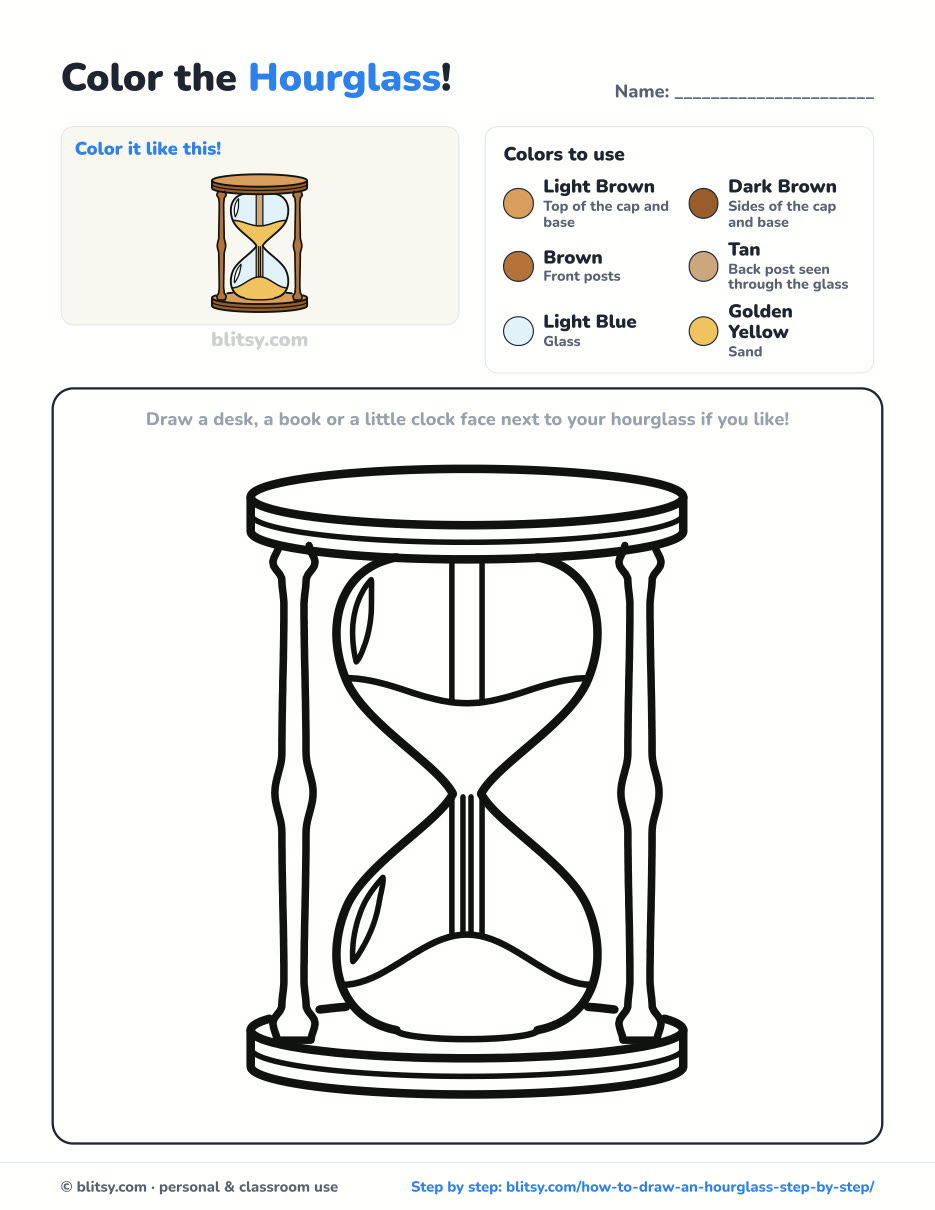
Black outlines with a colored example and the color names at the top. Ready to print and color.
⬇️ Download Coloring PageEvery step picture with its instructions and tips, to keep beside your paper while you draw.
⬇️ Download Drawing Guide📱 On a phone? Tap a download button, then open the file and choose Share → Save to Files or Print. On a computer, the PDF opens or saves straight to your Downloads folder.
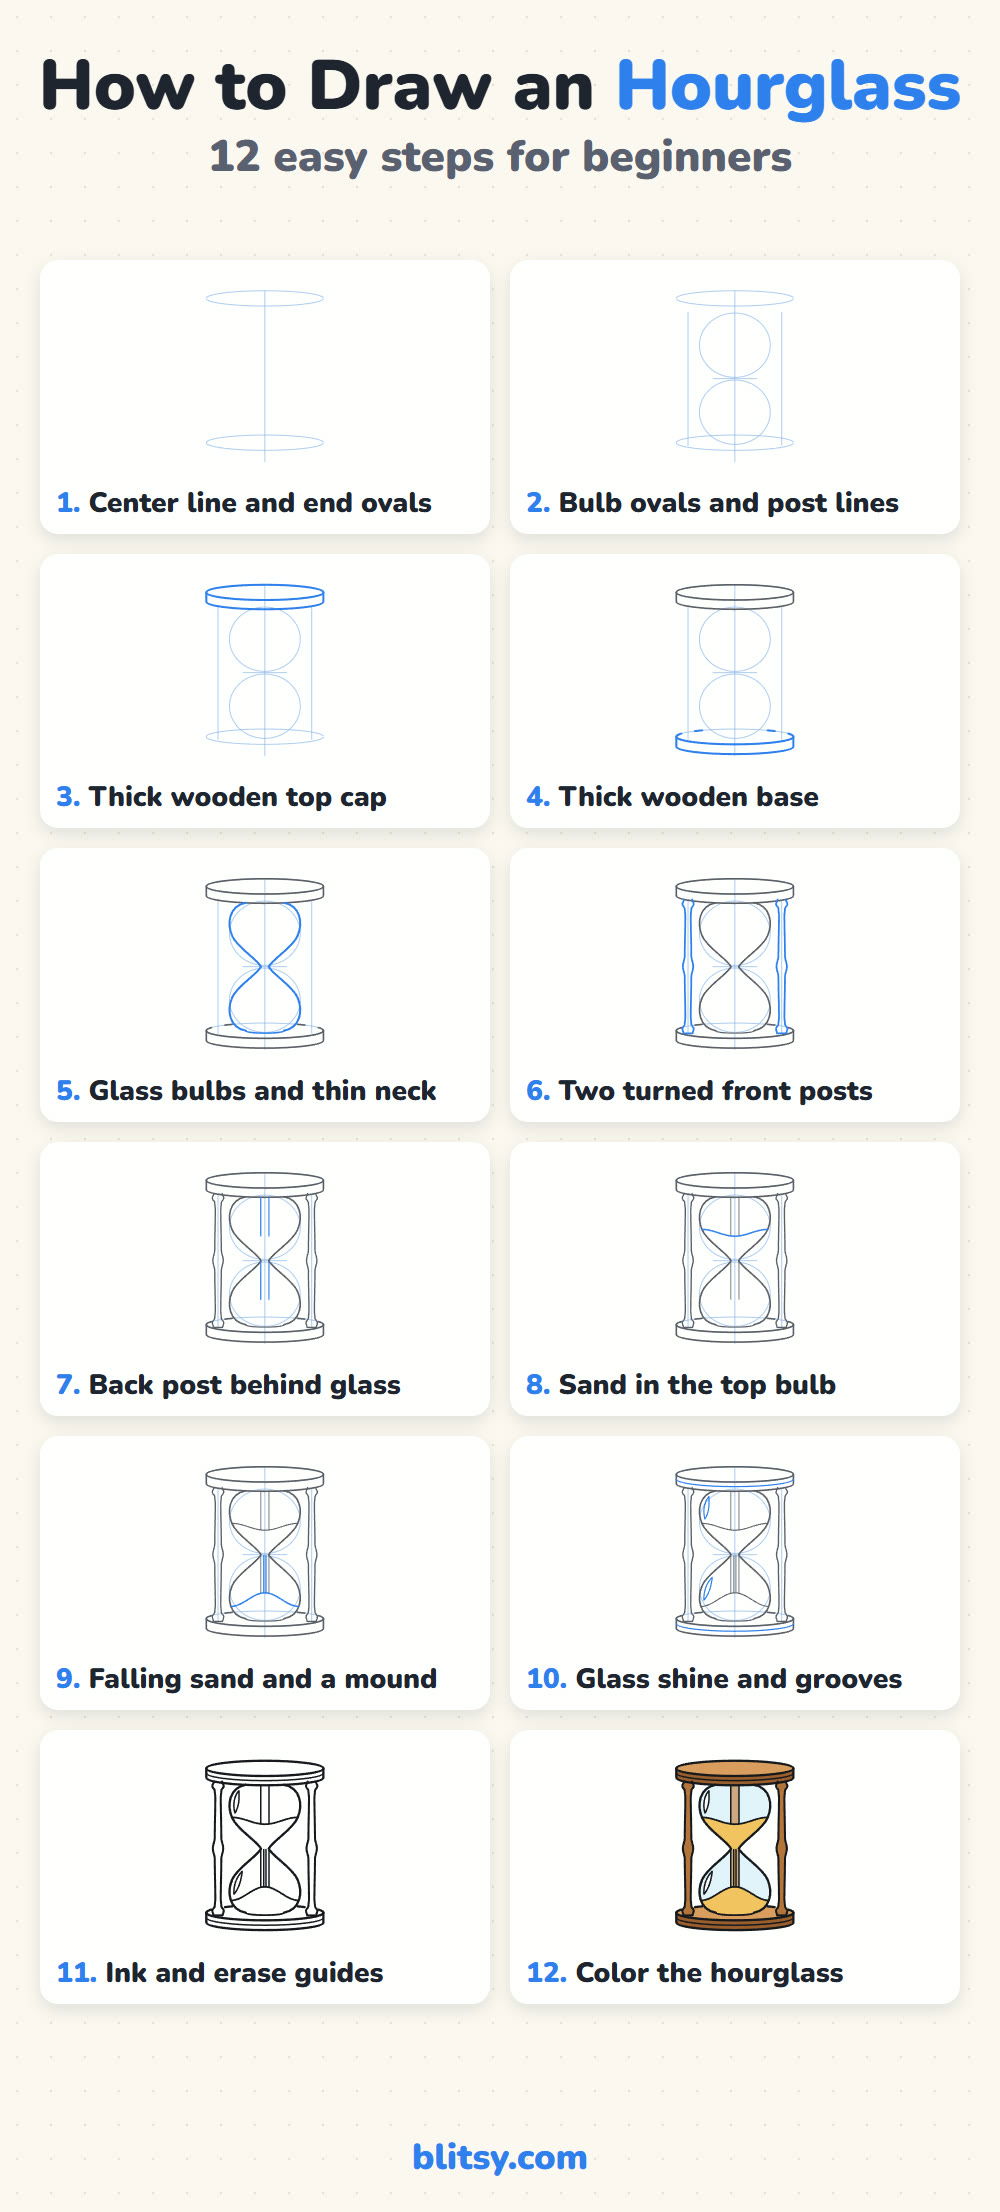
Keep the Hourglass Steps on Your Pinterest Board
Glass, Gems and Castles to Draw Next
Each of these is a full step-by-step tutorial with one picture per step.
- Light Bulb Drawing: A glowing old-style bulb with a curly filament and a ridged screw base starts from one circle in this light bulb drawing tutorial.
- Diamond Drawing: Draw a sparkling cut diamond with a heart gem beside it in this diamond drawing step by step lesson.
- Crystal Drawing: A purple amethyst cluster grows out of a gray rock as simple six-sided columns in this crystal drawing tutorial.
- Castle Drawing: Build a fairy-tale castle with cone roofs, battlements and a drawbridge from rectangles and triangles in this how to draw a castle step by step guide.
Hourglass Questions from Young Artists
What is the easiest way to draw an hourglass?
Start with a center line and two flat ovals for the ends. Stack two ovals for the bulbs, join them with an S-shaped curve on each side, and use straight posts if turned ones feel hard.
How do you make an hourglass look like glass?
Add a thin white shine mark inside each bulb, on the same side, and color the glass with a very light blue. Letting the back post and the sand show through also says the glass is clear.
How do you draw sand in an hourglass?
Put a wavy line low in the top bulb with a small dip in the middle, draw a thin stream through the neck and finish with a rounded mound in the bottom bulb where the stream lands.
How long does it take to draw an hourglass?
Plan on about 30 minutes with coloring. The glass curves take the most care, so slow down on step 5.
Grab a pencil, set a timer if you have one, and see if your hourglass is finished before the sand runs out. ⏳✏️
Related posts:
 How to Draw a Car Step by Step (Easy Drawing for Beginners)
 How to Draw a Whale Step by Step (Easy for Beginners)
 How to Draw an Arctic Fox Step by Step (Easy for Beginners)
 How to Draw a Chicken Step by Step (Easy for Beginners)
 How to Draw a Snowman Step by Step (Easy for Beginners)
 How to Draw an Airplane Step by Step (Easy Jet for Beginners)
 How to Draw a Mouse Step by Step (Easy for Beginners)
 How to Draw a T-Rex Step by Step (Easy for Beginners)
 How to Draw a Pig Step by Step (Easy for Beginners)
 How to Draw a Minion Step by Step (Easy for Beginners)
 How to Draw a Yorkie Step by Step (Easy for Beginners)
 How to Draw a Notebook Step by Step (Easy for Beginners)

