
Jars look simple until you try one and the lid comes out flat and the bottom comes out square. I always tell beginners the secret is two ovals, one at the top and one at the base. Here I'll show you how to draw a jar step by step: a glass mason jar seen from slightly above, with a metal lid band, a threaded neck, a pile of candies inside and a twine bow with a tag. No experience needed, only a light hand for the first lines.
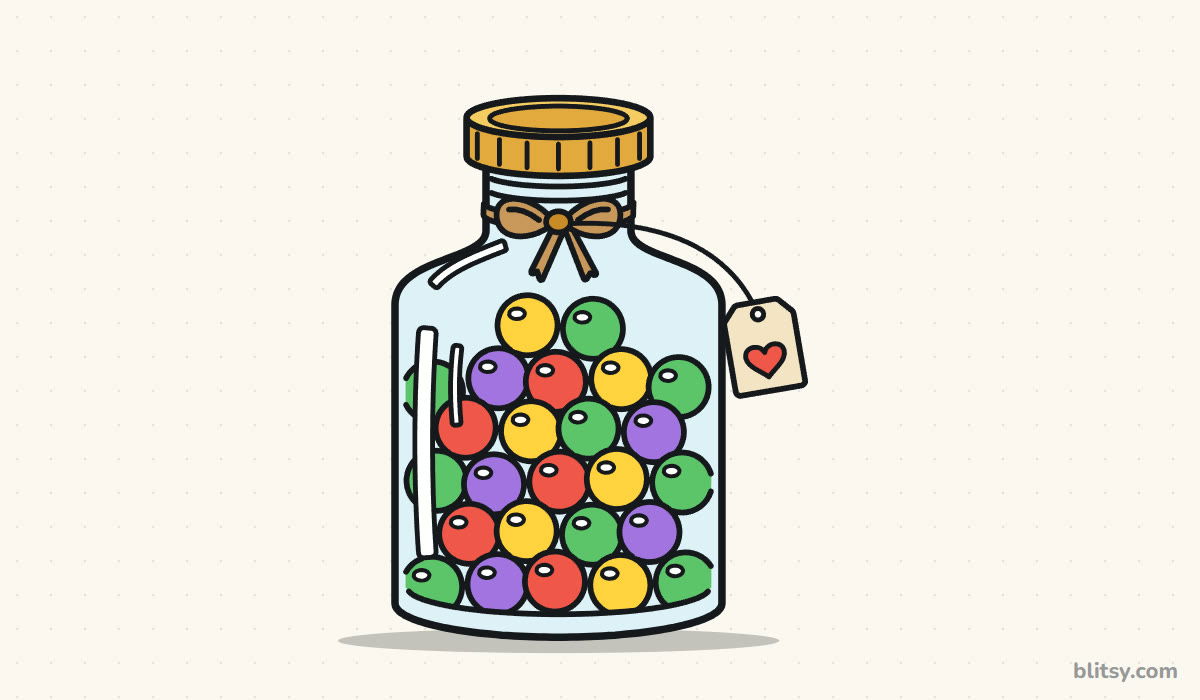
Jar parts you add in a step show up blue, and anything from earlier steps turns gray. Copy only the blue lines, compare, then keep going.
Quick overview
⏱️ Time: about 30 to 40 minutes, coloring included
🎯 Level: easy, fine for kids around 7 and up
✏️ Steps: 12
🫙 You'll draw: a glass mason jar filled with round candies
Supplies for a Glass Jar Sketch
- A pencil you can press softly (HB or 2B)
- A good eraser, since the guide ovals all come out later
- A ruler if you like straight sides (optional)
- A black marker or fineliner for the final lines
- Colored pencils or markers: light blue, gold, light brown, cream and four candy colors
- Plain white paper
A coin or a bottle cap is handy for tracing the candies if freehand circles frustrate you.
How to Draw a Jar Step by Step
Step 1: Draw a center line and two ovals
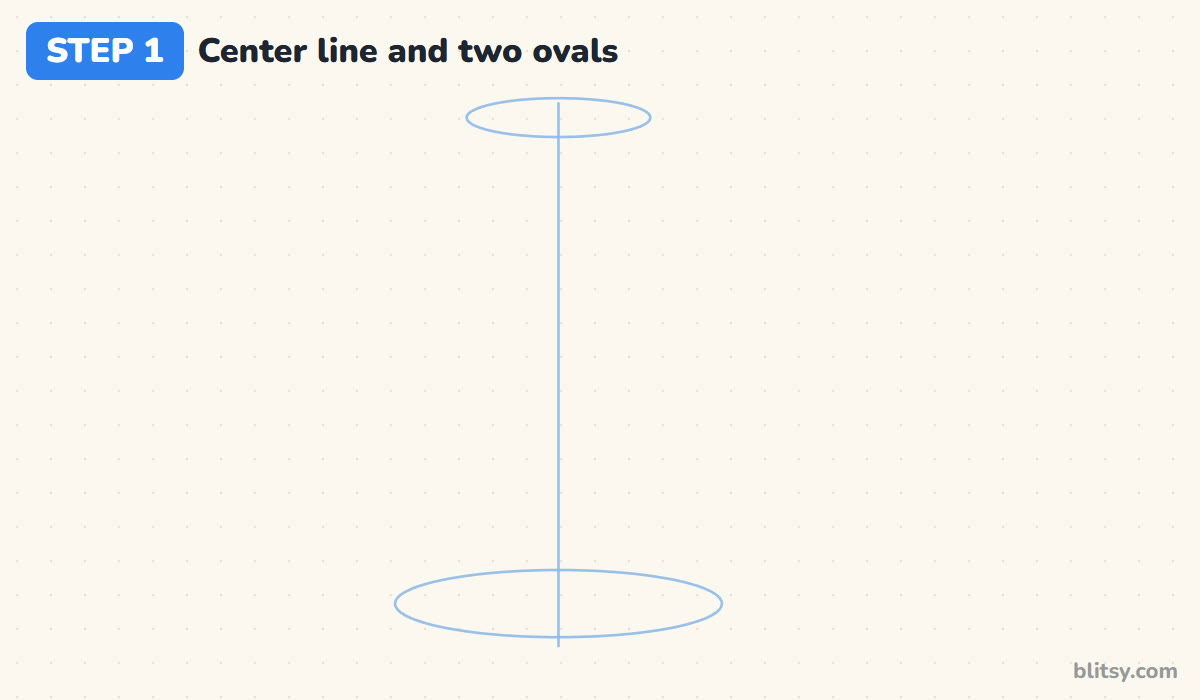
Draw a light vertical line down the middle of the page. Near the top, put a small, flat oval across it for the lid. Near the bottom, draw a much wider oval for the base. That center line is what keeps my left and right halves even.
💡 Tip: Draw each oval in one smooth loop, moving your whole arm. Short scratchy strokes make lumpy ellipses.
Step 2: Add the side lines and a neck box
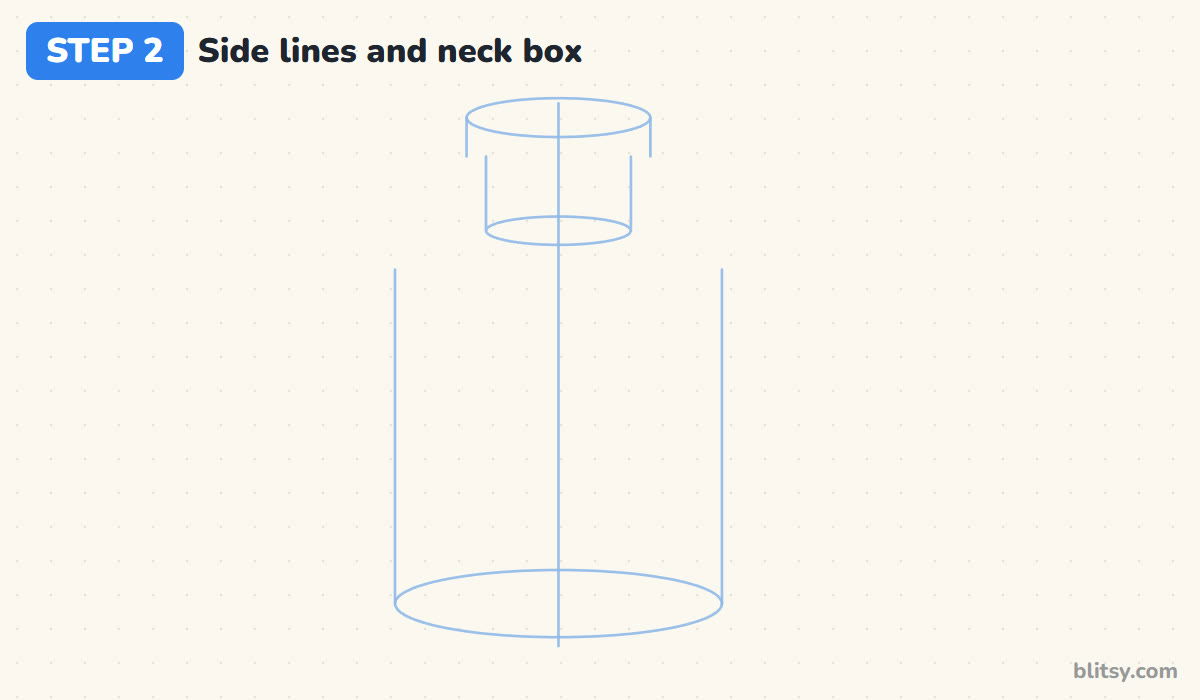
From the edges of the base oval, draw two straight lines up for the jar's sides. Under the lid oval, sketch two short lines for the band and two more, a little closer together, for the neck. Close the neck with a small oval where the shoulders will start.
💡 Tip: Check that both side lines lean neither in nor out. Turning the page upside down shows a tilt right away.
Step 3: Draw the lid top and the metal band
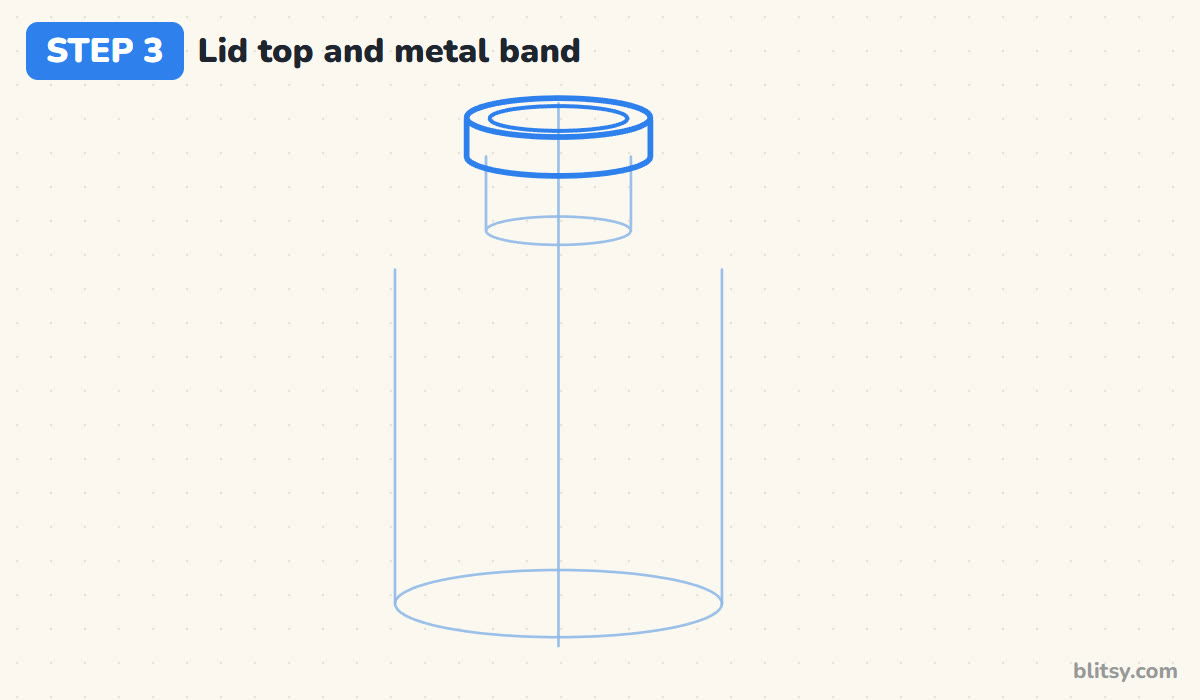
Go over the top oval with a firm line and draw a smaller oval inside it for the raised center. Drop two short lines from the ends and join them with a curve that copies the front half of the top oval. That gives the band its thickness.
💡 Tip: The bottom curve of the band must bend the same way as the top oval. A straight bottom edge makes the lid look like a flat box.




Step 4: Add grip ridges and screw threads
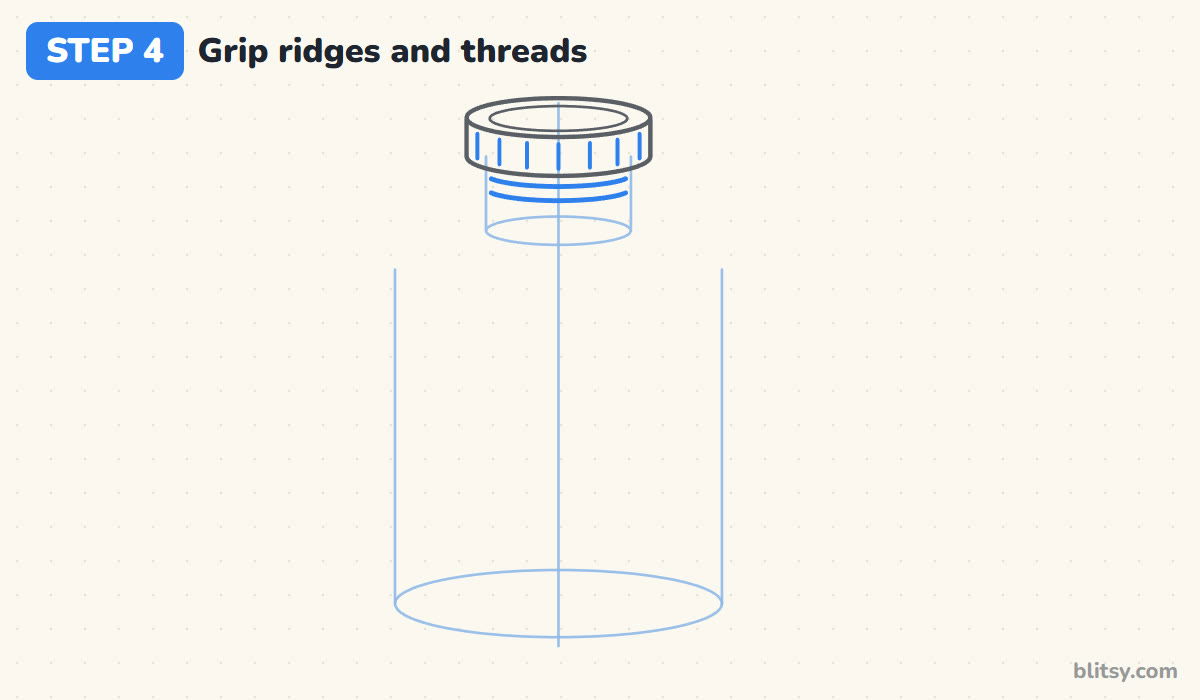
Draw a row of short vertical lines on the band. Space them wider in the middle and closer near the edges, because the band curves away there. Below it, draw two shallow curves across the neck for the glass threads.
💡 Tip: Seven ridges are plenty. More than that starts to look like a zipper.
Step 5: Draw the shoulders, sides and base
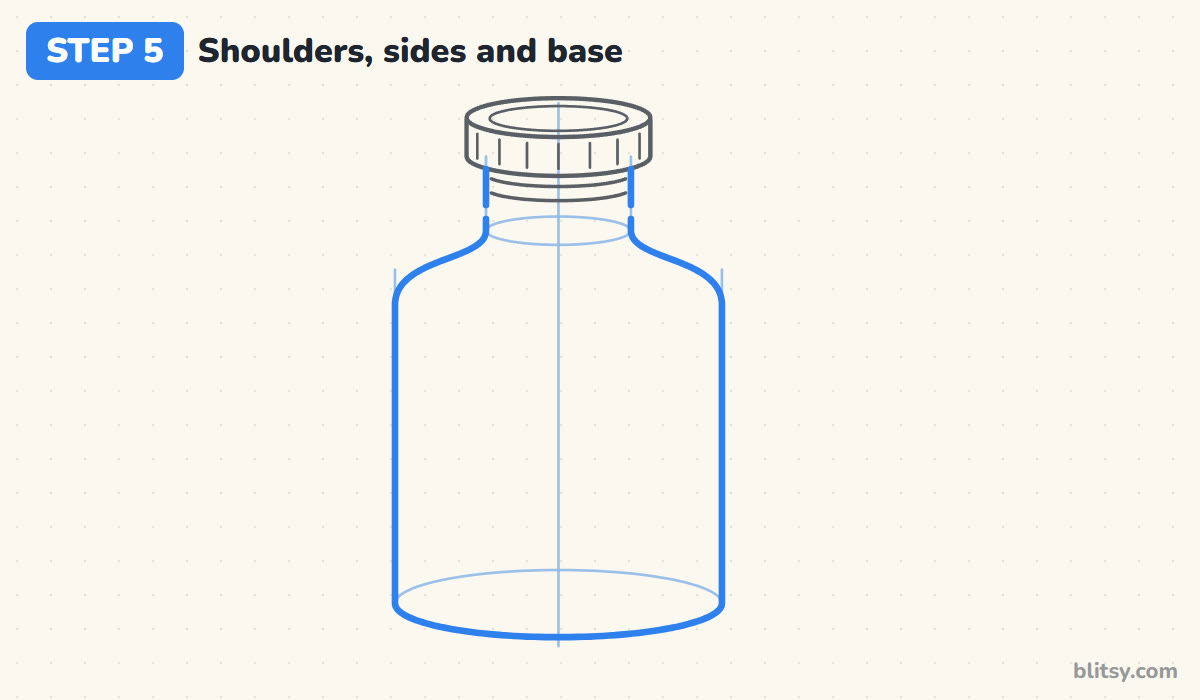
Run a line down each side of the neck, then curve it outward into a round shoulder that meets the side guide. Follow the sides straight down and finish with the front half of the base oval, so the bottom is curved, not flat. I leave the back half of that oval as a guide only.
💡 Tip: Draw one shoulder, then the other right away while you still remember how round you made the first.
Step 6: Add a thick bottom and glass shine
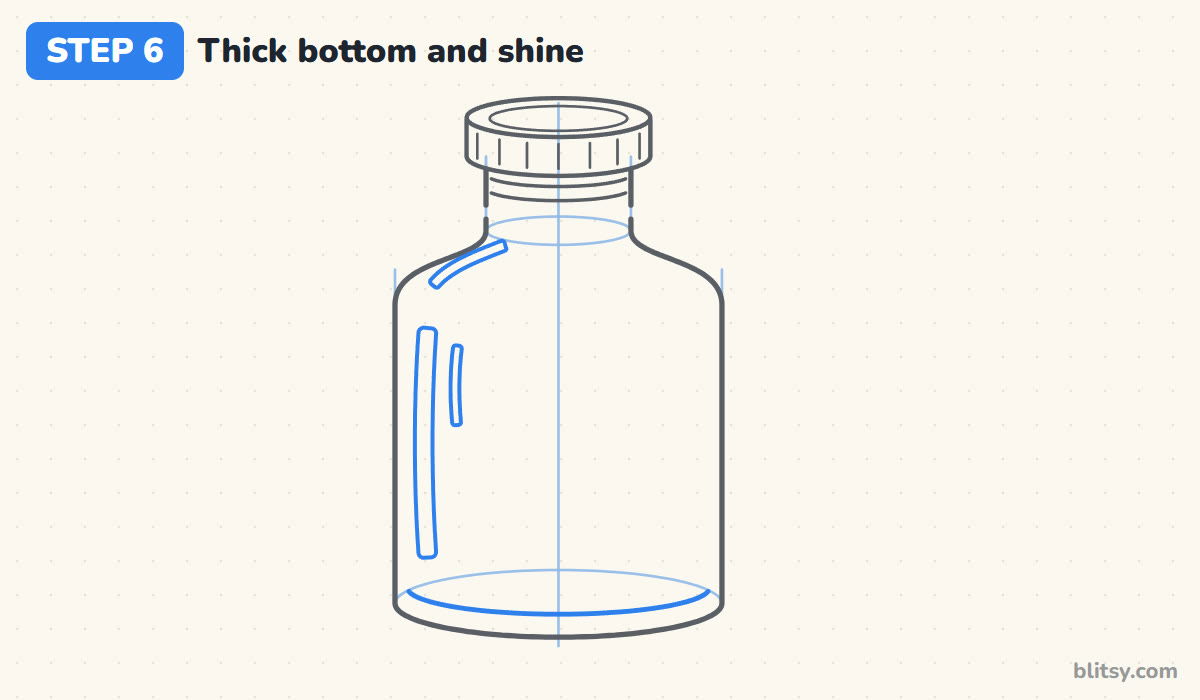
Just above the base curve, draw a second, narrower curve that follows it; the gap reads as thick glass. On the left, add a long narrow stripe, a shorter one beside it and a small curved stripe on the shoulder. These reflections are what make it look like glass rather than plastic.
💡 Tip: Put every shine mark on the same side of the jar. Light from one direction makes the glass believable.
Step 7: Draw the front rows of candies
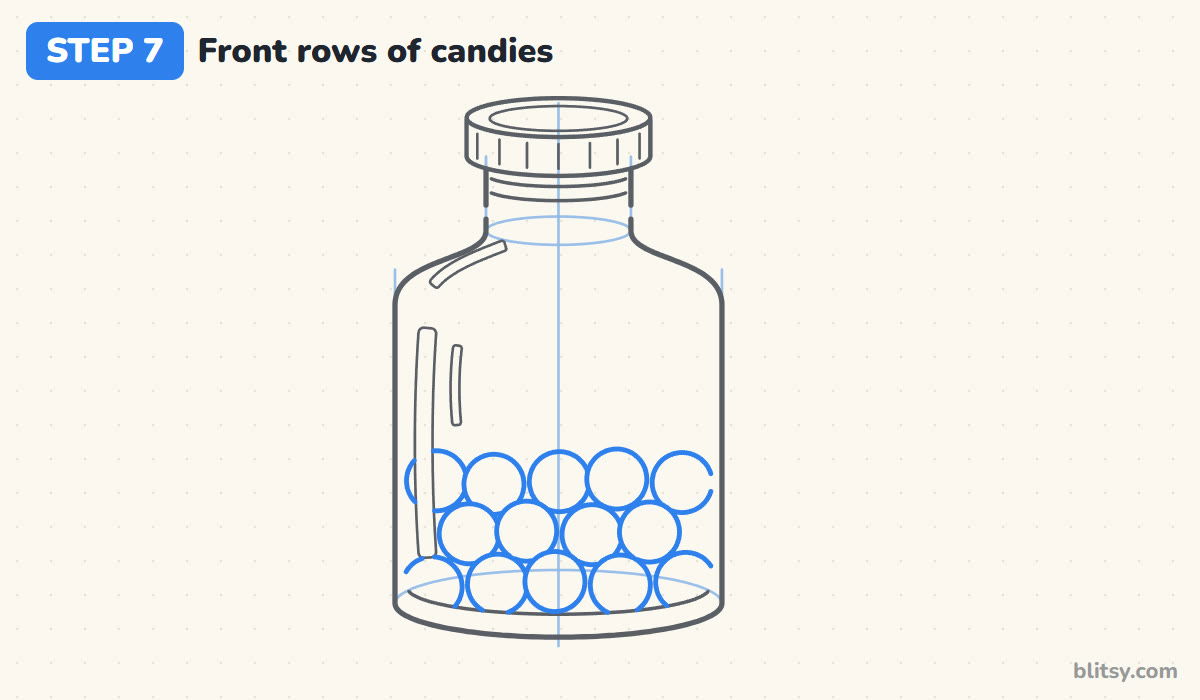
Start with the bottom row of round candies resting on the thick glass, then stack the next row in the dips between them, like oranges in a crate. Candies at the edges get cut off by the glass wall. Skip the space behind the shine stripes.
💡 Tip: Keep every circle about the same size. A coin traced lightly works fine if your circles keep growing.


Step 8: Pile more candies behind and add shines
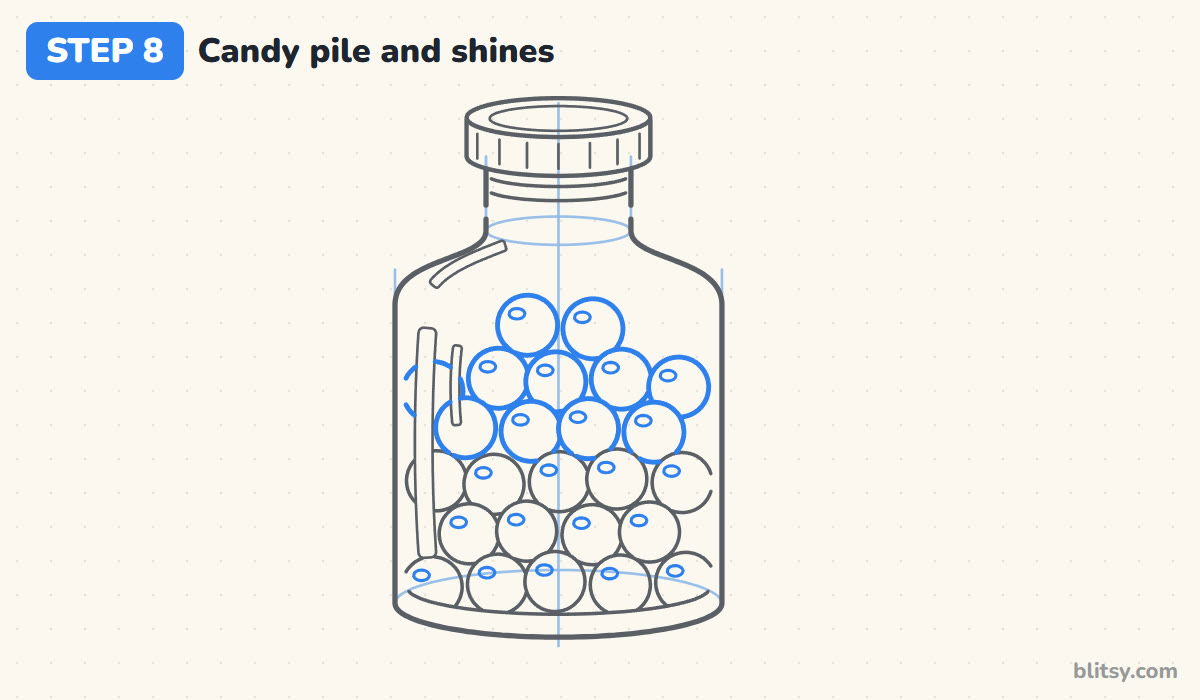
Add two more rows tucked behind the first, drawing only the parts of each circle you can still see. Keep the top row short, just two candies in the middle, so the pile looks rounded. Then give each candy a tiny oval shine in its top left corner.
💡 Tip: Drawing the front candies first and the hidden ones after is much easier than erasing overlaps later.
Step 9: Wrap twine around the neck and tie a bow
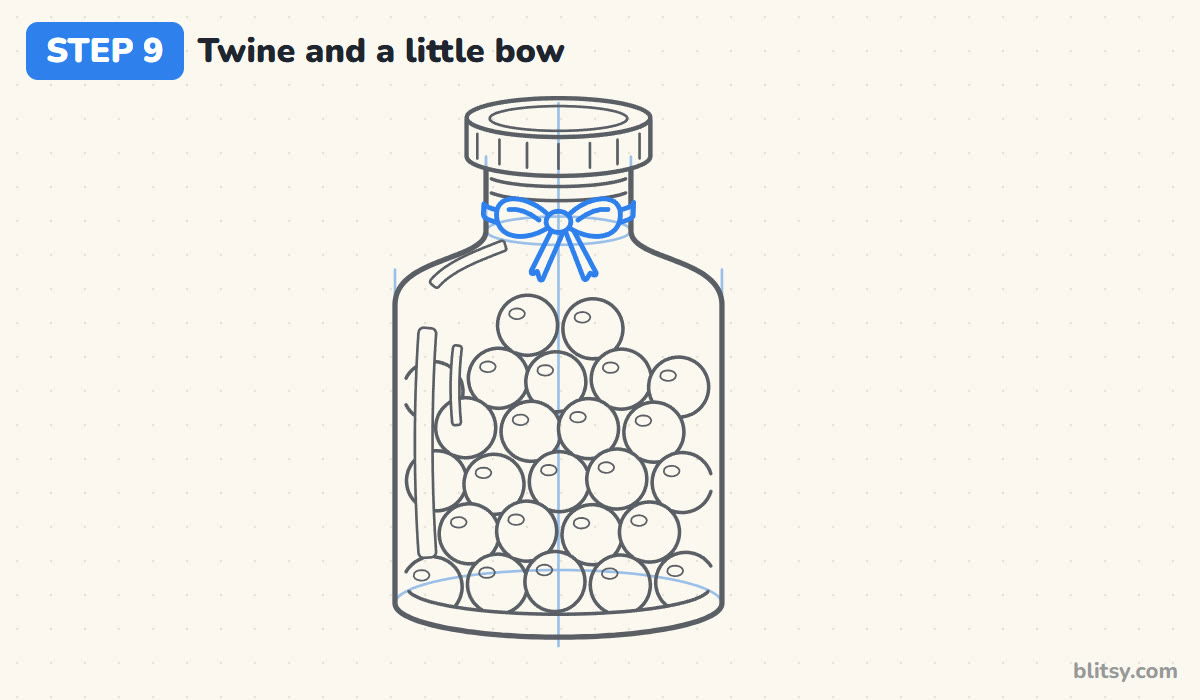
Draw a narrow band around the bottom of the neck with two curves that follow the threads. In the middle of the front, add a small oval knot with a teardrop loop on each side. Two short tails hang from the knot, each with a notch in its end.
💡 Tip: Make the loops a bit lopsided. A perfectly even bow looks stiff.
Step 10: Hang a tag with a heart
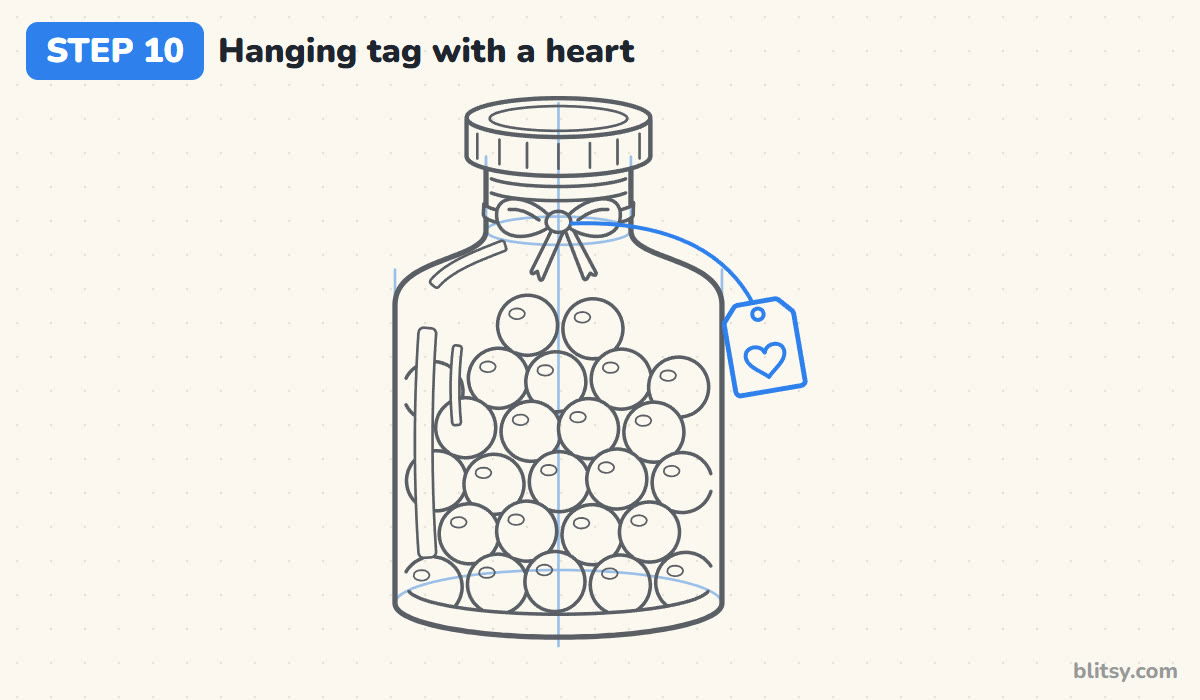
From the knot, draw a thin string that curves past the right shoulder and down the outside of the jar. At its end, add a small tilted rectangle with the top corners cut off. Put a tiny hole near the top and a heart in the middle.
💡 Tip: Let the tag hang outside the glass. Inside the outline it gets lost among the candies.
Step 11: Ink the jar and erase the guides
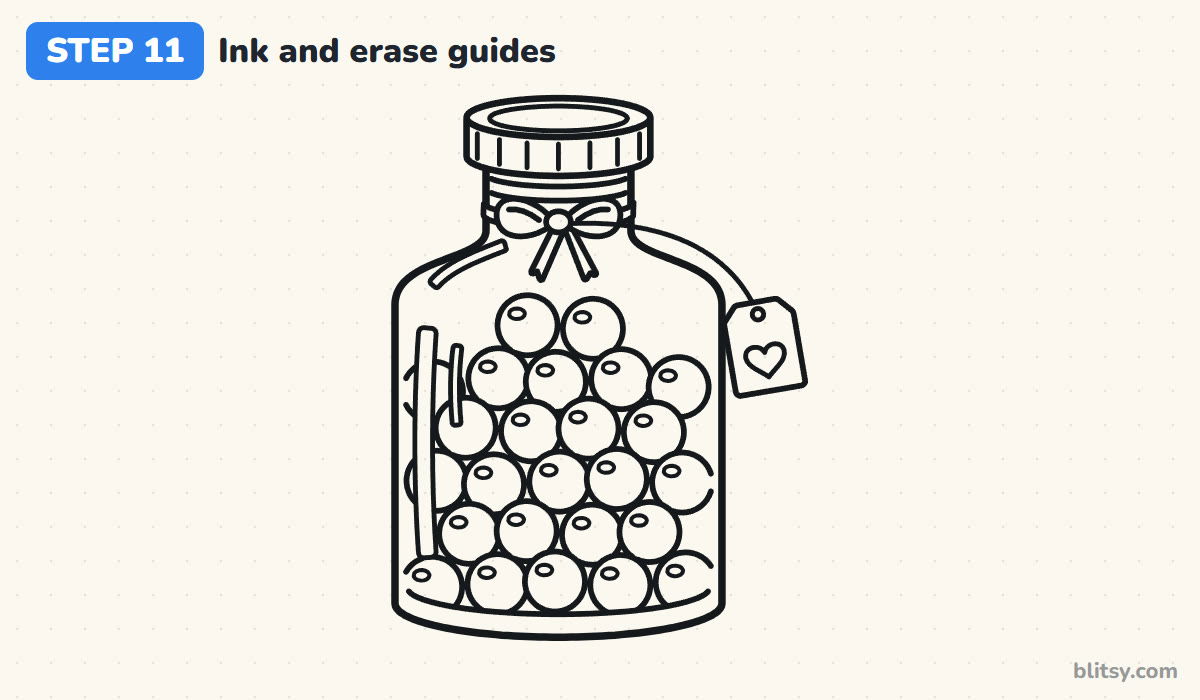
Trace the keeper lines with the black marker. I start with the lid and neck, where the lines are short and need a steady hand, then the outline, and the candies last. Once the ink is dry, erase the center line, guide ovals and side lines.
💡 Tip: Use a thicker line for the jar outline and a thinner one for the candies and shines. The glass then stands out in front.

Step 12: Color your candy jar
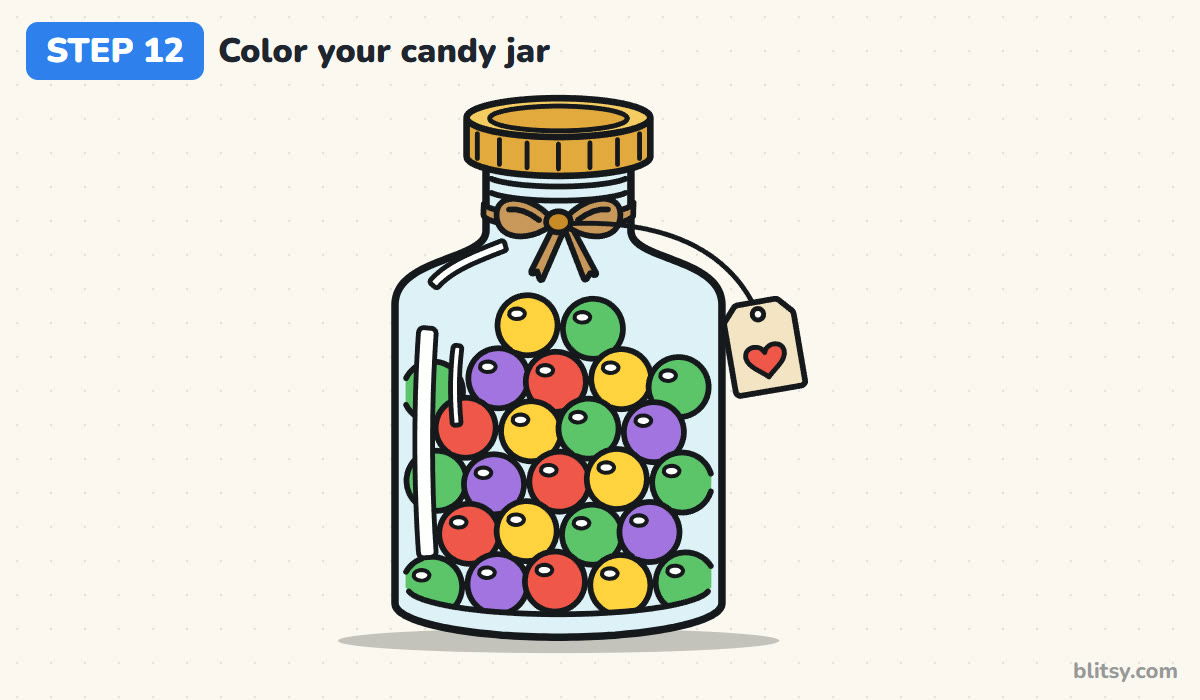
Shade the glass very light blue and keep the shine stripes white. Color the candies red, yellow, green and purple so no two of the same color touch, leaving each tiny shine white. The lid is gold, lighter on top, the twine light brown and the tag cream with a red heart. A gray shadow sets the jar on a table.
💡 Tip: Press harder on the right edge of the glass for a slightly deeper blue. That bit of shade makes the jar look round.
Why Jar Drawings Often Look Flat
- A straight line across the bottom. We look down at the jar, so the base must curve like the front of an oval. A flat bottom makes it look like a cardboard cutout.
- Ovals with pointed ends. Ellipses are round at both ends, like a squashed circle. If the ends look like a lemon, redraw them in one loop.
- A lid narrower than the neck. The band has to fit over the threads, so make it a little wider than the neck below it.
- Shine marks on both sides. Reflections on the left and right at once confuse the eye. Keep them on one side.
- Candies floating in the air. The bottom row has to rest on the thick glass, and each row above sits in the gaps of the one below.
Filling Your Jar with Something New
Swap the candies for honey with a wooden dipper, cookies, buttons, seashells, or a few glowing fireflies on dark paper. A tall thin jar works for pickles, and a short wide one becomes a jam jar with a checkered cloth on the lid. Younger kids can skip the ridges and threads. If you liked shading the glass, my light bulb drawing tutorial uses the same shine trick on a round globe. For company on the table, the how to draw a strawberry lesson makes a sweet pair, and a butterfly drawing resting on the lid adds a garden feel.
Free Jar Coloring Page and Printable Drawing Steps
The free jar coloring page has a finished colored jar at the top to copy from and a key telling which color goes on which part, with a large outline below to color in. The step-by-step PDF guide puts all 12 steps with pictures and tips on paper, handy for a classroom table or a rainy afternoon. Both print well on Letter or A4.
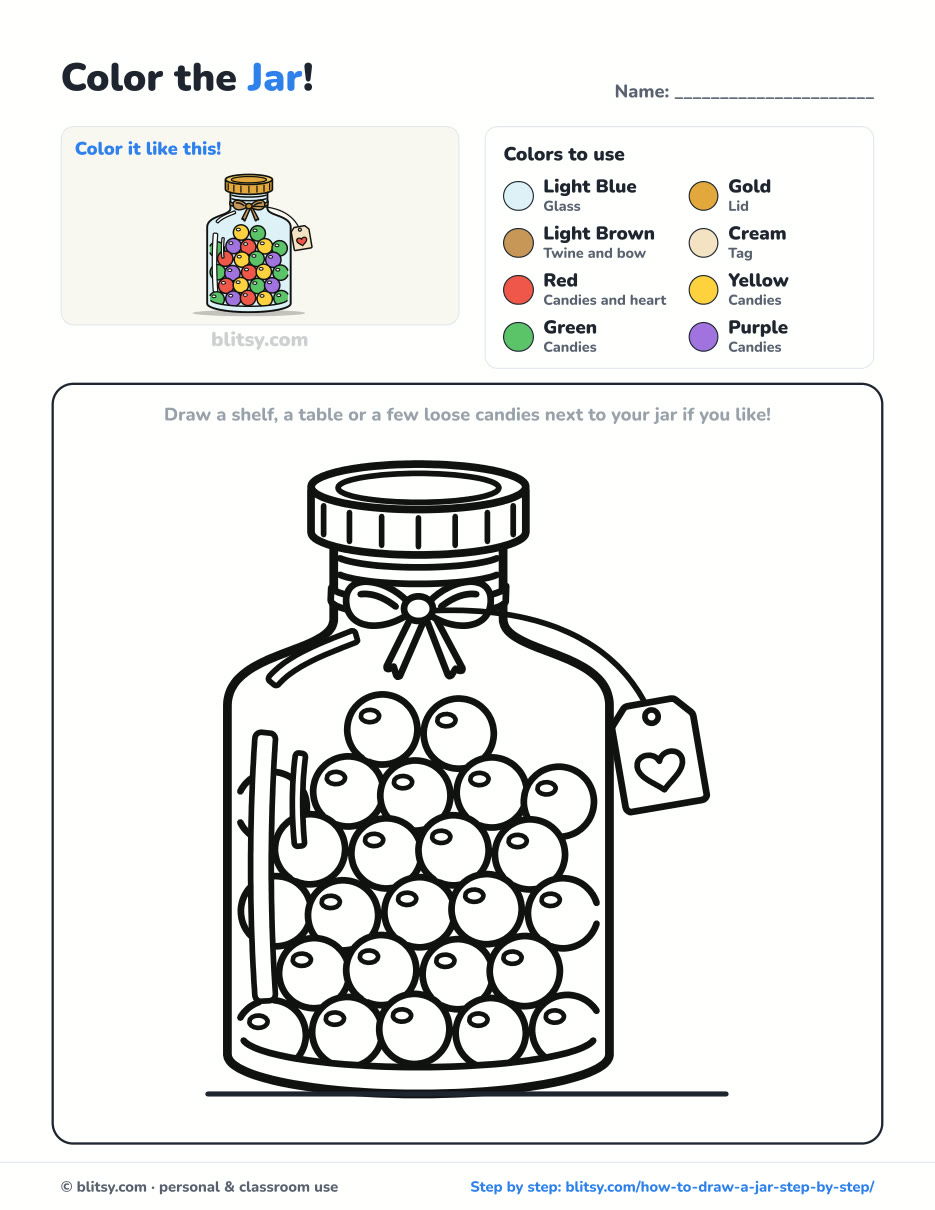
Black outlines with a colored example and the color names at the top. Ready to print and color.
⬇️ Download Coloring PageEvery step picture with its instructions and tips, to keep beside your paper while you draw.
⬇️ Download Drawing Guide📱 On a phone? Tap a download button, then open the file and choose Share → Save to Files or Print. On a computer, the PDF opens or saves straight to your Downloads folder.
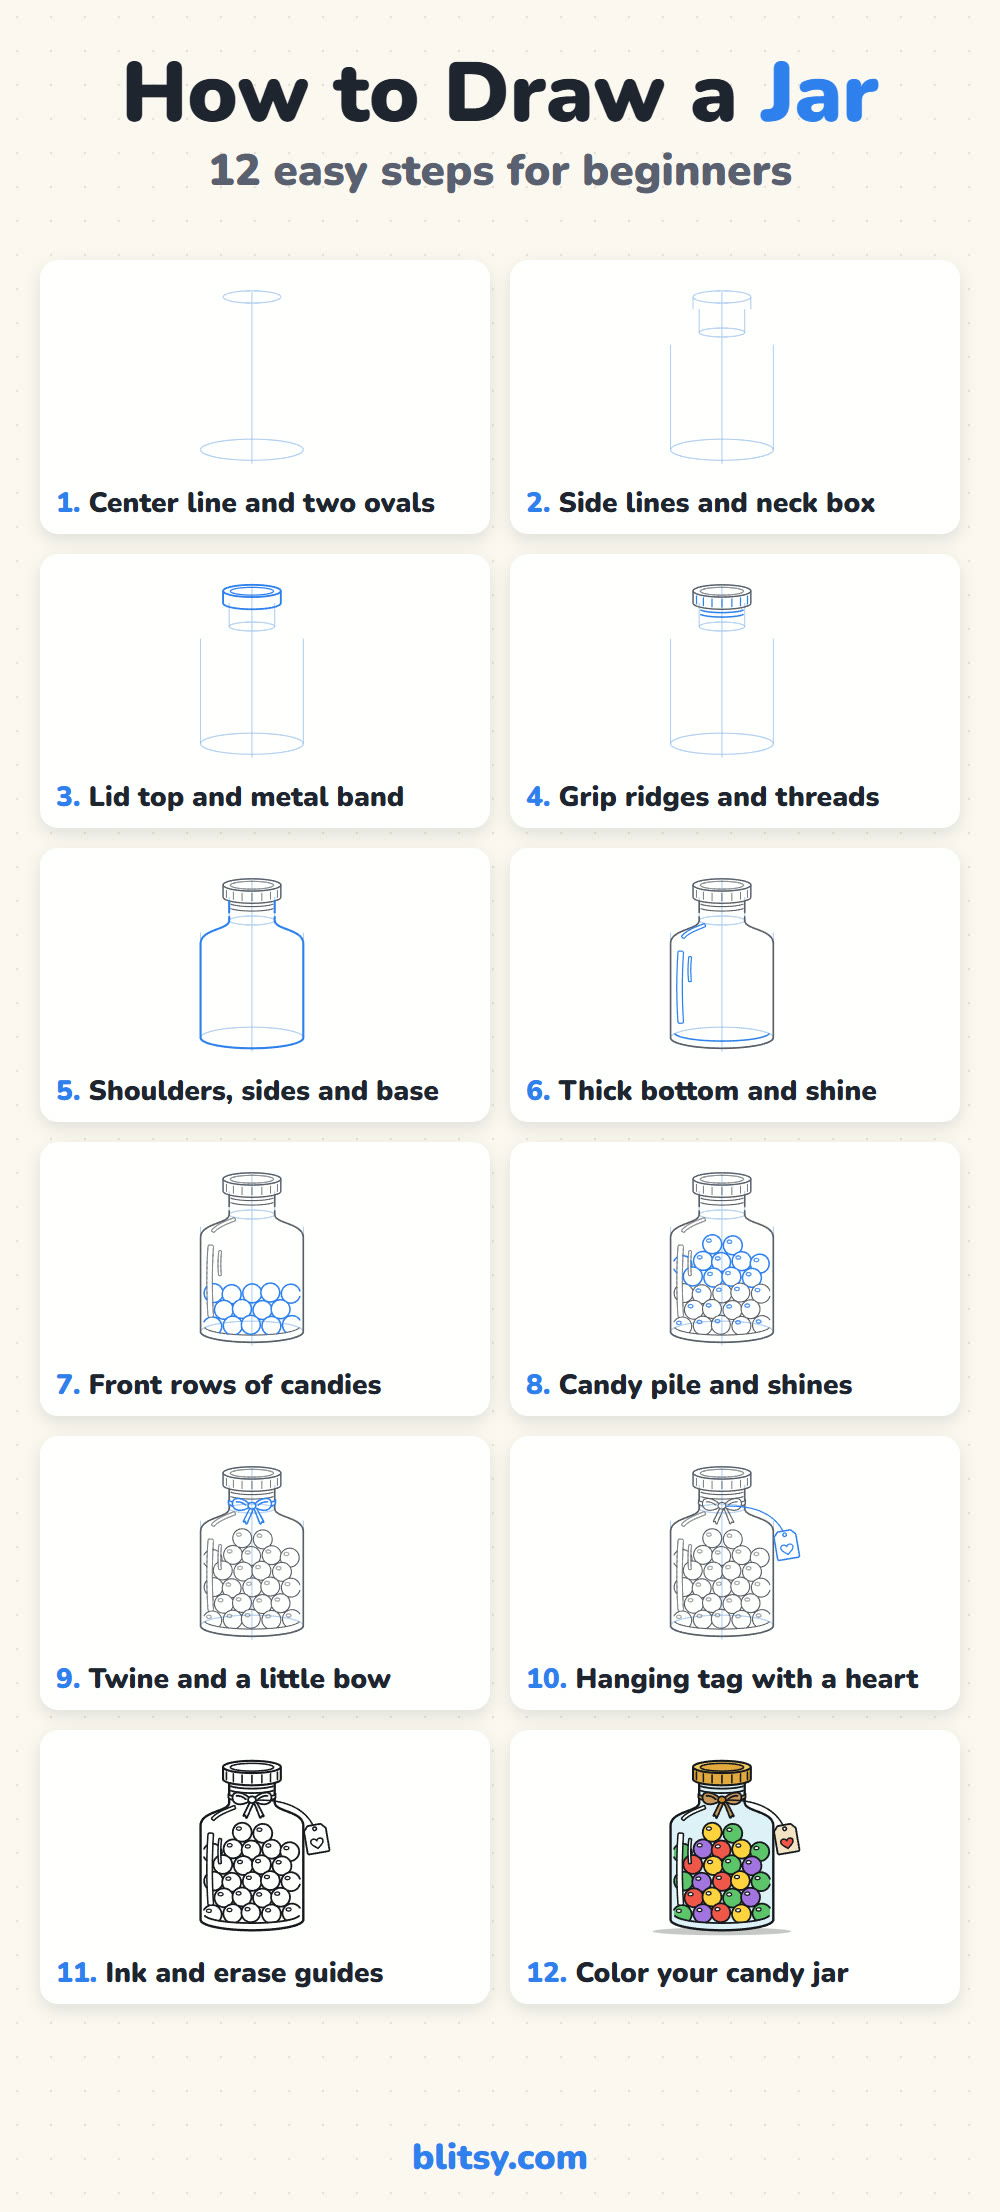
Pin the Candy Jar Steps
More Things to Draw Next to Your Jar
Each of these is a full step-by-step tutorial with a picture for every stage, so the same light-guide method carries over.
- Light Bulb Drawing: An old-style glowing bulb with a curly filament and a ridged screw base in this light bulb drawing tutorial.
- Strawberry Drawing: A plump berry with a leafy cap, seeds and a cut half in this how to draw a strawberry step by step lesson.
- Butterfly Drawing: A big orange butterfly with black veins, drawn with the mirror trick, in this butterfly drawing tutorial.
- Cupcake Drawing: A kawaii cupcake with a frosting swirl and a cherry in this cupcake drawing step by step guide.
- Heart Drawing: Turn the little tag heart into a glossy one with this how to draw a heart tutorial.
Jar Drawing Questions from Beginners
What is the easiest way to draw a jar?
Start with a center line and two ovals, a small one for the lid and a wide one for the base. Connect them with straight sides, round the shoulders, and the jar shape is done.
How do you draw an ellipse for the top of a jar?
Think of a circle squashed from top to bottom. Draw it lightly in one loop with your whole arm, keep both ends round, and make sure the top and bottom halves match.
How do you make a drawing look like glass?
Leave white stripes for reflections on one side, keep the glass color very pale, and let the things inside show through clearly. A second line at the bottom shows the thick glass base.
How long does it take to draw a mason jar?
About 30 to 40 minutes with coloring. The candies take the longest, so smaller kids can draw fewer and bigger ones.
Two ovals, a few straight lines and a handful of circles: that's your jar. Fill yours with whatever you like best. 🍬✏️
Related posts:
 How to Draw a Car Step by Step (Easy Drawing for Beginners)
 How to Draw a Whale Step by Step (Easy for Beginners)
 How to Draw an Arctic Fox Step by Step (Easy for Beginners)
 How to Draw a Chicken Step by Step (Easy for Beginners)
 How to Draw a Snowman Step by Step (Easy for Beginners)
 How to Draw an Airplane Step by Step (Easy Jet for Beginners)
 How to Draw a Mouse Step by Step (Easy for Beginners)
 How to Draw a T-Rex Step by Step (Easy for Beginners)
 How to Draw a Pig Step by Step (Easy for Beginners)
 How to Draw a Minion Step by Step (Easy for Beginners)
 How to Draw a Yorkie Step by Step (Easy for Beginners)
 How to Draw a Notebook Step by Step (Easy for Beginners)

