
A green bamboo tube across the mouth and long black hair that glows orange at the ends: put those two things on a cartoon girl and Demon Slayer fans know exactly who she is. Below you'll find how to draw Nezuko step by step in a chibi style, which means a big round head, a tiny body and huge eyes. This is my own simple fan-art version for practice, so it doesn't need to match the show line for line.
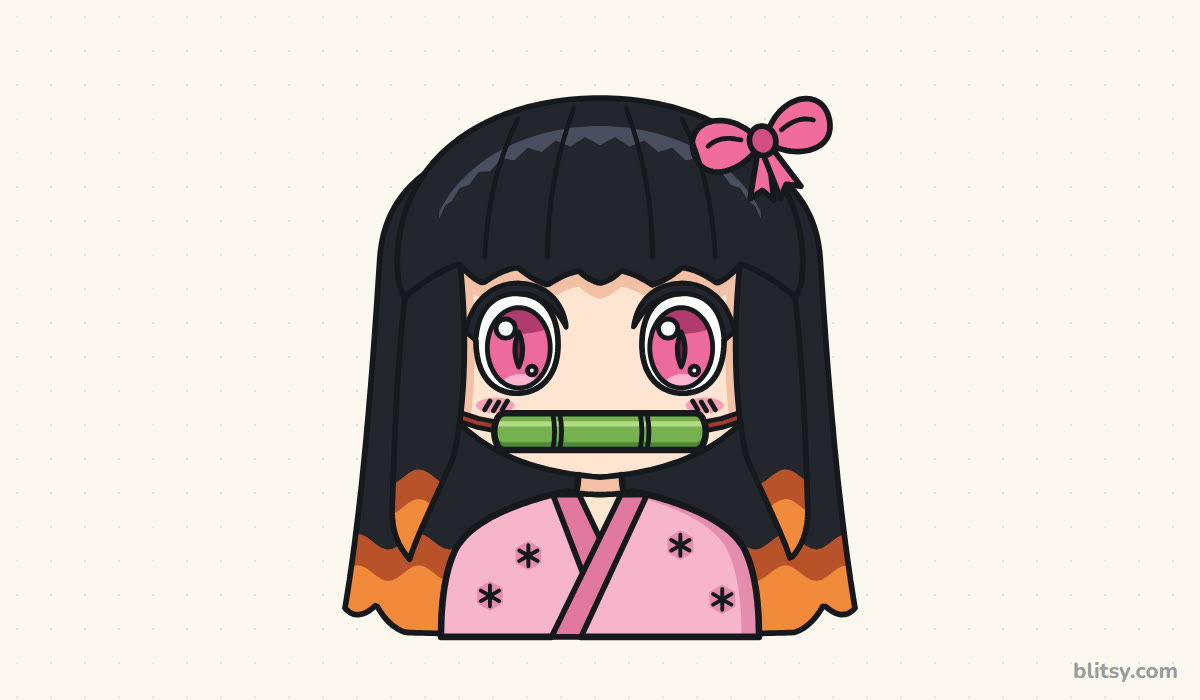
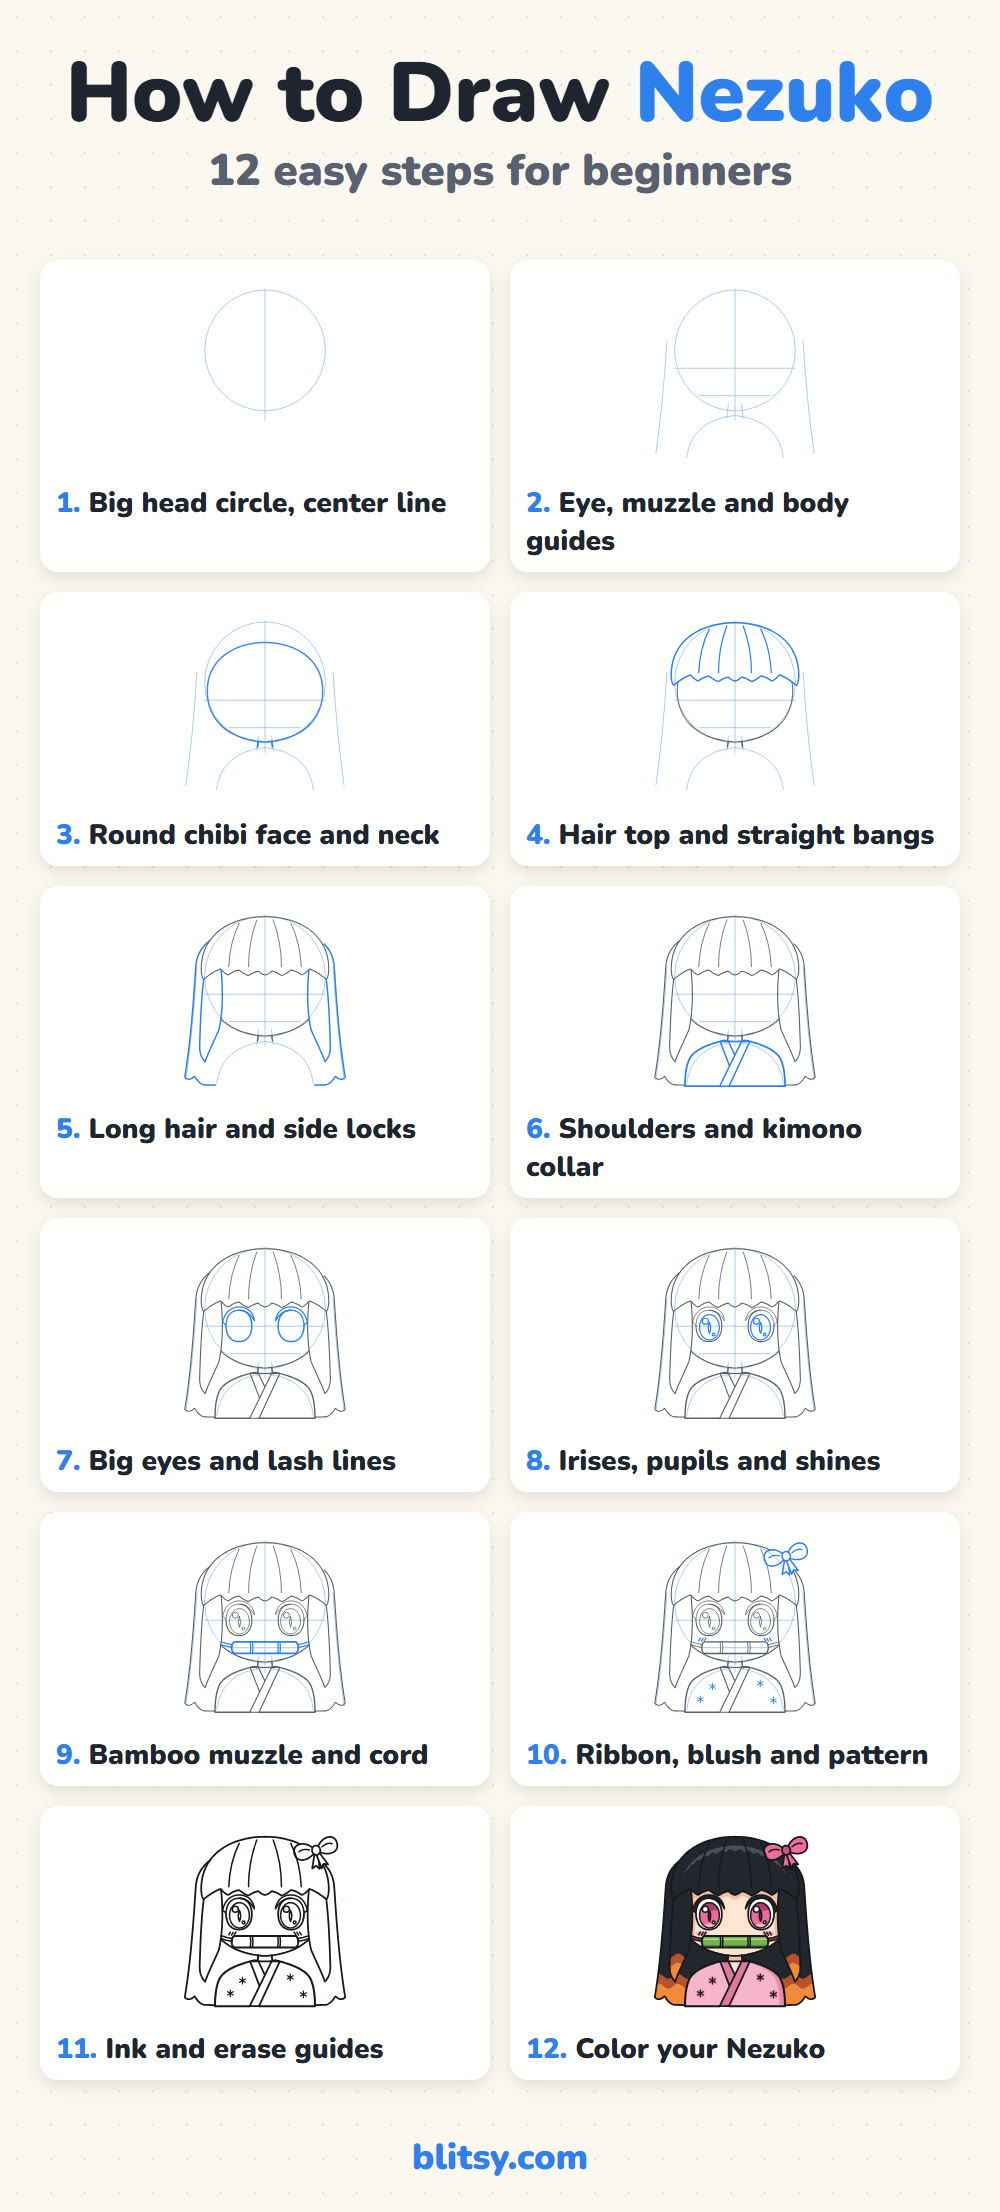
Blue ink in these pictures marks whatever is new in that step. Gray lines were drawn before. The thin light blue shapes are helpers, and you'll rub them out in step 11.
Quick overview
⏱️ Time: about 35 minutes with coloring
🎯 Level: easy, good for ages 7 and up
✏️ Steps: 12
🎀 You'll draw: a chibi Nezuko from the shoulders up, wearing her muzzle and a pink ribbon
Pencils and Pens for a Chibi Demon Slayer Sketch
- A pencil you can press softly, like an HB
- A clean eraser
- A black fineliner or thin marker for inking
- Coloring tools in black, orange, two pinks and green, plus a skin tone
- A dark orange or brown if you want the hair to fade more smoothly
- A sheet of plain paper
Felt-tip markers make the black hair quick to fill, and colored pencils are easier for the orange fade.
How to Draw Nezuko Step by Step
Step 1: Draw a big head circle and a center line
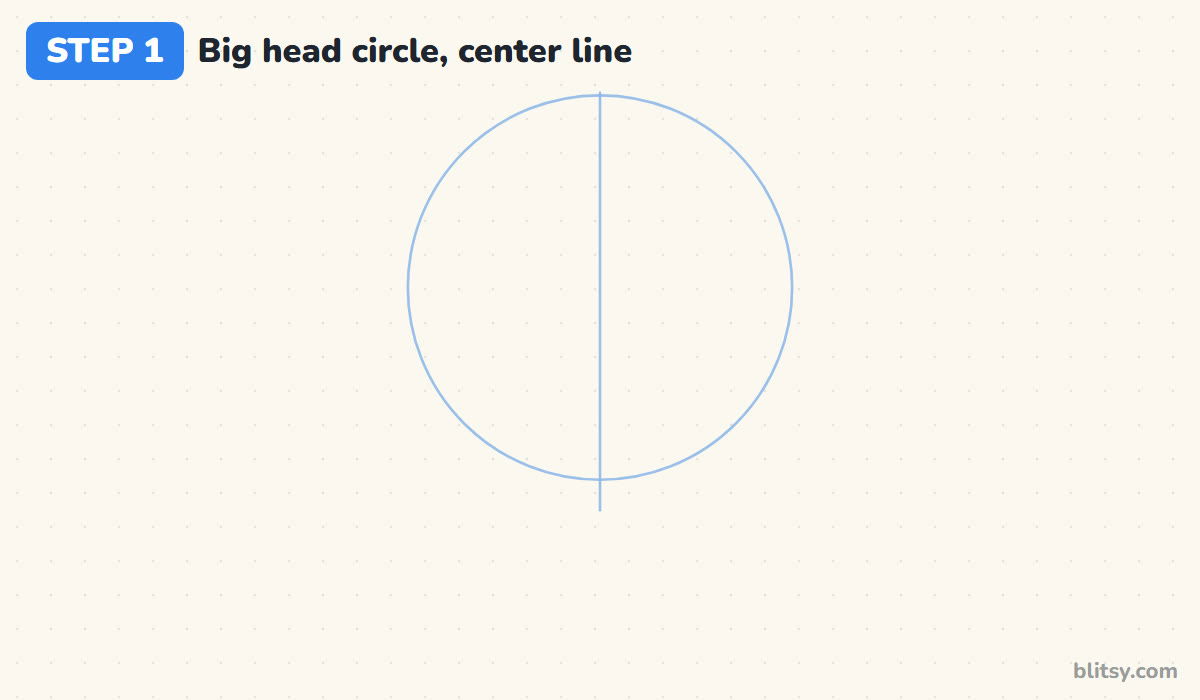
Chibi characters are mostly head, so this circle should be large and sit in the upper half of the paper. I make it take up about two thirds of the drawing's height. Then draw a straight line down through the middle and a little past the bottom of the circle.
💡 Tip: Press so lightly that you can barely see the circle. You'll erase it later.
Step 2: Add the eye, muzzle and body guides
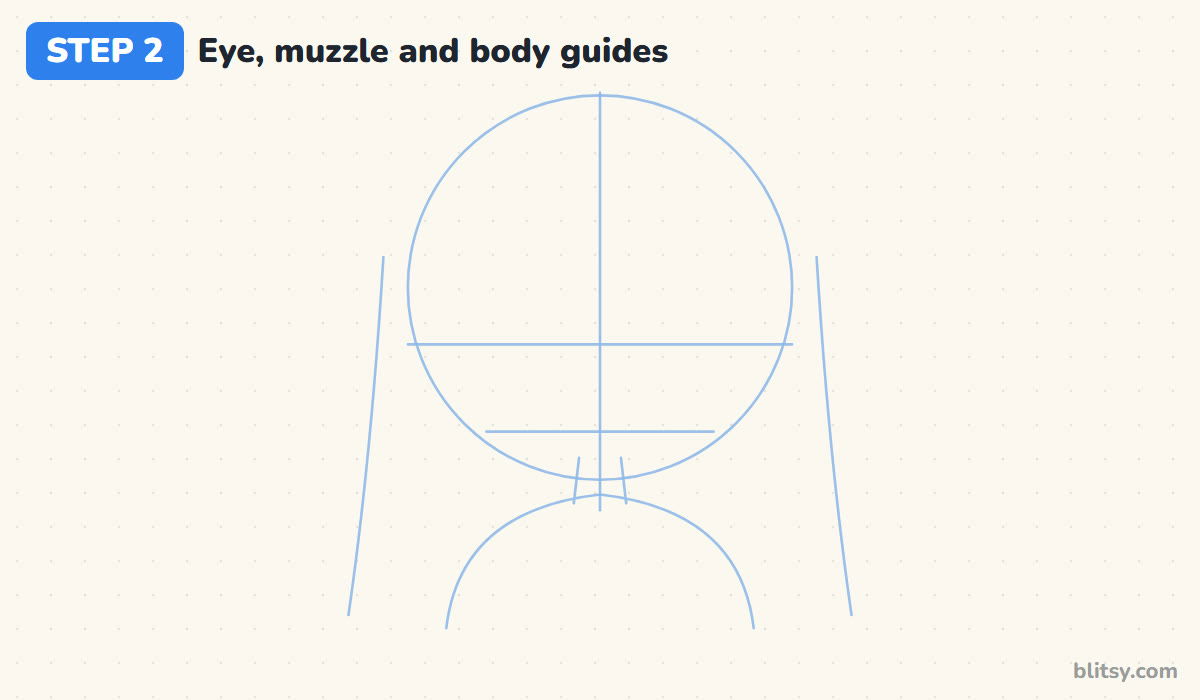
Draw a level line across the circle a bit below its middle; the eyes sit on it. Lower down, add a shorter line for the bamboo muzzle. Under the circle, sketch two short neck lines and a small rounded hump for the shoulders. Two long, slightly slanted lines on each side show how far the hair will fall.
💡 Tip: Keep the shoulder hump narrow. A small body is what makes a drawing look chibi.
Step 3: Shape the round chibi face and the neck
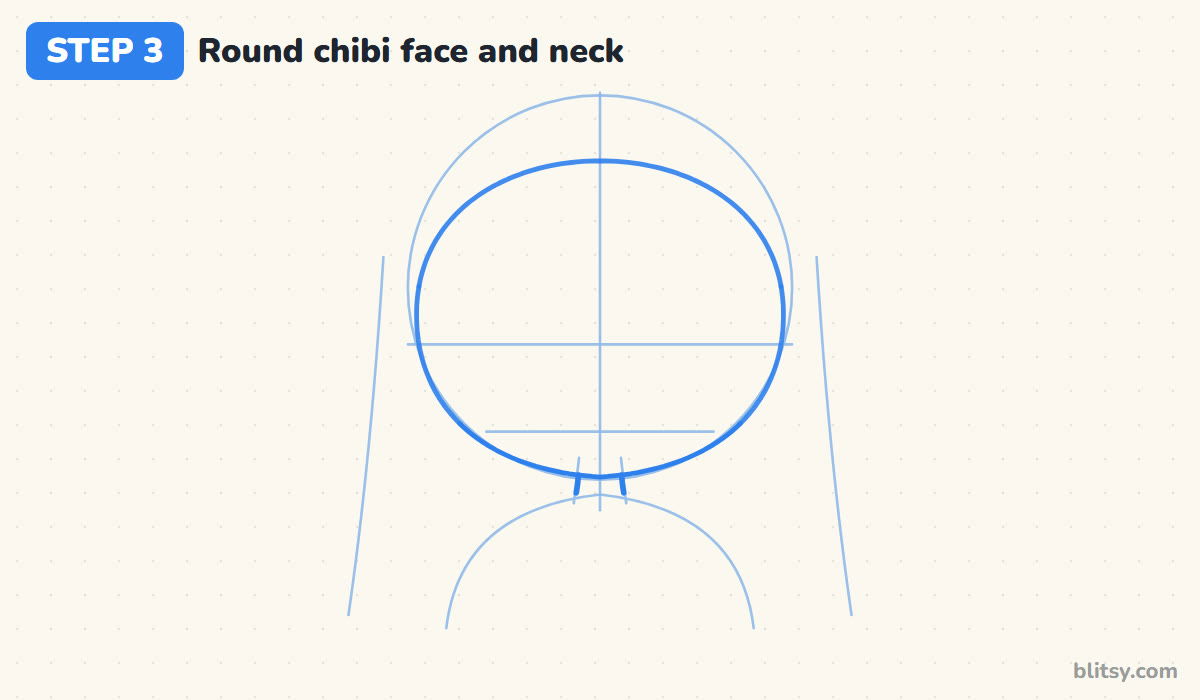
Inside the circle, draw a wide oval face with full, soft cheeks and a rounded chin that sits near the bottom of the circle. There's no pointed jaw here; chubby cheeks read as cute. Join the two short neck lines under the chin.
💡 Tip: If the face looks long, push the cheeks out sideways instead of moving the chin.
Step 4: Draw the hair top and straight bangs
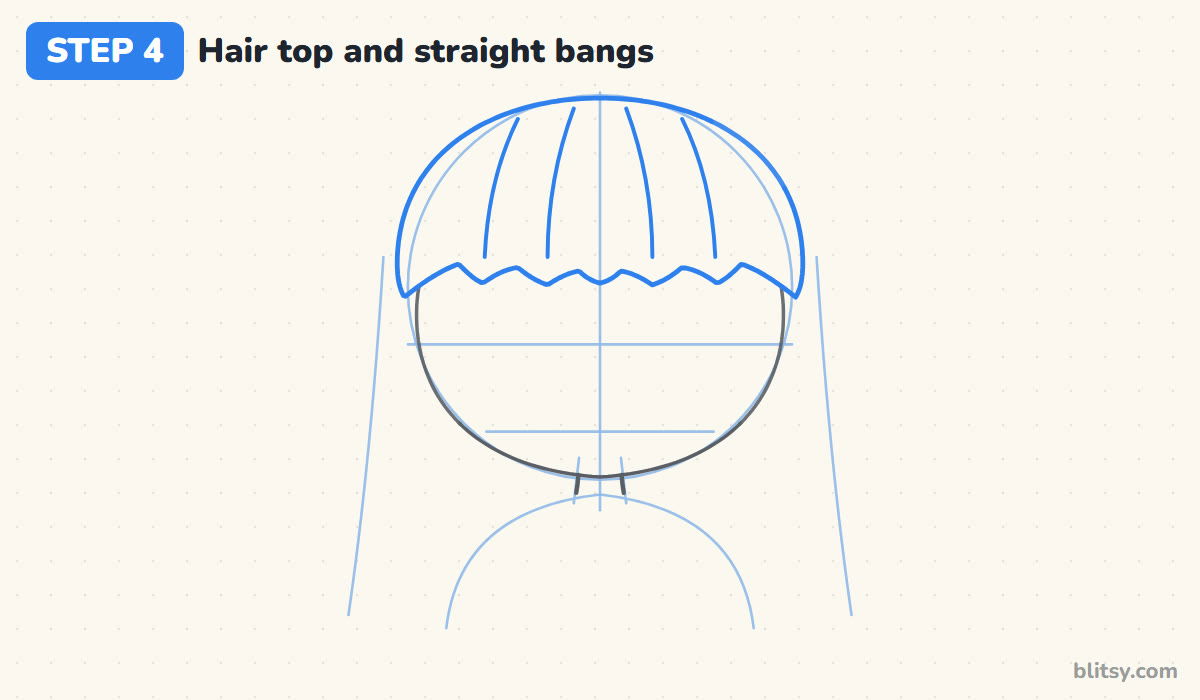
Go around the top of the circle with a dome for the hair, a little outside the face on both sides. Nezuko's bangs are cut straight, so draw the lower edge almost level, just above the eye line, with small dips that split it into sections. Add four long strand lines from the top down to the bangs. Erase the face line that now sits under the hair.
💡 Tip: Keep the dips in the bangs shallow; deep points make her look like a different character.
Step 5: Add the long hair and the side locks
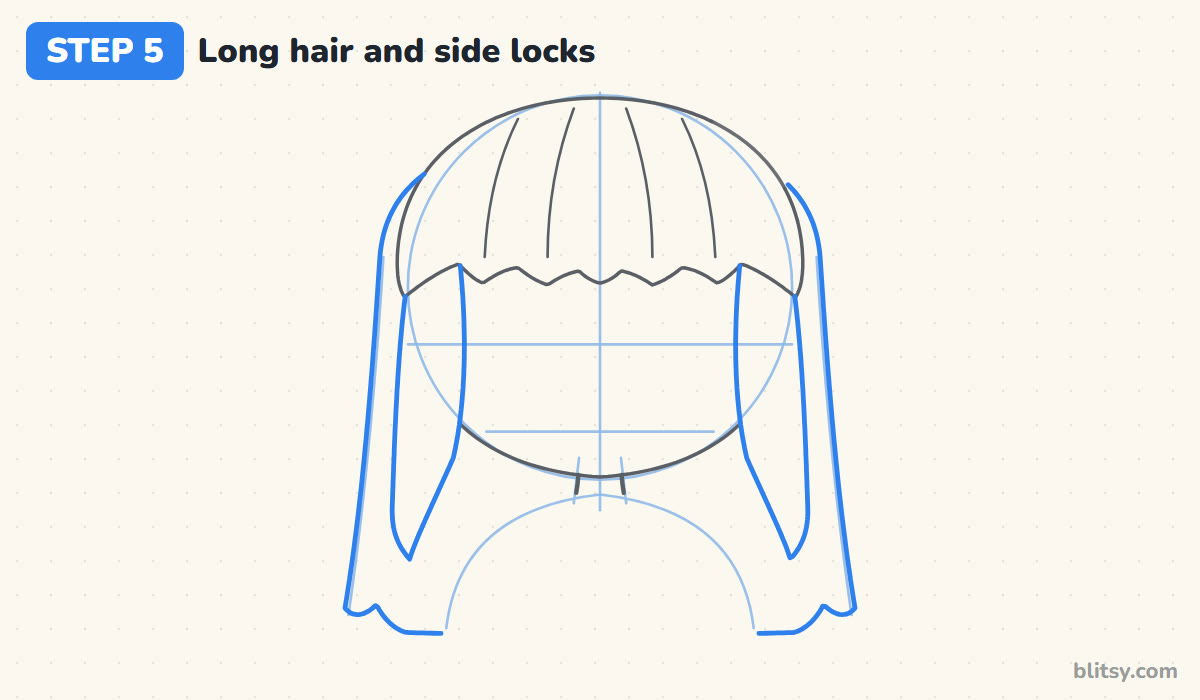
Follow the long guide lines down on each side for the back hair and finish them with soft, wavy ends near the bottom of the page. Then draw a narrow lock in front of each cheek, starting under the bangs and ending in a point near the shoulder. Erase the bits of face outline the locks cover.
💡 Tip: Let the locks touch the cheeks but stop before the eyes, or the face will feel crowded.
Step 6: Draw the shoulders and the kimono collar
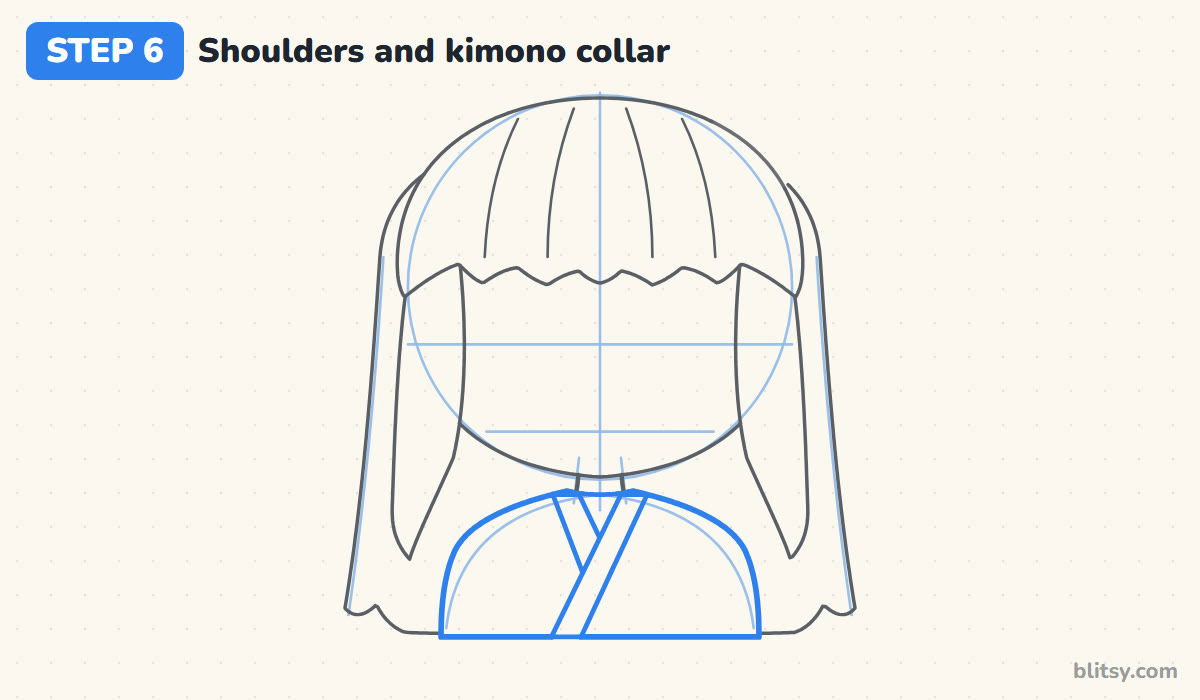
Round off the small shoulders and close them with a flat line at the bottom. For the collar, picture a lowercase y. One band runs from the neck down toward the crossing point, and the other crosses over it from the opposite side and keeps going to the bottom edge. A little V of skin stays open above the crossing.
💡 Tip: Draw each collar band as two parallel lines; that's what makes it look like fabric.
Step 7: Draw the big eyes and lash lines
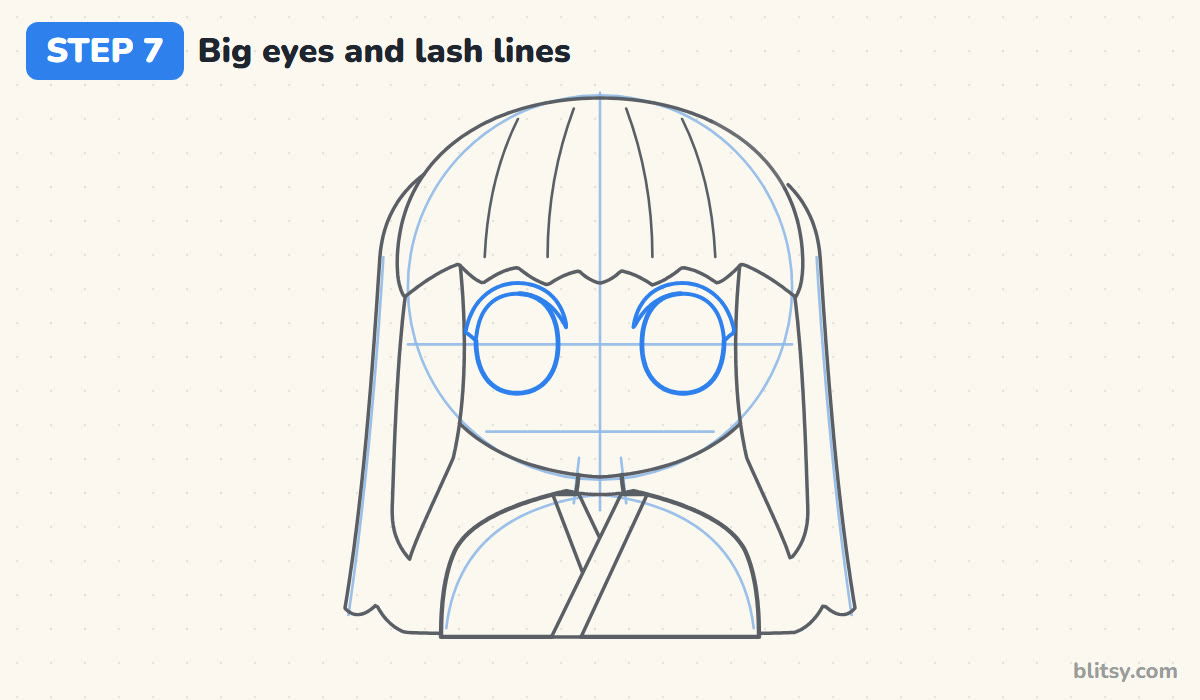
Sit two tall rounded eyes on the eye line, close to the bangs. In chibi style the eyes are really large; each one here is nearly as wide as the gap between them. Over the top of each eye, draw a thick curved lash line that sticks out a little at the outer corner.

💡 Tip: Draw one eye, then check the other against it before going further.
Step 8: Add the irises, pupils and shines
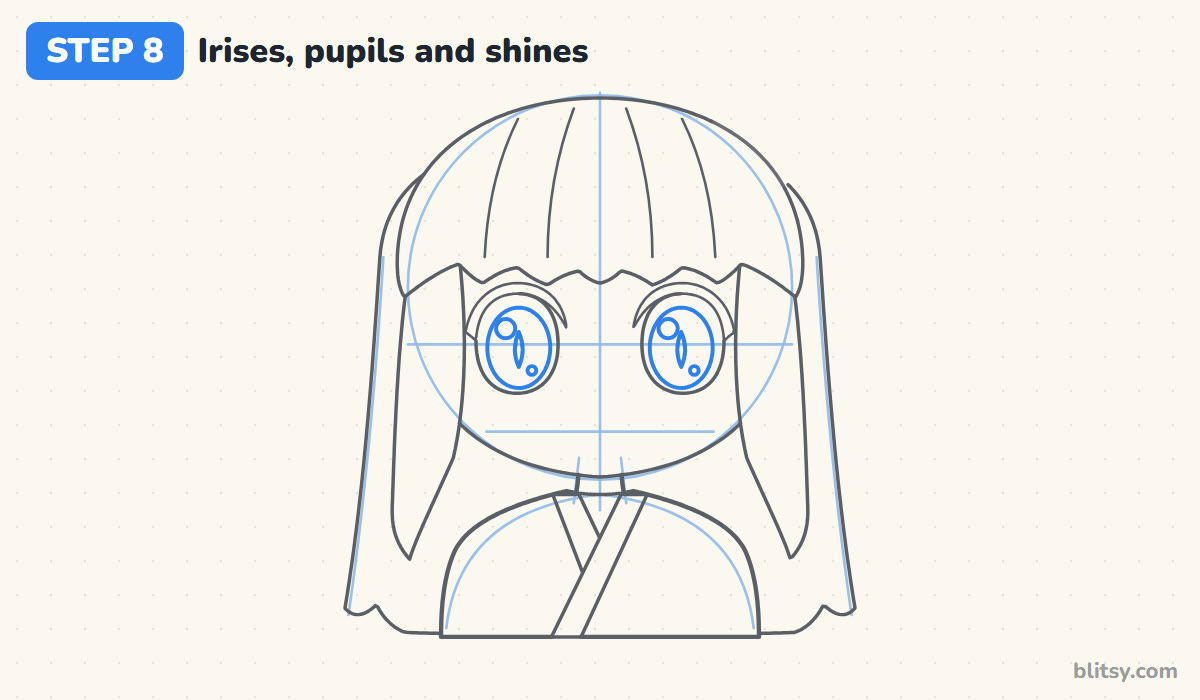
Fill most of each eye with a big oval iris. In the middle, draw a thin pointed pupil, a bit like a cat's, which gives her that demon look without being scary. Leave a large shine circle at the top left of each iris and a tiny one near the bottom right.
💡 Tip: Put the shines on the same side in both eyes so she seems to look straight at you.
Step 9: Draw the bamboo muzzle and the cord
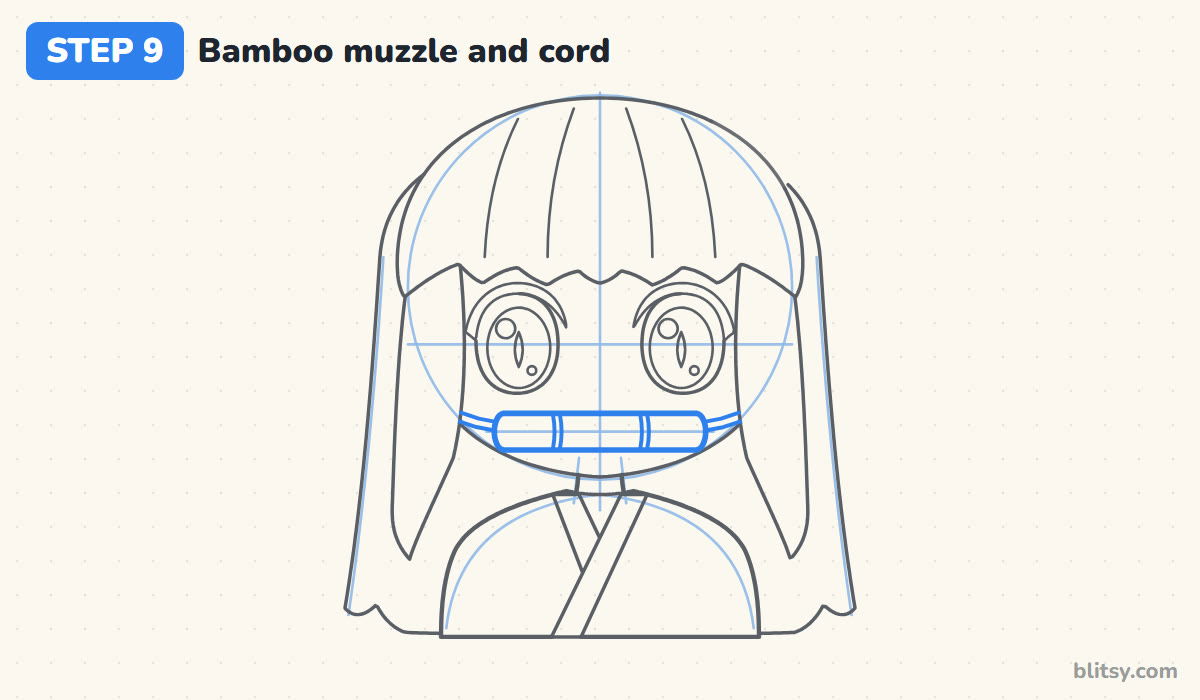
This is the part that makes the drawing say Nezuko. On the muzzle guide, draw a long capsule shape, a rectangle with round ends, wider than the space between her eyes. Add two pairs of short curved lines across it for the bamboo joints. From each end, run a thin band back to the side of the face, where it disappears under the hair.
💡 Tip: Keep the tube straight and level. A tilted muzzle makes the whole face look lopsided.
Step 10: Add the ribbon, the blush and the kimono pattern
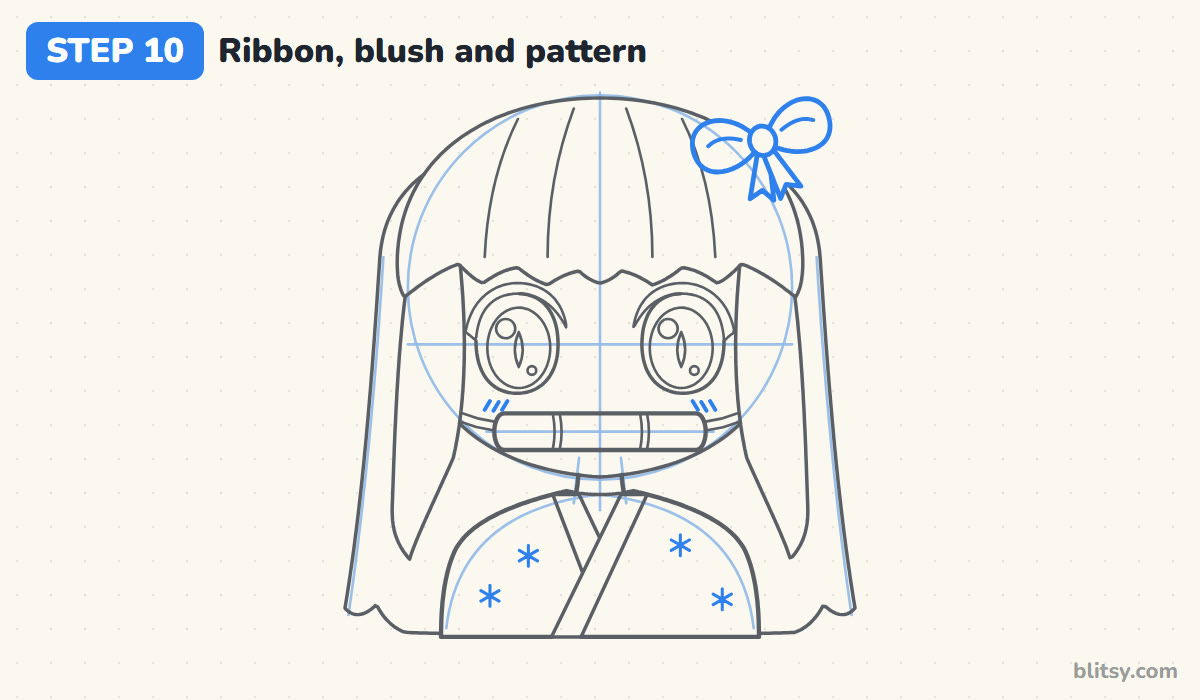
Near the top right of her hair, draw a small bow with two loops around a round knot, plus two short tails. I tilt it slightly so it looks pinned on rather than glued flat. Put three tiny slanted lines on each cheek above the muzzle for blush. On the kimono, draw a few small six-line stars as a hint of the hemp-leaf pattern.
💡 Tip: Four or five little stars are enough; the pattern should whisper, not shout.
Step 11: Ink the lines and erase the guides
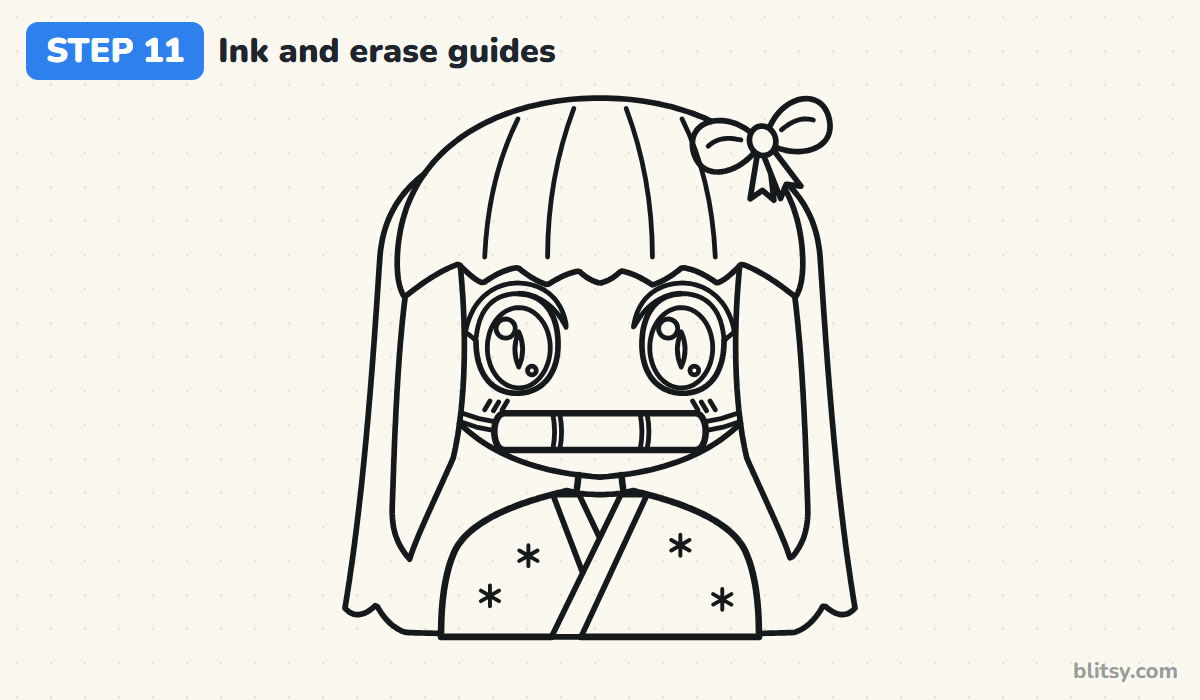
Trace all the keeper lines with your pen. The eyes are the trickiest part, so I ink them while my hand is fresh and leave the long hair for last. Skip the guide circle and the helper lines. Once the ink is fully dry, erase every bit of pencil.
💡 Tip: Give the ink a full minute before erasing, or the black will smear across the face.
Step 12: Color your Nezuko
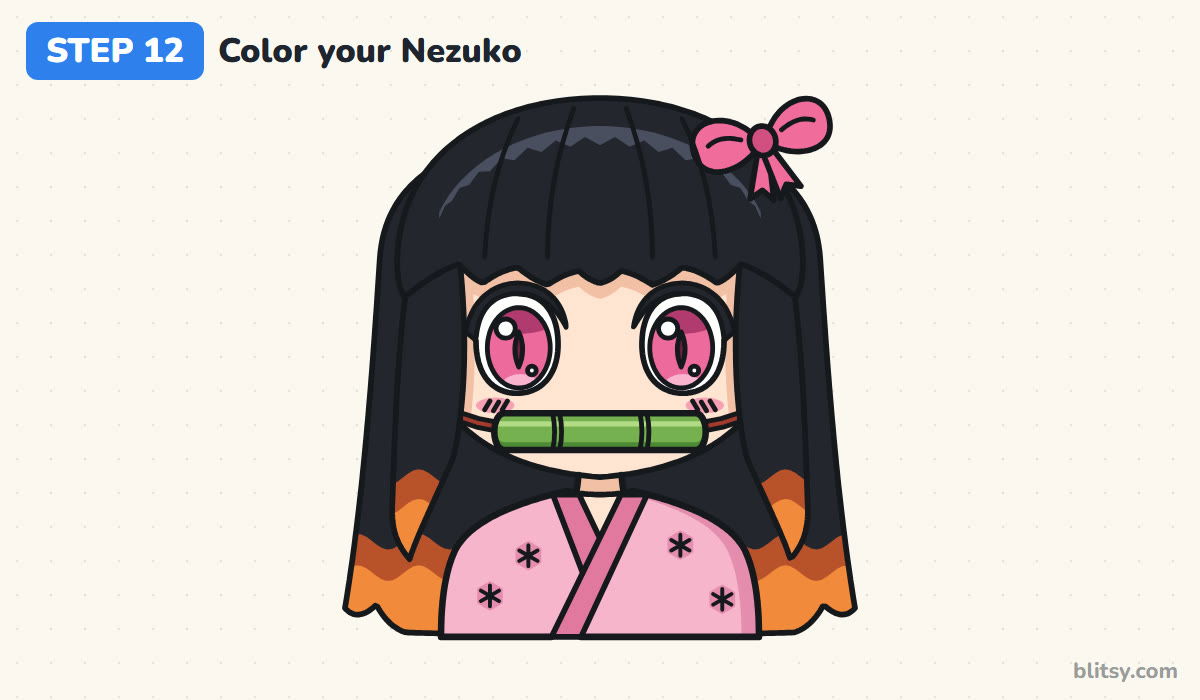
Fill the hair black, leaving a lighter gray wave on the top as shine. Near the ends, switch to dark orange and then bright orange so the hair seems to fade. The eyes are pink, darker at the top and lighter at the bottom. Color the muzzle green with a darker strip underneath, the cord dark red, the ribbon pink and the kimono light pink with a darker pink collar.
💡 Tip: Color the orange tips before the black, so you don't drag dark color into the light part.
Where a Chibi Nezuko Starts Looking Like Someone Else
- A grown-up sized body. Wide shoulders turn chibi into a normal portrait. Keep the body narrower than the head.
- A tiny muzzle. If the bamboo is shorter than the gap between the eyes, it looks like a toothpick. Stretch it almost cheek to cheek.
- Spiky bangs. Her bangs are cut straight across. Keep the bottom edge level with only small dips.
- All-black hair. Without the orange ends she could be any dark-haired girl. Save room at the bottom of the hair for the fade.
- Small eyes. Chibi eyes need to be huge. If yours look sleepy, make them taller before you ink.
Changing Nezuko's Look Once You Know the Shapes
When this version comes out easily, try giving her closed, happy eyes drawn as two upside-down U shapes, or turn the head a little to one side. You could also add her dark brown haori over the kimono, or draw her small, the way she sometimes rides in a wooden box. Younger kids can skip the kimono pattern and the cord. Her brother is waiting in the Demon Slayer drawing tutorial, which draws Tanjiro in his checkered haori, and the easy chibi drawing tutorial is good practice for the big-head style.
Free Nezuko Coloring Page and a Printable Step Sheet
The Nezuko coloring page has the clean outline plus a small colored example with a color key beside it. The step-by-step guide PDF holds all 12 steps with tips, sized for Letter or A4 paper.
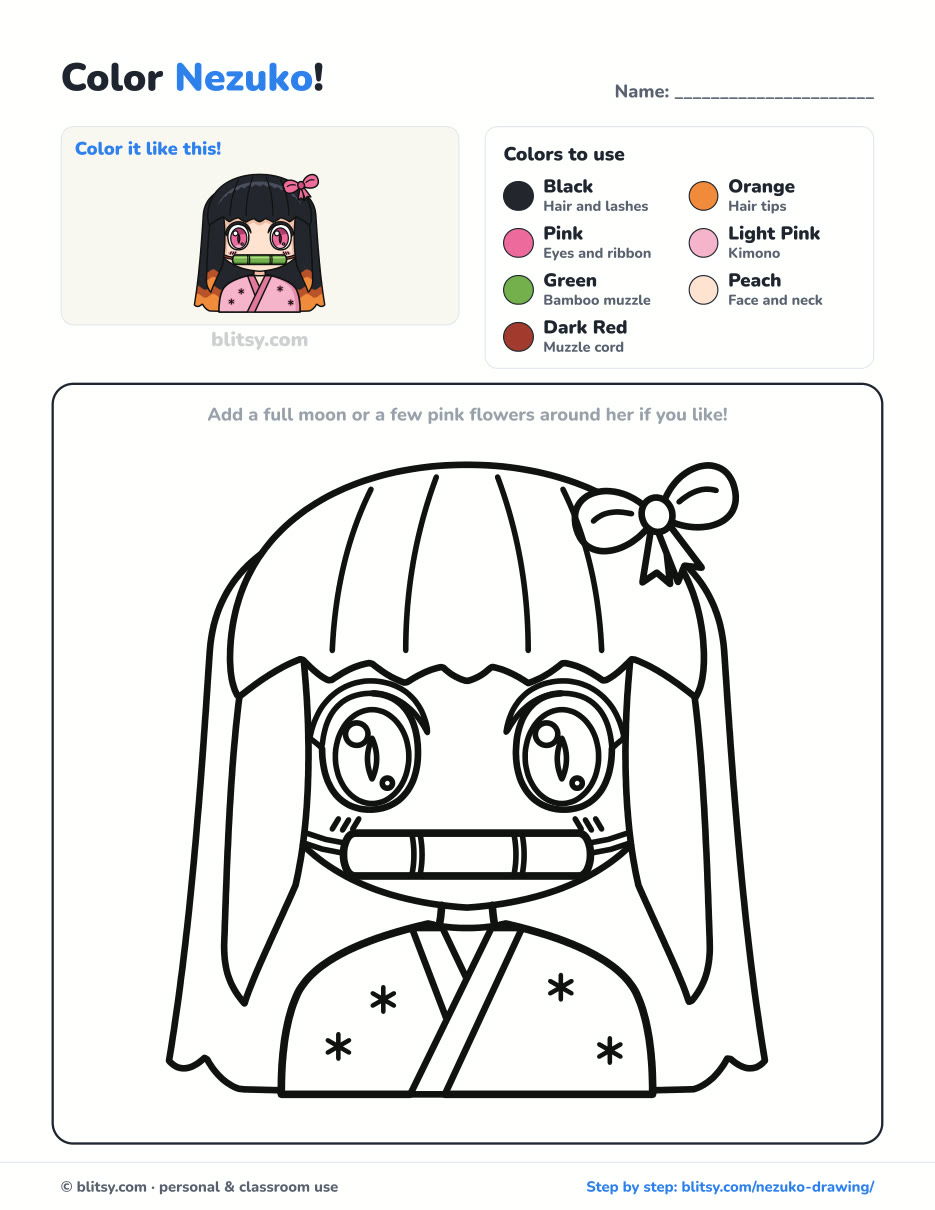
Black outlines with a colored example and the color names at the top. Ready to print and color.
⬇️ Download Coloring PageEvery step picture with its instructions and tips, to keep beside your paper while you draw.
⬇️ Download Drawing Guide📱 On a phone? Tap a download button, then open the file and choose Share → Save to Files or Print. On a computer, the PDF opens or saves straight to your Downloads folder.
Keep All Twelve Nezuko Steps on One Tall Pin
Characters and Heroes to Draw After Nezuko
Each one is a separate step-by-step tutorial, many of them in the same chibi style as this Nezuko.
- Chalk Art: Take a break from characters with the chalk art step by step lesson: hopscotch, a rainbow and a sun.
- Todoroki Drawing: Ice on one side, fire on the other: the Todoroki drawing tutorial keeps his face calm in between.
- Ariana Grande Drawing: Draw a chibi Ariana with her swinging ponytail in this Ariana Grande drawing tutorial.
- Phoenix Drawing: Wings up and tail blazing, the phoenix drawing tutorial takes eleven calm steps.
- Olaf Drawing: Learn how to draw Olaf with his arms up and a wide grin.
- Mario Drawing: The chibi Mario drawing tutorial starts from a light circle and ends with a waving glove.
- Princess Drawing: A lavender ball gown, crown and star wand come together in the princess drawing tutorial.
- Family Drawing: Four people, a puppy and a balloon share one page in this family portrait drawing tutorial.
- Rosa Parks Drawing: The Rosa Parks drawing tutorial is a gentle portrait with glasses, a white collar and a brooch.
- Wonder Woman Drawing: Draw a chibi Wonder Woman with tiara and lasso using the Wonder Woman drawing step by step lesson.
- Fortnite Drawing: This Fortnite llama drawing tutorial builds the pinata llama on four stubby legs.
- Raccoon Drawing: A masked raccoon with its tail up takes 12 steps in the raccoon drawing tutorial.
- Anime Girl Drawing: Follow the anime girl drawing tutorial for pink bangs, purple eyes and a sailor collar.
- Luffy Drawing: The how to draw Luffy guide ends with his straw hat, scar and huge grin.
- Hulk Drawing: Draw a chibi Hulk with both fists up in this Hulk drawing tutorial.
Nezuko Drawing Questions I Hear Most
What is the easiest way to draw Nezuko?
Draw her as a chibi. Start with a big circle for the head and straight bangs. Large eyes plus a green bamboo tube across the mouth are enough for people to recognize her.
How do you draw Nezuko's bamboo muzzle?
Draw a long rectangle with rounded ends across the lower face, add two pairs of curved lines for the joints, and run a thin cord from each end back under the hair.
What colors do I need for Nezuko?
You need black and orange for the hair, pink for the eyes and ribbon, and light pink for the kimono. Add green for the bamboo plus a skin tone. A dark red for the cord is a nice extra.
Is this Nezuko drawing good for kids?
Yes. Kids around seven and up can follow it, and younger ones can leave out the pattern and blush lines. It takes about 35 minutes with coloring.
Your Nezuko doesn't have to be perfect on the first try; that big soft circle is the only thing you need to begin. Have fun with it! 🎀✏️
Related posts:
 How to Draw the Joker Step by Step (Easy Chibi for Beginners)
 How to Draw Miraculous Ladybug Step by Step (Cute Chibi)
 How to Draw Springtrap Step by Step (Cute Chibi for Kids)
 How to Draw Freddy Krueger Step by Step (Cute Chibi Version)
 How to Draw Ariana Grande Step by Step (Cute Chibi Fan Art)
 How to Draw Wonder Woman Step by Step (Chibi for Kids)
 How to Draw the Hulk Step by Step (Easy Chibi for Kids)
 How to Draw Kurama Step by Step (Easy Chibi Nine-Tails)
 How to Draw Cat Noir Step by Step (Easy Chibi Hero)
 How to Draw Master Chief Step by Step (Easy Chibi Armor)
 How to Draw Tinkerbell Step by Step (Easy Flying Chibi)
 How to Draw a Chibi Step by Step (Easy 2-Head Method)

