
Mittens are one of the friendliest things to draw on a cold day. The whole shape is a rounded pocket with a thumb stuck on the side, and once you see that, the rest is decoration. In this lesson I'll show you how to draw a mitten step by step, and since mittens come in pairs, we'll draw two of them overlapping, joined by a yarn string with a pom-pom at each end.

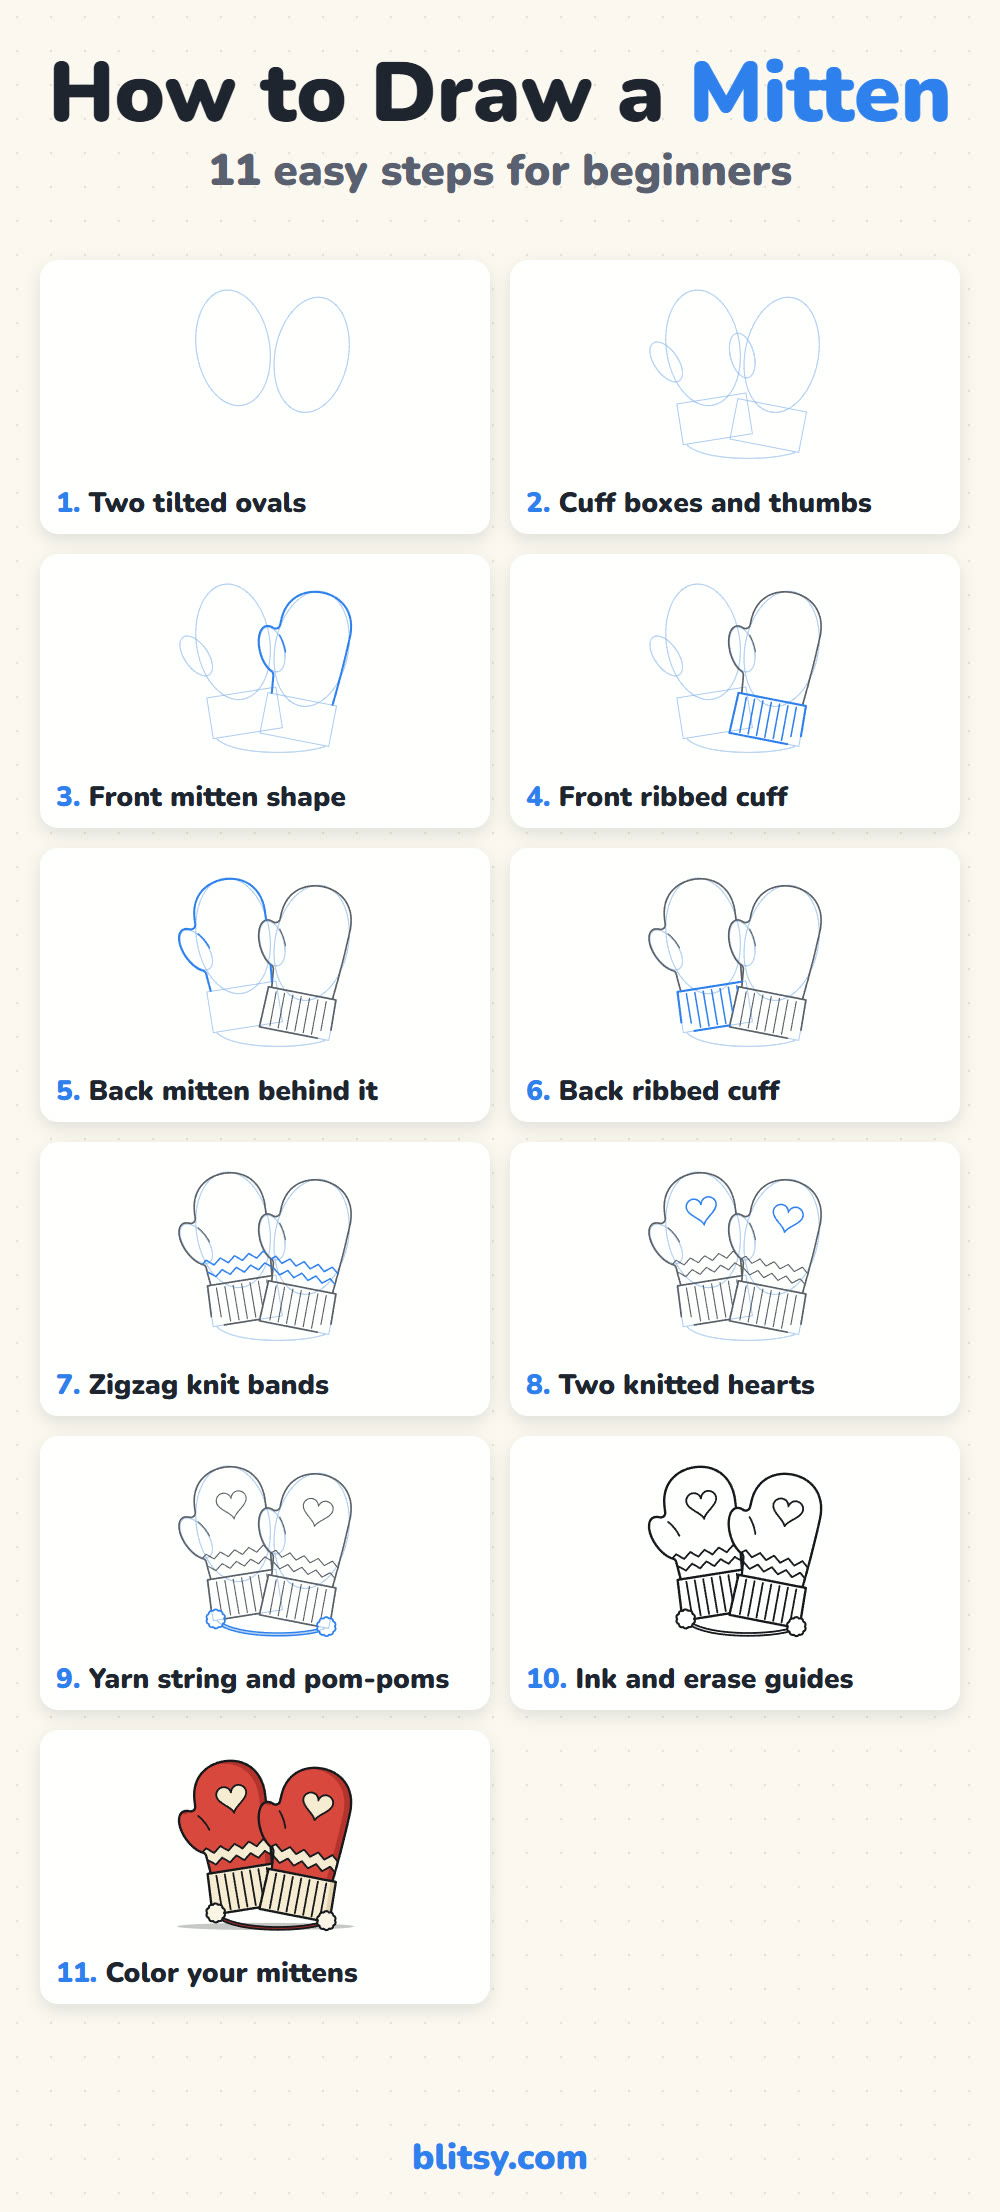
Think of every picture as one small job. Whatever is new in it shows up in blue, and the gray lines are your work from earlier, so copy only the blue part.
Quick overview
⏱️ Time: about 25 to 30 minutes with coloring
🎯 Level: easy, fine for kids from about 6 up
✏️ Steps: 11
🧤 You'll draw: a pair of knitted mittens on a yarn string
Yarn-Free Supplies for Drawing Mittens
- A pencil you can keep light (HB works well)
- An eraser that doesn't smudge
- A black marker or fineliner for the final outline
- Colored pencils, crayons or markers in red, dark red, cream and white
- Plain white paper, turned sideways
A ruler helps with the cuff boxes, but freehand cuffs look more hand-knitted anyway.
How to Draw a Mitten Step by Step
Step 1: Draw two tilted ovals
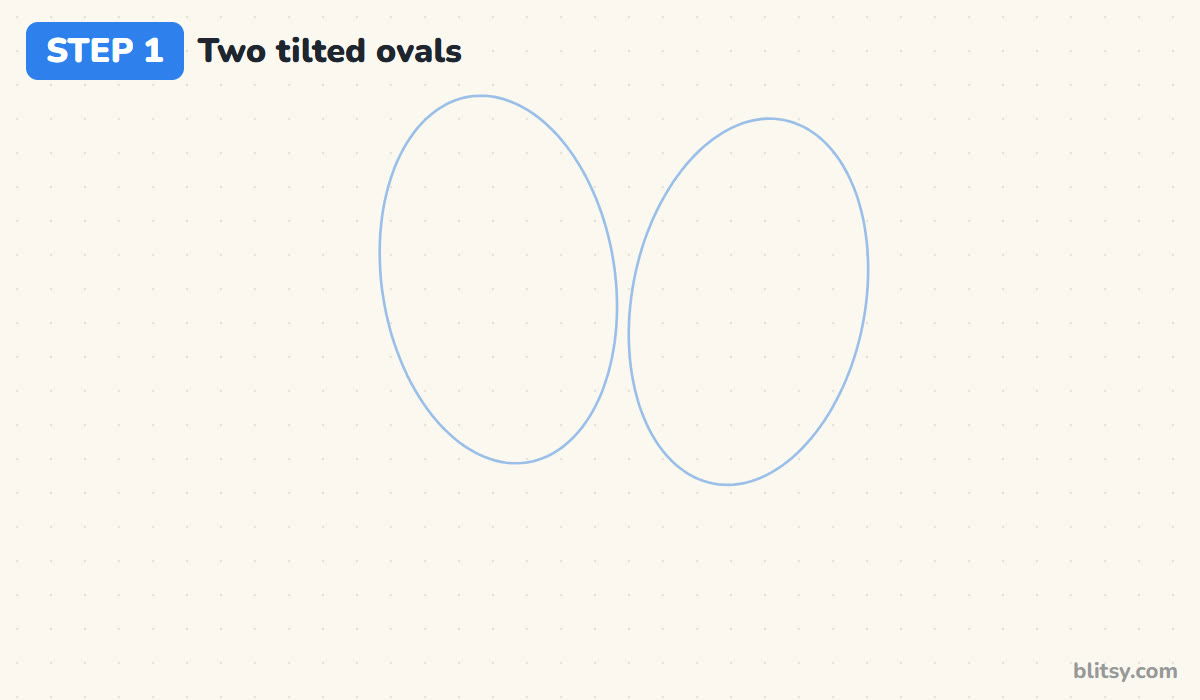
Sketch two tall ovals side by side, a little above the middle of the page. Tip the left one slightly to the left and the right one slightly to the right. The right oval sits a bit lower and its left edge just touches the first oval, because that mitten will end up in front.
💡 Tip: Make each oval about one and a half times as tall as it is wide. Rounder ovals turn into puffy oven gloves.
Step 2: Add cuff boxes, thumbs and a string line
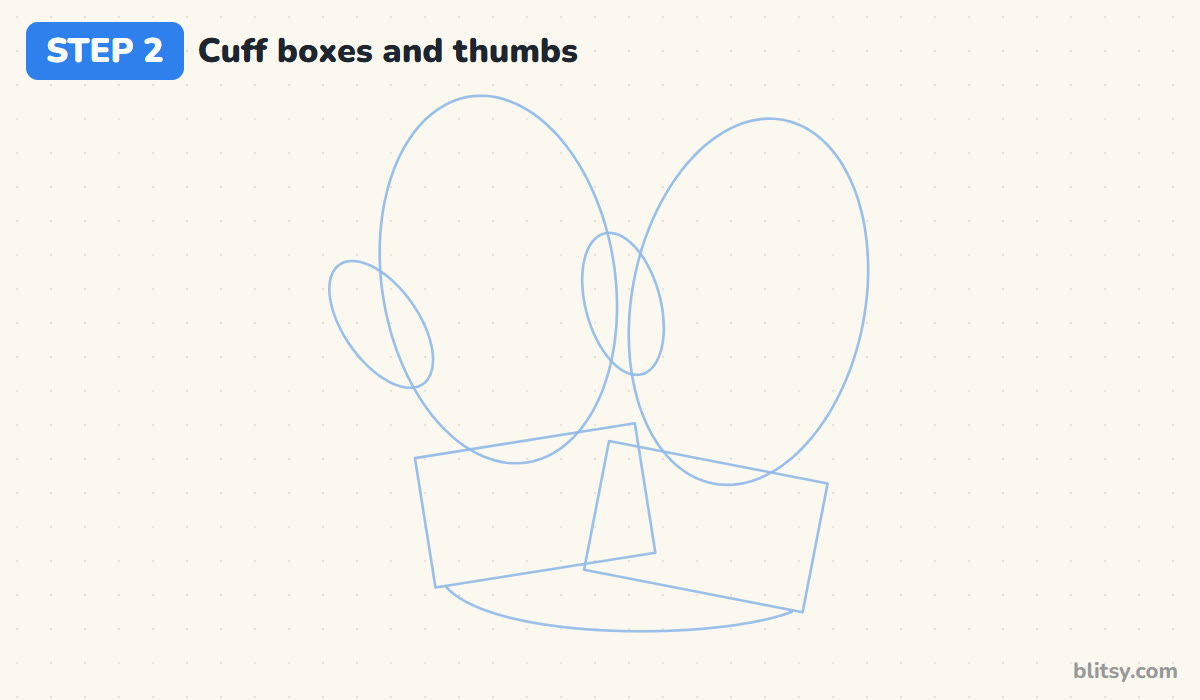
Under each oval, draw a short wide box for the cuff, tilted the same way as its oval. The box should be a little wider than the oval's bottom. Then add a small slanted oval for each thumb on the left side, about a third of the way up. Last, swing one curved line below both cuffs for the yarn string.
💡 Tip: Both thumbs point left here. That's what a real pair looks like when one mitten lies flipped over.
Step 3: Outline the front mitten
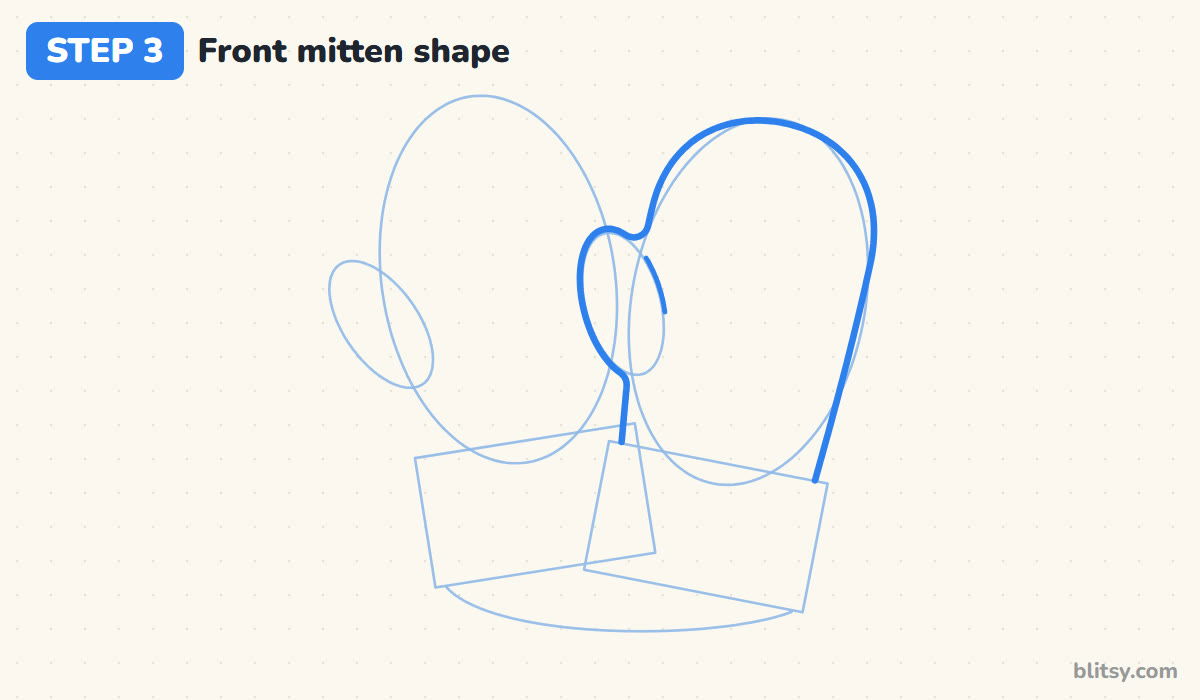
Start with the mitten on the right, since nothing covers it. Trace around the top of the oval, come down the right side to the cuff, then go back to the top and curve down into the thumb. Round the thumb's tip, dip back in toward the hand and finish at the cuff. A short curved seam line inside shows where the thumb joins.
💡 Tip: The dip between thumb and hand should be a soft curve, not a sharp V. Knitted yarn never makes sharp corners.




Step 4: Draw the front ribbed cuff
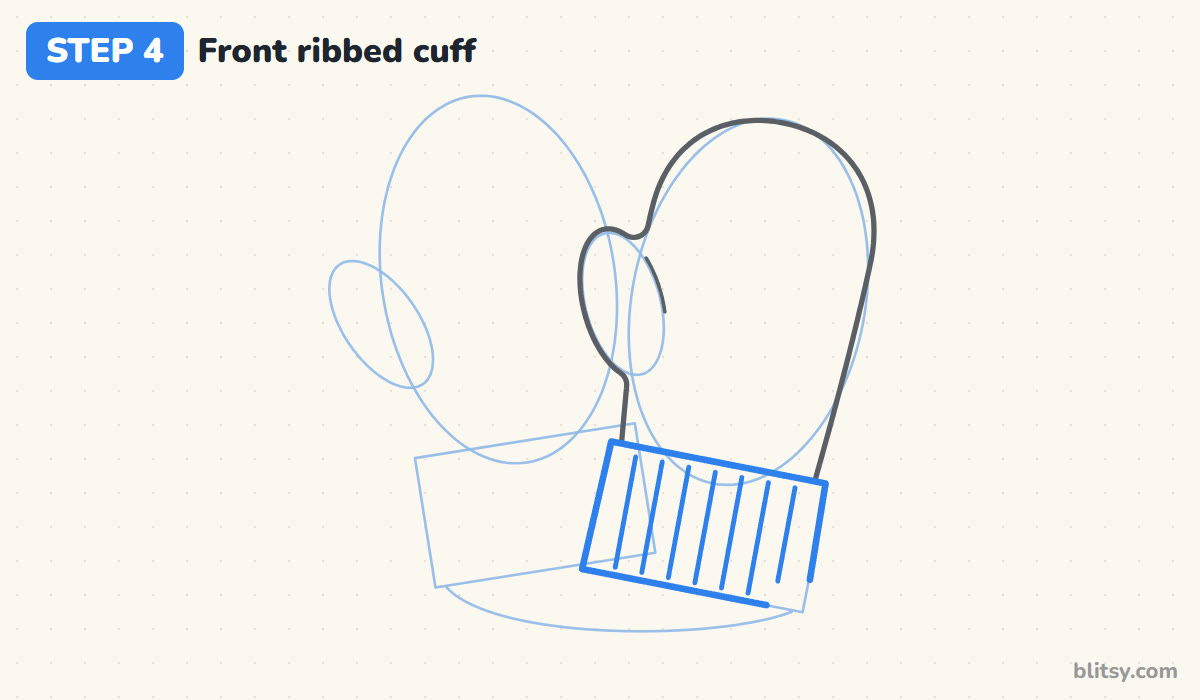
Firm up the cuff box with slightly rounded corners. Then fill it with straight lines running from the top edge to the bottom edge, evenly spaced. These are the ribs, the stretchy knit that keeps a mitten from slipping off.
💡 Tip: Draw the middle rib first, then the outer ones, and fill the gaps last. The spacing stays far more even.
Step 5: Draw the back mitten behind it
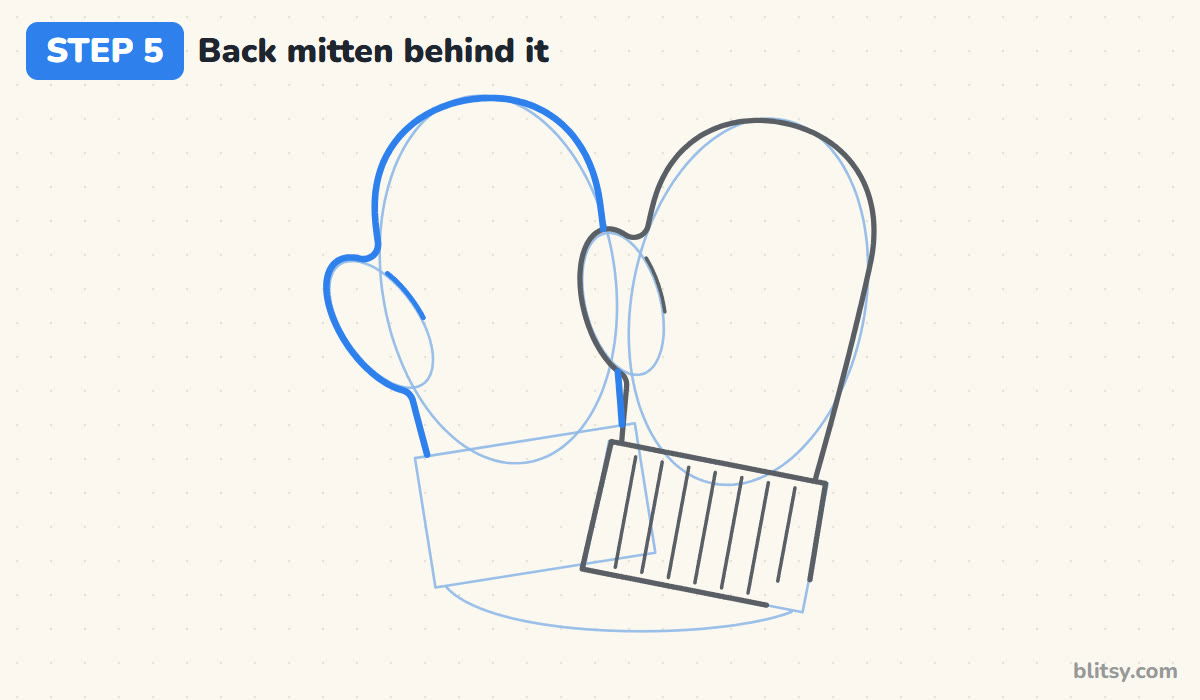
Now outline the left mitten the same way, but stop every line the moment it reaches the front mitten. That's the whole trick of overlapping: the back shape simply disappears behind the front one. Give it the same thumb and the same little seam.
💡 Tip: If you're unsure where to stop, lightly shade the front mitten with your pencil side first. Then just don't draw into the shaded area.
Step 6: Add the back ribbed cuff
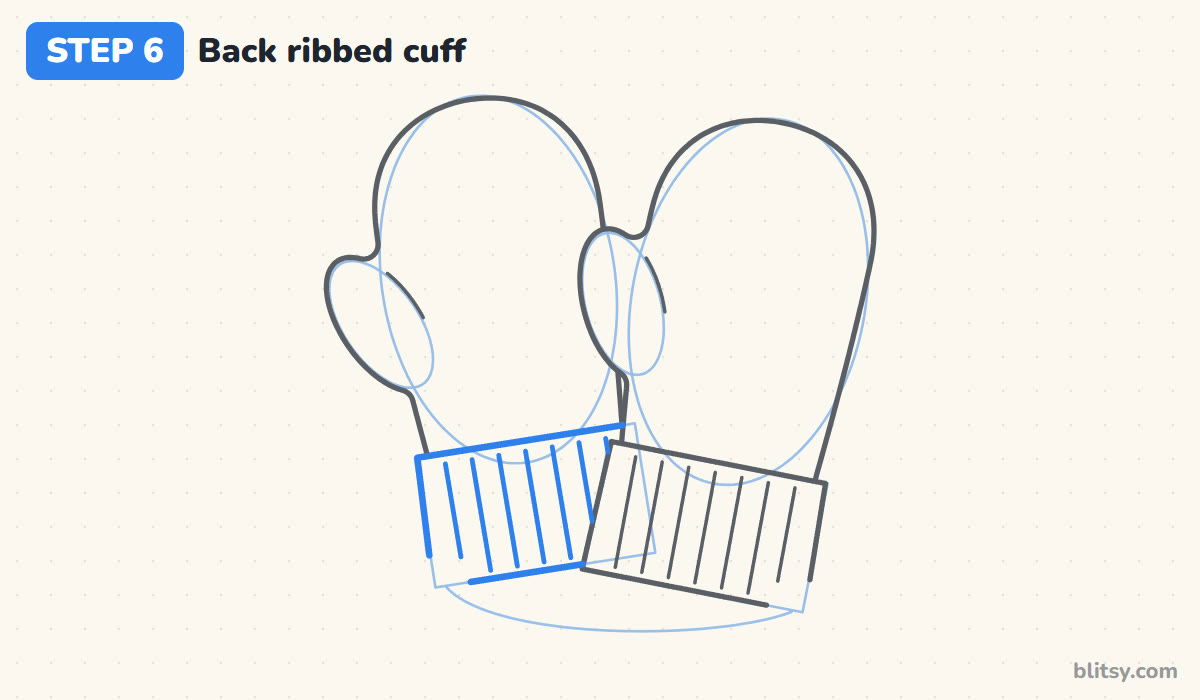
Draw the second cuff and its rib lines. Its right side tucks behind the front cuff, so the lines end where they meet it. Keep the ribs about as far apart as on the front cuff, otherwise the two mittens won't look like a matching pair.
💡 Tip: Leave the bottom left corner a little open. A pom-pom will cover it in step 9.
Step 7: Draw zigzag knit bands
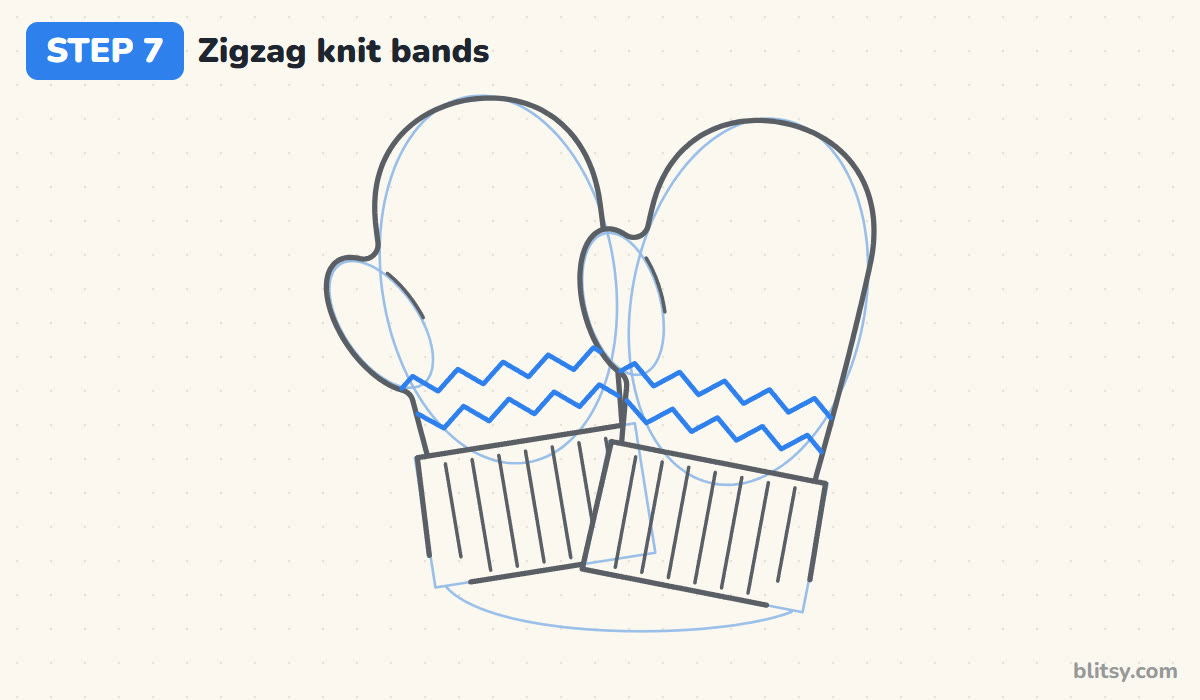
Just above each cuff, draw two zigzag lines across the hand, one under the other, with the points lined up. The space between them becomes a cream stripe later. Zigzags are a classic knit pattern and they're easier than they look, because each zag is just a short tilted line.
💡 Tip: Count your points. Six or seven peaks across one mitten looks like knitting, while twenty tiny ones just look scribbled.


Step 8: Add a heart to each mitten
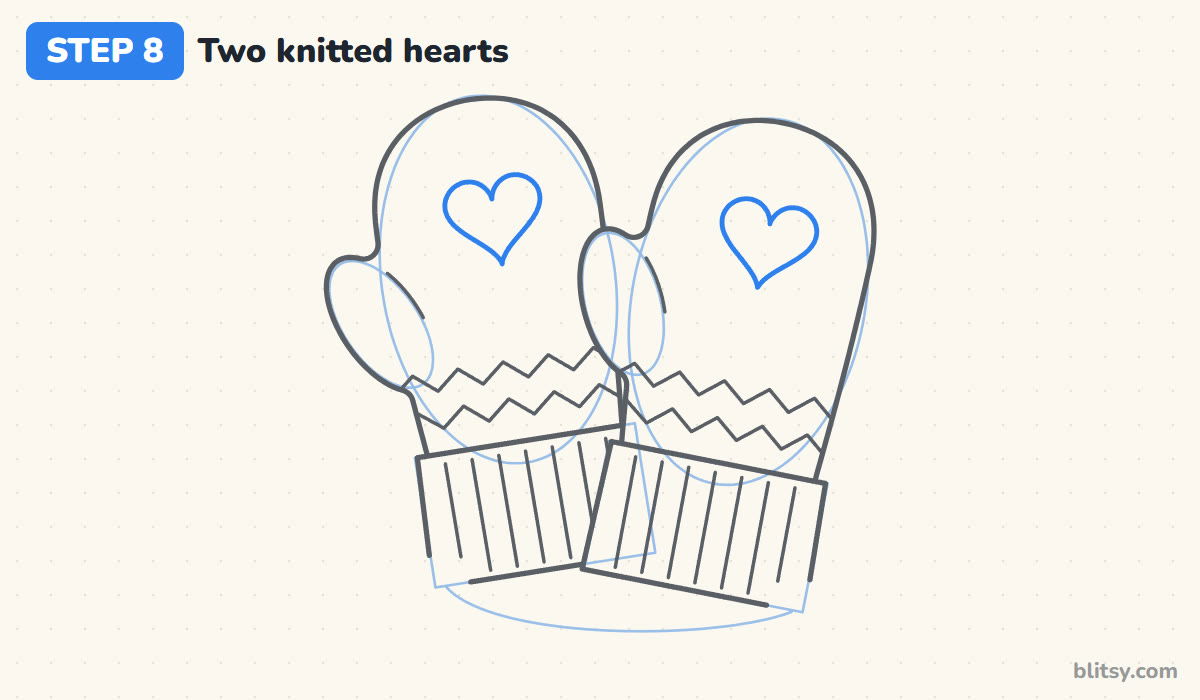
Draw a small heart on the back of each hand, near the top and a little toward the middle. I start with the dip at the top, curve down one side to the point, then do the other side. Keep both hearts the same size so the pair matches.
💡 Tip: Small kids can swap the hearts for a star, a dot pattern or their first initial.
Step 9: Draw the yarn string and pom-poms
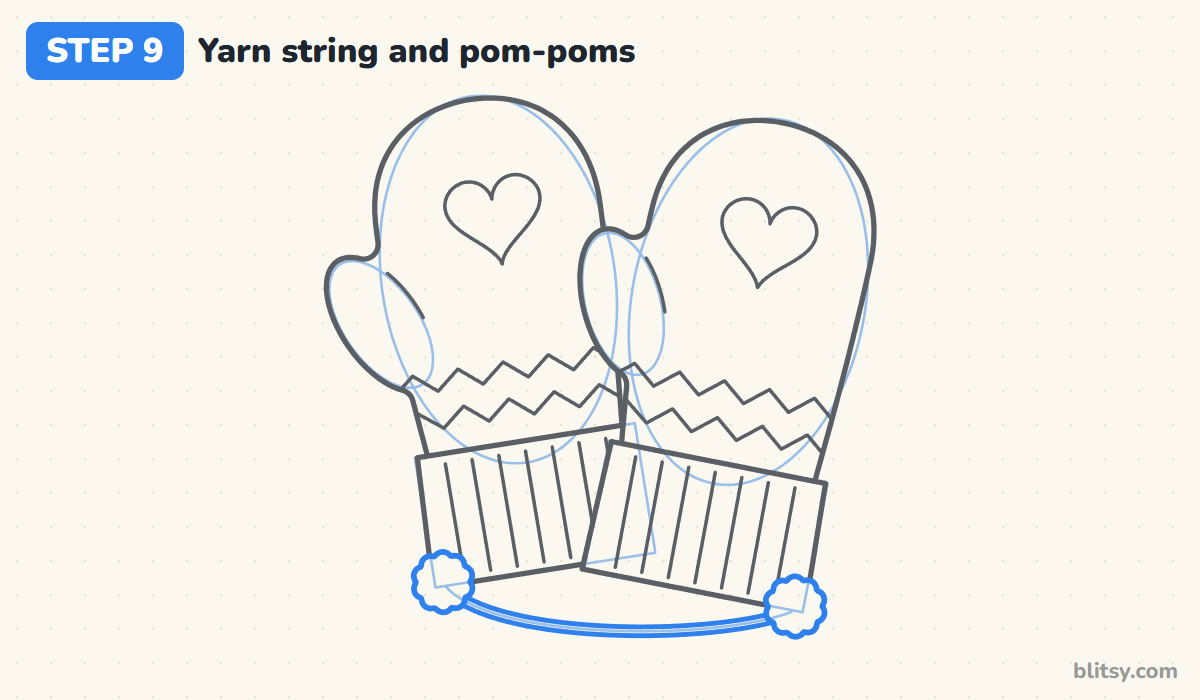
At the bottom left corner of the back cuff and the bottom right corner of the front cuff, draw a fluffy pom-pom: a small circle with a bumpy edge. Then follow your string guide with two close lines that run from one pom-pom to the other, passing under both mittens.
💡 Tip: Keep the bumps on the pom-pom small and many. Big bumps make it look like a flower.
Step 10: Ink the mittens and erase the guides
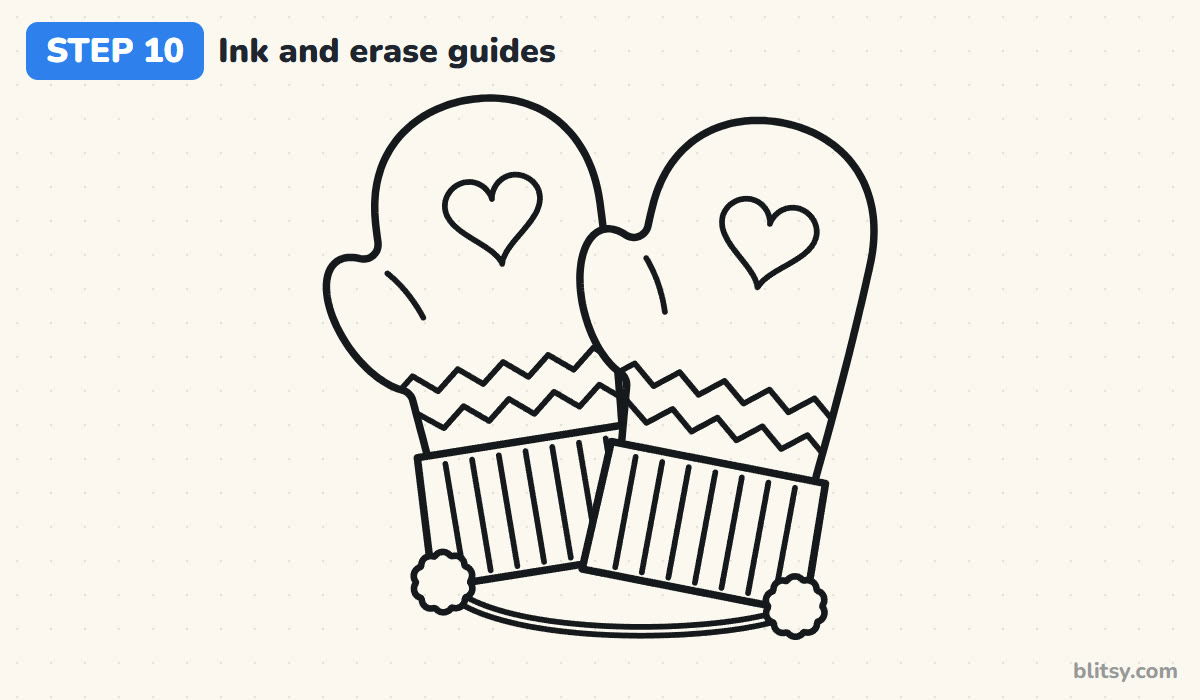
Trace every keeper line with your black marker: outlines, seams, ribs, zigzags, hearts and the string. Leave the light ovals and boxes alone. When the ink is completely dry, erase all the pencil underneath.
💡 Tip: Ink the rib lines with one quick stroke each. Slow strokes get wobbly.
Step 11: Color your mittens
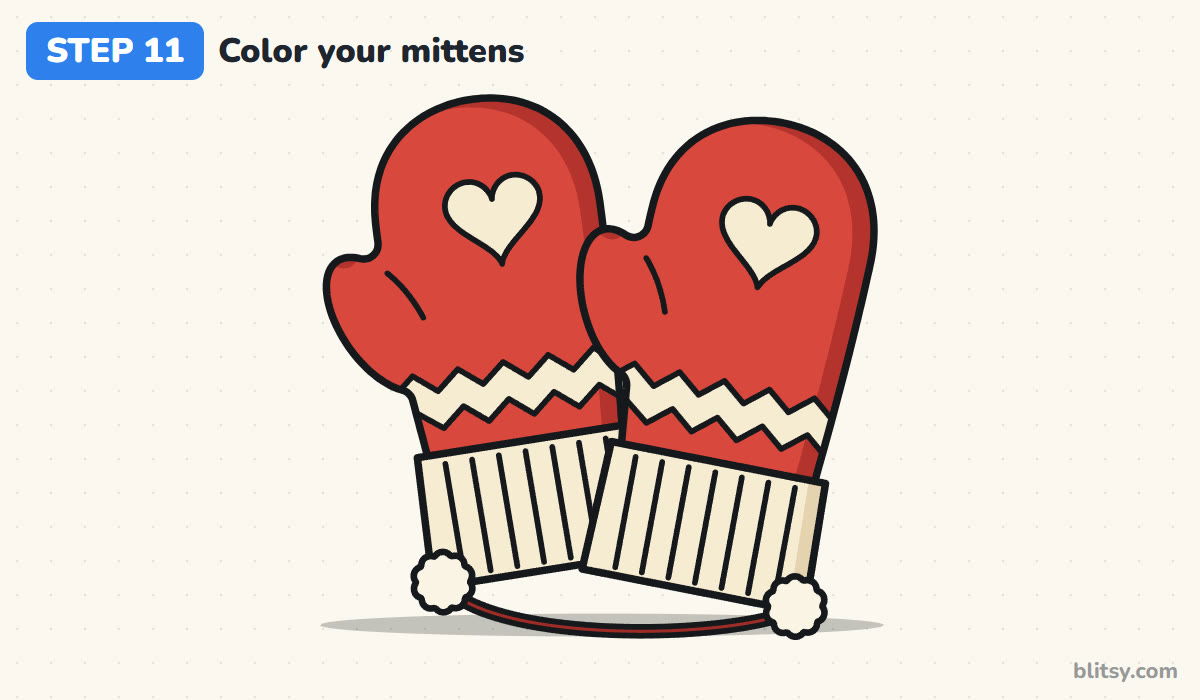
Color both hands red, then add a strip of darker red along the right edge of each one so they look round and soft. The cuffs, zigzag bands and hearts are cream. The string is maroon and the pom-poms white. A gray smudge underneath grounds the pair so they don't float.
💡 Tip: Teal and white mittens look just as cozy if you want a cooler color set.
Where Mitten Drawings Usually Slip
- The thumb sits too high. Then it reads like an ear. Start the thumb about a third of the way up the hand, close to the cuff.
- A pointed mitten top. Mittens are round on top like a fingertip. A point turns them into a sock or a gnome hat.
- Lines crossing through the overlap. If you can see the back mitten through the front one, erase those lines before you ink.
- Cuffs as narrow as the wrist. A ribbed cuff flares out a little. Make it slightly wider than where the hand meets it.
- Uneven rib spacing. Crowded ribs on one side and wide gaps on the other look messy. Space them from the middle out.
New Patterns for Your Mitten Pair
Once the shape feels easy, change the knit pattern. Stripes, dots, a row of tiny diamonds or a simple six-point snowflake all work on the back of the hand. You can also skip the string and draw a single mitten waving hello, or add a matching hat. Mittens are basically hands in a cozy coat, so if you want to understand the shape underneath, the hands drawing tutorial is a good next lesson. The hearts on these mittens come straight from the heart drawing step by step guide, and the ribbed cuffs work the same way as the ones in the hoodie drawing tutorial.
Free Mitten Coloring Page and Step Guide PDF
The free mitten coloring page shows the colored pair at the top as a model, with a key that matches each color to its part, and a big outline below for coloring. The step-by-step PDF guide has all 11 steps with pictures and tips, so you can draw away from the screen. Both print fine on Letter or A4 paper.
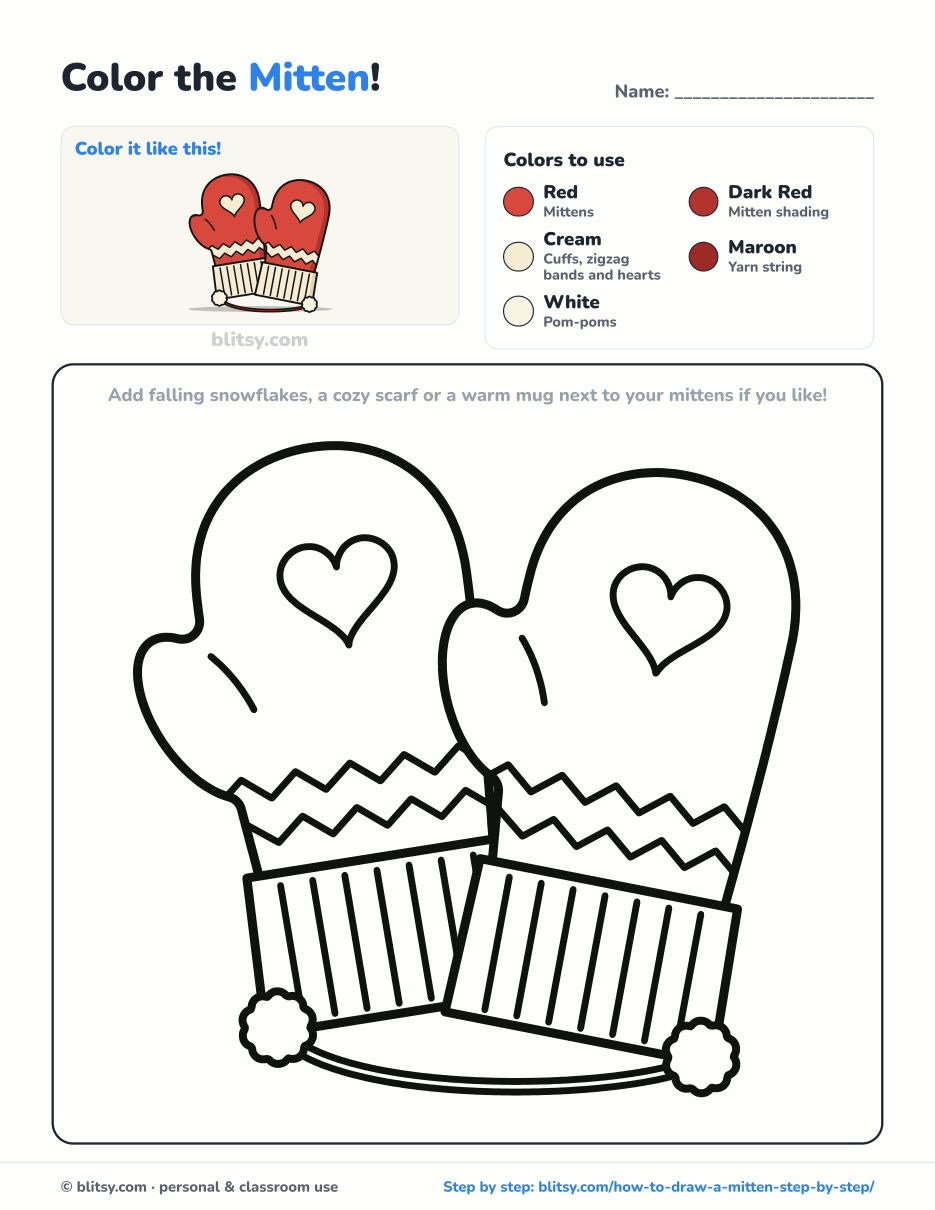
Black outlines with a colored example and the color names at the top. Ready to print and color.
⬇️ Download Coloring PageEvery step picture with its instructions and tips, to keep beside your paper while you draw.
⬇️ Download Drawing Guide📱 On a phone? Tap a download button, then open the file and choose Share → Save to Files or Print. On a computer, the PDF opens or saves straight to your Downloads folder.
Keep the Mitten Steps for a Snowy Afternoon
More Cozy Tutorials to Draw Next
Every link below is a full step-by-step lesson with a picture for each stage, like this one.
- Hands Drawing: An open palm built from a rounded square and a mitten shape, in this how to draw hands step by step tutorial.
- Heart Drawing: Two circles and a V make an even, glossy heart in this heart drawing tutorial.
- Hoodie Drawing: Draw a hoodie with ribbed cuffs from the front and the back in this hoodie drawing step by step lesson.
- Snowman Drawing: Three light circles become a snowman in a top hat and striped scarf in this snowman drawing tutorial.
- Shirt Drawing: A T-shirt and a plaid button-up grow from one T-shape in this shirt drawing tutorial.
Mitten Drawing Questions from Young Artists
How do you draw a simple mitten for kids?
Draw a tall oval, add a small oval on one side for the thumb, and trace around both as one shape. Put a box underneath for the cuff and you have a mitten.
What is the difference between drawing a mitten and a glove?
A glove has five separate fingers. A mitten has only a thumb and one rounded pocket for the other four fingers, which makes it much easier to draw.
How long does it take to draw these mittens?
Most kids finish in 25 to 30 minutes including coloring. The rib lines and zigzags take the longest.
How do I make my mitten drawing look knitted?
Add straight rib lines on the cuff and a simple repeating pattern like zigzags or stripes on the hand. Soft rounded edges help too.
Grab a warm drink, find your red crayon and give your mittens a cozy home on the page. 🧤✏️
Related posts:
 How to Draw a Car Step by Step (Easy Drawing for Beginners)
 How to Draw a Whale Step by Step (Easy for Beginners)
 How to Draw an Arctic Fox Step by Step (Easy for Beginners)
 How to Draw a Chicken Step by Step (Easy for Beginners)
 How to Draw a Snowman Step by Step (Easy for Beginners)
 How to Draw an Airplane Step by Step (Easy Jet for Beginners)
 How to Draw a Mouse Step by Step (Easy for Beginners)
 How to Draw a T-Rex Step by Step (Easy for Beginners)
 How to Draw a Pig Step by Step (Easy for Beginners)
 How to Draw a Minion Step by Step (Easy for Beginners)
 How to Draw a Yorkie Step by Step (Easy for Beginners)
 How to Draw a Notebook Step by Step (Easy for Beginners)

