
Green skin, raised fists and a pair of ripped purple shorts: kids spot the Hulk from across the room. The trick is to keep all that muscle but shrink everything else, so he ends up big-headed, short-legged and grinning instead of growling. Here I'll show you how to draw the Hulk step by step, starting with a circle and an oval and finishing with a colored hero in a double-arm flex. This is my own simple fan-art version for drawing practice, not official Marvel art.
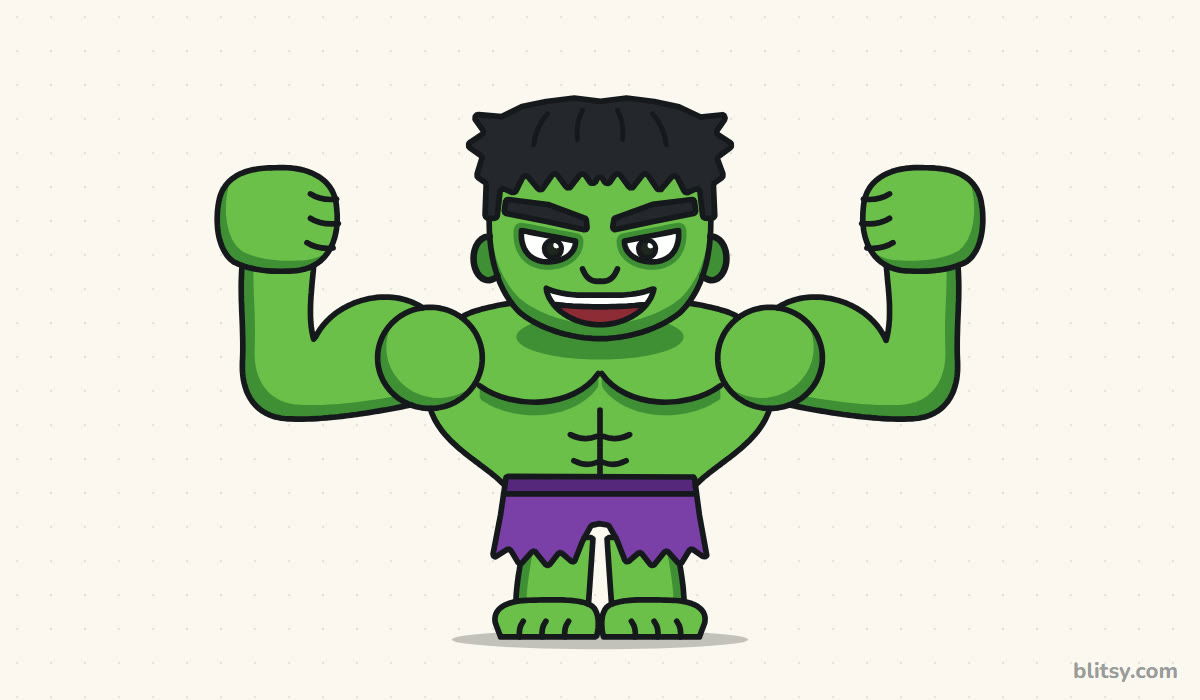
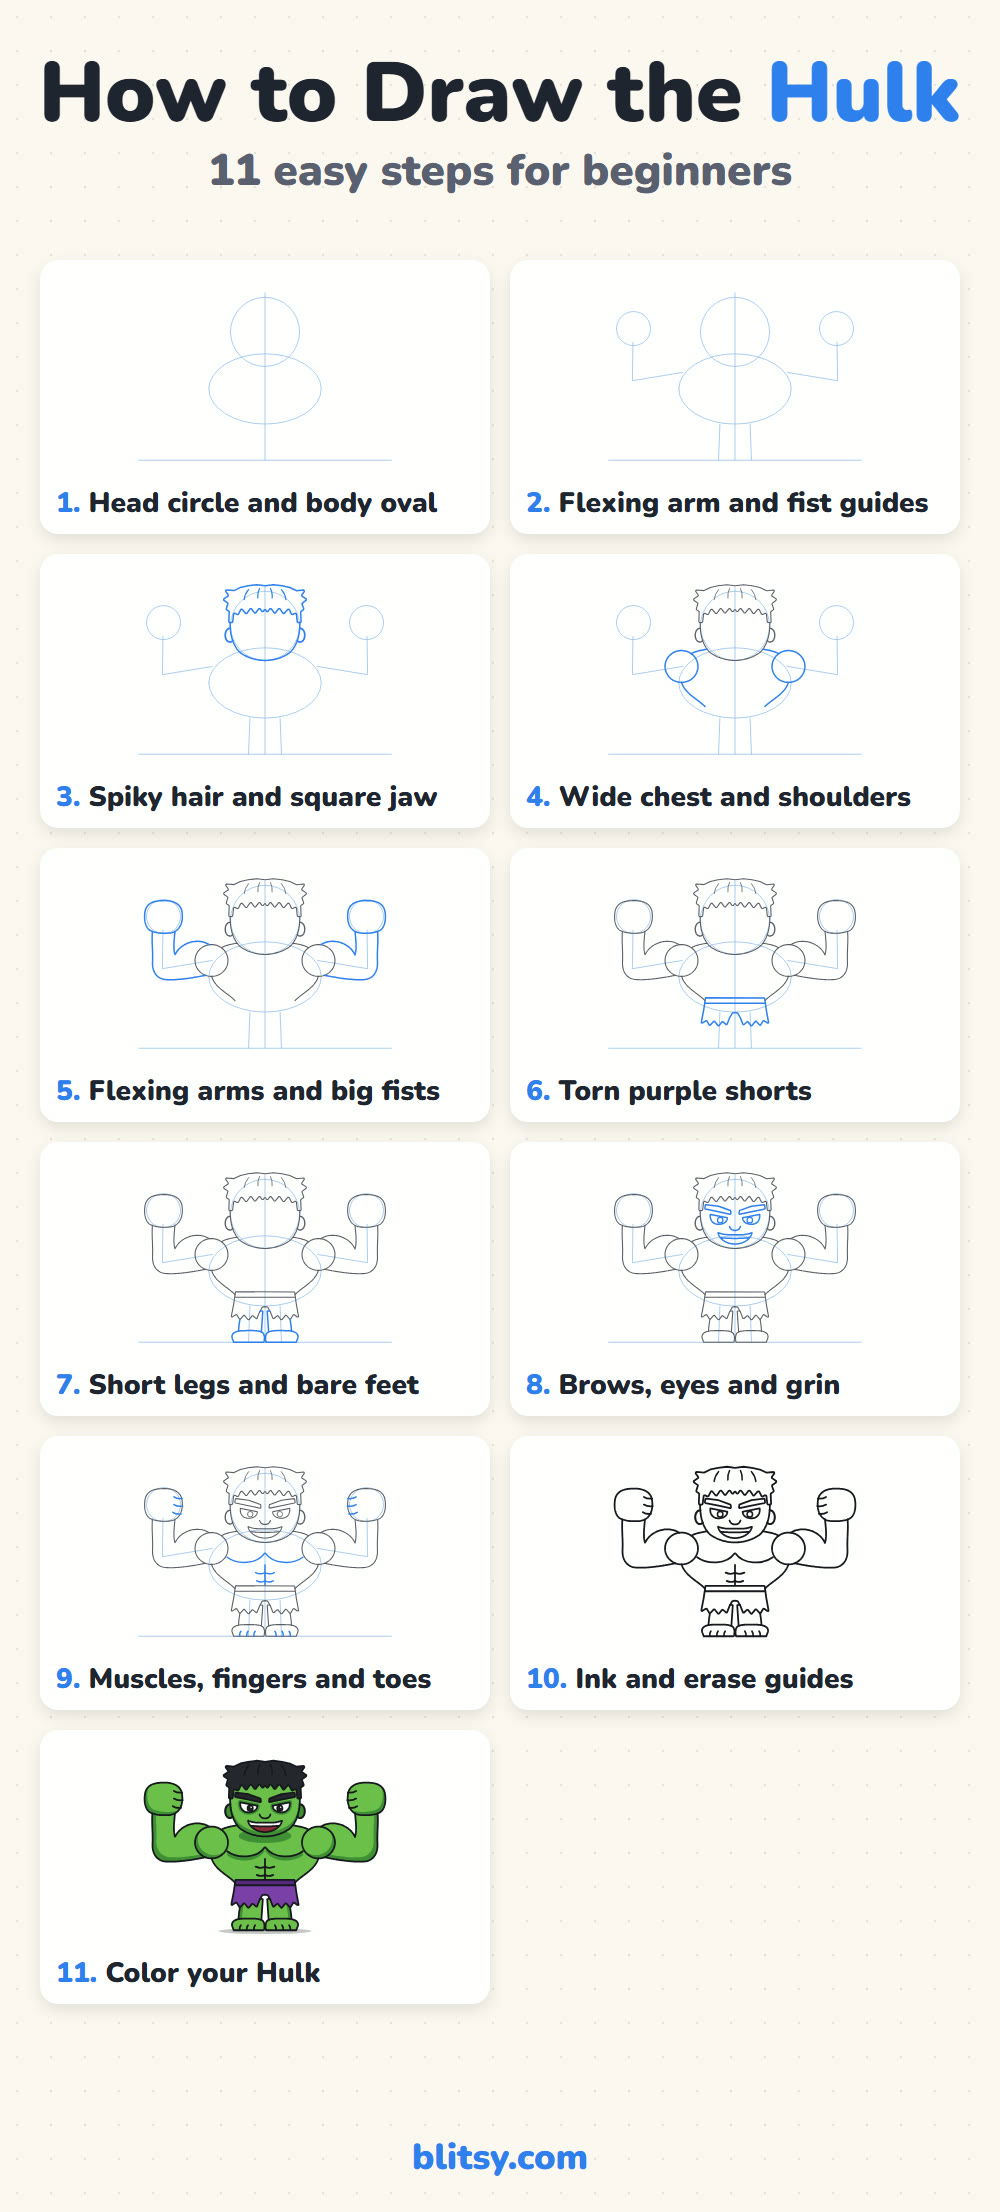
Read the pictures by color. Bright blue lines are the ones to add right now, gray lines came from earlier steps, and the pale blue guide shapes are only scaffolding that you'll rub out before inking.
Quick overview
⏱️ Time: roughly 30 to 45 minutes, with coloring
🎯 Level: easy, fine for kids from about 7
✏️ Steps: 11
💪 You'll draw: a chibi Hulk flexing both arms
Gamma-Green Art Supplies for a Mighty Sketch
- A regular pencil (HB or 2B) for light first lines
- An eraser that doesn't smudge
- A black fineliner or thin marker for the final outlines
- Two greens, one light and one dark, plus purple, black, dark red and white
- Plain paper, turned sideways so the arms have room
One green is enough if that's all you have; press harder with it in the shadow areas.
How to Draw the Hulk Step by Step
Step 1: Sketch a head circle and a wide body oval
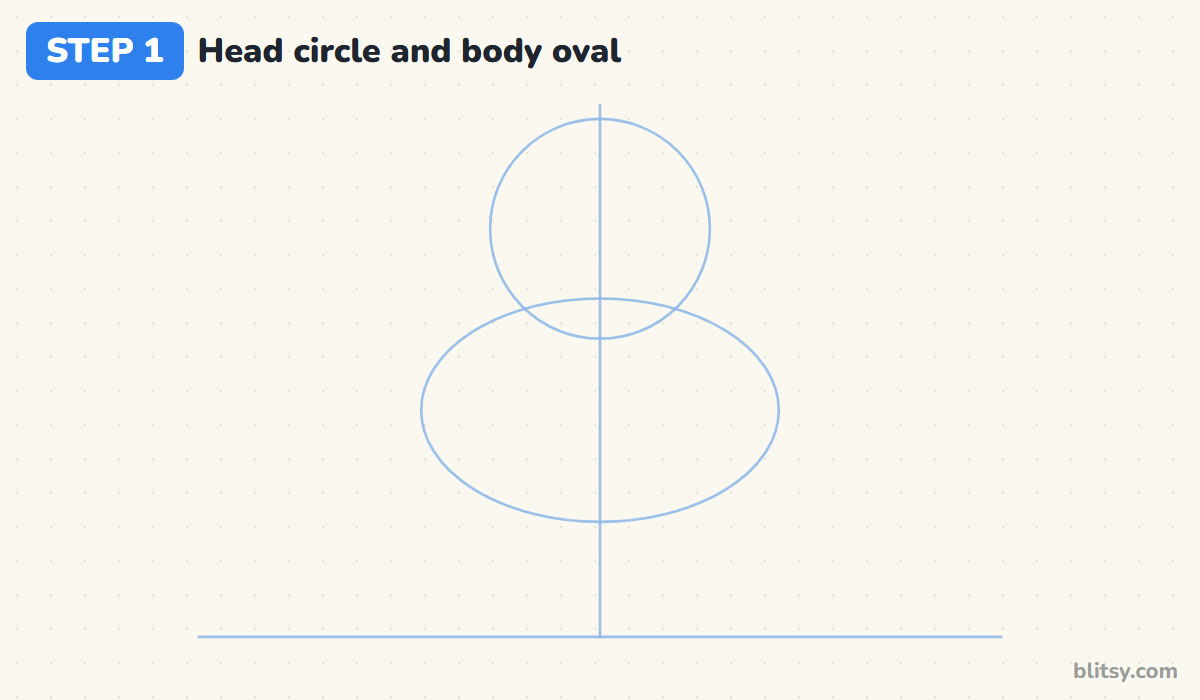
Draw a flat ground line near the bottom of the page and a light vertical line up the middle. Near the top of that line, place a big circle for the head. Under it, draw a wide oval for the chest that overlaps the bottom of the circle a little. The oval should be clearly wider than the head, because the Hulk's power is all in his shoulders.
💡 Tip: Hold the pencil further back from the tip. Your lines come out lighter without you trying.
Step 2: Add guides for the flexing arms, fists and legs
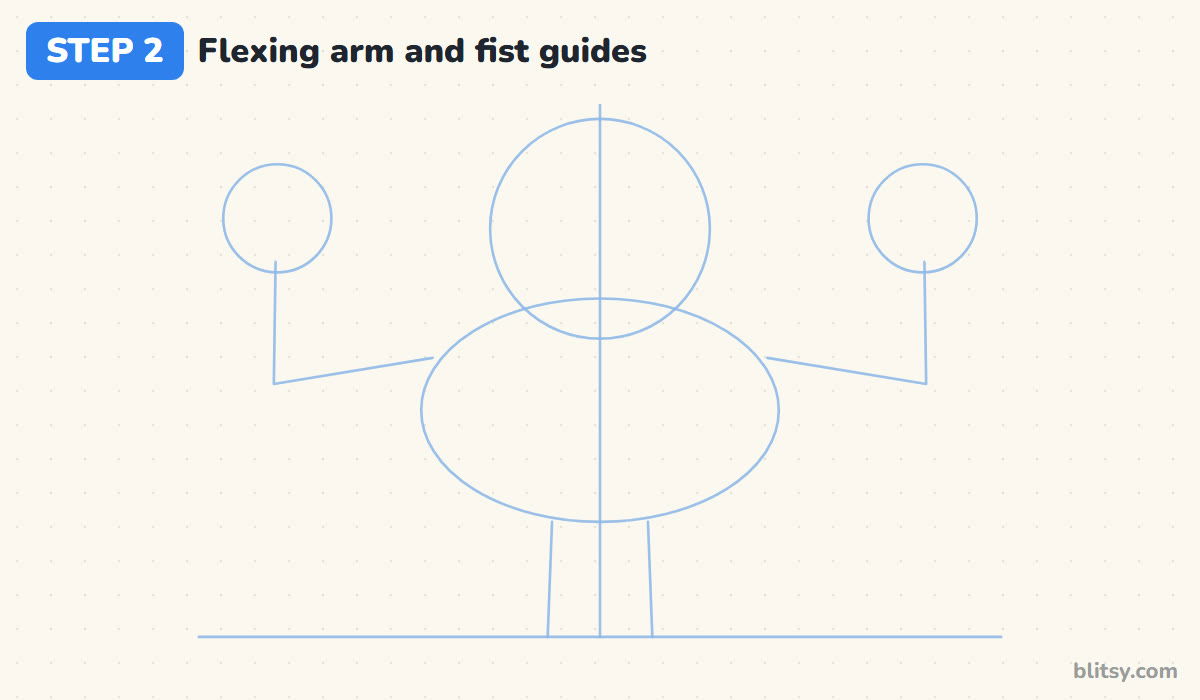
From each side of the oval, draw a line going out sideways and slightly down to an elbow point. Then turn straight up and stop level with the middle of the head. Put a circle at the top of each line for a fist. Add two short lines from the bottom of the oval to the ground for the legs. These L shapes give you the classic double-arm flex.
💡 Tip: Check that both elbows sit at the same height before going on. Lopsided guides make lopsided arms.
Step 3: Draw the spiky hair and the square jaw
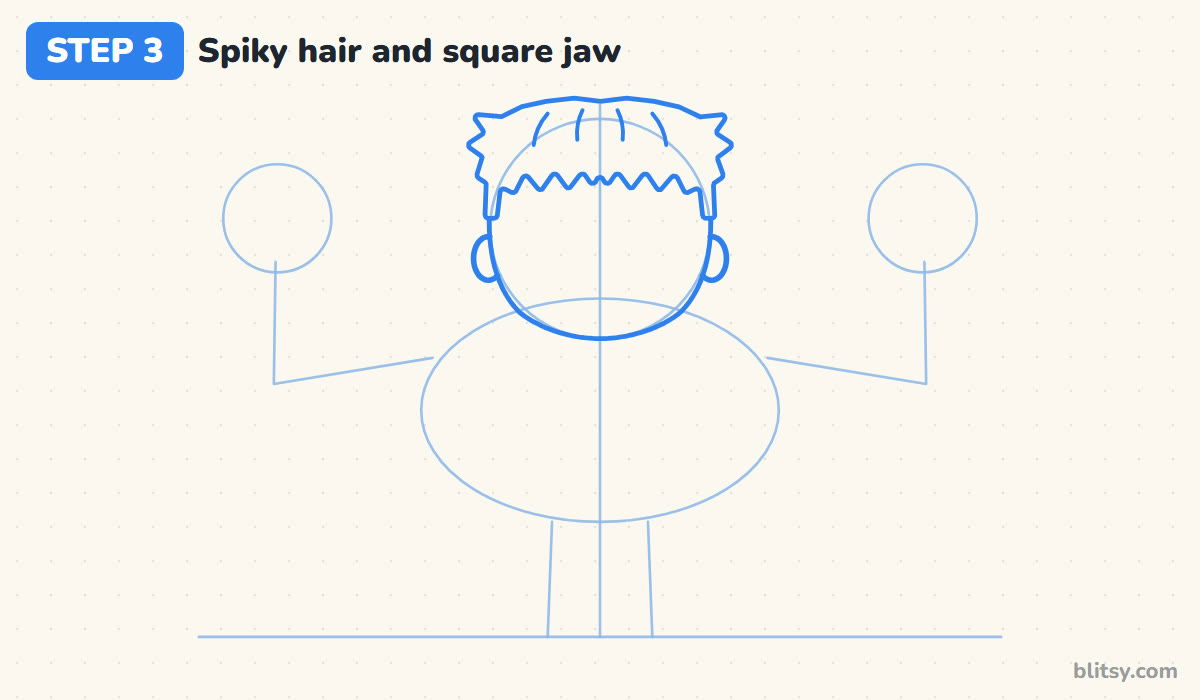
I always start the face with the hair, since it decides how much forehead is left. Draw a messy cap over the top of the circle with a few short spikes poking out at the sides, and a zigzag fringe across the forehead. Bring a short sideburn down each side. Then square off the lower half of the circle into a broad, flat jaw, and tuck a small ear behind each cheek.
💡 Tip: Keep the fringe low. A tiny forehead under heavy hair is what makes him look like the Hulk.
Step 4: Draw the wide chest and round shoulders
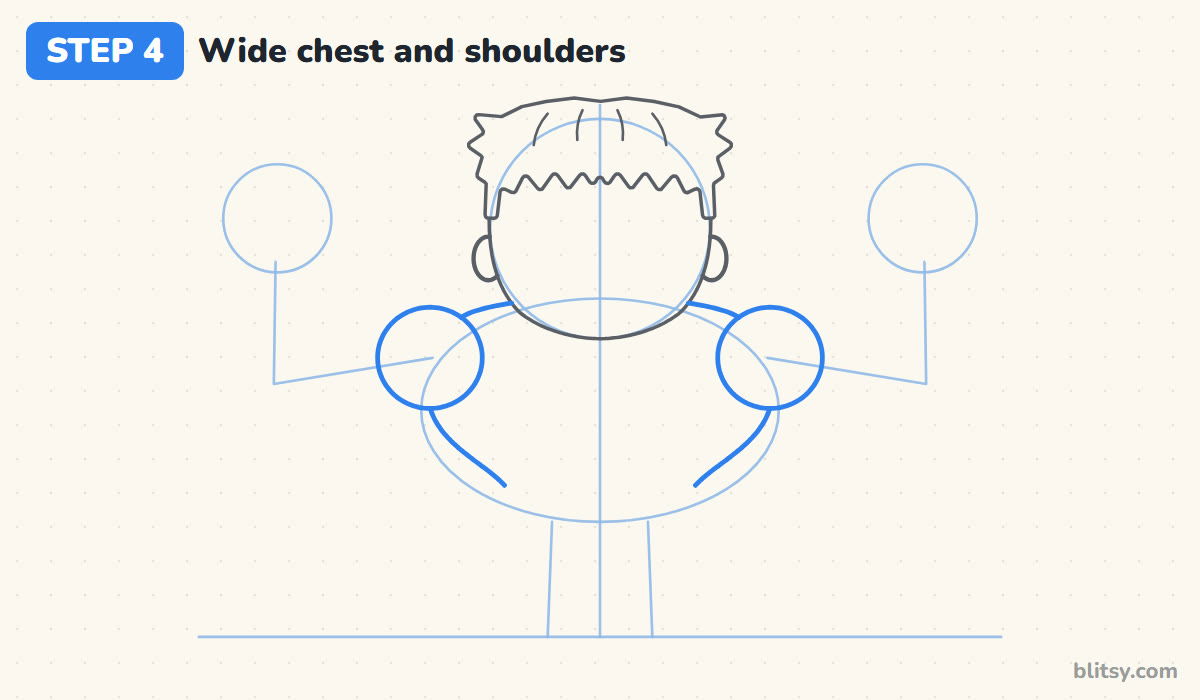
Starting under the chin, slope a line outward on each side for the big trapezius muscles. Bring the sides of the body down and in toward a narrow waist inside the oval. On each corner, draw a large round shoulder muscle about half the size of the head. Those two balls carry the whole strong-man look.
💡 Tip: Draw the shoulder circles bigger than feels right. Small ones turn him into a regular kid.
Step 5: Shape the flexing arms and big fists
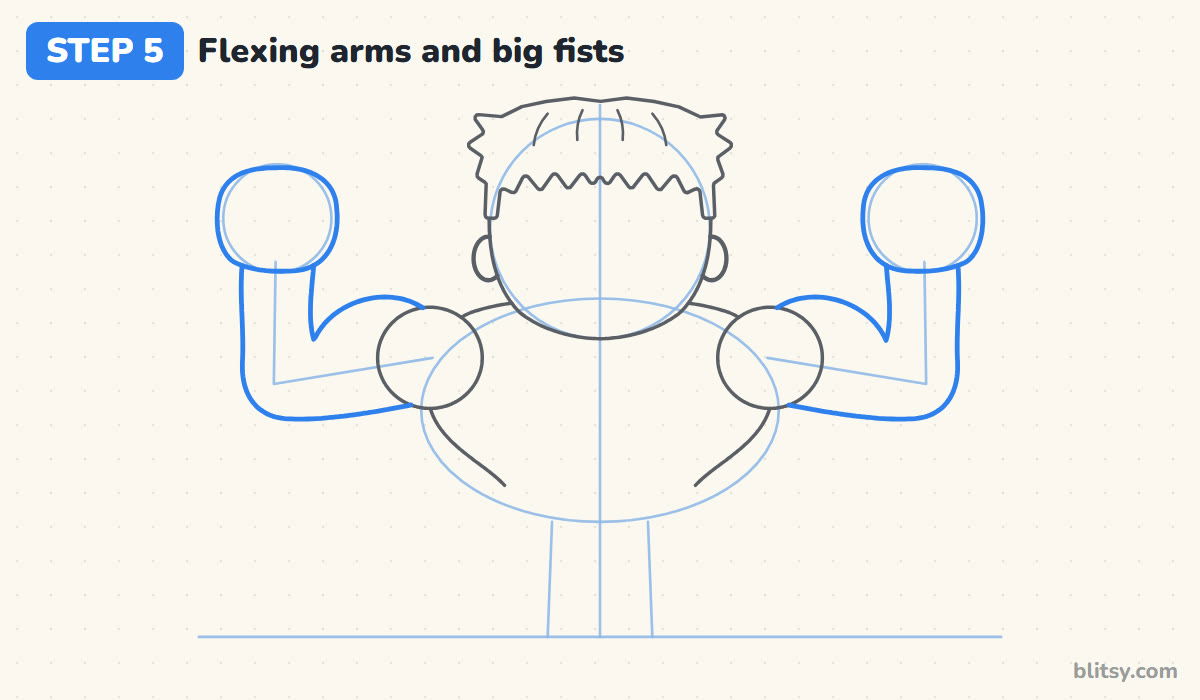
Follow your arm guides. The upper arm runs out from under the shoulder to a rounded elbow, with a bump on top for the bicep. The forearm goes straight up and gets a bit wider near the wrist. On top of each forearm, draw a fist as a rounded square that's almost as wide as the head is tall. Big hands look friendly and strong at the same time.
💡 Tip: Let the bicep bump rise right next to the shoulder, like a hill beside a mountain.
Step 6: Add the torn purple shorts
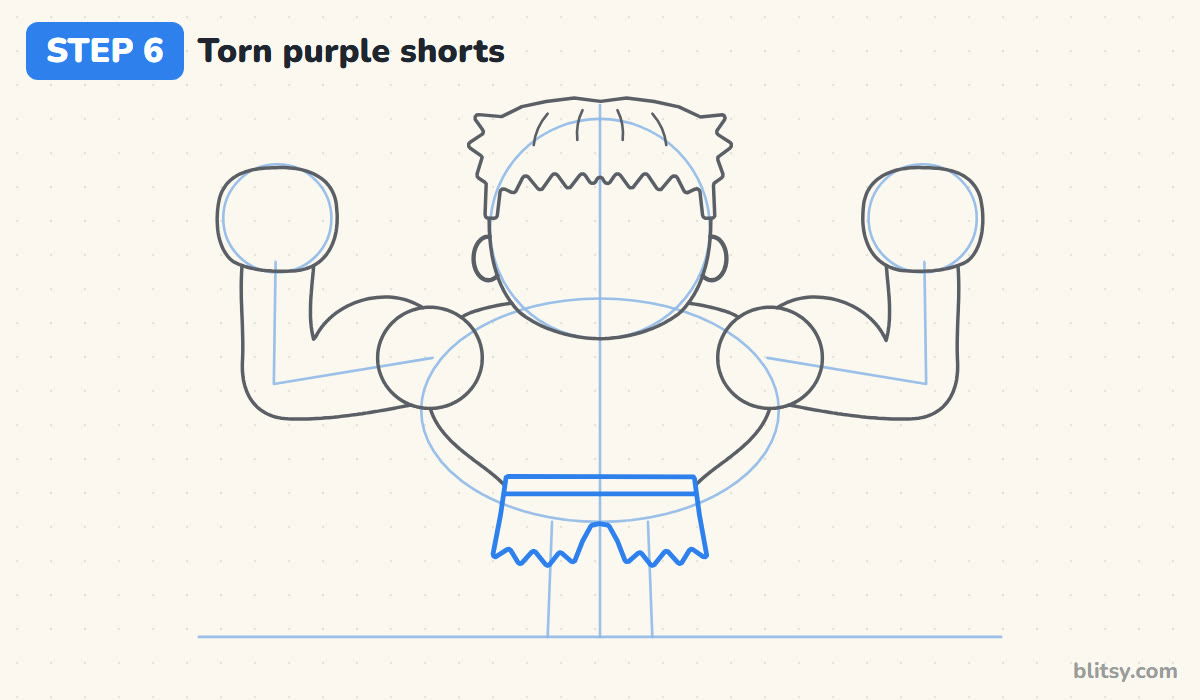
Across the waist, draw a straight band a little wider than the body. Below it, the shorts drop down on each side and end in a jagged, torn edge. Make the zigzags uneven, some long and some short, so the rips look real. Leave a small rounded gap in the middle where the legs will come out.
💡 Tip: Ragged hems look best when no two points are the same size.
Step 7: Draw short legs and bare feet
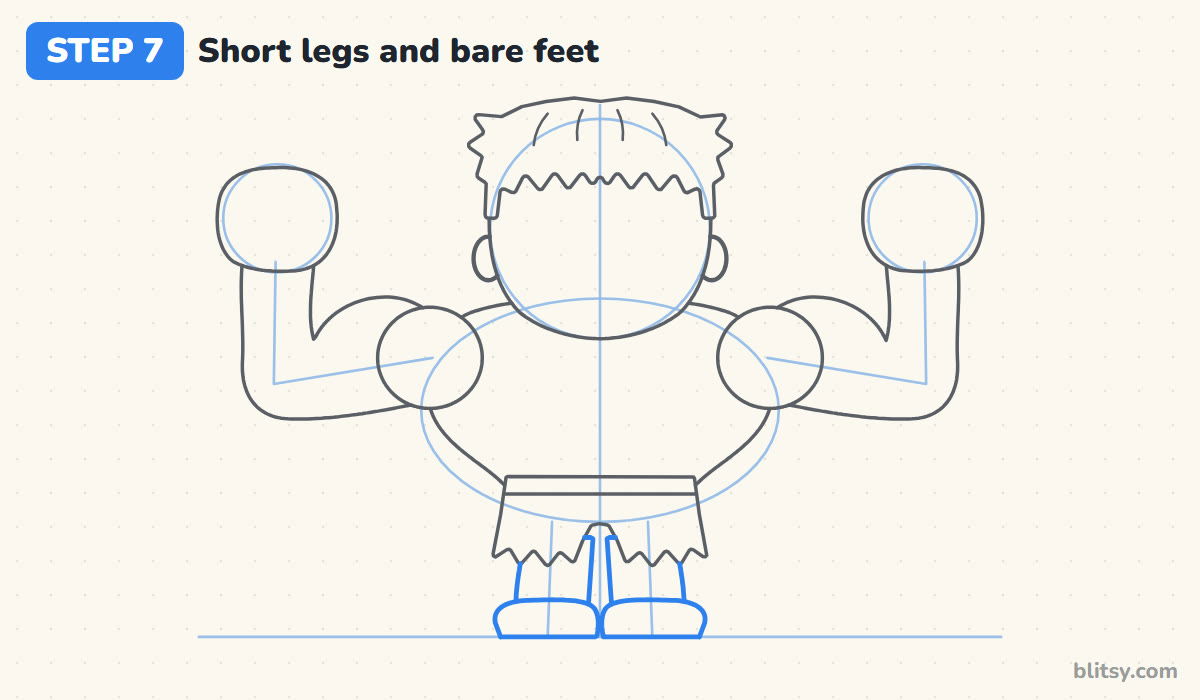
Under the shorts, draw two thick, stubby legs that taper slightly toward the ankles. They should be short; in a chibi, the legs are often shorter than the head. Finish each leg with a wide, flat foot resting on the ground line, with rounded toes at the front.

💡 Tip: Keep the feet wide. Narrow feet make a heavy figure look like he'll tip over.
Step 8: Give him heavy brows, eyes and a grin
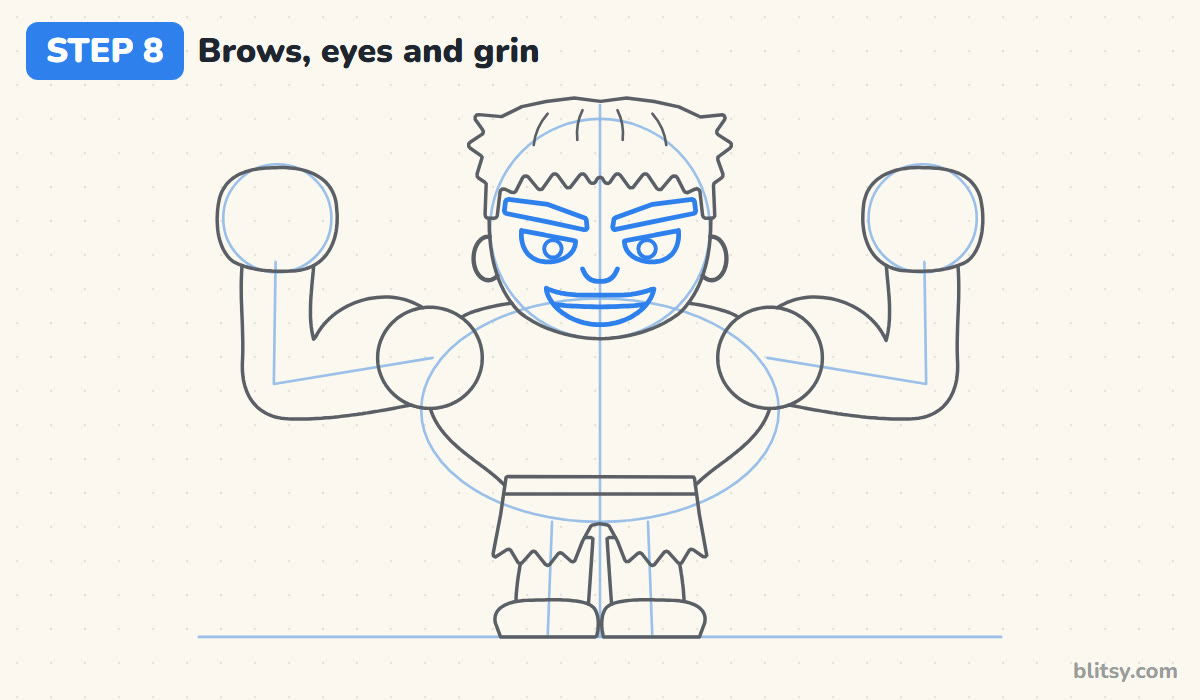
Here's where the personality comes in. Draw two thick eyebrows that slope down toward the nose; that slant reads as determined. Right under them, add eyes with flat tops and round bottoms, each with a dark pupil and a tiny white shine. A small curved nose sits in the middle. For the mouth, draw a wide open grin with a row of top teeth, so he looks ready for action instead of angry.
💡 Tip: If he looks too fierce, curve the mouth corners up a bit more. The grin cancels out the frown.
Step 9: Add chest muscles, finger lines and toes
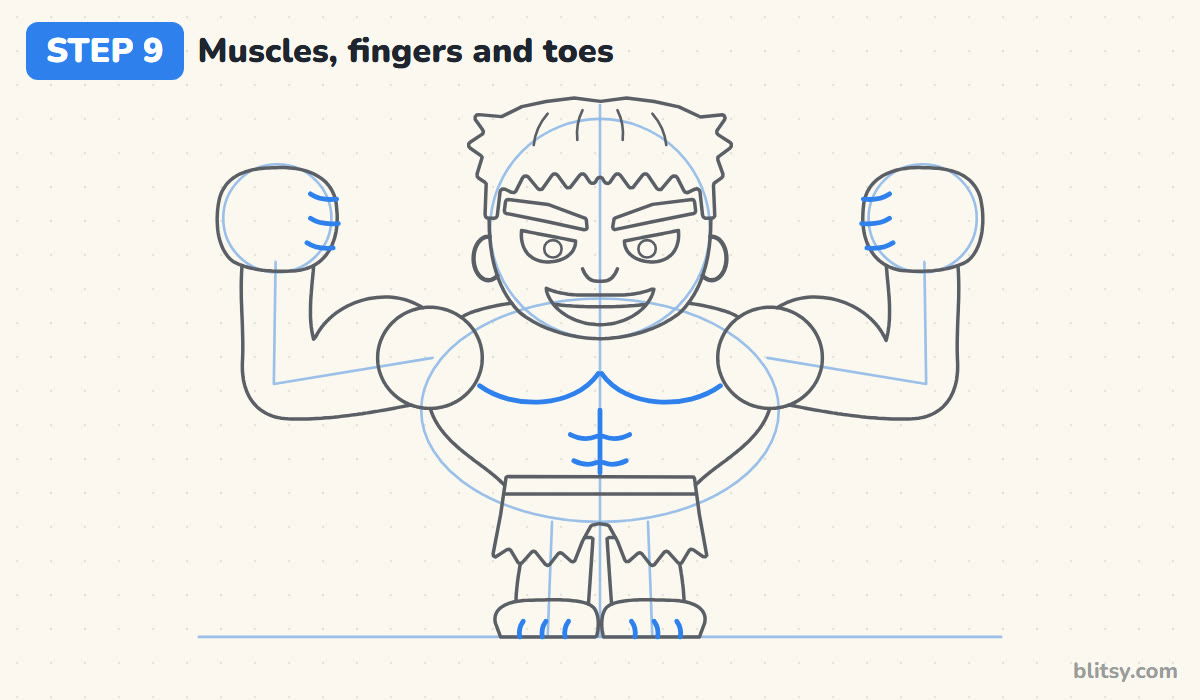
On the chest, draw a curved line under each side so the pecs meet in the middle like a wide W. A short line runs down the center, with two small pairs of curves on either side for the abs. On each fist, add three curved finger lines on the side facing his head. Then put three little toe lines on each foot.
💡 Tip: Stop at two rows of abs. More lines on a small body start to look busy.
Step 10: Ink the outlines and erase the guides
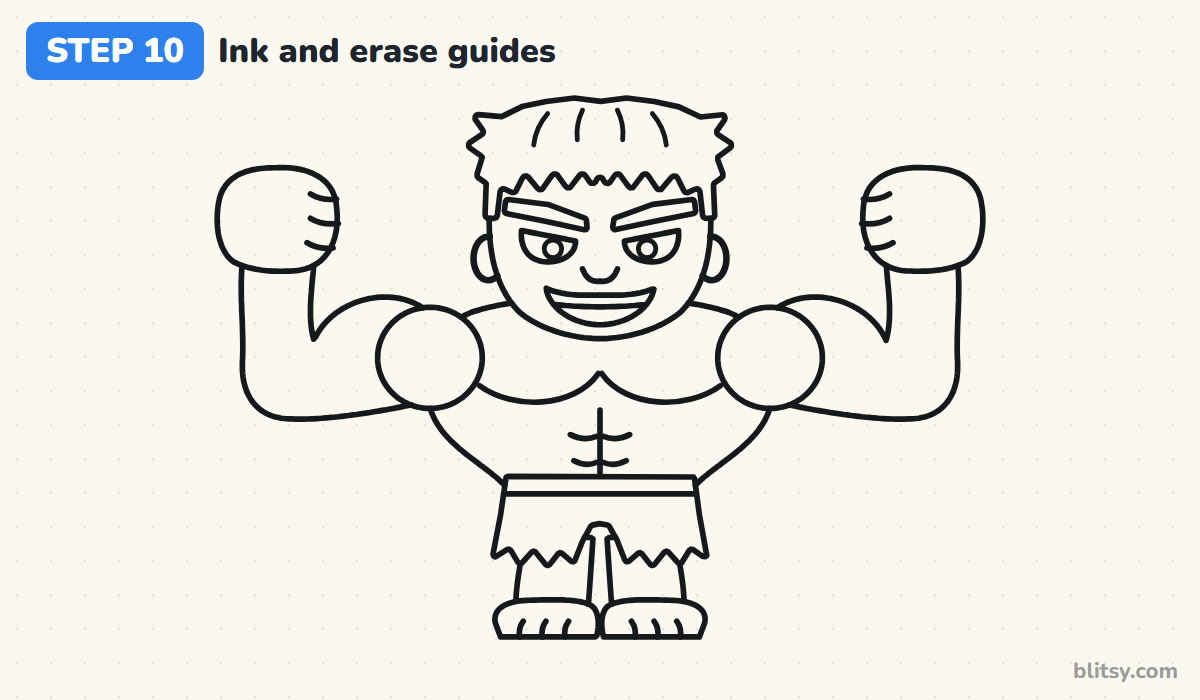
Trace every line you want to keep with the fineliner. I go from the top down and from the inside out, so my hand doesn't rest on wet ink. Skip the guide circles, the oval and the arm lines. Wait a minute for the ink to dry, then erase all the pencil marks underneath.
💡 Tip: Ink the fist outlines in one smooth pass each. Stopping halfway leaves little bumps.
Step 11: Color your Hulk
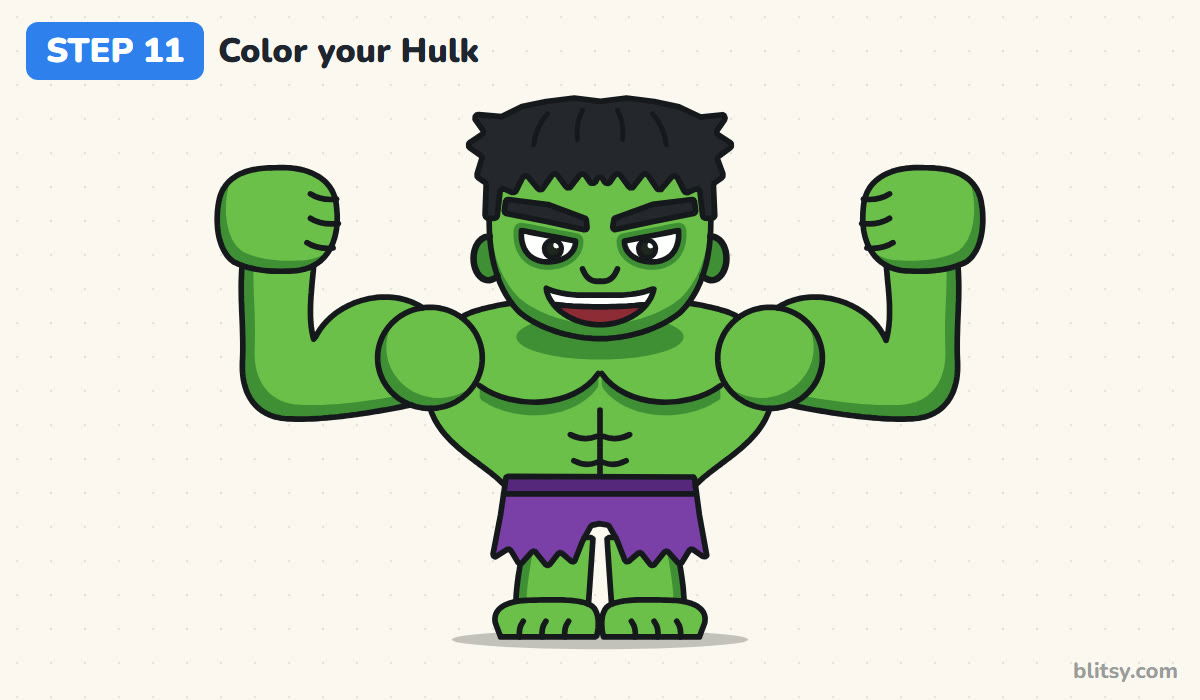
Cover all the skin in light green first. With the dark green, shade under the chin, along the bottom edge of each arm and fist, under the pecs, around the eyes and on the ears. Color the hair and eyebrows black, the shorts purple, and the waistband a darker purple. Make the mouth dark red and leave the teeth and eyes white.
💡 Tip: Keep the dark green along the bottom edges. That way the light looks like it's coming from above.
Hulk Drawings That Turn Scary or Skinny
- A snarling mouth full of teeth. Combined with the frown, it's too much for a kids' drawing. Use a wide grin and let the eyebrows carry the toughness.
- Narrow shoulders. Without a broad chest, he looks like any green cartoon kid. Make the shoulder line much wider than the head.
- Long legs. They pull the figure toward realistic proportions and lose the chibi charm. Keep them short and thick.
- Tiny fists. Small hands make the arms look weak. Each fist should be roughly as tall as the face.
- One flat green everywhere. The muscles disappear without shading. Even a few dark green strips under the arms and chest bring back the shape.
Smash-Ready Twists on Your Green Giant
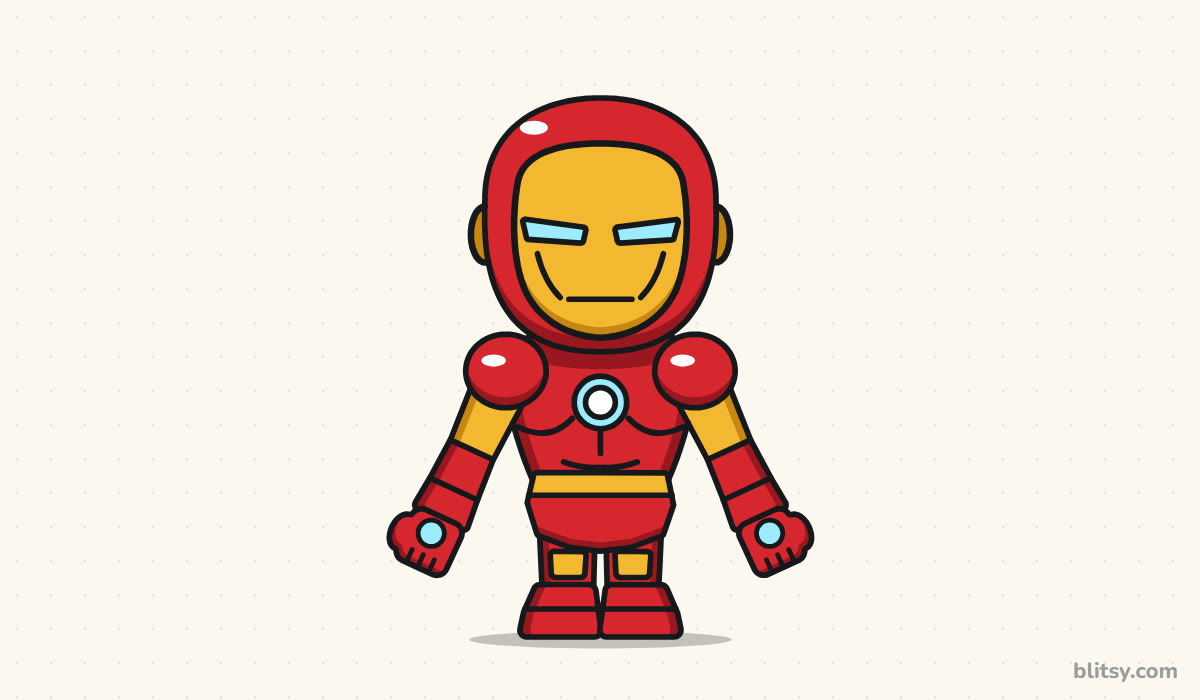
Once the flex feels easy, try one fist raised and the other punching forward, or give him a mid-jump pose with both feet off the ground. A few cracked rocks around his feet make a nice background without much work. Younger kids can skip the abs and finger lines; the green skin and purple shorts still make it obvious who he is. For a whole team on one page, pair him with the Iron Man drawing tutorial or the Wonder Woman drawing tutorial.
Hulk Coloring Page and a Printable Flexing Guide
Need something ready for a rainy afternoon? Print the free Hulk coloring page. A small colored example sits at the top with a color key, so kids can see which green goes where. The step-by-step PDF guide holds all 11 steps and tips, two per page, and fits Letter or A4 paper.
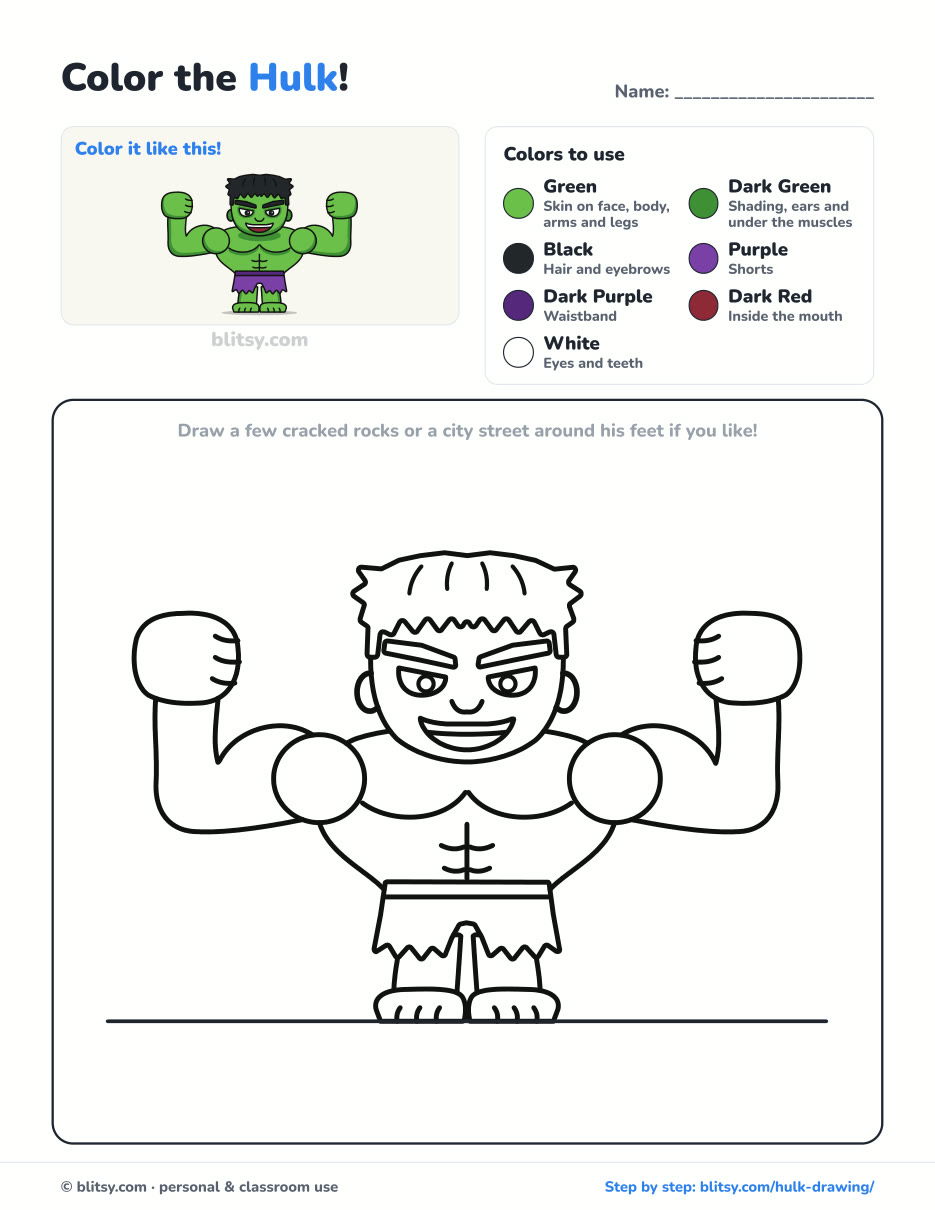
Black outlines with a colored example and the color names at the top. Ready to print and color.
⬇️ Download Coloring PageEvery step picture with its instructions and tips, to keep beside your paper while you draw.
⬇️ Download Drawing Guide📱 On a phone? Tap a download button, then open the file and choose Share → Save to Files or Print. On a computer, the PDF opens or saves straight to your Downloads folder.
Flex Lesson Saved to One Tall Pin
Hulk Smashed It? Draw These Characters Next
Every pick below is a step-by-step tutorial with numbered pictures, from heroes and anime faces to a three-headed pup.
- Chalk Art: Head outside for the chalk art step by step lesson, which draws a hopscotch grid and a rainbow resting on two clouds.
- Nezuko Drawing: Twelve small steps take a plain circle to a chibi Nezuko in the how to draw Nezuko tutorial.
- Olaf Drawing: Draw the snowman with his arms up and grinning ear to ear using this Olaf drawing step by step guide.
- Luffy Drawing: The Luffy drawing tutorial ends with the straw hat on and the widest grin on the page.
- Care Bear Drawing: A cuddly pink bear with a rainbow between two clouds on its tummy is the goal of the Care Bear drawing tutorial.
- Family Drawing: Four people, a puppy and a red balloon share the same few shapes in our how to draw a family tutorial.
- Phoenix Drawing: Wings up and tail blazing, the fire bird takes eleven steps in the phoenix drawing step by step lesson.
- Scarecrow Drawing: Build a patched, smiling scarecrow from a T and a circle with this easy scarecrow drawing tutorial.
- Ariana Grande Drawing: Her swinging ponytail and a little cloud nearby come together in the Ariana Grande chibi drawing tutorial.
- Princess Drawing: Lavender gown, golden crown and a star wand are where the how to draw a princess step by step guide finishes.
- Anime Girl Drawing: Learn the face guide behind pink bangs and purple eyes in this anime girl drawing tutorial.
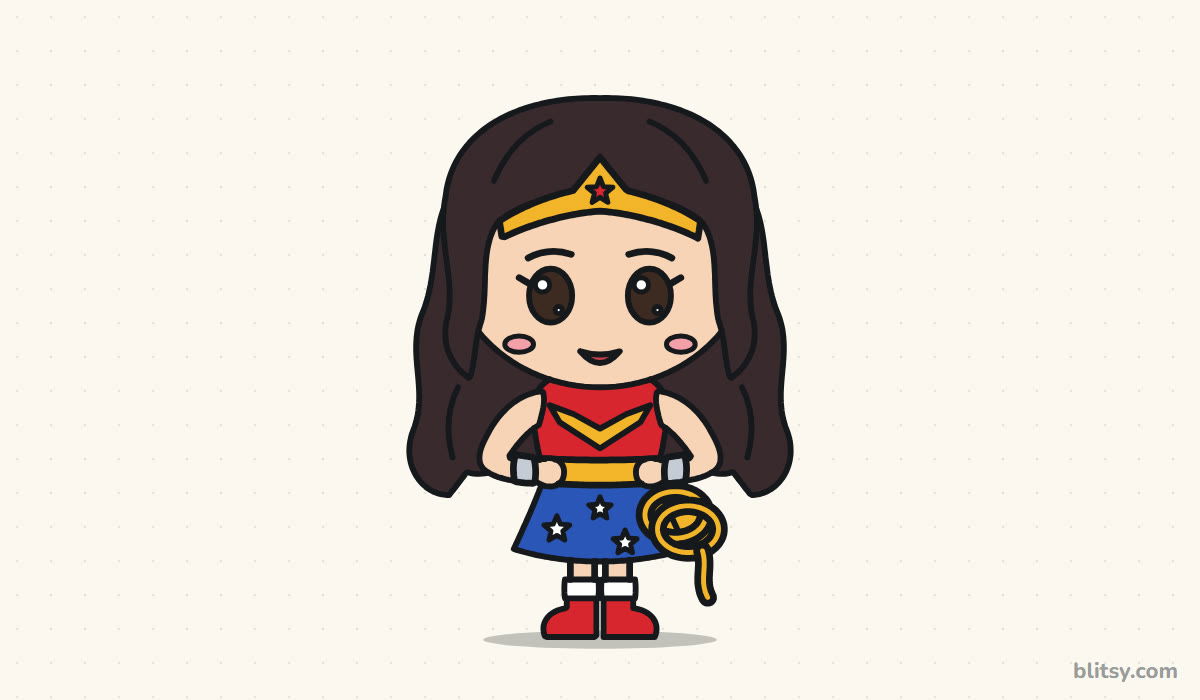
- Wonder Woman Drawing: Put another hero on the page with the Wonder Woman drawing tutorial, hands on her hips and lasso ready.
- Todoroki Drawing: Fire on the right, ice on the left: the how to draw Todoroki tutorial keeps the face calm in between.
- Rosa Parks Drawing: For a school portrait, the Rosa Parks drawing step by step lesson adds soft glasses, a white collar and a gold brooch.
- Cerberus Drawing: Give each head its own mood in this cute Cerberus drawing tutorial of a three-headed pup.
- Master Chief Drawing: Fists on hips and visor gleaming, the little Spartan comes from the Master Chief drawing tutorial.
Hulk Questions From Young Marvel Fans
What is the easiest way to draw the Hulk?
Draw him as a chibi from the front. A big head circle, a wide chest oval and two L-shaped arm guides set up the pose, and the green skin with purple shorts makes him easy to recognize.
How do you draw the Hulk for kids?
Use the same steps with bigger shapes and a thick marker. Leave out the abs, finger and toe lines if small hands get tired, and keep his face smiling.
What colors do you need to draw the Hulk?
A light and a dark green for the skin, purple for the shorts, and black for the hair. Dark red for the mouth and white for the eyes and teeth finish it.
How long does it take to draw the Hulk?
Plan on 30 to 45 minutes with coloring. The face and the arms take the most care.
So lift those pencil arms, give your Hulk his biggest grin, and see how much muscle you can fit on one page. 💪💚
Related posts:
 How to Draw Wonder Woman Step by Step (Chibi for Kids)
 How to Draw Iron Man Step by Step (Easy Chibi for Kids)
 How to Draw Springtrap Step by Step (Cute Chibi for Kids)
 How to Draw Nezuko Step by Step (Cute Chibi for Beginners)
 How to Draw Kurama Step by Step (Easy Chibi Nine-Tails)
 How to Draw Mario Step by Step (Easy Chibi Version)
 How to Draw Cat Noir Step by Step (Easy Chibi Hero)
 How to Draw Master Chief Step by Step (Easy Chibi Armor)
 How to Draw Tinkerbell Step by Step (Easy Flying Chibi)
 How to Draw Tanjiro Step by Step (Easy Demon Slayer Chibi)
 How to Draw a Chibi Step by Step (Easy 2-Head Method)
 How to Draw Darth Vader Step by Step (Easy Chibi Version)

