
When I teach this animal, I start by talking about grace. A deer has a long, level back with a neck that lifts the head high, and its legs are so thin they hardly look strong enough to hold it up. The good news is that all of it starts from one oval and two little circles. Here's how to draw a deer step by step, ending with a friendly young buck standing in the grass, white tail and all.
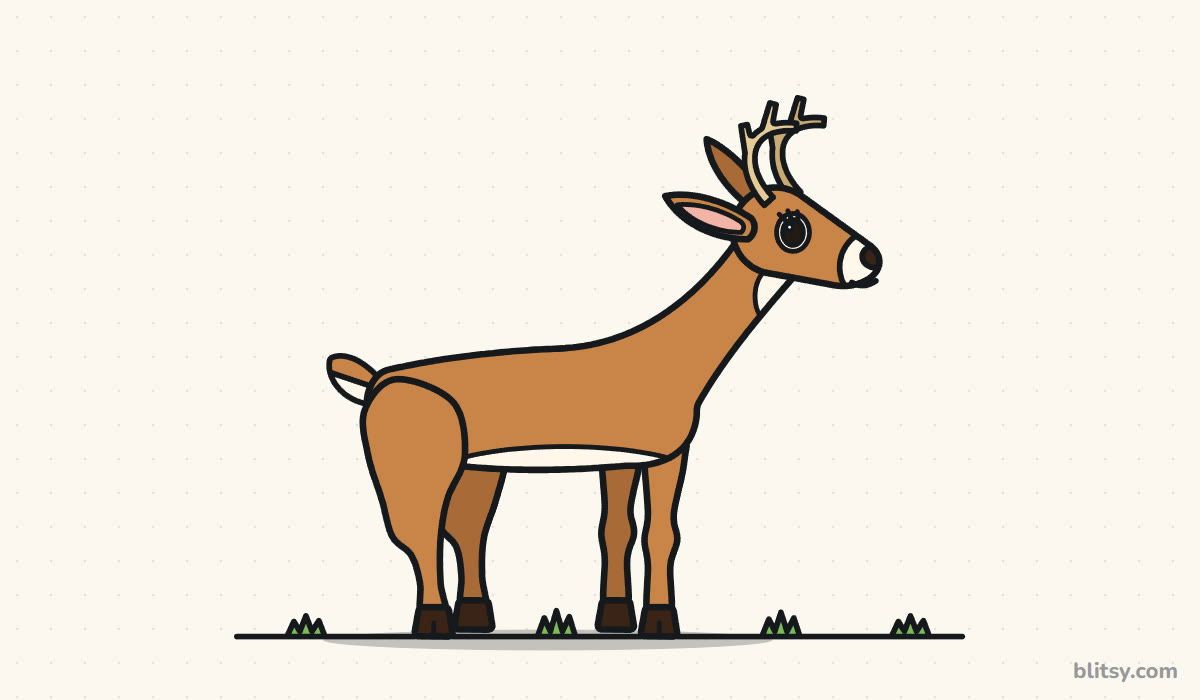
Look for the blue: that's what this step adds. The gray lines are things you've already drawn.
Quick overview
⏱️ Time: around 30 minutes, plus coloring
🎯 Level: easy, good for kids from about 7 and up
✏️ Steps: 12
🦌 You'll draw: a white-tailed deer standing sideways
Supplies for a Forest Deer Sketch
- A pencil for light sketching (HB or 2B)
- A clean eraser that won't smudge
- A black fineliner or thin marker for the outline
- Colored pencils or crayons in light brown, brown, dark brown, tan, pink plus green
- Plain white paper, turned sideways
Turn the paper sideways, because a deer is longer than it is tall and the antlers still need room at the top.
How to Draw a Deer Step by Step
Step 1: Draw a long body oval and two head circles
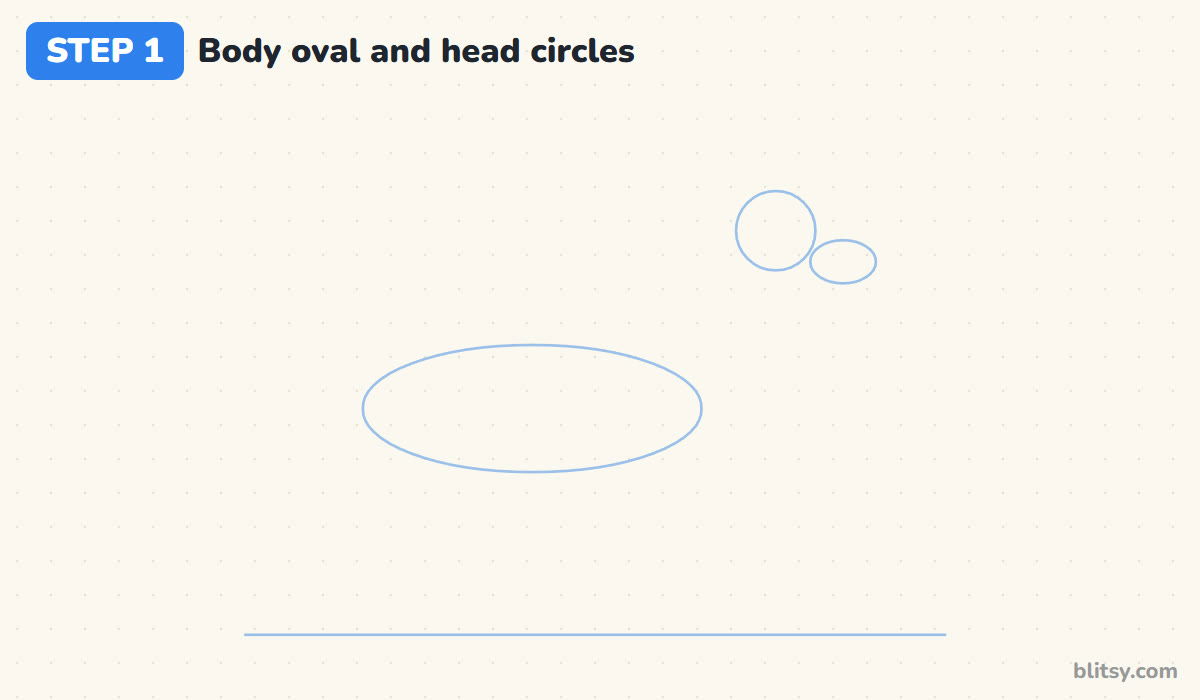
Lightly draw a ground line near the bottom. A little below the middle of the page, sketch a long, flat oval for the body, closer to the left side. Then move up and to the right and draw a circle for the head with a smaller oval touching its front for the snout.
💡 Tip: The head circle should sit about one body height above the oval. Any lower and the deer looks like it's grazing.
Step 2: Add neck, leg and tail guide lines
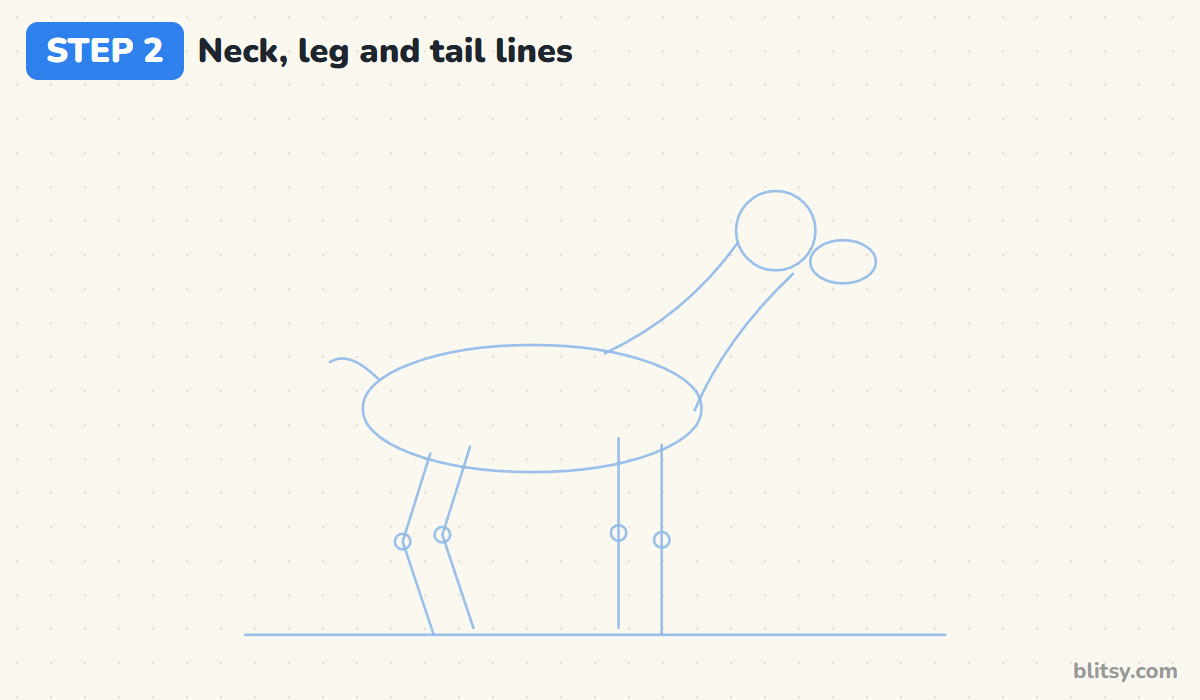
Connect the front of the oval to the head with two lines that lean forward. For the front legs, drop two straight lines to the ground. The back legs are different: each one goes down, bends backward at a small circle, then goes down again. Finish with a tiny curve at the back for the tail.
💡 Tip: That backward bend on the hind leg is the hock. It's what makes the legs look right.
Step 3: Outline the body and the graceful neck
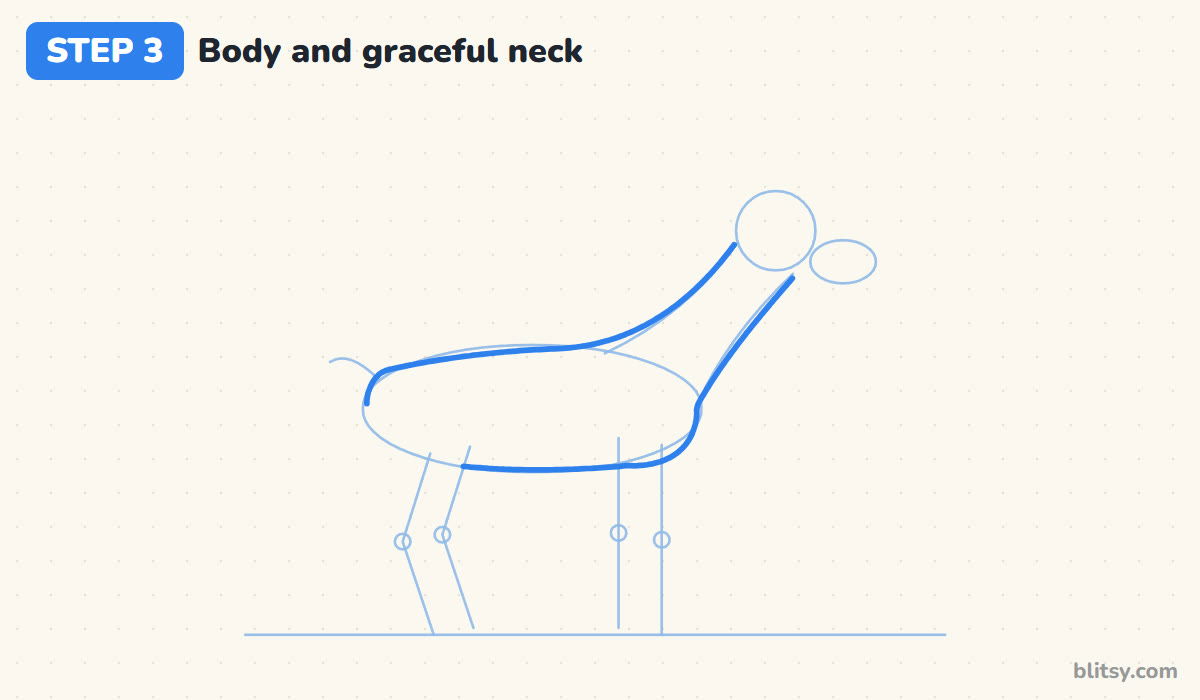
I draw the back first, nearly level, and let it curve smoothly up into the neck and on to the head. Come back down the front of the neck to a rounded chest and run a gentle belly line toward the rear. I make the neck wide at the shoulders and narrower under the head.
💡 Tip: Don't make a sharp corner where the back meets the neck. One smooth swoop looks more elegant.




Step 4: Shape the head with a slim snout
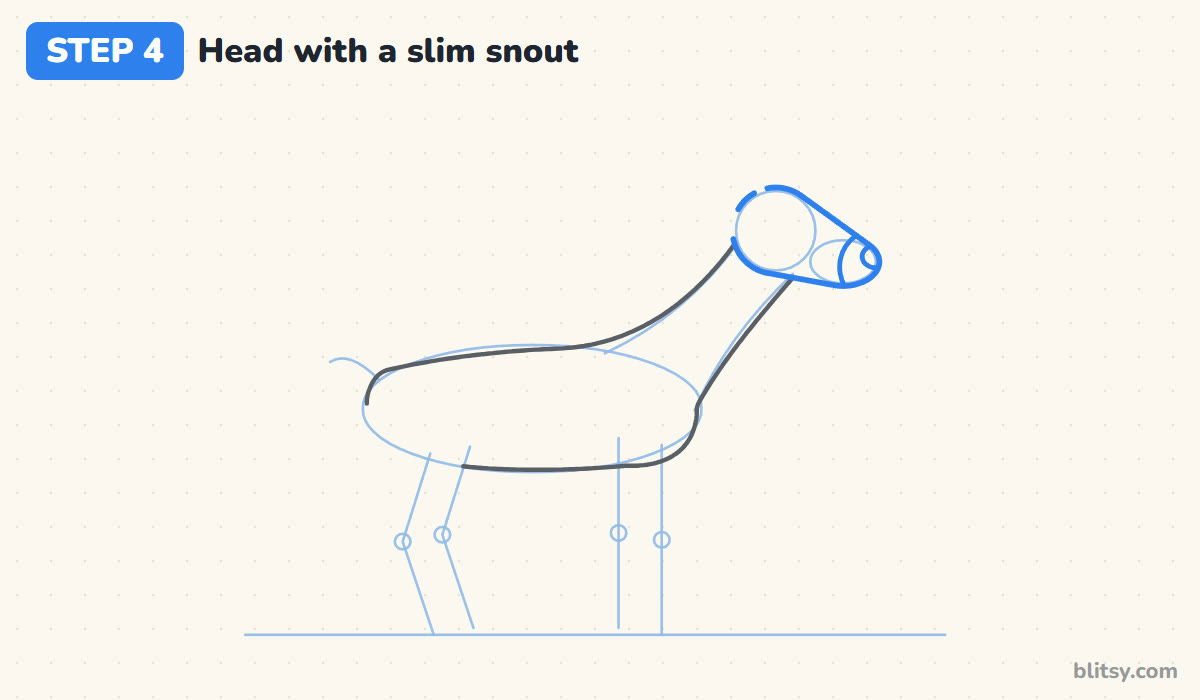
Wrap a line around the head circle and the snout oval so they join into one shape that narrows toward the nose. At the tip, draw a small round nose and a curved line behind it to mark the light muzzle. I keep the snout a little lower than the top of the head, which gives the face a gentle downward tilt.
💡 Tip: A deer's face is long and narrow. If the snout ends up as wide as the head, it starts to look like a dog.
Step 5: Draw two big ears
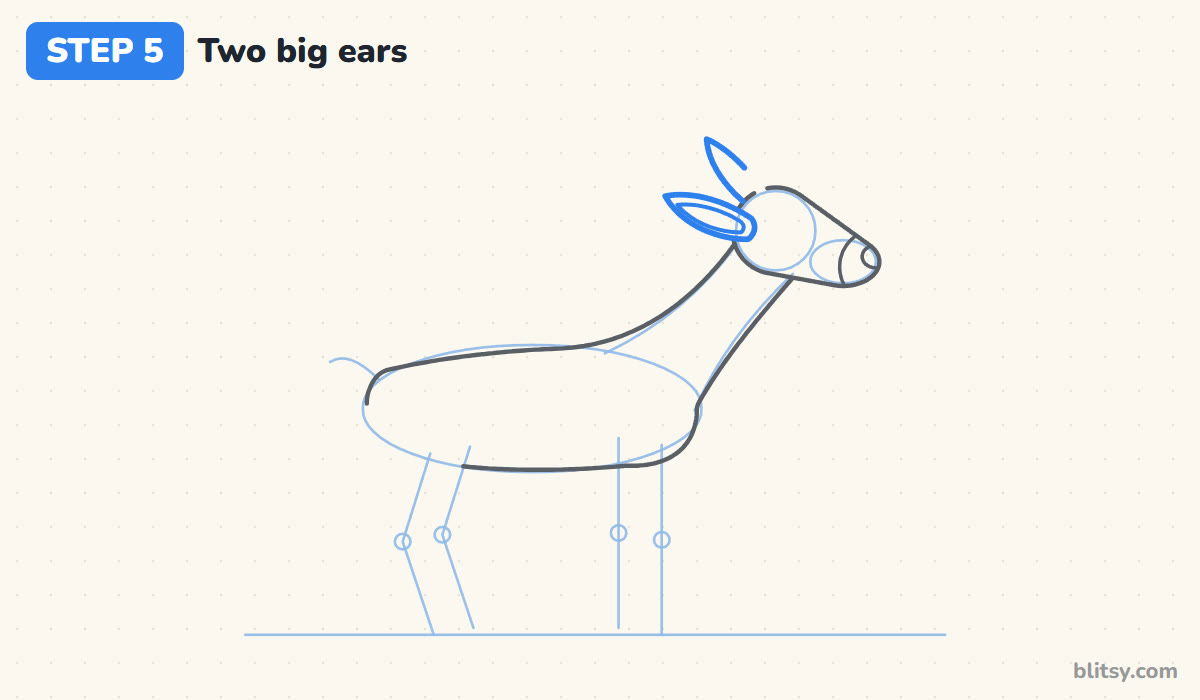
Deer have large ears for the size of their heads, so I tell beginners not to be shy here. Draw a big leaf shape coming out of the back of the head and pointing back, then a smaller leaf inside it. Behind it, add the second ear pointing more upward, partly hidden by the head.
💡 Tip: Each ear can be almost as long as the head itself. Small ears make the deer look like a goat.
Step 6: Add small branching antlers
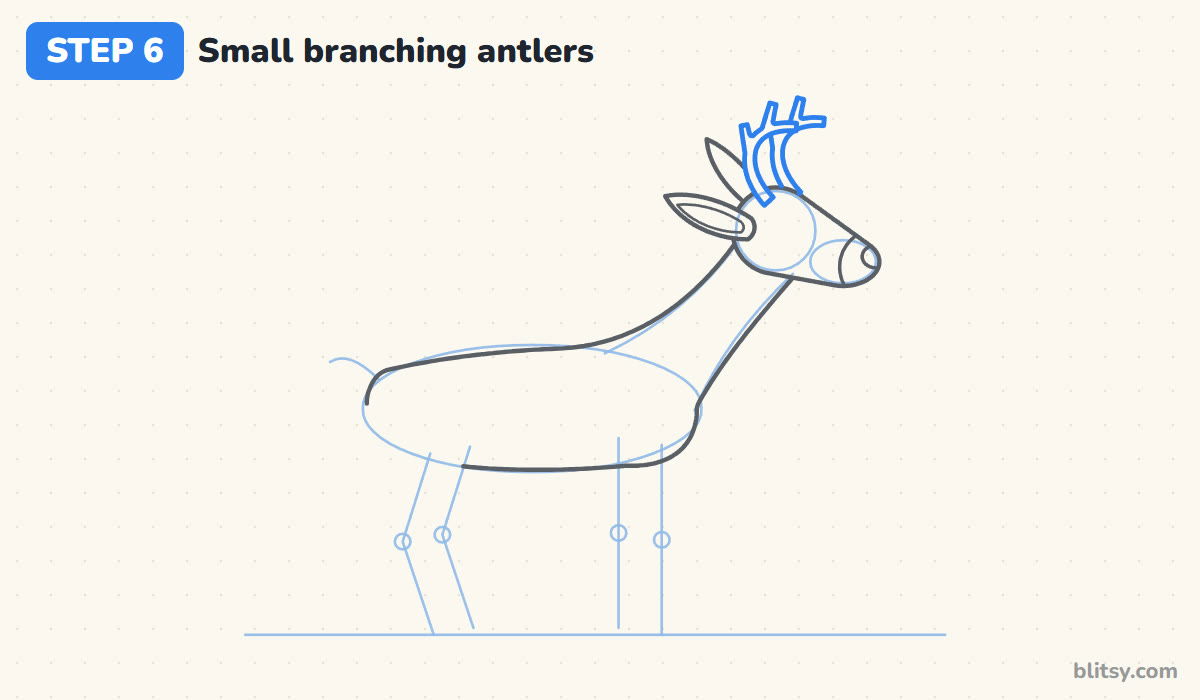
From the top of the head, draw a thin curved branch that leans back first and then bends forward, like a hook. Add two short points sticking up from it. Draw the second antler the same way, a little to the right and slightly behind the first.
💡 Tip: Draw each antler as a narrow tube with two sides, not a single line, so you'll have room to color it later.
Step 7: Draw the back legs with a bend
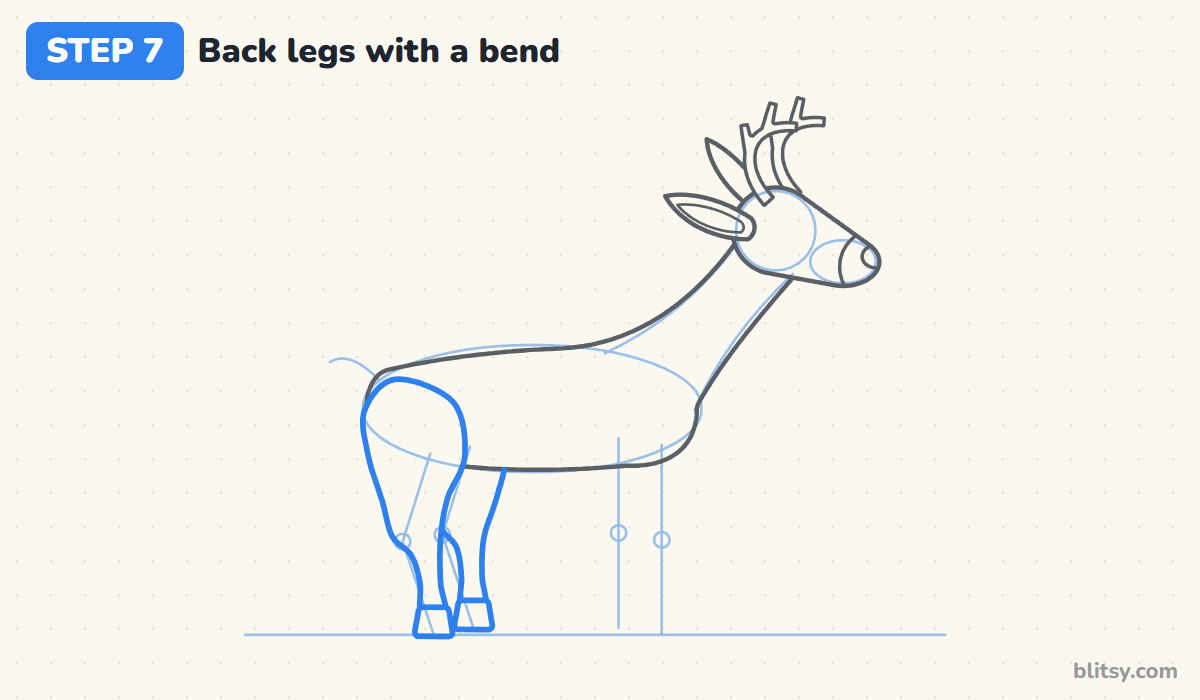
Start with a big rounded thigh shape over the back of the body. From there, the leg narrows as it goes down, pokes backward at the hock and then drops straight to a small hoof. Draw the far back leg just to the right, partly hidden by the near one.
💡 Tip: Keep the lower leg really thin, about as wide as the hoof. That's where a deer gets its light, springy look.


Step 8: Add slim front legs and hooves
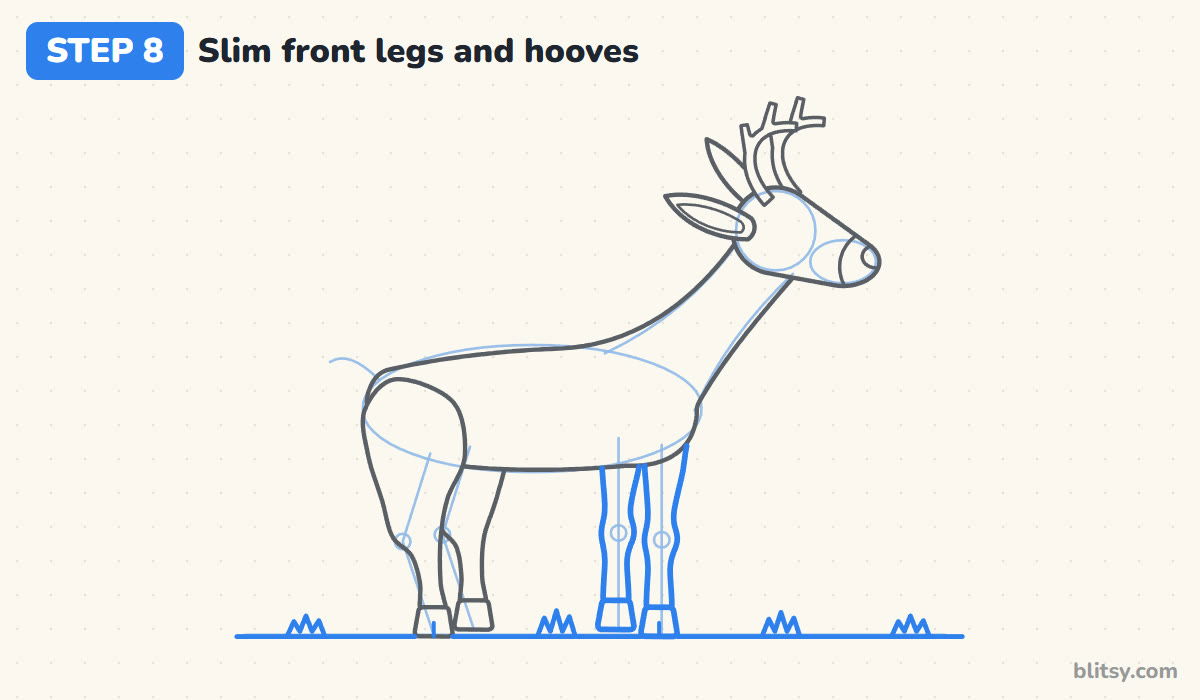
The front legs are straighter, the easiest part of the deer. Draw each one as two long, thin lines with a small bump for the knee, ending in a little hoof. Put the far front leg slightly to the left of the near one. Then draw a short line up the middle of each near hoof to split it, add the ground line and a few grass tufts.
💡 Tip: Let all four hooves rest on the same ground line, otherwise the deer will look like it's floating.
Step 9: Draw the tail, belly and throat patches
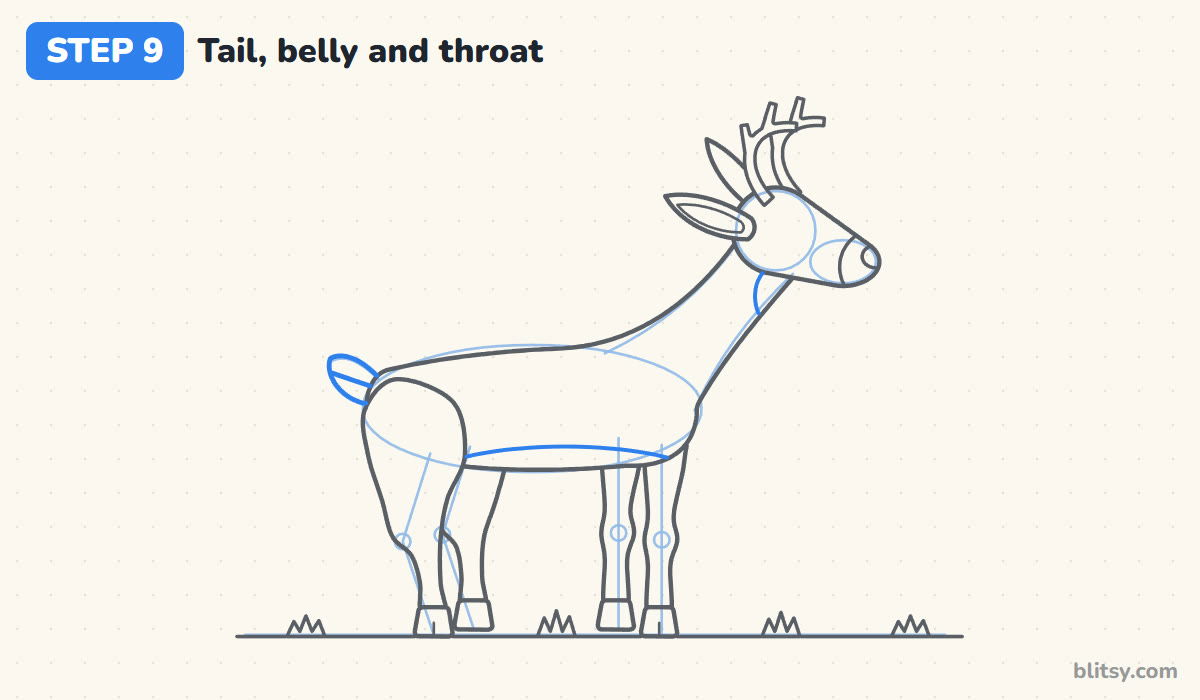
At the top of the rump, draw a short, round tail that flicks up and back, with a line across it to mark the white underside. Next, draw a soft curve along the belly to mark the white tummy. Finish with a small rounded patch on the throat just under the chin.
💡 Tip: The white tail is why this deer is called a white-tailed deer.
Step 10: Give it a gentle eye and a smile
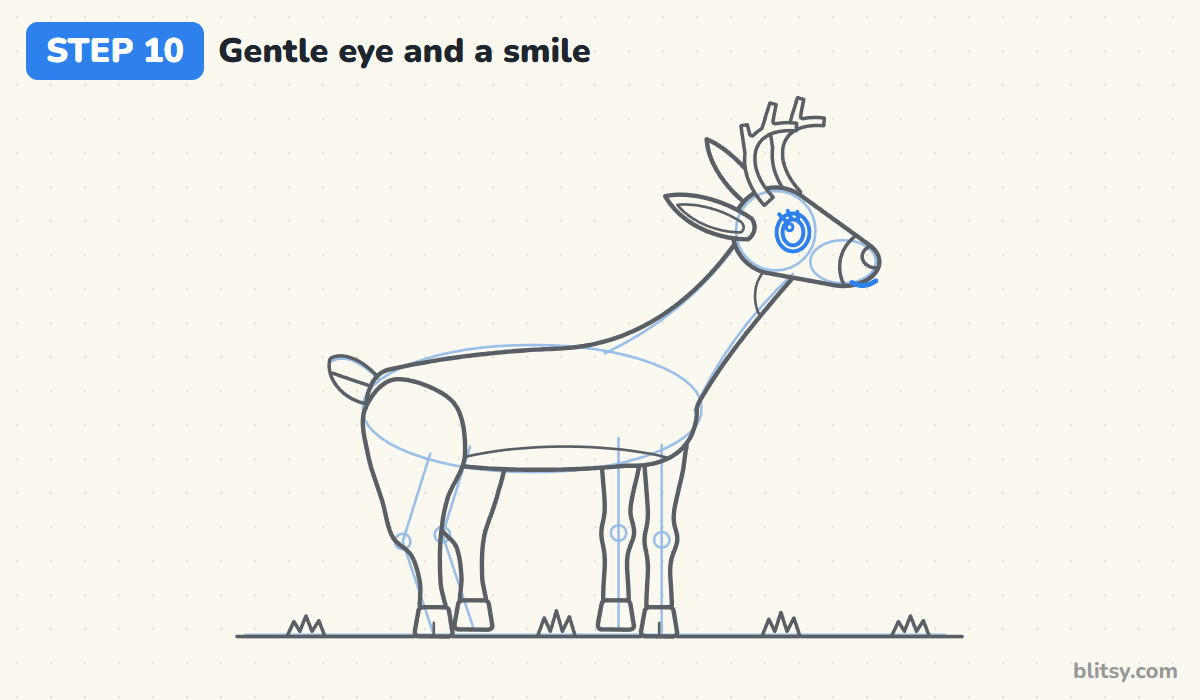
Place a large oval eye on the side of the head, a bit behind the middle. Draw a ring around it for the pale fur deer have there, then leave a small shine dot inside and add three short lashes. Under the nose, a tiny curve becomes the smile.
💡 Tip: Big eyes set wide apart are what make deer look so calm. Make this one generous.
Step 11: Ink the deer and erase the guides
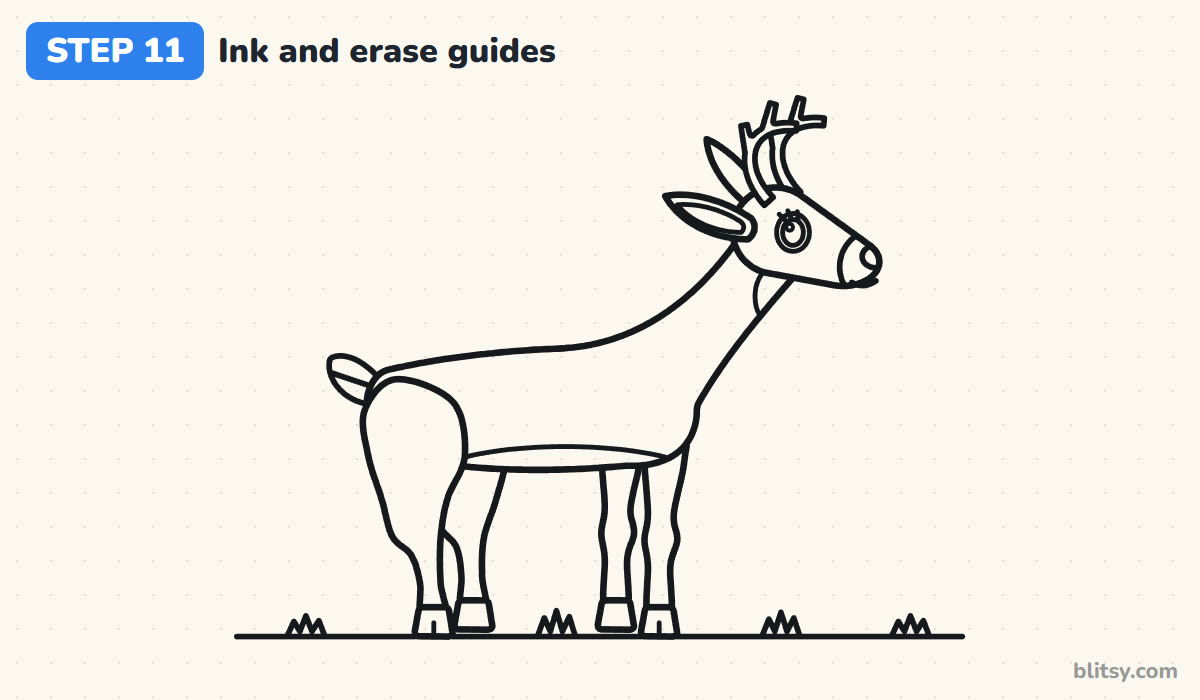
Trace over all your keeper lines with the fineliner, from the antlers down to the hooves. Skip the oval and the circles, plus the straight guide lines. Once the ink has dried, erase every bit of pencil that's left.
💡 Tip: Ink the thin legs with slow, steady strokes. Quick strokes tend to wobble on long, narrow shapes like these.


Step 12: Color your deer
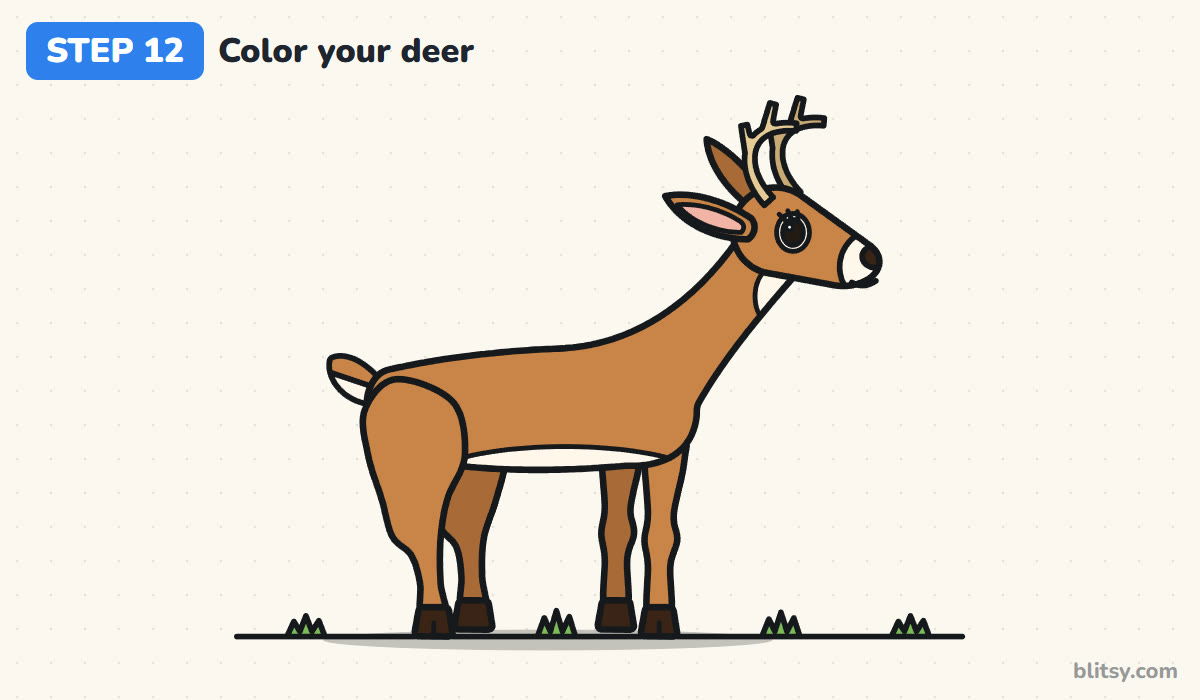
Light brown goes on the whole body and head, including the near legs and the top of the tail. Use a slightly darker brown for the far legs and far ear, so they sit back. Leave the belly and throat white, along with the muzzle, the eye ring and the tail underside. Then add tan antlers and a dark brown nose and hooves. Pink goes inside the ear, green on the grass.
💡 Tip: Press lightly with the light brown first and go over the back a second time. A darker back and lighter sides look more natural.
Deer Drawing Slip-Ups That Make It Look Like a Dog
- Thick, straight legs. Deer legs are very slim below the knee and hock. Thin them out until they look almost too delicate.
- No bend in the back leg. A back leg that goes straight down looks stiff. Add the backward point at the hock.
- Tiny ears. Deer ears are big and stick out to the sides. Small ears turn the head into a dog's or a goat's.
- A short neck. If the head sits right on the shoulders, lift it higher with a longer, curved neck.
- Antlers that are too big. On a beginner drawing, huge antlers take over the page. Two small points per side are plenty.
Turning Your Buck Into a Doe or a Fawn
The body and legs here follow the same plan as my horse drawing tutorial, just slimmer, so practicing one helps with the other. To draw a doe, simply leave off the antlers. For a fawn, shorten the legs a little, make the head and eyes bigger, and add rows of small white spots along the back. Want a ready-made picture to color afterward? These free deer coloring pages have plenty, and if you like woodland animals, try the wolf drawing tutorial next.
Free Deer Coloring Page and Printable Step Guide
The free deer coloring page shows a colored deer at the top to copy from, a small key that matches each color to a body part, and a large outline to color below. The step-by-step PDF guide holds all 12 steps with pictures and tips for drawing away from the screen. Both print on Letter or A4 paper.
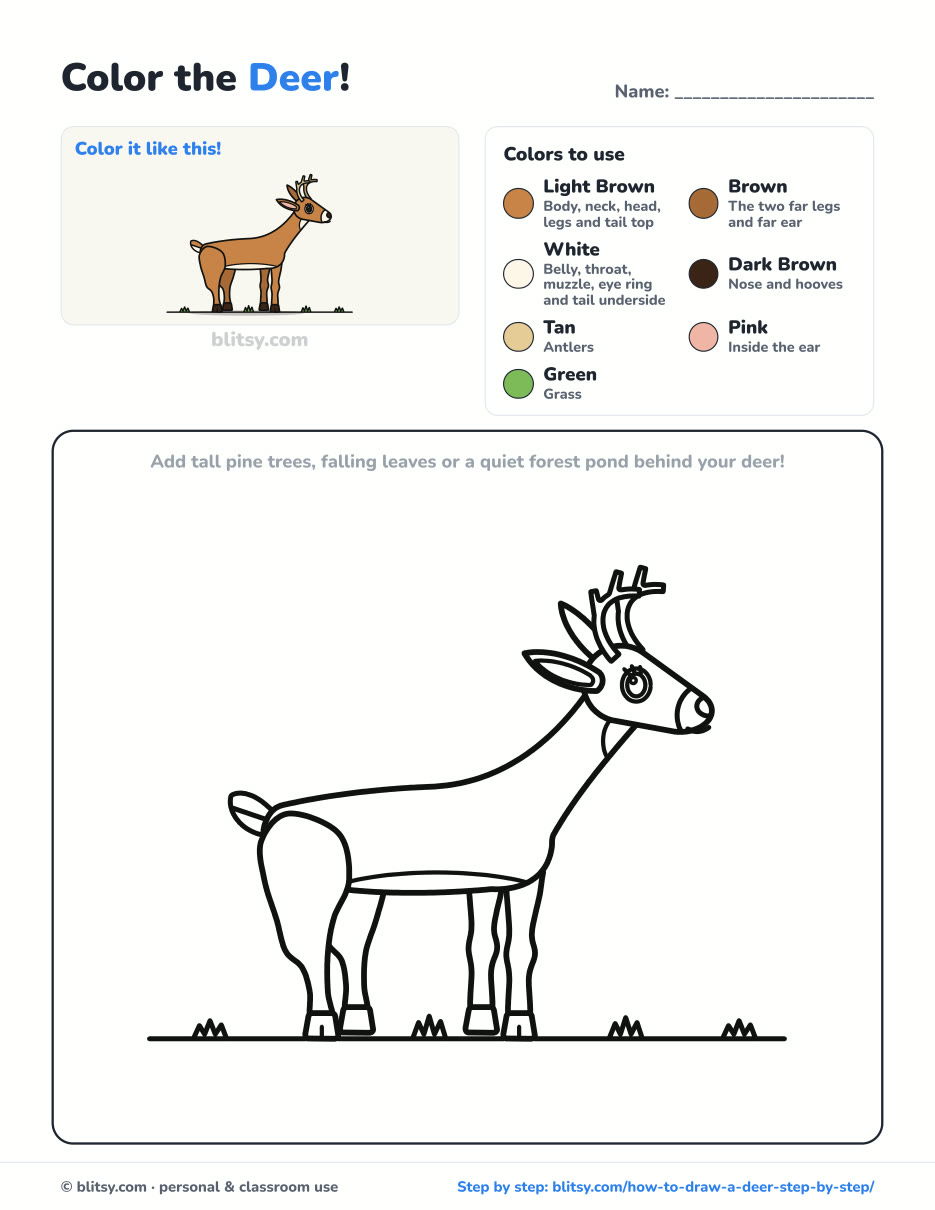
Black outlines with a colored example and the color names at the top. Ready to print and color.
⬇️ Download Coloring PageEvery step picture with its instructions and tips, to keep beside your paper while you draw.
⬇️ Download Drawing Guide📱 On a phone? Tap a download button, then open the file and choose Share → Save to Files or Print. On a computer, the PDF opens or saves straight to your Downloads folder.
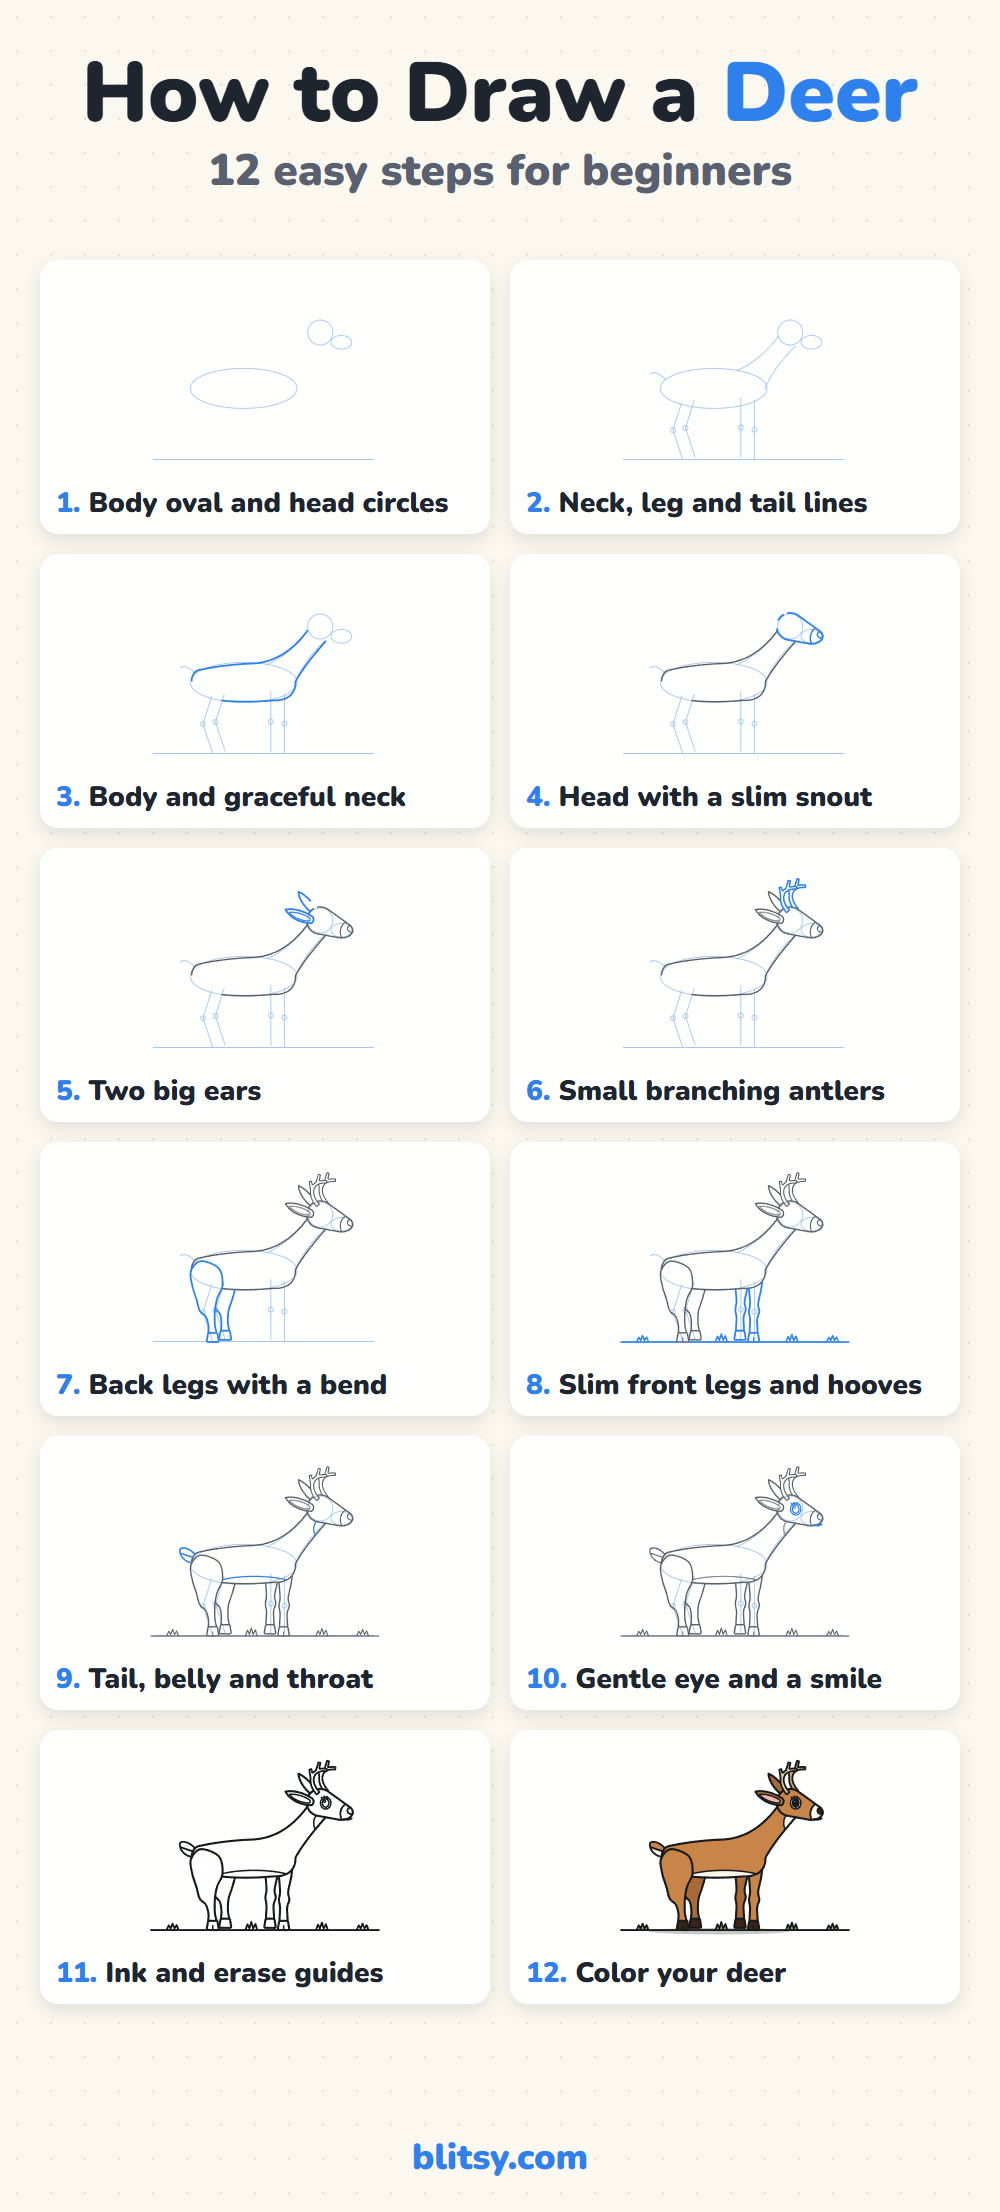
A Pinnable Deer Cheat Sheet
More Animals to Draw After Your Deer
Each of these is a full step-by-step lesson with a picture for every stage, so the same oval-and-circle method carries over.
- Horse Drawing: A strong four-legged animal with a flowing mane in this how to draw a horse step by step lesson.
- Wolf Drawing: Another woodland animal, with pointed ears and a bushy tail, in the wolf drawing tutorial.
- Arctic Fox Drawing: A fluffy white fox for winter scenes in this arctic fox drawing step by step guide.
- Bunny Drawing: Big ears again, this time on a small round body, in the bunny drawing tutorial.
- Bear Drawing: A brown bear walking through the woods in this how to draw a bear tutorial.
Deer Drawing Questions Kids Ask Most
What is the easiest way to draw a deer?
Start with a long oval for the body and a small circle for the head, up and to the right. Join them with a curved neck and add thin legs. The ears and antlers come next, then the face.
How do you draw deer legs?
Keep them long and very thin. The front legs are almost straight with a small knee bump. The back legs bend backward at the hock, about halfway down.
How do you draw antlers for beginners?
Draw one curved branch that leans back and then forward, and add two short points pointing up. Draw it as a narrow tube so it's easy to color.
What colors do you need to color a deer?
Light brown covers most of the coat. Leave the white parts white (belly, throat, muzzle, tail underside). Dark brown goes on the nose and hooves, and tan on the antlers.
One quiet oval is all it takes to begin, so find a sunny spot at the table and let your deer step out of the woods. 🦌✏️
Related posts:
 How to Draw a Car Step by Step (Easy Drawing for Beginners)
 How to Draw a Whale Step by Step (Easy for Beginners)
 How to Draw an Arctic Fox Step by Step (Easy for Beginners)
 How to Draw a Shark Step by Step (Easy for Beginners)
 How to Draw a Chicken Step by Step (Easy for Beginners)
 How to Draw a Fish Step by Step (Easy Goldfish for Beginners)
 How to Draw a Snowman Step by Step (Easy for Beginners)
 How to Draw Hands Step by Step (Easy Palm View for Beginners)
 How to Draw an Airplane Step by Step (Easy Jet for Beginners)
 How to Draw a Mouse Step by Step (Easy for Beginners)
 How to Draw a T-Rex Step by Step (Easy for Beginners)
 How to Draw a Pig Step by Step (Easy for Beginners)

