
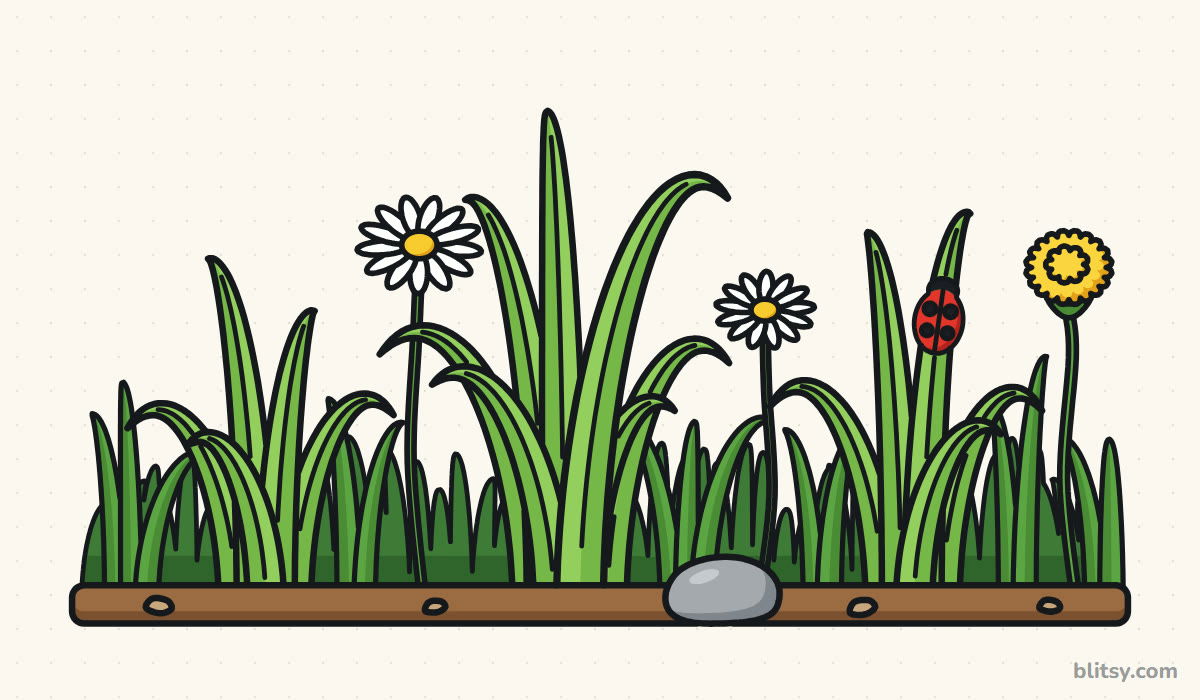
Grass shows up in almost every outdoor picture, yet most of us still draw it as a row of spiky zigzags. Grass on its own is really a texture, so I teach it as one small, lush meadow patch that covers everything at once. Here you'll learn how to draw grass step by step: a single blade that bends, clumps that fan out from one point, then three rows that give the patch depth. A few flowers and a ladybug make it worth hanging on the fridge.
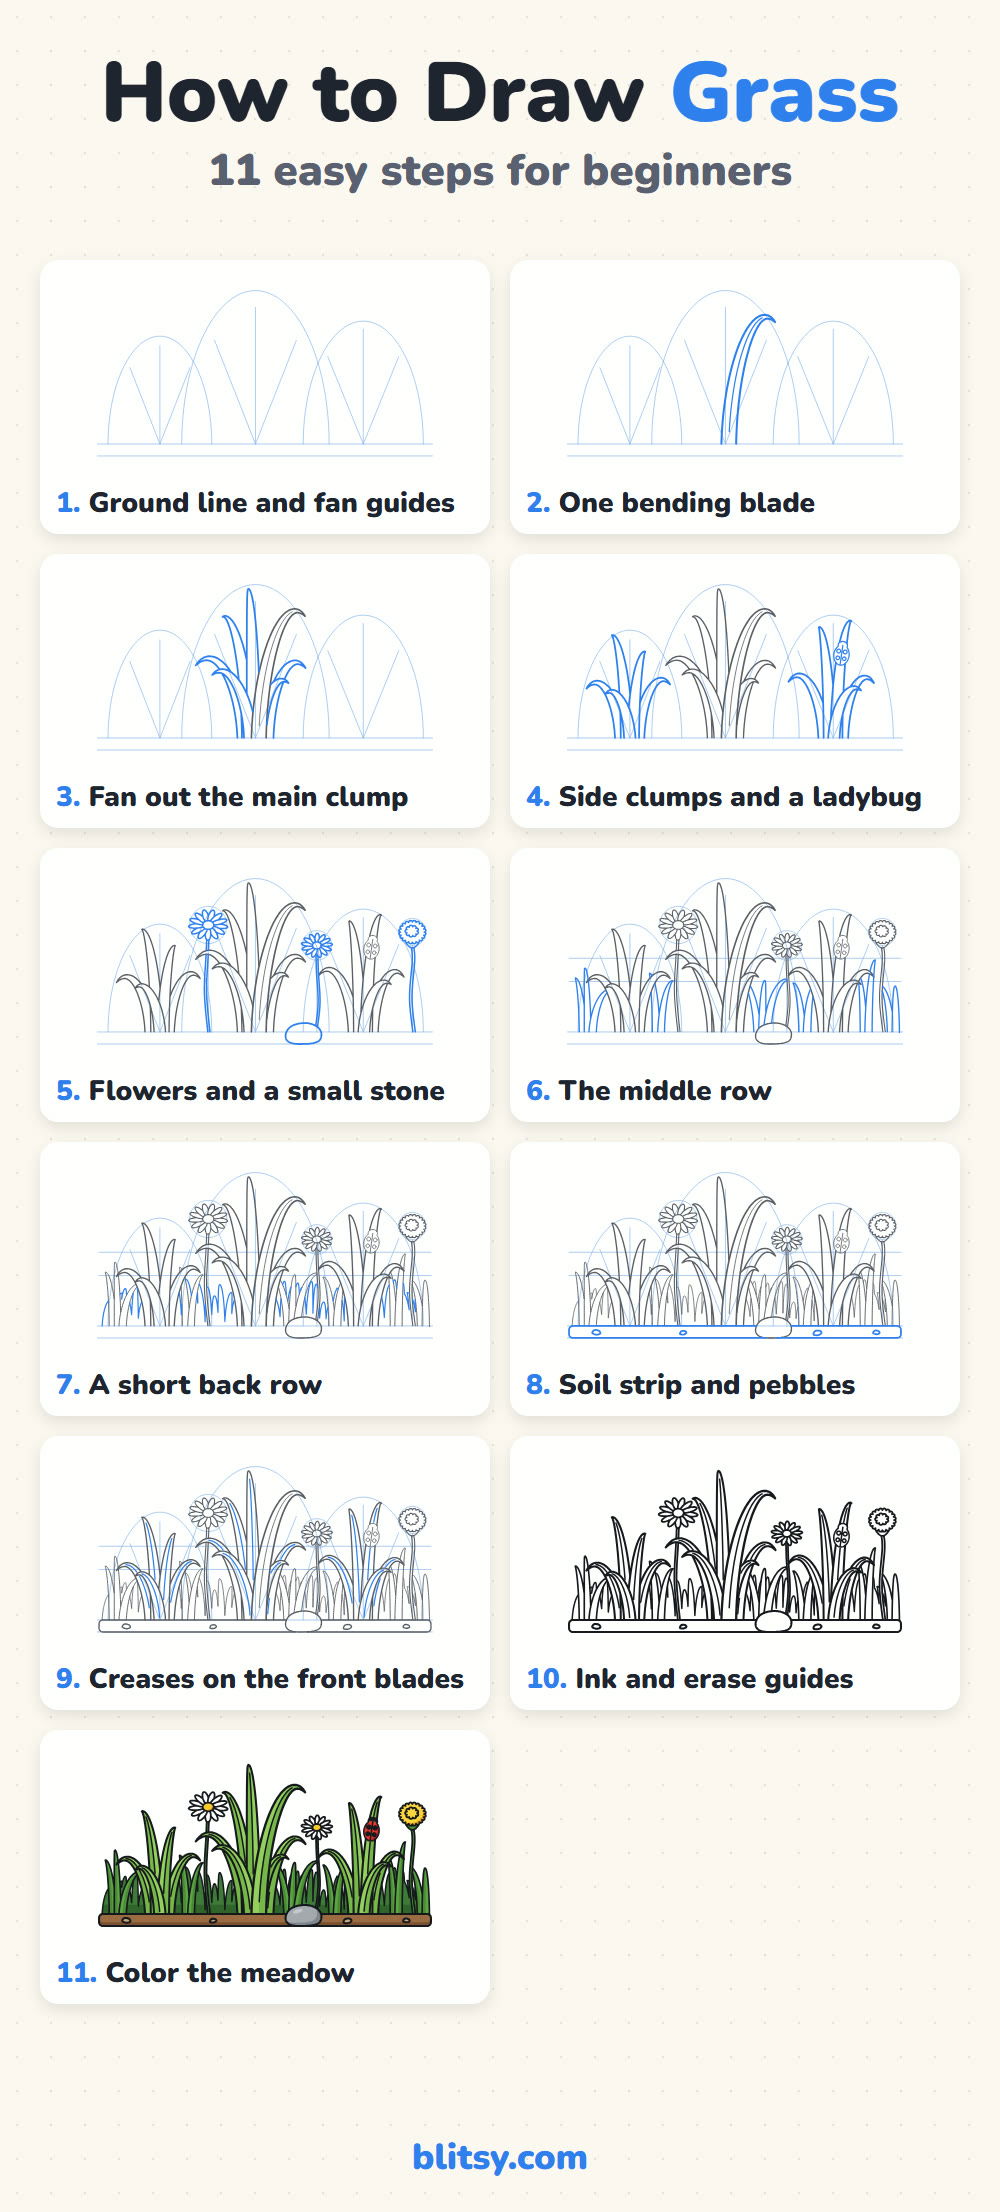
Each picture paints that step's fresh lines blue. Gray lines come from earlier steps, and the pale blue shapes are light guides you'll rub out before coloring.
Quick overview
⏱️ Time: about 35 to 45 minutes with color
🎯 Level: beginner; kids from around 7 can manage it, younger ones can stop after the clumps
✏️ Steps: 11
🌱 You'll draw: three fanned grass clumps, a middle and a back row, two daisies, a dandelion, a ladybug, a stone and a strip of soil
Pencils and Greens for a Grassy Patch
- A regular HB pencil for light guides
- An eraser (a kneaded one lifts guides without smudging)
- A black felt-tip pen or fineliner for the final lines
- Colored pencils or markers: a dark, a medium and a light green, plus yellow, red, gray and brown
- A sheet of plain paper turned sideways
Only have one green? Press hard for the back row, medium for the middle and lightly for the front, and you'll still get three shades.
How to Draw Grass Step by Step
Step 1: Draw the ground line and fan guides
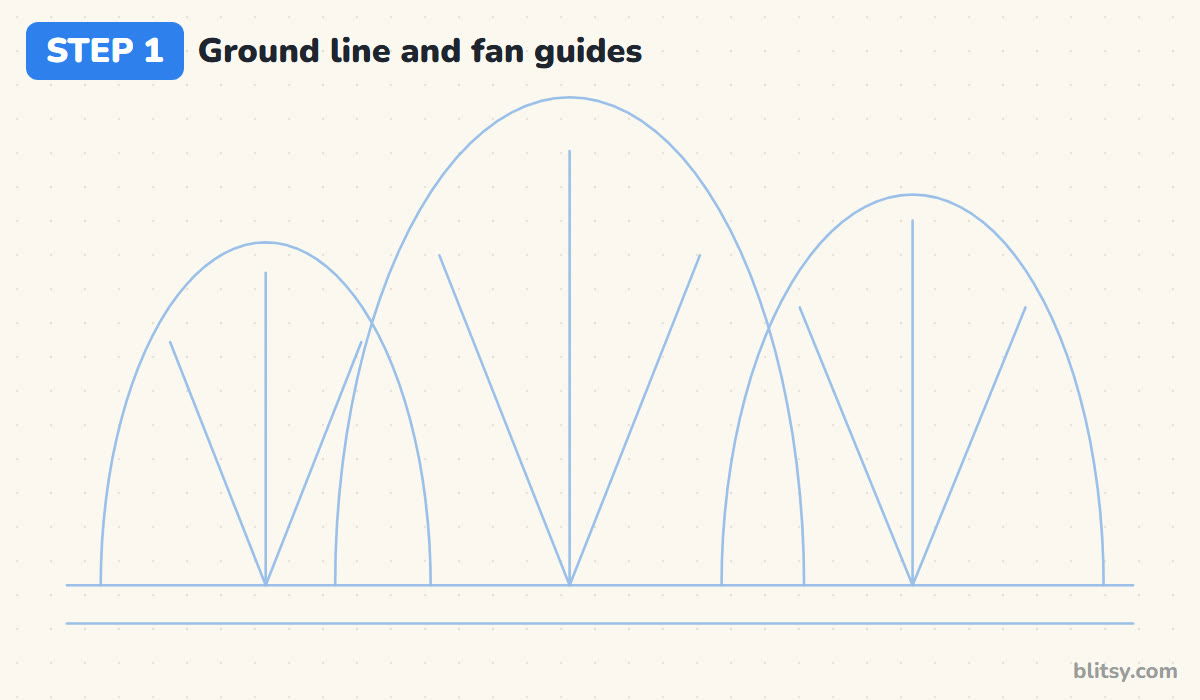
Near the bottom of your page, draw a long ground line and a second one a finger's width below it for the soil. Above it, sketch three tall arches, the middle one biggest. Inside each arch, draw three straight lines spreading up from one point on the ground, like an open hand. The arches decide how tall and wide each clump grows.
💡 Tip: Make the middle arch the tallest. Equal heights look like hedges, not grass.
Step 2: Draw one bending blade
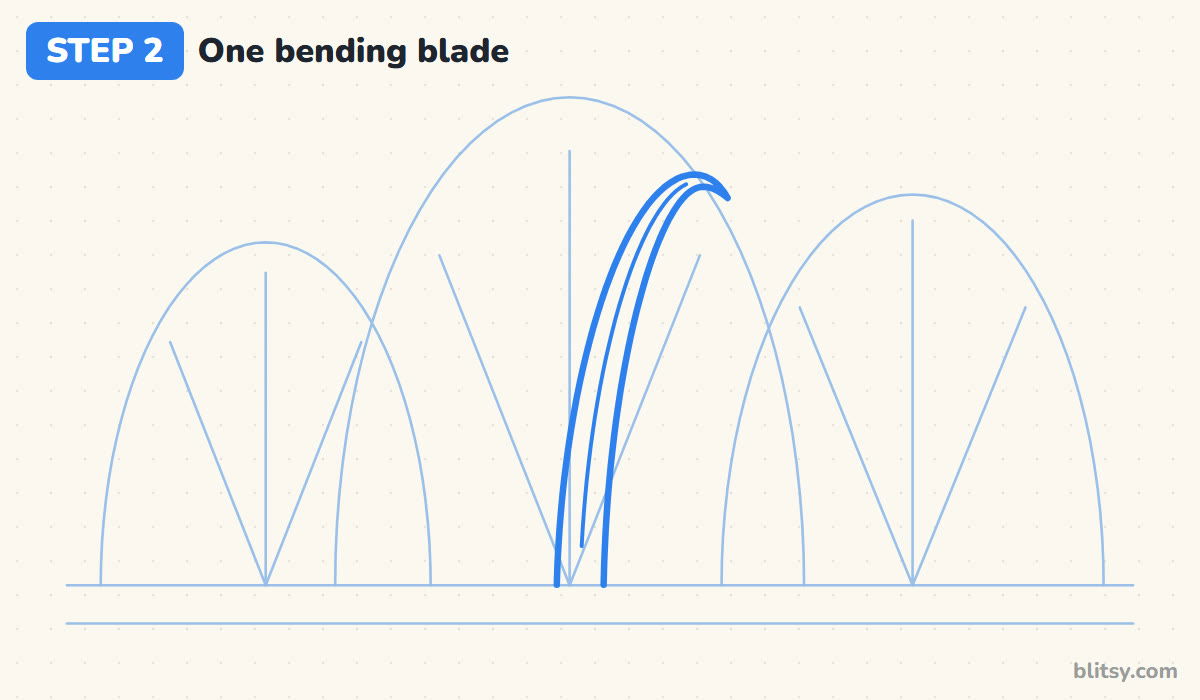
This is the shape everything else is built from, so take your time. Start at the ground in the middle clump and draw a long line that rises, leans right and curls over at the top. Come back down from the same pointed tip with a second line, so the blade is wide at the bottom and thin at the tip. I finish with a light crease down the middle; that fold makes it look like a leaf instead of a ribbon.
💡 Tip: Draw each edge in one smooth pull from the shoulder, not in short scratchy strokes.
Step 3: Fan out the main clump
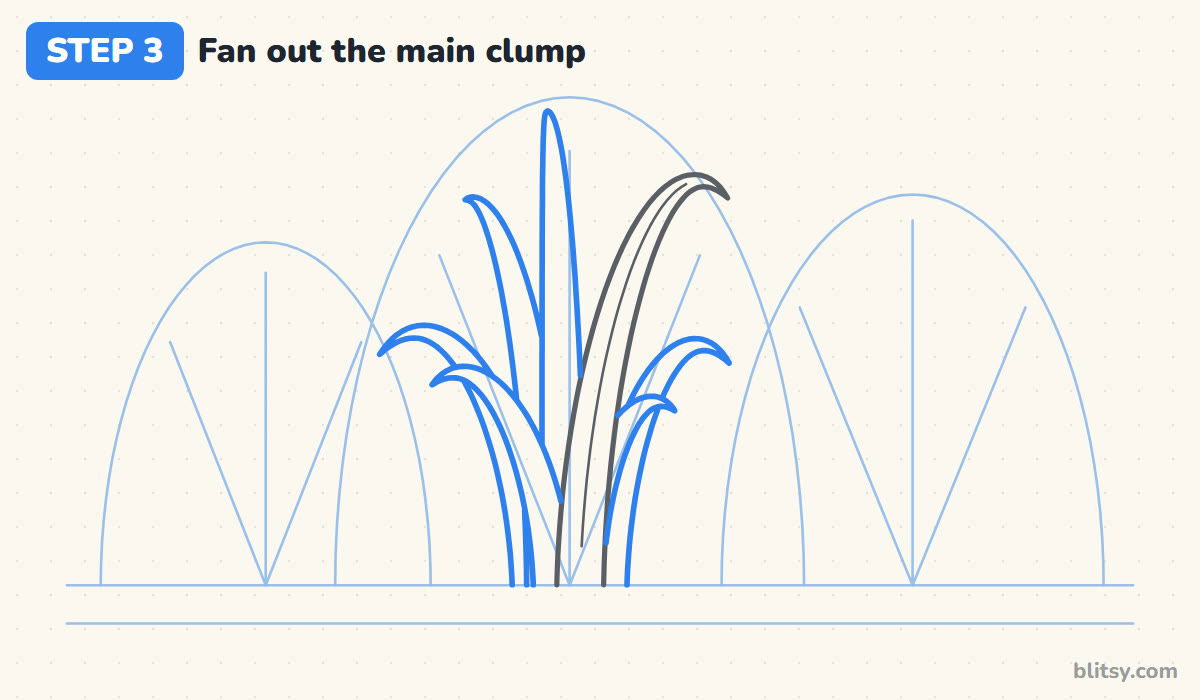
Now add more blades to the same clump. They all start near the base of your first blade and spread along the fan guides. I like one very tall, straight blade, a couple of shorter ones arching left and a small one tucked in on the right. Where a new blade passes behind the first one, stop the line at its edge.




💡 Tip: Stop lines where they meet a blade in front. That gap is what creates depth.
Step 4: Add the side clumps and a ladybug
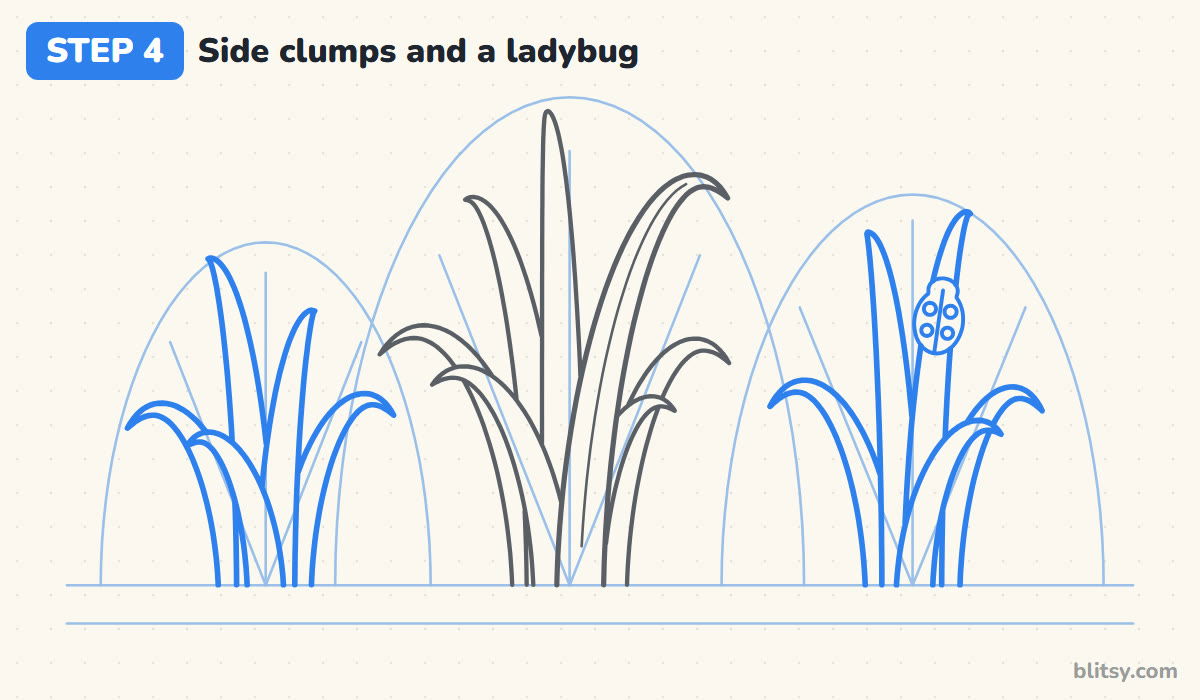
Repeat the fan idea inside the two smaller arches, with four or five blades each. Change the heights and bends, because real clumps never match. On the tallest blade of the right clump, draw a small oval ladybug climbing up, with a half circle for its head, a line down its back and four round spots.
💡 Tip: Give each clump at least one blade that droops; it keeps the patch from looking stiff.
Step 5: Draw the flowers and a small stone
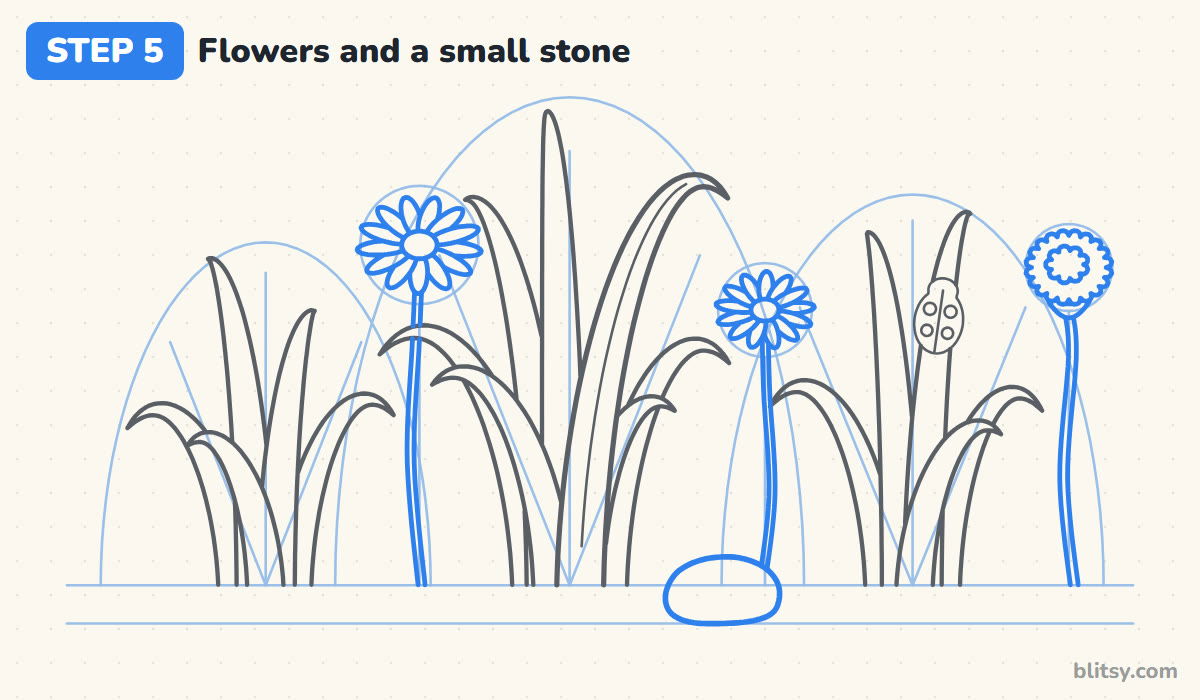
Lightly sketch three circles between the clumps for the flower heads. Two become daisies: a small center, then thin oval petals all the way around. The third is a dandelion with a bumpy round edge, a smaller bumpy ring inside and a little cup under it. Give each flower a thin stem down to the ground, and put a rounded stone on the soil line near the middle.
💡 Tip: Draw the daisy petals in pairs on opposite sides so they stay evenly spaced.
Step 6: Fill the gaps with a middle row
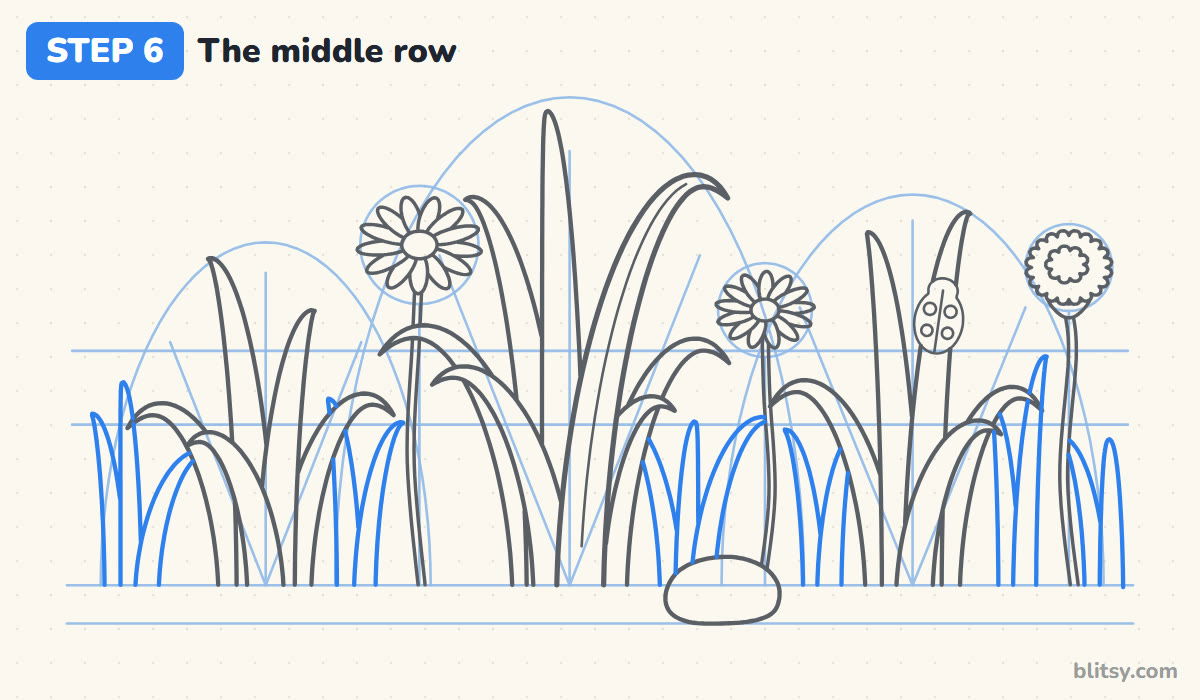
Draw two light lines across the page, one about halfway up the side clumps and one a little lower. Between the clumps, add small groups of two or three narrower blades reaching roughly to the higher line. These sit behind everything you've drawn, so stop each blade wherever it touches a clump, a stem or the stone.
💡 Tip: Keep these blades narrower than the front ones. Thinner shapes read as farther away.
Step 7: Add a short back row
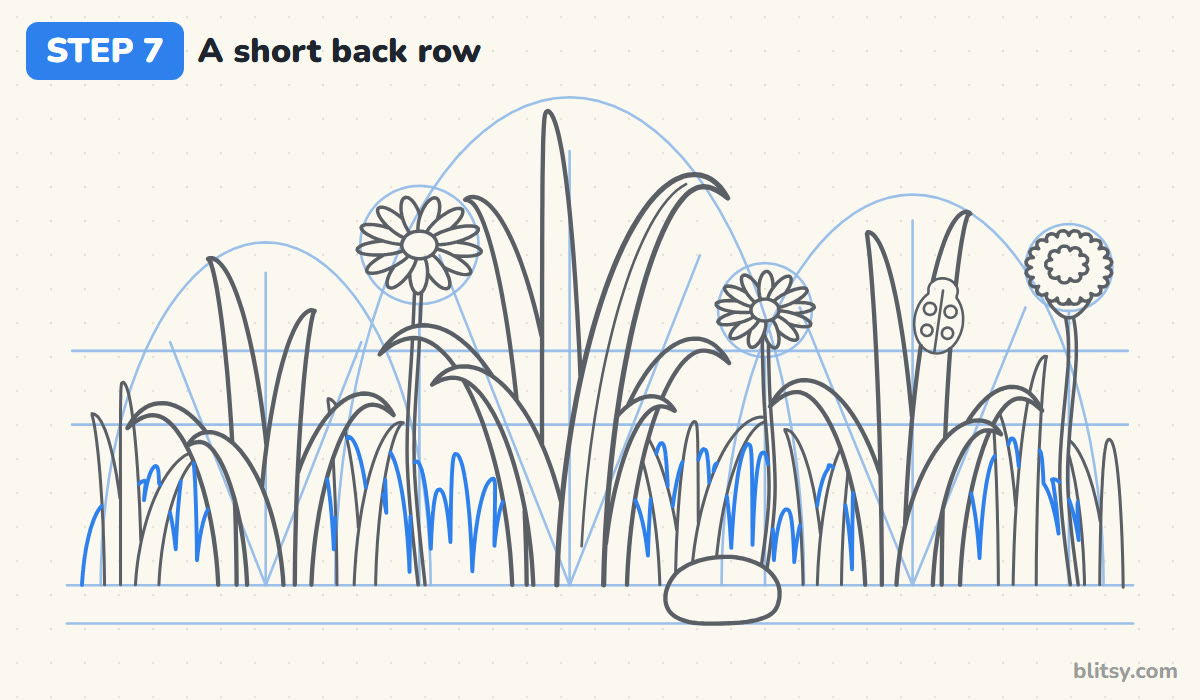
The back row is the easiest part. Draw a run of short, pointy blades along the ground, reaching only to the lower guide line, sloping down at both ends. You'll only see their tips peeking out between taller blades, which is exactly the effect you want.


💡 Tip: Small, quick points are enough here. Nobody looks closely at the back row.
Step 8: Draw the soil strip and pebbles
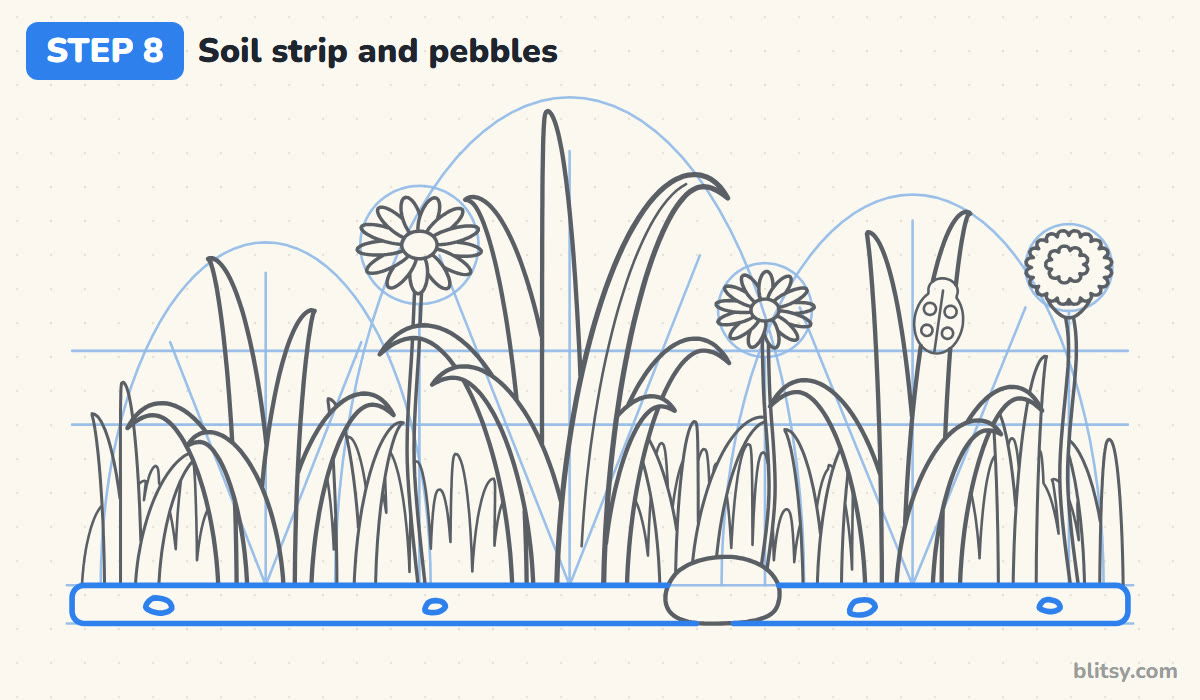
Trace the two ground lines into a long strip with rounded ends, running behind the stone. Every blade should now seem to grow out of the soil's top edge. Add three or four small pebbles inside the strip, well apart.
💡 Tip: Keep the soil strip thin. A thick band starts to steal attention from the grass.
Step 9: Add creases to the front blades
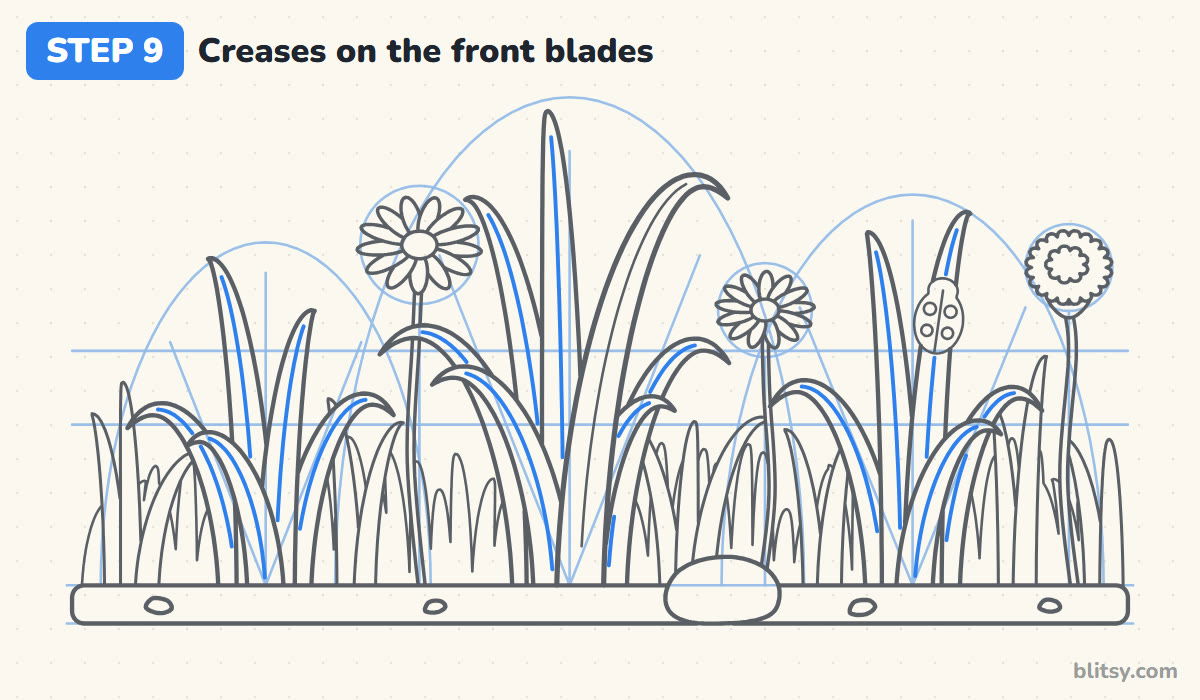
Go back to the big front clumps and draw a thin crease line down the middle of each wide blade, following its curve. Start a little above the soil and stop before the tip. Skip the crease on the middle and back rows; leaving them plain helps those blades sit farther back.
💡 Tip: Follow each blade's bend with the crease, so it curls over exactly where the blade does.
Step 10: Ink the lines and erase the guides
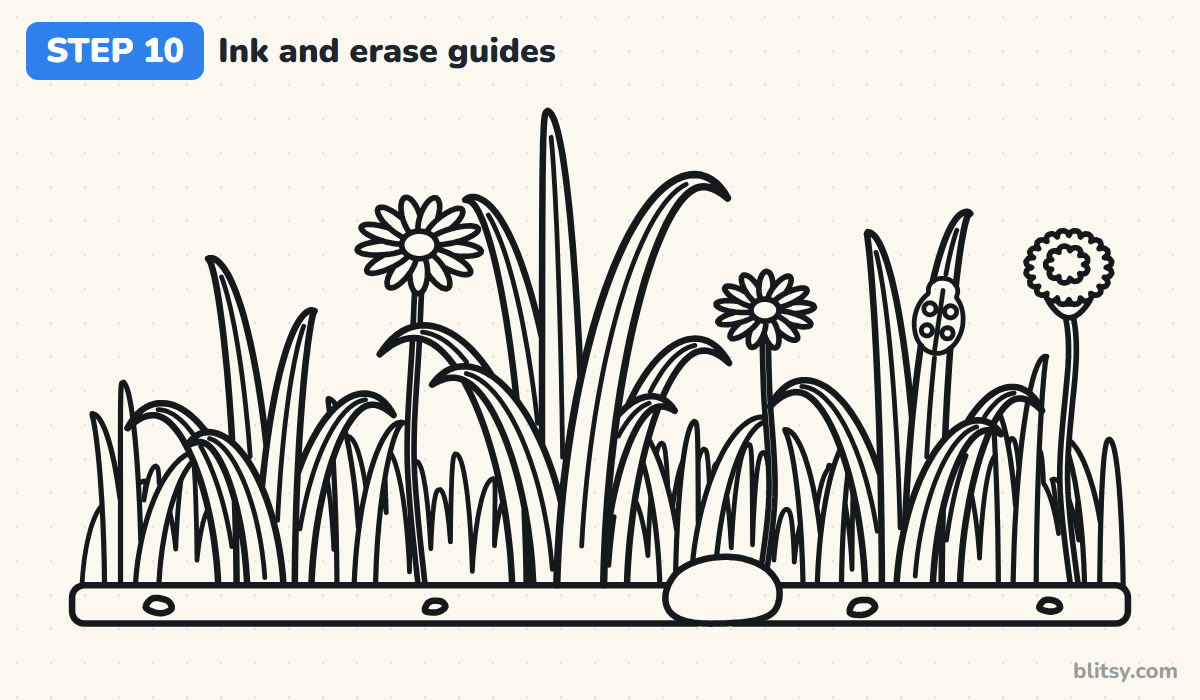
Go over every line you want to keep with the black pen. I ink the front clumps first because they matter most, then the flowers and ladybug, then the rows behind and the soil. Once the ink is properly dry, erase every guide: the arches, the fan lines, the circles and the two row lines.
💡 Tip: Ink the creases with a lighter touch so they stay thinner than the outlines.
Step 11: Color the meadow
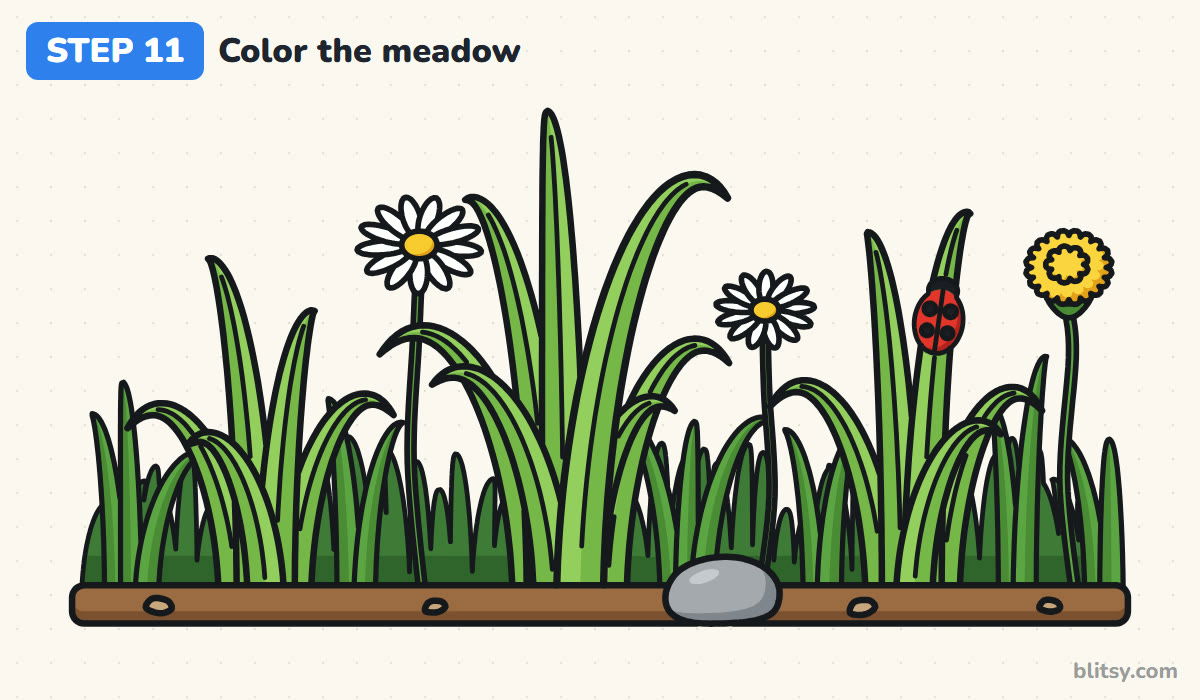
Color the back row dark green, the middle row medium green and the front clumps light green. That one change is what makes the patch look deep. On each front blade, shade one side of the crease a little darker. Then the daisies get white petals and yellow centers, the dandelion yellow, the ladybug red, the stone gray and the soil brown.


💡 Tip: Color each blade from the bottom up, in the direction it grows.
Why Grass Drawings Often Look Flat or Spiky
- A row of identical zigzags. Same-sized triangles look like a fence or a saw. Give every blade its own height and bend, and group them into clumps.
- Blades as single lines. One stroke per blade gives you hair, not grass. Give each front blade two edges that meet at a point, so it has width you can color.
- Every blade crossing every other blade. Lines that run through each other turn into a tangle. Decide which blade is in front and stop the ones behind at its edge.
- One shade of green for everything. Without a dark back and a light front, the patch looks like a flat sticker. Use three greens, or one green pressed at three strengths.
- Blades floating above the ground. If the bases don't touch the soil, the grass looks pasted on. Start every blade on the ground line.
Growing the Patch Into a Bigger Scene
Once you can fan a clump, the same blade works almost anywhere. Stretch the soil across the whole page and add a fence post, or let every blade lean one way as if the wind were blowing. Small kids can draw only the main clump and one daisy. Simple tufts and sunset fields both grow from this same blade. The ladybug can become a drawing of its own with the ladybug drawing tutorial, and if the dandelion was your favorite part, try the dandelion drawing tutorial next.
Free Meadow Coloring Page and Step Guide PDF
Prefer to skip straight to coloring? The free grass coloring page has a small colored example at the top to copy, plus a big outline of the meadow with space above it for a sky or a sun. The PDF drawing guide puts all 11 steps and tips on a few pages that print on Letter or A4.
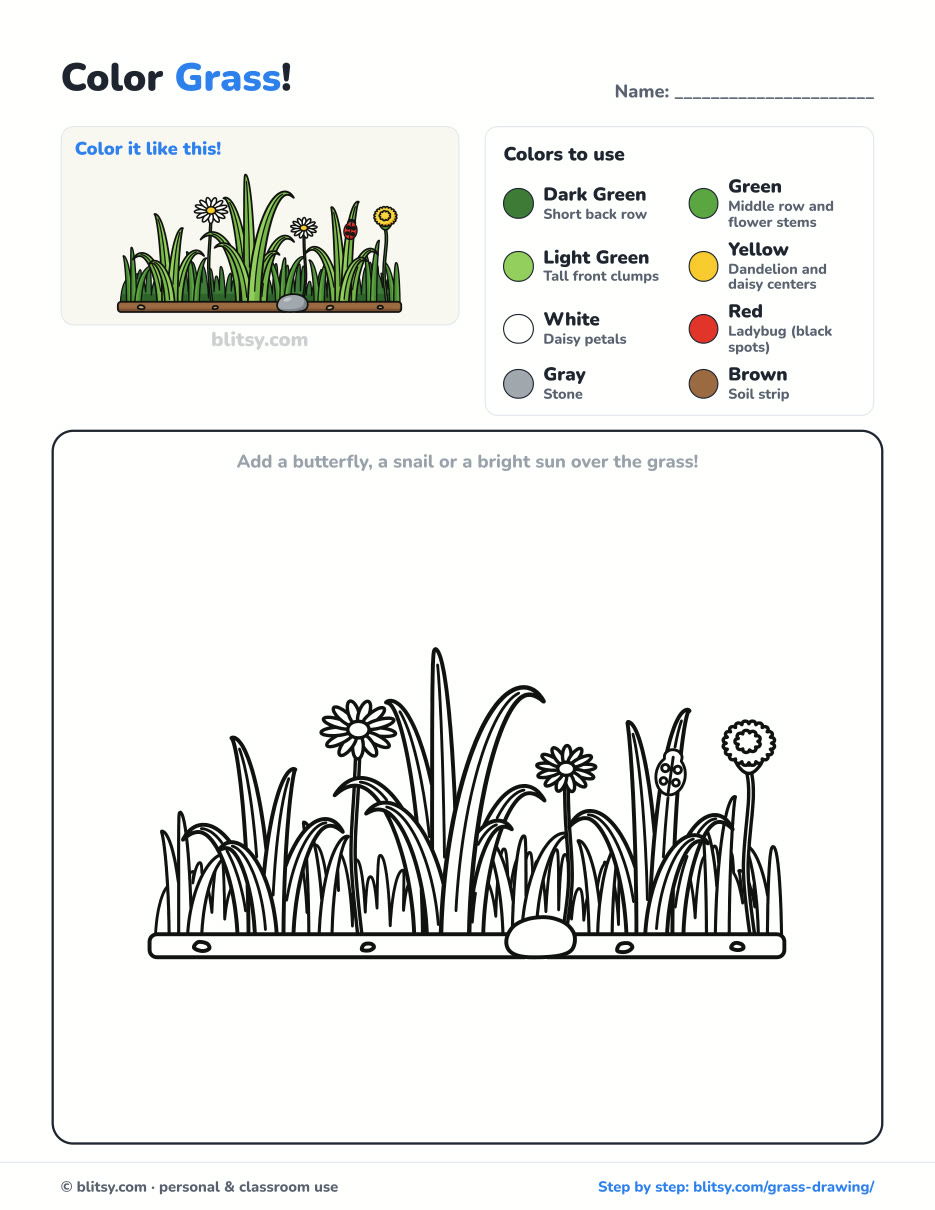
Black outlines with a colored example and the color names at the top. Ready to print and color.
⬇️ Download Coloring PageEvery step picture with its instructions and tips, to keep beside your paper while you draw.
⬇️ Download Drawing Guide📱 On a phone? Tap a download button, then open the file and choose Share → Save to Files or Print. On a computer, the PDF opens or saves straight to your Downloads folder.
Keep the Grass Steps on Pinterest
Grass Drawing Questions From Beginners
What is the easiest way to draw grass?
Draw small clumps instead of single blades. Pick a point on the ground and pull three to five pointed blades up and out from it, each a different height. A few clumps along a ground line already look like grass.
How do you make grass look realistic in a drawing?
Overlap the blades so some sit in front of others, and use darker shades at the back and near the ground. In my experience, varying the bend and height of each blade does more than adding hundreds of extra lines.
How do you draw grass with a pencil?
Use quick upward flicks that start with pressure at the base and lift off at the tip, so each blade fades to a point. Darken the area between blades near the ground to make the front ones stand out.
How long does this grass drawing take?
Around 20 minutes for the pencil and ink, and another 15 to 20 for coloring. Skip the flowers and back row for a ten-minute version.
There you go: a little meadow you grew from one curved blade. How many daisies did yours end up with? 🌼
Related posts:
 How to Draw a Car Step by Step (Easy Drawing for Beginners)
 How to Draw Godzilla Step by Step (Easy Kaiju for Beginners)
 How to Draw a Whale Step by Step (Easy for Beginners)
 How to Draw a Rat Step by Step (Easy for Beginners)
 How to Draw an Arctic Fox Step by Step (Easy for Beginners)
 How to Draw a Shark Step by Step (Easy for Beginners)
 How to Draw a Chicken Step by Step (Easy for Beginners)
 How to Draw a Fish Step by Step (Easy Goldfish for Beginners)
 How to Draw a Snowman Step by Step (Easy for Beginners)
 How to Draw a Crow Step by Step (Easy for Beginners)
 How to Draw Hands Step by Step (Easy Palm View for Beginners)
 How to Draw an Airplane Step by Step (Easy Jet for Beginners)

