
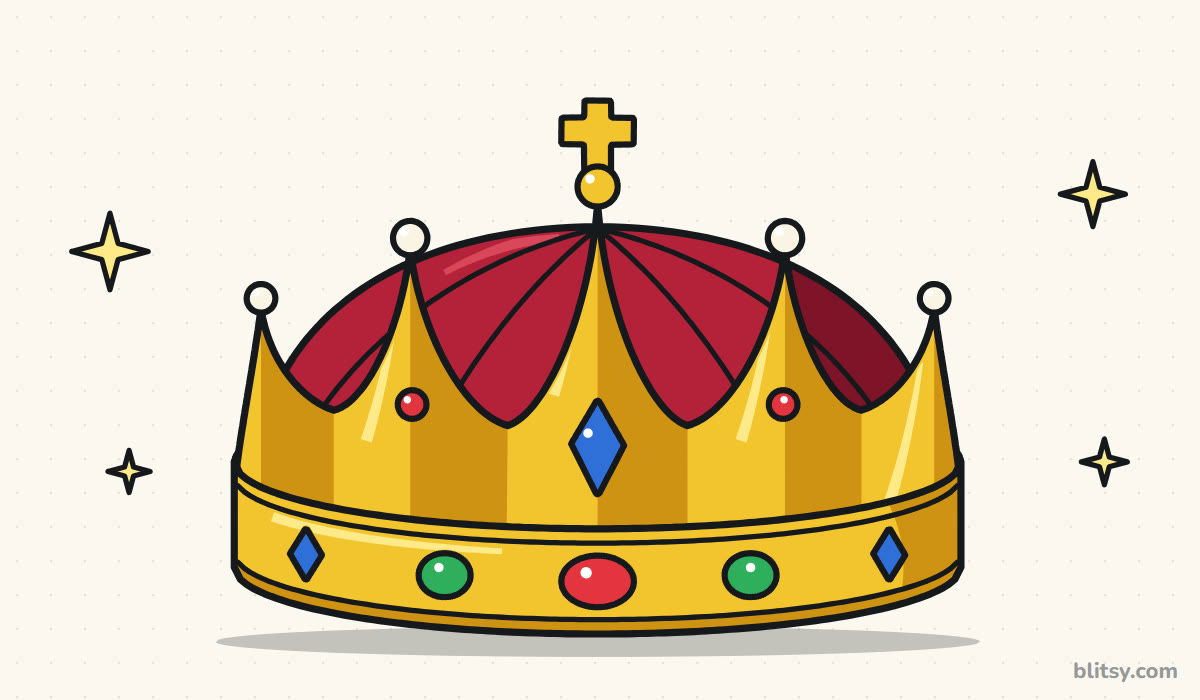
A crown is one of those things kids draw all the time, and it usually comes out as a flat zigzag. This one has a bit more going on. Here's how to draw a crown step by step, seen slightly from above so the band curves and you can peek at the red velvet cushion inside. My secret is one line down the middle: everything you draw on the left gets a twin on the right.
Look for the color blue in each picture: those are the lines for that step. Gray lines came earlier.
Quick overview
⏱️ Time: about 25 to 35 minutes, coloring included
🎯 Level: easy, good for kids around 6 and up
✏️ Steps: 12
👑 You'll draw: a gold royal crown with pearls, gems and a velvet cushion
Crown Drawing Supplies From Your Desk Drawer
- A pencil for light guide lines
- A soft eraser
- A black marker or fineliner for the final outline
- Crayons or colored pencils in yellow, orange, deep red, red, blue and green
- A sheet of paper turned sideways
Turn the paper the wide way, because a crown is much wider than it is tall.
How to Draw a Crown Step by Step
Step 1: Draw a center line and a flat oval
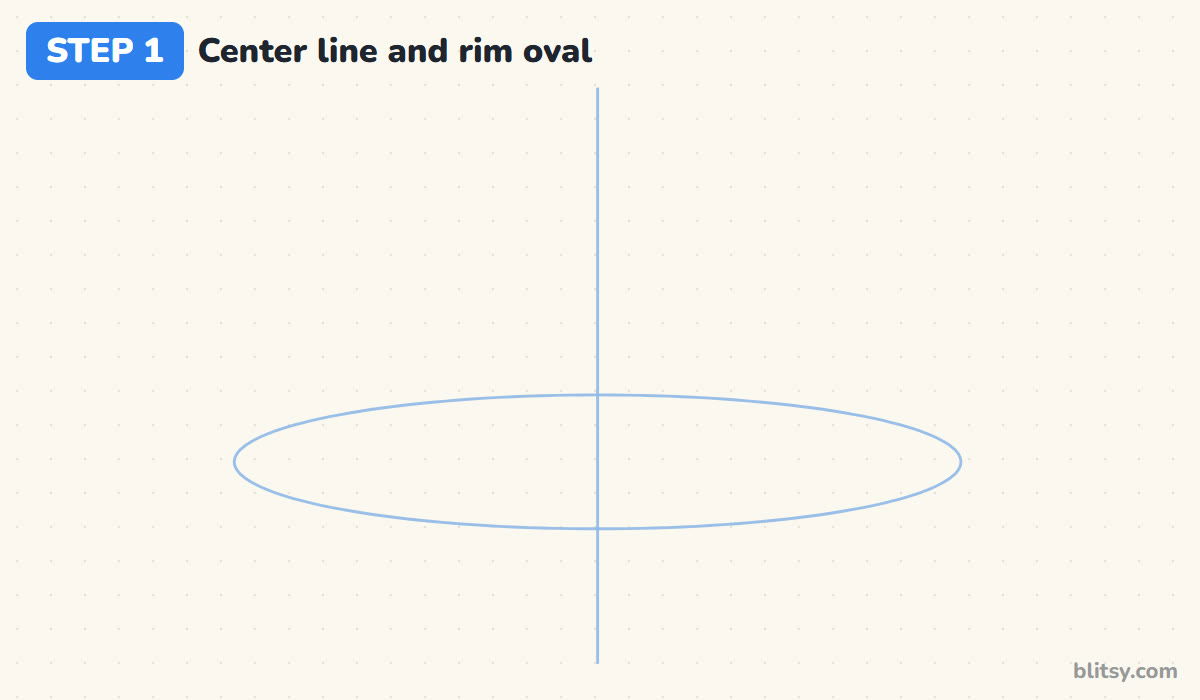
Draw a straight line down the middle of the page. Then draw a wide, flat oval that the line cuts exactly in half, a bit below the middle of the paper. This oval is the top rim of the crown seen from slightly above. When I teach this, I call the center line the mirror, because every peak and gem gets a partner across it.
💡 Tip: Make the oval about four or five times wider than it is tall. A rounder oval makes the crown look tipped toward you.
Step 2: Add guides for the band, the peaks and the cushion
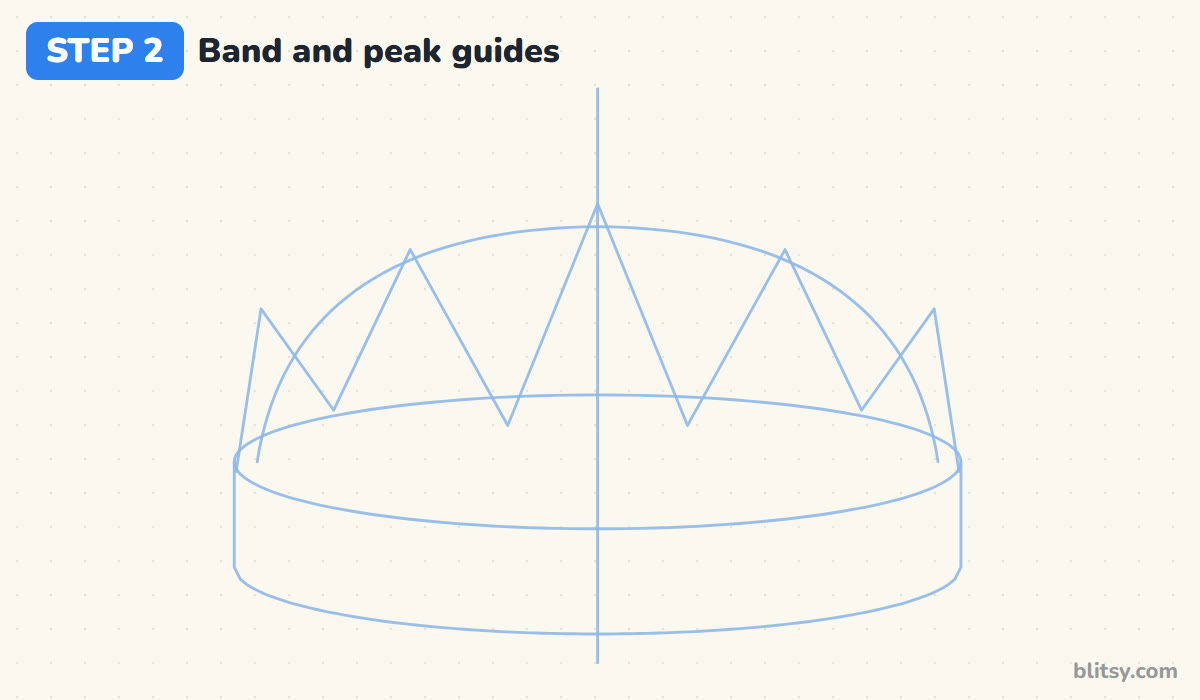
From both ends of the oval, drop two short lines down and join them with a curve that matches the front of the oval. That's the band. Above the oval, sketch a zigzag with five points: the middle one highest, two a little lower, and two lower still at the ends. Finish with a light dome over the oval for the cushion.
💡 Tip: Count the zigzag points out loud as you go. Five tips and four dips between them.
Step 3: Draw the curved band
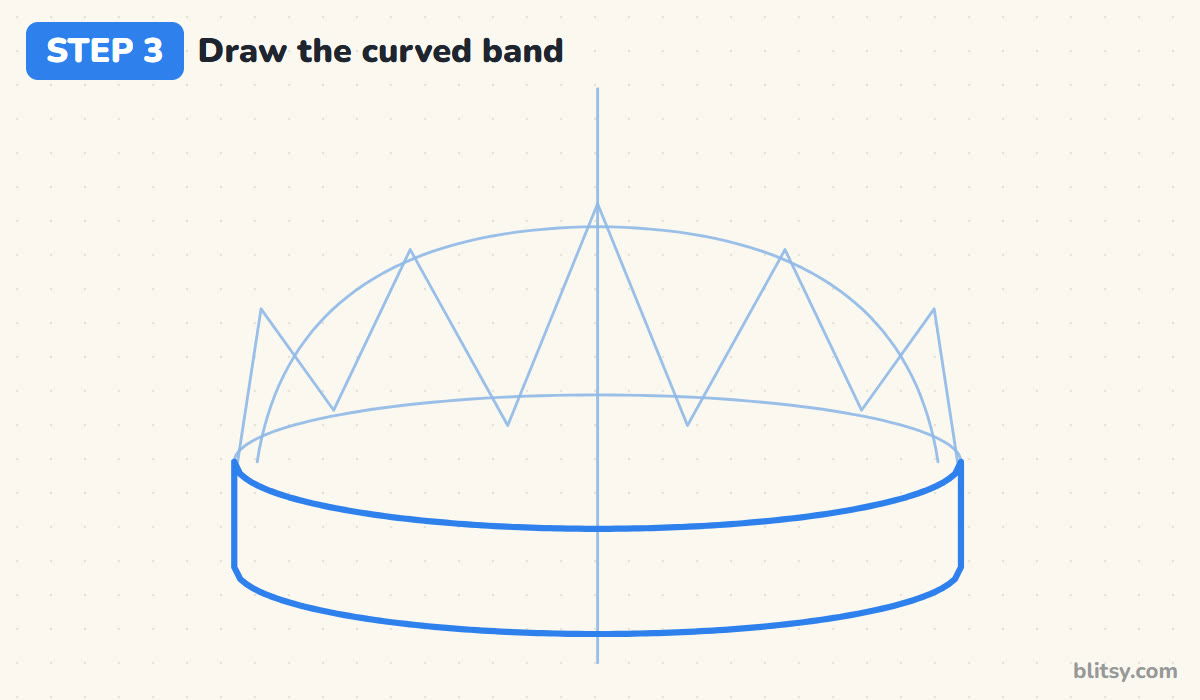
Go over the band with firmer lines: the front curve of the oval, the two short sides and the lower curve. Leave the back half of the oval alone, since the peaks will cover it. Both curves bend the same way, and that matching bend is what makes the band look round.
💡 Tip: Draw each curve in one slow sweep from left to right instead of short scratchy strokes.




Step 4: Draw five pointed peaks
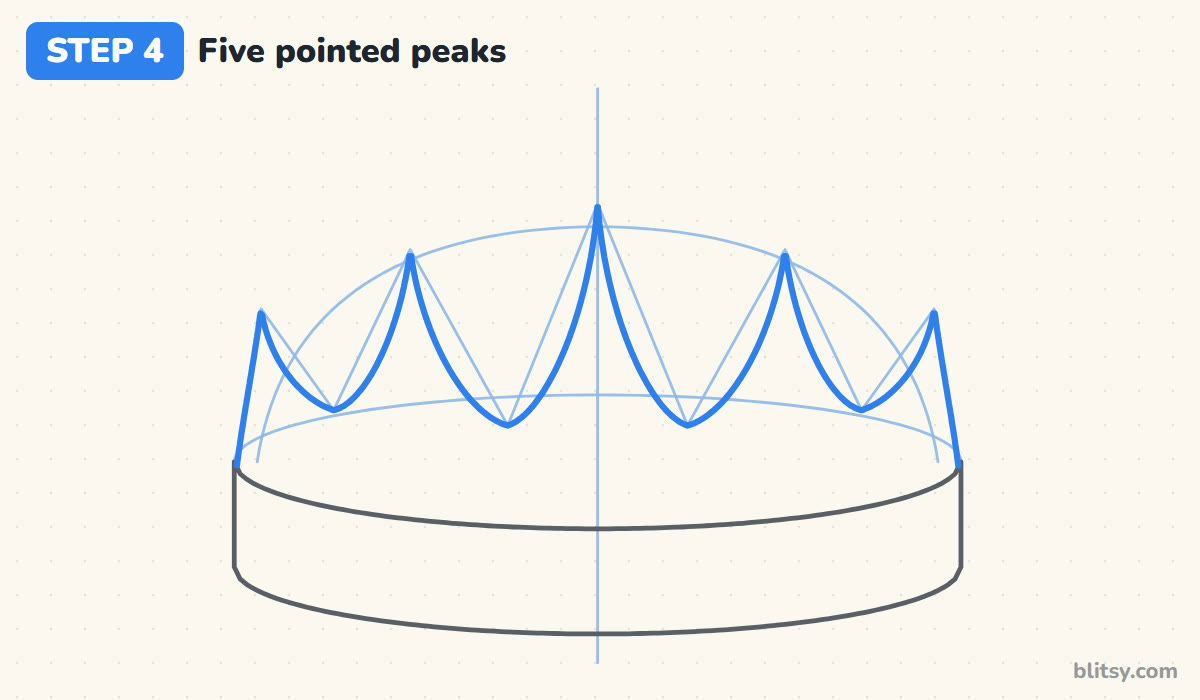
Follow the zigzag, but curve each side inward a little so the peaks are slim at the top and wide at the base. Each dip between peaks is a soft rounded V. I make the outer peaks shorter because they're turning away from us, and that small change sells the round shape.
💡 Tip: Draw one peak on the left, then its twin on the right, and check that both touch the same height on the center line's sides.
Step 5: Put pearls on the tips and a cross on top
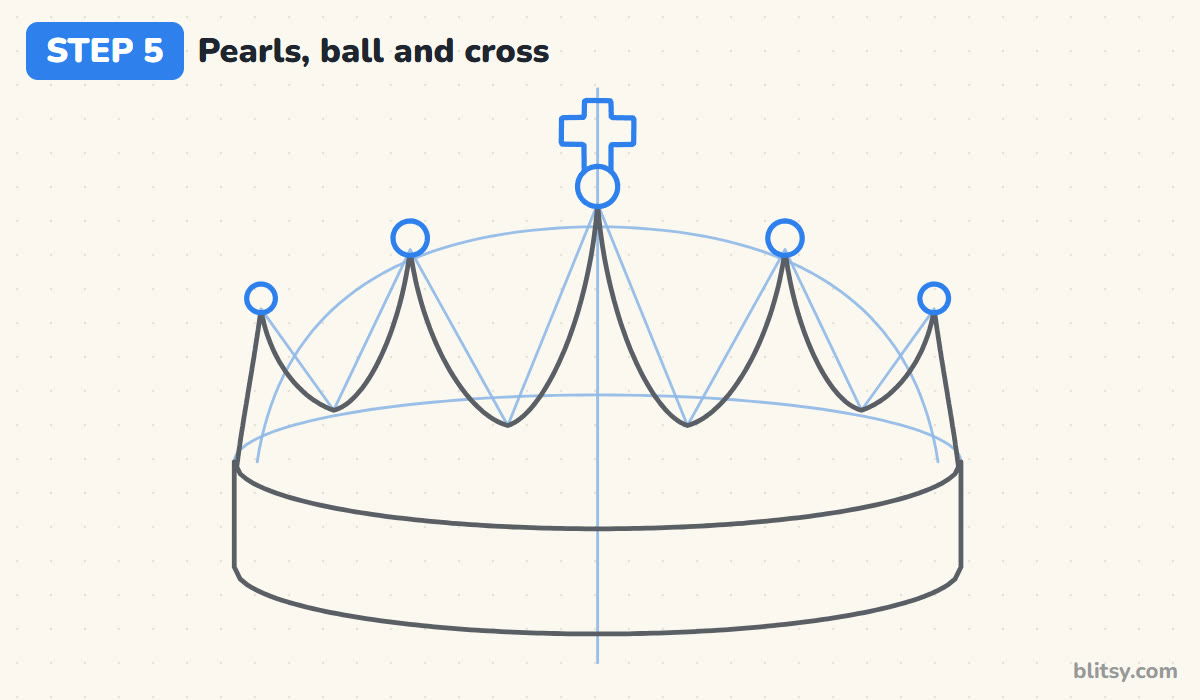
Draw a small circle on the tip of each side peak, with the outer two a little smaller. On the middle peak, draw a slightly bigger ball and stand a simple cross on it, like a plus sign with a longer lower arm. The pearls should sit on the points, not float above them.
💡 Tip: If a cross feels too fiddly, put a star or a heart on the ball instead.
Step 6: Draw the velvet cushion inside
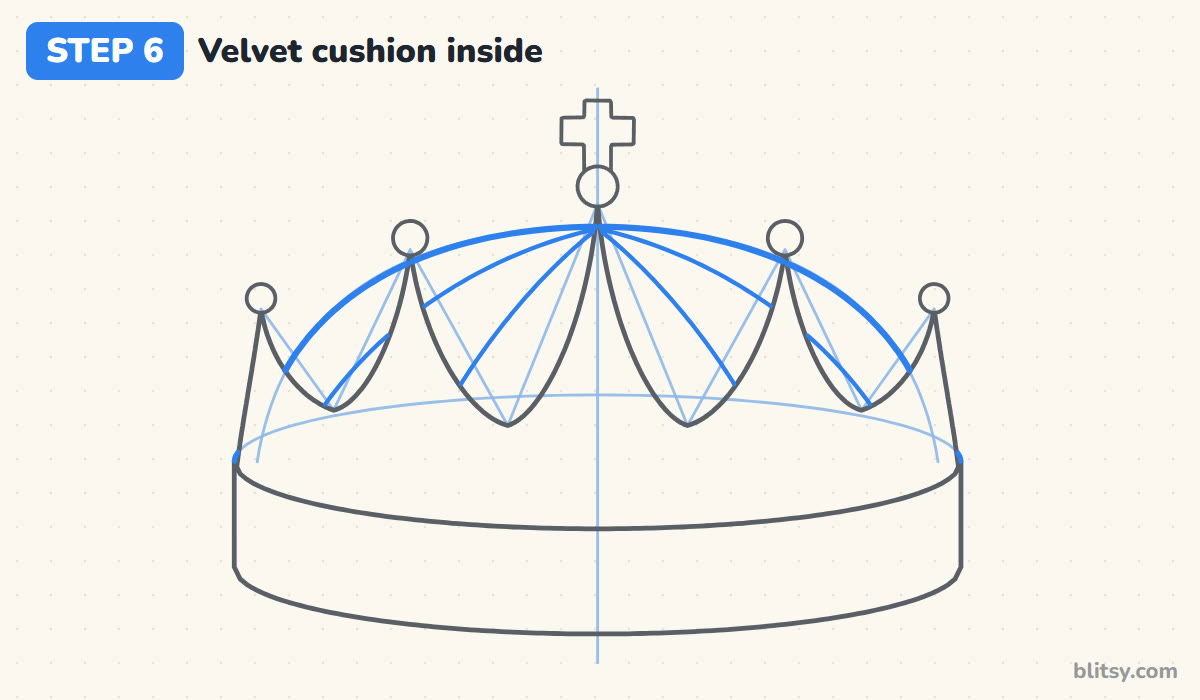
Trace the dome guide only where it shows between the peaks, and stop the line at every peak, because the gold sits in front of the cushion. Then draw a few curved seams that fan out from the top of the dome toward the band. Those lines turn a plain bump into soft, puffy fabric.
💡 Tip: Keep the seam lines curved like slices of an orange, not straight like spokes.
Step 7: Add trim lines along the band
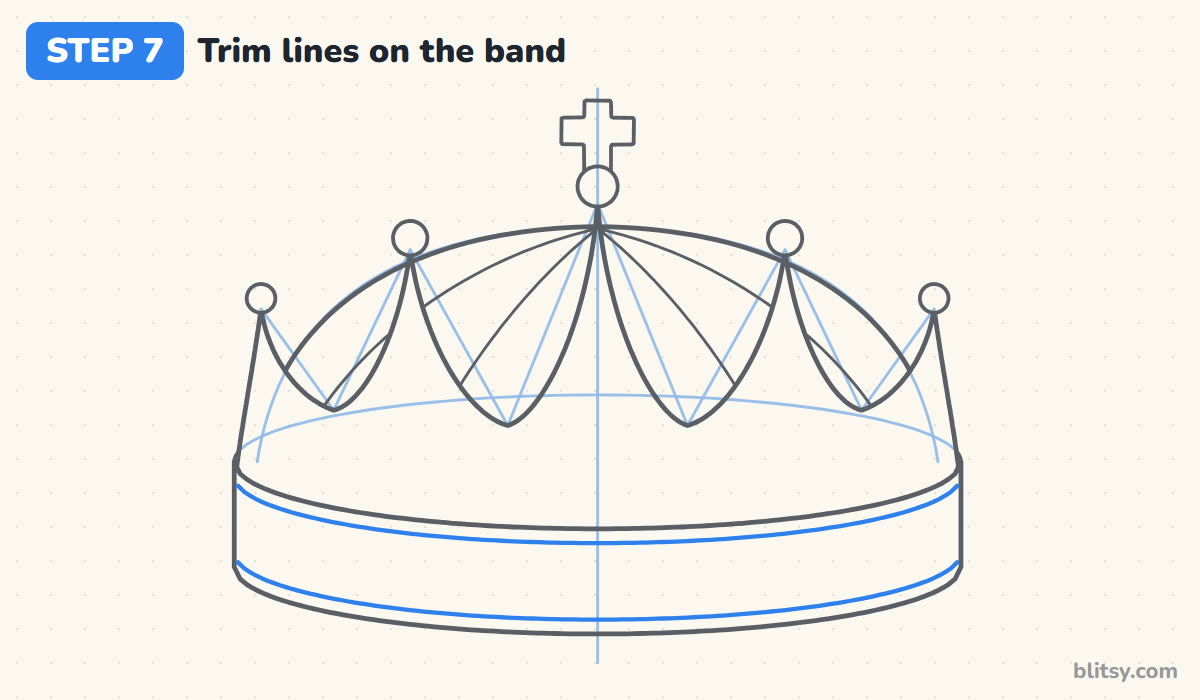
Draw one curve just under the top edge of the band and another just above its lower edge. Keep both the same distance from the edge all the way across. They look like a raised gold strip and give the gems a neat lane to sit in.
💡 Tip: Turn your paper as you draw these long curves. Your hand is steadier when it moves in its natural arc.




Step 8: Draw gems on the band and the peaks
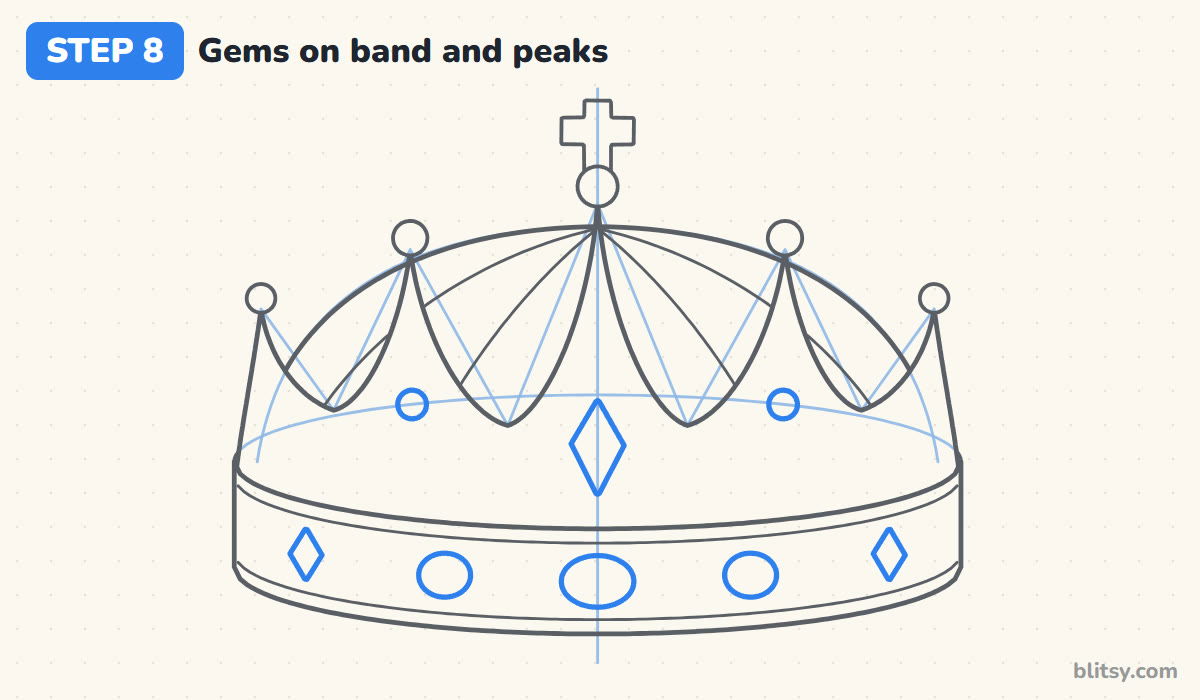
Start with a wide oval right on the center line. On each side, add a smaller oval and then a diamond shape near the end of the band. The end gems are narrower because that part of the band curves away. Finish with a tall jewel on the middle peak and a small round gem on each inner peak.
💡 Tip: Draw every gem as a pair, left then right, and measure the gap to the center line with your eye.
Step 9: Add a few sparkles around the crown
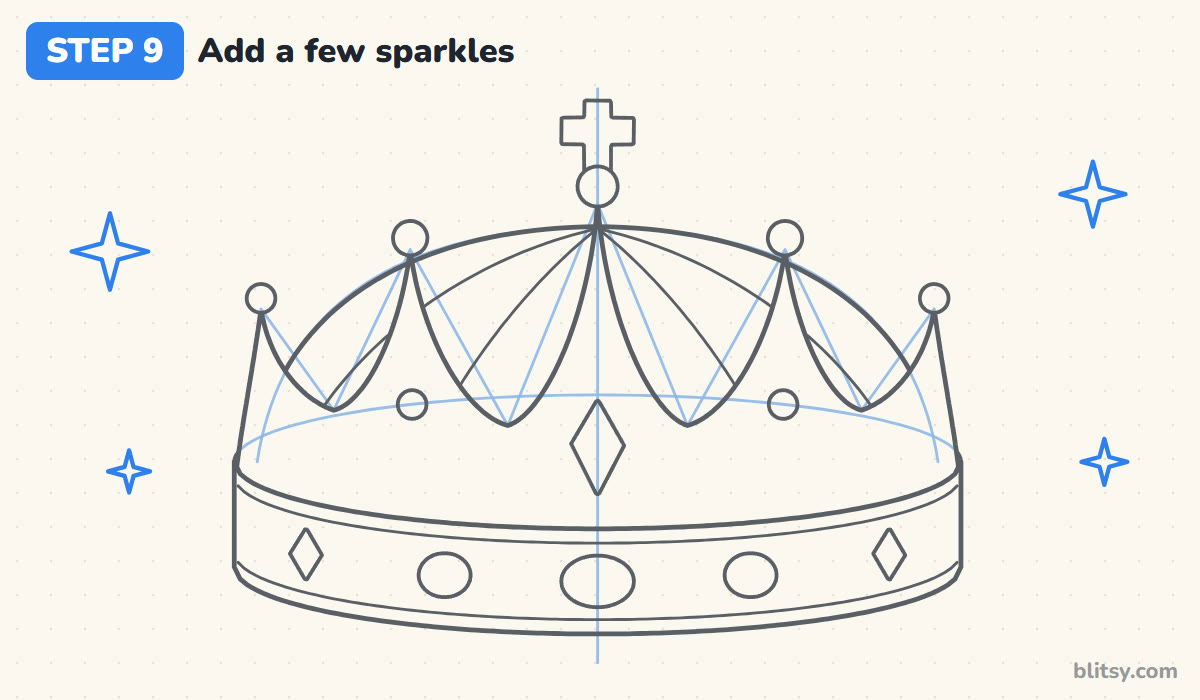
Draw a few four-pointed stars in the empty space around the crown, one big and the others small. Sparkles tell the viewer the crown is shiny metal before you even pick up a crayon.
💡 Tip: Place the sparkles at different heights so they don't line up like a fence.
Step 10: Ink the outline and erase the guides
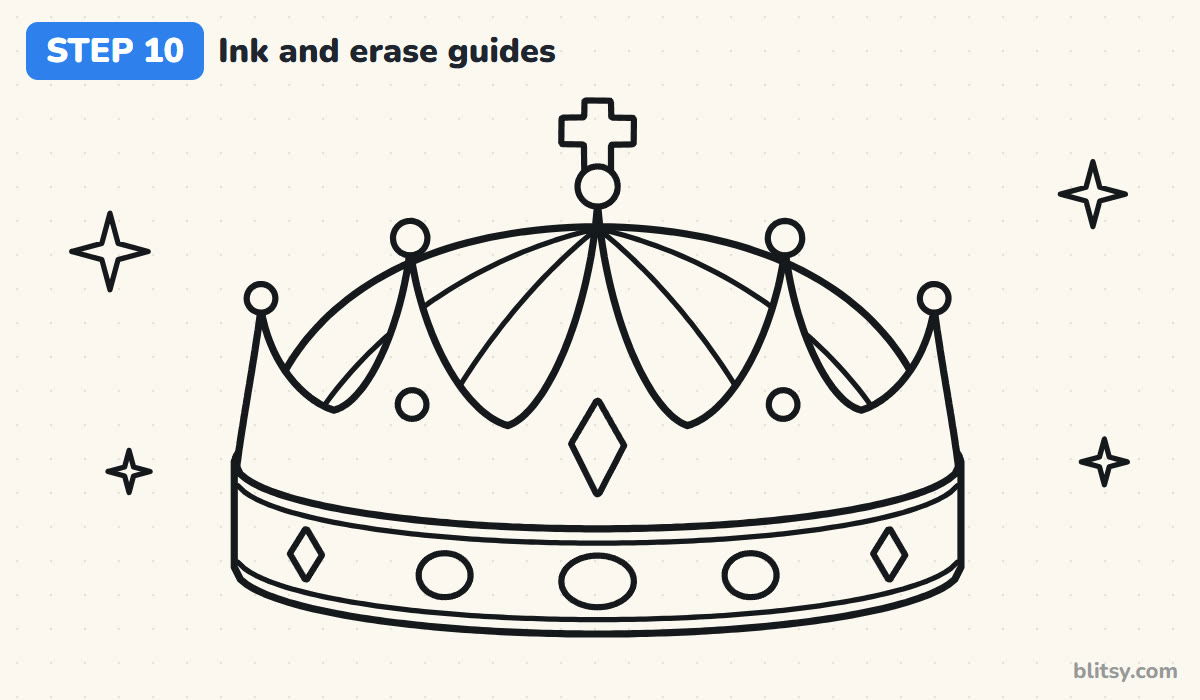
Trace every keeper line with a black marker. Give the ink a minute to dry, then erase the center line, the oval, the zigzag and the dome guide. If you drew the guides lightly, they come off in a few passes and the crown looks finished.
💡 Tip: Ink the pearls and gems last, so your hand doesn't drag through wet lines on the band.
Step 11: Color the gold
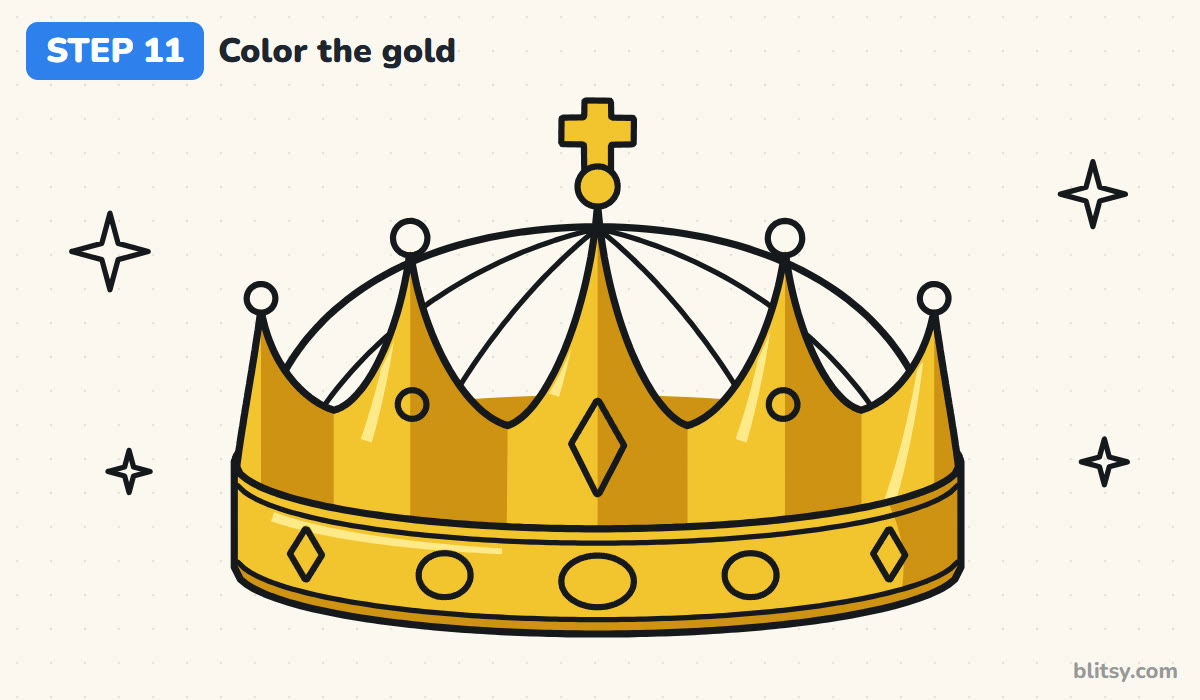
Fill the band, the peaks, the ball and the cross with golden yellow. Then color the right half of every peak and the right end of the band in a darker orange, and leave a thin streak near the left edge of each peak almost white. Light on one side and dark on the other is my whole trick for gold.
💡 Tip: Press lightly for the yellow and harder for the orange, so the two colors blend where they meet.




Step 12: Color the velvet and the gems
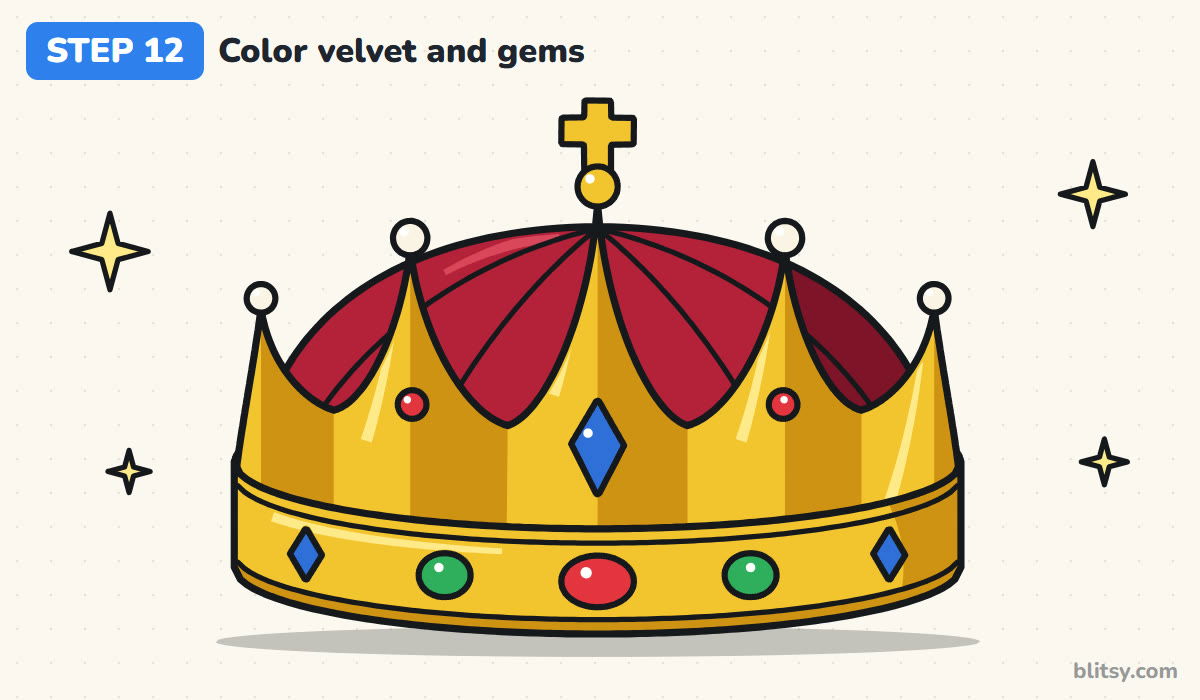
Color the cushion deep red, darker on the right with a little purple on top. The middle band gem and the peak gems are red, the tall jewel and the end gems blue, and the last two band gems green. Leave a tiny white dot on each gem and pearl. A soft gray shadow under the band keeps the crown from floating.
💡 Tip: Color the gems last, after the gold, so a dark crayon doesn't smear into the yellow.
Crown Trouble Spots and How I Fix Them
- A straight band. A flat lower edge makes the crown look like a paper cutout. Curve the top and bottom of the band the same way, like a smile.
- Peaks that don't match. One fat peak and one thin one makes the crown look lopsided. Draw them in pairs across the center line.
- All five peaks the same height. Equal peaks look like a fence. Keep the middle one tallest and the outer ones lowest.
- Coloring the gold all one shade. Flat yellow reads as cardboard. A darker side and a light streak make it shine like metal.
- Drawing the cushion line through the peaks. The cushion is behind the gold, so its line stops at every peak.
From Royal Crown to Tiara or Cartoon King
Drop the cushion and the cross and you've got an open princess crown. Make the band thinner and the peaks taller for a tiara, or round off every tip for a cartoon king's crown. Little kids can skip the trim lines and side gems. If the gems were your favorite part, try my diamond drawing tutorial next, which shows how to draw a cut gem with its facets. A crown also needs someone to wear it, and the how to draw a princess step by step lesson draws a young royal in a ball gown. Then give them somewhere to live with the castle drawing tutorial.
Free Crown Coloring Page and Printable Steps
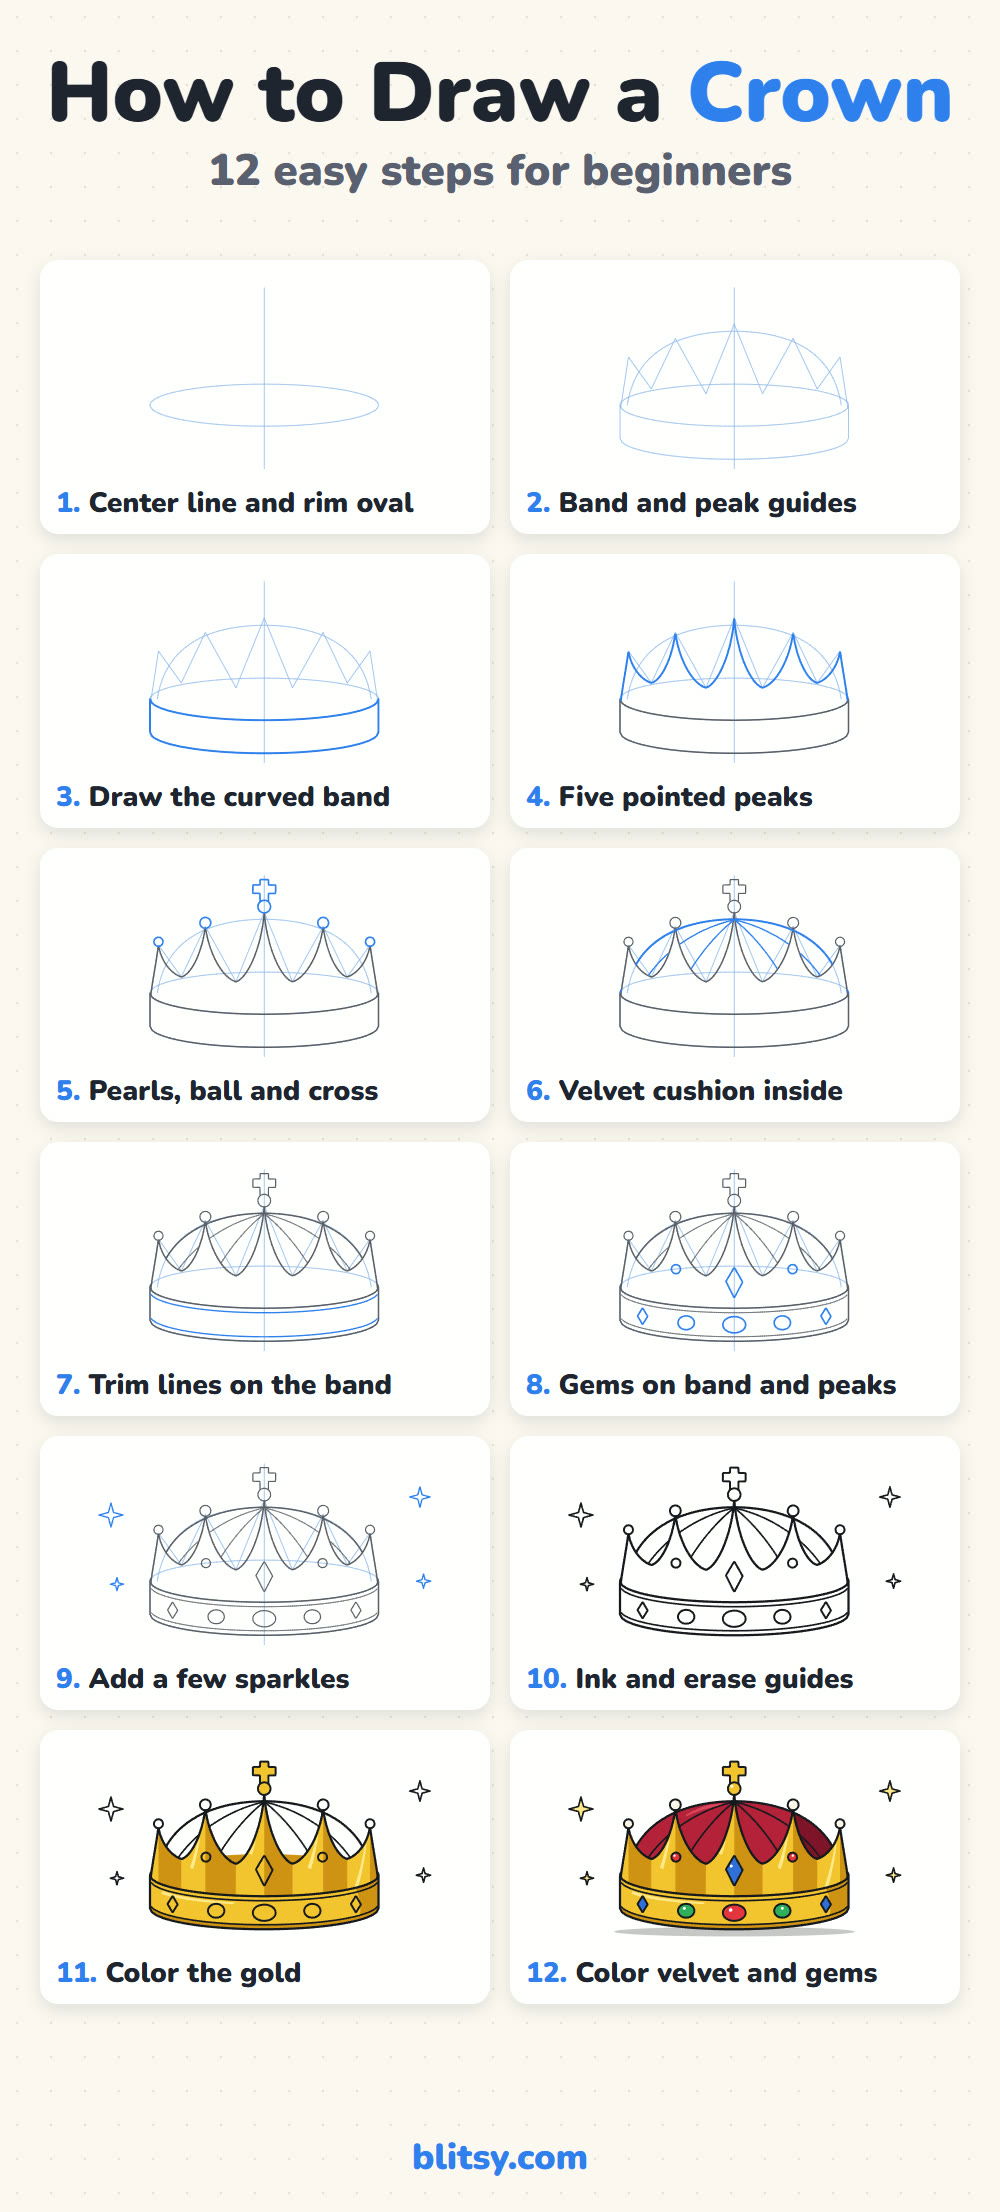
The free crown coloring page has a small colored example and a color key at the top, with a big outline below it. The step-by-step PDF guide holds all 12 steps with pictures and tips, so you can draw away from the screen. Both fit Letter or A4 paper.
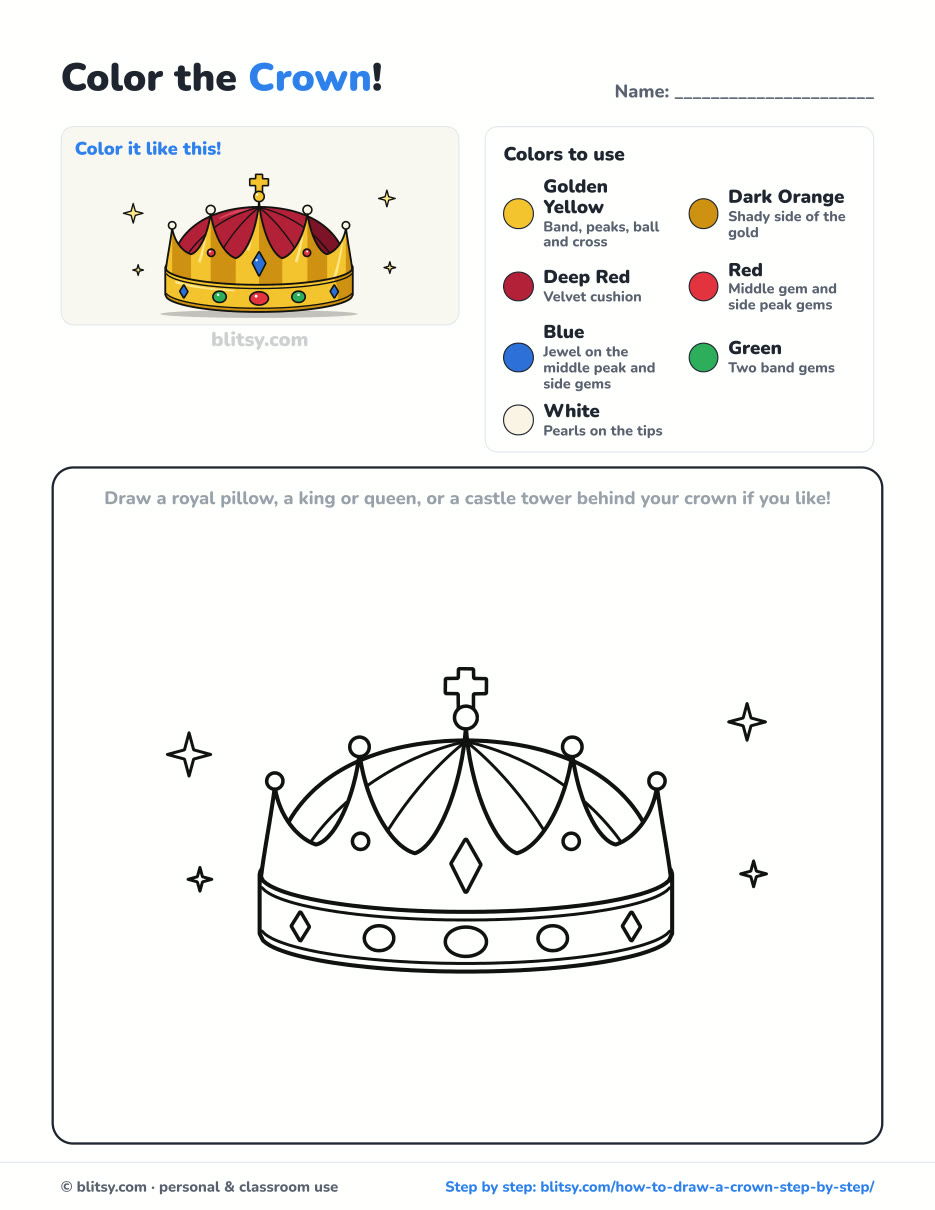
Black outlines with a colored example and the color names at the top. Ready to print and color.
⬇️ Download Coloring PageEvery step picture with its instructions and tips, to keep beside your paper while you draw.
⬇️ Download Drawing Guide📱 On a phone? Tap a download button, then open the file and choose Share → Save to Files or Print. On a computer, the PDF opens or saves straight to your Downloads folder.
Pin the Crown Steps for Later
More Royal and Fairy-Tale Drawings to Try
Each of these lessons has a picture for every step, the same way this crown does, so it's easy to keep going.
- Princess Drawing: A young princess with a braid and a lilac ball gown, step by step in this how to draw a princess lesson.
- Castle Drawing: Towers, a gate and pointed roofs make a fairy-tale home in this castle drawing tutorial.
- Diamond Drawing: Learn the facets of a sparkling cut gem in this diamond drawing step by step guide.
- Mask Drawing: A purple masquerade mask with gold trim and a gem grows from one center line in this mask drawing tutorial.
Crown Drawing Questions Kids Often Ask
How do you draw a simple crown for kids?
Draw a rectangle for the band, then a zigzag with three or five points on top. Add a circle on each point and a few gems on the band. This tutorial adds a curve and a cushion, but the zigzag is the heart of it.
How do you make a crown look 3D?
Curve the band instead of drawing it straight, make the outer peaks shorter than the middle ones, and shade one side of the gold darker. Those three changes make it look round.
What colors do you use to draw a gold crown?
Use yellow as the main color, orange or light brown for the shady side, and leave a few white streaks for shine.
How do you keep both sides of a crown the same?
Start with a light center line and draw every part in pairs, one on the left and then its twin on the right. Check the distance to the line each time before you move on.
One straight line down the middle is how every crown here starts, so go make yours and decide who wears it first. 👑✏️
Related posts:
 How to Draw a Pineapple Step by Step (Easy Crown and Slice)
 How to Draw a Whale Step by Step (Easy for Beginners)
 How to Draw Lungs Step by Step (Easy Science Diagram)
 How to Draw Iron Man Step by Step (Easy Chibi for Kids)
 How to Draw a Dress Step by Step (Easy Party Dress)
 How to Draw a Chicken Step by Step (Easy for Beginners)
 How to Draw a UFO Step by Step (Cute Alien Saucer)
 How to Draw Flames Step by Step (Easy Campfire Drawing)
 How to Draw a Moon Step by Step (Sleepy Crescent + Phases)
 How to Draw a Sunflower Step by Step (Big and Bright)
 How to Draw a Fall Leaf Step by Step (Maple, Oak and Birch)
 How to Draw a Mushroom Step by Step (Easy Storybook Toadstool)

