
A peach and an apple start from almost the same circle, so what makes people say "peach" the moment they see your drawing? One curved line. Below you'll find how to draw a peach step by step, with that crease running from the stem to the bottom so the fruit splits into two soft cheeks. Next to it we'll draw a peach cut open, with juicy golden flesh and the wrinkly stone sitting in its hollow.
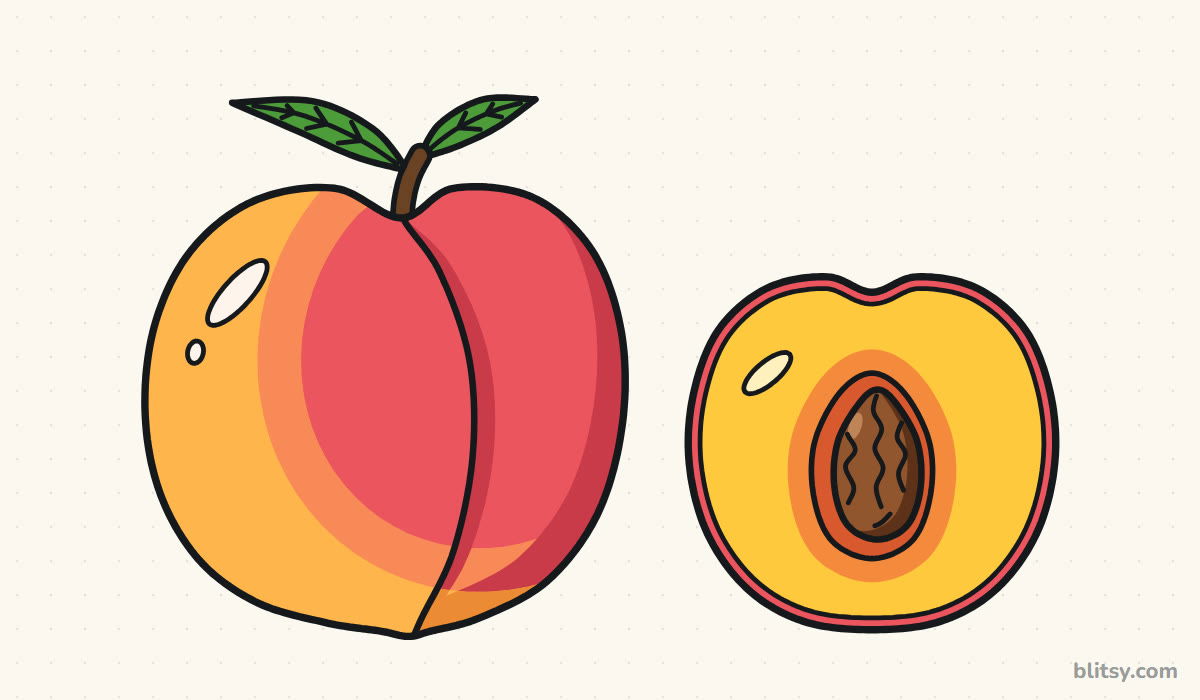
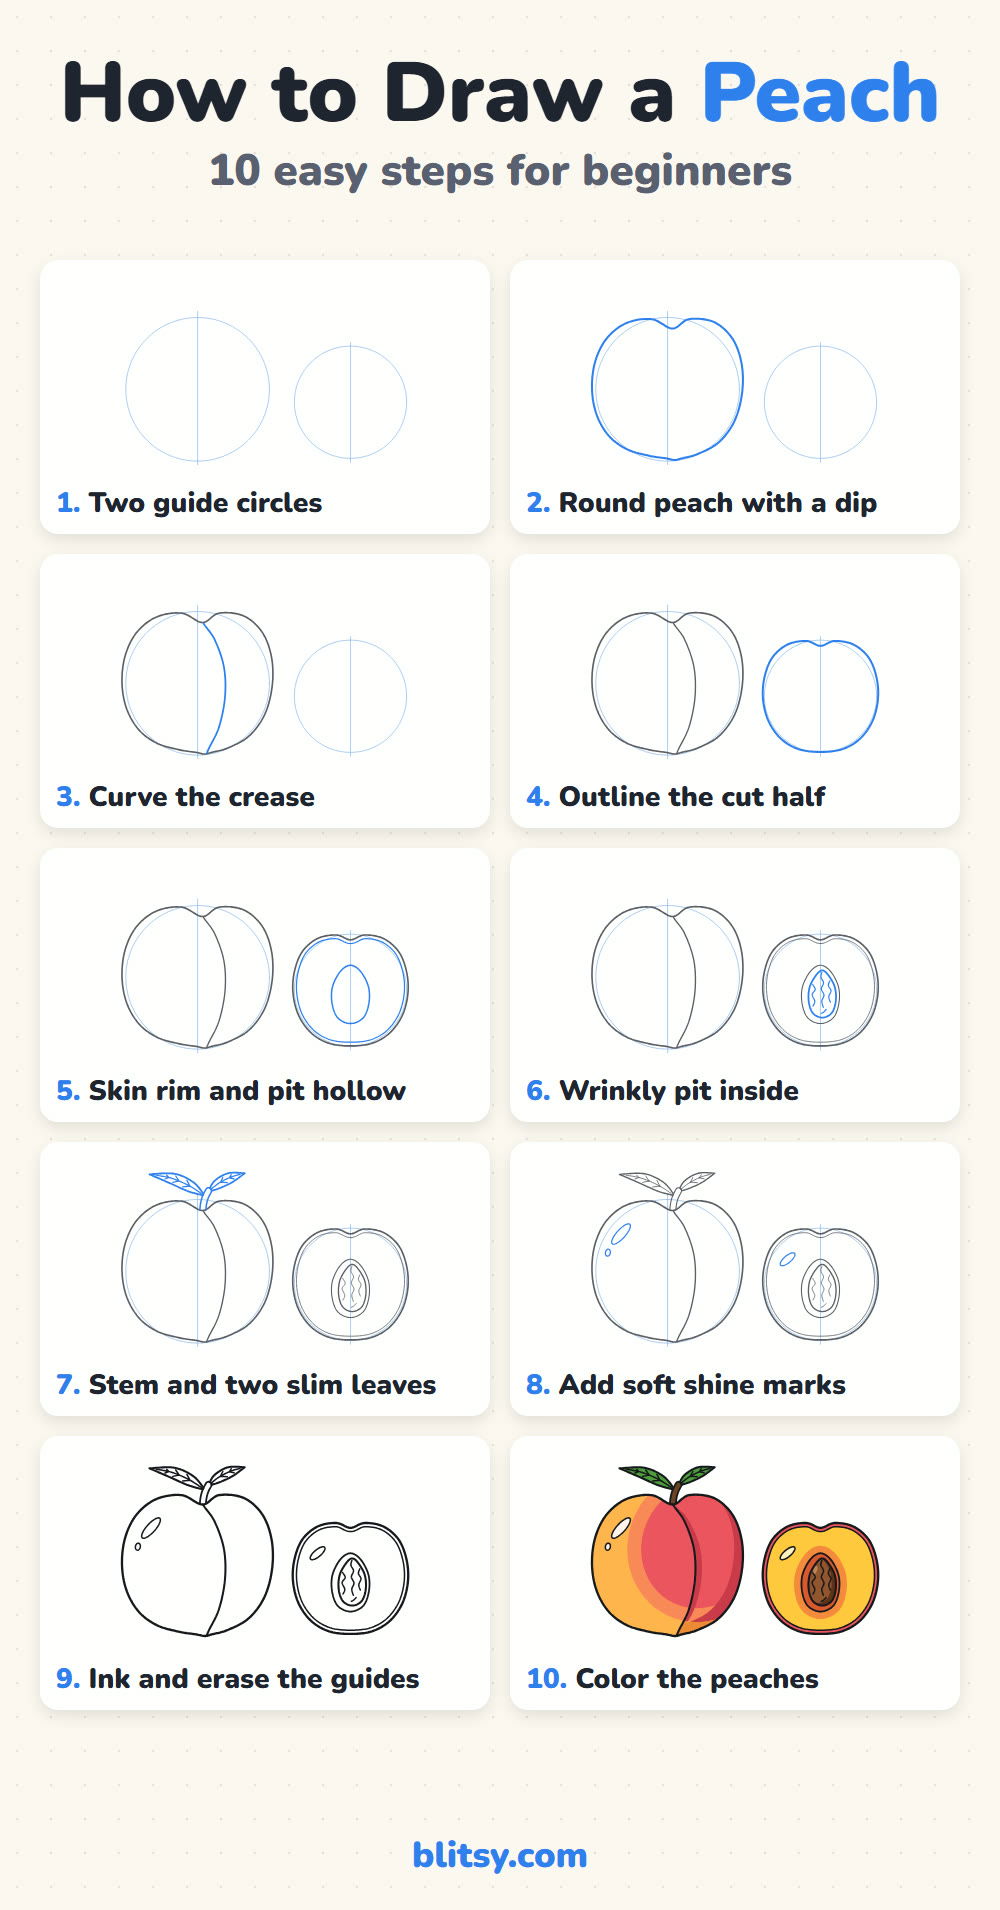
Peach lines you add right now show up in blue, so your eye goes straight to them. The gray lines are things you already drew in earlier steps. Pale blue circles and straight lines are only helpers, so draw them faintly; they disappear in step 9.
Quick overview
⏱️ Time: about 20 to 25 minutes, coloring included
🎯 Level: easy, fine for kids from about 6
✏️ Steps: 10
🍑 You'll draw: a whole peach with a stem and two leaves, plus a peach half with its pit
Pencils and Peachy Colors to Gather
- A regular pencil for the light first lines
- A soft eraser
- A black fineliner or thin marker for inking
- Colored pencils or markers: yellow orange, orange, dark orange, pinkish red, dark red, golden yellow, brown, green
- A sheet of plain paper turned sideways
No white pencil needed: the shine marks are simply left uncolored.
How to Draw a Peach Step by Step
Step 1: Sketch two guide circles
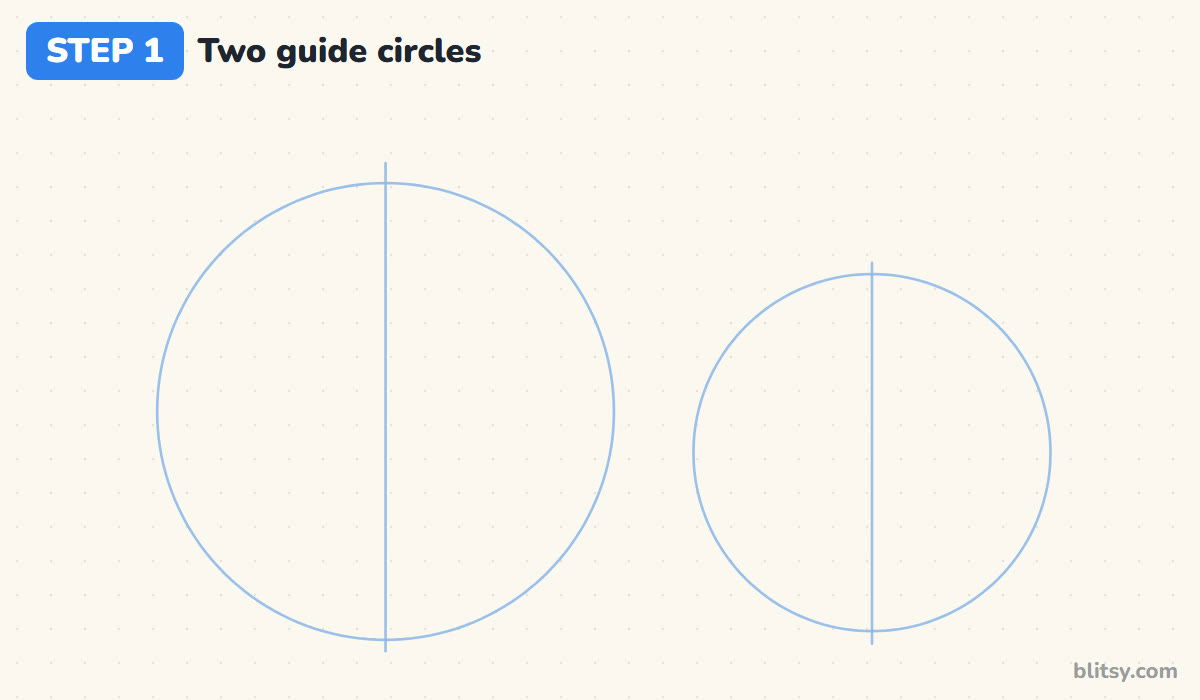
Lay your paper sideways. On the left, draw a big circle, and on the right a slightly smaller one, with a clear gap between them. Run a light vertical line through the middle of each circle. Those center lines tell you where the stem dip goes, so the fruit doesn't end up lopsided.
💡 Tip: Trace a cup or a roll of tape if freehand circles keep going wobbly.
Step 2: Draw the round peach with a dip on top
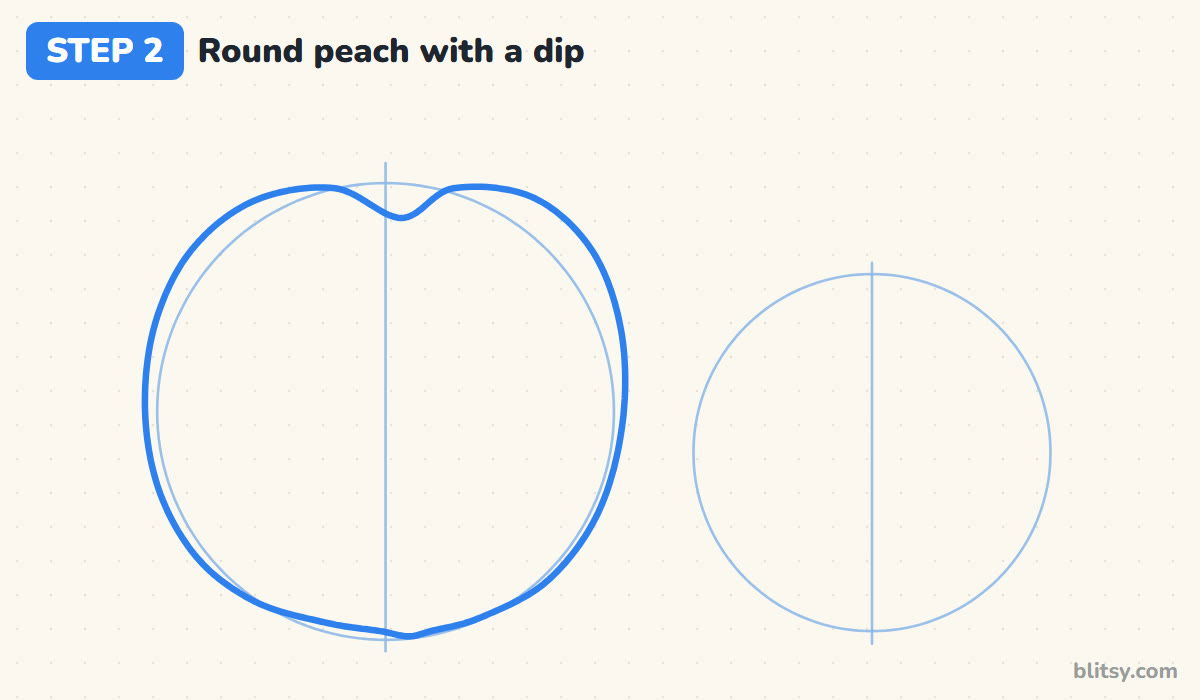
Go around the big circle with your real outline, letting it bulge a little past the guide on both sides. At the top, where the center line crosses, pull the line down into a small, gentle dip. At the bottom, bring both sides together into a very soft point, just to the right of the center line. I keep the dip shallow, because a deep notch starts to look like a heart.
💡 Tip: A peach is a touch wider than it is tall. Squash the circle slightly, not stretch it.
Step 3: Curve the crease down the front
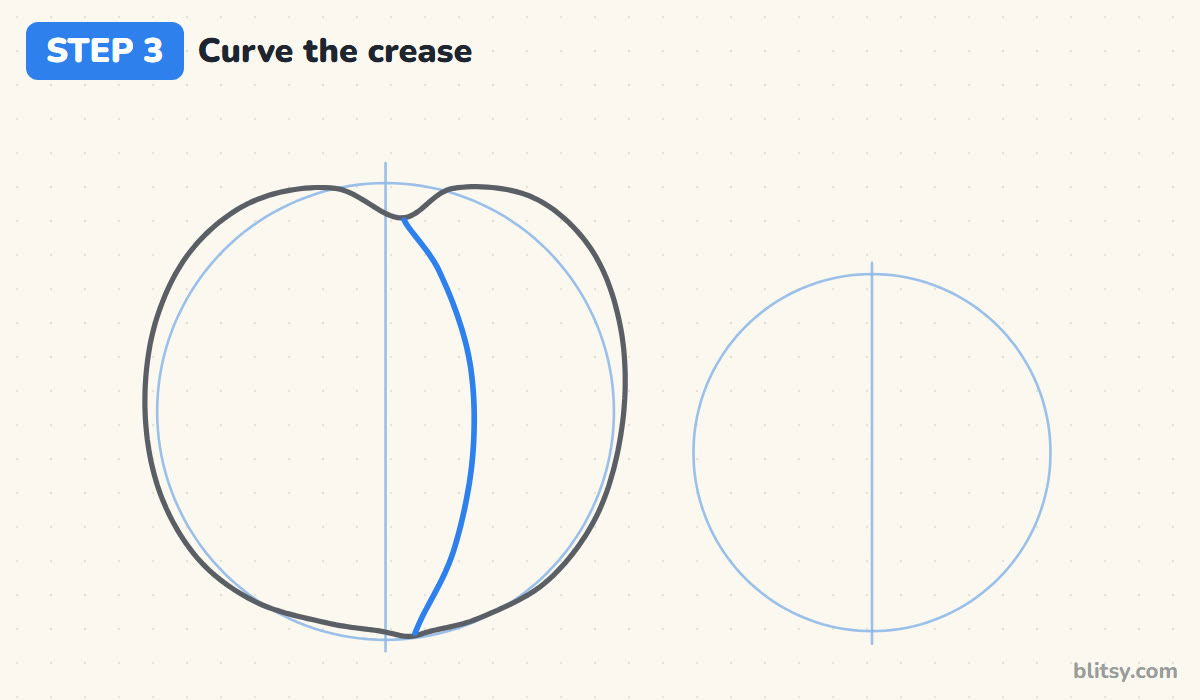
This is the line that turns a round fruit into a peach. Start inside the dip and sweep down to the soft point at the bottom, bowing out to the right as you go, like a stretched letter C turned backwards. When I teach this, I tell kids to imagine a seam on a ball. The crease makes the left side look bigger and closer, which is exactly how a real peach sits on a table.



💡 Tip: Draw the crease in one slow stroke. Stopping halfway leaves a bump.
Step 4: Outline the cut half
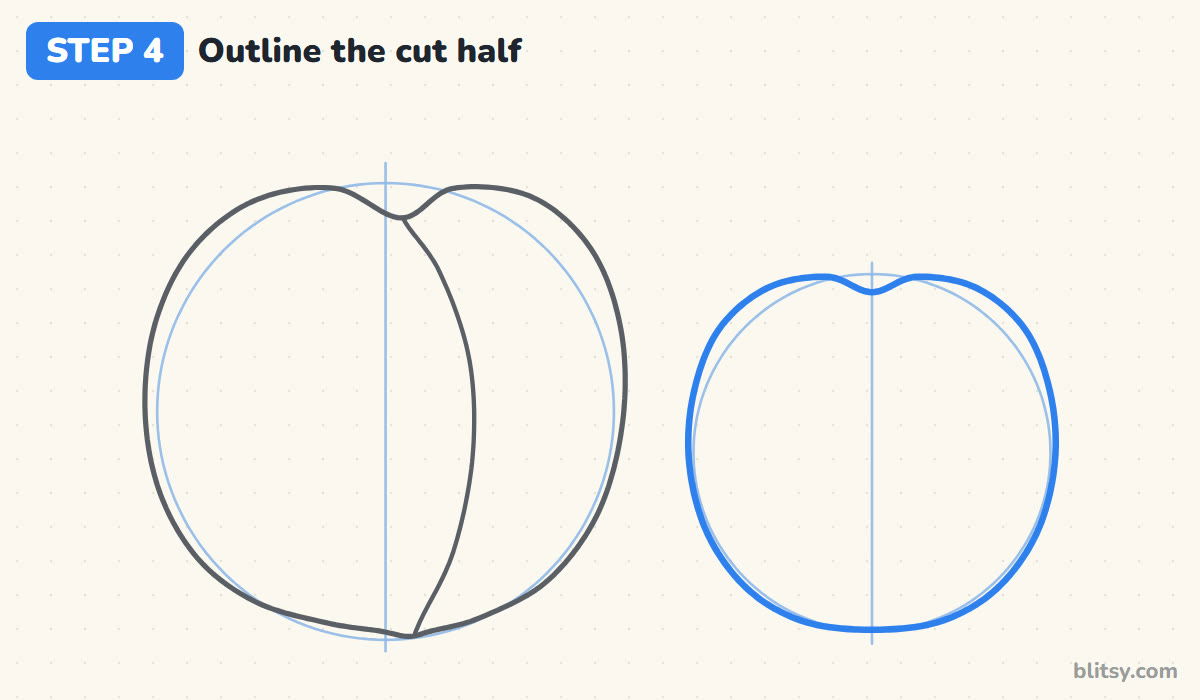
Over on the smaller circle, draw a rounder, almost symmetrical outline with a small dip at the top. There's no crease here, because we're looking straight at the flat cut face of the fruit. Let the bottom curve be full and even rather than pointed.
💡 Tip: Check that the dip sits right on the center line before you move on.
Step 5: Add the skin rim and the pit hollow
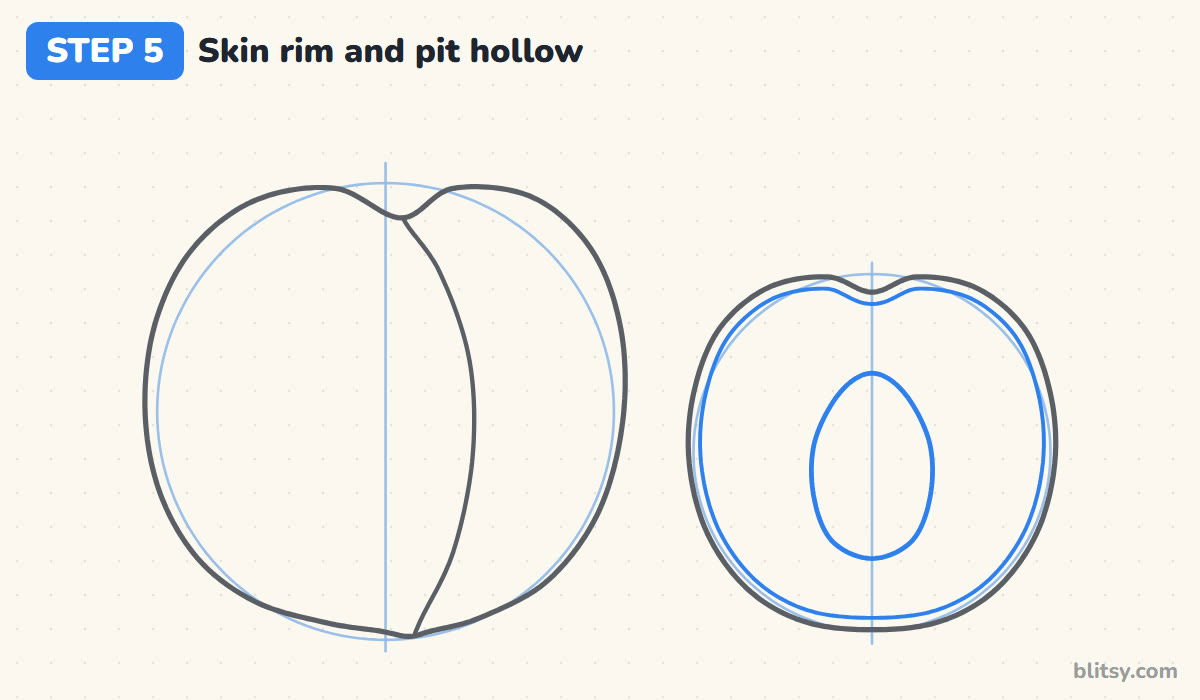
Just inside the half's outline, draw a second line that follows it all the way around, very close to the first. The skinny band between them is the peach skin seen from the side. Then, in the middle, draw an egg shape with the narrow end up. That is the hollow the stone sits in, and it should take up roughly a third of the half's height.
💡 Tip: Keep the rim thin. A thick band looks like the peel of an orange.
Step 6: Draw the wrinkly pit
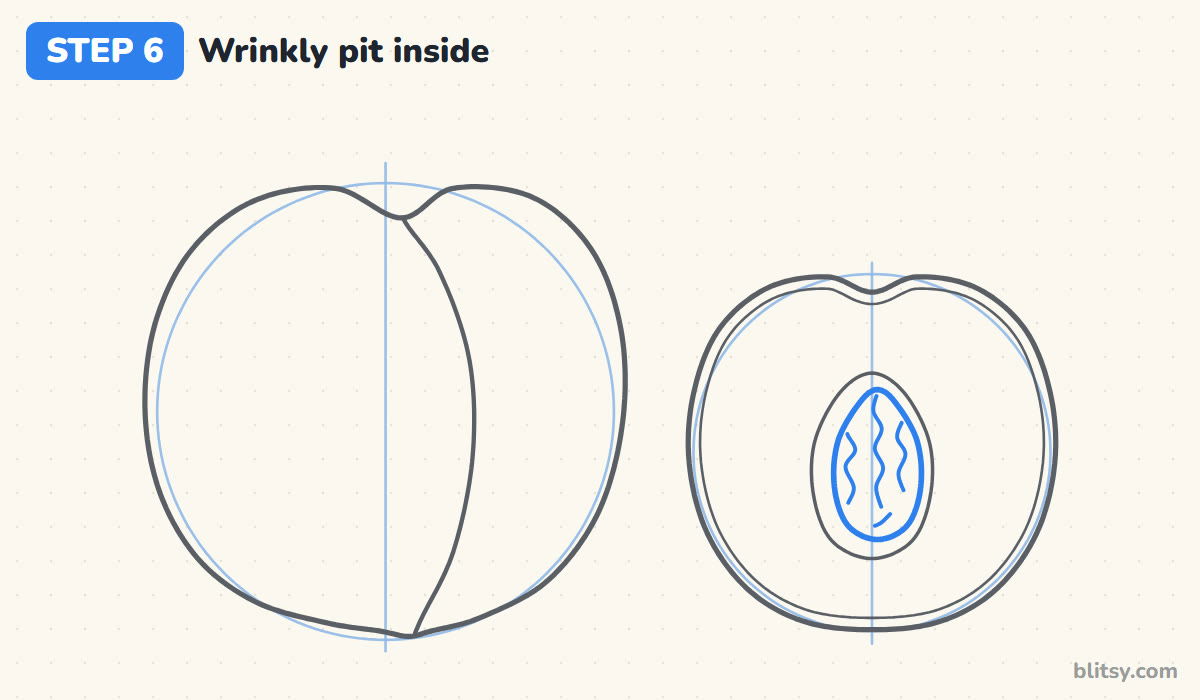
Inside the hollow, draw a slightly smaller almond shape with a pointed top, so a thin gap shows on one side. Now add a few wavy lines running from top to bottom across the stone. A real peach pit is covered in deep grooves and little pits, and those wiggly lines are what tell the viewer it's a peach stone and not an almond or a bean.
💡 Tip: Make the wiggles uneven and leave some short. Neat, matching waves look like stitching.
Step 7: Add a stem and two slim leaves
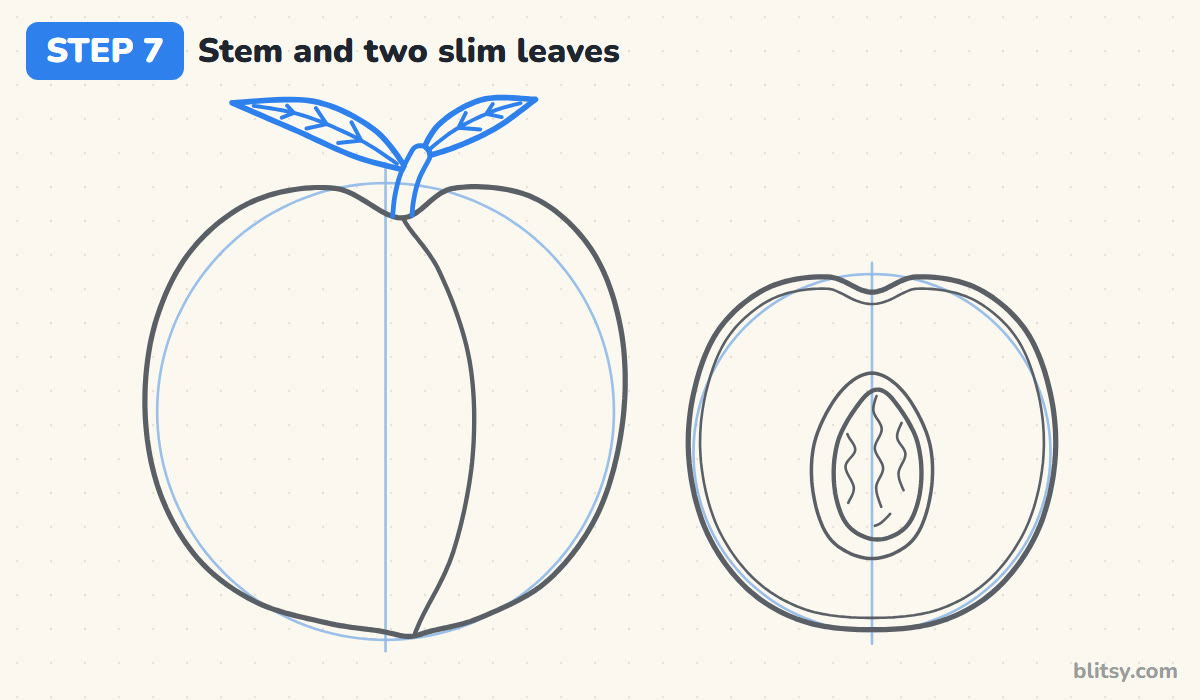
From the dip on the whole peach, draw a short stem that leans a little to the right. Off its top, draw two leaves: a longer one sweeping up to the left and a shorter one to the right. Peach leaves are long and narrow, almost like willow leaves, so keep them slim. Finish each with a center vein and a few short side veins angled toward the tip.



💡 Tip: Leave a small gap between the leaves and the fruit so they don't merge.
Step 8: Mark the shine spots
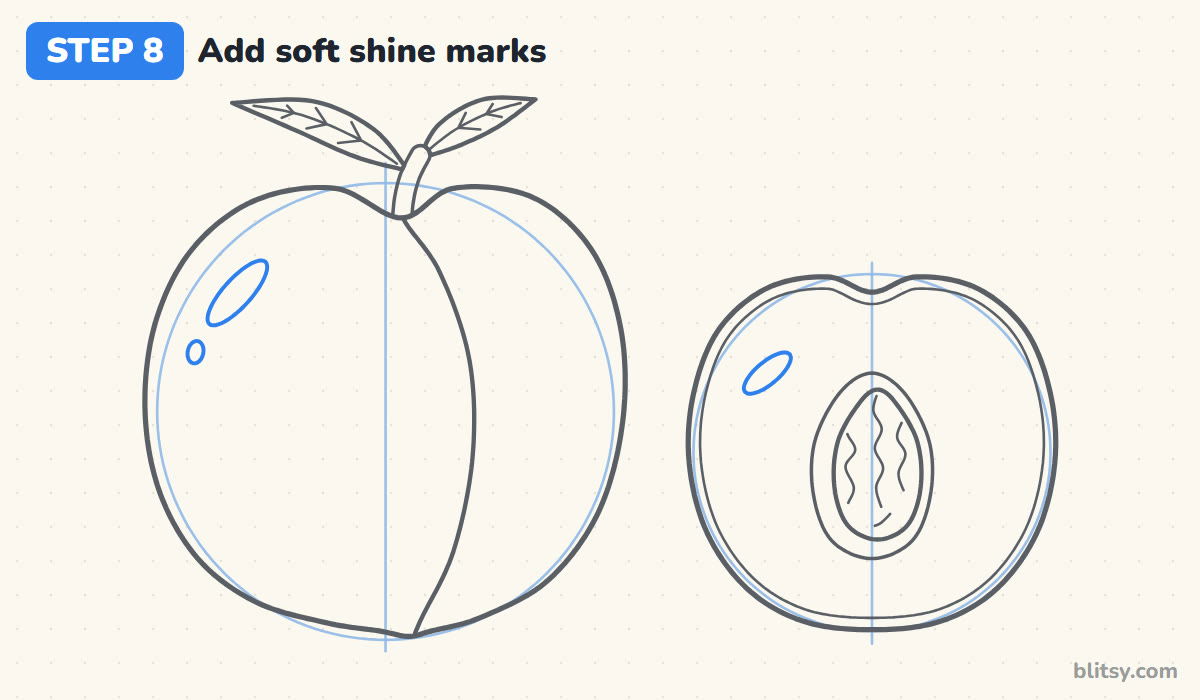
On the upper left of the whole peach, draw a slim, slanted oval and a tiny dot below it. Add one more small oval on the upper left of the cut flesh, which makes it look wet and juicy. Peach skin is fuzzy, so its shine is softer than an apple's. I draw the marks smaller than I would on an apple for that reason.
💡 Tip: Put both shines on the same side so the light comes from one direction.
Step 9: Ink the lines and erase the guides
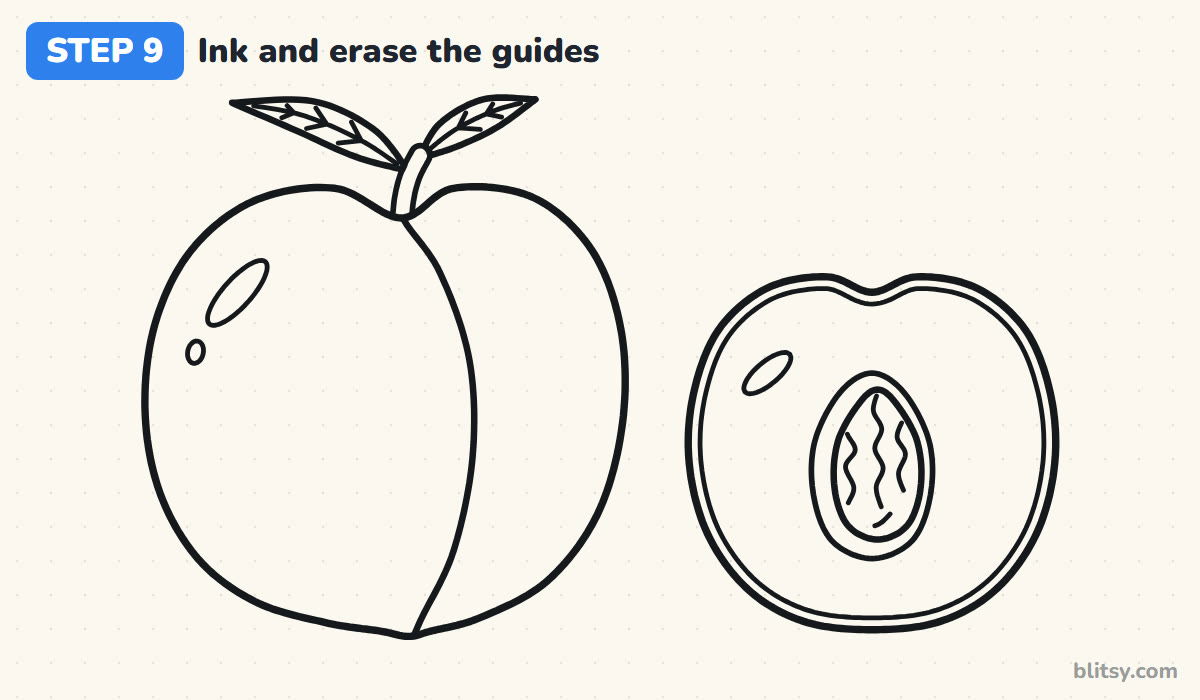
Trace over every line you want to keep with the black pen: both outlines, the crease, the rim, the hollow, the pit and its grooves, the stem, the leaves and the shines. Give the ink a minute to dry properly. Then erase the two circles and the center lines. Most beginners rush this part and smear the pen, so be patient here.
💡 Tip: Rub the eraser in one direction only, which keeps the paper from wrinkling.
Step 10: Color the peaches
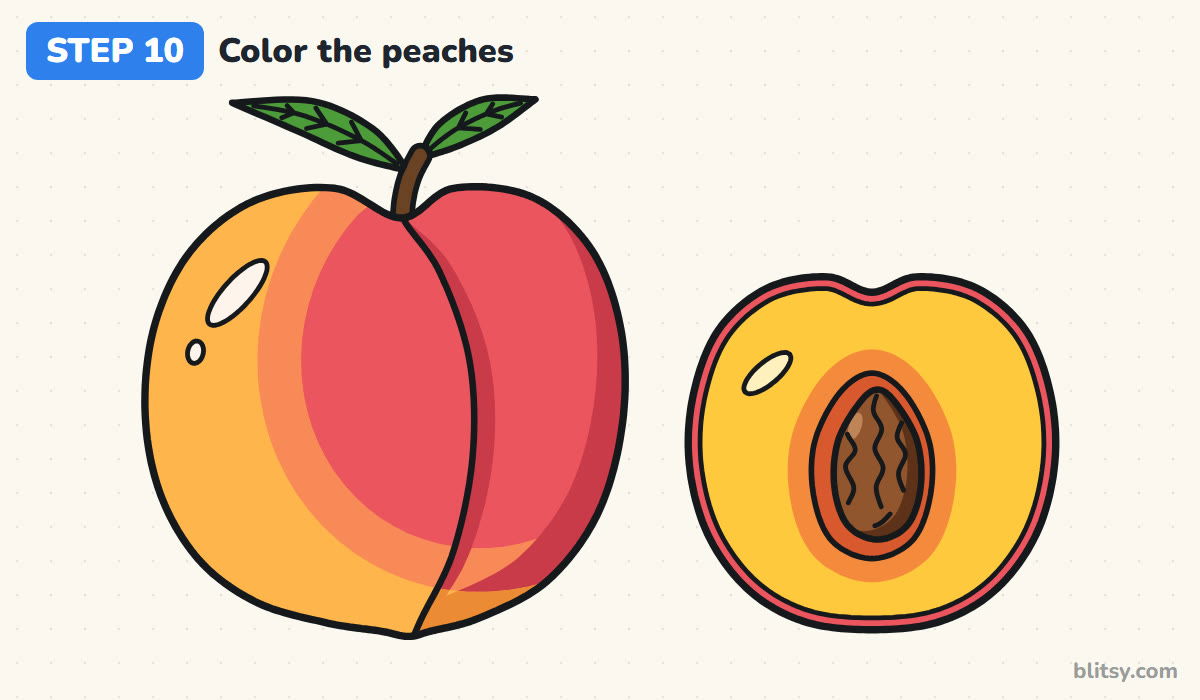
Start the whole peach with yellow orange everywhere except the shines. Then add a soft band of orange and fill the upper right with pinkish red, so the blush fades into the yellow. Shade along the right of the crease and the lower right edge with dark red, switching to dark orange where the shading crosses the yellow. For the half, color the rim pinkish red, the flesh golden yellow, an orange ring around the hollow, and the pit brown. The leaves are green and the stem brown.
💡 Tip: Color the yellow first and the red on top. Going the other way muddies the blush.
Why a Peach Can End Up Looking Like an Apple
- Leaving out the crease. Without it you've drawn an orange or an apple. That single curved line is the most important mark in the whole picture.
- Drawing the crease straight down the middle. A dead-center crease cuts the fruit into two equal halves and looks flat. Bow it to one side.
- A dip so deep it forms a heart. Keep the top dent shallow and soft, and let the stem hide part of it.
- Coloring the whole peach red. Real peaches are golden with a rosy blush. Leave yellow showing on one side and at the bottom.
- A smooth, plain pit. A stone without grooves reads as a nut or an egg. Add the wavy lines.
New Ways to Play With Your Peach Picture
Once the crease feels natural, try a pile of three peaches in a bowl, a peach with a bite taken out, or a branch with two peaches hanging under the leaves. You can also give the whole peach a pair of eyes and a shy smile in the crease for a cute sticker. Want a smoother look? A nectarine is a smooth-skinned peach, so skip the soft shine and add a stronger white highlight. When you're ready for another fruit, the easy fruit drawing tutorial makes a good next stop, and the apple drawing tutorial is handy for comparing the two shapes side by side.
Peach Coloring Page and Printable Step Guide
Printing is handy for a classroom or a rainy afternoon. The peach coloring page shows a small colored peach and a color key at the top, with the big outline below waiting for crayons. The step-by-step guide PDF puts all 10 steps and tips on paper, so kids can follow along without a screen. Both print fine on Letter or A4.
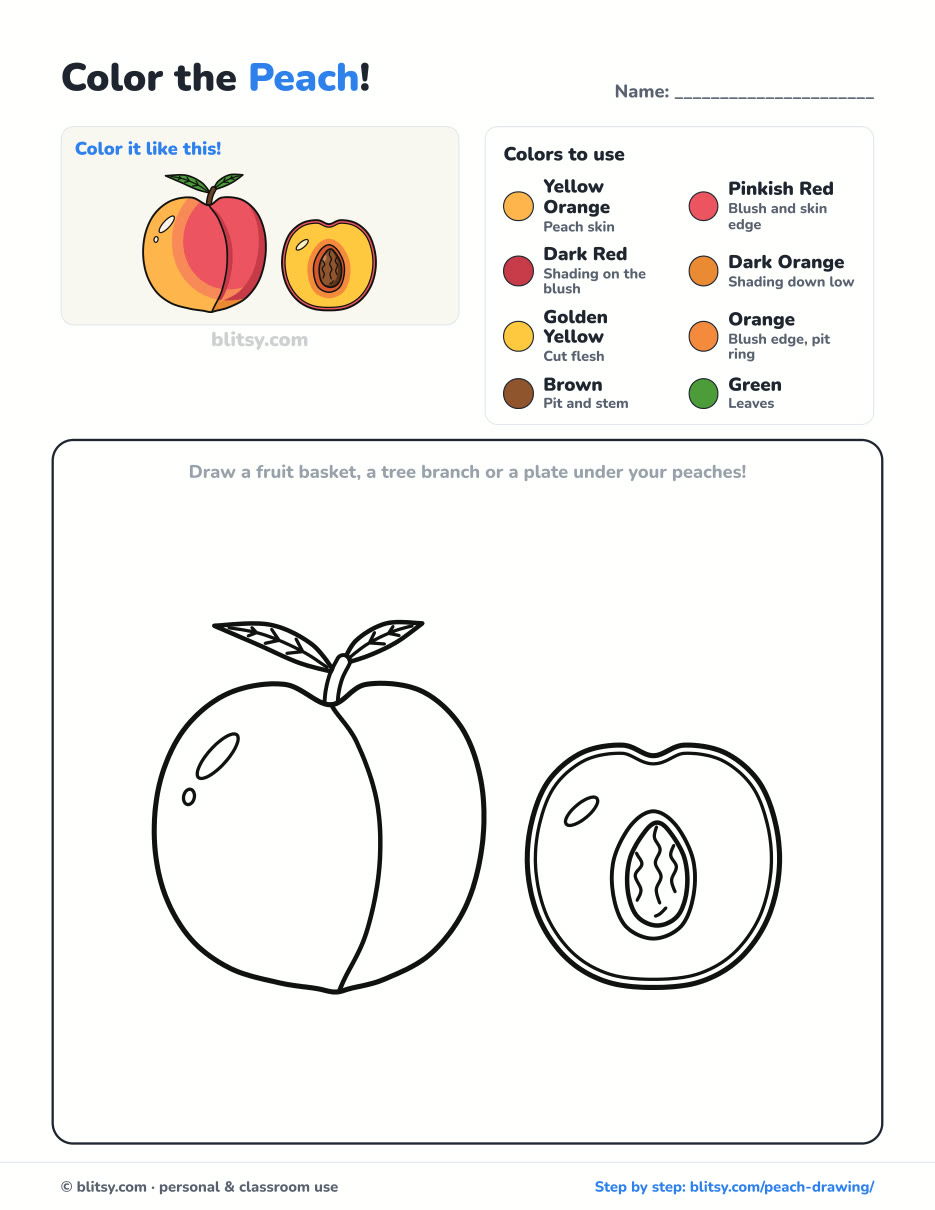
Black outlines with a colored example and the color names at the top. Ready to print and color.
⬇️ Download Coloring Page



Every step picture with its instructions and tips, to keep beside your paper while you draw.
⬇️ Download Drawing Guide📱 On a phone? Tap a download button, then open the file and choose Share → Save to Files or Print. On a computer, the PDF opens or saves straight to your Downloads folder.
Pin the Peach Steps for Another Day
Peach Drawing Questions Parents and Kids Ask
What is the easiest way to draw a peach?
Draw a circle, add a small dip at the top, then a curved crease from the dip to the bottom. Add a short stem and a leaf, and it already reads as a peach.
What makes a peach look different from an apple in a drawing?
The crease and the colors. A peach has a curved seam down one side, and its skin is golden with a pink-red blush rather than solid red or green.
How do you show that a peach is fuzzy?
Peaches have fine fuzz on their skin, so keep the shine small and soft. If you use colored pencils, light circular strokes give the skin a velvety look.
How long does it take to draw this peach?
Around 20 to 25 minutes with coloring. Drawing only the whole peach takes about 10.
Peaches first grew in China thousands of years ago, and yours only took ten steps. Show someone your blush colors! 🍑
Related posts:
 How to Draw a Strawberry Step by Step (Whole Berry + Cut Half)
 How to Draw Fruit Step by Step (Easy Fruit Bowl Still Life)
 How to Draw an Avocado Step by Step (Cute Cut Halves)
 How to Draw a Whale Step by Step (Easy for Beginners)
 How to Draw Lungs Step by Step (Easy Science Diagram)
 How to Draw a Pineapple Step by Step (Easy Crown and Slice)
 How to Draw Iron Man Step by Step (Easy Chibi for Kids)
 How to Draw a Dress Step by Step (Easy Party Dress)
 How to Draw a Chicken Step by Step (Easy for Beginners)
 How to Draw a UFO Step by Step (Cute Alien Saucer)
 How to Draw Flames Step by Step (Easy Campfire Drawing)
 How to Draw a Moon Step by Step (Sleepy Crescent + Phases)

