
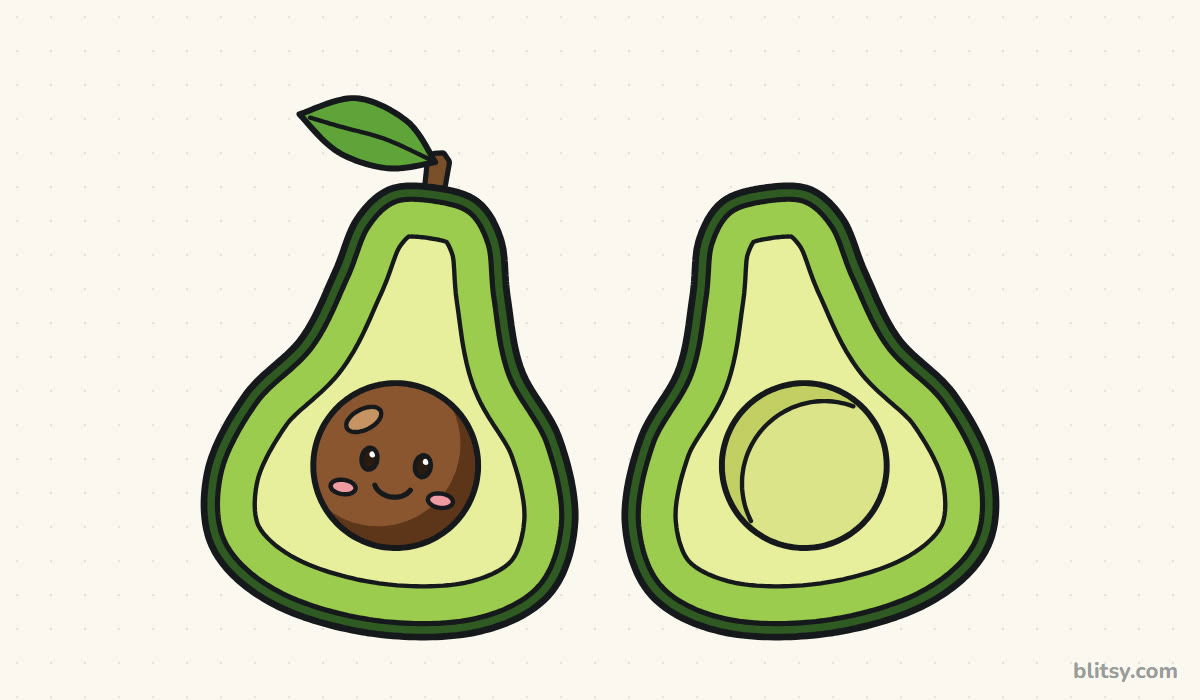
Slice an avocado open and you get two drawings for the price of one: a half with the big brown pit and a half with the dent it leaves behind. This lesson shows you how to draw an avocado step by step from nothing more than a large circle with a small one stacked on top. I like it for first-timers because every part is a smooth curve, so there are no sharp corners to get wrong.
Every step picture adds its new lines in blue. Lines from earlier steps turn gray, so you can see where the new part attaches. The faint blue circles are only helpers; draw them softly, because they vanish in step 10.
Quick overview
⏱️ Time: about 15 to 25 minutes, coloring included
🎯 Level: very easy, fine for kids from about 5
✏️ Steps: 11
🥑 You'll draw: an avocado cut in half, one side with a smiling pit and one side with the empty hollow
Avocado Art Supplies From Your Pencil Case
- A pencil, ideally a soft HB you can press gently
- A clean eraser
- A black felt-tip or fineliner for the final lines
- Colored pencils or crayons: dark green, a lighter green, light yellow, brown, pink and a leaf green
- A sheet of plain paper turned sideways
If you only own one green, press hard for the skin and softly for the flesh; it still works.
How to Draw an Avocado Step by Step
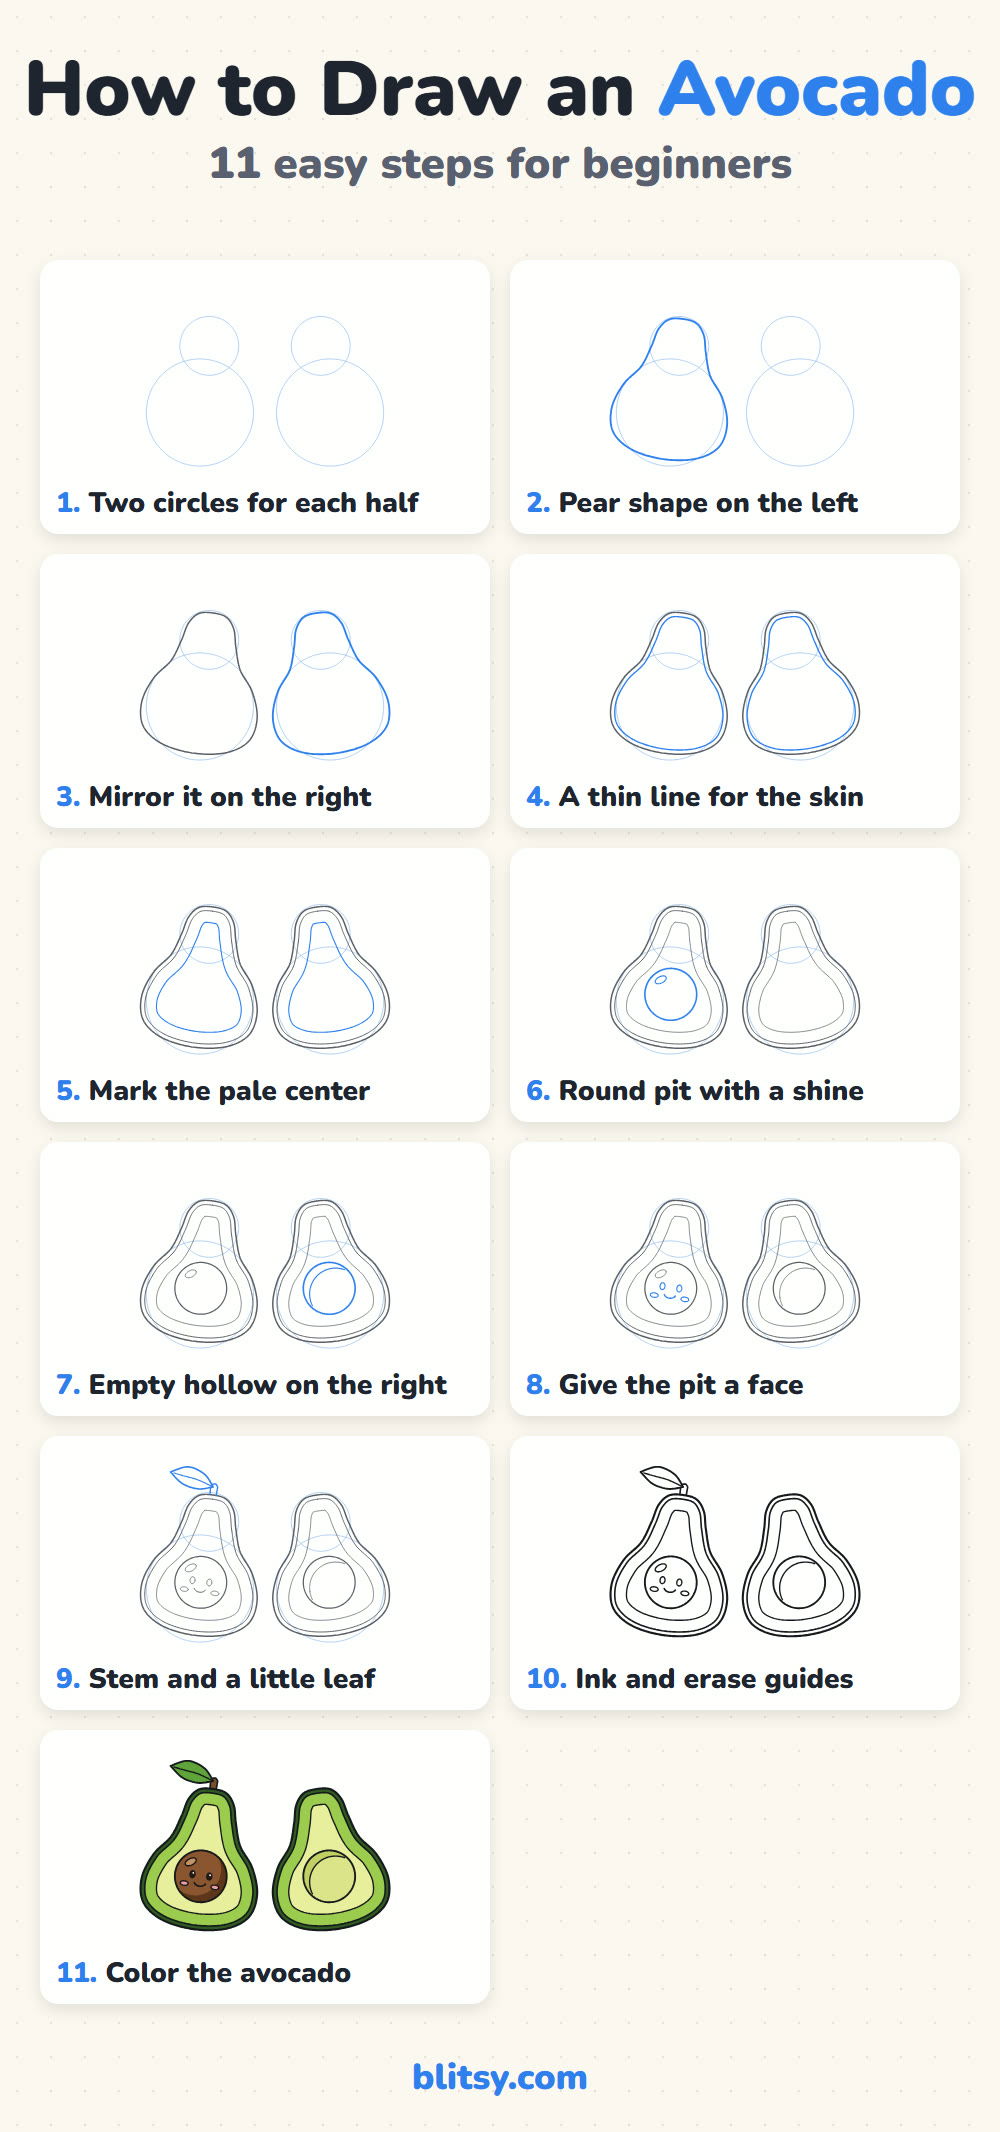
Step 1: Stack two circles for each half

Near the left side of the page, draw a large circle and set a smaller one on top of it so they overlap a little. The small circle should be roughly half as wide as the big one. Repeat the same pair on the right, leaving a gap of about two fingers between them. Together they give you the avocado body: heavy at the bottom, narrow on top.
💡 Tip: Draw the circles in two or three quick, light loops instead of one slow line. They come out rounder.
Step 2: Wrap a pear shape around the left circles
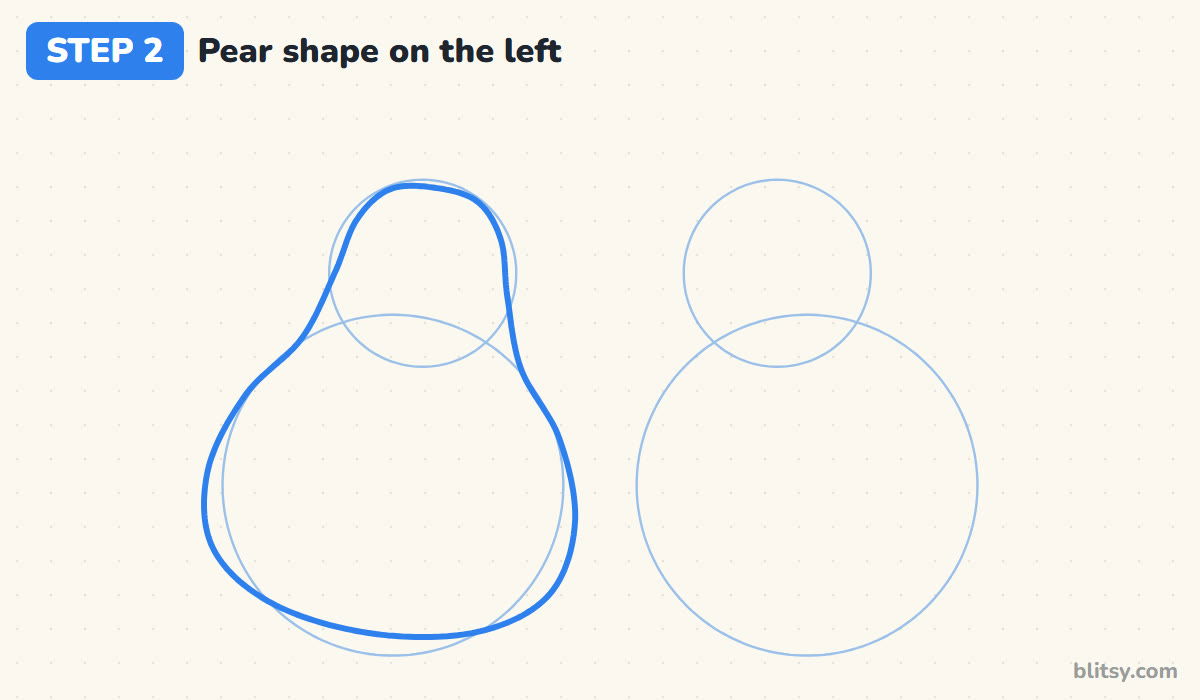
Starting at the top of the small circle, draw a smooth line down one side, letting it pinch in slightly where the two circles meet and then swell out around the big one. Do the same on the other side and close the bottom with a gentle curve. I tilt the whole shape a tiny bit toward the middle of the page, because perfectly upright halves look stiff.
💡 Tip: Keep the bottom a little flatter than the circle. A cut avocado rests on its belly.
Step 3: Mirror the shape on the right
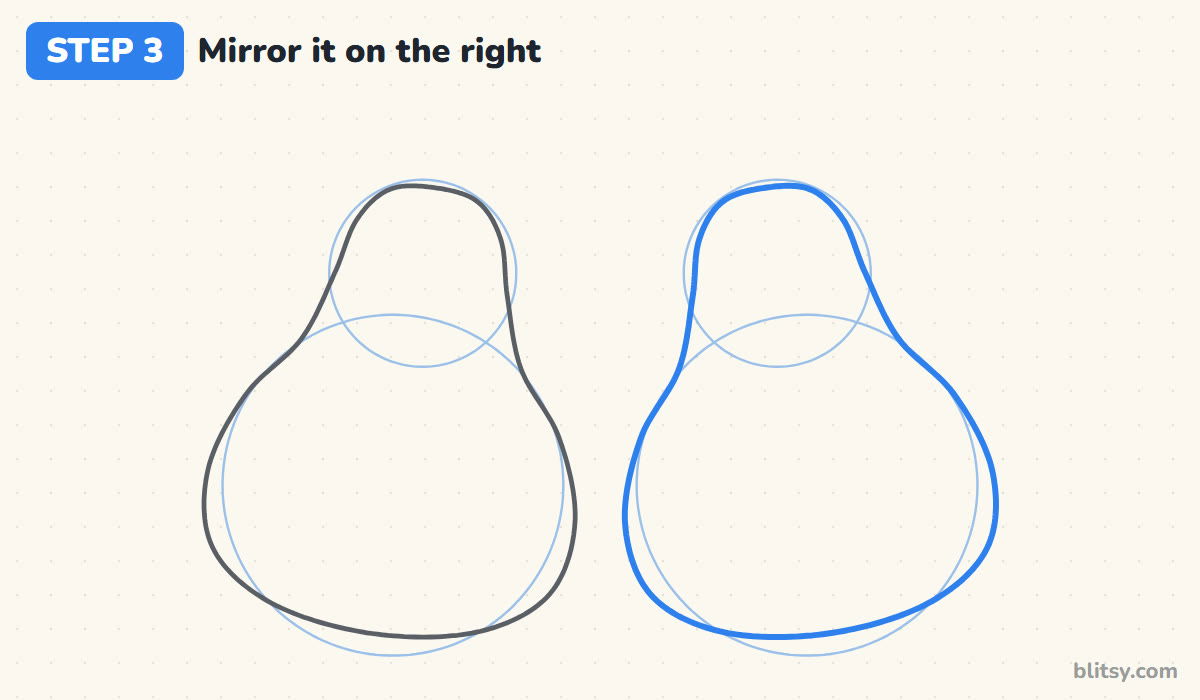
The two halves of one avocado are mirror images, so the right outline should look like the left one flipped. Tilt it toward the center by the same amount. Check that both tops and both bottoms sit at about the same level, or the fruit looks like two different avocados.



💡 Tip: Turn the paper upside down for a second. Uneven halves jump out much more that way.
Step 4: Draw a thin line inside for the skin
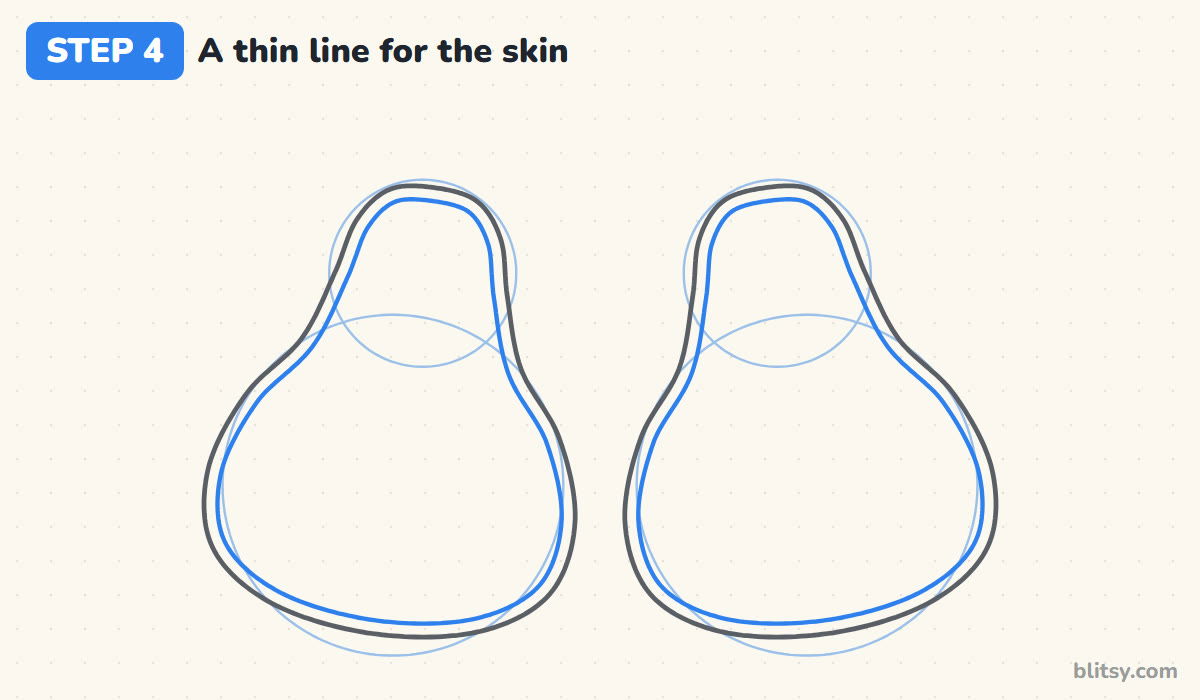
Just inside each outline, draw a second line that follows it all the way around. Keep the gap narrow, about the width of a grain of rice. That slim band is the dark green skin. Most beginners make it too thick, and then the avocado looks like it's wearing a heavy coat instead of a peel.
💡 Tip: Go slowly around the narrow top. That's where the band likes to get wider by accident.
Step 5: Mark the pale center of the flesh
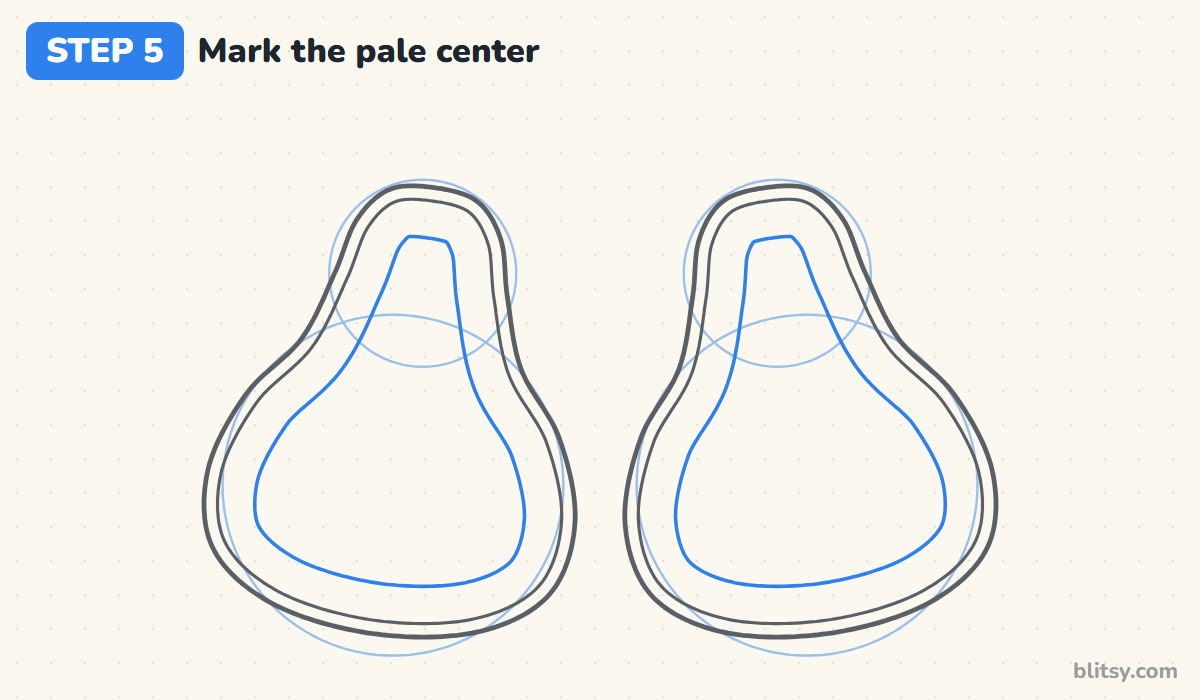
Real avocado flesh is bright green near the skin and turns creamy yellow toward the middle. To show that, draw a third line inside each half, this time leaving a wider gap from the skin line. It should follow the pear shape but stay softer and rounder. I keep a light hand here, since it marks a color change, not a hard edge.
💡 Tip: Leave the outer green band roughly twice as wide as the skin band. That ratio looks natural.
Step 6: Add the round pit on the left
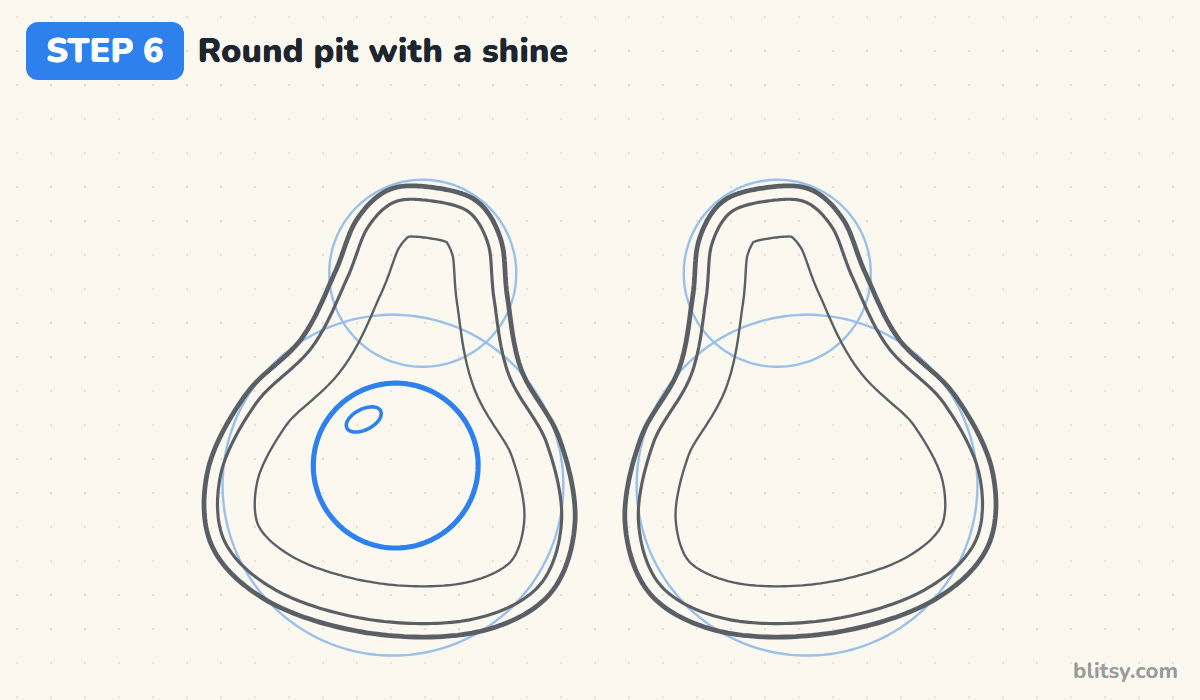
In the lower, wider part of the left half, draw a big circle for the pit. It takes up a lot of room, close to half the width of the fruit, and that's correct. Place it below the middle, where the body is roundest. Then draw a small slanted oval near its upper left edge for the shine, so the seed looks smooth and glossy.
💡 Tip: Trace around a coin first if your circles tend to wobble.
Step 7: Draw the empty hollow on the right
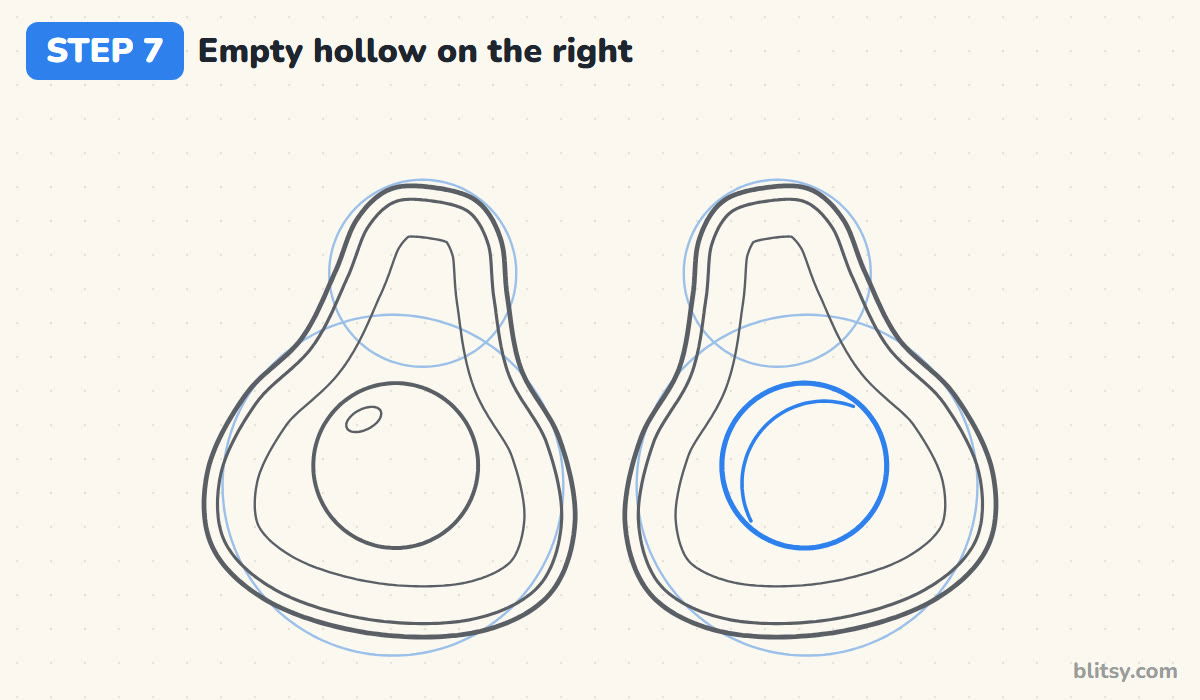
The right half lost its pit, so it has a dent where the seed used to sit. Draw a circle the same size and at the same height as the pit on the left. Inside it, add a curved line along the upper left side. That curve shows the inner wall of the dip, and it is what makes a flat circle read as a hollow.


💡 Tip: Match the hollow to the pit's size exactly. A smaller dent makes the halves look mismatched.
Step 8: Give the pit a happy face
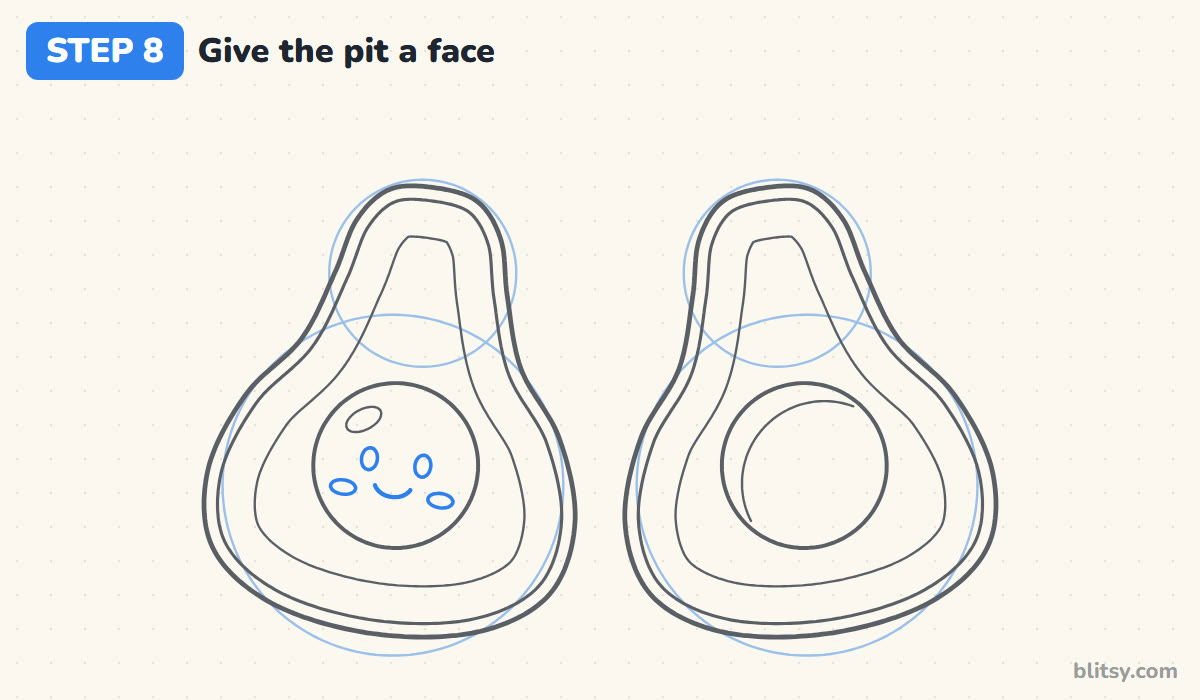
Draw two small upright ovals for eyes, a little below the middle of the pit and fairly close together. Put a short curved smile between and under them, then two flat ovals on the sides for rosy cheeks. Placing the face low on the pit gives it that cute, round-cheeked look.
💡 Tip: Leave a tiny white dot in each eye. One dot is enough to make the face look alive.
Step 9: Add a stem and a little leaf
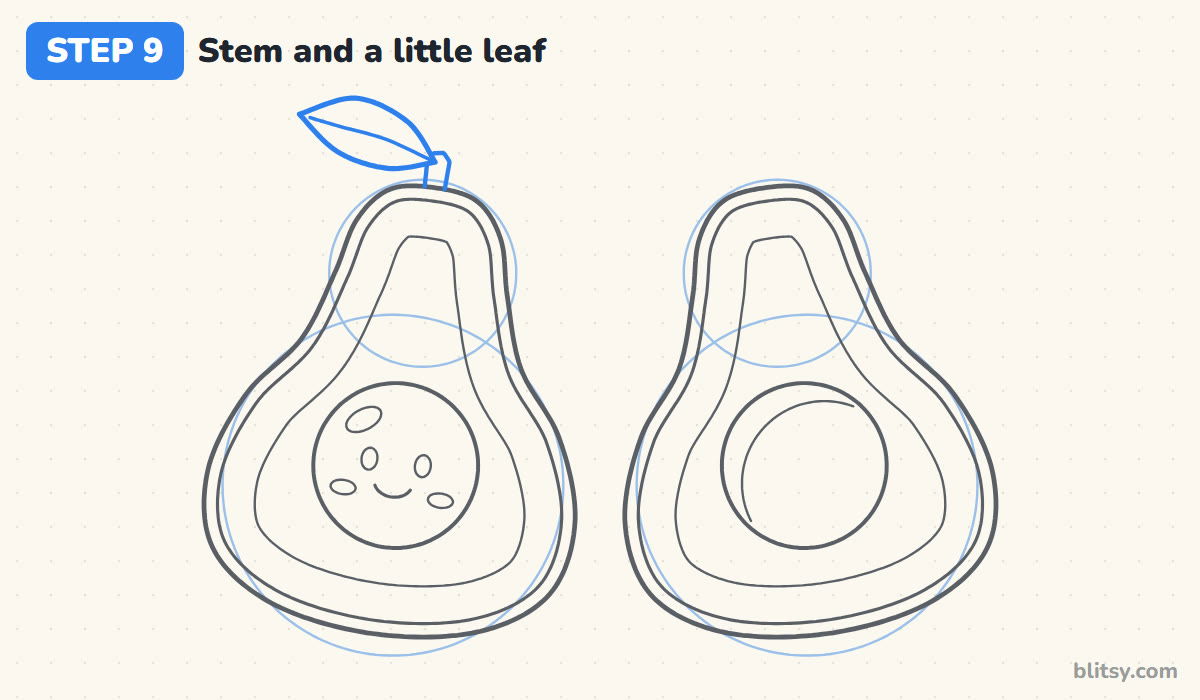
At the very top of the left half, draw a short stem leaning slightly to the right. From the tip of the stem, draw a leaf pointing up and out to the left: two curved lines that meet in a point. Run one line through the middle for the vein. I keep the leaf small, since a big one would pull attention away from the pit.
💡 Tip: Stop the stem lines where they touch the avocado, so the stem looks tucked into the skin.
Step 10: Ink the keepers and erase the guides
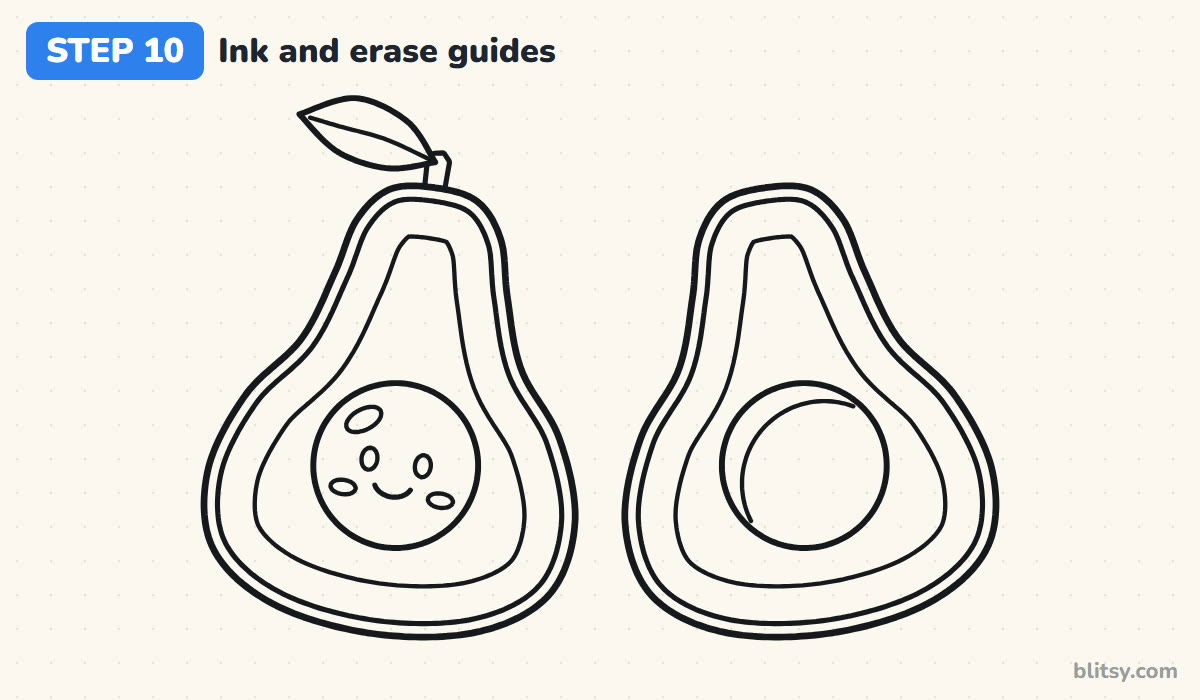
Go over every line you want to keep with the black pen: both outlines, the skin and center lines, the pit, the hollow, the face, the stem and the leaf. Let the ink dry for a minute so it can't smear. Then erase all four helper circles. This clean line drawing is also handy to photocopy for coloring later.
💡 Tip: Ink the outer outlines a little bolder than the inside lines. Thicker edges make the halves pop.
Step 11: Color the avocado
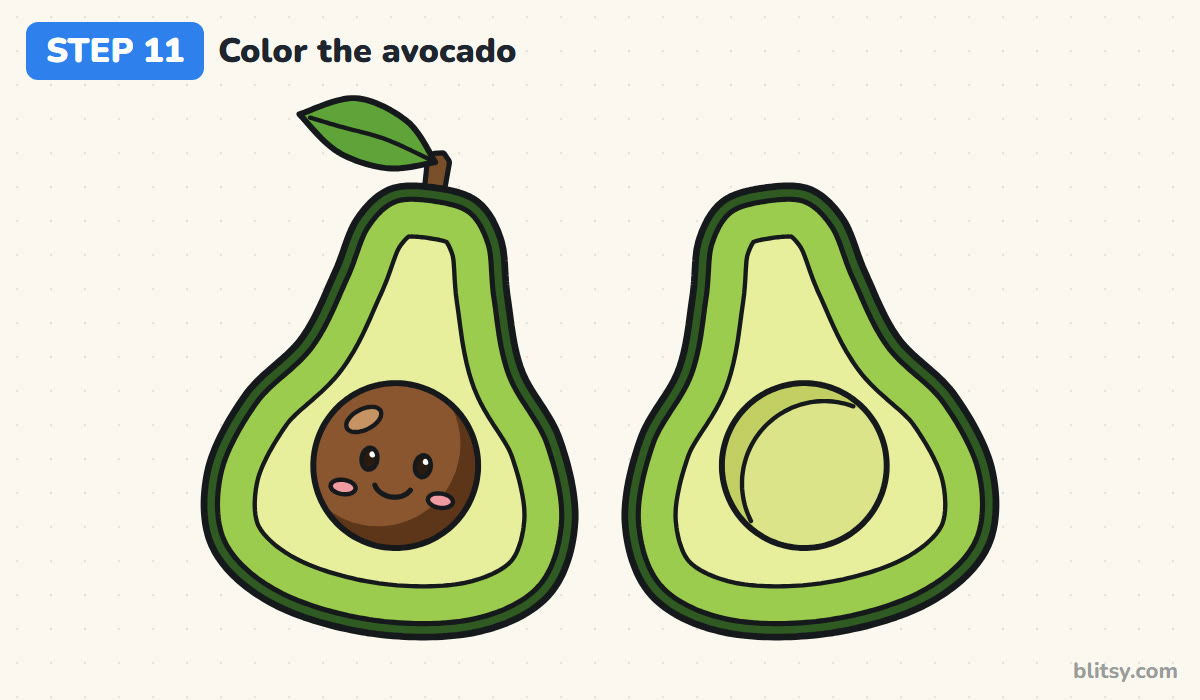
Color the skin band dark green and the outer flesh a lighter green. Fill the centers with light yellow, and use a slightly deeper yellow-green inside the hollow, with a darker crescent along its curved line. Make the pit brown with a darker brown along the lower right edge, leaving the shine pale. Finish with pink cheeks and a fresh green leaf.
💡 Tip: Blend the green into the yellow with light overlapping strokes where the two meet. No hard line needed.
Avocado Shapes That Turn Into Pears or Eggs
- A top that's too narrow. A thin neck turns the fruit into a pear. Keep the small guide circle at least half the width of the big one.
- No pinch at all. Without a gentle curve in at the waist, the avocado reads as an egg. Let the outline dip in a little where the circles meet.
- A tiny pit. Avocado seeds are huge. If the pit is smaller than a third of the width, it looks like a grape. Make it big and confident.
- Pit and hollow at different heights. They came from the same seed, so line them up across the page.
- Coloring the flesh one flat green. The fruit looks like a leaf. Save the yellow for the middle so it looks ripe and creamy.
Toast, Tacos and Other Avocado Spin-Offs
Once the halves feel easy, put them to work. Draw one half lying on a slice of toast, add a sleepy face to the hollow so both sides have a character, or slice the second half into thin crescents fanned across a plate. If you want another fruit next, the strawberry drawing tutorial uses the same circle-first approach, and this fruit bowl drawing tutorial puts five fruits together in one still life.
Avocado Coloring Page and Printable Drawing Steps
For a screen-free afternoon, print the avocado coloring page. At the top sits a small colored example with the six colors named underneath, and below it a big outline with thick lines that small hands can stay inside. The step-by-step guide PDF holds all 11 steps and tips, two to a page. Both print fine on Letter or A4.
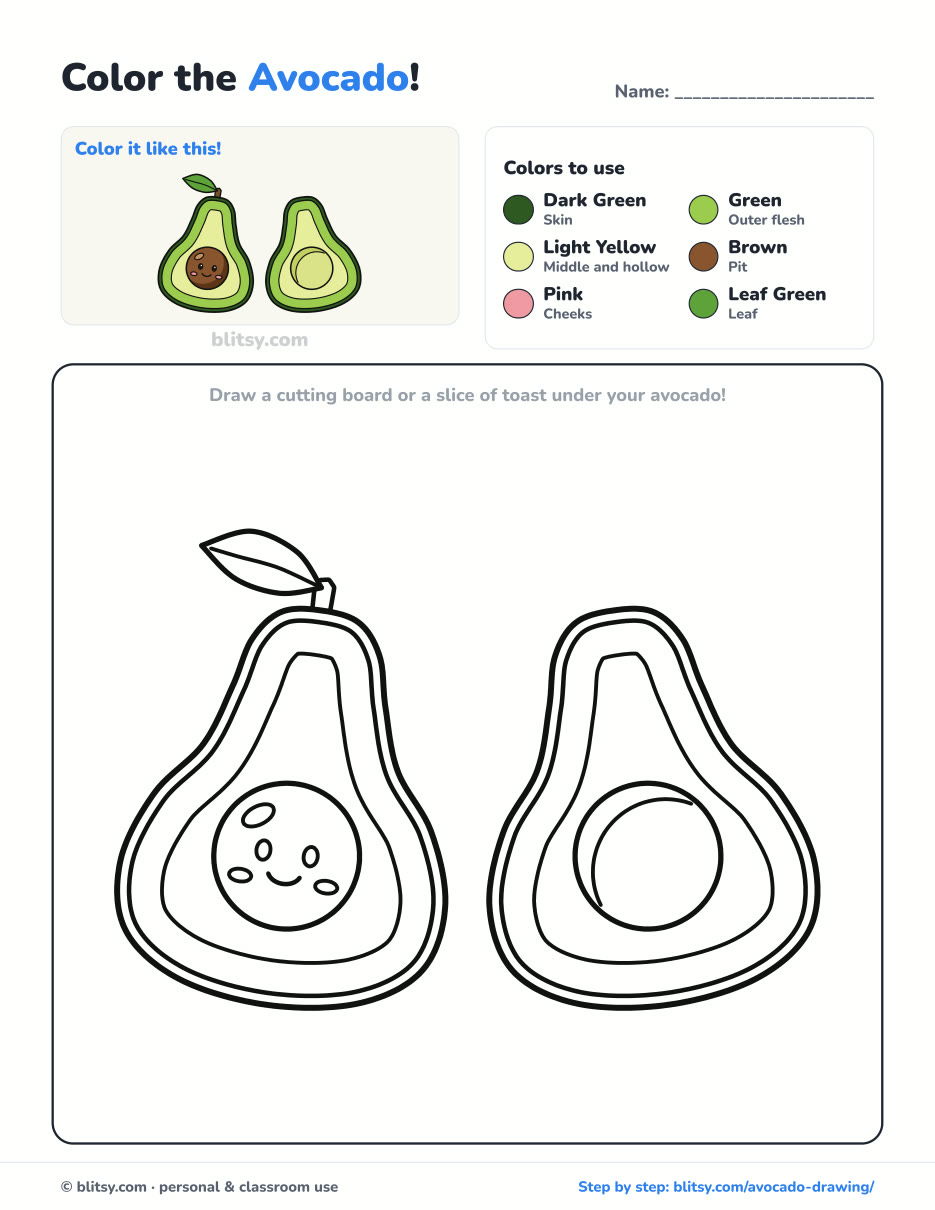
Black outlines with a colored example and the color names at the top. Ready to print and color.
⬇️ Download Coloring PageEvery step picture with its instructions and tips, to keep beside your paper while you draw.
⬇️ Download Drawing Guide📱 On a phone? Tap a download button, then open the file and choose Share → Save to Files or Print. On a computer, the PDF opens or saves straight to your Downloads folder.
Stack Every Avocado Step on One Pin
Avocado Done? Grow a Garden of Fruit and Flowers
Below are step-by-step tutorials for more plants and food, each built from simple shapes the way your avocado halves were.
- Flower Drawing: Three easy flowers stand in a little pot in this how to draw a flower step by step lesson.
- Tree Drawing: The tree drawing tutorial grows a leafy apple tree with a knothole in the trunk.
- Dandelion Drawing: Draw the yellow flower and the fluffy seed head side by side in the dandelion drawing tutorial.
- Cell Drawing: For biology homework, the cell drawing step by step guide labels its way through an animal cell.
- Succulent Drawing: Sage leaves with pink tips sit in a clay pot in this easy succulent drawing tutorial.
- Hibiscus Drawing: Five red petals spin around a dark center in the hibiscus drawing tutorial.
- Tulip Drawing: Red, pink and yellow tulips lean in different directions in the how to draw a tulip lesson.
- Magnolia Flower Drawing: One open magnolia, a half-closed flower and a furry bud come together in this magnolia flower drawing tutorial.
- Grass Drawing: Build a small meadow from one bending blade with the grass drawing step by step guide.
- Pineapple Drawing: The pineapple drawing tutorial gives you a golden fruit under its leafy crown, plus a fresh slice.
- Fruit Drawing: Fill a blue bowl with five fruits in this fruit drawing tutorial.
- Plant Drawing: Draw a potted monstera with split leaves in the how to draw a plant lesson.
- Rose Drawing: Roses are a classic next flower, and this rose drawing tutorial opens one from a tight spiral, with a bud and two leaves.
- Strawberry Drawing: A whole berry and a cut half sit next to each other in the strawberry drawing tutorial, just like your two avocado halves.
- Birthday Cake Drawing: Frosting, sprinkles and three little flames finish the birthday cake drawing step by step lesson.
- Jack O Lantern Drawing: One oval starts the carved pumpkin in this jack o lantern drawing tutorial.
Avocado Questions Kids Ask Me at the Table
What is the easiest way to draw an avocado?
Stack a small circle on a big one and wrap one smooth outline around both. Add a line inside for the skin and a big circle for the pit, and you're done.
How do you draw a cute avocado?
Give the pit two oval eyes with a white dot in each, a small smile and pink cheeks. Keeping the face low and small is what makes it cute.
What colors do you need to draw an avocado?
Dark green for the skin, a lighter green for the outer flesh, light yellow for the middle and brown for the pit. Pink cheeks and a leaf green are extras.
How long does it take to draw an avocado?
About 10 minutes for the lines and 10 more for coloring. Younger kids can draw only the half with the pit.
Next time someone cuts an avocado in your kitchen, take a peek at the pit and then go draw your own. 🥑
Related posts:
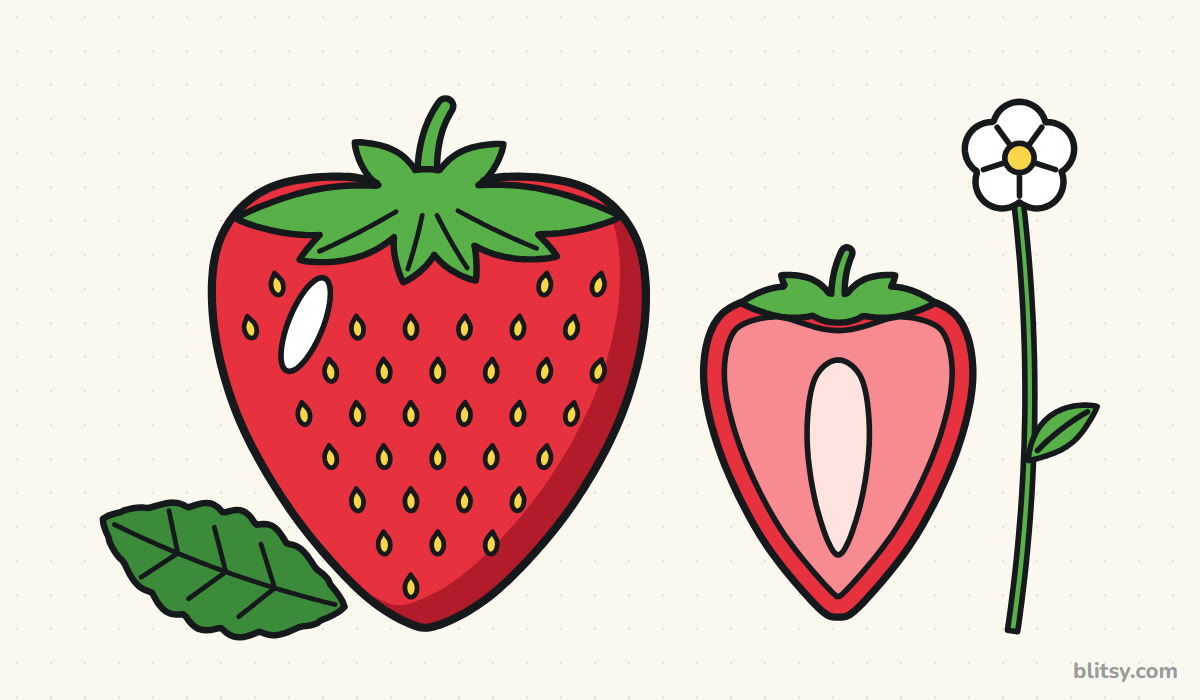 How to Draw a Strawberry Step by Step (Whole Berry + Cut Half)
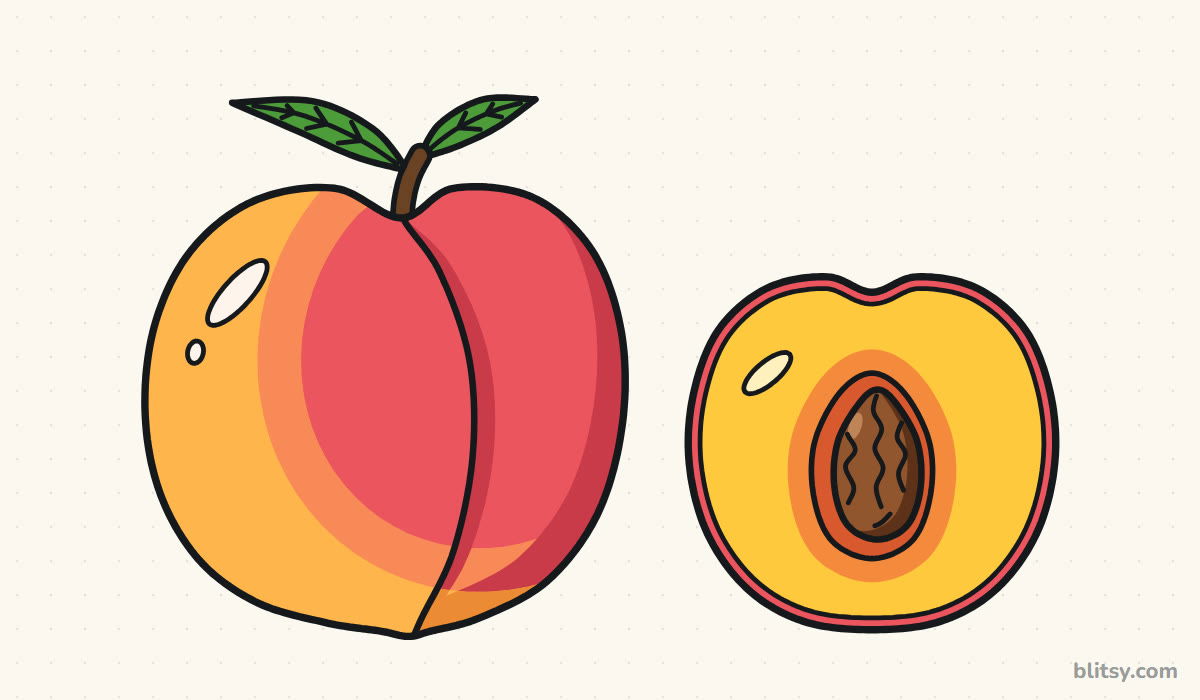 How to Draw a Peach Step by Step (Whole Fruit + Cut Half)
 How to Draw a Tooth Step by Step (Cute and Easy for Kids)
 How to Draw an Owl Step by Step (Cute Night Owl)
 How to Draw an Axolotl Step by Step (Cute and Easy)
 How to Draw Cute Animals Step by Step (Cat, Bear & Bunny)
 How to Draw an Octopus Step by Step (Cute and Easy)
 How to Draw a Frog Step by Step (Cute Frog on a Log)
 How to Draw a Jellyfish Step by Step (Cute, Easy Guide)
 How to Draw a Care Bear Step by Step (Cute Fan Art for Kids)
 How to Draw Cerberus Step by Step (Cute and Easy)
 How to Draw a Monster Step by Step (Cute and Easy)

