
Two people in one picture sounds harder than one, but the tricky part is really just getting their sizes right. Once the little girl looks clearly smaller than her mom, the drawing already feels like a family. In this lesson I'll show you how to draw a mother and daughter step by step, from two plain circles to a mom and her girl holding hands with a heart floating above them. It makes a sweet Mother's Day card, too.
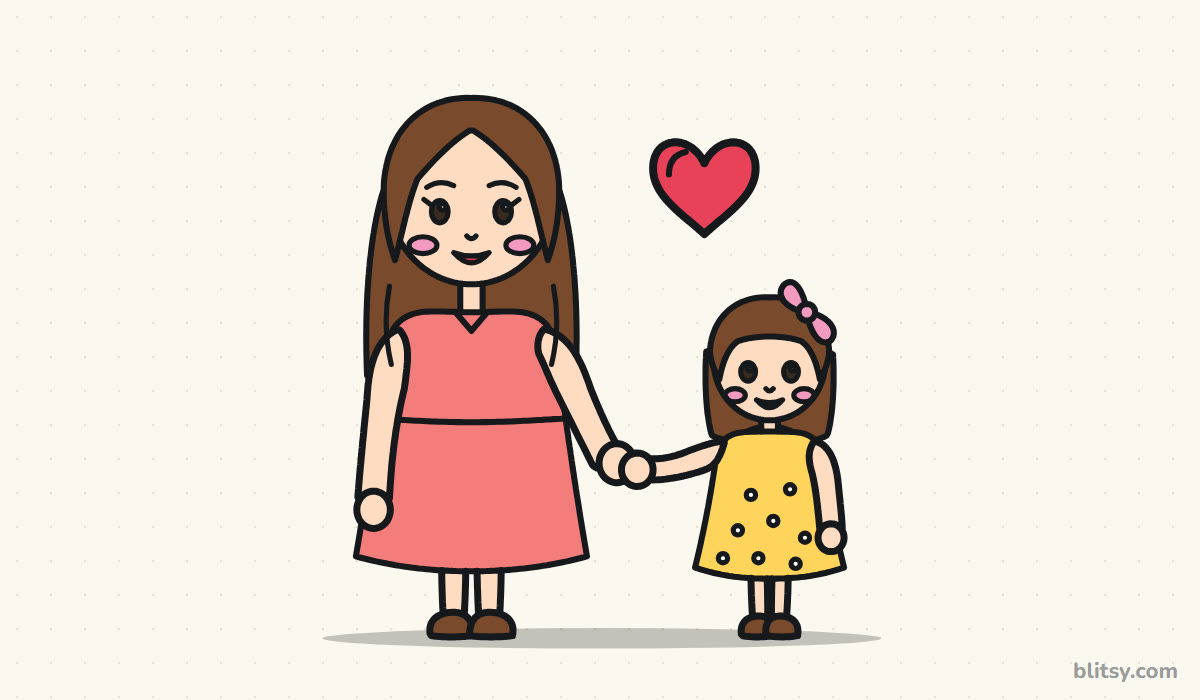
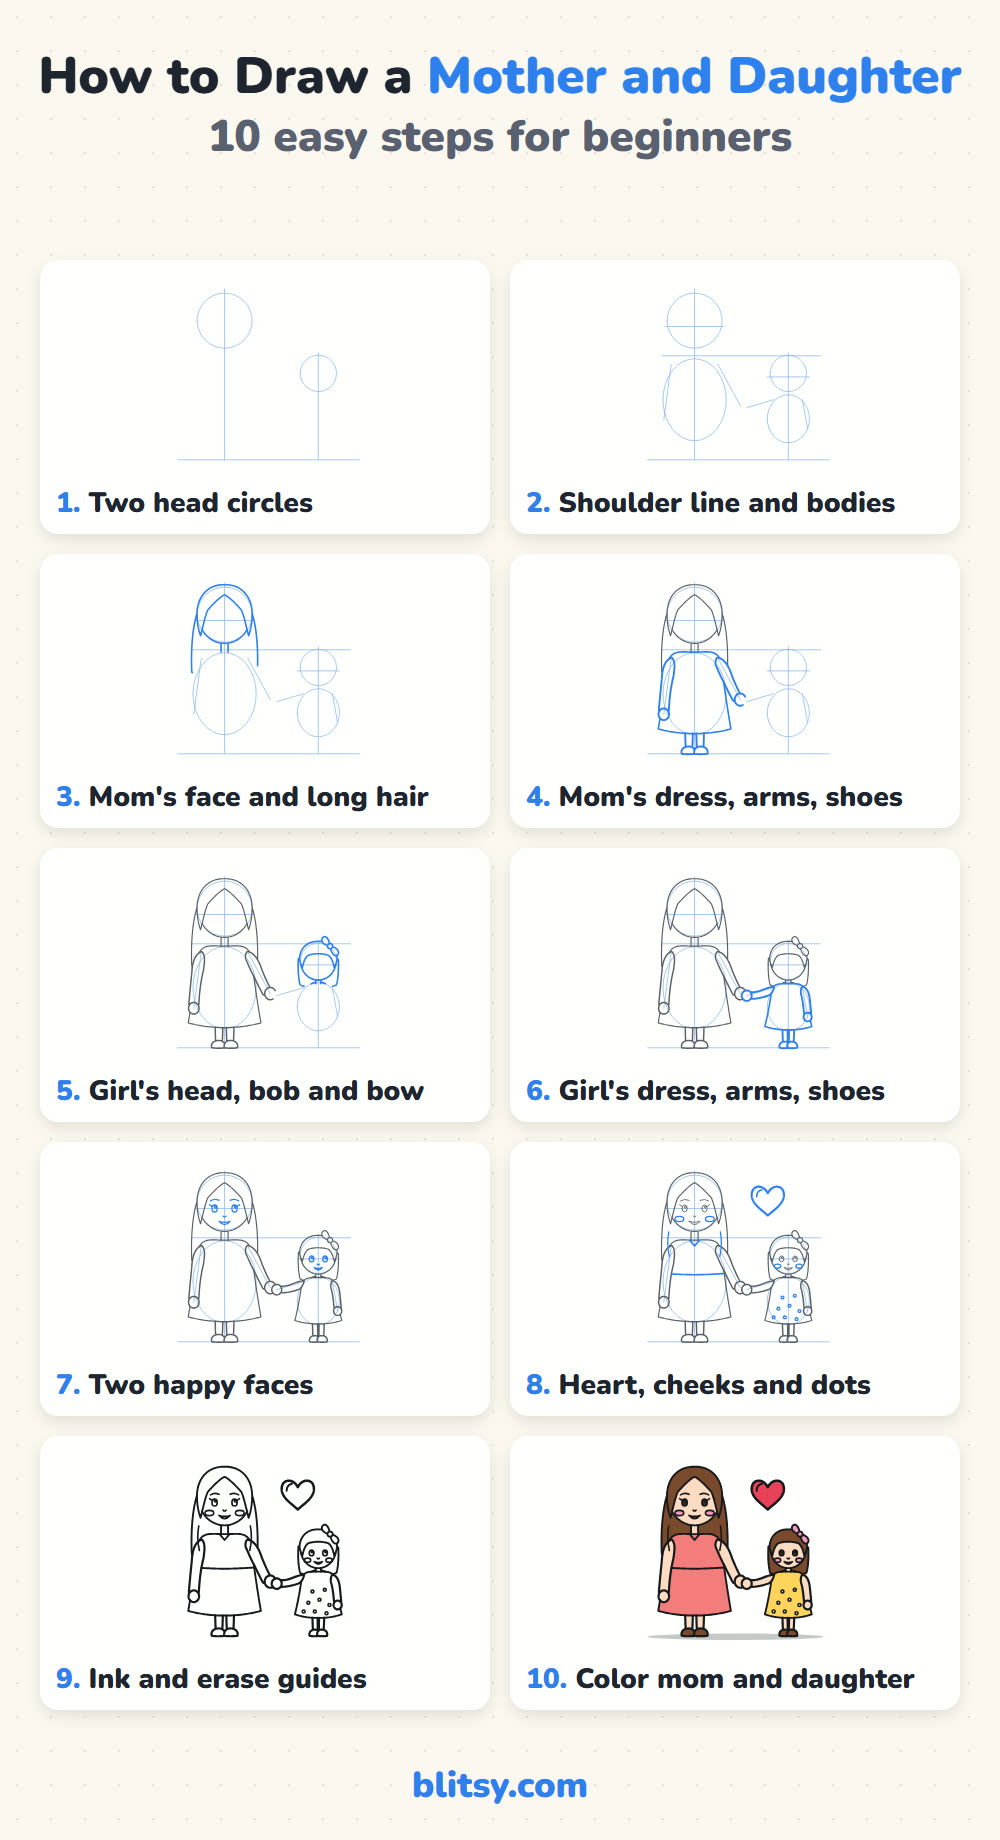
Blue marks what you add in each step, and gray is the work already on your paper. The faint light blue shapes are helpers. Keep them soft so you can rub them out later.
Quick overview
⏱️ Time: roughly 30 to 40 minutes, coloring included
🎯 Level: easy, suits kids from about 7 and grown-ups
✏️ Steps: 10
👩👧 You'll draw: a mom and her daughter holding hands under a heart
Supplies to Gather for a Family Portrait
- A pencil you can press lightly with (HB works well)
- A soft eraser for the helper shapes
- A black fineliner or thin marker for the final lines
- Colored pencils or crayons in peach, brown, coral and yellow, plus pink and red
- A sheet of plain paper turned sideways so both figures fit
No coral pencil? A light red or salmon pink pressed softly gives the mom's dress the same warm look.
How to Draw a Mother and Daughter Step by Step
Step 1: Draw two head circles of different sizes
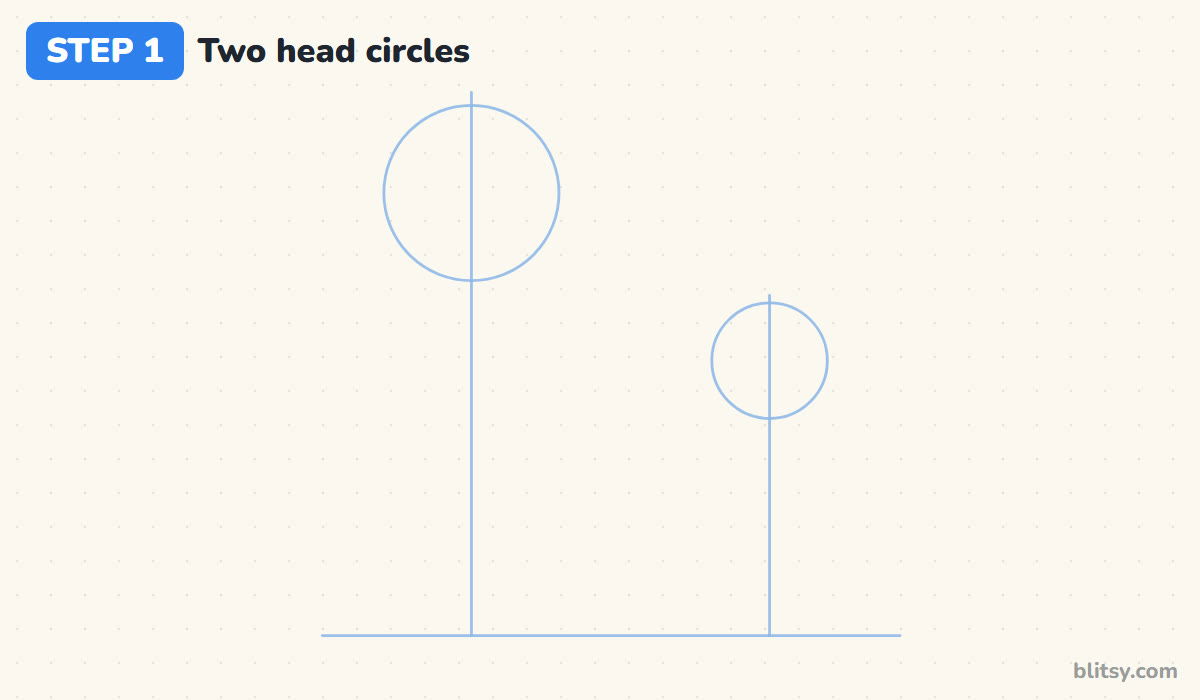
Start with a long ground line near the bottom of the page. Draw two straight lines standing up from it, one for the mom on the left and one for her daughter on the right. Near the top of the left line, draw a large circle for mom's head. The girl's circle sits lower on the right line and should be about two thirds as wide. When I teach this lesson, this size difference is the first thing I check, because it does most of the storytelling.
💡 Tip: Press so lightly that the circles almost disappear. You'll be erasing them at the end.
Step 2: Add a shoulder line, eye lines and body ovals
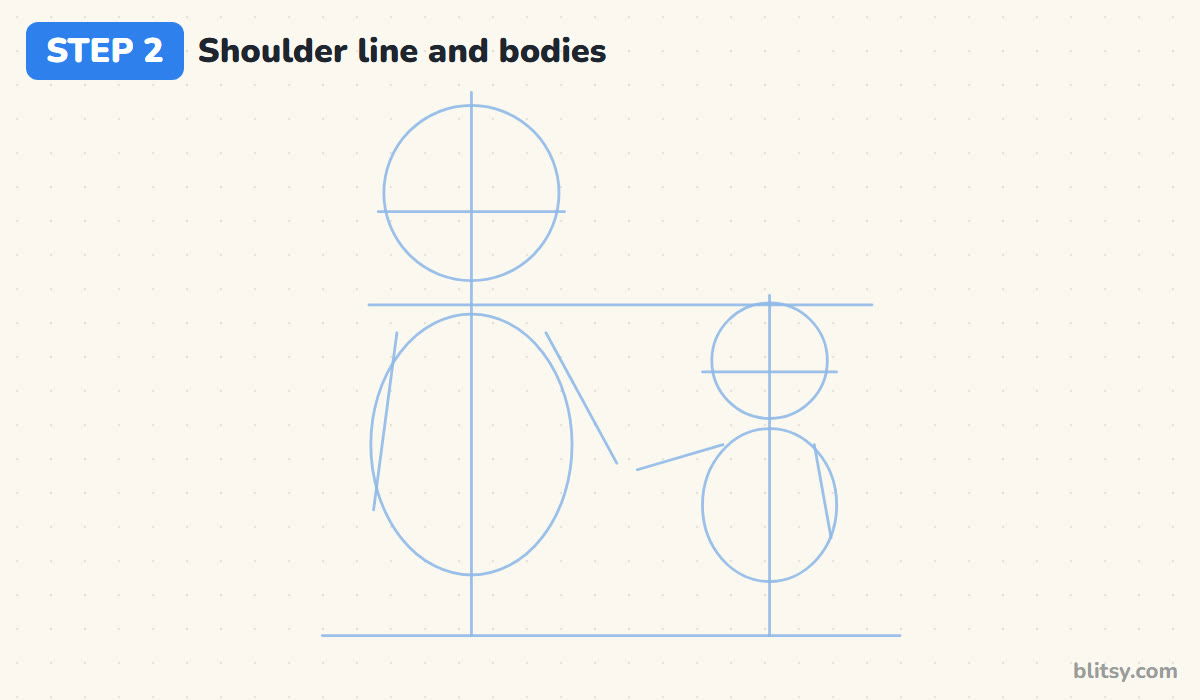
Draw one long flat line right under mom's head, reaching across to the right. That's mom's shoulder line, and the top of the girl's head should sit just under it. Cross each head with a short line a little below its middle for the eyes. Below each head, sketch a body oval, a tall one for mom and a short, round one for the girl. Add four slanted arm lines, with the two inner ones meeting in the middle.
💡 Tip: If the girl's head pokes above the shoulder line, she will look like a teenager. Lower her circle.
Step 3: Shape mom's face and long hair
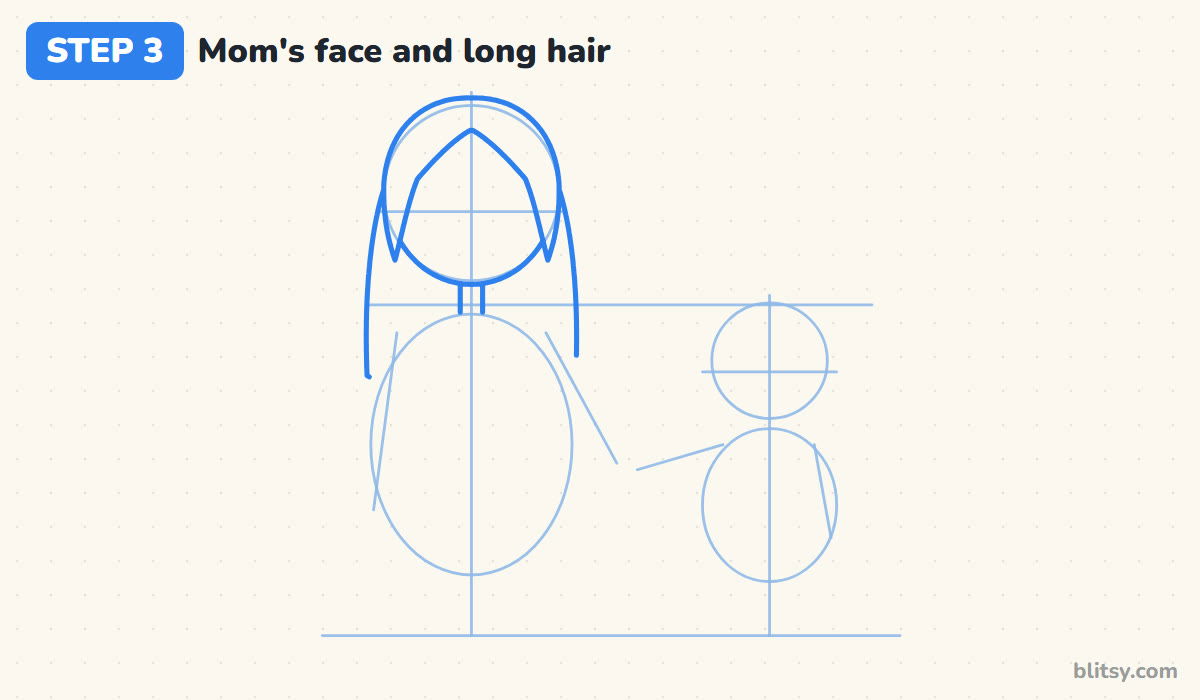
Go over mom's head circle with a steady line, then add a short neck under the chin. For the hair, draw curtain bangs that part in the middle of the forehead and sweep down past each cheek. Behind the head, let the long hair fall in two straight lines down to below the shoulders. The hair should stand a little wider than the face on each side so it looks full.




💡 Tip: Leave the forehead uncovered between the bangs. Mom's eyes and brows need that room.
Step 4: Dress mom and add her arms
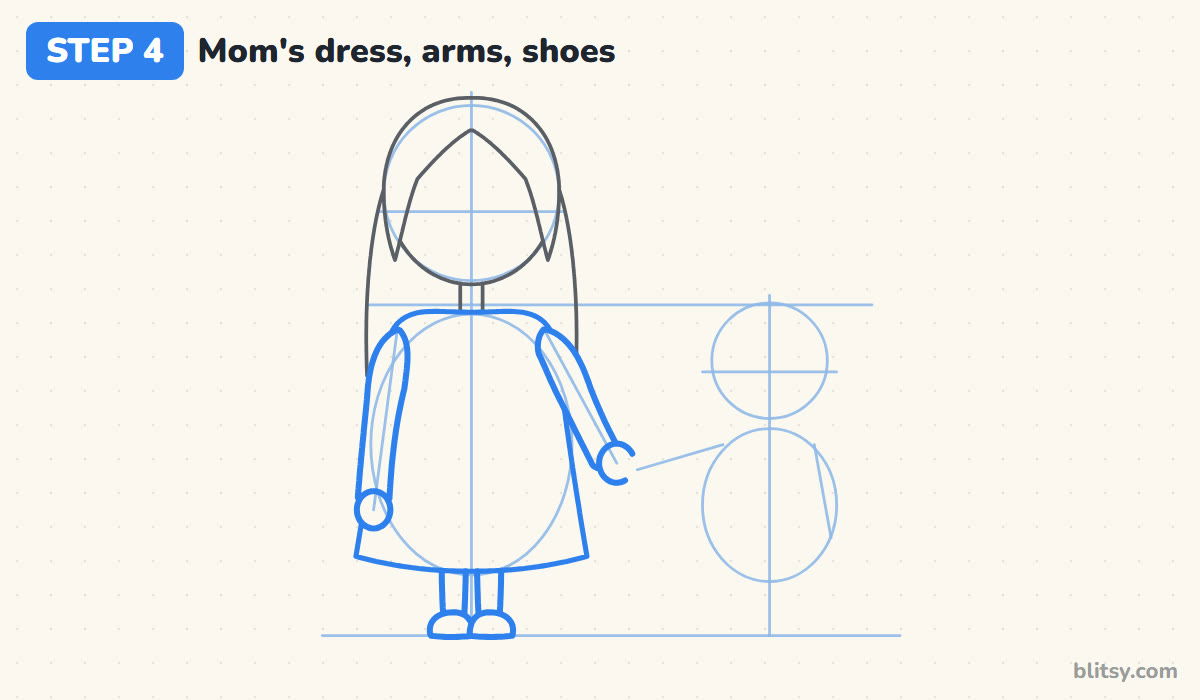
Use the big oval to place an A-line dress: narrow at the shoulders, wider at the hem, which stops a little above the ground. Her left arm hangs straight down with a round hand at the end. The right arm angles down toward the middle of the page. Under the hem, add two short legs and small rounded shoes on the ground line. The right hand is left slightly open on one side, because the girl's hand will cover that spot.
💡 Tip: Keep both arms the same thickness from shoulder to wrist. Tapering them makes mom look stiff.
Step 5: Draw the girl's head with a bob and a bow
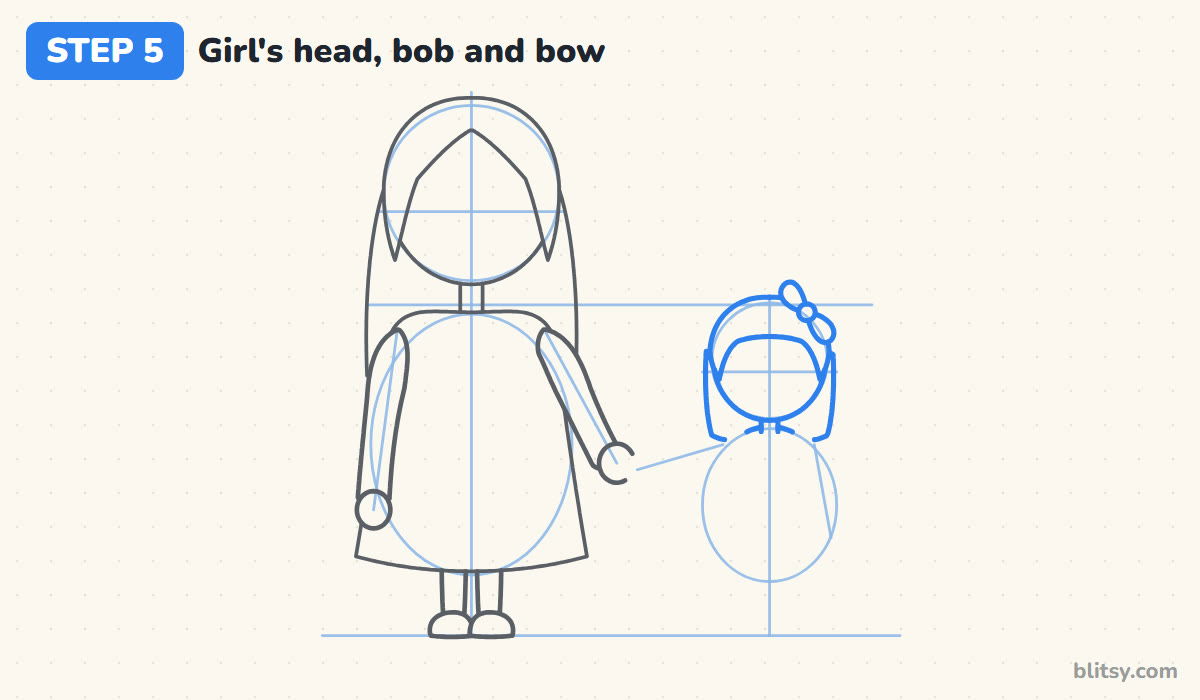
Trace the smaller head circle and add a tiny neck. Her hair is a short bob: a rounded cap with straight bangs and sides that end near her chin. Then I put a little bow on the top right of her head, two teardrop loops with a small round knot between them. Tilting it slightly gives her a playful look.
💡 Tip: Draw the bow last in this step, on top of the hair. Then you won't need to erase hair lines through it.
Step 6: Give the girl her dress and arms
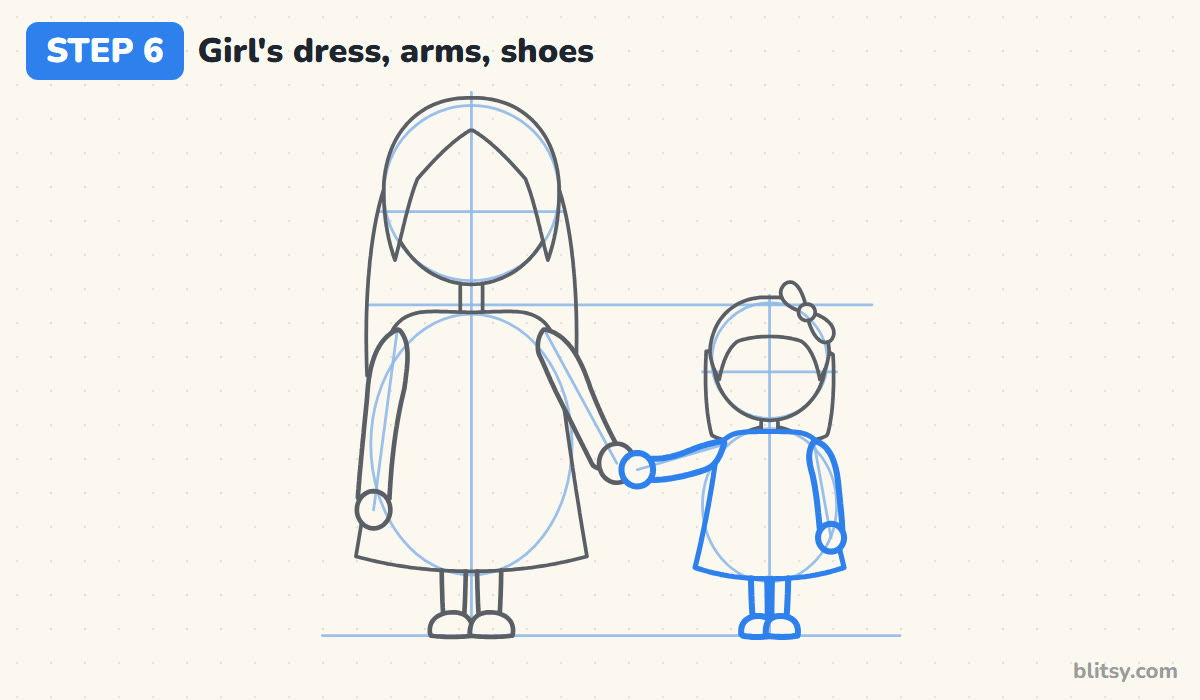
Her dress is a shorter version of mom's, flaring gently to a hem above her knees. Reach her left arm out toward mom and close her small round hand over mom's hand so the two overlap. Her other arm hangs by her side. Two short legs and tiny shoes go under the hem, on the same ground line as mom, or one of them will seem to float.
💡 Tip: Overlap the two hands by about a third. A small overlap reads as holding hands, a gap reads as reaching.
Step 7: Give them two happy faces
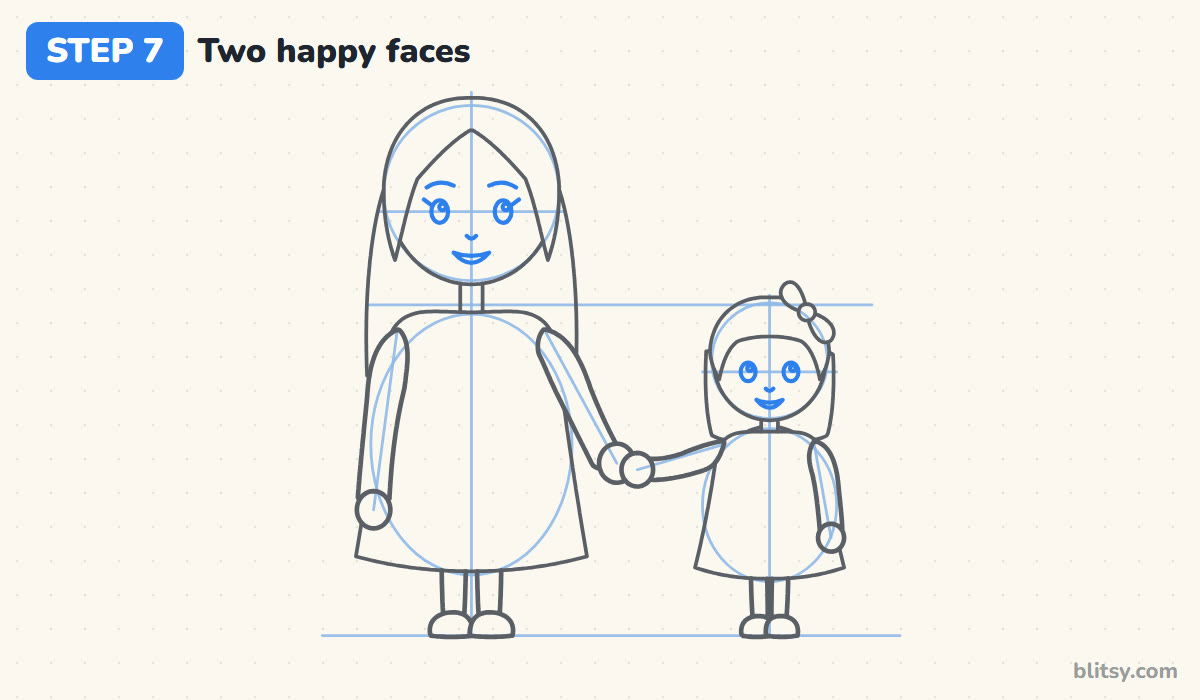
Faces are where most people slow down, and that's fine. For mom, place two small oval eyes on her eye line with a white shine dot in each, a flick of lashes at the outer corners and a soft brow above. Her nose is a short curve, her smile a half-moon. The girl gets the same face in miniature without brows. Matching smiles make them look related.

💡 Tip: Check the distance between the eyes on both faces. Equal spacing keeps each face friendly and even.
Step 8: Add the heart and small details
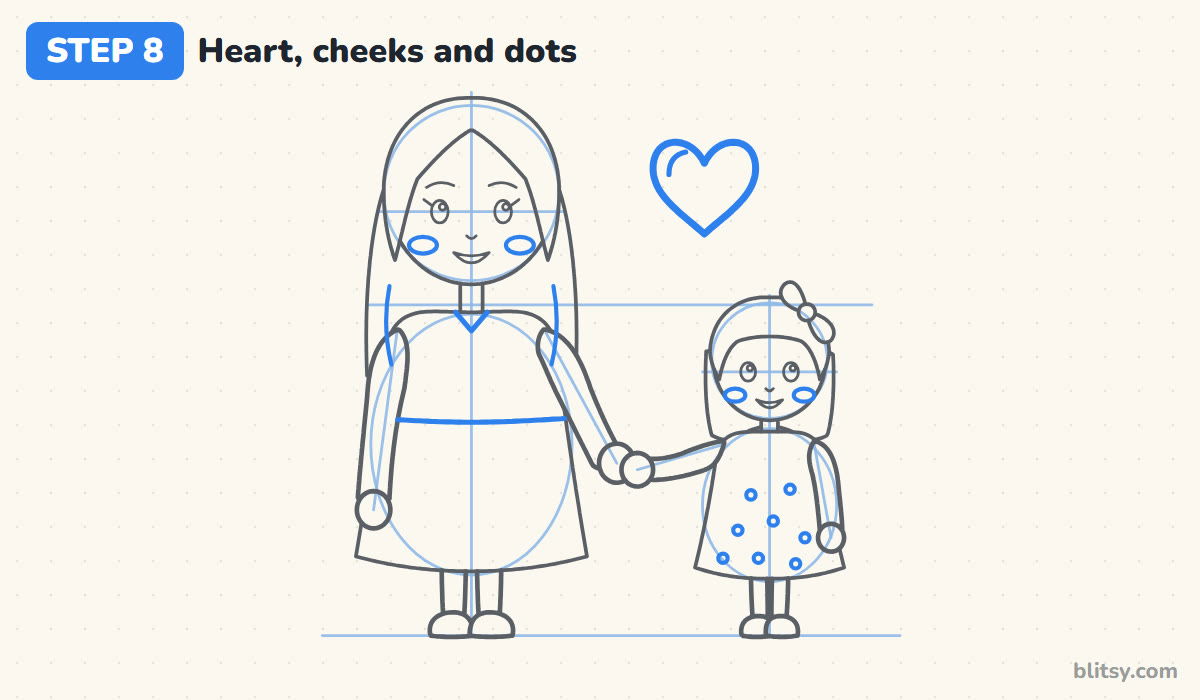
Float a heart in the empty space above the girl, roughly as wide as her head, with a curved shine line inside. Give both faces round cheeks just below the eyes. On mom, draw a little V at the neckline and a waist line across the dress, plus a few long strands in her hair. Sprinkle small circles on the girl's dress for polka dots.
💡 Tip: Draw the heart one half at a time, starting both sides from the dip at the top.
Step 9: Ink the lines and erase the guides
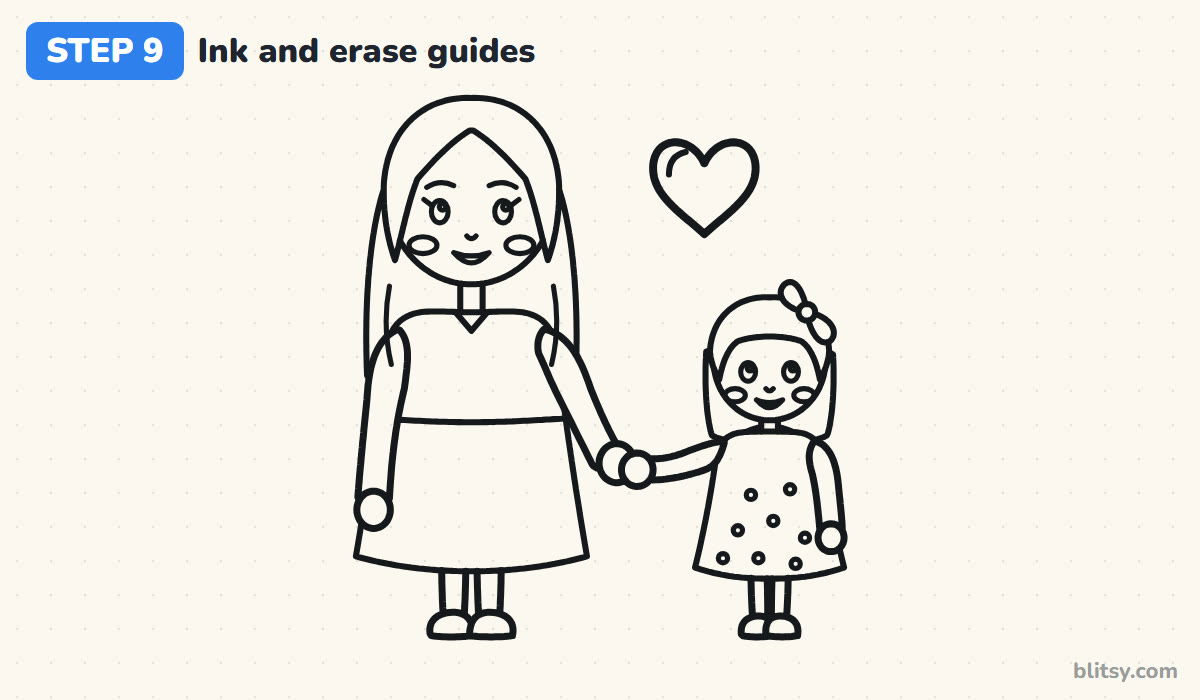
With the black pen, trace every line you want to keep. I start with the faces while my hand is steady, then move outward to the hair and clothes. Skip all the helper shapes. Wait until the ink is properly dry, then erase the pencil so only clean black lines remain.
💡 Tip: Rest the side of your hand on a scrap of paper while inking so you don't smudge the faces.
Step 10: Color the mother and daughter
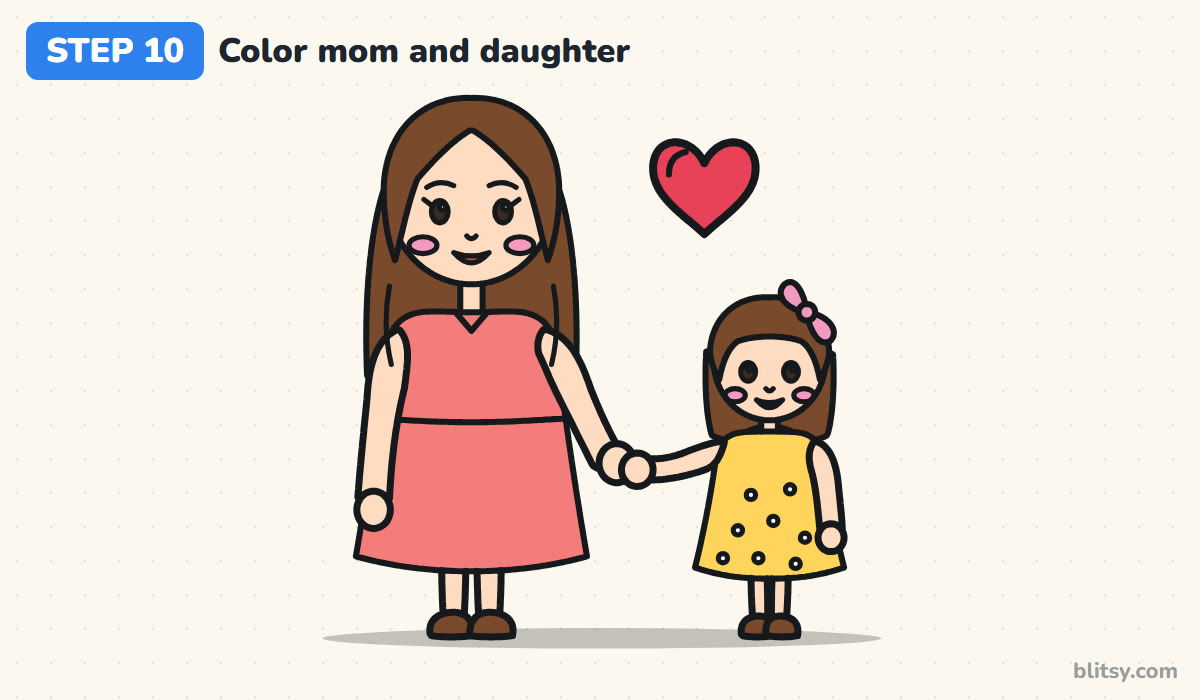
Peach goes on all the skin. Both have brown hair and brown shoes, which makes them look like a matching pair. Color mom's dress coral and her daughter's dress yellow, leaving the polka dots white. Use pink for the bow and cheeks, red for the heart and mouths, and dark brown for the eyes. A light gray shadow under their feet finishes the picture.
💡 Tip: Color the skin first with soft pressure, then the hair, so dark brown never smears onto the faces.
Why the Girl Sometimes Looks Like a Tiny Adult
- Her head is too small compared with mom's. Children have big heads for their bodies. Keep her head about two thirds of mom's even though she's much shorter.
- The figures stand at different heights. If their shoes aren't on one shared ground line, the girl seems to float. Draw that line first.
- The hands don't touch. A tiny gap breaks the connection between them. Let the girl's hand overlap mom's.
- Too much detail on the girl's face. Lashes and brows on a small face make her look older. Keep hers simpler than mom's.
- Different smile shapes. A wide smile next to a tight one loses the warmth. Make them echo each other.
New Poses for Mom and Daughter Pictures
Once this version feels easy, try a hug instead of holding hands: bring the two figures closer and wrap mom's arm around the girl's shoulders. You can also match their outfits or add a baby brother in mom's arms. For a Mother's Day card, write a short message under the ground line. If you'd like to add the rest of the family, my family drawing tutorial is a good next stop, and the heart drawing tutorial gives you fancier hearts to float above them.
Mom and Daughter Coloring Page With a Step PDF
The mother and daughter coloring page has a colored example and a small color key at the top, with a big clean outline below. The step-by-step PDF guide holds all 10 steps with pictures and tips. Both print on Letter or A4 paper.
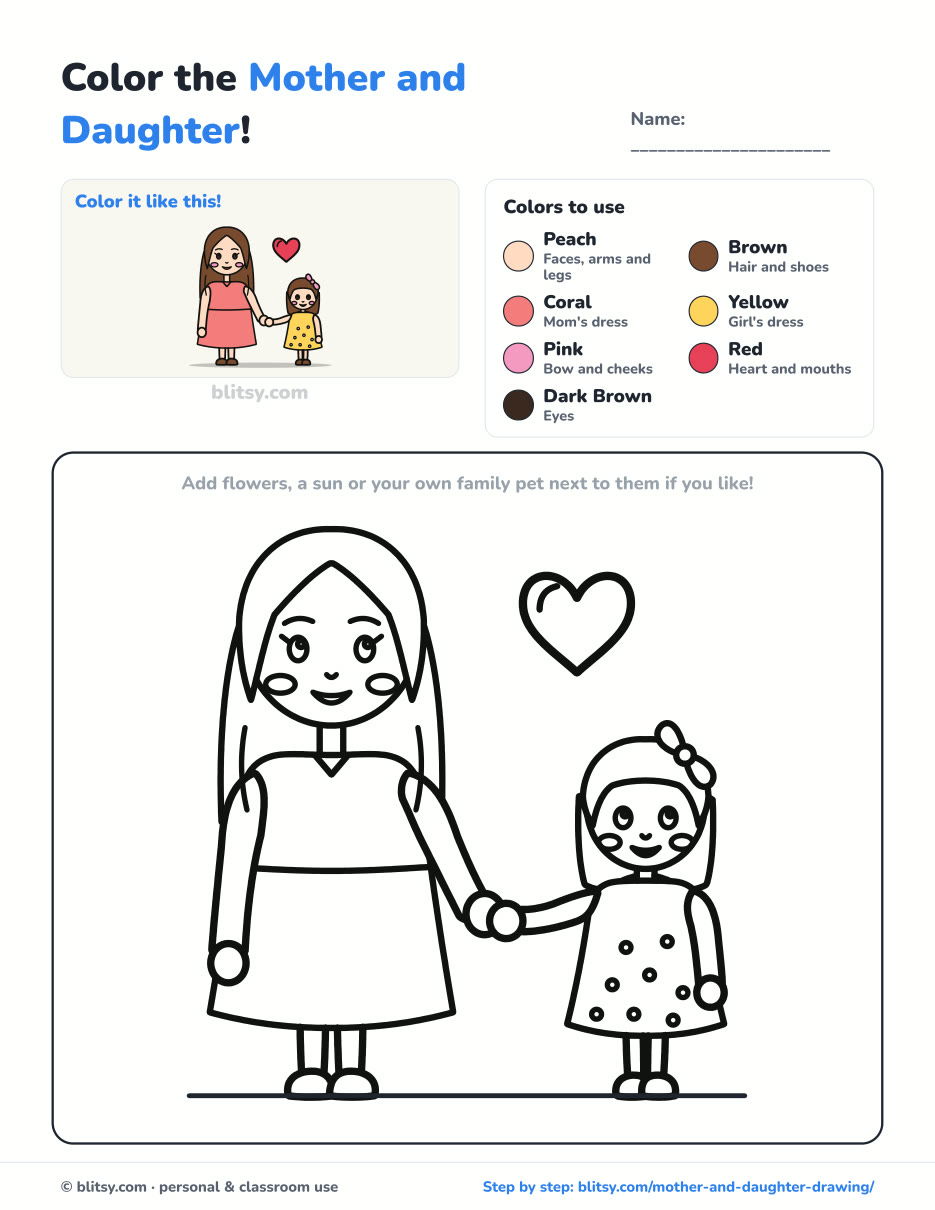
Black outlines with a colored example and the color names at the top. Ready to print and color.
⬇️ Download Coloring PageEvery step picture with its instructions and tips, to keep beside your paper while you draw.
⬇️ Download Drawing Guide📱 On a phone? Tap a download button, then open the file and choose Share → Save to Files or Print. On a computer, the PDF opens or saves straight to your Downloads folder.
Keep the Mom and Me Lesson Handy
People, Faces and Body Tutorials to Draw Next
These are step-by-step tutorials too, most of them about people and the human body, so they build on the shapes you used here.
- Emoji Drawing: Three yellow faces for smiling, love and giggles all come from the same circles in this how to draw an emoji tutorial.
- Woman Drawing: Learn to measure a figure about six heads tall with the woman drawing step by step guide.
- Lungs Drawing: For science class, the lungs drawing tutorial builds pink lungs, a pale blue trachea and a branching airway tree ready for labels.
- Tooth Drawing: A grinning molar with its own toothbrush and three sparkles is the result of this cute tooth drawing tutorial.
- Human Heart Drawing: Draw a textbook-style heart with its aorta and blue vessels in the human heart drawing step by step lesson.
- Skeleton Drawing: Our how to draw a skeleton tutorial ends on a cheerful bone buddy standing on his own little shadow.
- Braid Drawing: Give the daughter a new hairstyle with this braid drawing tutorial, which turns one zig-zag into a chunky three-strand braid.
- Baby Drawing: One curl of hair, rosy cheeks and a rattle held high: follow the how to draw a baby step by step guide to add a little sibling.
- Skull Drawing: Cream bone, dark sockets and two small marigolds make up the skull drawing tutorial in front view.
- Heart Drawing: Get an even, symmetric shape every time with the how to draw a heart tutorial, plus three small heart friends.
- Side Profile Drawing: Measuring lines do most of the work in this side profile drawing step by step lesson, which starts from a plain circle.
- Hand Drawing: Draw one open palm with five digits and three palm lines in the easy hands drawing tutorial.
- Ghost Drawing: A waving ghost, a baby ghost and a pumpkin below all start from one circle in this cute ghost drawing tutorial.
- Realistic Drawing: Try real shading on one shiny apple with the realistic drawing tutorial, where every value follows the round form.
- Male Face Drawing: Short brown hair and a squarer jaw sit on guide lines you draw yourself in the how to draw a male face tutorial.
Questions Families Ask About Drawing Each Other
What is the easiest way to draw a mother and daughter?
Begin with two head circles on one ground line, the girl's about two thirds the size of mom's. Add simple dress shapes under each head, then join them with holding hands.
How do you make the daughter look younger than the mother?
Give her a bigger head compared with her body, shorter arms and legs, and a simpler face. Placing the top of her head at mom's shoulder line helps a lot too.
Is this drawing good for a Mother's Day card?
Yes. Fold a sheet in half, draw the pair on the front, and color the dresses to match your own family's favorite colors.
How long does it take to draw a mother and daughter?
Most beginners need about 30 to 40 minutes with coloring. The two faces take the longest, so give them extra time.
Grab a pencil, sit down with someone you love, and draw the two of you side by side. 💖✏️
Related posts:
 How to Draw a Tooth Step by Step (Cute and Easy for Kids)
 How to Draw the Hulk Step by Step (Easy Chibi for Kids)
 How to Draw Iron Man Step by Step (Easy Chibi for Kids)
 How to Draw Springtrap Step by Step (Cute Chibi for Kids)
 How to Draw Peppa Pig Step by Step (Easy for Kids)
 How to Draw a Police Car Step by Step (Easy for Kids)
 How to Draw a Monster Truck Step by Step (Easy for Kids)
 How to Draw a Fire Truck Step by Step (Easy for Kids)
 How to Draw a Mermaid Step by Step (Easy Cartoon for Kids)
 How to Draw a Boat Step by Step (Easy Sailboat for Kids)
 How to Draw a Care Bear Step by Step (Cute Fan Art for Kids)
 How to Draw Hello Kitty Step by Step (Easy for Kids)

