
Faces feel scary because we look at them all day, so we notice every small mistake. The good part is that almost every adult face follows the same few measurements, and once you know them, how to draw a male face step by step becomes a matter of placing lines, not guessing. I teach the proportions first and the features second, because a nicely drawn eye in the wrong spot still looks wrong.
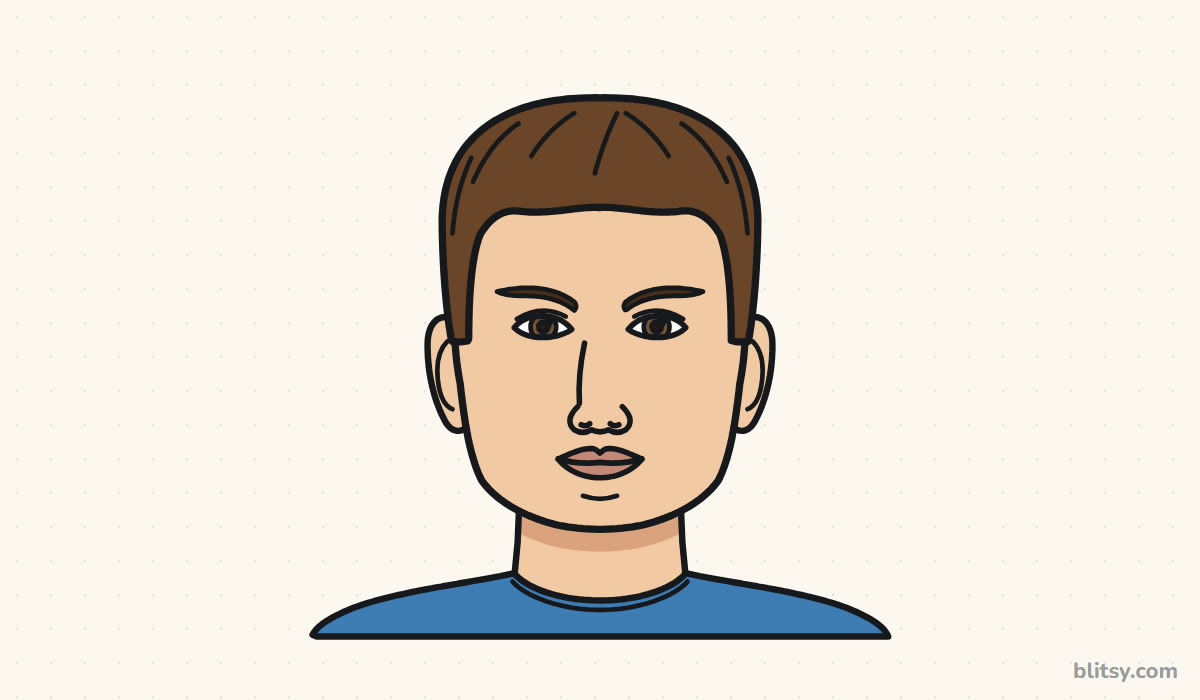
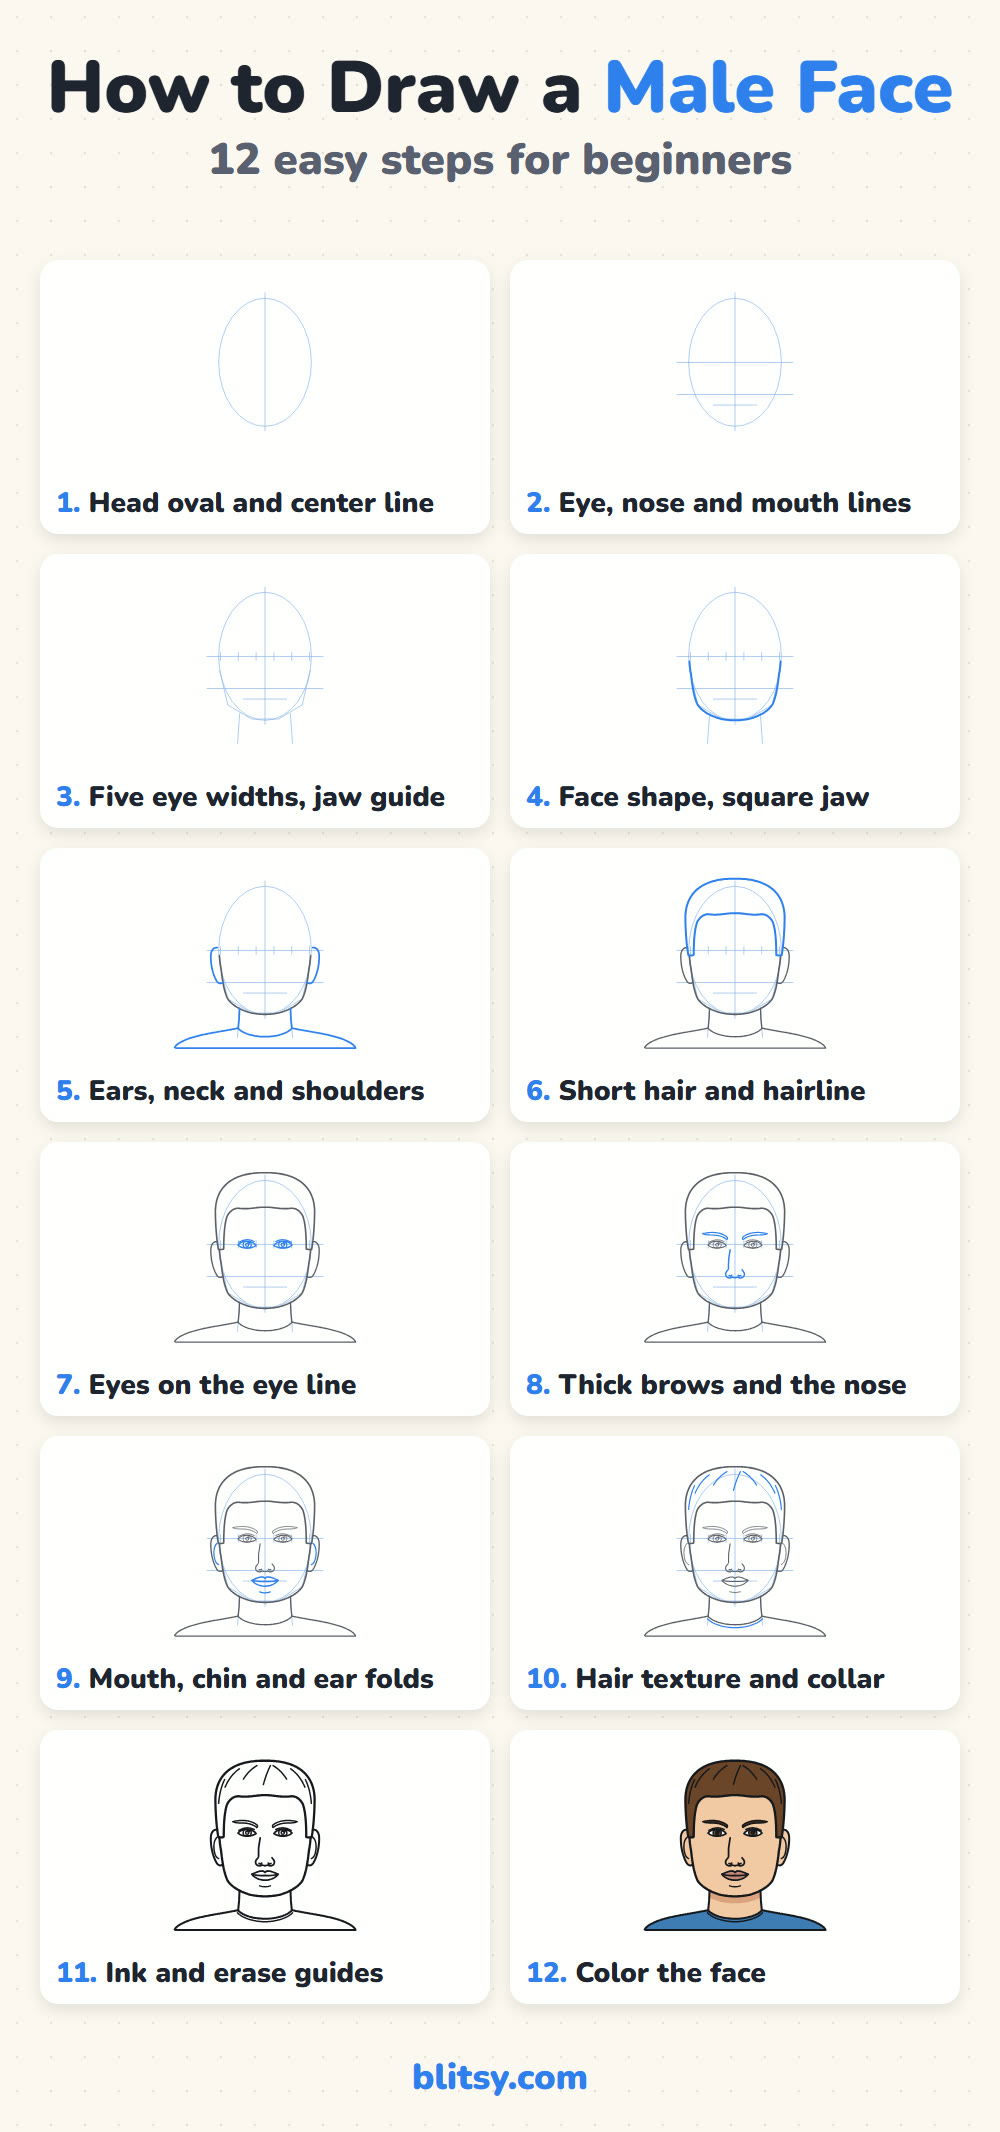
Each picture shows that step's lines in blue. Gray lines came earlier, and the pale blue guides stay until we erase them.
Quick overview
⏱️ Time: about 35 minutes, plus 15 for coloring
🎯 Level: easy to medium, good for ages 10 and up
✏️ Steps: 12
👨 You'll draw: a front-view man's face with short hair and a T-shirt collar
Sketching Kit for a Portrait Lesson
- An HB or 2B pencil for the guide lines
- A soft eraser (a kneaded one is ideal for faces)
- A black fineliner for inking
- Colored pencils in peach, tan, browns, rose and blue
- Smooth white paper
Nothing fancy here; a school pencil case covers almost all of it.
How to Draw a Male Face Step by Step
Step 1: Sketch a head oval and a center line
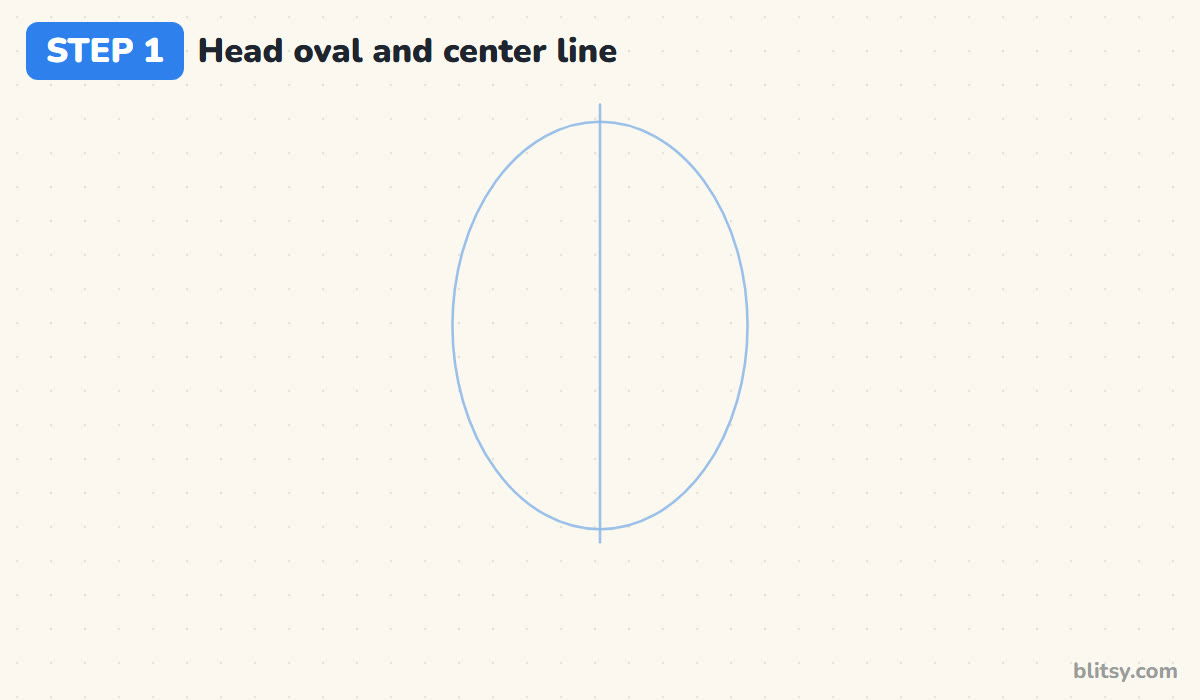
Draw an egg shape that's taller than it is wide, about three units across for every four down. This oval is the skull, not the hair, so leave room above it. Run a light vertical line through the middle. Both halves of the face mirror each other across it.
💡 Tip: Turn your paper upside down and look again. A lopsided oval jumps out at you that way.
Step 2: Add the three feature lines
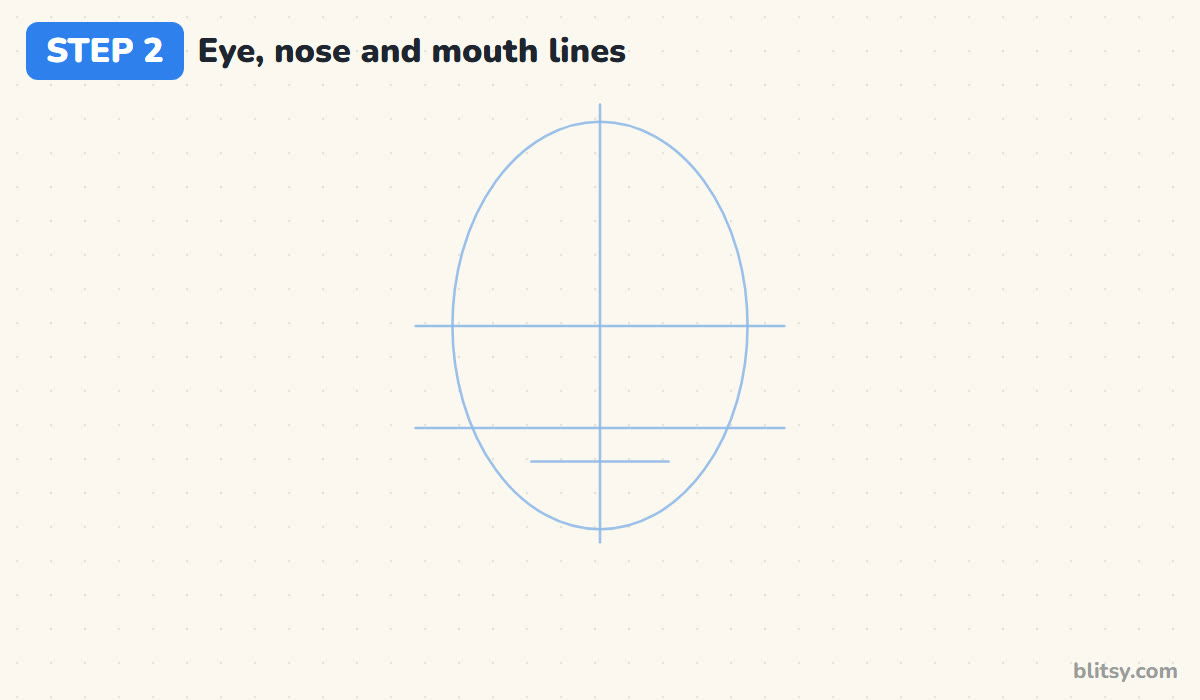
Here's the rule that surprises most people: the eyes sit halfway down the head, not near the top. Draw the eye line exactly halfway between the top of the oval and the chin. Halfway between that line and the chin goes the nose line. The short mouth line sits one third of the way from the nose line down to the chin.
💡 Tip: Hold your pencil against the oval and pinch the length with your thumb. That's an easy measuring stick.
Step 3: Mark five eye widths and a jaw guide
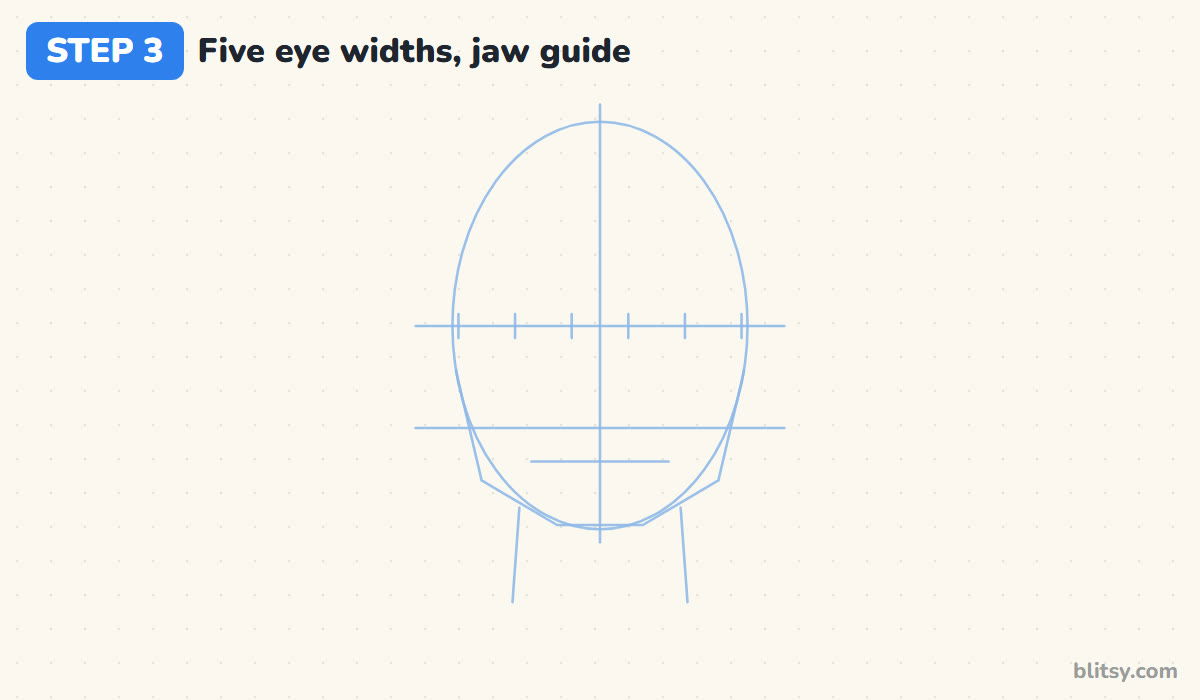
A front-view head is about five eyes wide. Tick the eye line into five equal parts across the oval. The second and fourth parts hold the eyes, and the middle part is the gap between them. Then draw the jaw guide: straight down from the cheeks to a corner just below the mouth line, then in to a flat chin. Add two neck lines under the jaw.
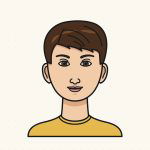



💡 Tip: If your five parts don't fit, adjust the ticks, not the oval. Small shifts are fine.
Step 4: Draw the face shape with a square jaw
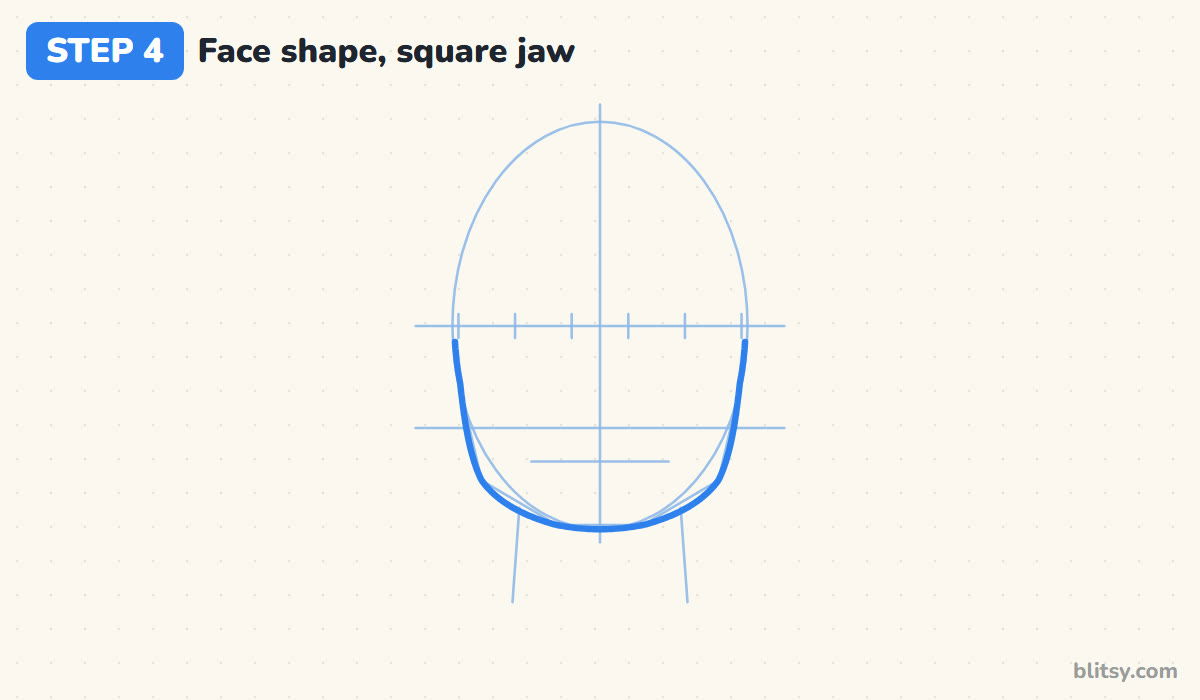
Start the outline at the side of the oval near the eye line and bring it down the cheek. Instead of curving into a point, turn a clear corner at the jaw guide and run a wide, almost flat line across the chin. That angle is what reads as male. Skip the top of the oval; hair will cover it.
💡 Tip: Keep the chin at least as wide as the mouth guide. A narrow chin makes him look much younger.
Step 5: Add ears, a neck and the shoulders
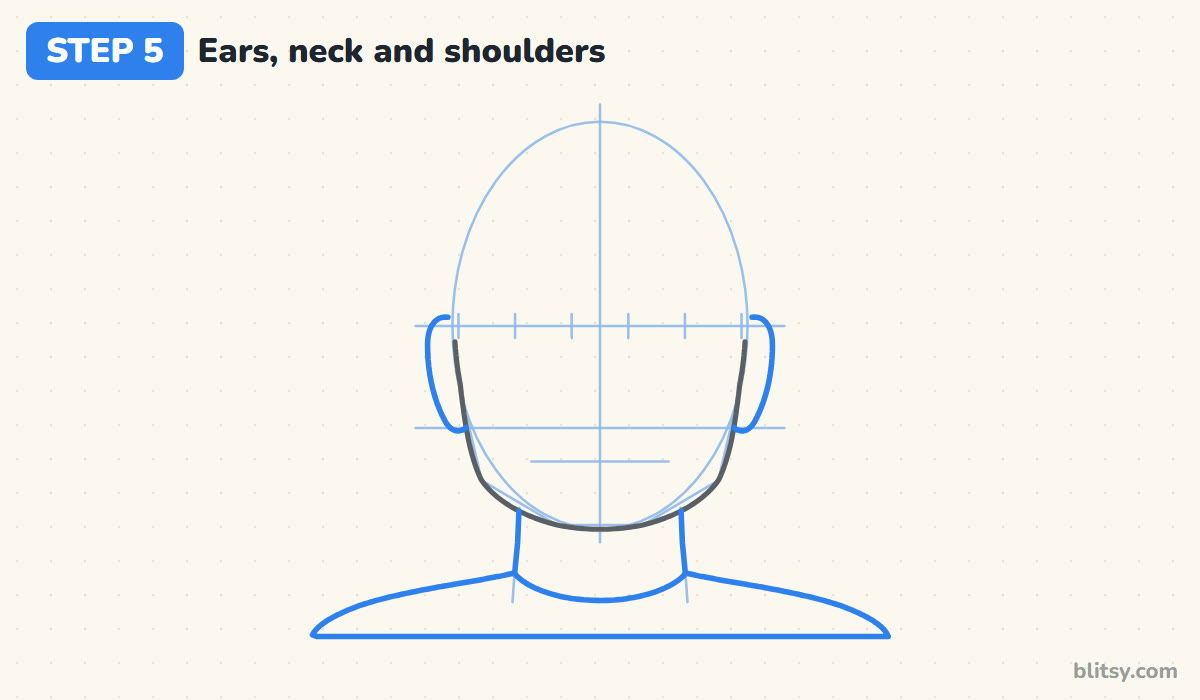
The ears go between the eye line and the nose line. Draw each as a tall C that bulges out from the head and tucks back in at the lobe. I line the sides of the neck up roughly under the outer corners of the eyes, because men's necks are thick. Finish with a curved neckline and two shoulder lines sloping gently outward.
💡 Tip: Check that the tops of both ears touch the eye line. Uneven ears tilt the whole face.
Step 6: Draw short hair and the hairline
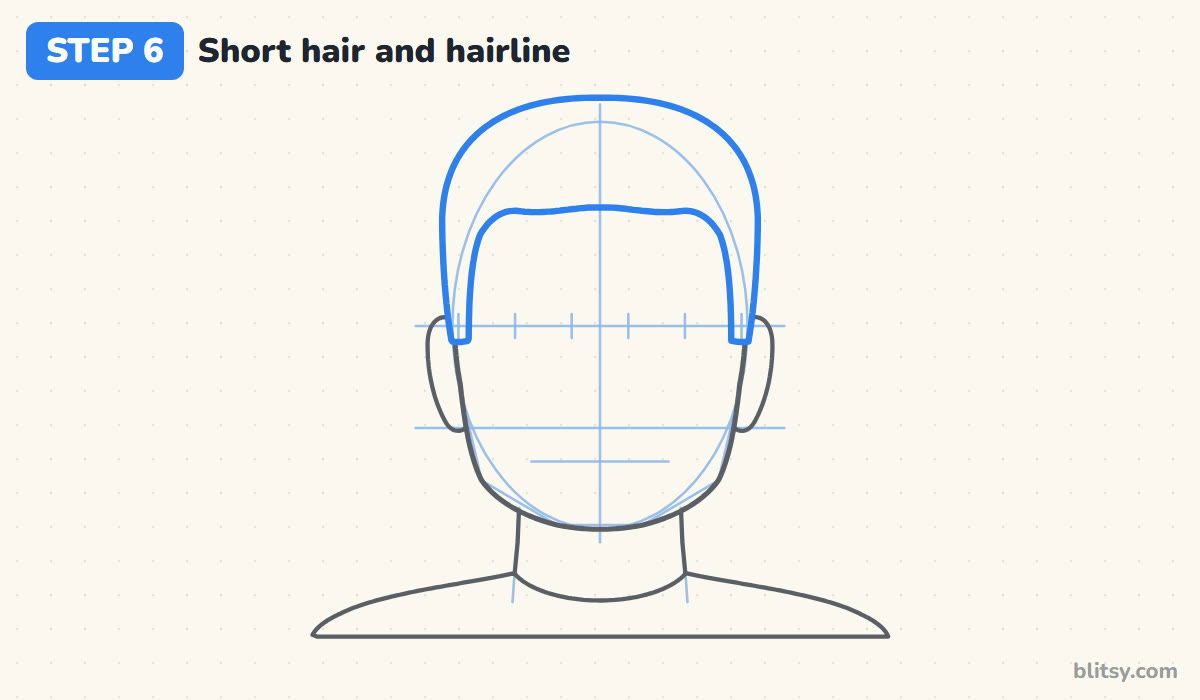
Draw the hair a finger's width above the oval and close to the head on the sides. Bring it down as short sideburns that stop at the eye line, just in front of the ears. The hairline crosses the forehead about halfway between the top of the oval and the eye line. I round the corners at the temples so it doesn't look like a helmet.
💡 Tip: Draw the hair shape as one closed outline first. Texture strokes come much later.
Step 7: Draw the eyes on the eye line
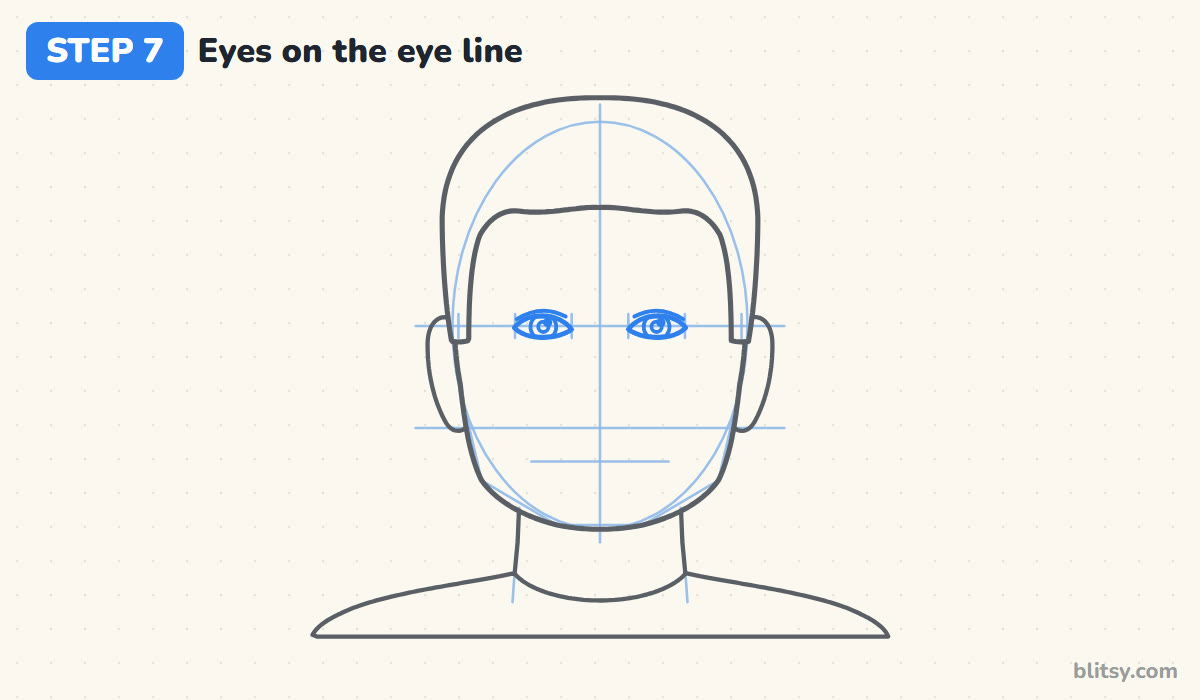
Inside the second and fourth spaces, draw two almond shapes. The inner corners point toward the nose; the outer corners are a little flatter. Add a round iris in each, tucked under the upper lid so part of the circle is hidden, then a dark pupil and a tiny white highlight. A light curve above each eye shows the lid crease.


💡 Tip: Put both highlights on the same side of the pupil, or the eyes will seem to look in two directions.
Step 8: Add thick brows and the nose
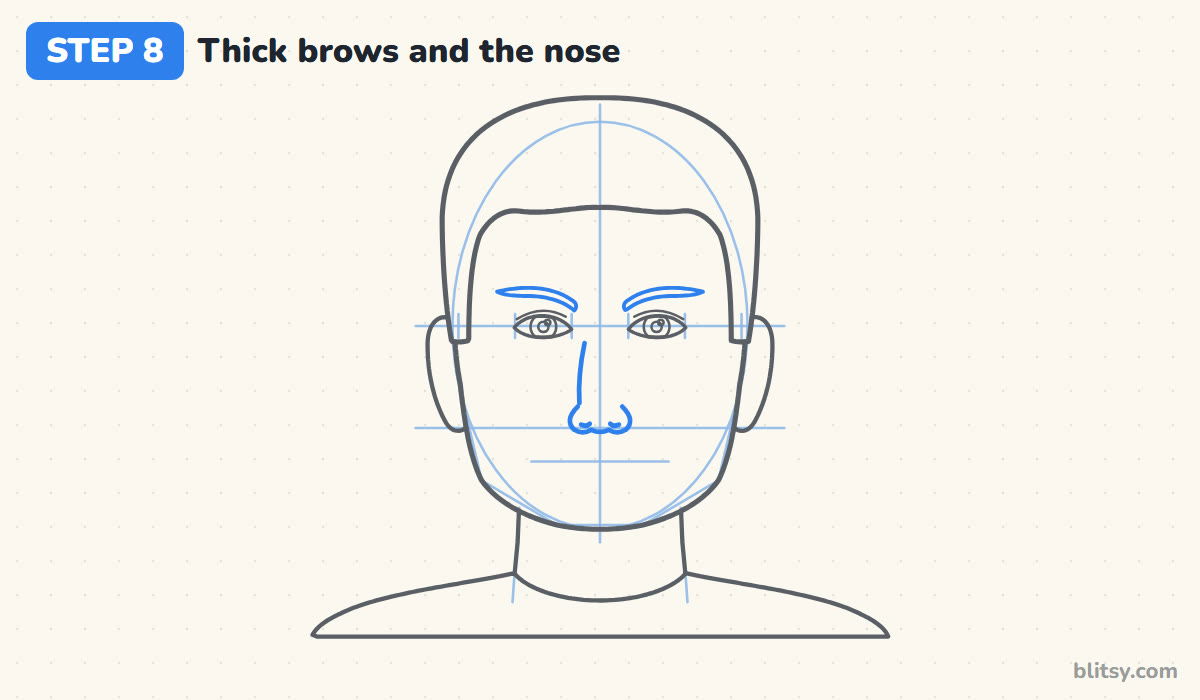
Men's brows are usually thicker and lower than women's, so sit them close above the eyes. Make each one thickest near the nose and taper it toward the temple. For the nose, run one gentle line down from the inner end of a brow. Then draw the base on the nose line with two rounded wings and a soft tip, about as wide as the gap between the eyes.
💡 Tip: Skip the second bridge line. One line suggests the shape, while two make a long tube.
Step 9: Shape the mouth and ear folds
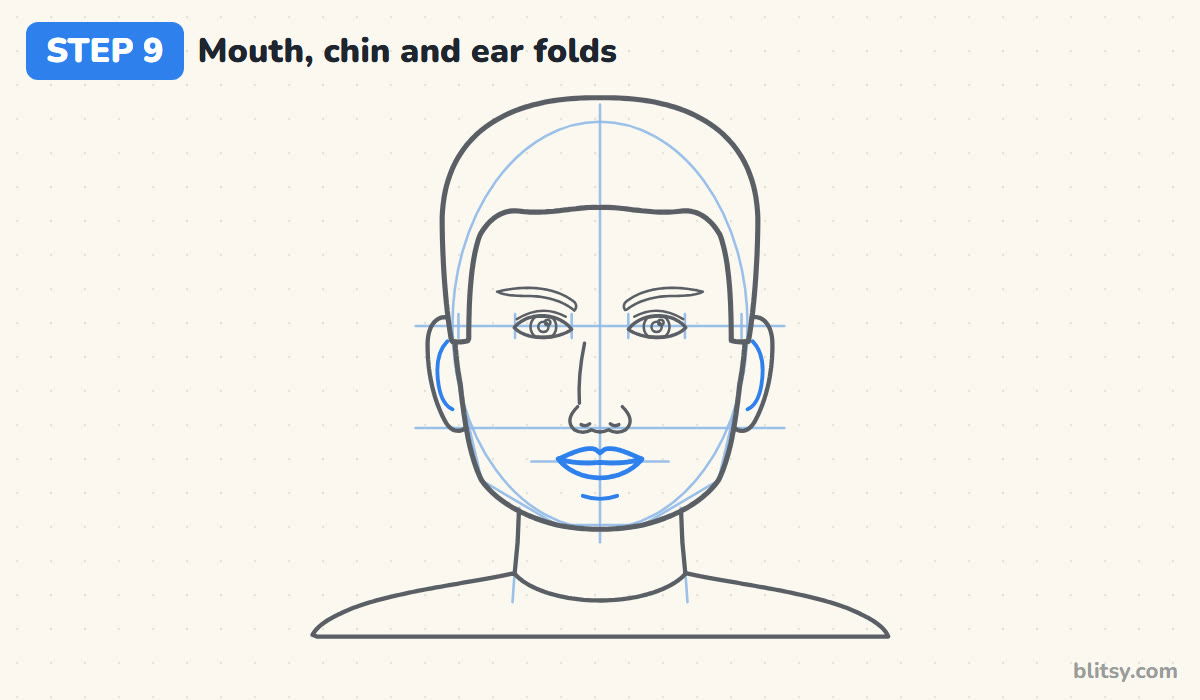
Center the mouth on the mouth line, with the corners roughly under the inner edge of each iris. Keep the upper lip thin with a small dip in the middle and make the lower lip fuller. Lift the corners a touch for a relaxed look. A short curve under the lower lip marks the chin, and a C-shaped fold goes inside each ear.
💡 Tip: Draw the line between the lips first, then add the outer lip shapes around it.
Step 10: Add hair texture and the collar
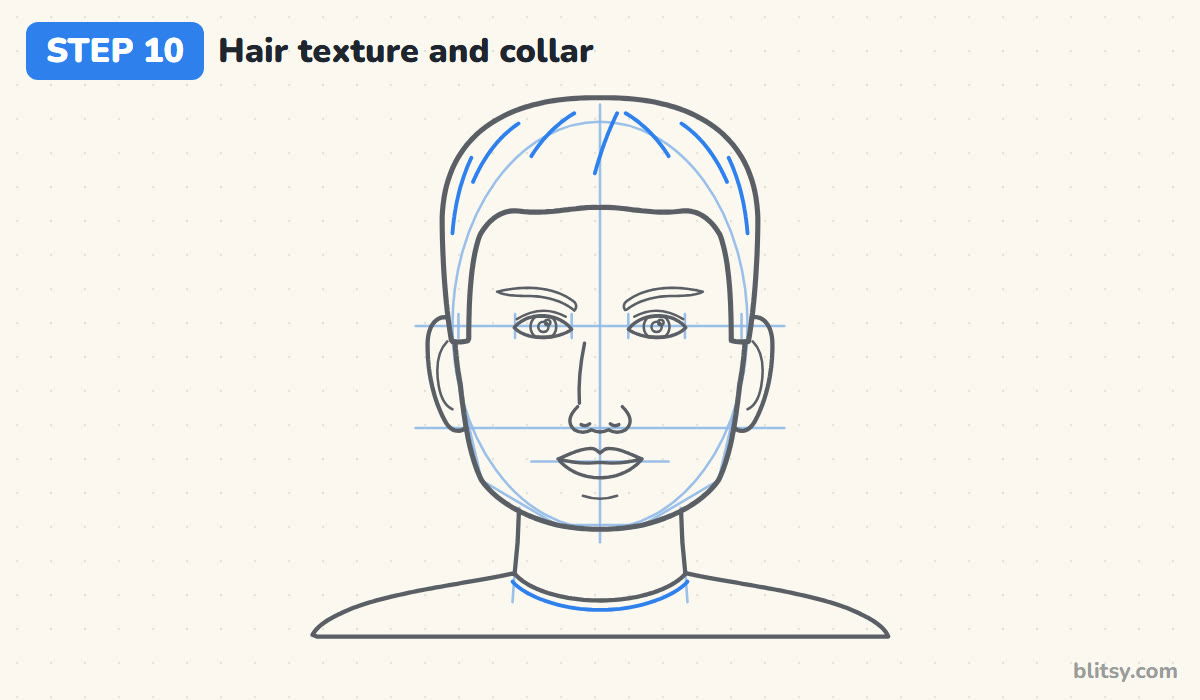
Draw a few long, curved strokes that start near the top and sweep down and out, the way short hair grows from the crown. Five or six are plenty. At the neck, add a second curved line just below the neckline for the ribbed T-shirt collar.
💡 Tip: Leave gaps between hair strokes. Filling the whole cap with lines makes it look scribbled.
Step 11: Ink the face and erase the guides
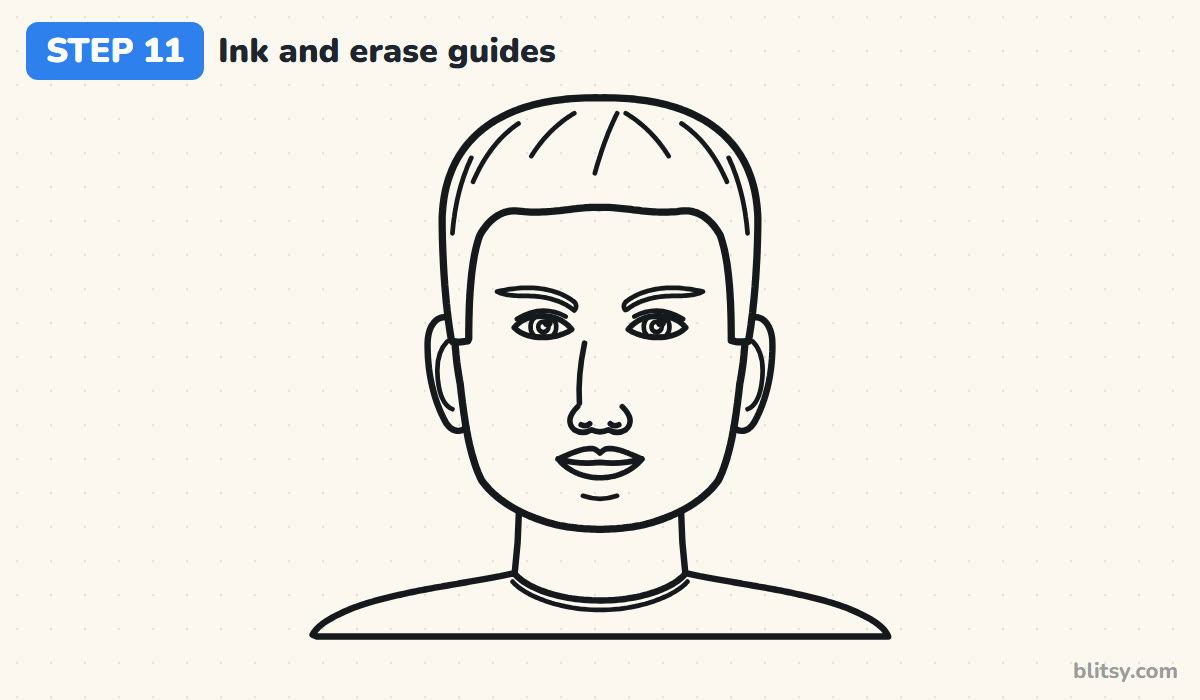
Go over every keeper line with a black fineliner using slow, steady strokes. Let the ink dry for a minute, then erase the oval, the center line and all the proportion lines. Be gentle around the eyes, because small details smudge.


💡 Tip: Ink the long outlines in one smooth pass each. Stopping and starting leaves little bumps.
Step 12: Color the face
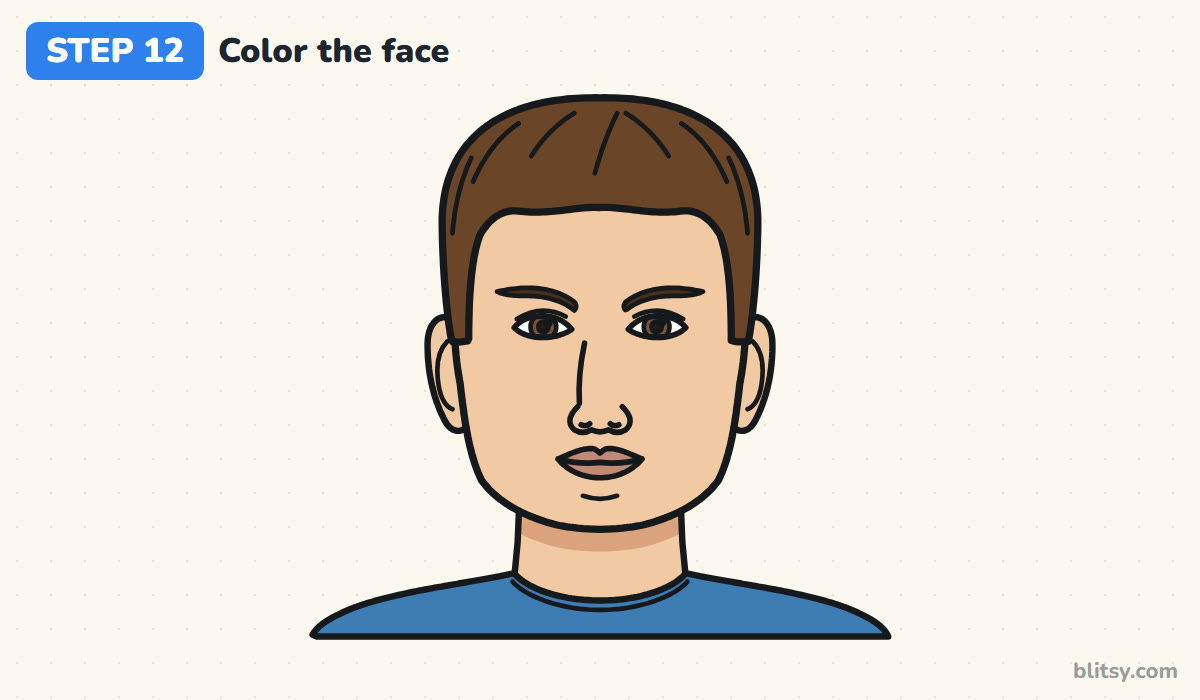
Fill the skin with a light peach. Add a band of tan on the neck right under the jaw, shaped like the jawline, because the head casts a shadow there and it pushes the chin forward. Use brown for the hair and a darker brown for the brows. Give the irises light brown, the lips a soft rose and the shirt any blue you like.
💡 Tip: Press lightly on the skin color and build it up in layers. Heavy first strokes look waxy.
Face Proportions Beginners Tend to Misjudge
- Eyes placed too high. Put them exactly halfway between the top of the skull and the chin. Most first faces have huge foreheads above a squashed lower face.
- Eyes too close together. Leave one full eye width between them.
- A pointy chin. Turn the outline sharply at the jaw and flatten the bottom.
- Ears floating above the eyes. Keep the top of each ear on the eye line and the lobe near the nose line.
- A pencil-thin neck. Bring the sides down from about the outer corners of the eyes.
Changing His Hairstyle and Expression
Once the proportion lines feel natural, the same face can become many different people. Keep the hair close to the oval for a buzz cut, or draw a second jaw outline a little outside the first for a beard. Raising one brow changes the whole mood. For older faces, I add a couple of soft lines on the forehead. When you're ready to turn the head, the side profile drawing tutorial uses the same eye and nose lines.
Male Face Coloring Page and a Printable Proportion Guide
Prefer paper? The coloring page has the inked face with a small colored example and a color key. The step guide PDF puts all twelve steps on a few pages for practice away from a screen.
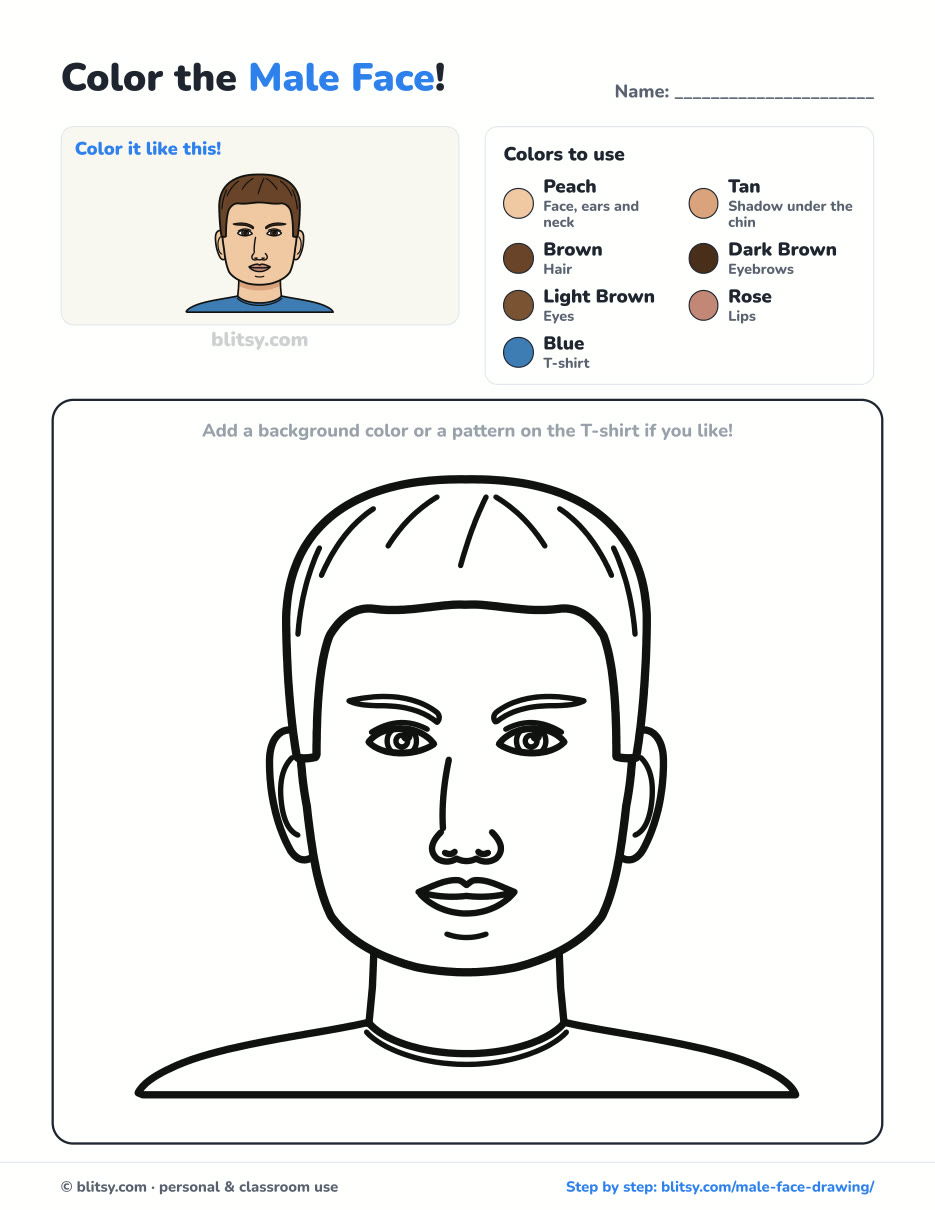
Black outlines with a colored example and the color names at the top. Ready to print and color.
⬇️ Download Coloring PageEvery step picture with its instructions and tips, to keep beside your paper while you draw.
⬇️ Download Drawing Guide📱 On a phone? Tap a download button, then open the file and choose Share → Save to Files or Print. On a computer, the PDF opens or saves straight to your Downloads folder.
Pin the Face Proportion Cheat Sheet
Faces, Hands and Bodies to Practice After This One
Each link opens a step-by-step tutorial with guide lines you can follow, which suits anyone who just finished their first male face.
- Mother and Daughter Drawing: Two figures hold hands under a red heart in the mother and daughter drawing tutorial.
- Emoji Drawing: For a quick break from proportions, the emoji drawing step by step lesson makes three smiley faces from circles.
- Human Heart Drawing: The how to draw a human heart lesson is a textbook-style diagram with the aorta arching over the top.
- Lungs Drawing: Draw pink lungs with a branching airway tree in this lungs drawing tutorial.
- Tooth Drawing: A grinning molar holds its toothbrush in the cute tooth drawing tutorial.
- Realistic Drawing: If you want your faces to look more solid, the realistic drawing step by step lesson teaches value and shadow on an apple.
- Side Profile Drawing: Turn the head ninety degrees with the side profile drawing tutorial, which uses the same kind of measuring lines.
- Chalk Art: This chalk art tutorial moves you onto the sidewalk with a hopscotch grid and a rainbow.
- Family Drawing: Four cartoon people, a puppy and a balloon share one simple body recipe in the family drawing step by step guide.
- Woman Drawing: Practice full-body proportions, six heads tall, in this how to draw a woman tutorial.
- Skull Drawing: Knowing the skull helps with every face, and the skull drawing tutorial shows it from the front.
- Hands Drawing: The hands drawing step by step lesson builds one open palm with all five digits.
- Ghost Drawing: Wind down with the easy ghost drawing tutorial, where a waving ghost starts from one circle.
- Smile Drawing: Give your man a grin with the how to draw a smile lesson, which covers teeth, lips and three variations.
Portrait Questions I Hear From New Artists
What are the basic proportions of a male face?
From the front, the eyes sit halfway between the top of the skull and the chin. The nose base is halfway between the eyes and the chin, the mouth a third of the way from nose to chin. The head is about five eyes wide.
How is a male face different from a female face in a drawing?
The guide lines are the same. For a man, I make the jaw squarer with a clear corner, the brows thicker and lower, and the neck wider.
Can kids learn to draw a man's face?
Yes. Ten-year-olds usually manage the guide lines well. Younger kids can skip the creases and hair strokes and use simple dots for eyes on the eye line.
How long does it take to get good at drawing faces?
It depends on practice. Drawing this face a few times in a week helps more than one long session.
Draw the oval, find the halfway line, and the rest of his face has a place to land. Try a second one tomorrow with a beard! ✏️
Related posts:
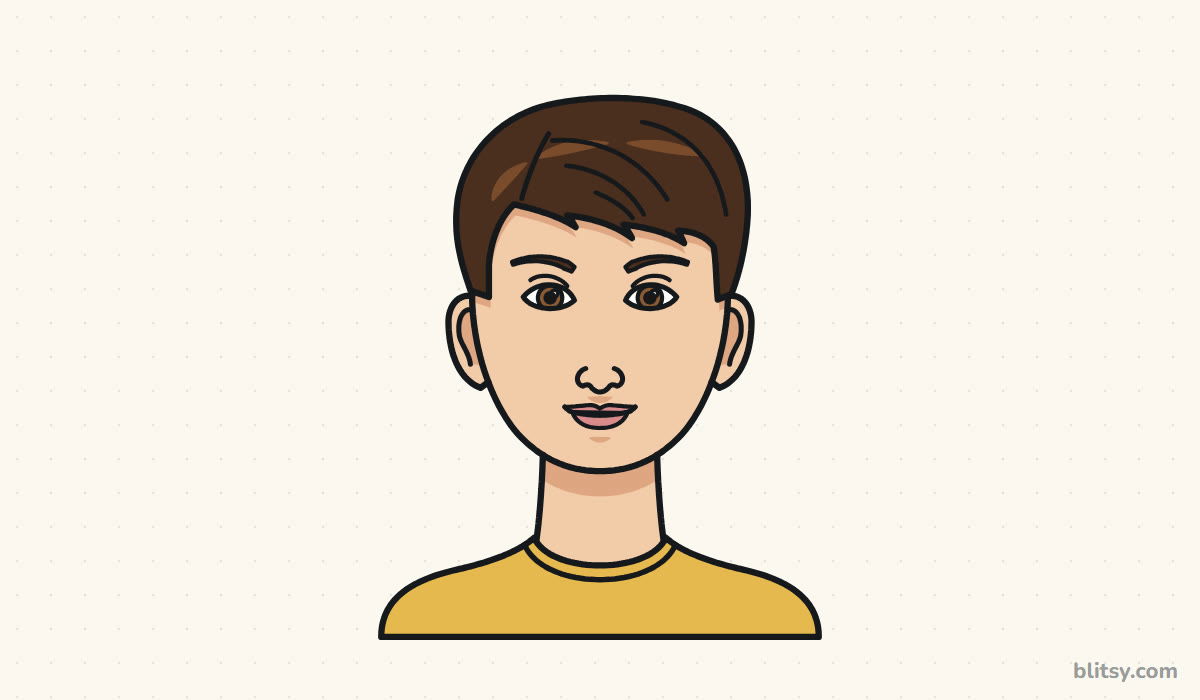 How to Draw a Face Step by Step (Easy Proportions Guide)
 How to Draw a Woman Step by Step (Easy Body Proportions)
 How to Draw an Anime Girl Step by Step (Easy Face Guide)
 How to Draw Anime Step by Step (Easy Anime Boy Face)
 How to Draw a Cat Face Step by Step (Easy Tabby Guide)
 How to Draw a Sad Cat Step by Step (Easy Sad Face Lesson)
 How to Draw a Whale Step by Step (Easy for Beginners)
 How to Draw Lungs Step by Step (Easy Science Diagram)
 How to Draw a Plant Step by Step (Easy Potted Monstera)
 How to Draw the Fortnite Llama Step by Step (Easy Fan Art)
 How to Draw a Hoodie Step by Step (Front and Back View)
 How to Draw a Parrot Step by Step (Easy Scarlet Macaw)

