
Most full-body drawings go wrong long before the face, because the legs end up too short or the arms too long. A plain ruler of head-sized units fixes that, and it's the trick I lean on every time I draw a standing person. Here you'll learn how to draw a woman step by step, starting with a few light measuring lines and ending with a smiling young woman in a teal top, holding her handbag. No anatomy knowledge needed.
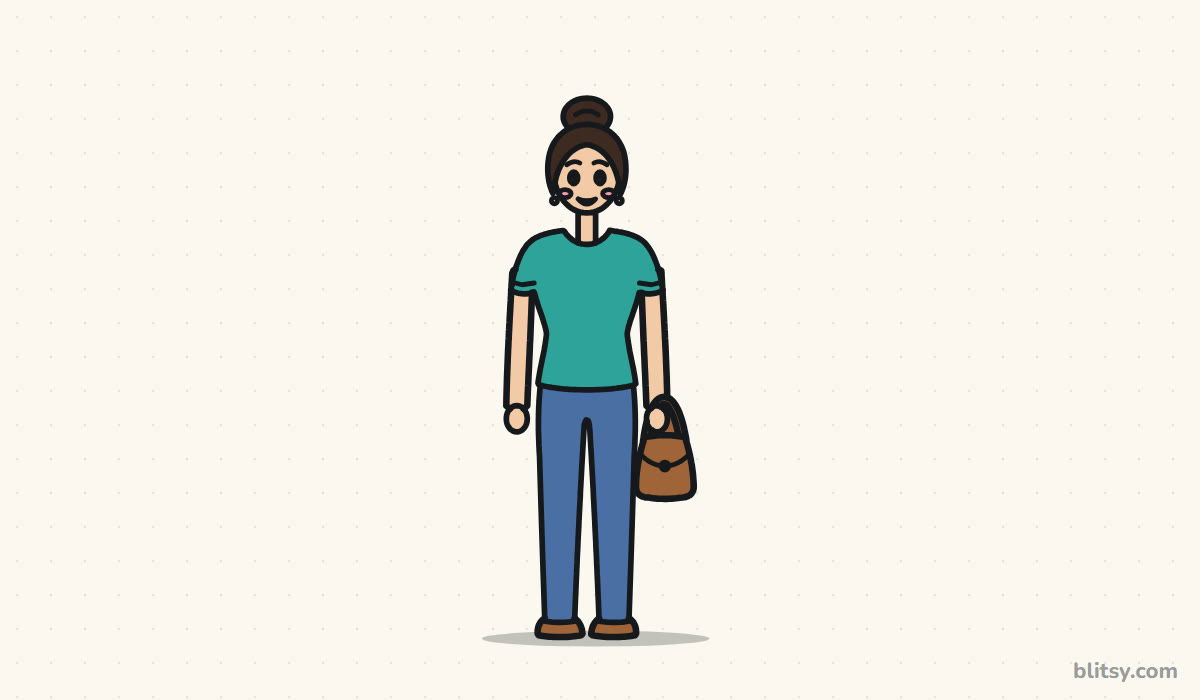
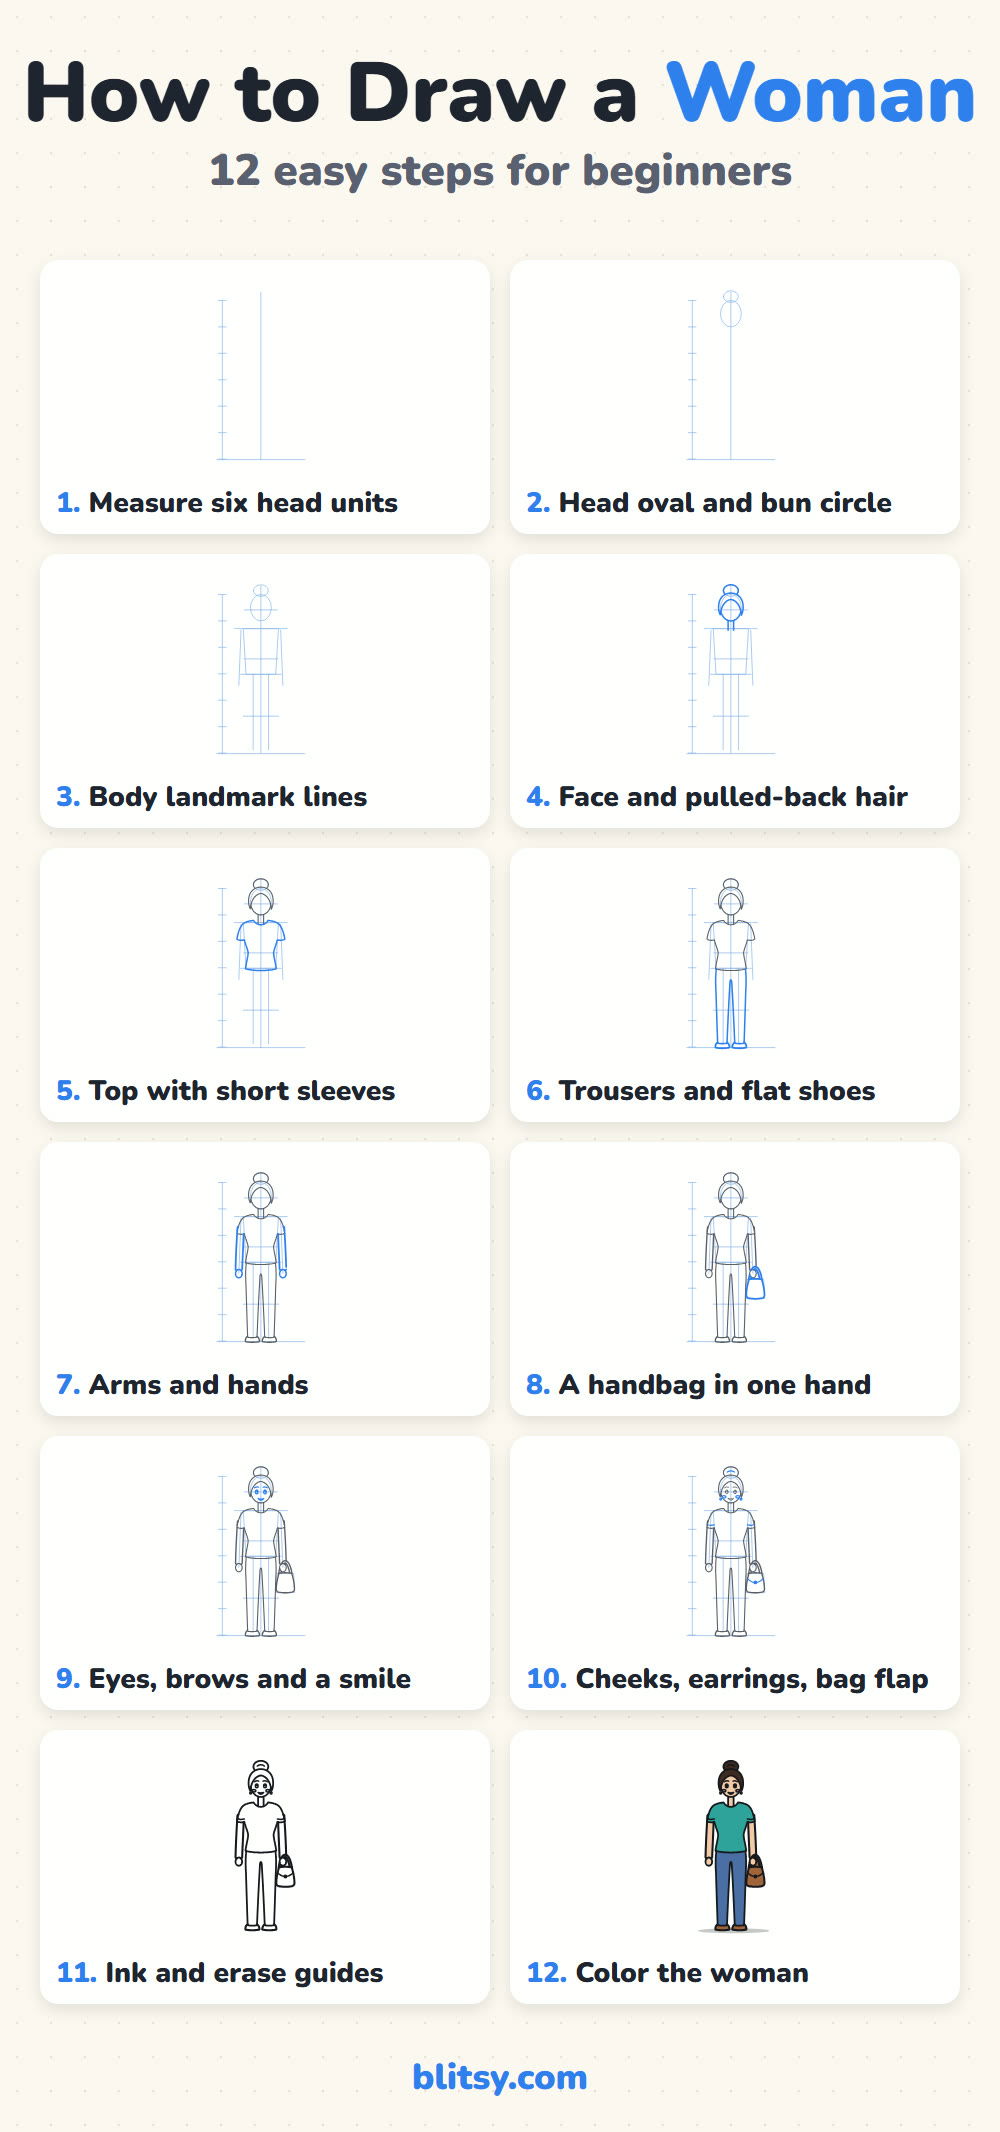
Each picture shows the newest lines in blue. Anything gray was drawn in an earlier step, and the pale blue marks are measuring helpers that disappear when you ink.
Quick overview
⏱️ Time: about 35 to 45 minutes with coloring
🎯 Level: beginner friendly, good for ages 8 and up
✏️ Steps: 12
👩 You'll draw: a standing woman with a bun, a teal top and a handbag
Tools for Sketching a Standing Figure
- An HB pencil for light measuring lines
- A soft eraser that won't smear
- A ruler, or any straight edge, for the six head units
- A black fineliner for the final outline
- Colored pencils or markers: peach, dark brown, teal, blue, brown, pink and yellow
- Plain paper held upright (portrait), since she's tall and narrow
No teal in the box? Layer a light green over a light blue and you'll get very close.
How to Draw a Woman Step by Step
Step 1: Measure six head units
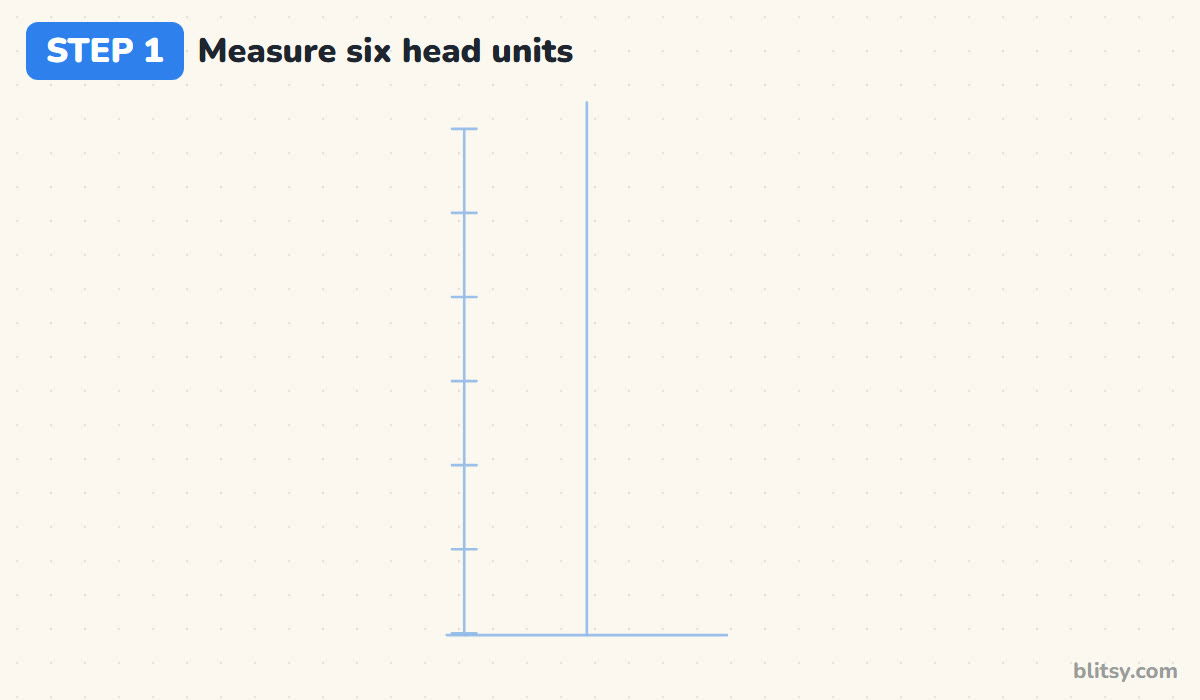
Draw a ground line near the bottom of the page and a long vertical centre line standing on it. To its left, rule a second line of the same height and split it into six equal parts with small ticks. Each part is one head. This ruler decides every length that follows.
💡 Tip: Measure the gaps with your ruler instead of guessing. Uneven ticks will stretch one part of her body.
Step 2: Sketch the head oval and a bun circle
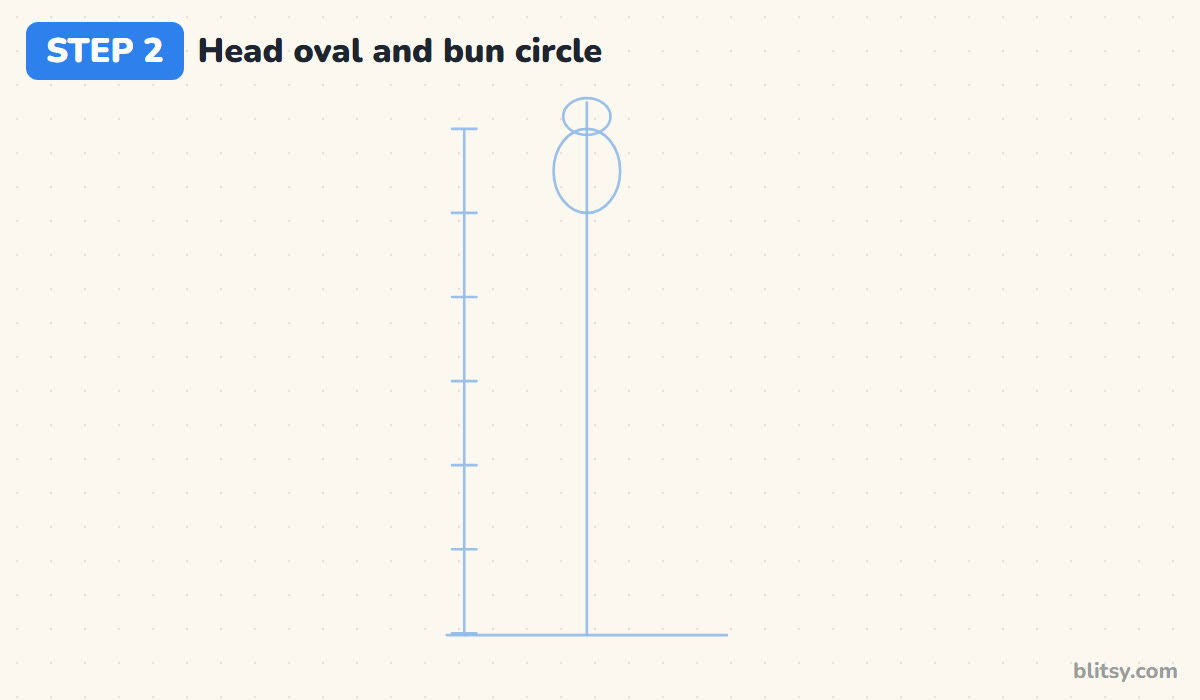
Fit an oval into the top unit of the ruler, centred on the vertical line. It should be a little taller than wide, like an egg. Sitting on top, add a small flattened circle for the bun, about two thirds as wide as the head. Let it overlap the oval slightly so it looks attached.
💡 Tip: If the oval spills into the second unit, shrink it now. A head that's too big turns her into a child.
Step 3: Mark the body landmark lines
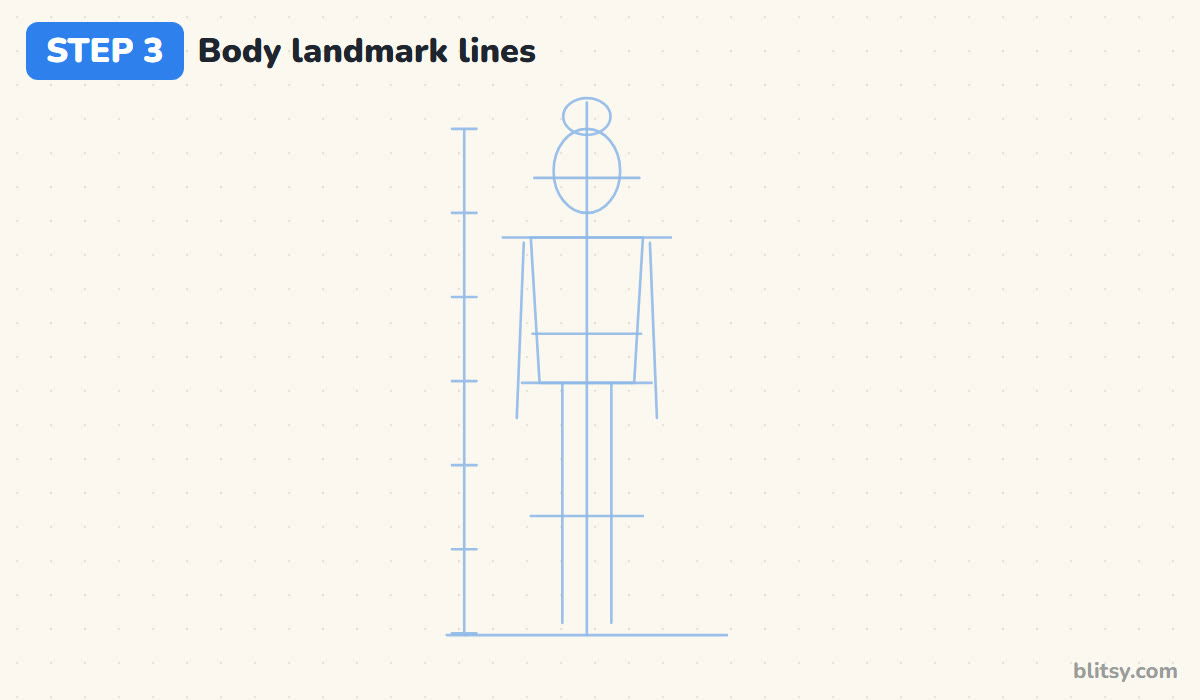
Now the body gets its map. A short line across the face shows where the eyes go, just under the middle of the oval. Draw the shoulder line a little below the chin, wider than the head on each side. The waist sits a little below the second tick, the hips at the third tick, and the knees at about four and a half. Join shoulders to hips with a simple box, then add straight lines for the arms and legs.


💡 Tip: Her wrists should reach the hip line. That one check tells you the arms are the right length.
Step 4: Outline the face and pulled-back hair
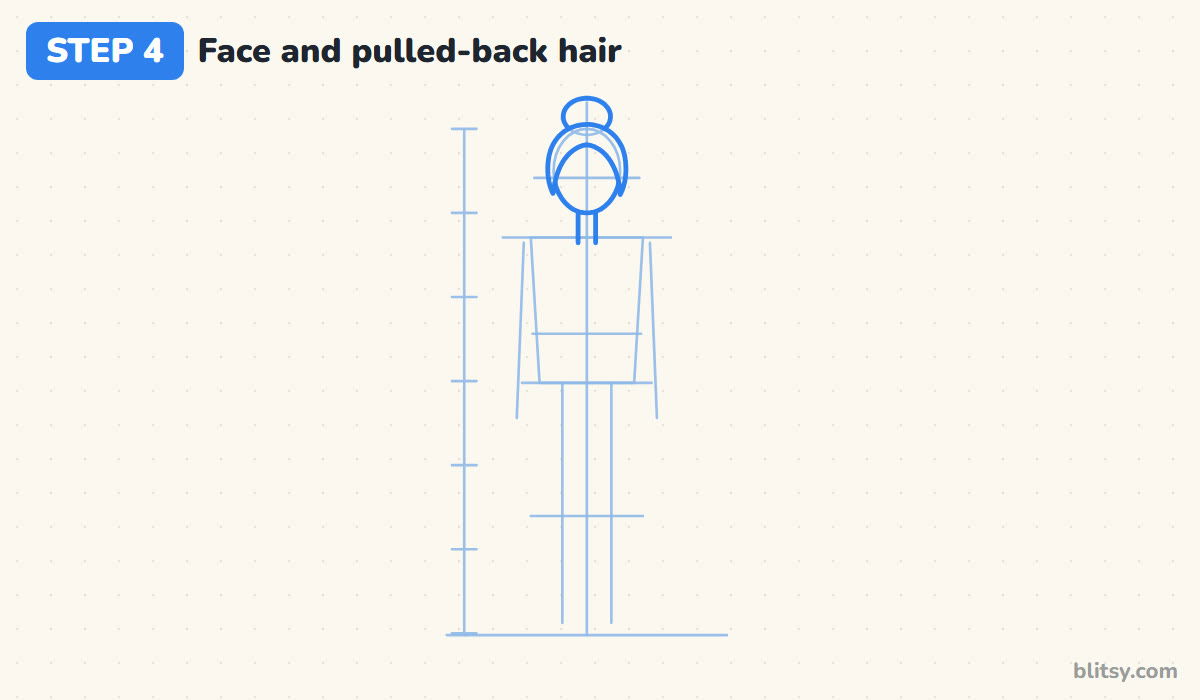
Trace the head oval with a firm line and drop a short neck down toward the shoulder line. Her hair is smooth and pulled back, so draw a rounded cap over the top of the head with a soft arch for the hairline. Let the sides come down just past the cheeks. Then outline the bun on top, letting the cap hide its lower edge.
💡 Tip: Keep the neck about half the width of the face. A thin stick neck looks wobbly once it's inked.
Step 5: Draw the top with short sleeves
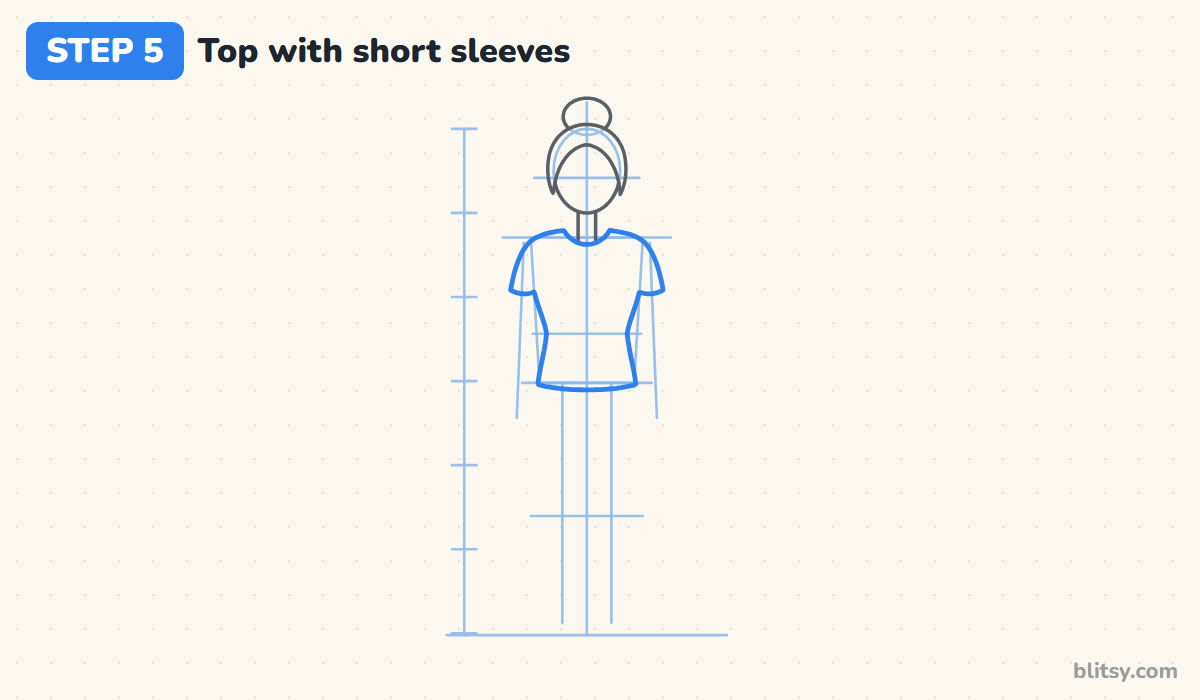
Start at the round neckline, then slope down to the shoulders and out into two short sleeves that end around the chest line. From the armpits, bring the sides in toward the waist line and let them flare a little over the hips. Finish with a gently curved hem just below the hip line.
💡 Tip: Draw one side, then copy the same curves on the other side by eye before moving on.
Step 6: Add the trousers and flat shoes
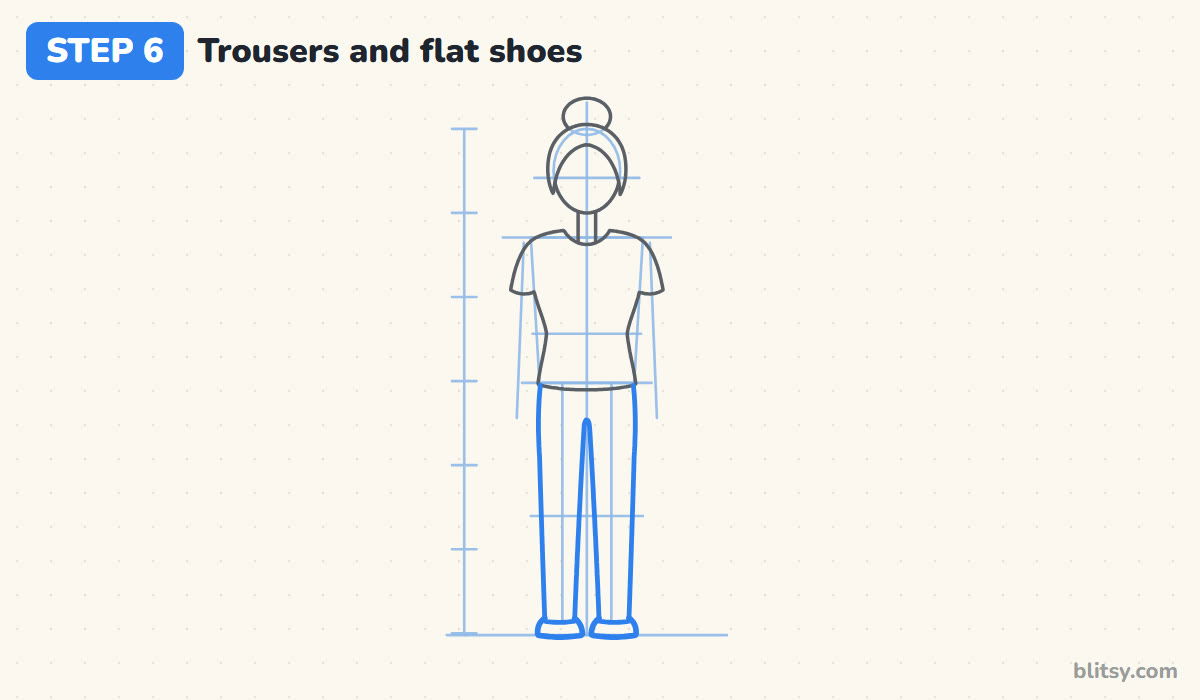
The trousers start under the hem and follow the leg guides straight down to the ankles. Leave a narrow gap between the two legs that begins just below the hips; this little split stops her legs from looking like one tube. At the bottom, draw two rounded flat shoes resting on the ground line, with the toes pointing slightly outward.
💡 Tip: Both shoes must touch the ground line. A small lift makes her hover.
Step 7: Shape the arms and hands
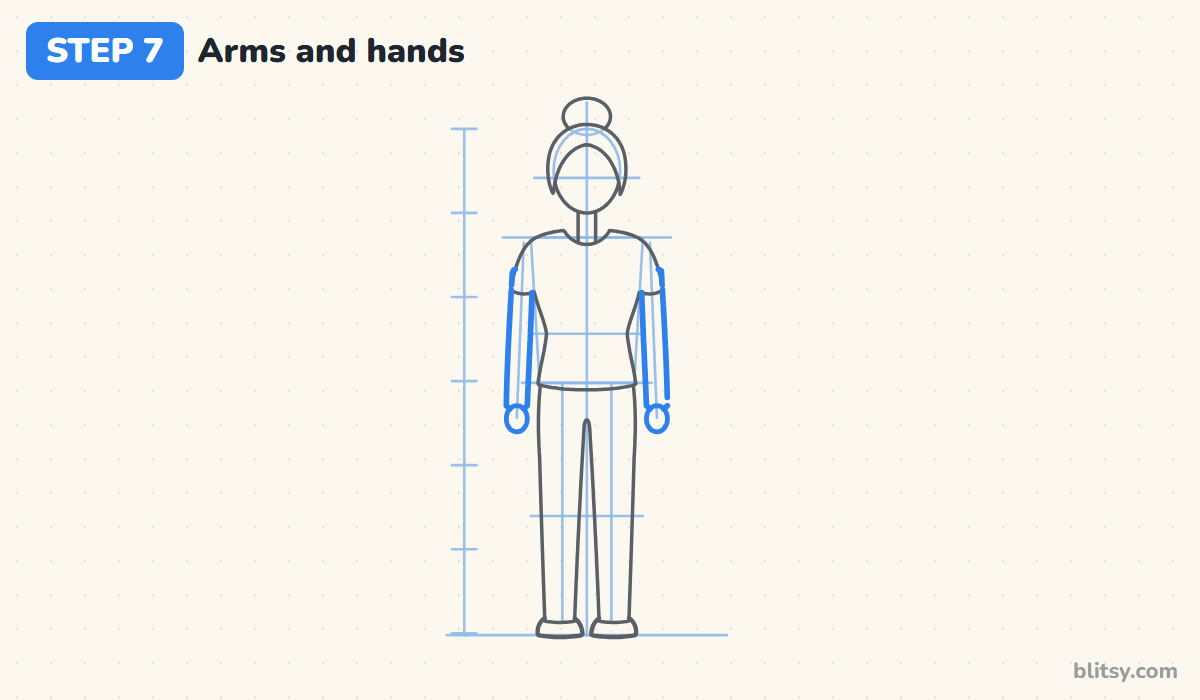
Each arm comes out of a sleeve and hangs beside the body, following the slanted guide you drew earlier. Keep a small gap between the arm and the waist so the shape of the top stays visible. End each arm with a small round hand right at hip level.




💡 Tip: Space between arm and body matters. Arms glued to her sides make the top look boxy.
Step 8: Put a handbag in one hand
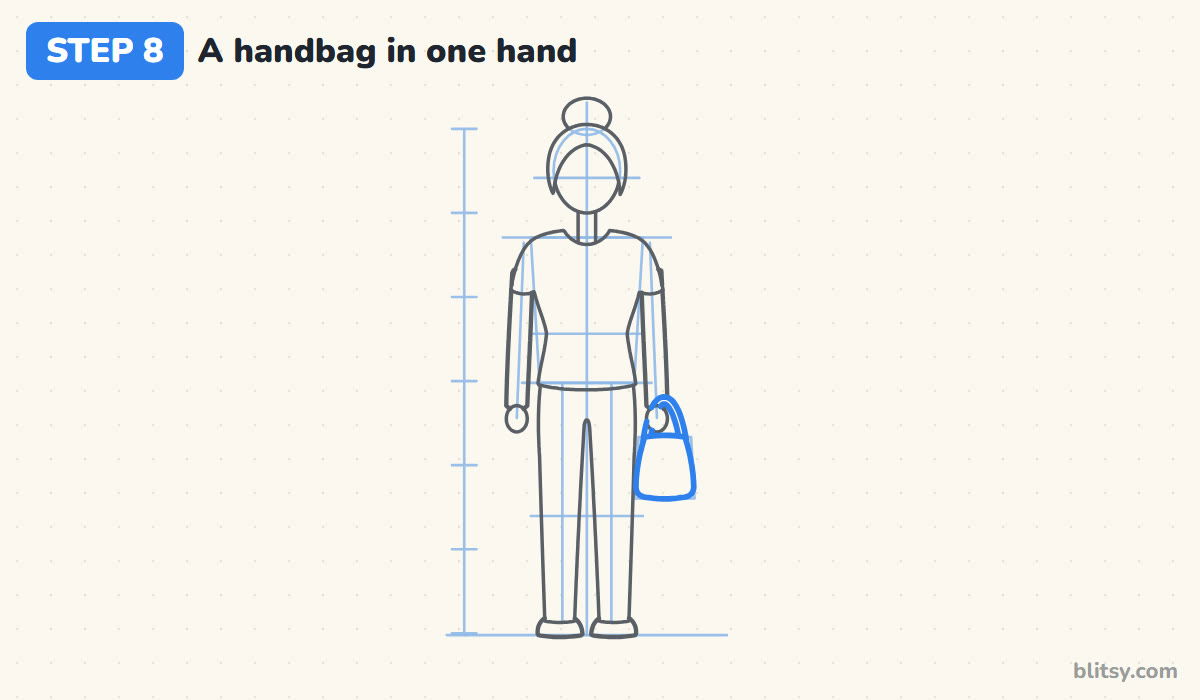
Sketch a light box below her right hand (on your right as you look at the page), about the size of her head. Round its corners and make the bottom a touch wider than the top. Then add a curved handle that rises from the bag and passes behind her fingers. It's the one part that isn't symmetric, and it relaxes the pose.
💡 Tip: Draw the hand first and the handle second, so the strap disappears behind her fingers cleanly.
Step 9: Draw the eyes and a small smile
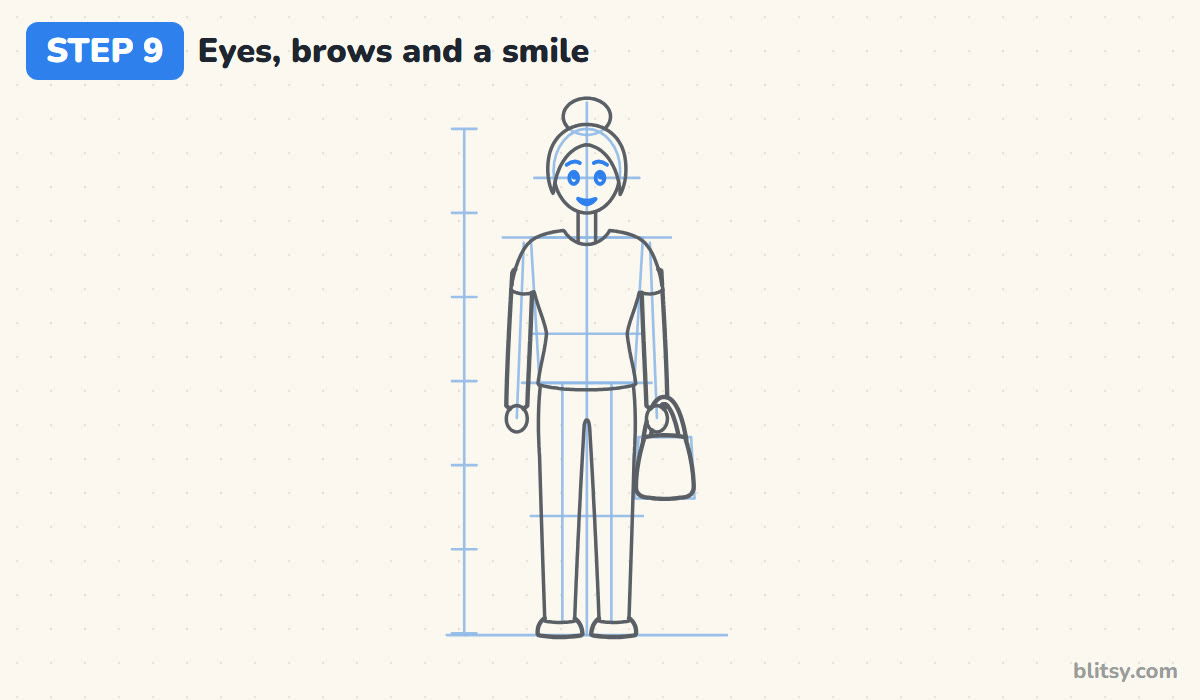
I keep faces this small to very few marks. Place two oval eyes on the eye line, one on each side of the centre, with a white shine dot in the same top corner of each. Two short curved brows sit above them. The smile is a small half-moon, closer to the chin than to the eyes. Most beginners put the mouth too high.
💡 Tip: Draw the eyes a bit bigger than feels natural. Tiny dot eyes get lost once you ink around them.
Step 10: Add the small finishing details
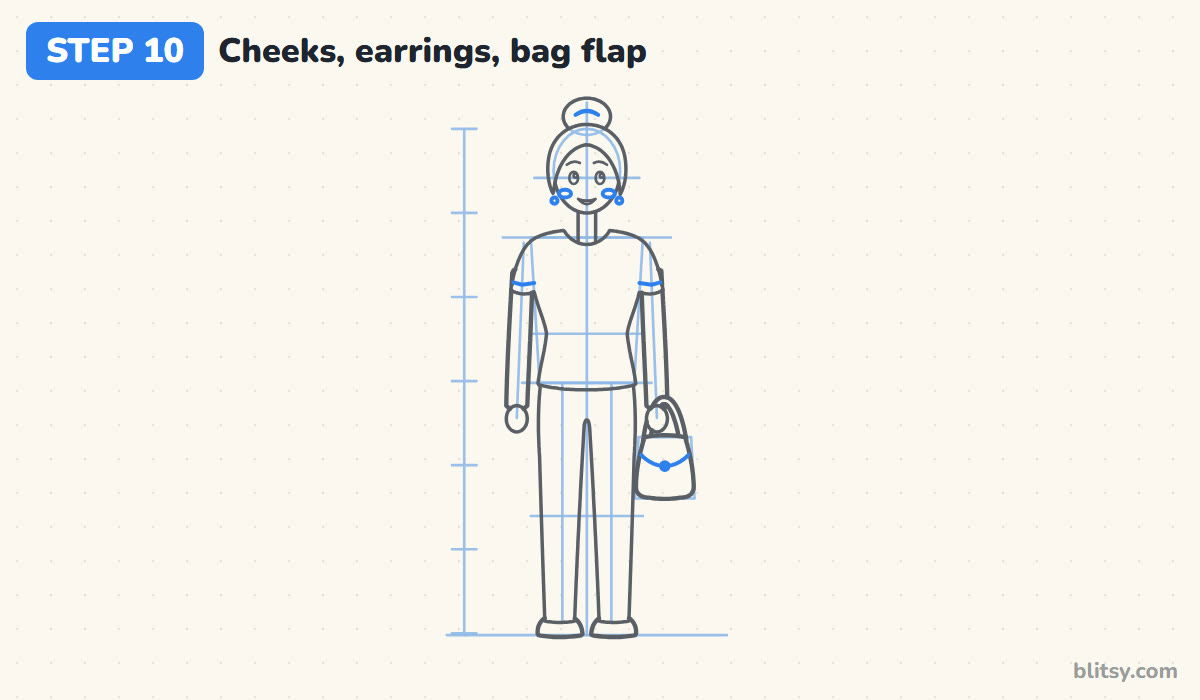
Add two soft ovals on the cheeks just under the eyes and a small round earring below each side of the hair. On the sleeves, draw a short band line near the edge. The bag gets a curved flap across its upper part and a round clasp in the middle. Very young artists can skip these.
💡 Tip: Stop when it looks complete. Extra pockets or buttons crowd a figure this size.
Step 11: Ink the outline and erase the guides
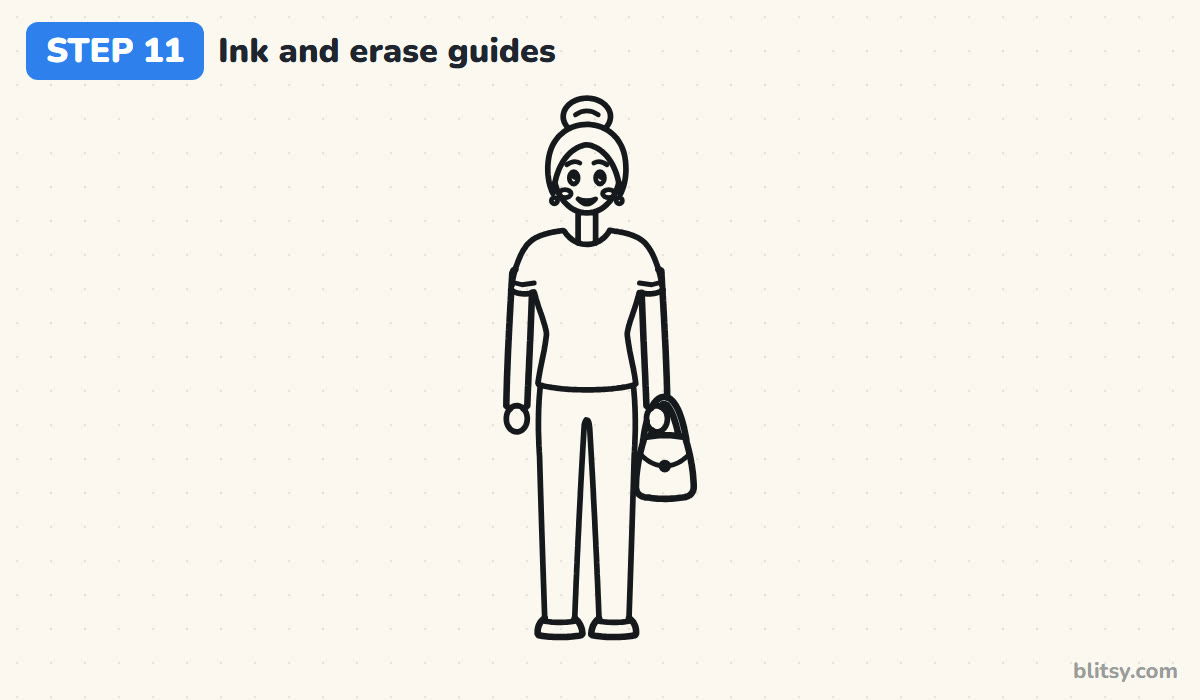
I ink the face first, while my hand is fresh, then every other line I want to keep. Leave the ruler, landmark lines and box shapes alone. Once the ink is fully dry, erase all the pencil underneath.



💡 Tip: Wait a full minute before erasing. Gel and felt pens can stay wet longer than they look.
Step 12: Color the woman
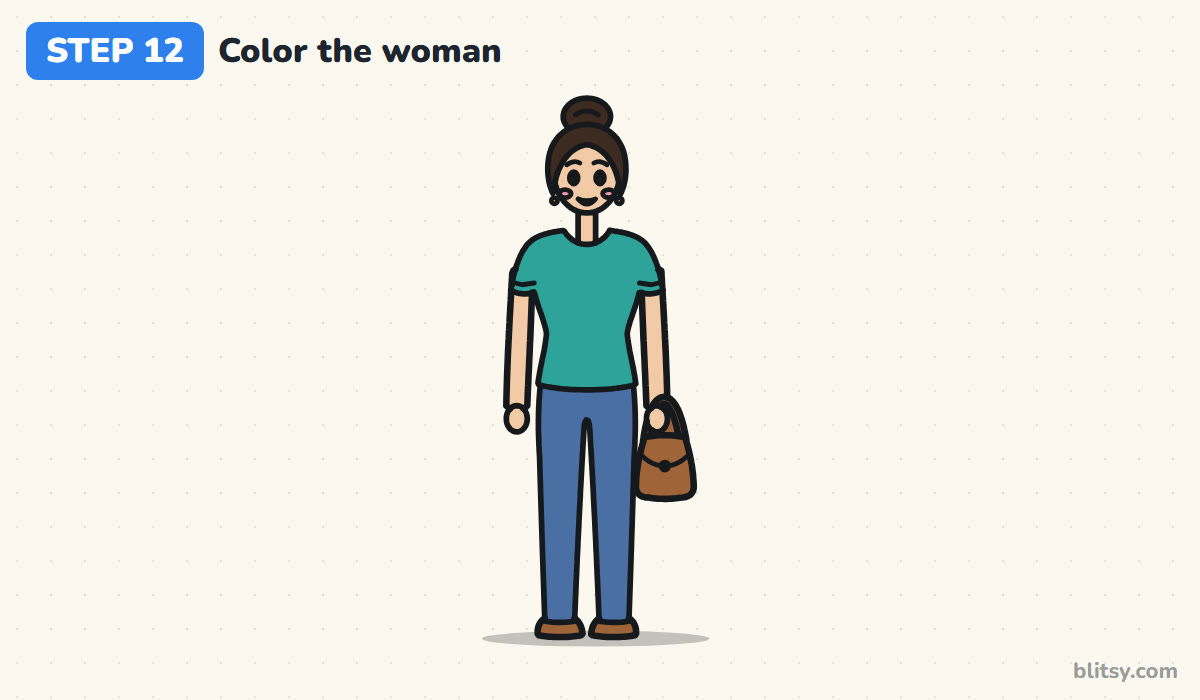
Peach goes on all the skin. Use dark brown for the hair and bun, teal for the top and blue for the trousers. Her handbag and shoes share one brown, which ties the outfit together. Finish with pink cheeks, yellow earrings and clasp, a red smile, and a light gray shadow under her feet.
💡 Tip: Color the big shapes in long strokes going one direction, and save the tiny spots for last.
Where Full-Body Woman Drawings Lose Their Balance
- The legs are too short. The hips belong at the halfway point of the whole figure, so check your ruler before drawing the trousers.
- The arms end at the waist. Short arms make her look stiff. Let the wrists reach the hip line.
- No waist at all. A straight tube from shoulders to hips looks like a box. Curve the top inward slightly at the waist line.
- The head is drawn huge. One big head with a small body reads as a little girl. Keep it inside the first unit.
- She leans to one side. When the centre line is skipped, the figure tips. Keep the neck, the gap between the legs and the space between the feet lined up on it.
Outfit and Hairstyle Swaps for Your Figure
Because the six-head ruler stays the same, you can redraw her many times with a new look. Swap the trousers for a long skirt or a simple dress that ends below the knees, or let her hair down to her shoulders instead of the bun. For a braid over one shoulder, the braid drawing tutorial shows how to build one. And if you want to put her in a group picture, the family portrait drawing tutorial shows how to fit several people on one page.
Woman Coloring Page and a Printable Step Sheet
The woman coloring page shows a colored example with a small color key at the top and a large clean outline below it. The step-by-step PDF guide has all 12 steps with pictures and tips. Both fit Letter and A4 paper.
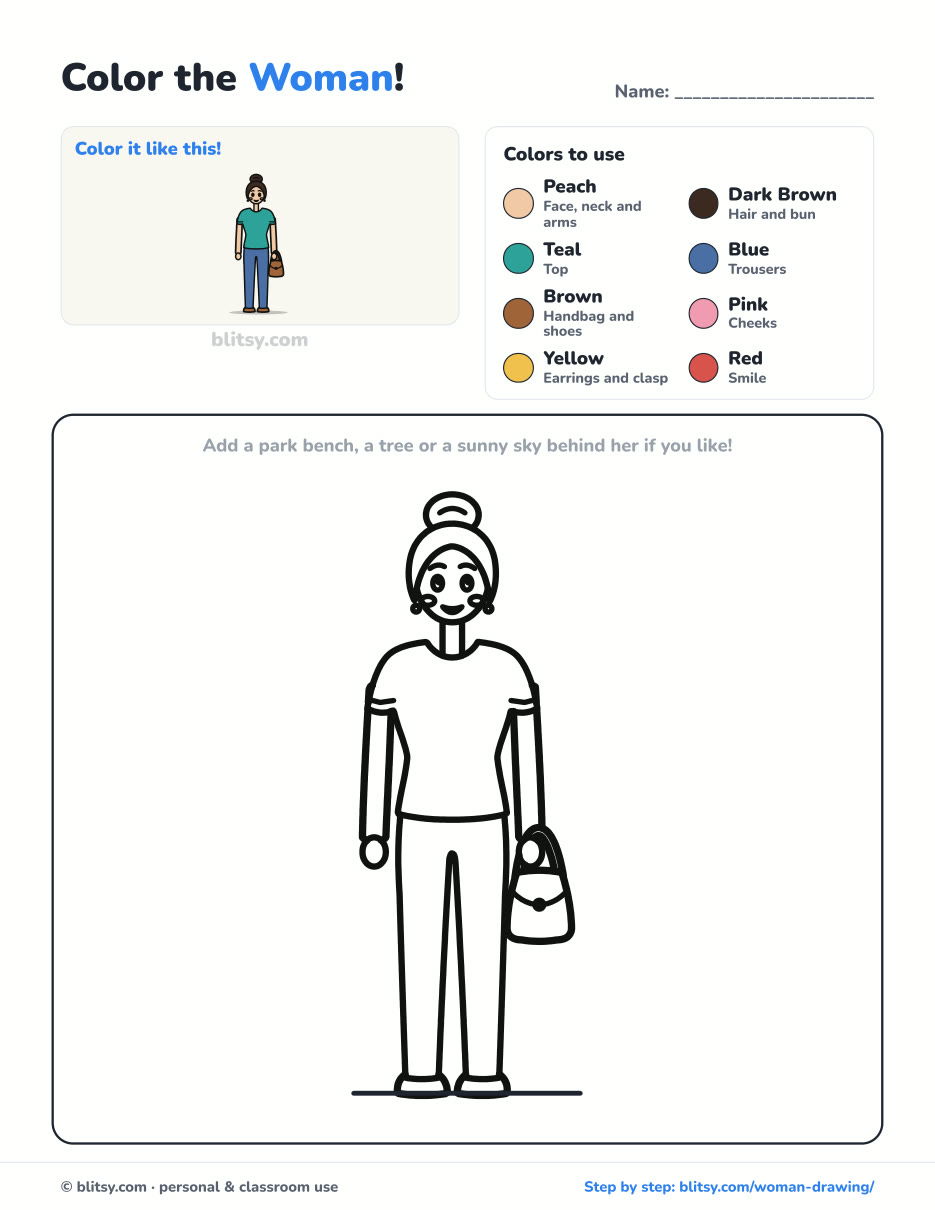
Black outlines with a colored example and the color names at the top. Ready to print and color.
⬇️ Download Coloring PageEvery step picture with its instructions and tips, to keep beside your paper while you draw.
⬇️ Download Drawing Guide📱 On a phone? Tap a download button, then open the file and choose Share → Save to Files or Print. On a computer, the PDF opens or saves straight to your Downloads folder.
Pin the Six-Head Method
Woman Figure Finished? Try These People and Body Lessons
These are step-by-step tutorials too, from faces and smiles to a few science diagrams of the body.
- Braid Drawing: Learn how to draw a braid step by step: a chunky three-strand braid with a pink hair tie that starts as one zig-zag.
- Baby Drawing: The baby drawing tutorial gives you one curl of hair, rosy cheeks and a rattle held high, in ten steps.
- Smile Drawing: Draw one big grin plus a closed smile, an open laugh and a lopsided grin with how to draw a smile.
- Lungs Drawing: For science class, this lungs drawing step by step guide builds pink lungs, a trachea and a branching airway ready for labels.
- Male Face Drawing: The male face drawing tutorial places every feature on guide lines and finishes with short brown hair and a squarer jaw.
- Mother and Daughter Drawing: Two figures stand hand in hand under a heart, all from circles and ovals, in how to draw a mother and daughter step by step.
- Fairy Drawing: This fairy drawing tutorial has mint petals, pale blue wings and a spotted red toadstool seat.
- Tooth Drawing: Kids enjoy the tooth drawing step by step lesson: a grinning molar with a toothbrush and three sparkles.
- Skeleton Drawing: Meet a cheerful bone buddy standing on his own shadow in the easy skeleton drawing tutorial.
- Chalk Art: Take it outside with how to do chalk art step by step, a hopscotch grid and a rainbow resting on two clouds.
- Family Drawing: Put her in a group with the family drawing tutorial: four people, a puppy and a red balloon.
- Emoji Drawing: Three yellow faces come from the same three circles in this emoji drawing step by step guide.
- Human Heart Drawing: The human heart drawing tutorial draws a textbook-style heart with the aorta arching over the top and blue vessels.
- Realistic Drawing: To practice light and shadow, follow the realistic drawing tutorial on one shiny apple.
Figure Drawing Questions From Beginners
What is the easiest way to draw a woman's body?
Measure first. Split a vertical line into six equal head units, then mark shoulders, waist, hips and knees on it before you draw any clothing.
How many heads tall should a woman drawing be?
Realistic adults are often drawn seven to eight heads tall. For a simple cartoon like this one, about six heads keeps her friendly and easy to draw.
Can kids follow this woman drawing tutorial?
Yes, children from about eight can follow it. Younger kids can skip the ruler and the small details and simply copy the big shapes.
How long does it take to draw a woman step by step?
Plan on 35 to 45 minutes including coloring. The measuring steps are quick, and the face usually takes the longest.
Once she's done, try her again with a different outfit and see how the same six heads hold every version together. ✏️👗
Related posts:
 How to Draw a Male Face Step by Step (Easy Proportions)
 How to Draw a Face Step by Step (Easy Proportions Guide)
 How to Draw Wonder Woman Step by Step (Chibi for Kids)
 How to Draw a Boy Step by Step (Easy Full-Body Cartoon)
 How to Draw a Whale Step by Step (Easy for Beginners)
 How to Draw Lungs Step by Step (Easy Science Diagram)
 How to Draw a Plant Step by Step (Easy Potted Monstera)
 How to Draw the Fortnite Llama Step by Step (Easy Fan Art)
 How to Draw a Hoodie Step by Step (Front and Back View)
 How to Draw a Jellyfish Step by Step (Cute, Easy Guide)
 How to Draw Cerberus Step by Step (Cute and Easy)
 How to Draw a Taco Step by Step (Easy Kawaii Taco)

