
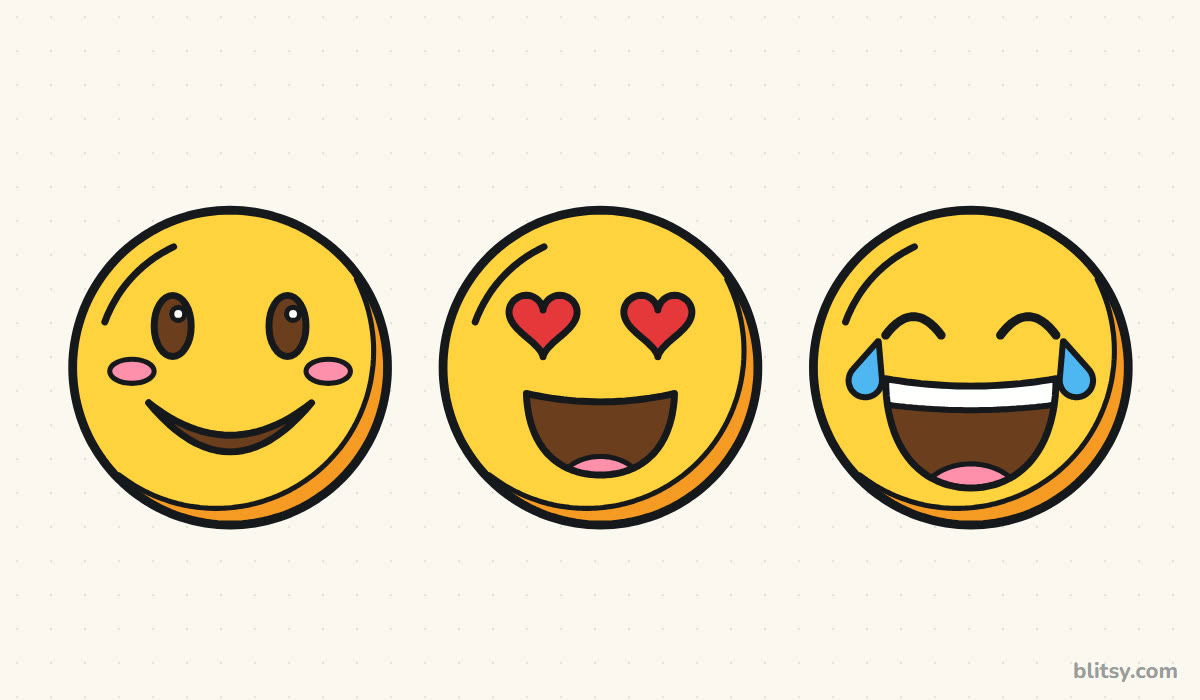
An emoji is a whole feeling squeezed into one small circle, which makes it a great first drawing for anyone who thinks faces are too hard. Here you'll learn how to draw an emoji step by step, and instead of stopping at one, we'll draw three in a row: a smiling face, a heart-eyes face and a face laughing so hard it cries. Two simple guide lines inside each circle do most of the work, so the eyes and mouths land in the middle every time. These are my own simple designs for practice, not copies of any phone's emoji set.
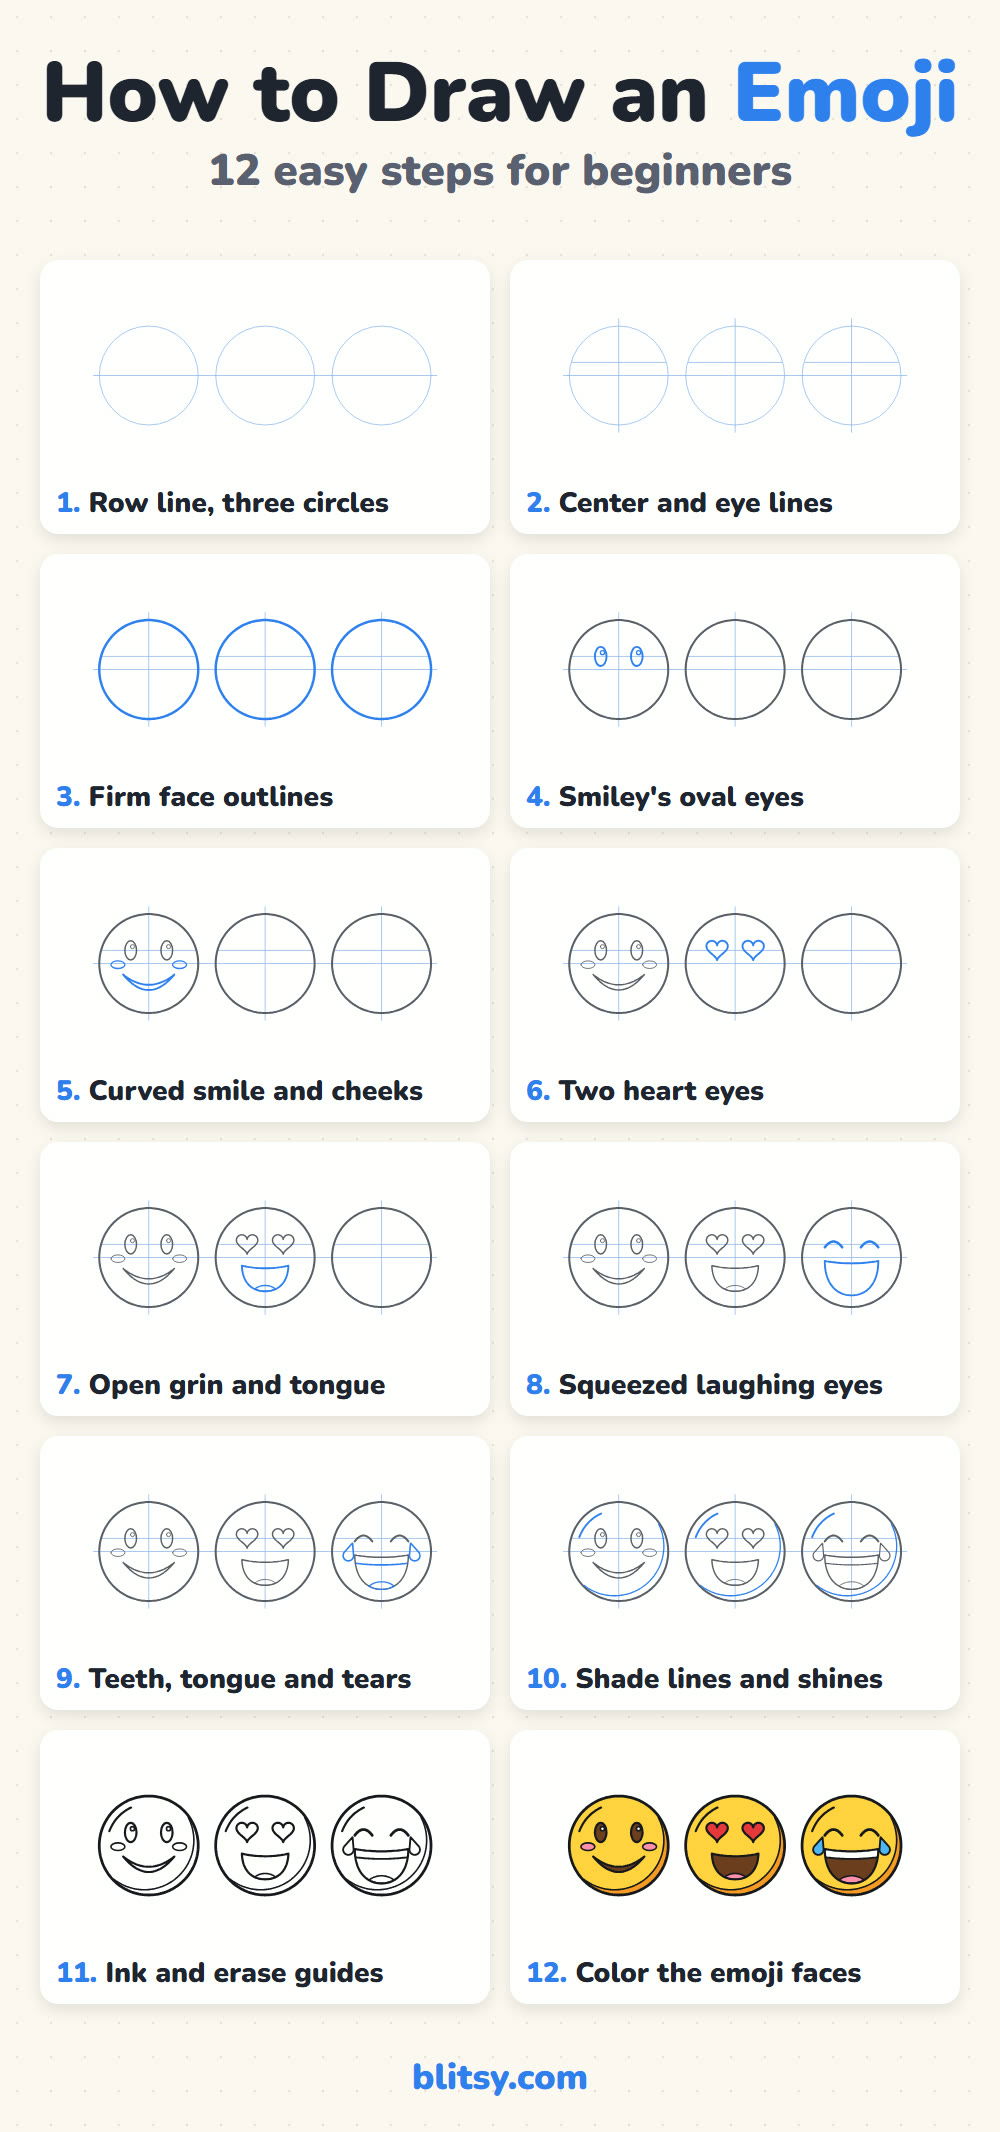
Read each picture by its colors. Blue lines are the part you add in that step, and gray ones are already on your paper from before. The light blue crosses and circles are helpers only, so keep them faint; they get erased in step 11.
Quick overview
⏱️ Time: about 20 to 25 minutes
🎯 Level: easy, good for kids from around 5
✏️ Steps: 12
😀 You'll draw: three emoji faces in a row (smiling, heart eyes, laughing with tears)
A Short Supply List for Three Smiley Faces
- A pencil you can press very lightly
- An eraser that lifts pencil without smearing
- A black marker or fineliner for the final lines
- Coloring pencils or markers in yellow, orange, brown, red, pink and light blue
- Plain paper turned sideways so all three faces fit
- Something round to trace, like a cup or a roll of tape (optional)
If circles make you nervous, tracing around a cup is completely fine and still counts as your drawing.
How to Draw an Emoji Step by Step
Step 1: Draw a row line and three circles
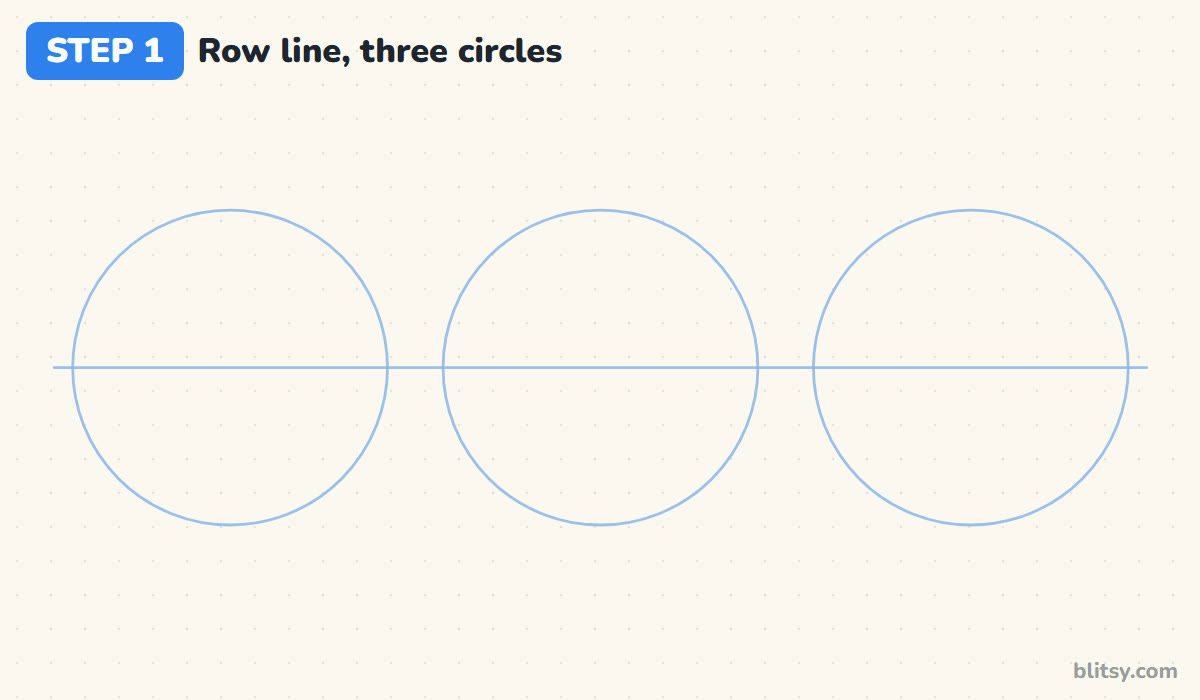
Start with one long, light line straight across the middle of your paper. Now draw three circles of the same size along it, with the line passing right through the center of each one. Leave a small gap between them. I always draw the row line first, because it keeps all three faces at the same height.
💡 Tip: Trace the bottom of a cup three times if freehand circles keep coming out lumpy.
Step 2: Add a center line and an eye line to each face
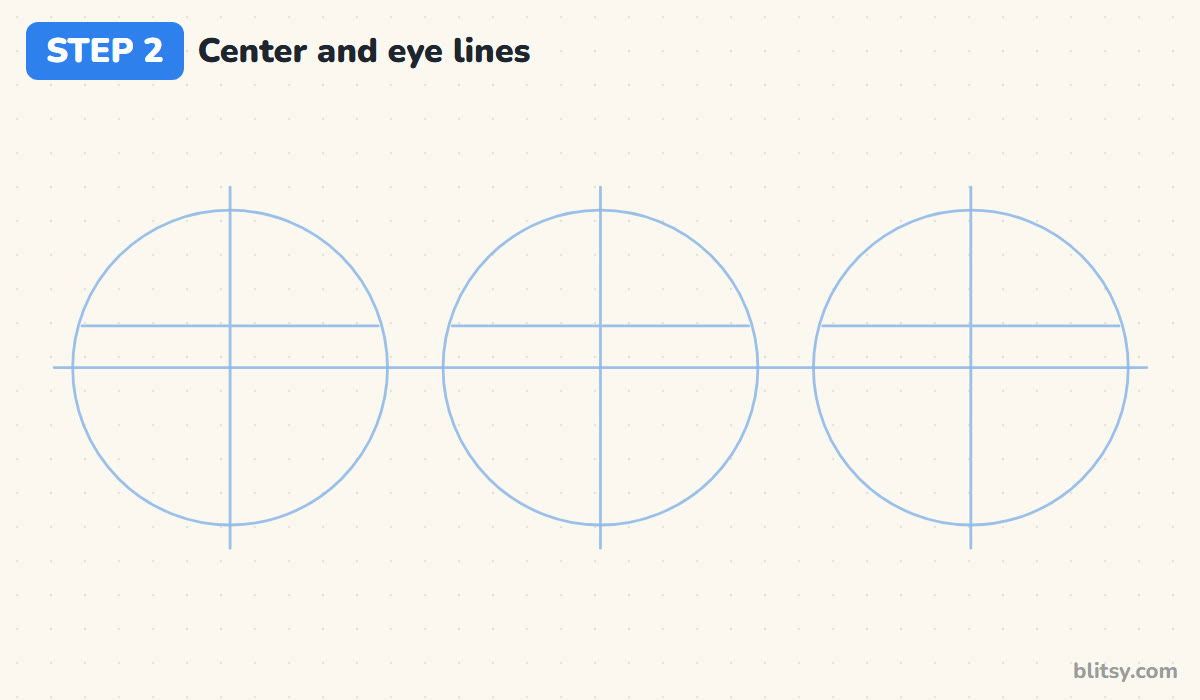
Inside each circle, draw a straight line from top to bottom through the middle. Then add a short level line a little above the row line. That upper line is where the eyes will sit. Anything you put left of the center line gets a twin at the same distance on the right.
💡 Tip: Put the eye line slightly above the middle, not on it, or the faces look sleepy.
Step 3: Go over the three face outlines
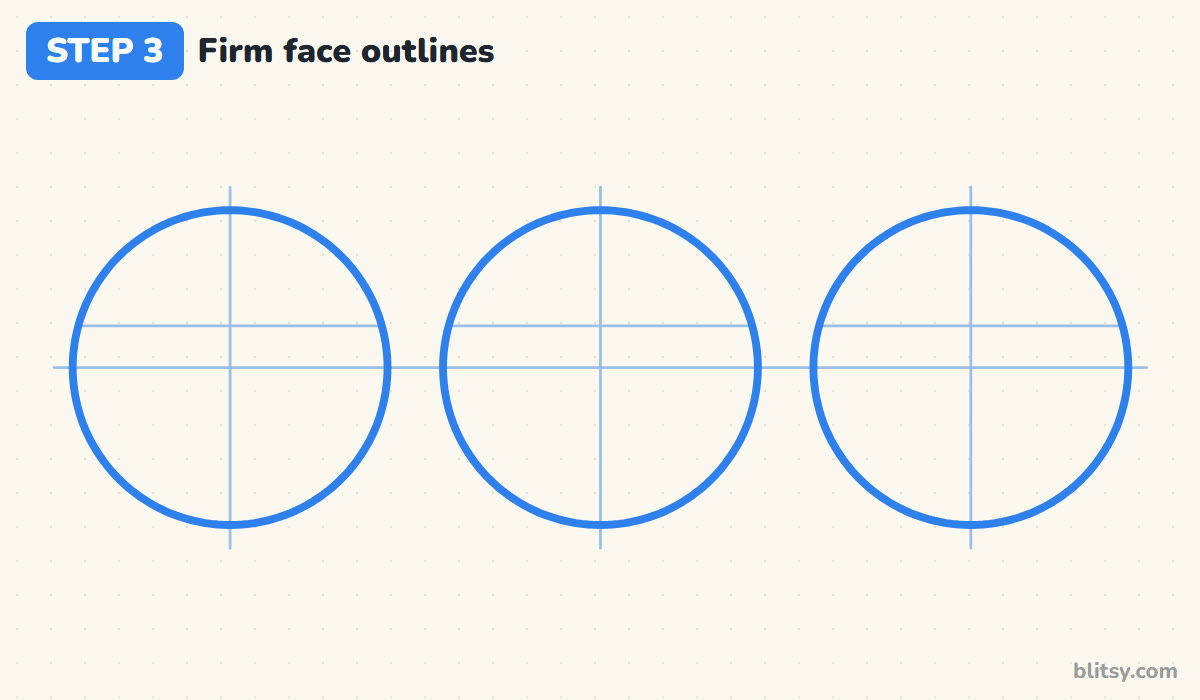
Pick the best version of each circle and go over it with a firmer pencil line. Keep the guide lines faint underneath. A firm outline now makes the next steps feel much more like a real face.




💡 Tip: Turn the paper as you go around each circle so your hand stays comfortable.
Step 4: Give the first face two oval eyes
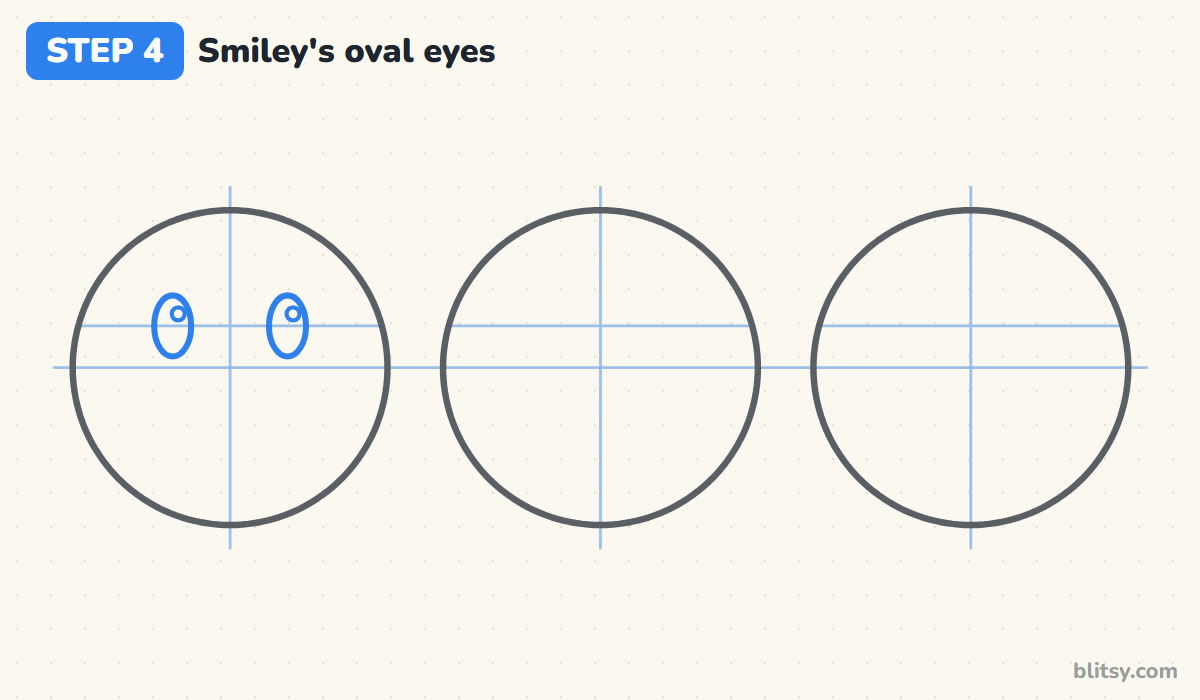
On the left face, draw two tall ovals sitting on the eye line, one on each side of the center line. Then put a tiny circle near the top right of each oval for the shine. Shines facing the same way make the eyes look alive.
💡 Tip: Make the ovals taller than they are wide. Round dots look surprised, not happy.
Step 5: Draw a curved smile and round cheeks
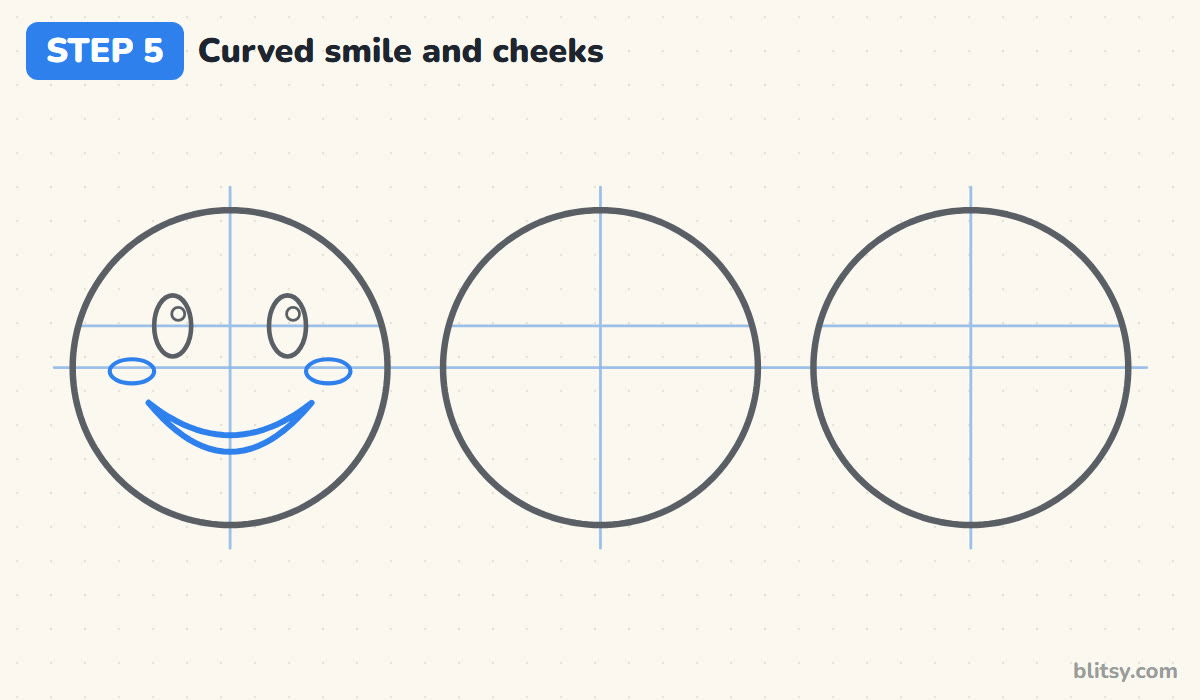
Below the row line, draw a wide curve like a bowl, centered on the middle line. Then draw a second, shallower curve that joins both ends, so the smile becomes a thin crescent. Add a small flat oval under each eye for the cheeks. My rule for this face: the smile should be a little wider than the space between the eyes.
💡 Tip: Keep the cheeks just under the eyes and outside them, never touching the smile.
Step 6: Draw two heart eyes on the middle face
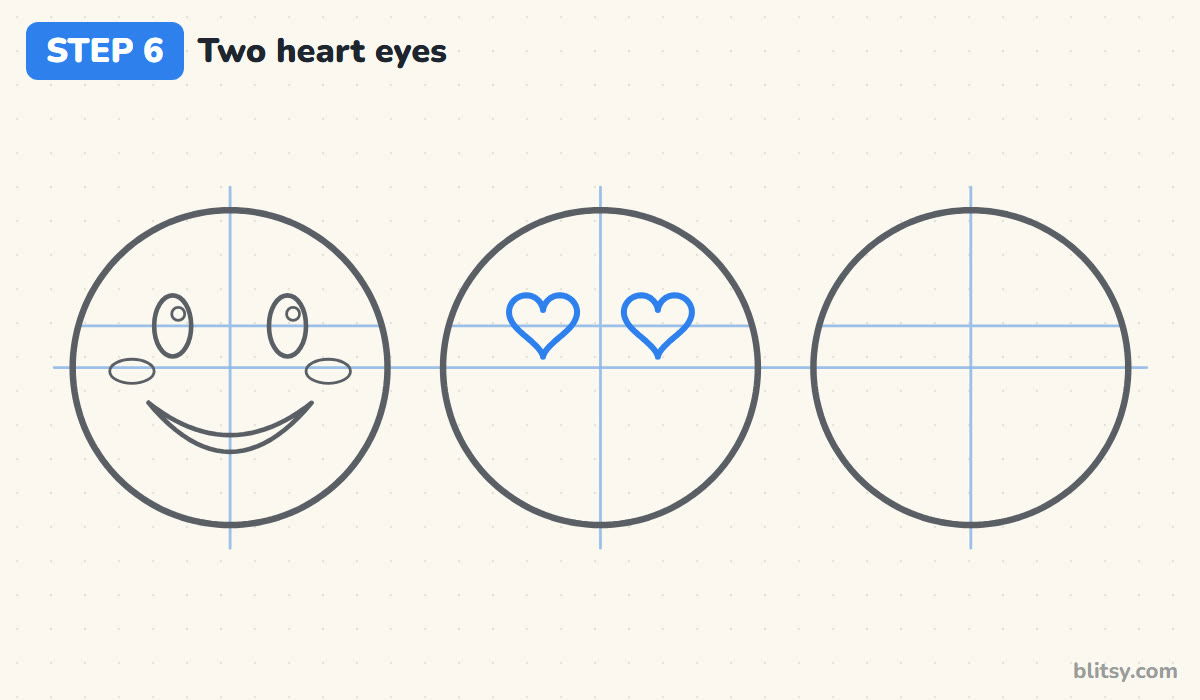
Hearts replace the eyes here, so center each one on the eye line in the same spots the ovals took on the first face. Start every heart with two bumps on top and bring both sides down to a point. Small hearts look like freckles, while big ones crowd the forehead.
💡 Tip: Draw the left half of each heart, then mirror it, to keep both sides even.
Step 7: Add an open grin and a tongue
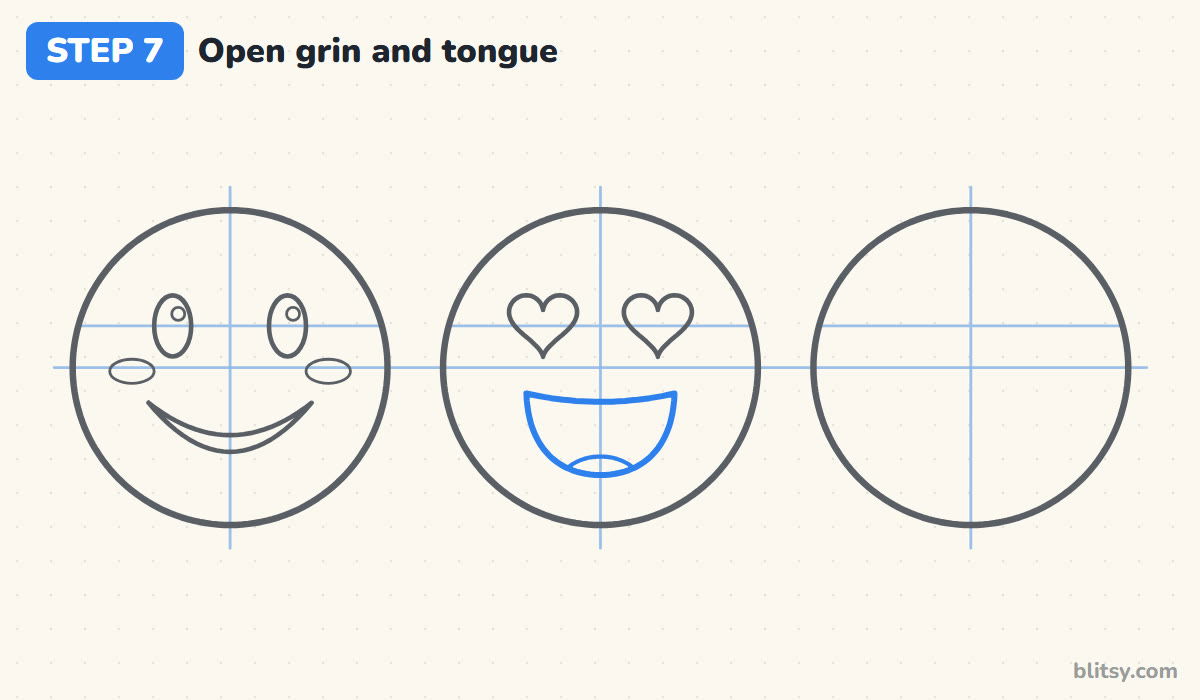
Just below the row line, draw a slightly curved top edge for the mouth. Hang a deep U from both ends so the mouth looks like a wide letter D lying on its back. At the bottom of the mouth, add a low hill for the tongue. When I draw this one, I keep the grin inside the two hearts' outer edges so the face stays balanced.




💡 Tip: Round the bottom corners of the D; sharp corners make the grin look like a box.
Step 8: Draw squeezed laughing eyes and a big mouth
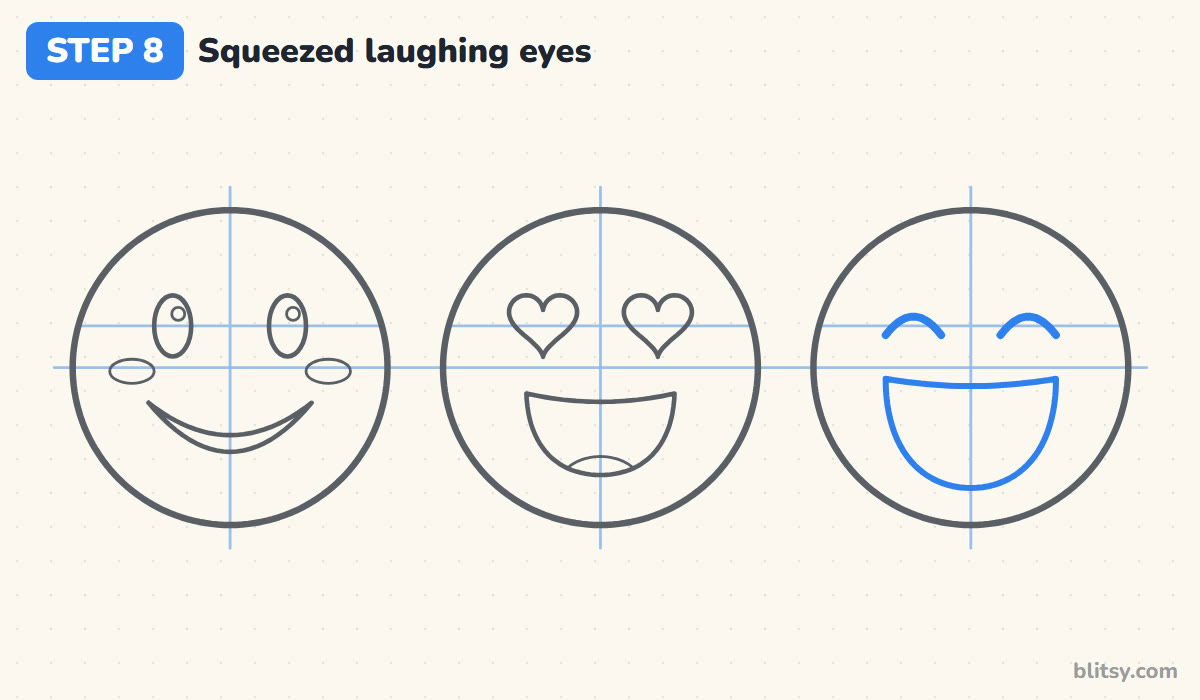
Laughing eyes are closed, so on the right face draw two arches on the eye line, curving up like little rainbows. Then draw the biggest mouth of the three: a gently curved top edge that starts higher than the other mouths, and a deep round bottom. Honestly, it's meant to look too big.
💡 Tip: Make the arches thick and short. Long thin ones read as raised eyebrows.
Step 9: Add teeth, a tongue and two tears
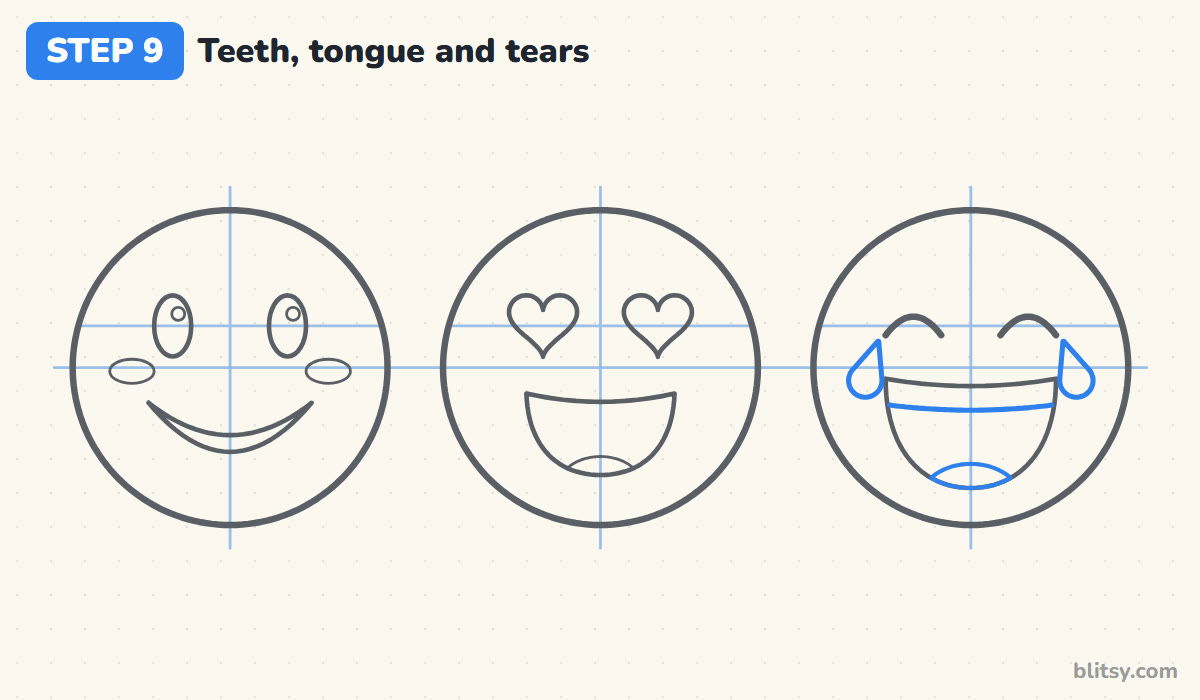
Draw a curved line across the top of the laughing mouth to make a band of teeth. Add a tongue at the bottom, a little wider than the one on the middle face. Next, draw a teardrop beside each eye: a pointed tip near the outer end of the arch and a round bottom just above the mouth corner.
💡 Tip: Start each tear at its tip and swing round the bottom in one stroke.
Step 10: Draw shading lines and shines
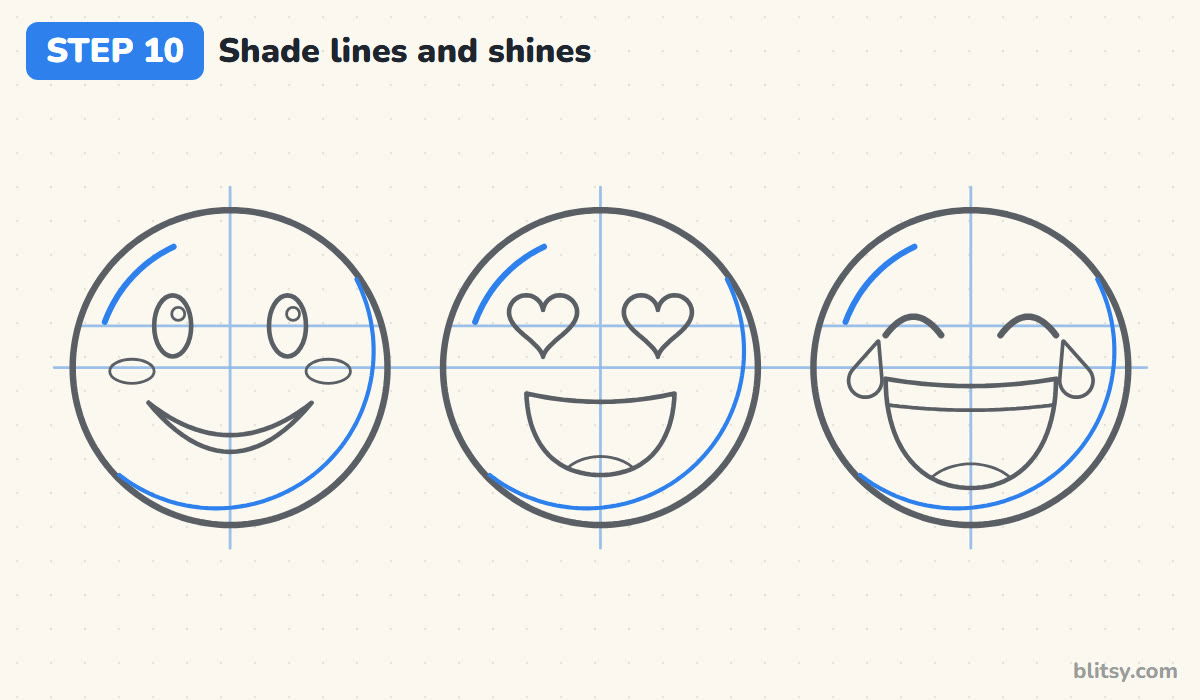
Shading makes a flat circle look like a ball. Inside each face, draw a long curve that follows the bottom right edge, close at the ends and a bit farther away in the middle. Then put a short curved stroke inside the top left edge of every face for a shine.
💡 Tip: Stop the shading curve before it reaches a mouth, cheek or tear.
Step 11: Ink the faces and erase the guides
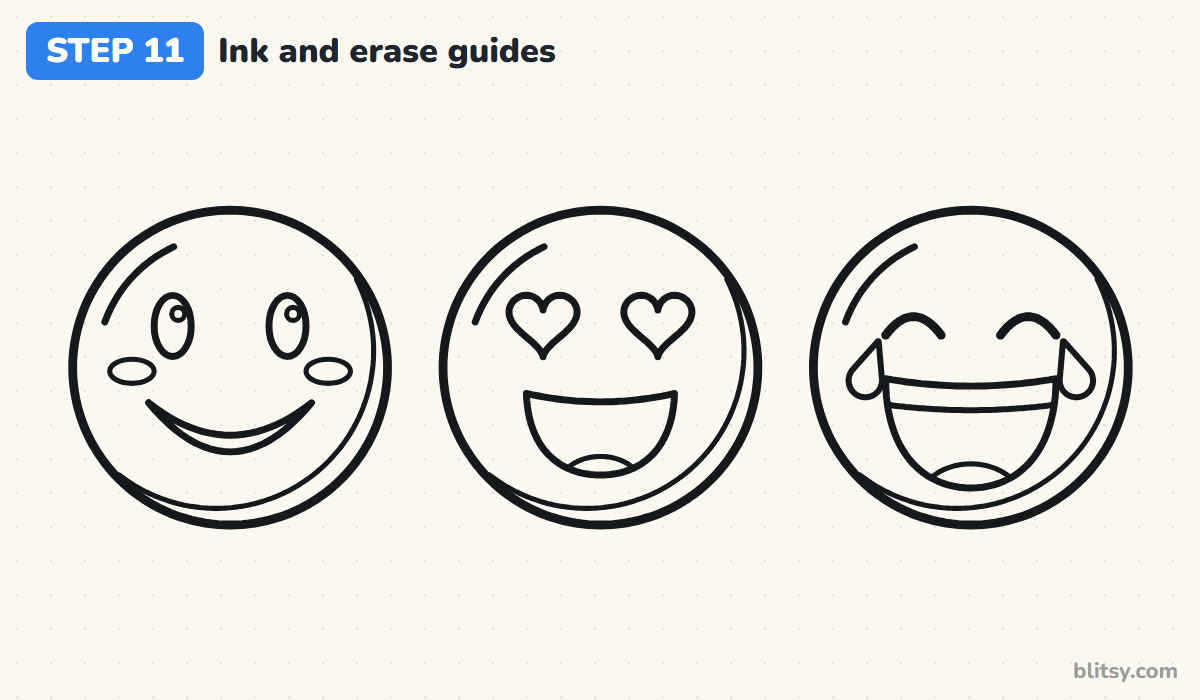
Trace every keeper line with a black marker: the outlines, eyes, hearts, mouths, teeth, tongues, tears, cheeks, shading curves and shines. Wait a minute for the ink to dry, then erase all the pencil. Without the crosses, the faces suddenly look like real emoji.




💡 Tip: Ink the outer circles slowly and a bit thicker than the features inside them.
Step 12: Color the three emoji
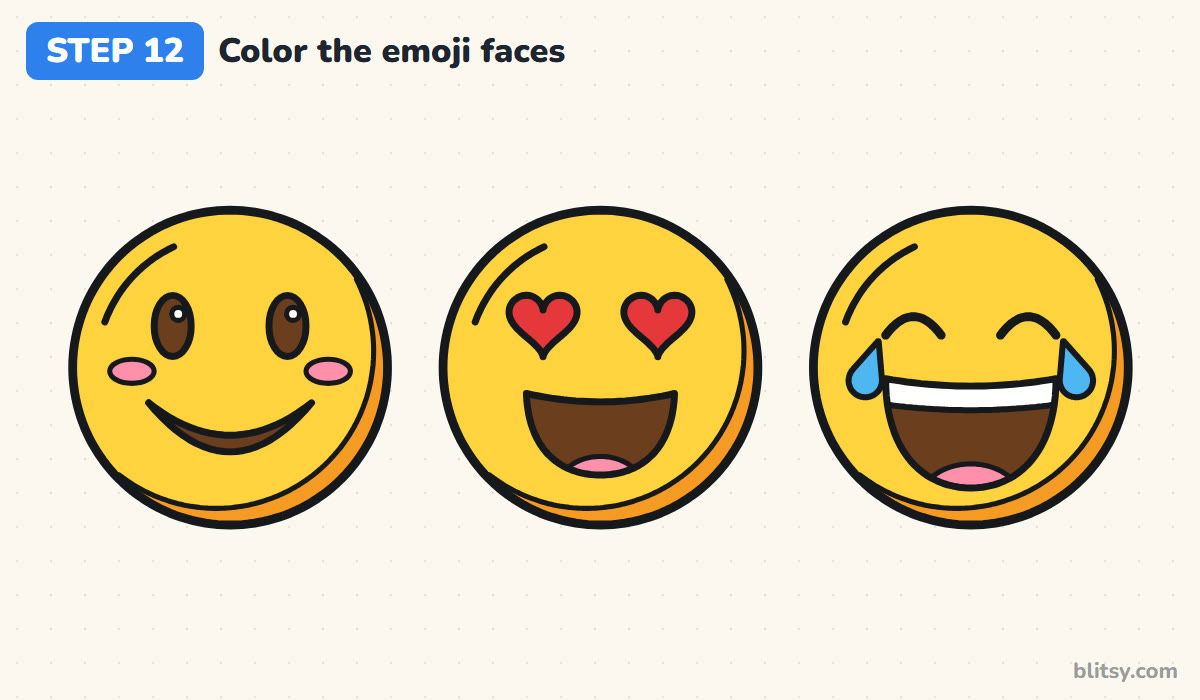
Fill the faces with yellow and the shading strips with orange. Use brown for the oval eyes and all three mouths, white for the teeth and eye shines, and pink for the tongues and cheeks. The hearts go red and the tears light blue. I color the yellow first, because it's the biggest area.
💡 Tip: Lay the orange right over the yellow edge so the two blend softly.
Why Emoji Faces End Up Lopsided
- Skipping the center line. Without it, one eye drifts and the face looks confused. Draw the cross every time; it takes five seconds and erases cleanly.
- Eyes placed too high. Eyes near the top leave a huge chin and make the emoji look shocked. Keep them just above the middle.
- Mouths that touch the edge. A grin running into the outline squashes the face. Leave a band of yellow all the way around every feature.
- Hearts of two different sizes. Uneven heart eyes look like a wink by accident. Draw both, then compare and fix the smaller one before inking.
- Coloring the shadow brown. Brown shading makes the faces look dirty. Orange on yellow keeps them warm and bright.
Turning Three Faces Into a Whole Emoji Keyboard
Once these three feel easy, keep the circles and the crosses and only swap the features. A wink is one oval and one arch. A cool face gets a pair of black sunglasses sitting on the eye line. Angry eyebrows slope down toward the center line, and a sleepy face has two flat lines with a little Z floating above. If the grins were your favorite part, the smile drawing tutorial shows several kinds of mouths, and this heart drawing step by step lesson is good practice for the heart eyes.
Emoji Faces Coloring Page and a Printable Step Guide
For a screen-free version, print the emoji coloring page. It has a small colored example and a color key at the top, so kids can match the yellow, orange and the rest, plus a big bold outline below. The step-by-step guide PDF carries all 12 steps with their tips. Both fit Letter or A4 paper.
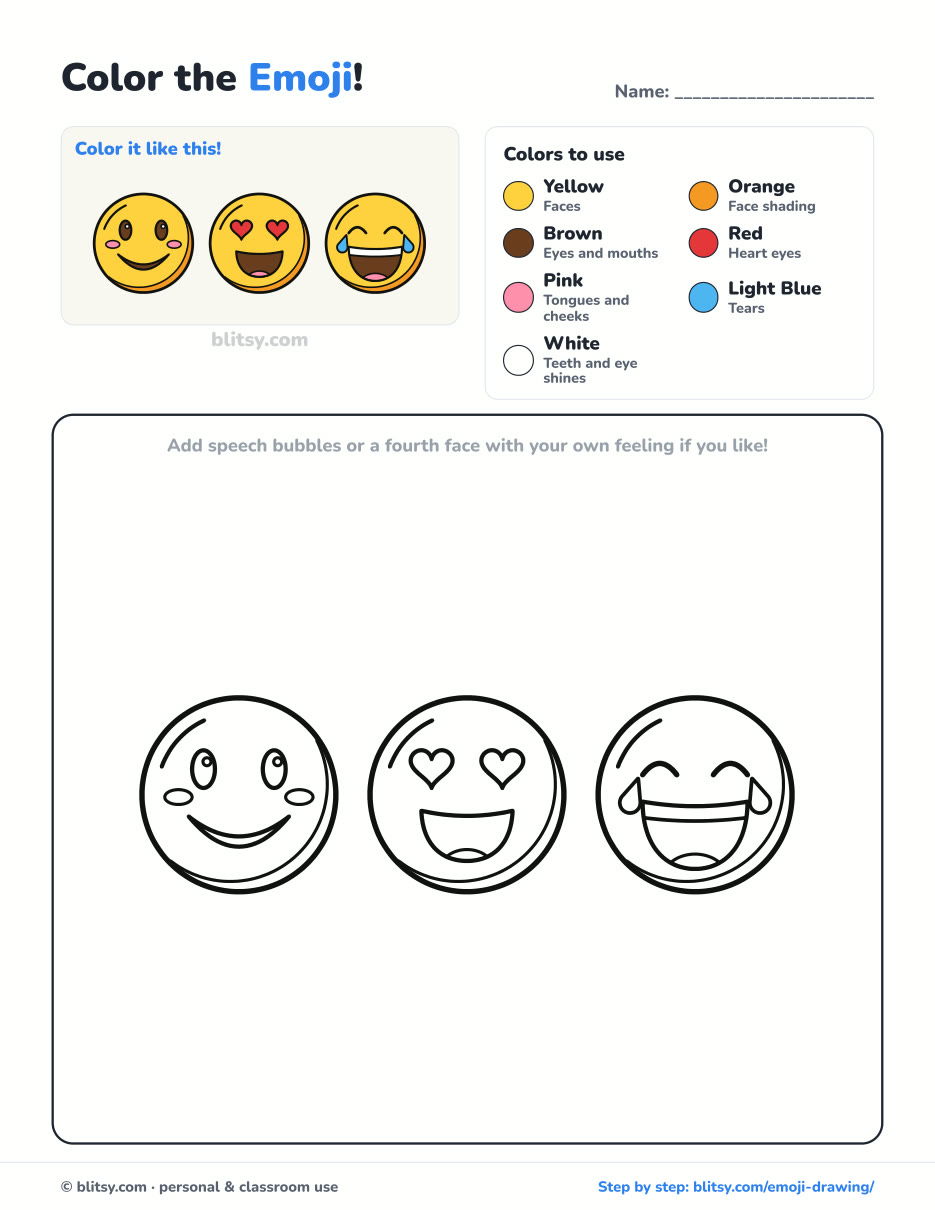
Black outlines with a colored example and the color names at the top. Ready to print and color.
⬇️ Download Coloring PageEvery step picture with its instructions and tips, to keep beside your paper while you draw.
⬇️ Download Drawing Guide📱 On a phone? Tap a download button, then open the file and choose Share → Save to Files or Print. On a computer, the PDF opens or saves straight to your Downloads folder.
Save All Twelve Smiley Steps to One Pin
Emoji Faces Done? Try These Tutorials
Each link opens a step-by-step drawing lesson, so you can move from simple faces to people, bodies and a few science diagrams.
- Realistic Drawing: Take your circles further with the realistic drawing step by step guide, where one lamp lights a round, shiny apple.
- Male Face Drawing: Learn how to draw a male face with short brown hair and a squarer jaw, every feature placed on a guide line.
- Mother and Daughter Drawing: This mother and daughter drawing tutorial shows the two holding hands under a heart, built from circles and ovals.
- Fairy Drawing: Draw a fairy with mint petals and pale blue wings sitting on a spotted red toadstool in this fairy drawing step by step lesson.
- Smile Drawing: The smile drawing tutorial covers one big grin plus a closed smile, an open laugh and a lopsided grin.
- Chalk Art: Head outside with this chalk art step by step guide for a hopscotch, a rainbow on two clouds and a sun.
- Family Drawing: Four people, a puppy and a red balloon share one picture in the how to draw a family lesson.
- Skeleton Drawing: Meet a cheerful bone buddy standing on his own shadow with this easy skeleton drawing tutorial.
- Woman Drawing: Mark six head heights first, then build the figure, in the woman drawing step by step guide.
- Human Heart Drawing: For a school project, follow the human heart drawing tutorial, with a red muscle, the aorta and blue vessels.
- Lungs Drawing: Draw pink lungs, a pale blue trachea and the branching airways, ready for labels, with this how to draw lungs step by step lesson.
- Tooth Drawing: A grinning molar holding a toothbrush is the result of the cute tooth drawing tutorial.
- Braid Drawing: One zig-zag line grows into a chunky three-strand braid with a pink tie in this braid drawing step by step guide.
- Baby Drawing: Finish with the how to draw a baby tutorial: one curl of hair, rosy cheeks and a rattle held high.
Emoji Questions From Kids Who Love to Doodle
What is the easiest emoji to draw?
The plain smiling face. It's a circle, two oval eyes and one curved smile, and it teaches you where every other emoji's features go.
How do I keep an emoji face symmetrical?
Draw a light cross inside the circle first: a center line and an eye line. Place each feature the same distance from the center line, then erase the cross.
What colors do I need for emoji?
Yellow and orange for the faces, brown for eyes and mouths, plus red for hearts, pink for tongues and light blue for tears. White paper can stay white for the teeth.
Can young kids draw these emoji?
Yes. Children from about 5 can manage the smiling face, especially if they trace a cup for the circle. The laughing face with teeth and tears suits slightly older kids.
Draw one more face with the feeling you have right now, then see if someone at home can guess it. 😄
Related posts:
 How to Draw a Whale Step by Step (Easy for Beginners)
 How to Draw a Woman Step by Step (Easy Body Proportions)
 How to Draw a Plant Step by Step (Easy Potted Monstera)
 How to Draw the Fortnite Llama Step by Step (Easy Fan Art)
 How to Draw a Hoodie Step by Step (Front and Back View)
 How to Draw a Parrot Step by Step (Easy Scarlet Macaw)
 How to Draw a Police Car Step by Step (Easy for Kids)
 How to Draw a Volcano Step by Step (Easy Erupting Volcano)
 How to Draw a Crow Step by Step (Easy for Beginners)
 How to Draw a Tiger Step by Step (Easy Walking Pose)
 How to Draw a Heart Step by Step (Even, Symmetric Shape)
 How to Draw a Jellyfish Step by Step (Cute, Easy Guide)

