
Kids who have just lost a wobbly tooth often want to draw one, and it turns out a cartoon molar is one of the friendliest shapes you can put on paper. In this lesson you'll learn how to draw a tooth step by step: a happy molar with two short roots, rosy cheeks and a toothbrush leaning beside it. Most of it comes from a single oval and three straight lines. If you can draw a bump and a curve, you already have the skills for this one.
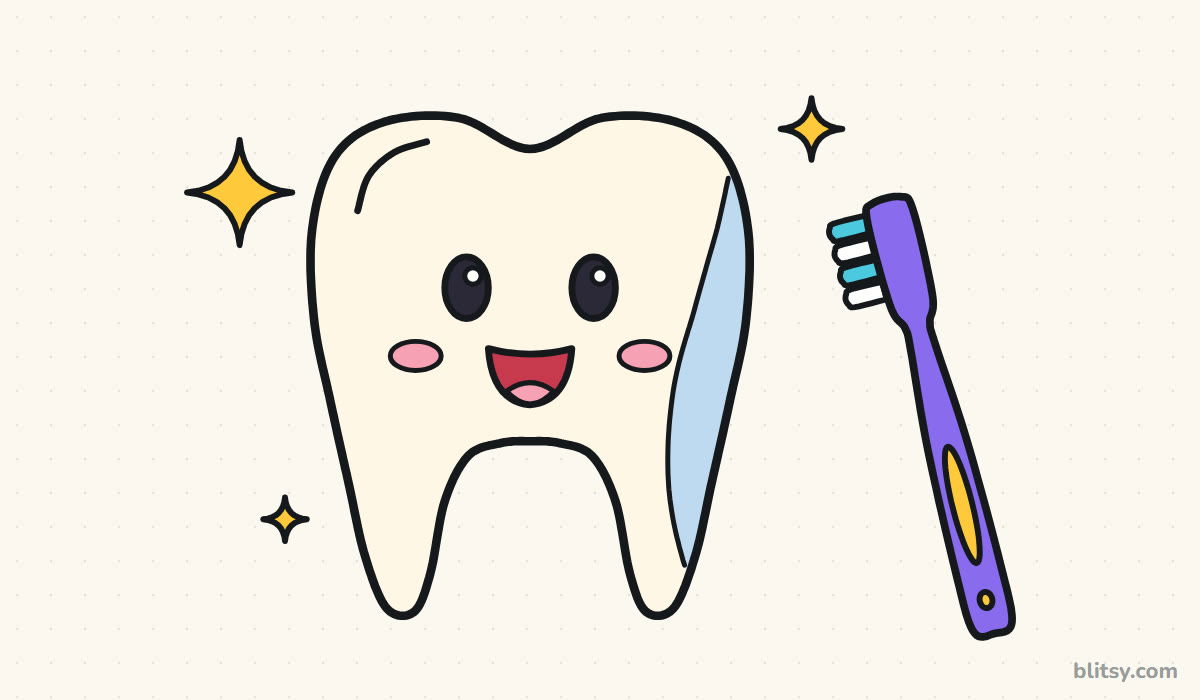
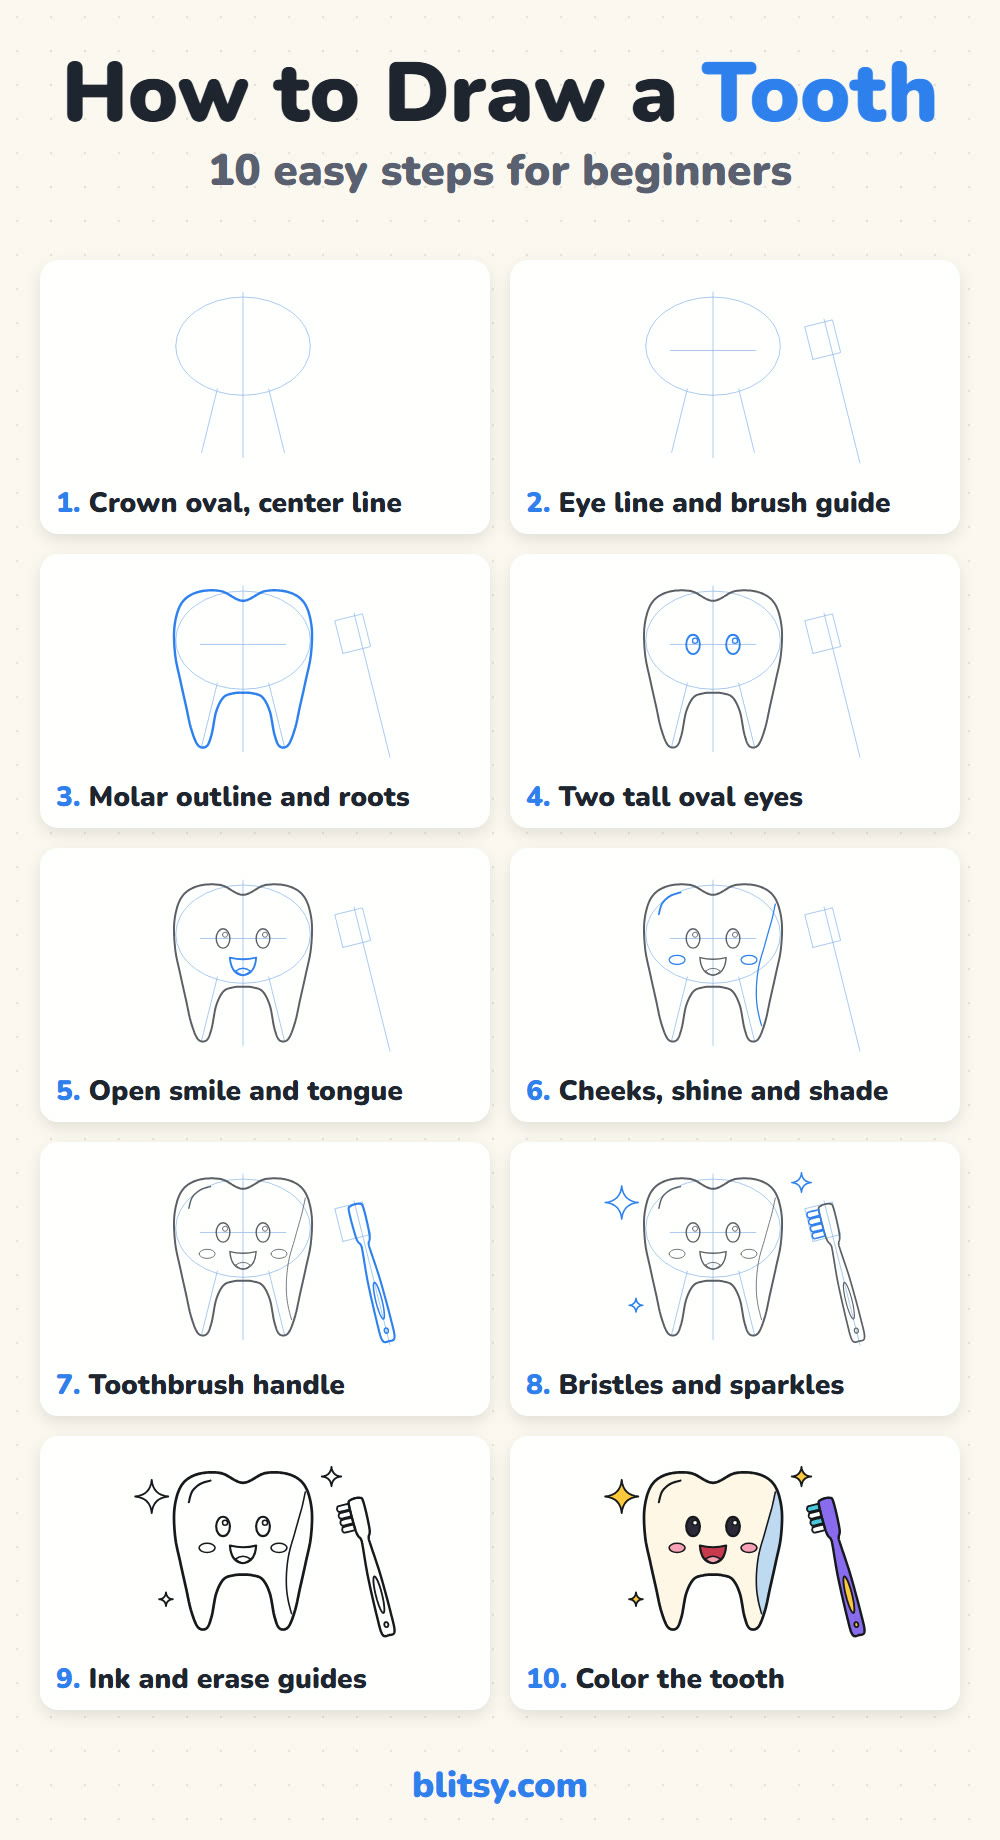
Each picture adds something new, and that new part is drawn in blue. Gray lines are what you drew in earlier steps. The pale blue guides at the start are only helpers, so draw them softly because they disappear in step 9.
Quick overview
⏱️ Time: around 20 minutes
🎯 Level: easy, fine for kids from about 6
✏️ Steps: 10
🦷 You'll draw: a smiling cartoon molar, a toothbrush and three sparkles
Pencils and Pens for a Happy Tooth
- A regular pencil you can press softly
- A soft eraser that won't smudge
- A black felt tip or fineliner
- Colored pencils: cream or pale yellow, light blue, pink, red, purple, yellow and turquoise
- Plain paper, held sideways
- A ruler for the guide lines, though freehand works too
A white tooth on white paper needs very little coloring, so even a small pencil set will do.
How to Draw a Tooth Step by Step
Step 1: Sketch a crown oval and the root lines
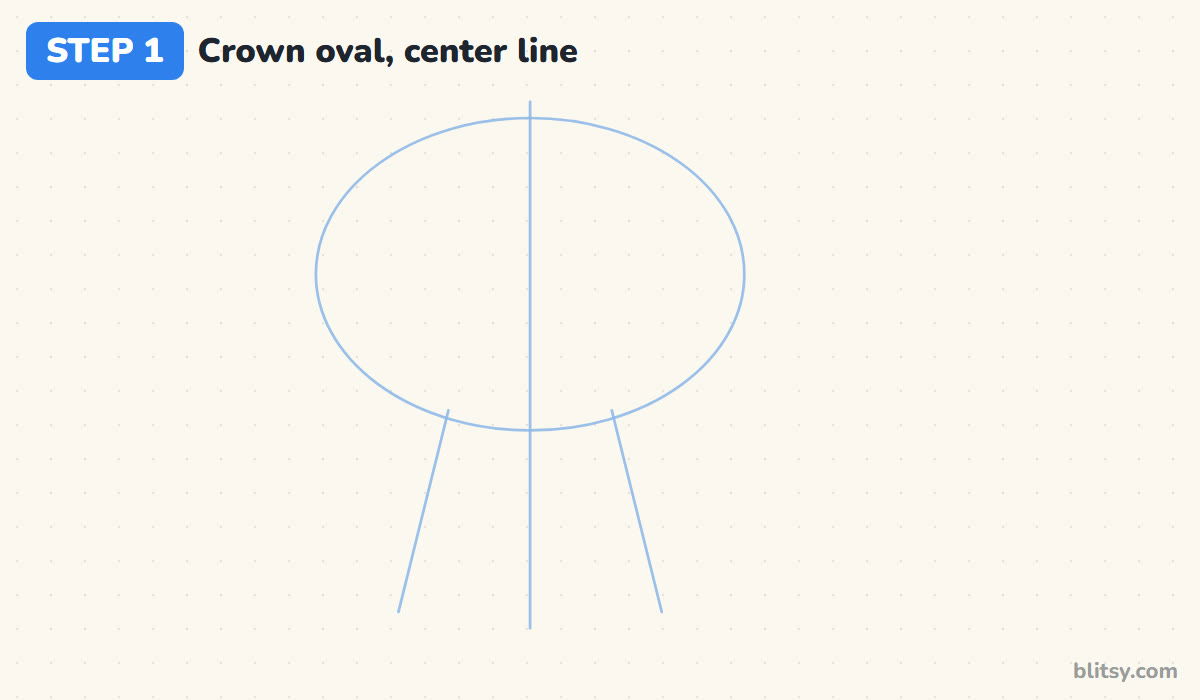
Start with a wide oval on the left half of the page, a little wider than it is tall. This will become the crown, the chewing part of the tooth. Draw a straight line down through its middle and keep going below the oval. Then add two slanted lines under the oval, one on each side of the center line, leaning slightly outward. Those two lines show where the roots will go.
💡 Tip: Keep the oval away from the right side of the paper. The toothbrush needs that space later.
Step 2: Add an eye line and a toothbrush guide
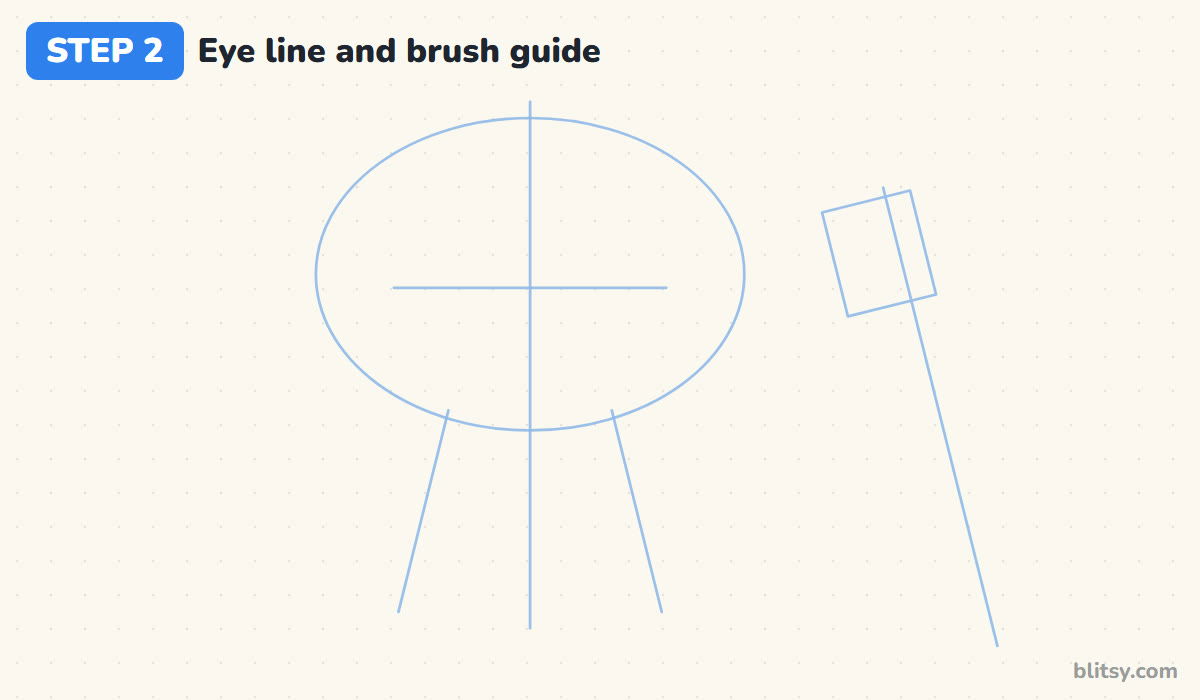
Draw a short level line across the oval, just below its middle. The eyes will sit on it. Over on the right, draw a long slanted line for the toothbrush handle, tipping its top toward the tooth. Finish with a small tilted box at the top of that line for the brush head. I like the brush leaning in a bit, because it looks like it's about to start scrubbing.
💡 Tip: Make the brush line a little shorter than the whole tooth so it doesn't look like a broom.
Step 3: Draw the molar outline with two roots
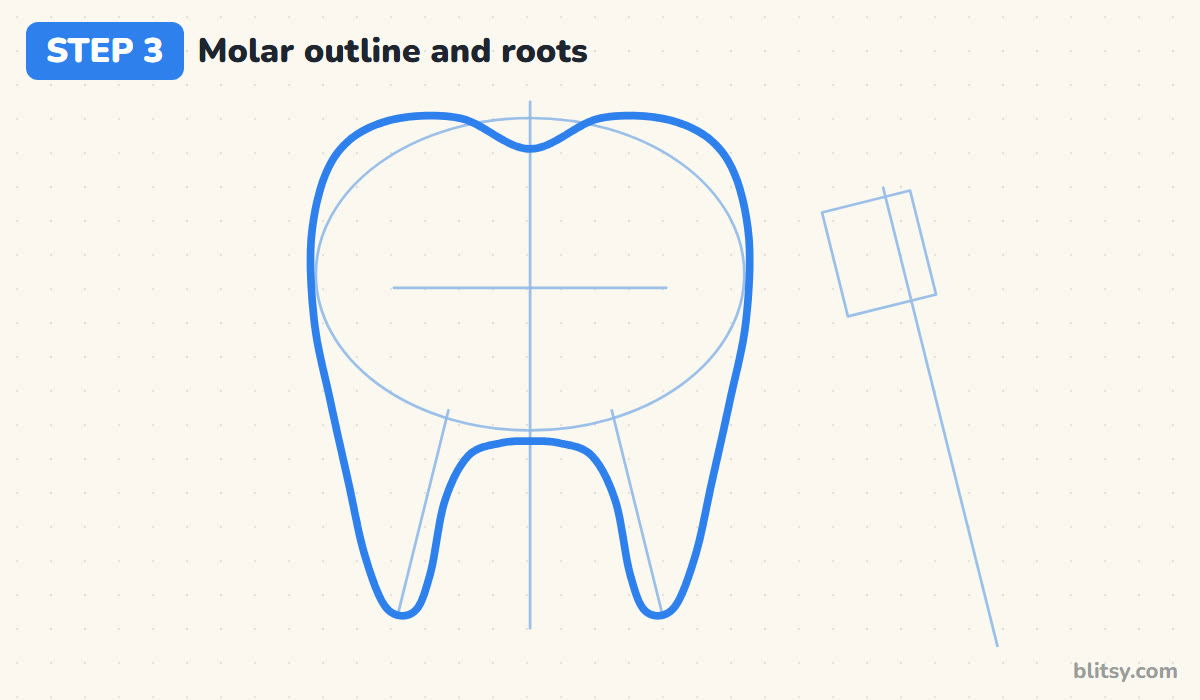
This is the most important line, so take it slowly. At the top, draw two soft bumps with a small dip in the middle, right on the center line. Let the sides run down along the oval and then narrow into two roots that follow your slanted lines. Round off each root tip, and join the roots with an arch that looks like an upside-down U. When I teach this, I tell kids the bottom looks like a pair of short legs.




💡 Tip: Make the dip between the two top bumps shallow. A deep notch turns the tooth into a heart.
Step 4: Add two tall oval eyes
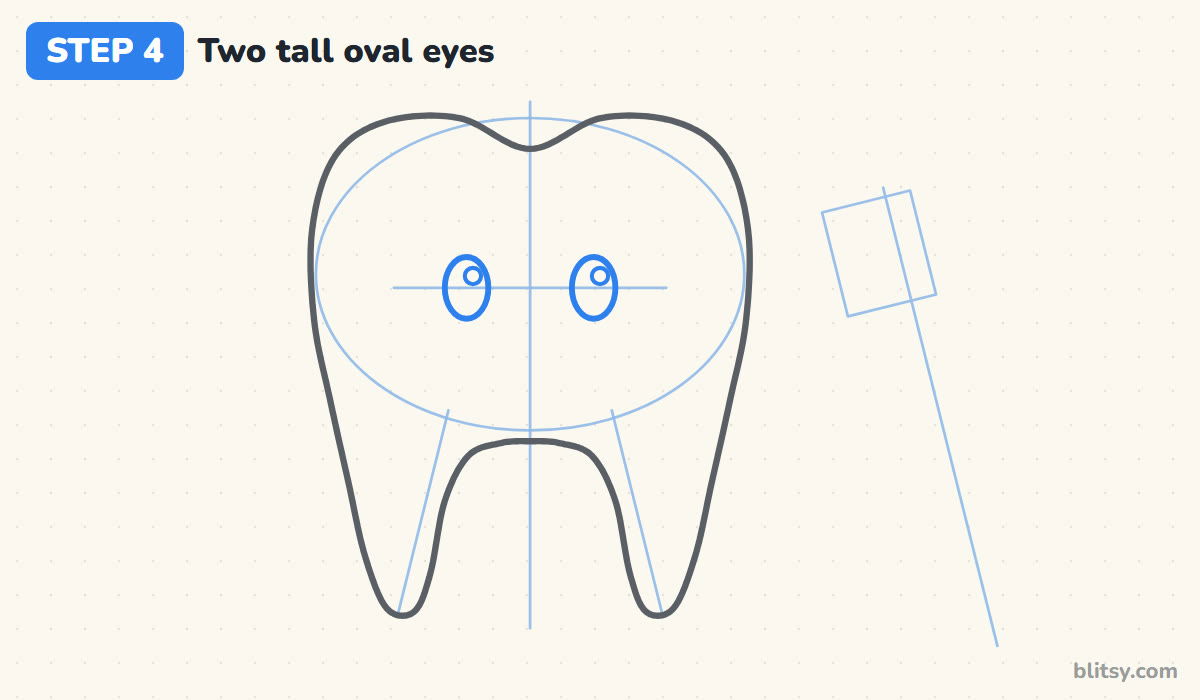
Place two ovals on the eye line, standing up tall rather than lying flat. Leave a gap between them about as wide as two eyes, so the face doesn't look cross-eyed. Inside each eye, near the top right, draw a small circle for the shine. Putting both shines on the same side makes the eyes look like they're catching the light from one window.
💡 Tip: Big eyes set low on the crown make the tooth look young and friendly.
Step 5: Give the tooth an open smile
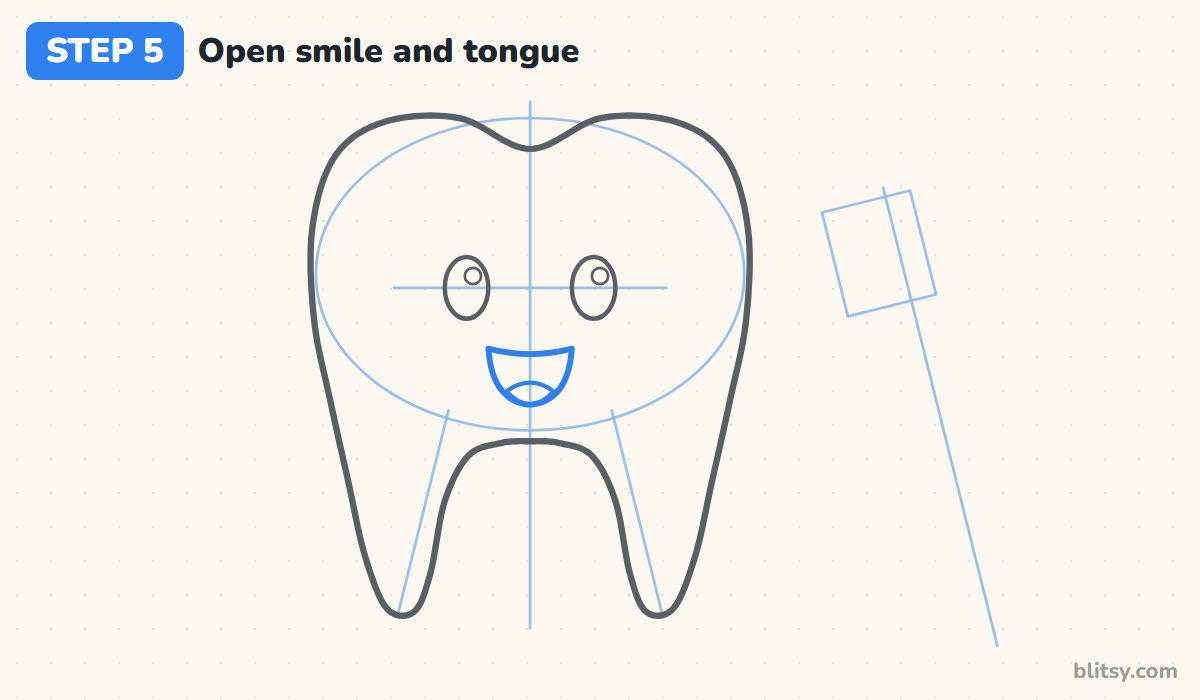
Right under the eyes, between them, draw a gentle curve for the top of the mouth. Hang a deep U shape from both ends of that curve, so the mouth looks like a wide open grin. Now add the tongue as a small hill along the bottom of the mouth. Keep the whole mouth narrower than the space between the outer edges of the eyes, or it will swallow the face.
💡 Tip: Start the U a bit inside the ends of the top curve so the corners stay rounded.
Step 6: Draw cheeks, a shine and the shading line
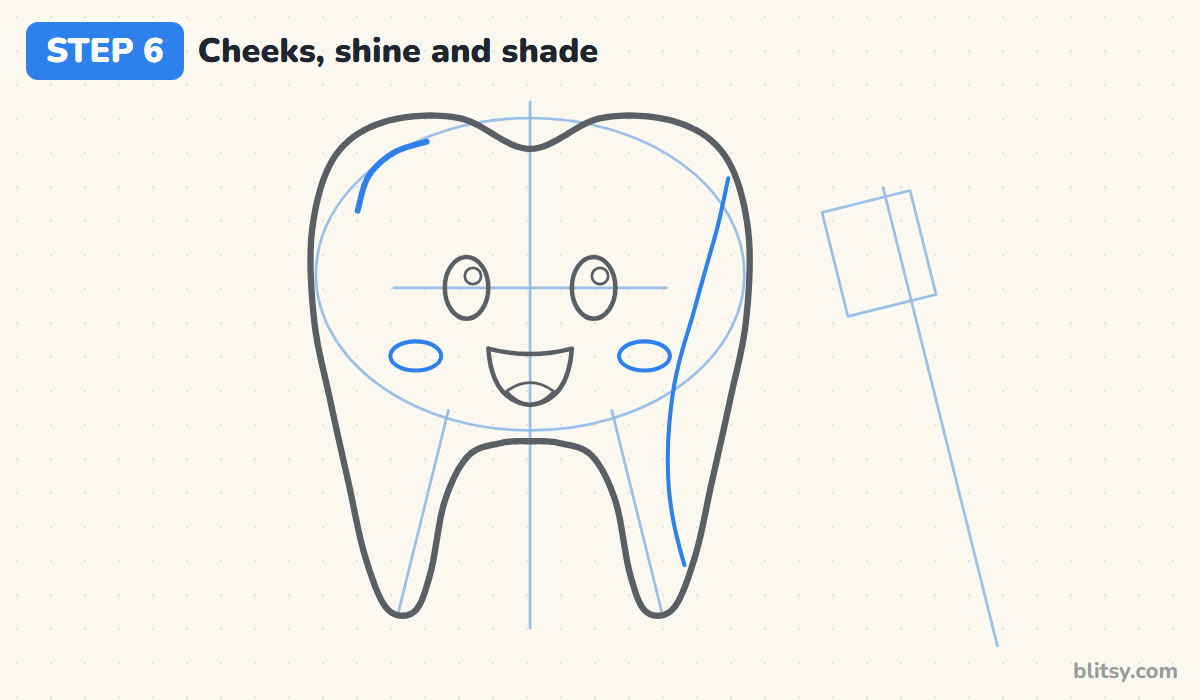
Put a small flat oval under each eye, a little to the outside, for the cheeks. Next, draw a curved shine line inside the top left bump, following the edge of the tooth. On the right side, draw a long gentle curve from the top shoulder down into the right root. The strip between that curve and the outline is the shadow side, and it makes a flat drawing look rounded.
💡 Tip: Stop the shading curve before it touches a cheek, so the face stays clear.
Step 7: Draw the toothbrush handle
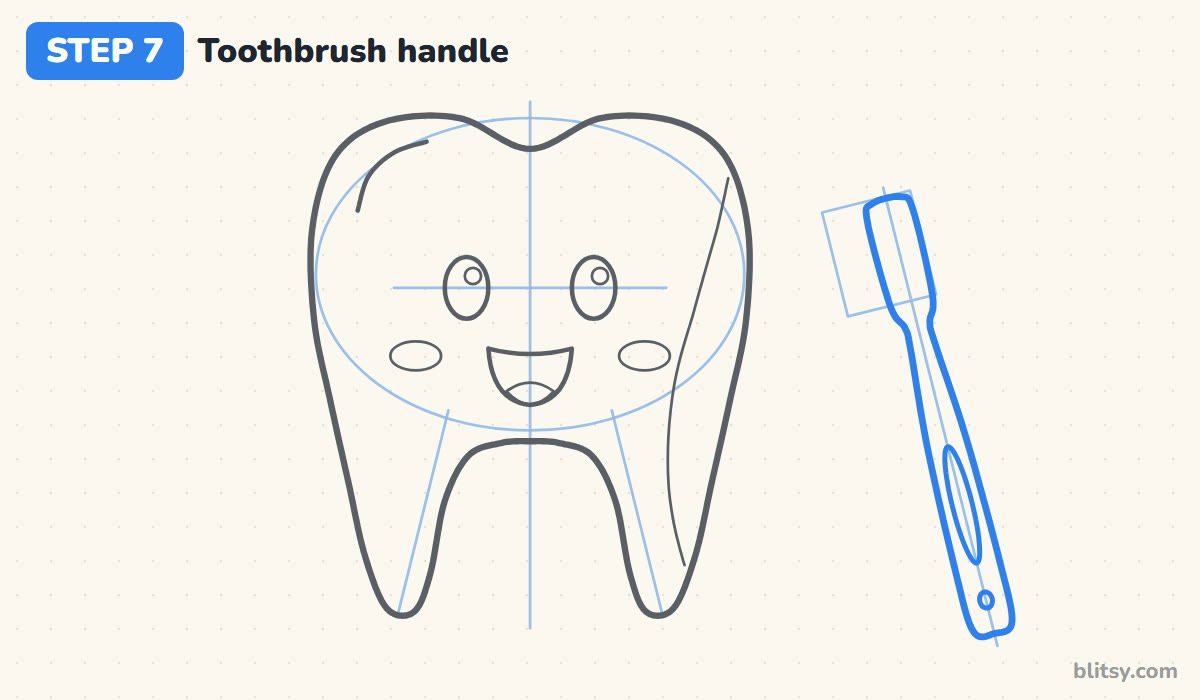
Use the slanted guide to draw the handle. Make it a long rounded shape that is wider at the bottom, gets slimmer just below the head, then widens again for the head itself. Add a long thin oval in the lower part for the rubber grip, and a tiny circle near the end. Honestly, the narrow neck is the part people forget, and without it the brush looks like a stick.



💡 Tip: Draw both sides of the handle at once, left then right, so the width stays even.
Step 8: Add the bristles and three sparkles
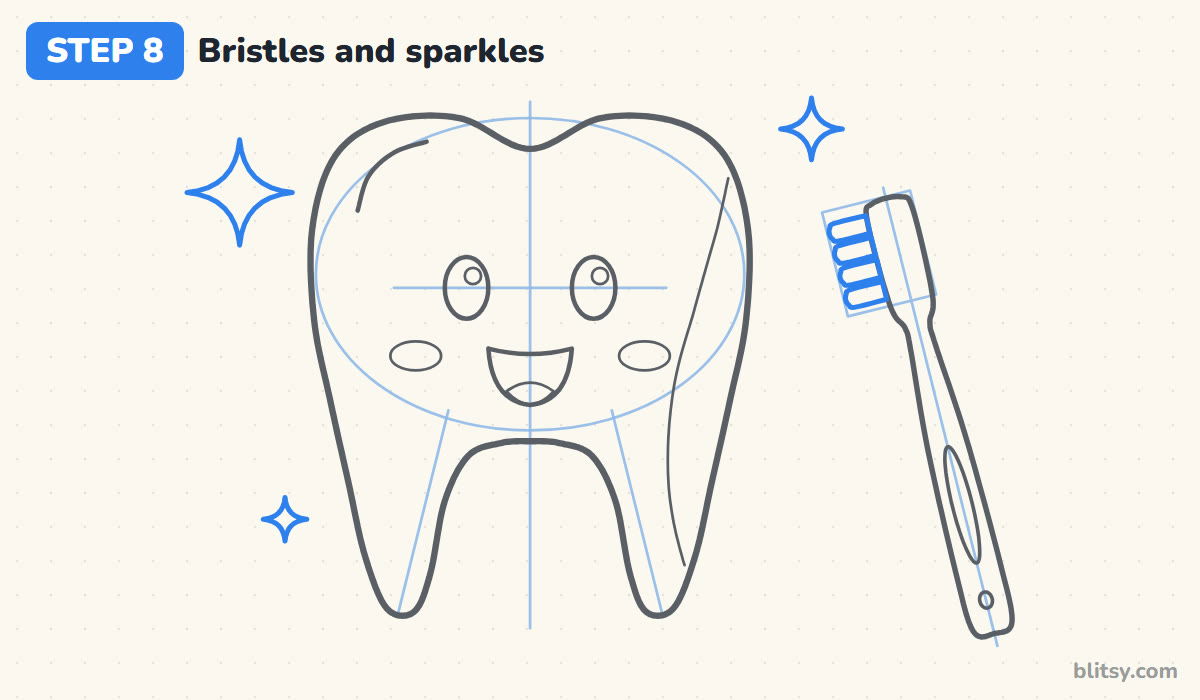
On the side of the brush head that faces the tooth, draw four short rounded tufts stacked one above the other. Small gaps between them keep the bristles looking separate. Then draw three four-pointed stars around the tooth: a big one at the upper left, a medium one near the brush and a tiny one low on the left. Each star has four points with sides that curve inward.
💡 Tip: Draw each star as a plus sign first, then connect the tips with inward curves.
Step 9: Ink every keeper line and erase the guides
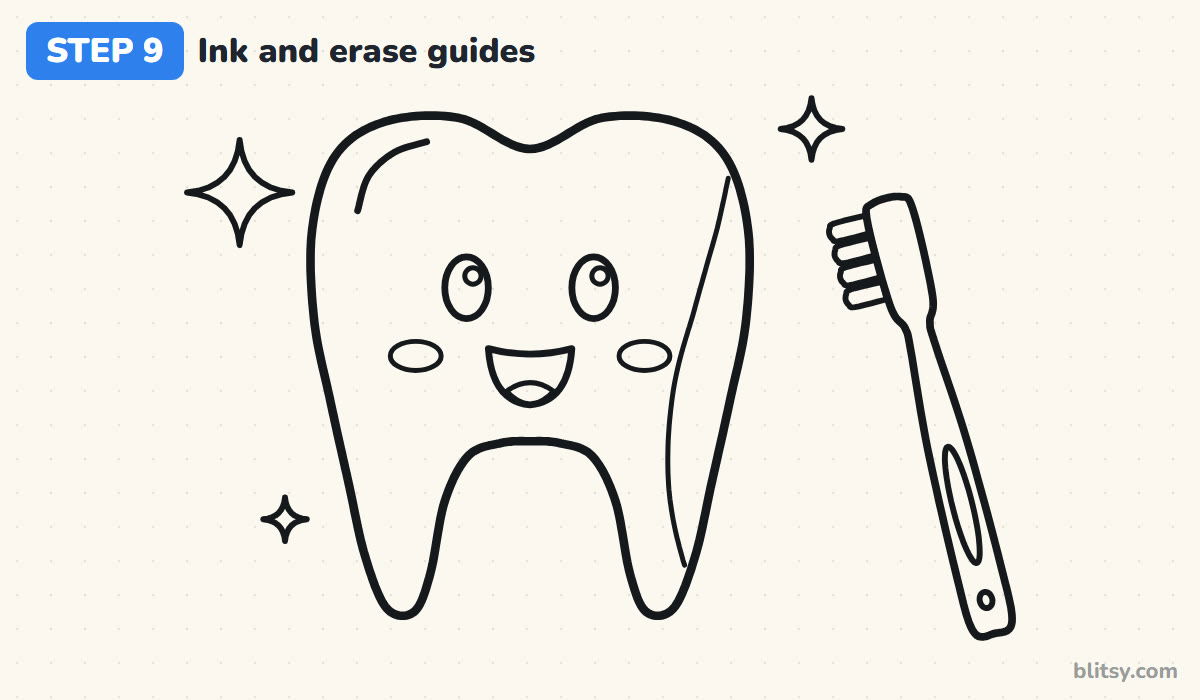
Trace over the tooth, face, cheeks, shine, shading line, toothbrush and stars with your black pen. Leave out the oval, the center line, the eye line, the root lines and the brush guide. Give the ink a minute to dry. Then erase all the pencil guides and your tooth will suddenly look clean and finished.
💡 Tip: Go over the tooth outline a second time so it's the thickest line on the page.
Step 10: Color the tooth and the toothbrush
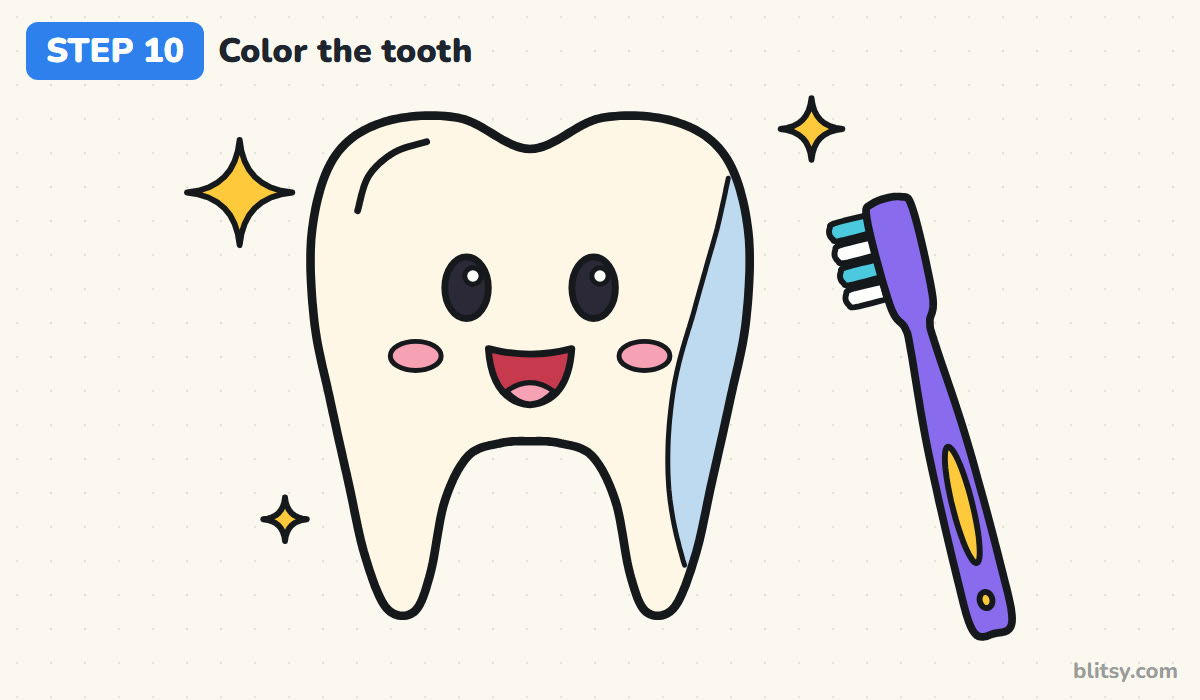
Shade the tooth with a soft cream or very pale yellow, and fill the strip on the right with light blue. Color the cheeks and tongue pink, the mouth red and the eyes black, leaving the little shine circles white. For the brush, I go with purple for the handle, yellow for the grip and turquoise on two of the tufts. The sparkles look best in the same yellow.
💡 Tip: Press very lightly on the cream. A heavy layer makes a healthy tooth look stained.
Tooth Shapes That Come Out Wonky
- Roots that are too long. Long roots make the tooth look like it's standing on stilts. Keep them about as long as the crown is tall, or a little shorter.
- A deep V at the top. A sharp dip between the bumps reads as a heart. A shallow, rounded dip keeps it clearly a molar.
- The face placed too high. Eyes near the top leave a big empty chin. Keep them just below the middle of the crown.
- Roots that pinch together. If the arch between the roots is too narrow, the bottom looks like one thick leg. Follow the two slanted guides so the roots spread apart.
- Coloring the whole tooth bright yellow. Yellow makes it look like it needs a dentist. Use cream, or leave it white and let the blue shading do the work.
Fun Twists on a Cartoon Tooth
After one smiling molar, try giving it a different mood. Swap the grin for a wobbly frown and a bandage for a sore tooth, or add a crown and a cape for a superhero tooth that fights sugar bugs. You can also line up a row of teeth for a big toothy grin. If you enjoy drawing faces with feelings, this step-by-step emoji tutorial is great practice, and the human heart drawing tutorial makes a good next body-part challenge.
Smiling Tooth Coloring Page and Step Guide PDF
Want to draw away from the screen? The tooth coloring page shows a small finished example and a color key at the top, with a big bold outline underneath that's ready for crayons or pencils. The step-by-step PDF guide holds all 10 steps and their tips. Both print well on Letter or A4 paper.
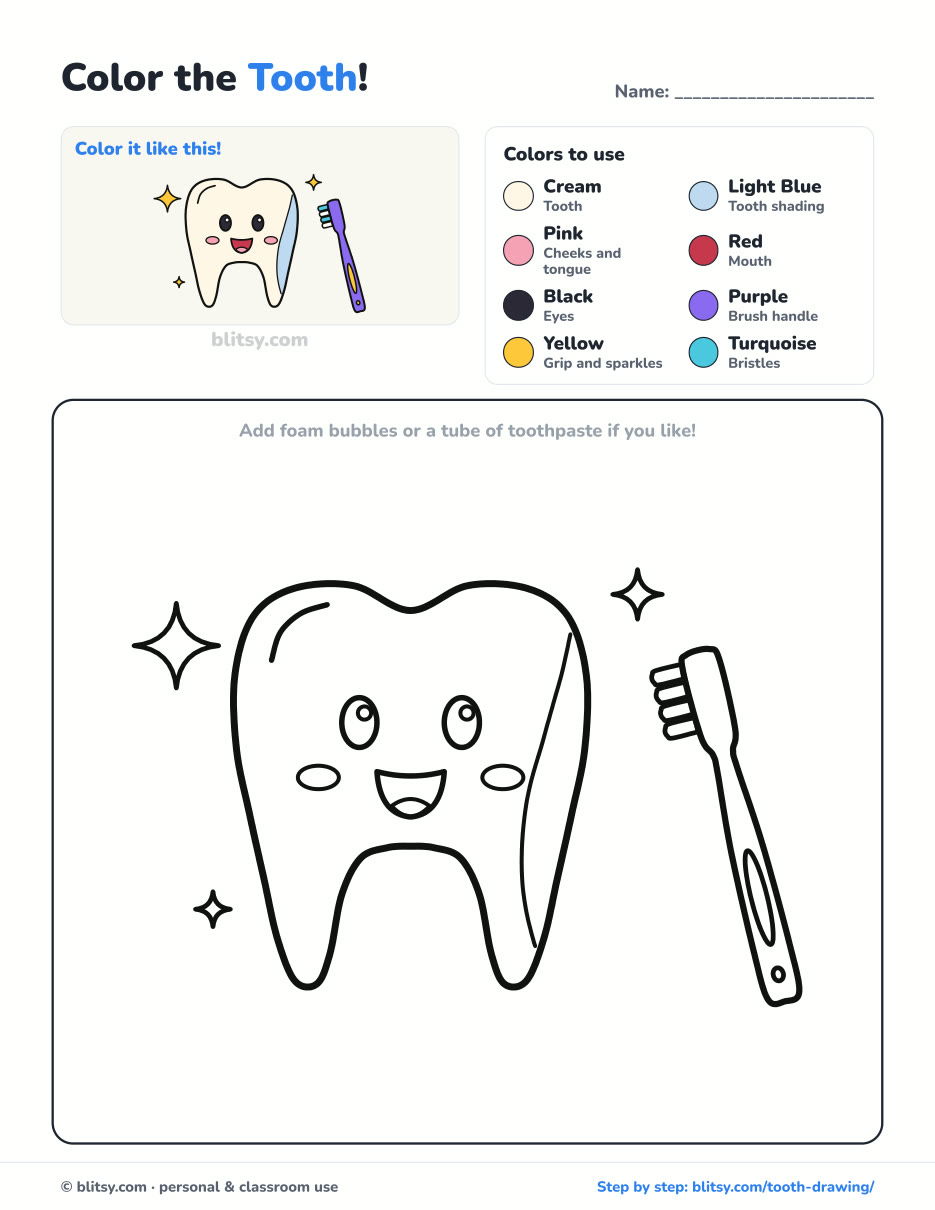
Black outlines with a colored example and the color names at the top. Ready to print and color.
⬇️ Download Coloring Page
Every step picture with its instructions and tips, to keep beside your paper while you draw.
⬇️ Download Drawing Guide📱 On a phone? Tap a download button, then open the file and choose Share → Save to Files or Print. On a computer, the PDF opens or saves straight to your Downloads folder.
Pin the Molar Lesson for Brushing Time
From One Tooth to a Whole Smile: More Tutorials
Each link below is a complete step-by-step tutorial, so the faces, bodies and diagrams are all broken into small steps.
- Emoji Drawing: Three yellow faces, one smiling, one in love and one giggling, grow from the same circles in this emoji drawing tutorial.
- Braid Drawing: Learn how to draw a braid step by step, starting from a single zig-zag and ending with a pink hair tie.
- Baby Drawing: A baby with one curl of hair and a rattle held high is the goal of this easy baby drawing tutorial.
- Lungs Drawing: Stay with the body and draw pink lungs, a pale blue trachea and a branching airway with the lungs drawing step by step diagram.
- Woman Drawing: The woman drawing tutorial begins by marking six head lengths, then builds the figure on top of them.
- Human Heart Drawing: Draw a textbook-style heart with its aorta and blue vessels in this how to draw a human heart lesson.
- Skeleton Drawing: A cheerful skeleton standing on his own shadow takes 12 steps in this skeleton drawing tutorial.
- Realistic Drawing: See how real light falls on a round shape with the realistic apple drawing tutorial.
- Male Face Drawing: Every feature sits on a guide line you draw yourself in this male face drawing step by step lesson.
- Mother and Daughter Drawing: Draw a mother and daughter hand in hand under a heart with the mother and daughter drawing tutorial.
- Smile Drawing: Your tooth already grins, so the how to draw a smile tutorial is a good next step: one big grin plus three variations.
- Chalk Art: Take your drawing outside with this chalk art step by step lesson for a hopscotch, a rainbow and a sun.
- Family Drawing: Four people, a puppy and a red balloon come from the same simple shapes in this family drawing tutorial.
- Fairy Drawing: Seat a little fairy on a spotted red toadstool with the how to draw a fairy step by step guide.
Quick Answers About Drawing Teeth
What is the easiest way to draw a tooth?
Draw a wide oval, give it two soft bumps on top and two short rounded roots at the bottom. That outline alone already looks like a molar.
How many roots should a tooth drawing have?
Front teeth have one root and back molars usually have two or three. For a cartoon molar, two roots read best and are easy to draw.
How do I make a tooth drawing look cute?
Use big tall eyes set low, a wide open smile and pink cheeks. A little sparkle or a toothbrush beside it adds a clean, happy feeling.
What color should I use for a tooth?
Leave it white or use a very pale cream, then add light blue on one side for shading. Gray or blue shadows look cleaner than yellow ones.
Show your sparkling molar to someone who just brushed, and see if they can name the tooth it's based on. 🦷
Related posts:
 How to Draw Springtrap Step by Step (Cute Chibi for Kids)
 How to Draw a Care Bear Step by Step (Cute Fan Art for Kids)
 Halloween Drawing Step by Step (Cute Haunted House for Kids)
 How to Draw an Owl Step by Step (Cute Night Owl)
 How to Draw an Axolotl Step by Step (Cute and Easy)
 How to Draw Cute Animals Step by Step (Cat, Bear & Bunny)
 How to Draw an Octopus Step by Step (Cute and Easy)
 How to Draw a Frog Step by Step (Cute Frog on a Log)
 How to Draw a Jellyfish Step by Step (Cute, Easy Guide)
 How to Draw a Grim Reaper Step by Step (Cute Halloween)
 How to Draw Cerberus Step by Step (Cute and Easy)
 How to Draw a Monster Step by Step (Cute and Easy)

