
Snow leopards spend their days lounging on cold rocky ledges, and that sleepy pose is one of the easiest big cat poses to draw. In this lesson you'll see how to draw a snow leopard step by step, lying on a slab of rock with its huge tail curled in front. The fur is pale, so most of the character comes from the spots and a little gray-blue shading.
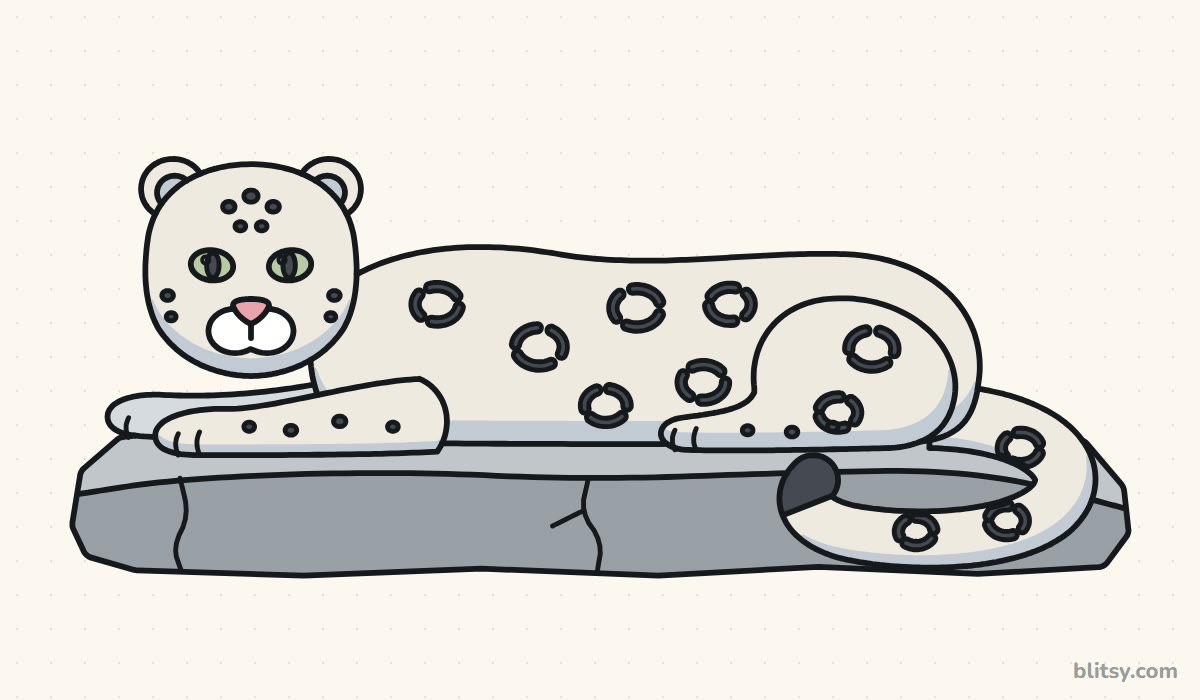
Snow leopard pictures below follow one simple code: blue marks what you draw in that step, gray shows the work already done, and the pale blue construction shapes vanish when you ink in step 11.
Quick overview
⏱️ Time: about 35 to 45 minutes, coloring included
🎯 Level: easy to medium, good for kids from about 8
✏️ Steps: 12
🐆 You'll draw: a snow leopard lying on a rock, with rosette spots and a thick tail curled along the stone
Gear for a Mountain Cat Sketch
- A regular HB pencil for the guide shapes
- An eraser, ideally a kneaded one that won't scuff the paper
- A black fineliner or thin marker for the final lines
- Colored pencils: cream or very light tan, light blue-gray, dark gray, two grays for the rock, pale green and pink
- A sheet of paper turned the long way (landscape)
If you only own a gray pencil and a black pen, that's enough, because a snow leopard is nearly a black and white animal anyway.
How to Draw a Snow Leopard Step by Step
Step 1: Start with a head circle and a cross

Turn the paper sideways and sketch a circle near the upper left, about a fifth of the page wide. Draw a vertical line through the middle, then a slightly curved line across it, a bit above the center. That curve is where the eyes go.
💡 Tip: Hold the pencil far back from the tip. You'll press more gently without trying.
Step 2: Add the body and hip guides
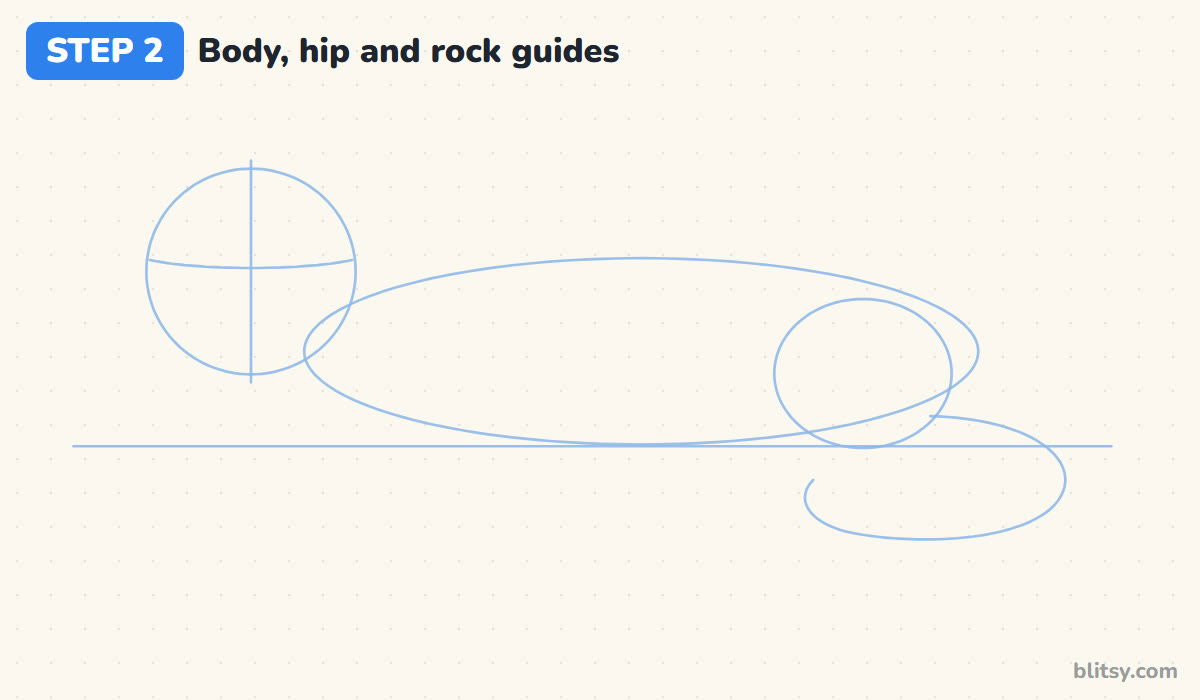
Sketch a long, flat oval to the right of the head, overlapping its lower edge, roughly three times as long as the head. At the far end, draw a smaller circle for the hip. Run a straight line under everything for the rock top, and add a looping curve below the hip for the tail.
💡 Tip: A lying cat is long and low. If your oval looks tall, stretch it sideways before going on.
Step 3: Draw the round head and small ears
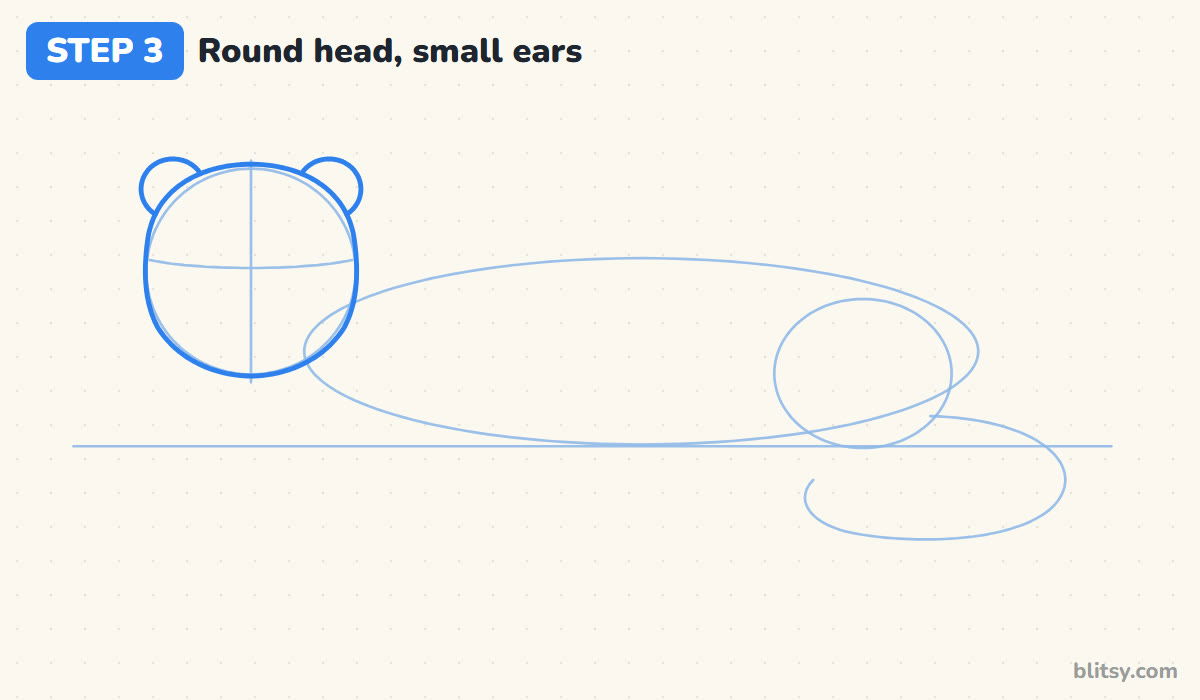
Go over the head circle, letting the cheeks bulge out a little below the cross line. Then put two small half circles on top, set wide apart. I keep these ears tiny on purpose. Snow leopards have short, rounded ears, and big pointed ones would turn this into a house cat.



💡 Tip: Compare the ears with a coin next to a plate. They should look that small against the head.
Step 4: Shape the long lying body
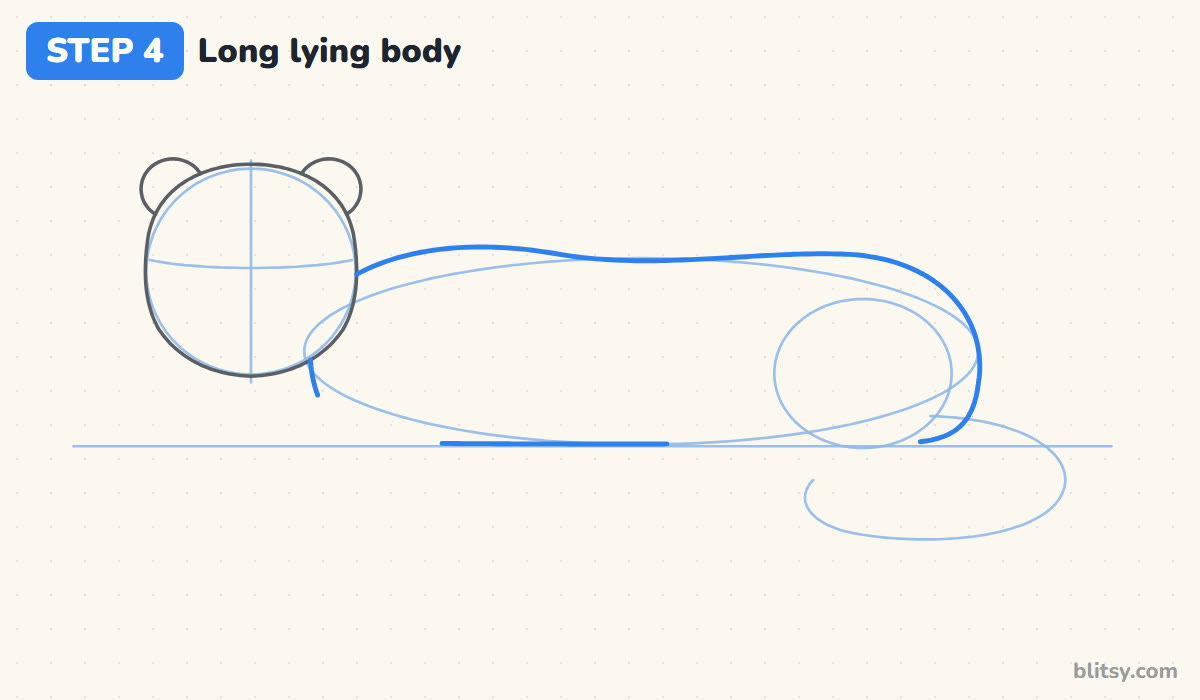
Start behind the head and draw the back along the top of the oval, with a soft bump over the shoulders and a rise toward the hip. Curve it down around the rump to the rock line. Then mark only the middle of the belly, because the legs will cover the rest.
💡 Tip: Stop the line wherever a leg will sit in front. Leaving gaps now saves erasing later.
Step 5: Stretch out the front legs and big paws
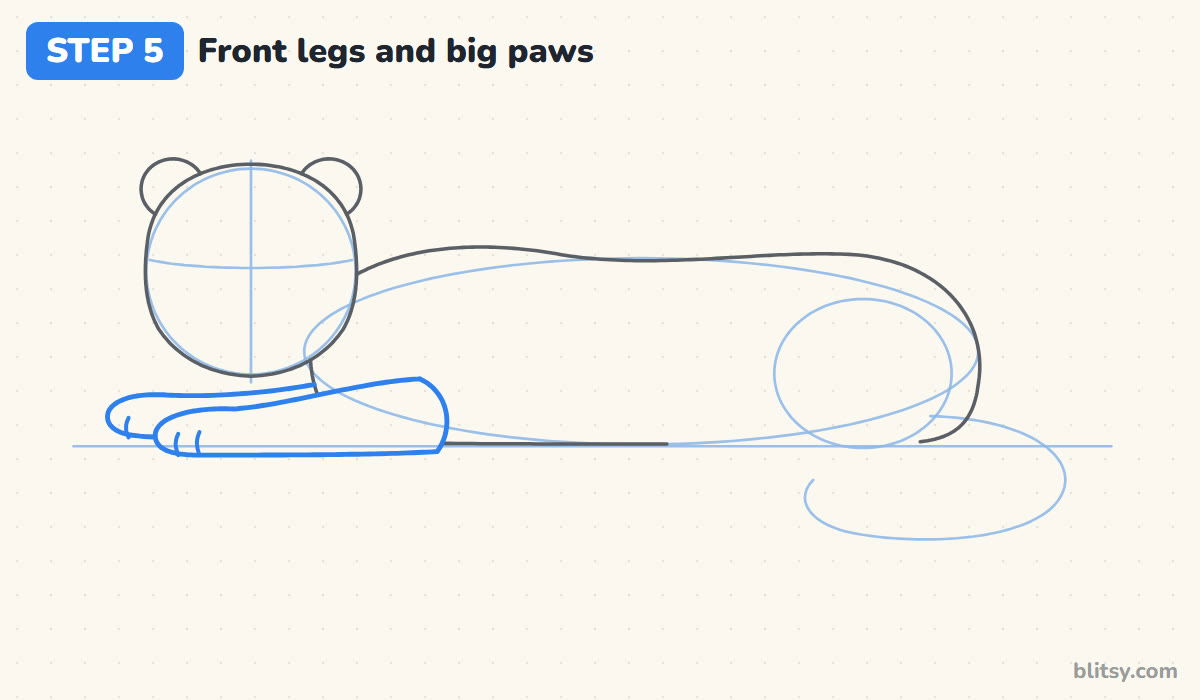
Both front legs reach forward under the chin. Draw the near leg as a thick tube ending in a wide, rounded paw on the rock line. The far leg sits just above and behind it, with its paw poking out further left. Add two toe lines on each paw.
💡 Tip: Make the paws wider than the legs. Big paws read as snowshoes, which is exactly right for this cat.
Step 6: Add the round back leg
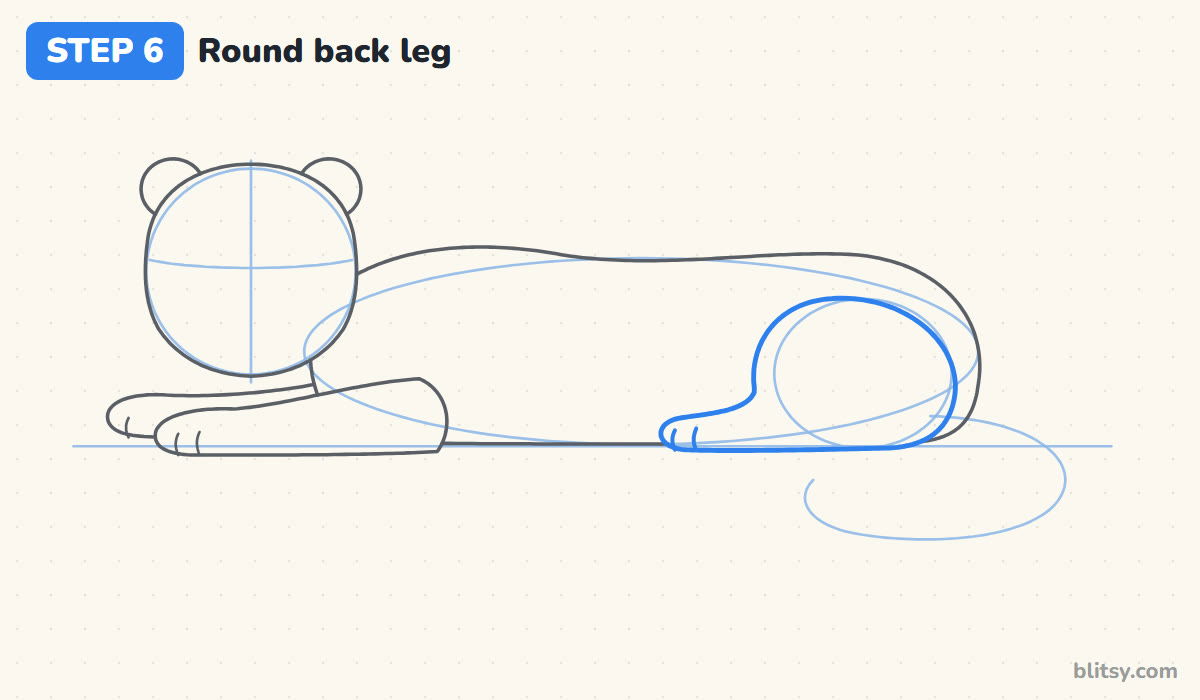
Trace the hip circle to make a big, round haunch. From its lower front edge, draw the hind foot as a long, flat shape tucked forward along the rock, with two toe lines. When a cat lies down like this, the back leg folds into almost a perfect circle.
💡 Tip: Let the haunch bulge past the back line a little. That roundness is what tells us the leg is folded.
Step 7: Draw the thick curled tail
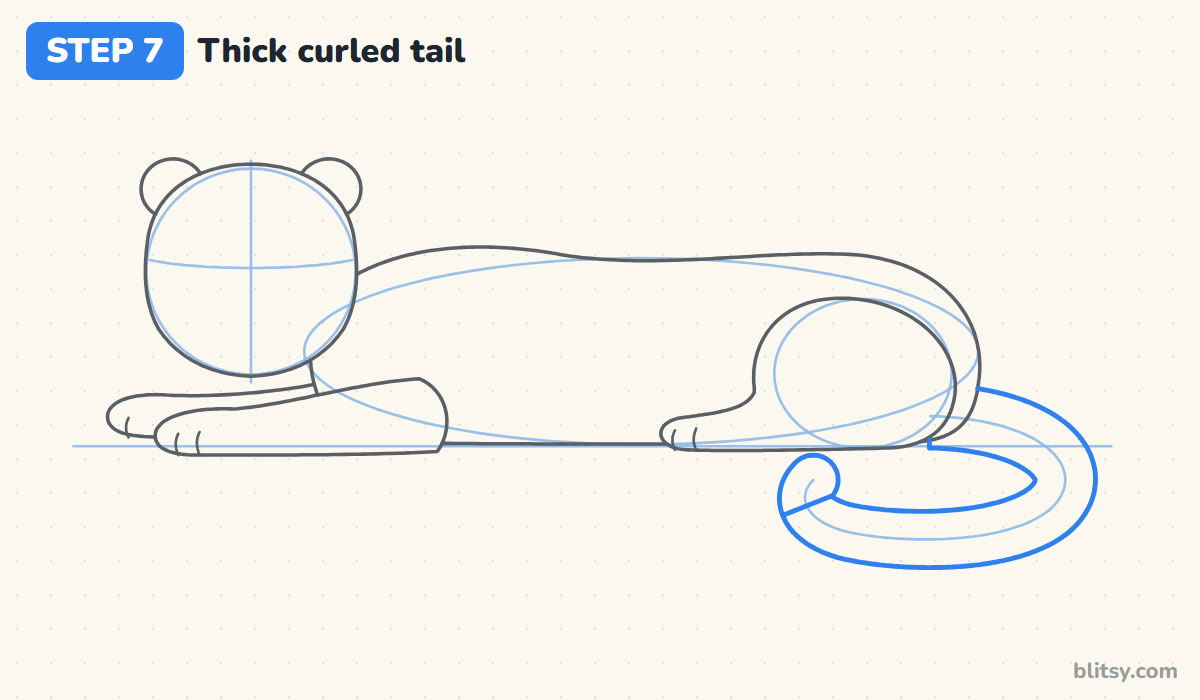
Here's the feature I always save my best attention for. From behind the haunch, draw a very fat tail that drops over the rock edge, sweeps back to the left and curls up at the tip. Keep it nearly as thick as a front leg the whole way. Mark the dark tip with a short line across the end.


💡 Tip: Use the curve guide as the middle of the tail and draw one edge on each side of it.
Step 8: Put in the face
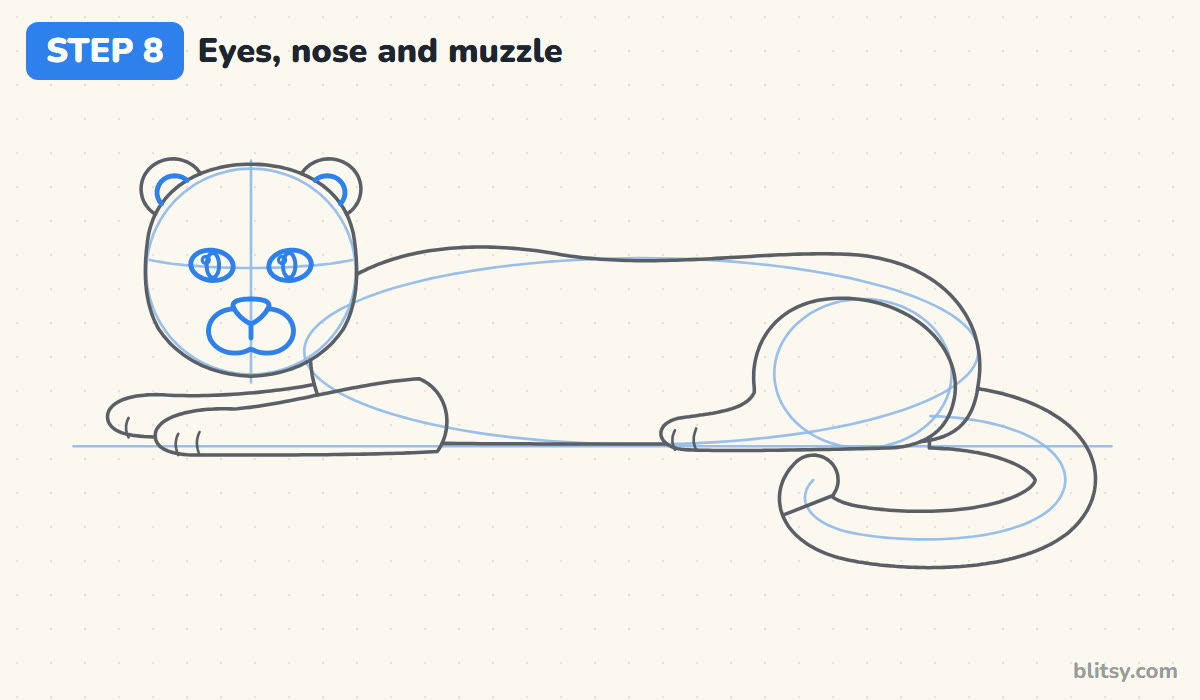
Sit two almond-shaped eyes on the cross line, each with a narrow upright pupil and a tiny shine dot. Below them, draw a rounded upside-down triangle for the nose. Under it, add two puffy muzzle shapes side by side with a short line down the middle. Finish with a smaller circle inside each ear.
💡 Tip: Leave about one eye width between the eyes. Closer than that and the face starts to look worried.
Step 9: Build the rock underneath
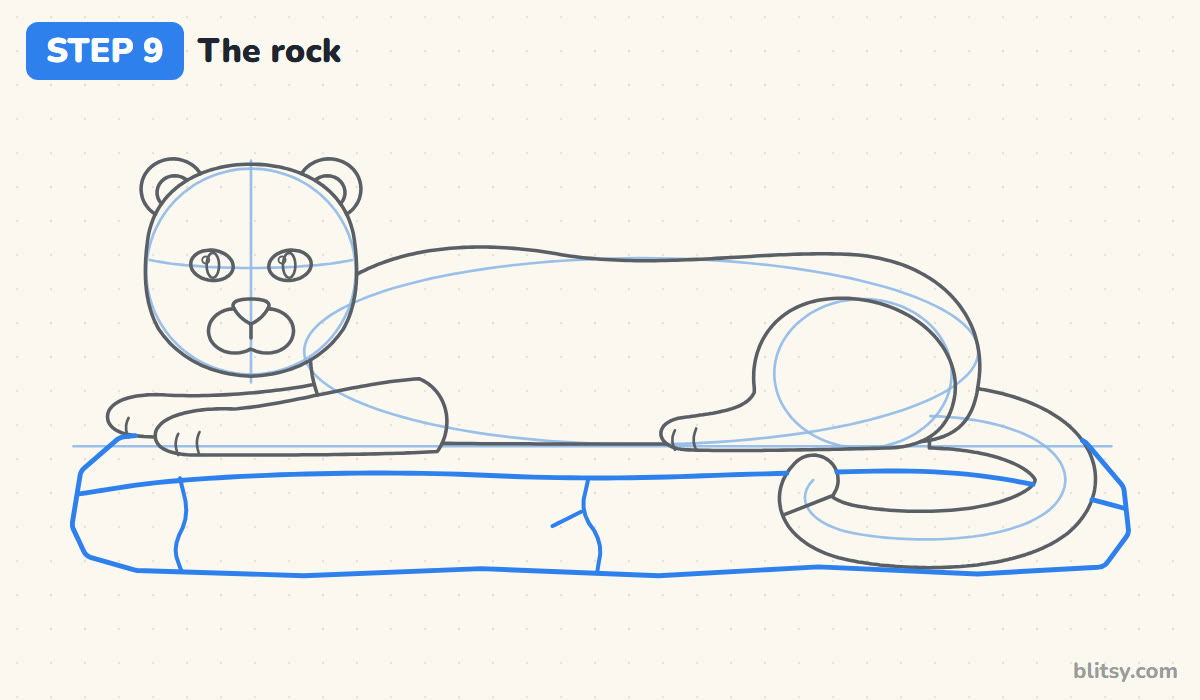
Now give your cat something to lie on. Draw a long, low slab under the body with flat sides and slightly cut corners, so it reads as stone and not a cushion. Add a line along the front for the top face, then two wobbly cracks. Stop every rock line where it meets the cat.
💡 Tip: Straight edges with a few sharp bends read as rock. Smooth curves make it look soft.
Step 10: Draw the rosettes and spots
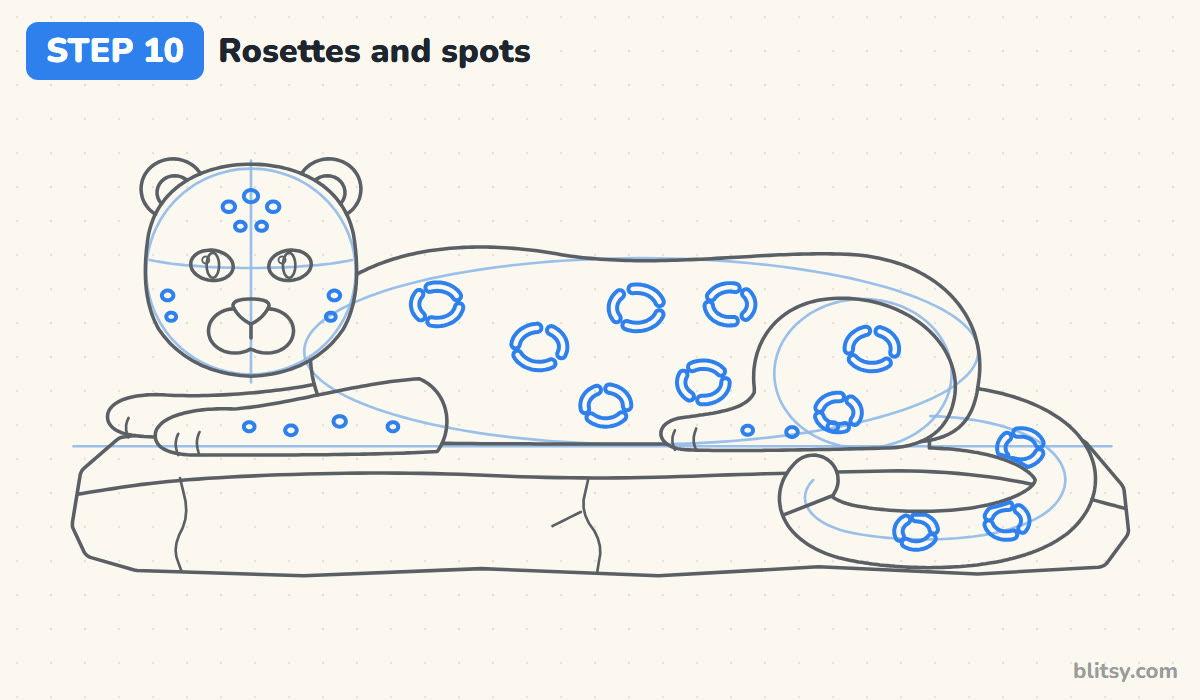
Snow leopard rosettes are open, broken rings. Draw each one as three short, thick curves arranged in a circle with small gaps. Spread six across the body, a few on the haunch and three on the tail. Dot small solid spots on the forehead, cheeks and legs. Most beginners pack too many in, so I leave plenty of plain fur between them.
💡 Tip: Vary the angle of each ring slightly. Identical rosettes in neat rows look like wallpaper.
Step 11: Ink the lines and erase the guides
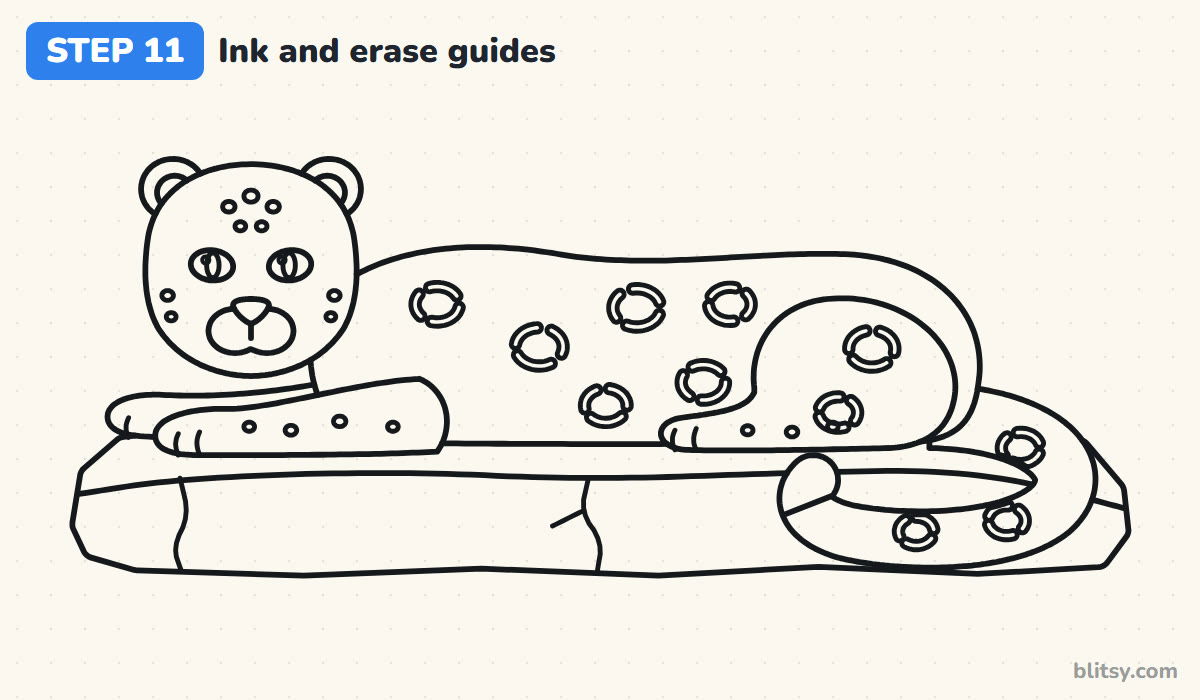
Trace every line you want to keep with the black pen, including the rosettes and the rock. Skip the circles, the oval, the rock line and the tail curve. Give the ink a full minute to dry, then erase all the pencil guides.



💡 Tip: Ink the rosettes slowly. Each little curve is short, so tiny wobbles show up more there.
Step 12: Color your snow leopard
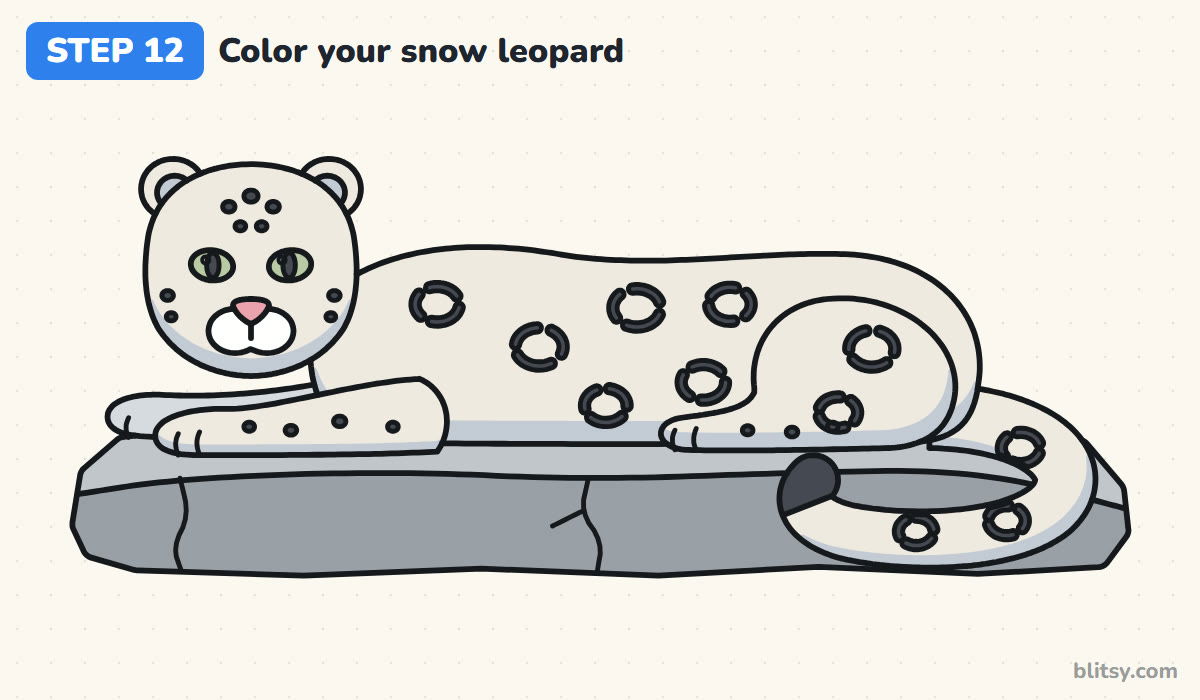
Color the fur a very light cream, then add light blue-gray along the bottom of the body, haunch, tail and chin. That cool shading makes pale fur look soft instead of blank. Fill the rosettes, spots and tail tip with dark gray. Give the eyes pale green and the nose pink, and leave the muzzle white. Use light gray for the rock top and a darker gray for its front.
💡 Tip: Color the dark rosettes last, after the cream and gray, so they stay crisp.
Why Snow Leopard Drawings Turn Into Cheetahs
- Solid round spots everywhere. Filled dots all over the body belong to a cheetah. Save the solid spots for the head and legs, and use open broken rings on the body.
- A skinny tail. A thin tail is the quickest way to lose the snow leopard look. Draw it almost as thick as a leg, right to the rounded tip.
- Big pointed ears. Tall ears make the head look like a lynx or a pet cat. I keep them small and round, set wide apart.
- Pure white fur with no shading. White against white paper disappears. A little blue-gray under the belly and chin gives the body shape.
- Rosettes jammed together. Too many rings turn into a busy pattern. Leave space between them so each one reads clearly.
Ways to Change Your Snow Leopard's Scene
Once the pose feels easy, change the setting. Draw a jagged mountain ridge behind the rock, scatter snowflakes across the sky, or tuck a small cub against its mother's paws. To compare it with its spotted cousin from warmer places, try the leopard drawing tutorial, and the tiger drawing step by step lesson shows how stripes change the same big cat body.
Snow Leopard Coloring Page and Printable Drawing Steps
Want something to hand out in class or keep on the fridge? The snow leopard coloring page shows a small colored example at the top with a key of which shades go where, and a large clean outline below to fill in. The step-by-step PDF guide collects all 12 steps and tips on a few pages. Both fit Letter and A4 paper.
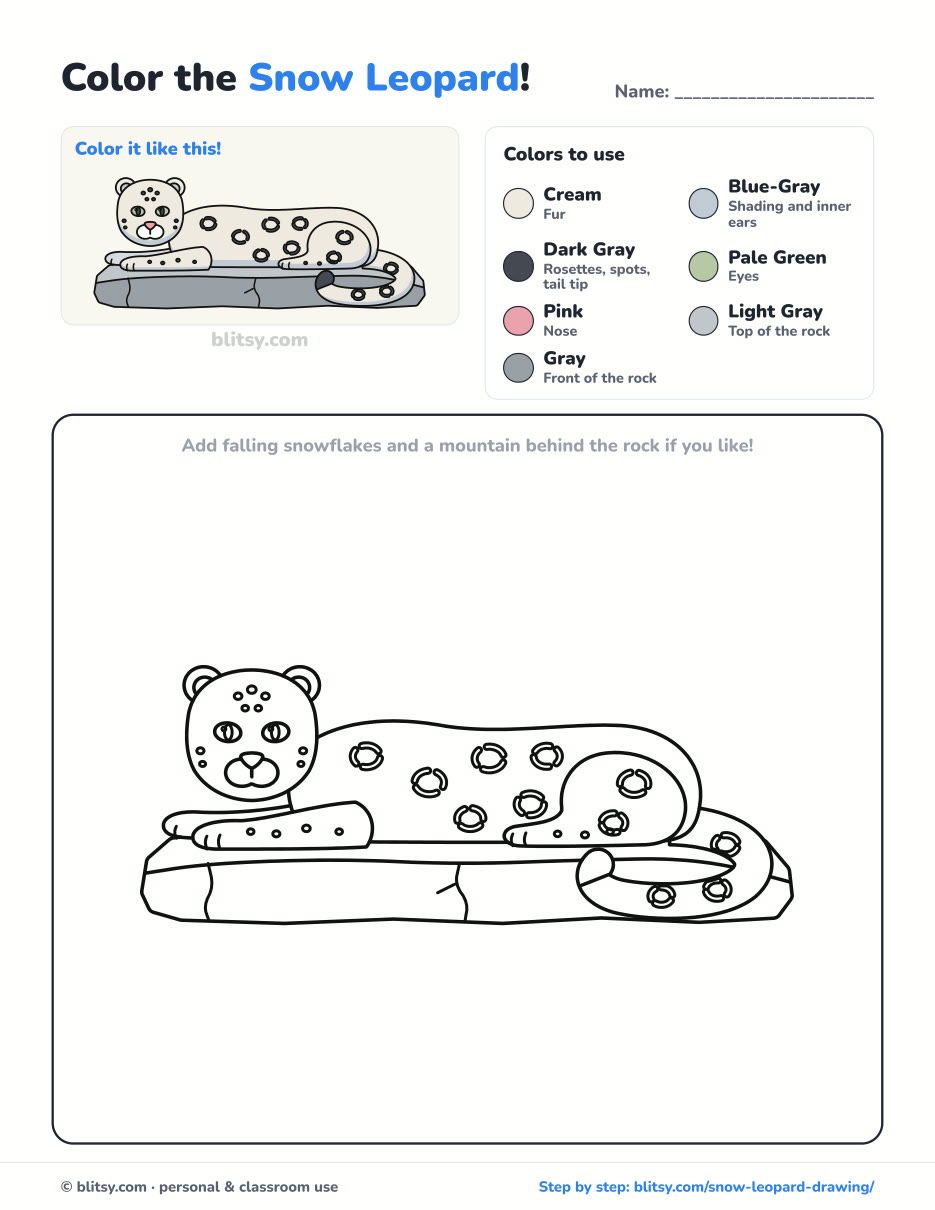
Black outlines with a colored example and the color names at the top. Ready to print and color.
⬇️ Download Coloring PageEvery step picture with its instructions and tips, to keep beside your paper while you draw.
⬇️ Download Drawing Guide📱 On a phone? Tap a download button, then open the file and choose Share → Save to Files or Print. On a computer, the PDF opens or saves straight to your Downloads folder.
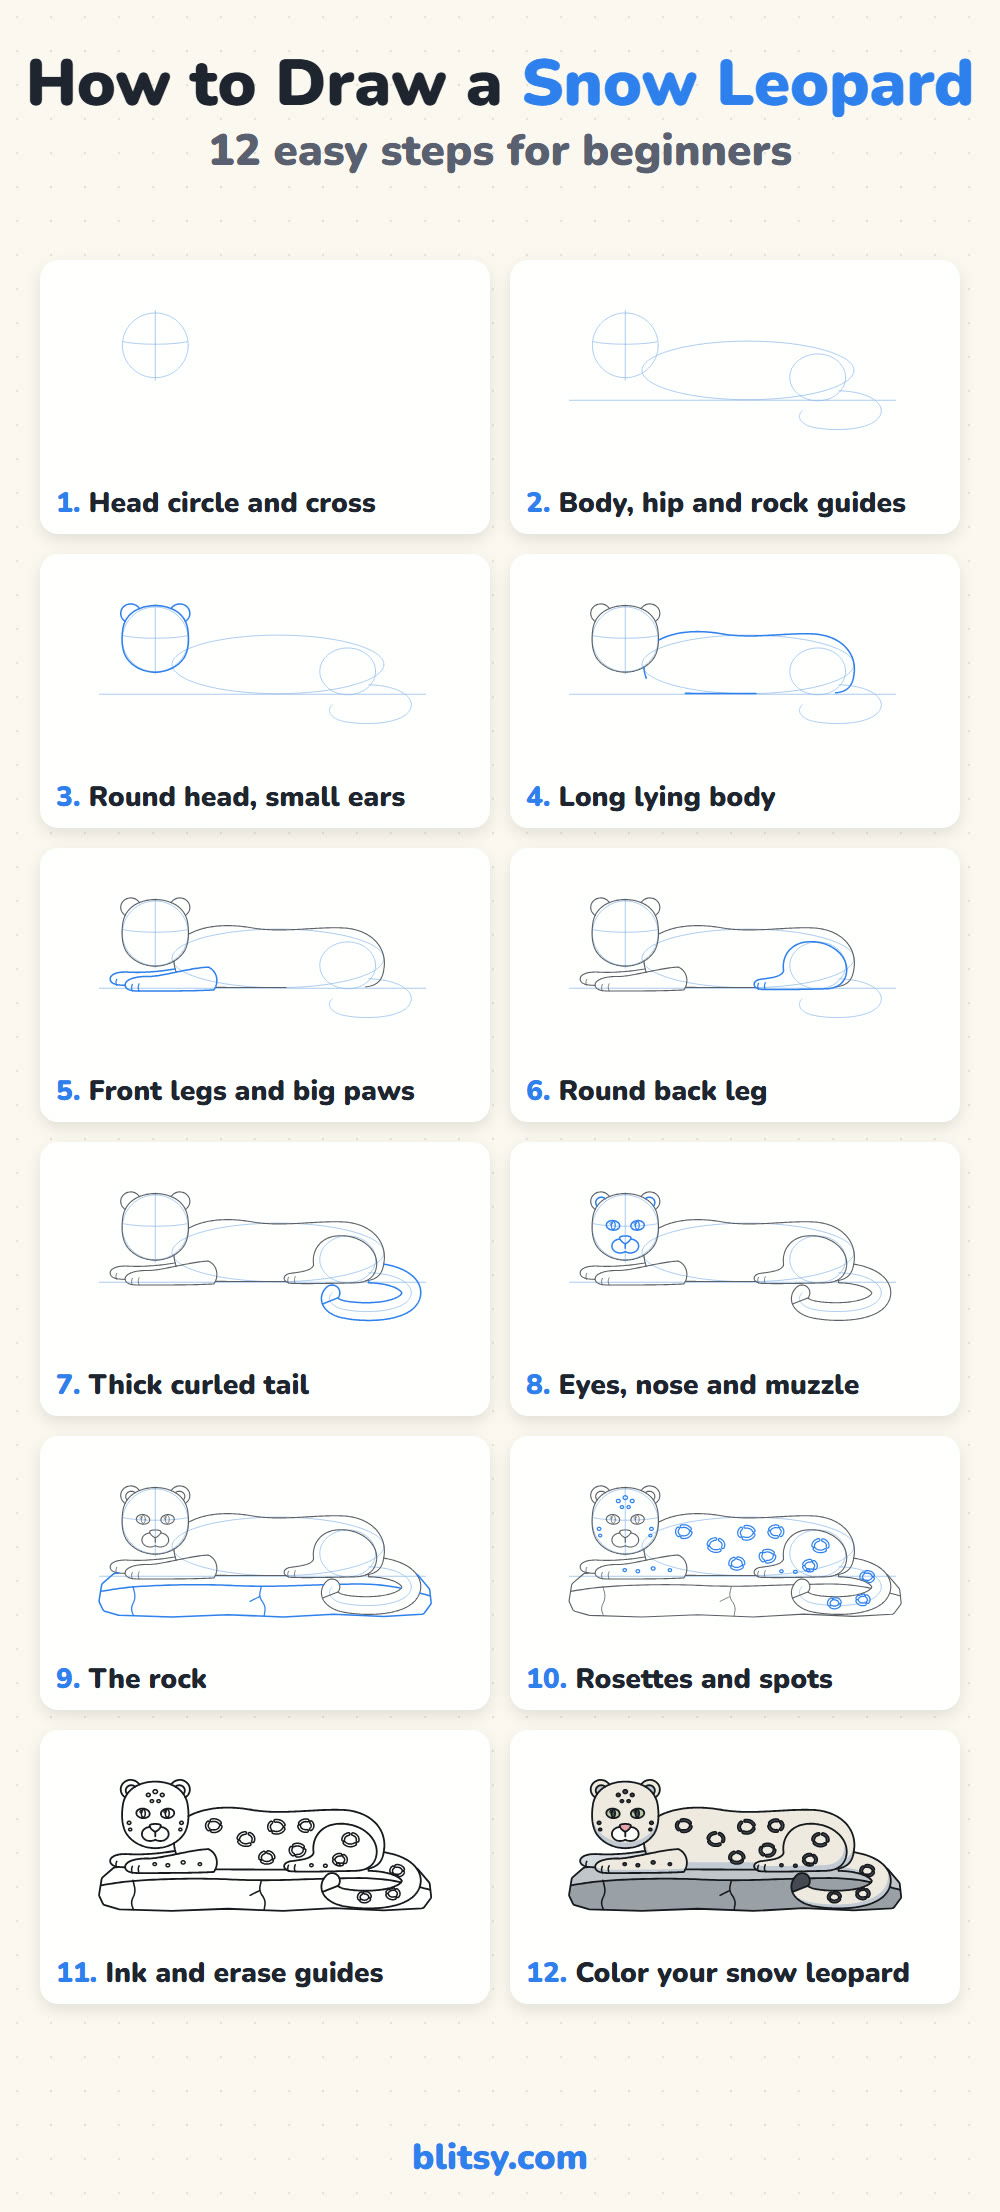
The Whole Snow Leopard Lesson in One Tall Image
Snowy Cats and Wild Friends: Lessons to Draw Next
Here are more step-by-step tutorials, each one taking you from a few light shapes to a colored animal, one picture per step.
- Parrot Drawing: A red, yellow and blue scarlet macaw perches on a sloping branch in this how to draw a parrot step by step lesson.
- Butterfly Drawing: Learn the mirror trick on a big orange butterfly with black veins and white dots in this butterfly drawing tutorial.
- Mouse Drawing: A field mouse sits up on its back legs holding a wedge of cheese in this mouse drawing step by step guide.
- Simba Drawing: Draw a playful lion cub with a tilted head and big amber eyes with this Simba drawing tutorial.
- Cat Eye Drawing: Get close to one green-gold eye, slit pupil and night pupil both, in this how to draw a cat eye lesson.
- Alligator Drawing: Two ovals and a tail curve become a smiling gator walking in side view in this alligator drawing tutorial.
- Leopard Drawing: The warm-weather cousin sits up tall with a cream chest and tidy rosettes in this leopard drawing step by step lesson.
- Peppa Pig Drawing: A side-view Peppa in her red dress stands in a muddy puddle in this Peppa Pig drawing tutorial for kids.
- Polar Bear Drawing: Stay in the cold with a chubby polar bear sitting on a cracked ice floe in this how to draw a polar bear guide.
Snow Leopard Drawing Questions Answered
What is the easiest way to draw a snow leopard?
Use a lying-down pose. Start with a circle for the head, a long oval for the body and a smaller circle for the hip, then draw the outline over those shapes. Add the spots only at the end.
How do you draw snow leopard spots?
Draw the body rosettes as open rings made of three short, thick curves with gaps between them. On the head and legs, use small solid dots instead.
What colors do I need for a snow leopard?
A very light cream or white for the fur, a light blue-gray for shading, and dark gray or black for the spots. Pale green works well for the eyes and pink for the nose.
How long does it take to draw a snow leopard?
Around 35 to 45 minutes with inking and coloring. The rosettes take the most time, so give that step a few extra minutes.
Grab your pencil, find a quiet spot of your own, and let your snow leopard settle onto its rock. ❄️🐆
Related posts:
 How to Draw a Leopard Step by Step (Easy for Beginners)
 How to Draw an Anime Girl Step by Step (Easy Face Guide)
 How to Draw Luffy Step by Step (Easy Straw Hat Guide)
 How to Draw Todoroki Step by Step (Easy Fire and Ice Guide)
 How to Draw a Cat Face Step by Step (Easy Tabby Guide)
 How to Draw a Face Step by Step (Easy Proportions Guide)
 How to Draw a Side Profile Step by Step (Easy Head Guide)
 How to Draw a Jellyfish Step by Step (Cute, Easy Guide)
 How to Draw a Magnolia Flower Step by Step (Easy Guide)
 How to Draw a Whale Step by Step (Easy for Beginners)
 How to Draw Lungs Step by Step (Easy Science Diagram)
 How to Draw a Pineapple Step by Step (Easy Crown and Slice)

