
Every October, somebody at the kitchen table asks for a pumpkin with a face. If you want one that looks carved and lit from inside, this lesson shows you how to draw a jack o lantern step by step with a handful of ovals and three triangles. I keep the expression friendly rather than scary, so it suits younger artists, but you can sharpen the grin later if you'd like something spookier.
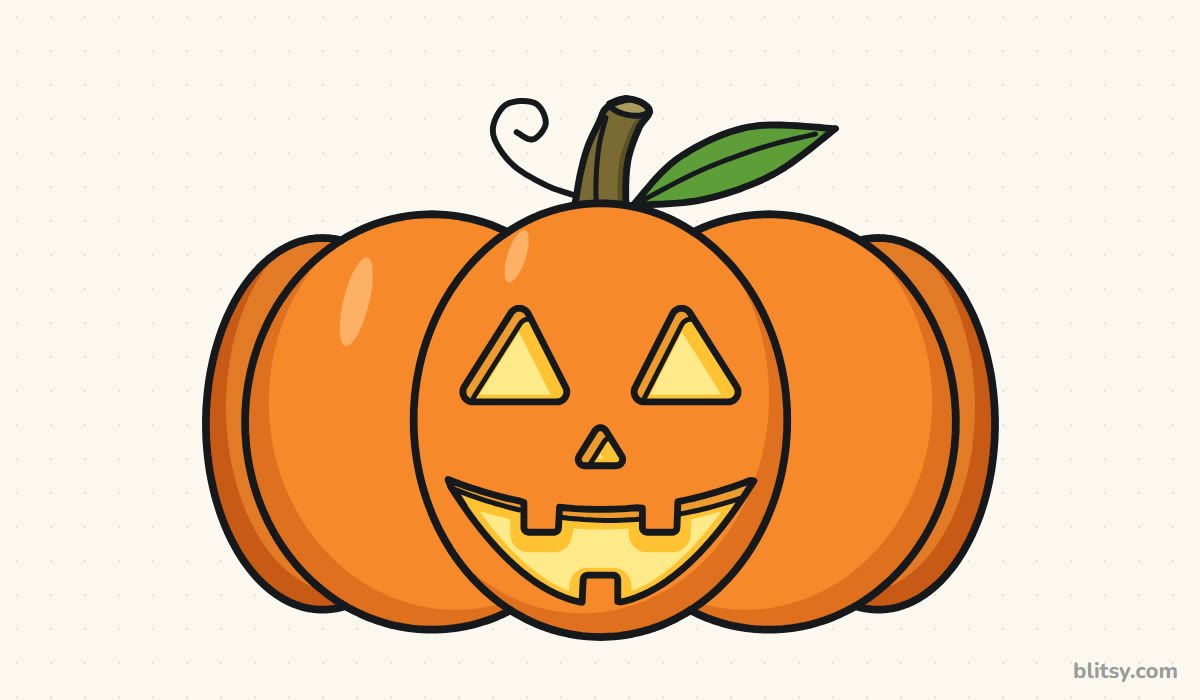
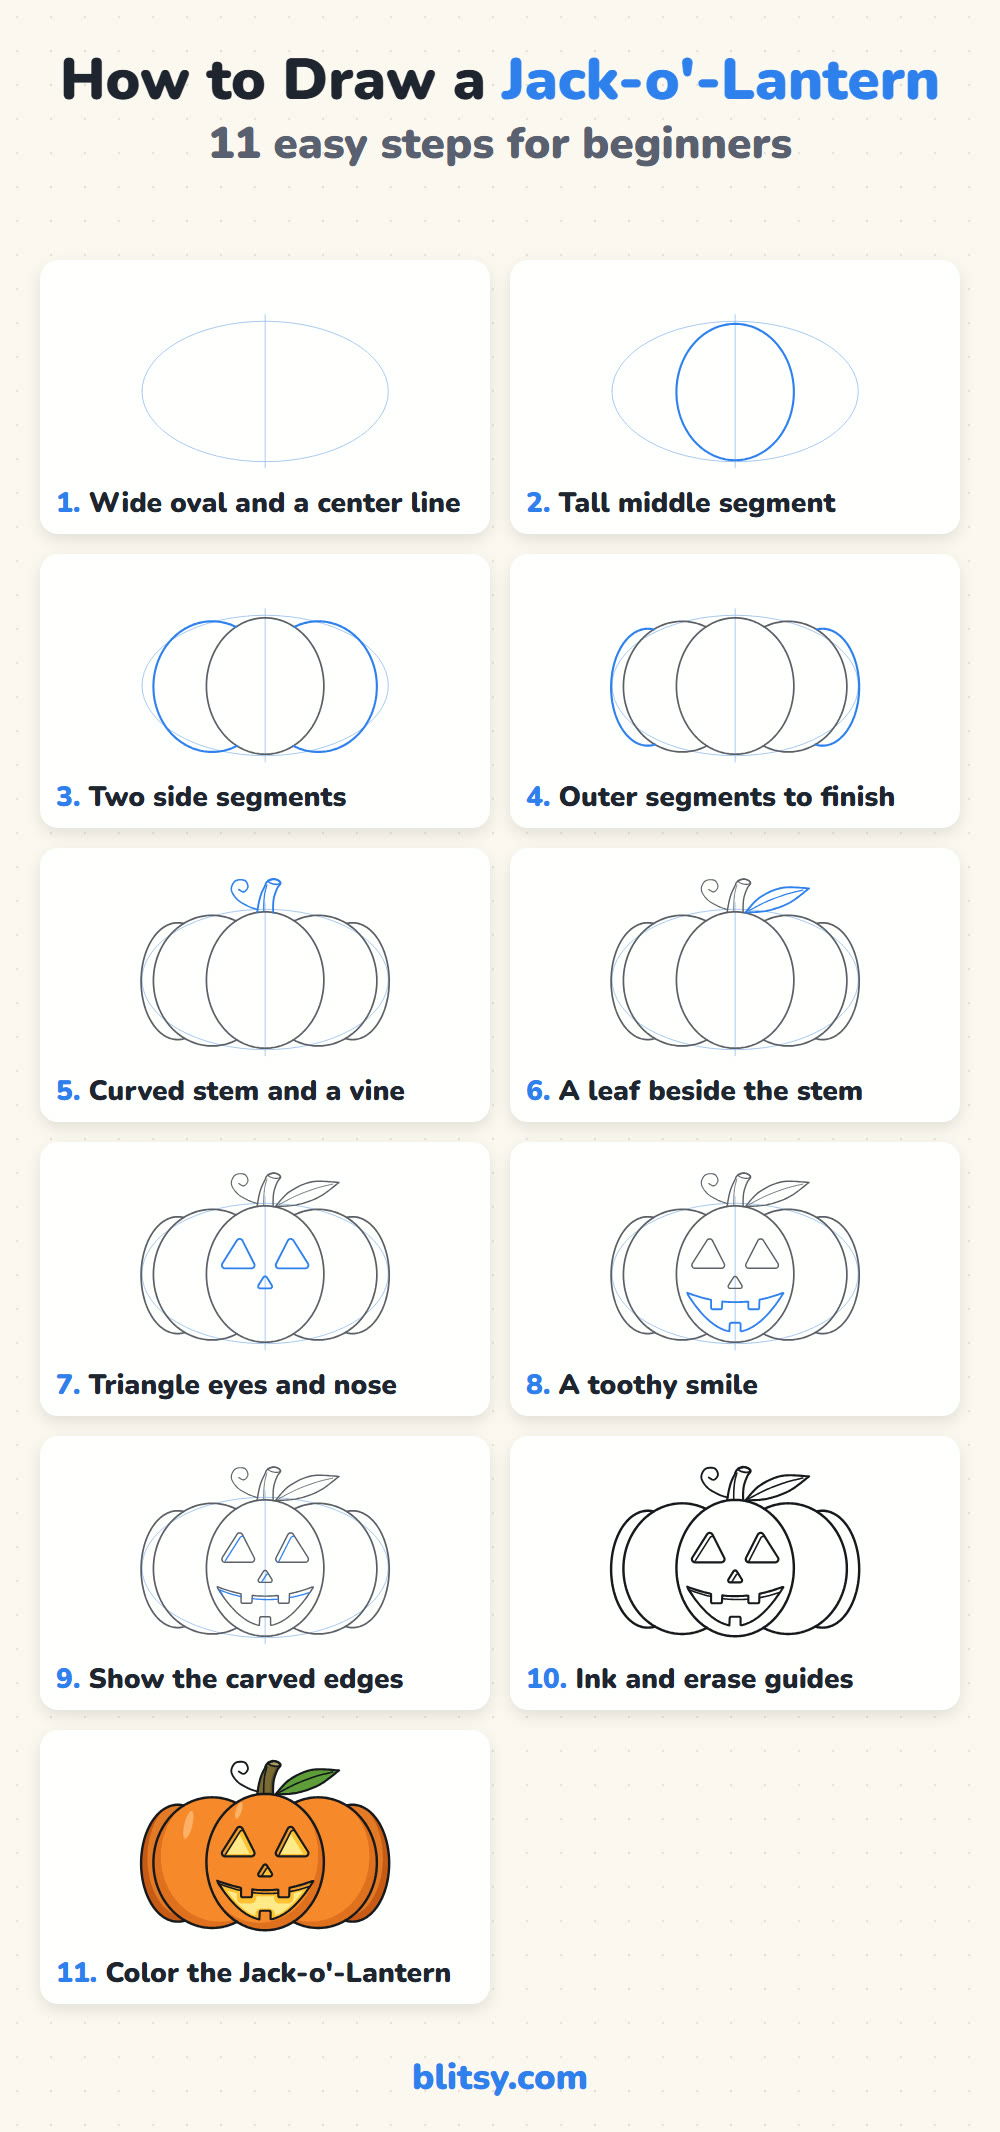
Each picture adds its new part in blue, while everything from earlier steps turns gray, so you always know what changed. The pale blue oval and center line are helpers only; keep them faint, because they get erased in step 10.
Quick overview
⏱️ Time: roughly 20 to 30 minutes, including color
🎯 Level: easy, good for kids around 6 and up
✏️ Steps: 11
🎃 You'll draw: a wide carved pumpkin with a curly stem, a leaf and a glowing toothy face
Pumpkin Patch Supplies on Your Desk
- A pencil you can use lightly, such as an HB
- A soft eraser that won't smudge
- A black marker or fineliner for the final outline
- Colored pencils or markers in orange, dark orange, yellow, light orange, brown and green
- Plain paper turned sideways, since the pumpkin is wider than it is tall
Only one orange in the box? Press harder for the ribs and shadows and you'll still get depth.
How to Draw a Jack O Lantern Step by Step
Step 1: Sketch a wide oval and a center line
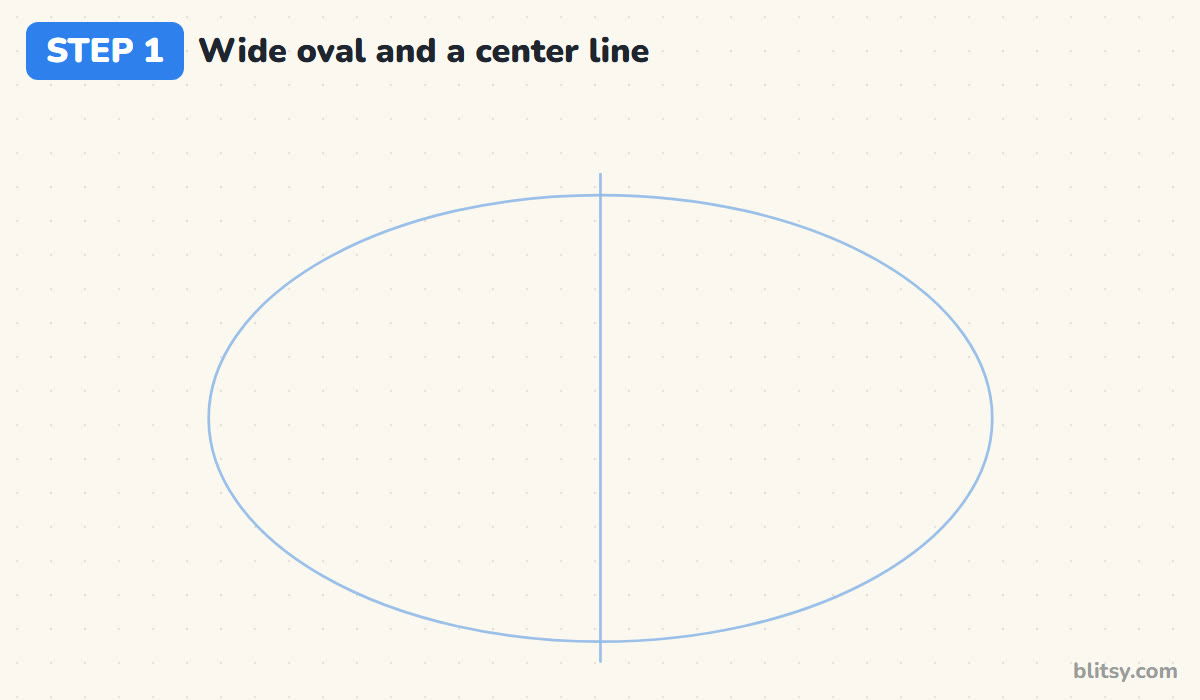
Draw a big oval across the middle of the page, about twice as wide as it is tall. Then run a light vertical line straight through its center, a little past the top and bottom. The oval sets the overall size of the pumpkin, and the line keeps the face centered later on.
💡 Tip: Hold the pencil near its end for guide shapes. Your lines come out lighter that way.
Step 2: Draw the tall middle segment
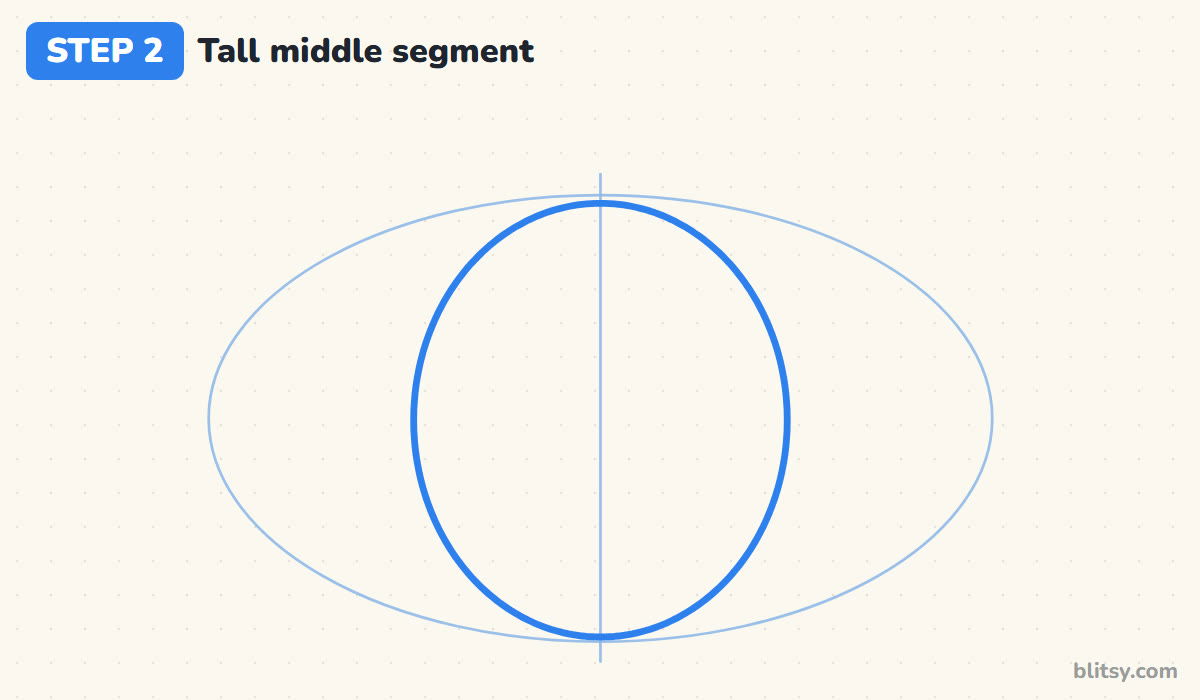
Centered on the line, draw an upright oval that touches the top and bottom of your guide. It should take up a bit less than half the guide's width. This front segment is the one facing you, and it will hold the whole face, so give it enough room. When I demonstrate this, I let it poke just above the guide at the top, where the stem will sit.
💡 Tip: Check both halves against the center line. A lopsided middle makes the whole face lean.
Step 3: Add a side segment on each side
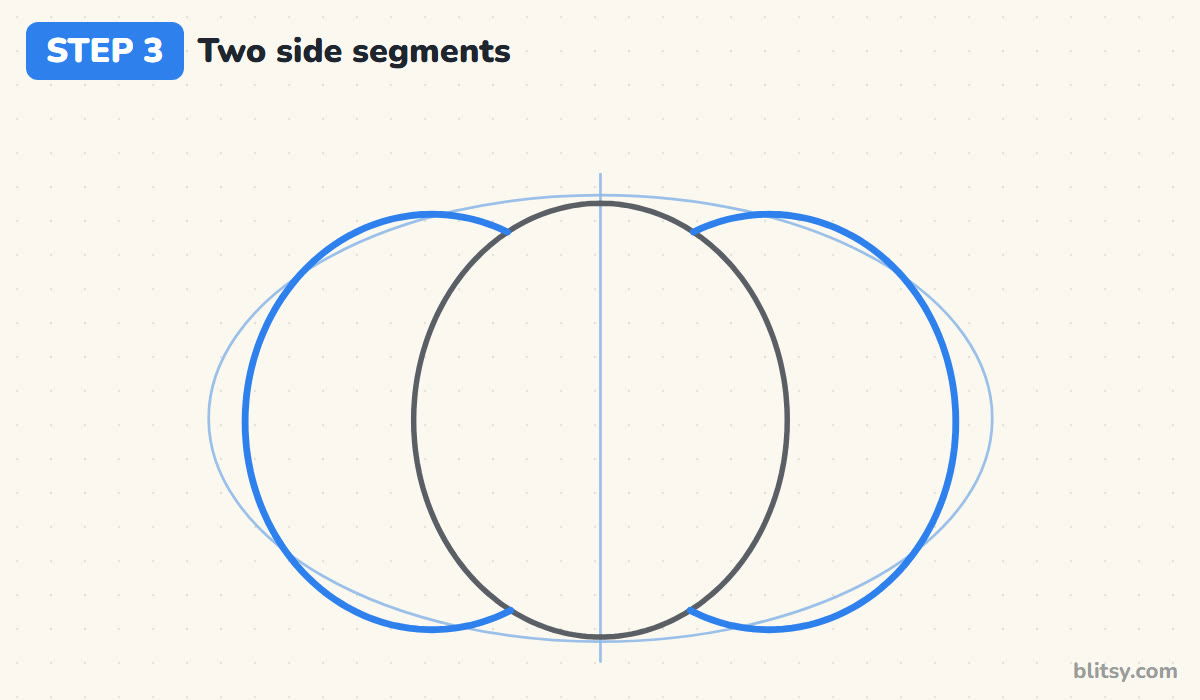
Start each side segment where it disappears behind the middle one, curve out toward the guide's edge and come back down to meet the middle again near the bottom. They're nearly as big as the middle segment. Don't draw through the middle oval; those parts are hidden behind it.


💡 Tip: Stop each curve the moment it touches the middle oval. Hidden lines make a pumpkin look flat.
Step 4: Finish with the outer segments
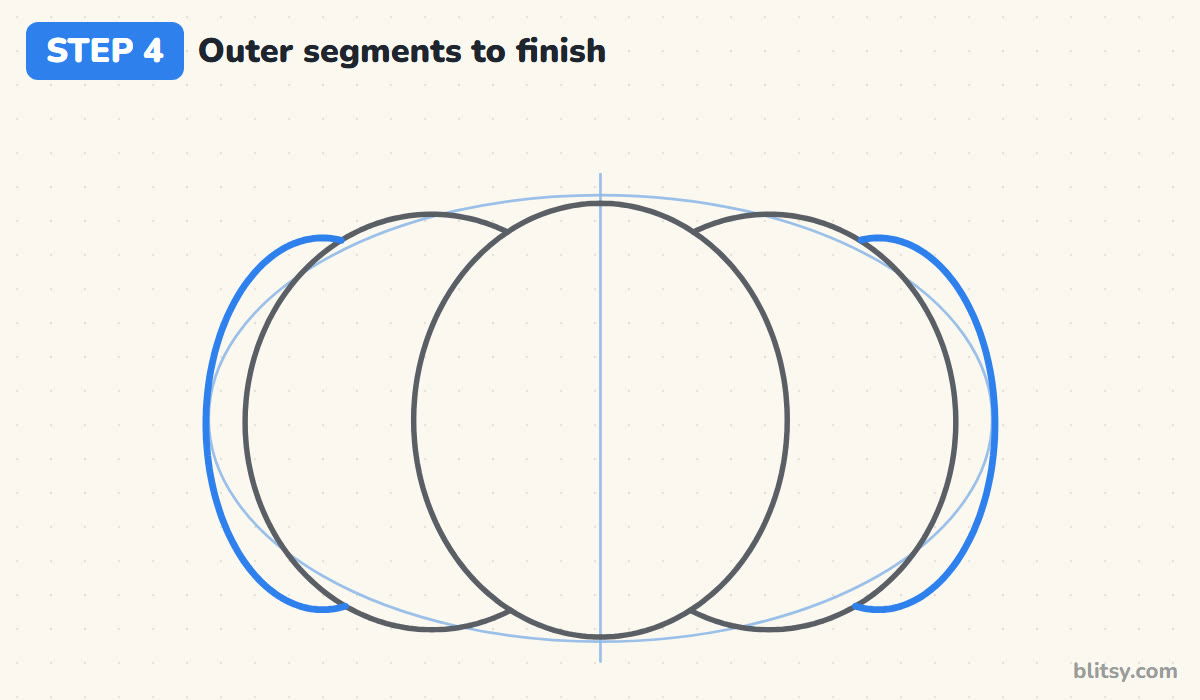
On the far left and right, draw a thin curved sliver peeking out from behind each side segment. These are the ribs turning away from you around the back of the pumpkin. Keep them narrow. Most beginners make them as fat as the others, and the pumpkin suddenly looks like a row of balloons instead of one round fruit.
💡 Tip: Let the slivers sit slightly lower than the side segments. Round things curve down at the edges.
Step 5: Draw a curved stem and a vine curl
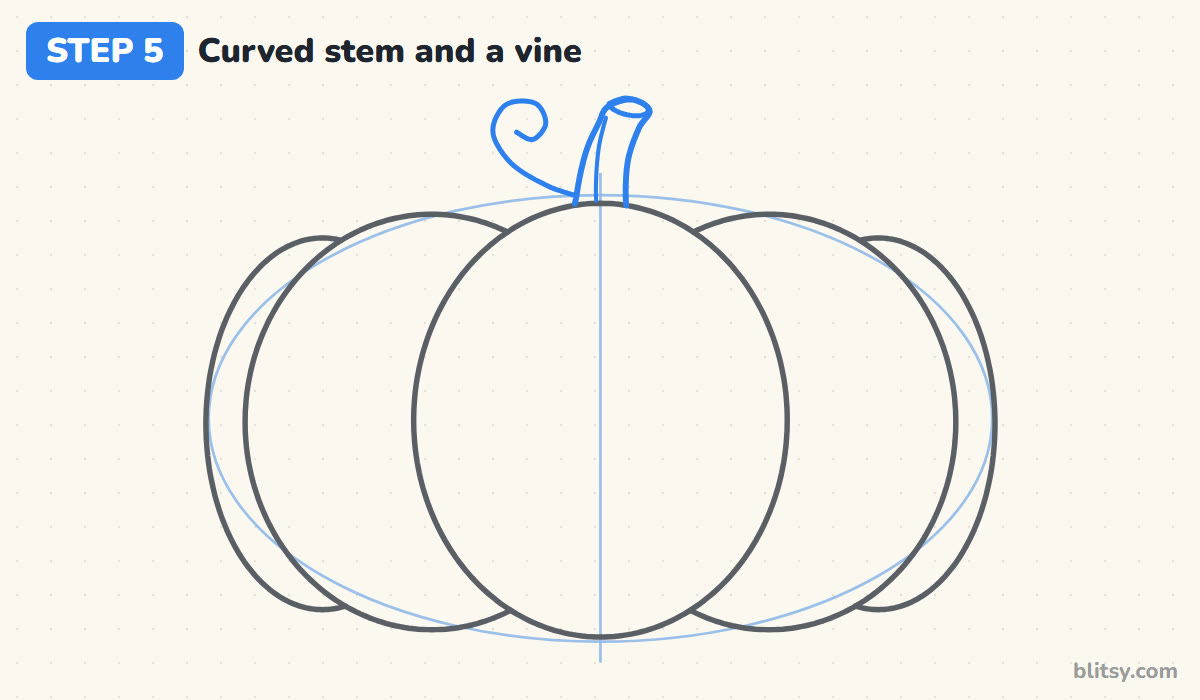
On top of the middle segment, draw a short, thick stem that leans a little to the right and widens where it meets the pumpkin. Cap it with a small flat oval, as if it had been snipped off the vine. Add one line down the stem for a groove. From the left of the stem, pull out a thin vine that loops into a little curl.
💡 Tip: Draw the curl as one slow spiral, from the outside in. Two tries on scrap paper helps.
Step 6: Add a leaf beside the stem
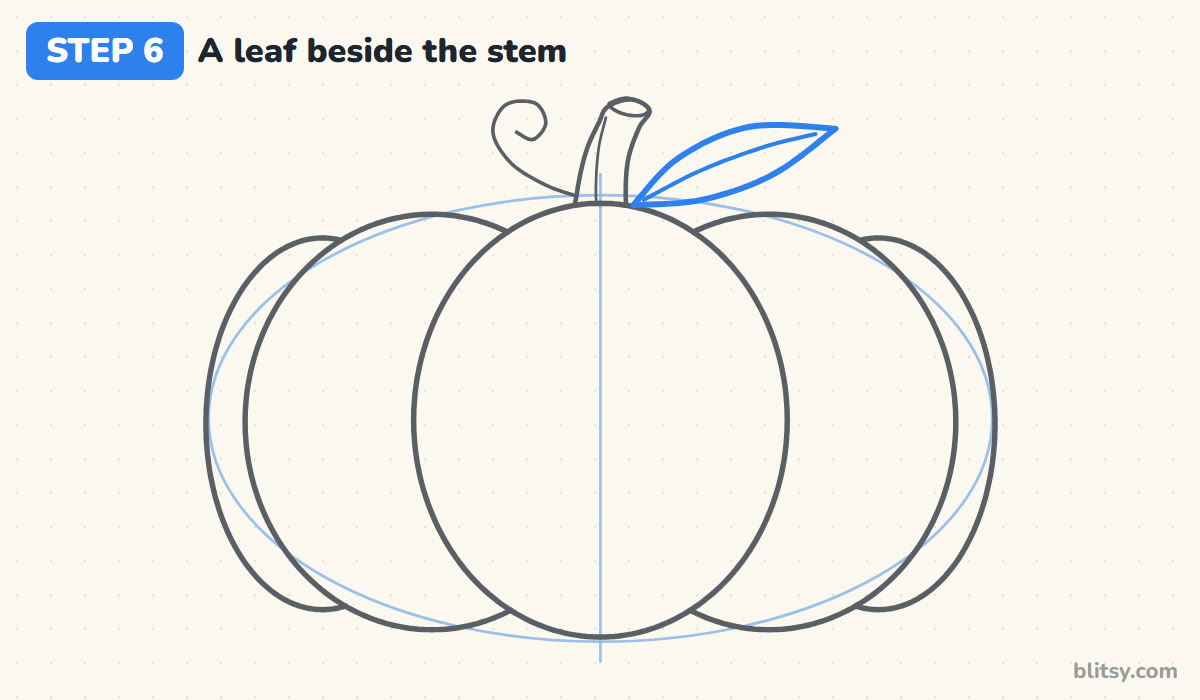
From the right side of the stem's base, draw a long pointed leaf reaching up and out to the right. Two gently curved lines that meet at a sharp tip are all it takes. Then add a vein down the middle. I tilt the leaf upward on purpose, since a drooping one tends to cover the top of the pumpkin and crowd the stem.
💡 Tip: Make the leaf's lower edge a touch rounder than the top. Real leaves are rarely symmetrical.
Step 7: Draw triangle eyes and a small nose
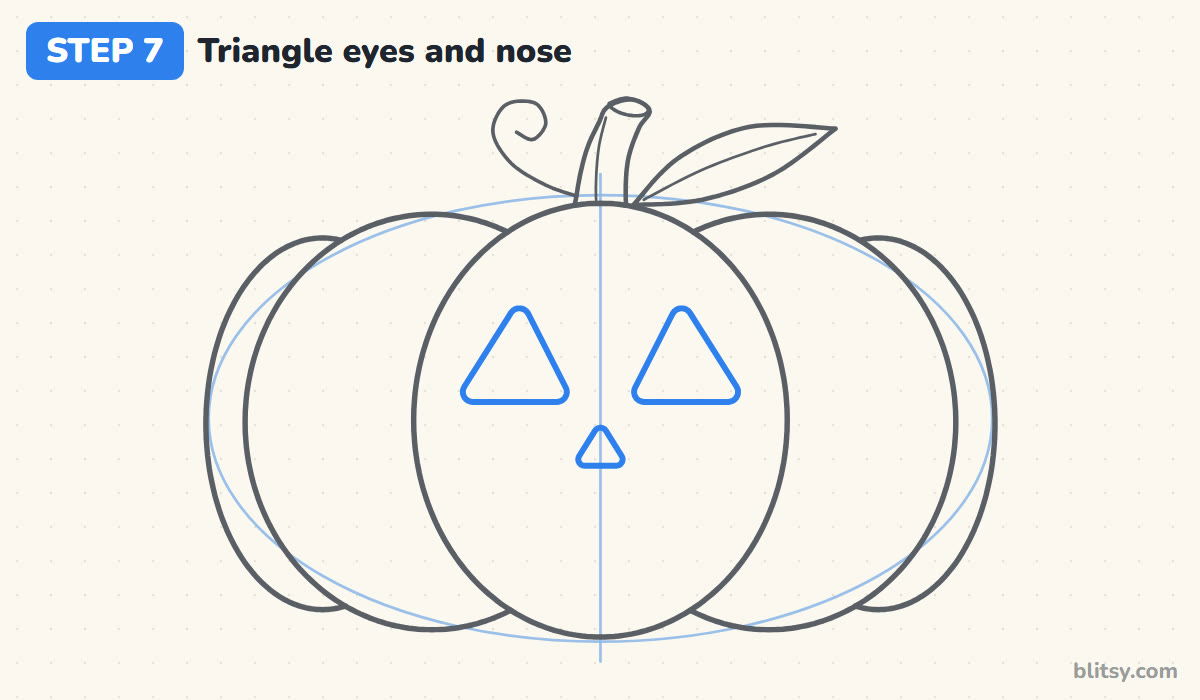
Place two triangles pointing up, roughly a third of the way down the middle segment, one on each side of the center line. Leave a gap between them about the width of one eye. Soften the corners slightly; sharp points look angry, round ones look friendly. The nose is a much smaller triangle, centered just below and between them.


💡 Tip: Draw both eyes before judging them. Comparing a pair is easier than fixing one alone.
Step 8: Carve a toothy smile
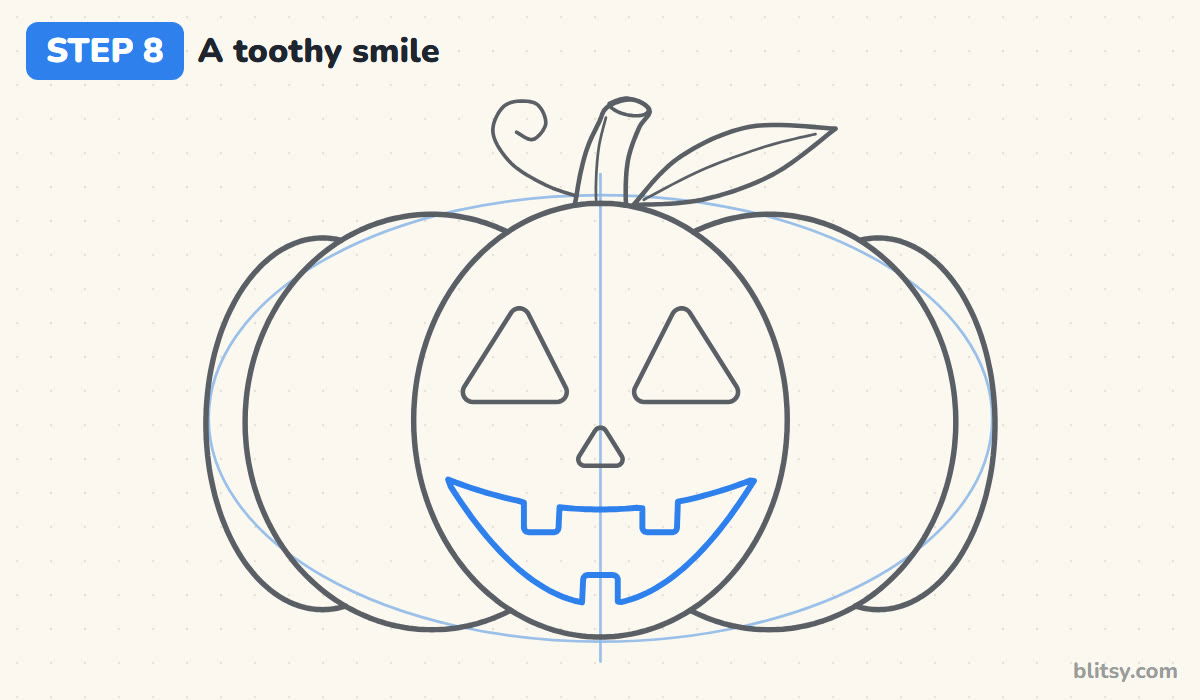
Below the nose, draw a wide smile that almost reaches both edges of the middle segment. The top lip curves only a little, while the bottom dips deep, so the grin opens like a half moon. Now notch in the teeth: two square blocks hanging from the top and one rising from the bottom, spaced apart so they don't line up.
💡 Tip: Odd, uneven teeth are charming here. Perfectly matched ones look like a fence.
Step 9: Show the thickness of the carved edges
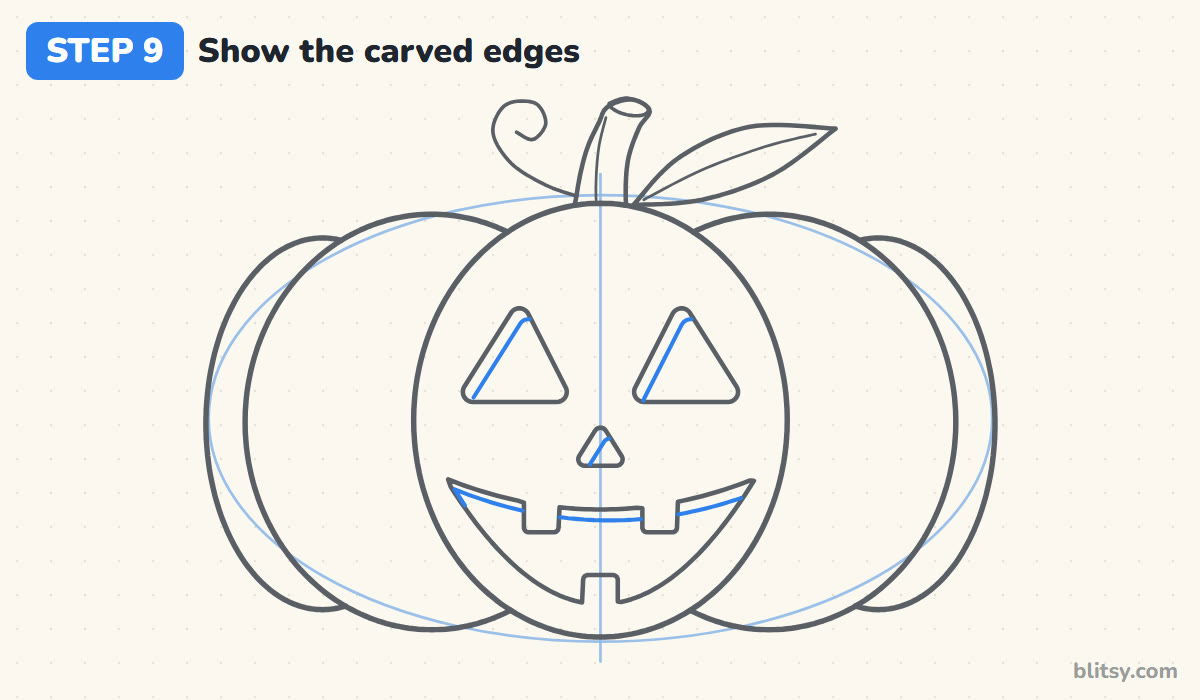
A real pumpkin wall is thick, so when you carve a hole you see the cut flesh along one side. Inside each eye and the nose, draw a second line close to the upper left edge, following its shape. Do the same just under the top lip of the smile. That thin band is what turns flat triangles into real holes.
💡 Tip: Put every band on the same side. Mixed directions confuse where the light comes from.
Step 10: Ink the outline and erase the guides
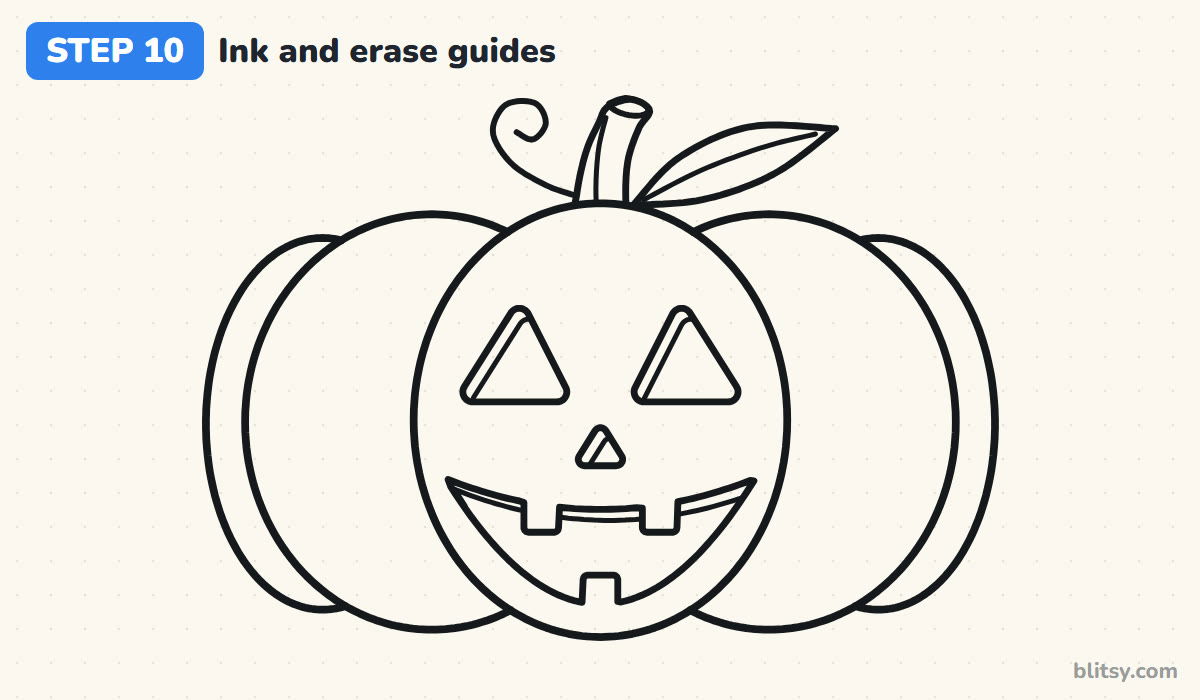
Trace every line you want to keep with the black marker: the five segments, the stem, vine, leaf and the whole face. Wait a minute so the ink sets, then erase the big oval and the center line. If a pencil smudge stays behind, a kneaded eraser lifts it without scuffing the paper.
💡 Tip: Go a little bolder on the pumpkin's outer edge than on the face. Thick edges look finished.
Step 11: Color the Jack-o'-Lantern
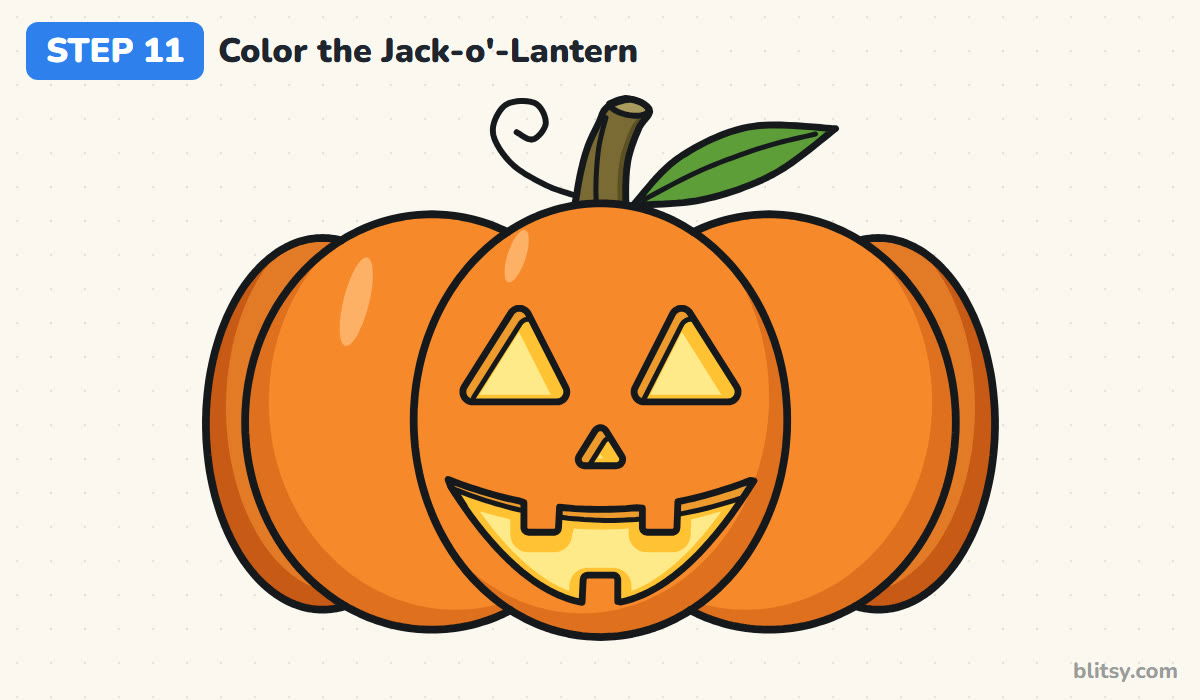
Color the middle and side segments orange and the back slivers a darker orange. Add a dark orange crescent along the lower outer edge of each segment for roundness, and leave a small pale streak on the upper left as a shine. Fill the eyes, nose and mouth with yellow, keep their centers lighter, and color the carved bands light orange. Finish with a brown stem and a green leaf.



💡 Tip: Color the glowing holes first. Yellow picks up orange smudges, never the other way round.
Pumpkin Faces That Turn Out Wonky
- All segments the same size. The pumpkin looks like stacked balloons. Keep the middle biggest and the back slivers thin.
- Drawing lines straight through the middle oval. Erase any part of a side segment that crosses the front one, so the ribs tuck behind each other.
- A face squeezed into the top half. Eyes about a third of the way down and a smile low on the segment look natural. High features make the pumpkin look surprised.
- A thin, straight stem. It reads as a twig. Make it chunky, slightly bent and wider at the bottom.
- Coloring the holes orange. Without the yellow glow it's just a pumpkin with spots. The bright face is what makes it a lantern.
Spooky, Silly or Sleepy Pumpkin Variations
Once the basic lantern feels comfortable, change only the face and you get a new character every time: half-closed eyes for a sleepy pumpkin, round eyes and a tongue for a silly one, or jagged teeth and slanted brows if you're after a proper fright. A row of three pumpkins in different sizes also makes a great porch scene. When you're ready to carve a real one, this pumpkin carving guide pairs well with your sketch, and the Halloween painted rock project lets you paint the same face on a stone.
Jack-o'-Lantern Coloring Page and Printable Steps
Need something for a Halloween party table or a rainy afternoon? The Jack-o'-Lantern coloring page has a small colored sample at the top with each color named, and a big thick-lined outline below for little hands. The step-by-step guide PDF collects all 11 steps with their tips, two per page. Both print on Letter or A4.
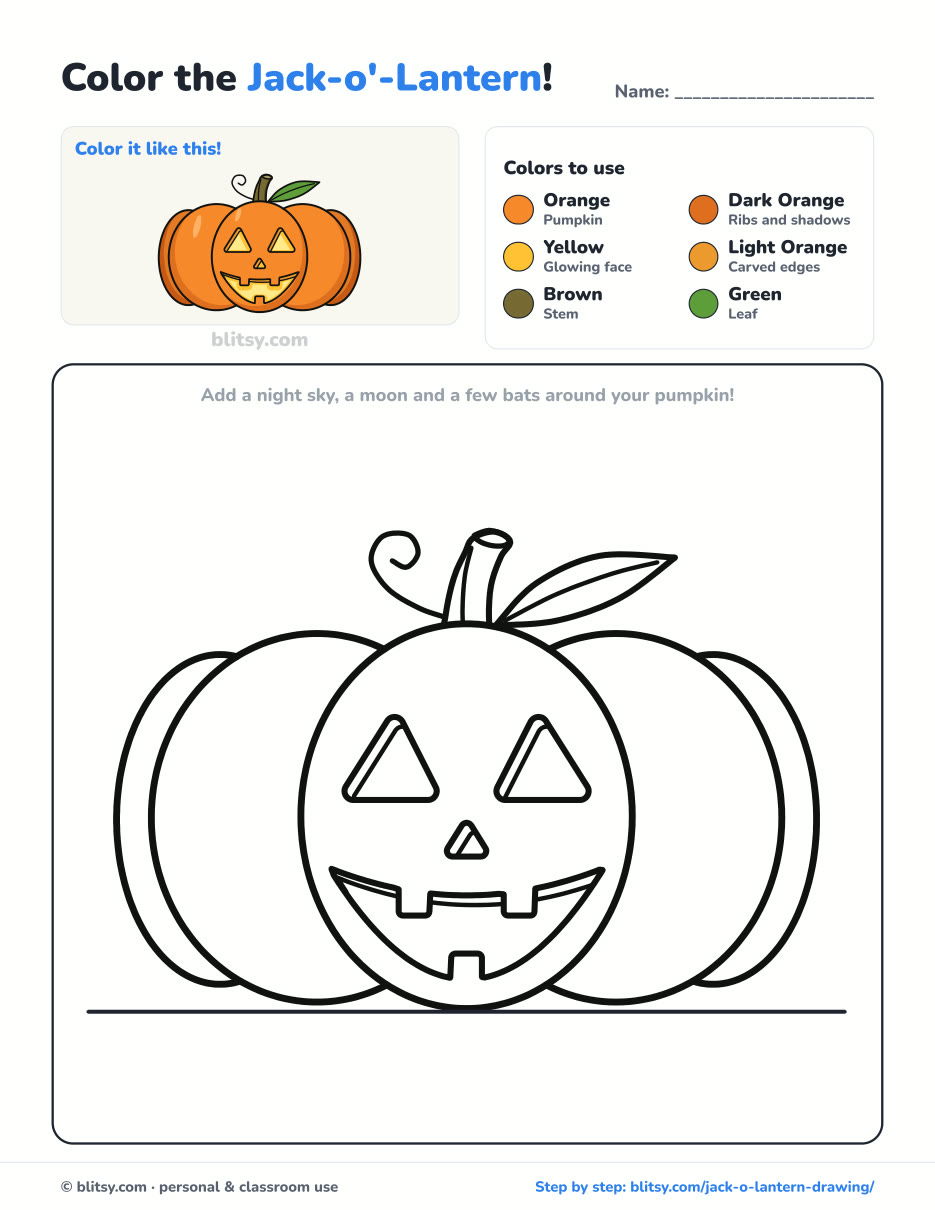
Black outlines with a colored example and the color names at the top. Ready to print and color.
⬇️ Download Coloring PageEvery step picture with its instructions and tips, to keep beside your paper while you draw.
⬇️ Download Drawing Guide📱 On a phone? Tap a download button, then open the file and choose Share → Save to Files or Print. On a computer, the PDF opens or saves straight to your Downloads folder.
Pin the Pumpkin Lesson for October
Harvest Season Picks: Plants, Fruit and Treats to Draw
All of these are step-by-step tutorials with a picture for each stage, from flowers and fruit to a birthday cake.
- Magnolia Flower Drawing: Draw a wide-open saucer magnolia, a half-closed flower and a furry bud in the magnolia flower drawing tutorial.
- Grass Drawing: One bending blade grows into a whole meadow patch in the how to draw grass step by step lesson.
- Flower Drawing: A pink flower, two purple bluebells and a yellow star flower share one pot in this easy flower drawing tutorial.
- Plant Drawing: The plant drawing step by step guide ends on a monstera in a coral pot with yellow stripes.
- Avocado Drawing: Two circles become cut avocado halves, one with a smiling pit, in the how to draw an avocado tutorial.
- Tree Drawing: Build a leafy apple tree with a knothole in the trunk using this tree drawing tutorial.
- Chalk Art: Take the art outside with the chalk art step by step lesson: a hopscotch grid, a rainbow on two clouds and a corner sun.
- Cell Drawing: Our animal cell drawing tutorial colors each part, from the purple nucleus to the red mitochondria.
- Succulent Drawing: Sage leaves with pink tips sit in a warm clay pot in the how to draw a succulent tutorial.
- Pineapple Drawing: A golden pineapple and a fresh slice take eleven calm steps in this pineapple drawing tutorial.
- Tulip Drawing: Learn how to draw a tulip step by step with three spring blooms and a leaf that twists to show its back.
- Fruit Drawing: Fill a blue bowl with five fruits in the easy fruit bowl drawing tutorial.
- Hibiscus Drawing: The hibiscus drawing step by step guide spins five red petals around a dark center.
- Rose Drawing: Start from a tight spiral and open it into a red rose with this rose drawing tutorial.
- Strawberry Drawing: A whole berry and a cut half sit side by side in the how to draw a strawberry tutorial.
- Birthday Cake Drawing: Two tiers of pink and cream frosting with three little flames are the goal of the birthday cake drawing tutorial.
Jack-o'-Lantern Drawing Questions From Little Carvers
What is the easiest way to draw a Jack-o'-Lantern?
Draw one wide oval, then overlapping upright ovals inside it for the ribs. Add a stem, two triangle eyes, a small triangle nose and a smile. That's the whole pumpkin.
How do you make a Jack-o'-Lantern look like it's glowing?
Color the carved holes yellow with a lighter middle, and keep the pumpkin around them a deeper orange. The contrast does the work.
How do you draw a Jack-o'-Lantern that isn't scary?
Round off the corners of the eyes, curve the smile upward and leave wide gaps between the teeth. Small kids usually like a single tooth best.
How long does it take to draw a Jack-o'-Lantern?
Around 15 minutes for the pencil and ink, and another 10 to 15 for coloring. Younger children can skip the carved edges in step 9.
Draw a few with different faces and line them up along the bottom of the page; a whole pumpkin patch grins back at you. 🎃
Related posts:
 How to Draw a Pumpkin Step by Step (Easy Autumn Still Life)
 How to Draw a Whale Step by Step (Easy for Beginners)
 How to Draw Lungs Step by Step (Easy Science Diagram)
 How to Draw a Plant Step by Step (Easy Potted Monstera)
 How to Draw the Fortnite Llama Step by Step (Easy Fan Art)
 How to Draw a Hoodie Step by Step (Front and Back View)
 How to Draw a Parrot Step by Step (Easy Scarlet Macaw)
 How to Draw a Police Car Step by Step (Easy for Kids)
 How to Draw a Volcano Step by Step (Easy Erupting Volcano)
 How to Draw a Crow Step by Step (Easy for Beginners)
 How to Draw a Tiger Step by Step (Easy Walking Pose)
 How to Draw a Heart Step by Step (Even, Symmetric Shape)

