
Dresses are one of the most requested things in any kids' drawing class. Here you'll learn how to draw a dress step by step, starting with a pink party dress that has puff sleeves, a navy bow and a skirt that flares out to a scalloped hem. A simple sundress on a hanger joins it, so you practice the same idea twice.
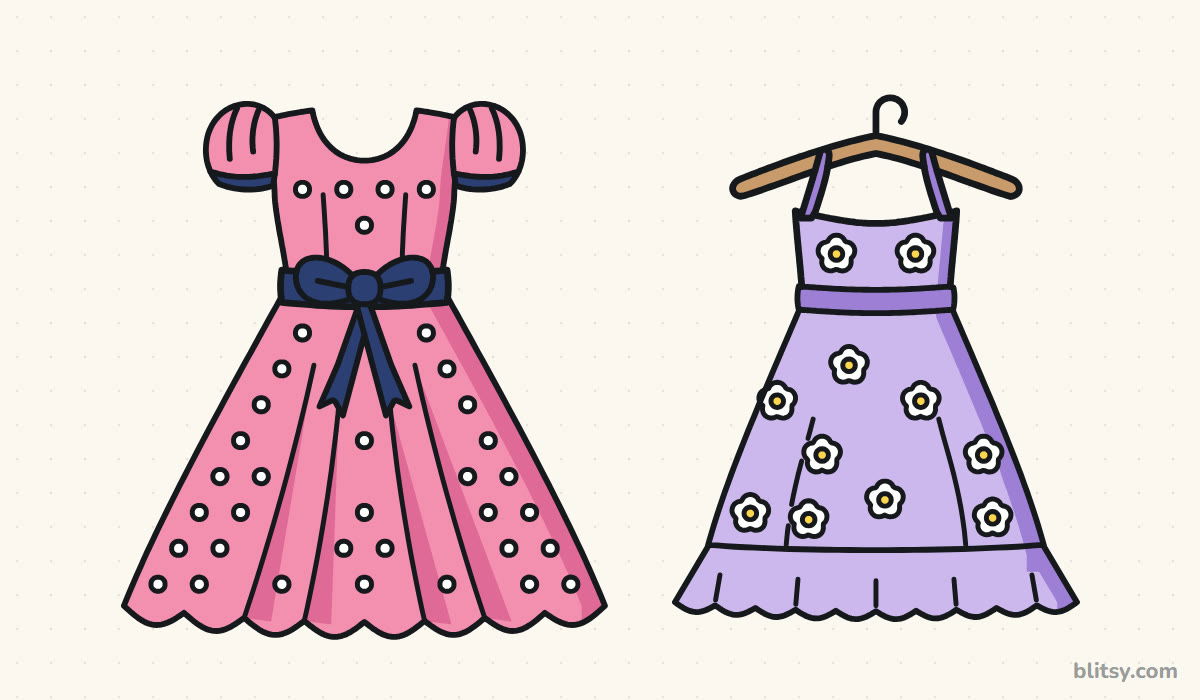
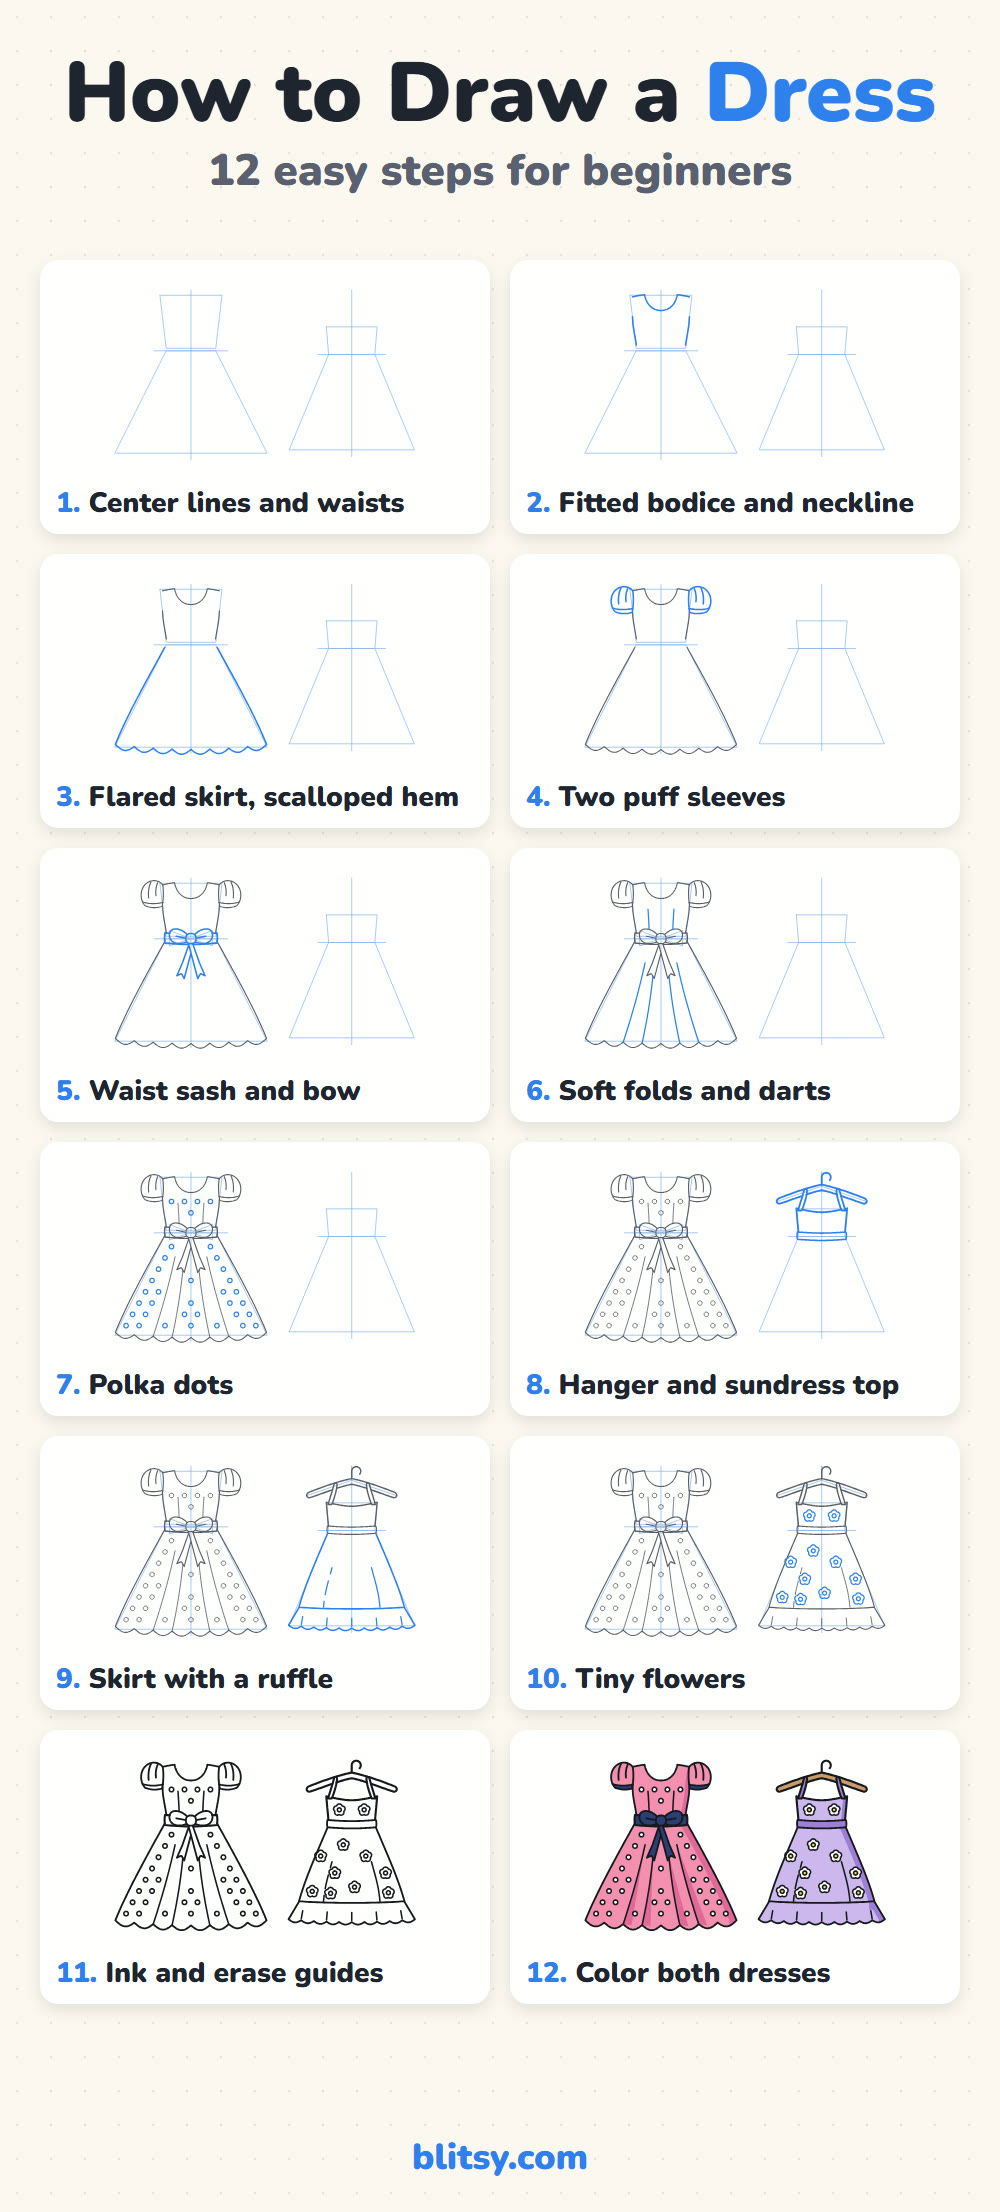
The new part in every picture is drawn in blue. Gray lines are already on your paper. The pale blue boxes and the line down the middle are helpers you sketch very lightly and rub out near the end.
Quick overview
⏱️ Time: about 35 to 45 minutes, coloring included
🎯 Level: easy, a good fit for kids from about 7
✏️ Steps: 12
👗 You'll draw: an A-line party dress with a bow and polka dots, plus a ruffled sundress on a hanger
Before the First Dress Line
- A regular pencil (HB is ideal) for the light guide shapes
- A soft eraser
- A ruler, handy for the center lines
- A black felt-tip pen or fineliner
- Colored pencils or markers in pink, dark pink, navy, lavender, purple, yellow and light brown
- A sheet of paper turned sideways
No ruler? A folded sheet of paper gives you a straight edge too.
How to Draw a Dress Step by Step
Step 1: Sketch the center lines and guide shapes
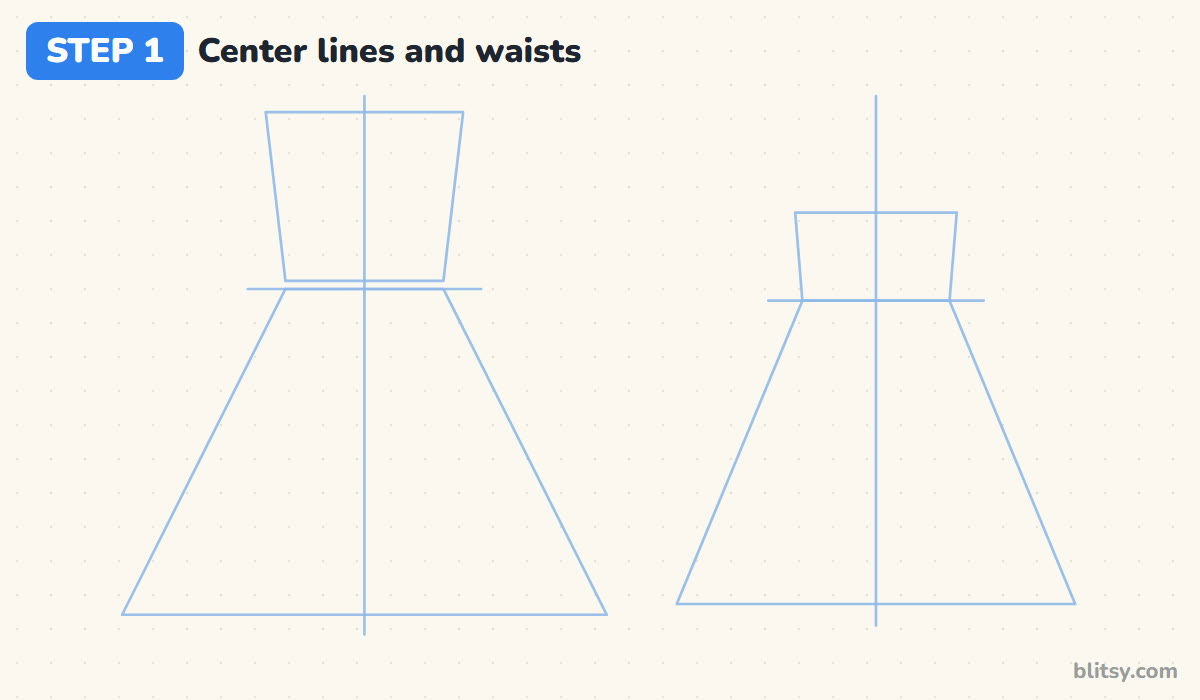
Turn your paper sideways. Draw two straight vertical lines, the left one a bit taller, then cross each with a short waistline about a third of the way down. Above the waist on the left, add a narrow box for the bodice, and below it a wide trapezoid for the skirt. Repeat a smaller version on the right. I press so lightly that I can barely see them.
💡 Tip: Make the skirt trapezoid at least three times wider at the bottom than at the waist.
Step 2: Draw the fitted bodice and the round neckline
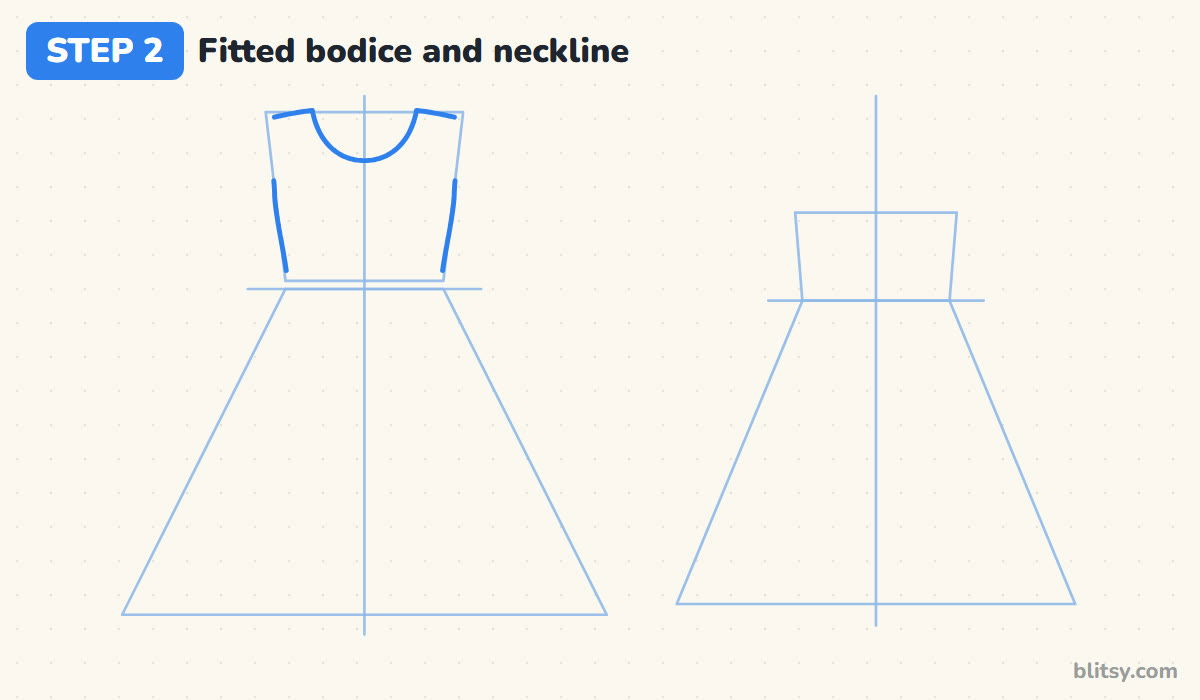
Start at the top of the bodice box with a scooped U for the neckline, centered on the middle line. From each end of the U, draw a short shoulder sloping outward. Then bring the sides down so they pinch in slightly toward the waistline. That inward curve makes the top look fitted, not boxy.
💡 Tip: Check the neckline dips the same depth on both sides of the center line.
Step 3: Add the flared skirt with a scalloped hem
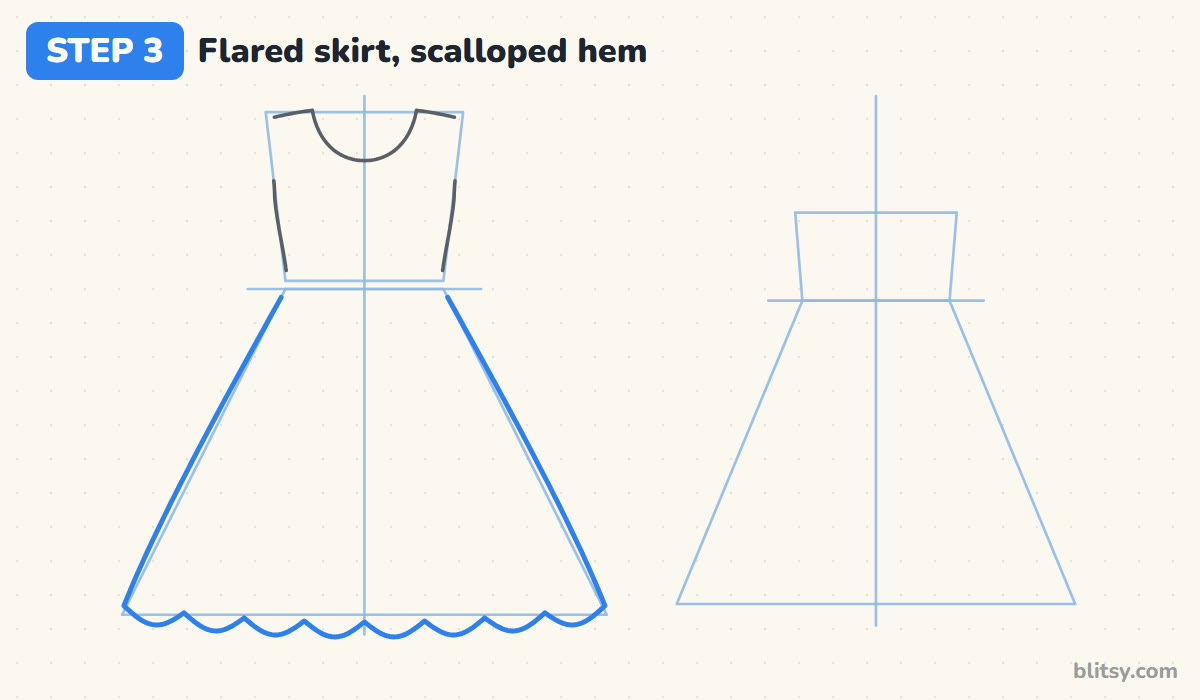
From each end of the waist, sweep a long curved line down and outward along the edges of the trapezoid. Let the curves bow out a tiny bit so the skirt looks full. Across the bottom, draw a row of small bumps, like the top edge of a cloud turned upside down. Eight scallops fit nicely, with one dip landing right on the center line.
💡 Tip: Draw the middle scallops first, then work outward so both sides end evenly.




Step 4: Draw two puff sleeves
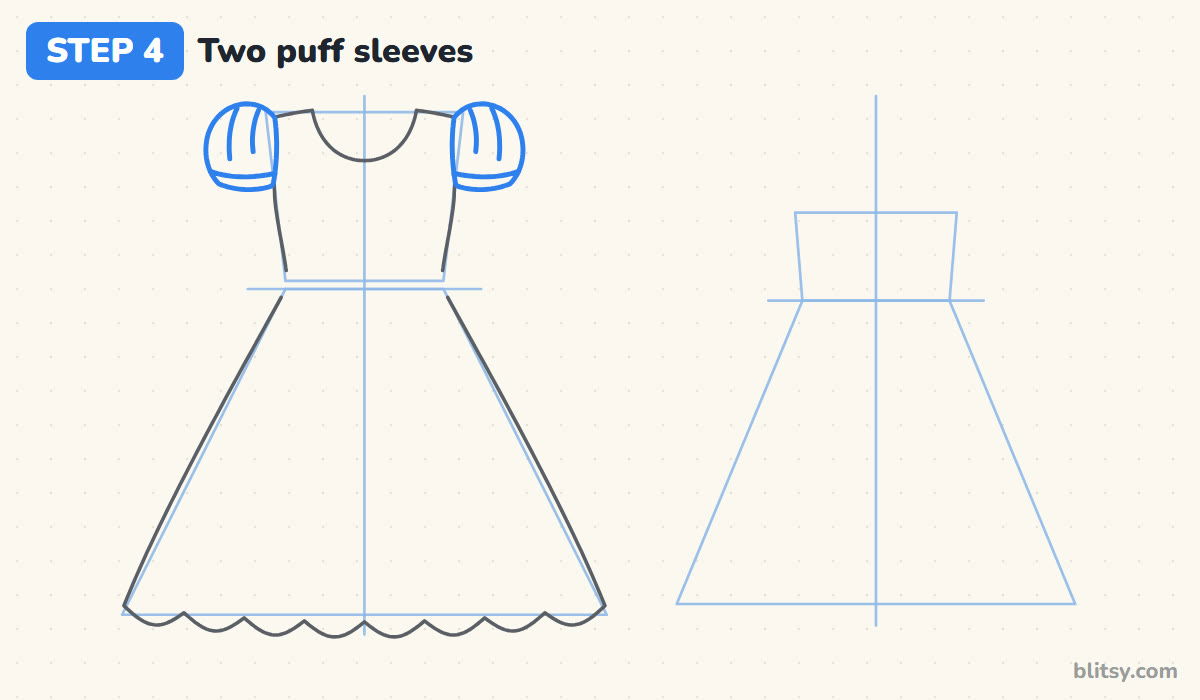
Each sleeve is a short, rounded balloon sitting on the shoulder. Begin where the shoulder meets the armhole, puff the line up and out, and curve it back in at the bottom. Underneath, add a thin band for the cuff. A few short curved lines inside the puff show where the fabric is gathered. Little ones can skip the gathers.
💡 Tip: Keep the sleeves short; if they reach the waist they turn into long sleeves.
Step 5: Wrap a sash and tie the bow
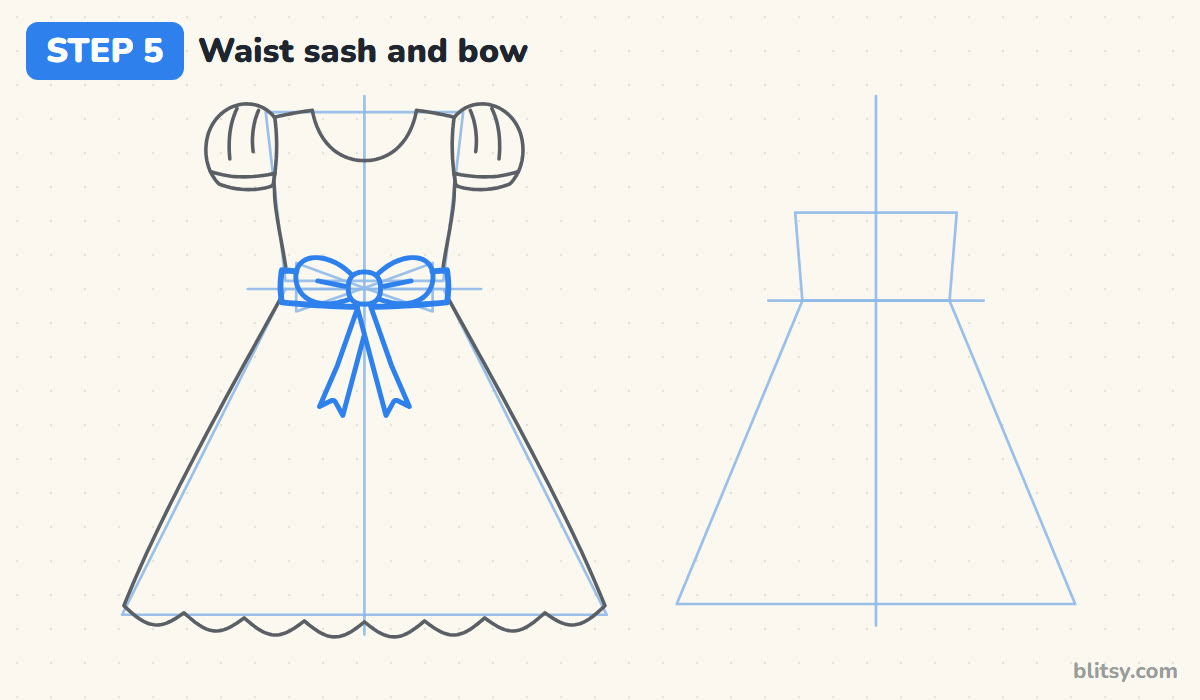
Draw a wide band across the waistline, slightly wider than the dress itself so it looks wrapped around. In the middle, sketch two light triangles pointing outward and round them off into bow loops. Add a small round knot where they meet. Last, let two ribbon tails hang down onto the skirt, each ending in a little V notch. I always draw the knot after the loops so it sits on top.
💡 Tip: Tilt the two bow tails apart a little, like an upside-down V.
Step 6: Add soft folds and bodice darts
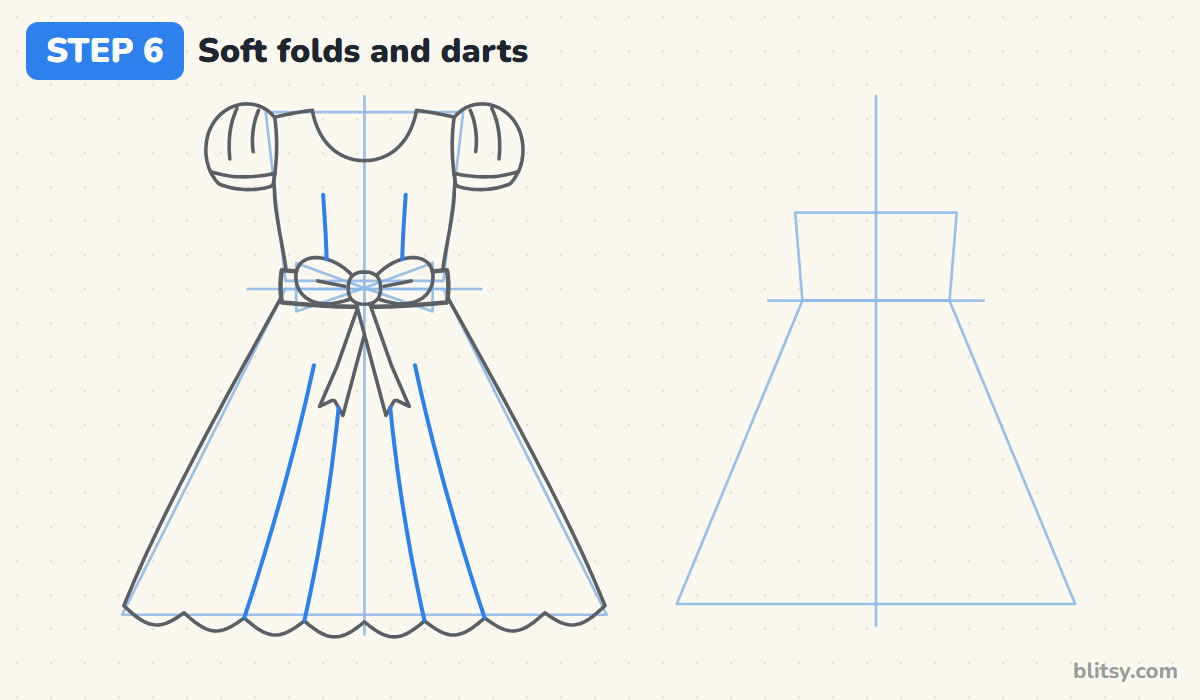
Folds make the skirt look like fabric instead of a cardboard triangle. From four of the scallop dips, draw a gently curved line upward, fading out about halfway to the waist. Keep them leaning toward the bow, the way real pleats spread from the waist. On the bodice, two short lines from the chest down to the sash are the darts that shape the top.
💡 Tip: Stop each fold line before the sash; folds that touch the waist look like stripes.
Step 7: Scatter the polka dots
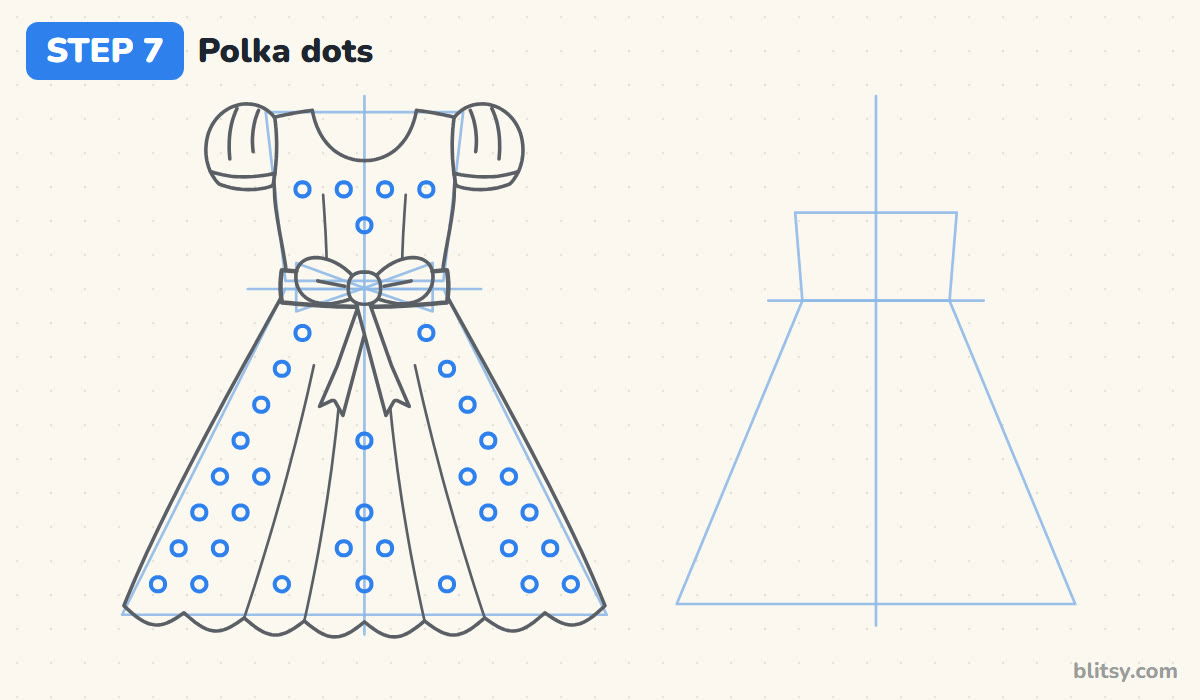
Polka dots look tidy when they sit in staggered rows, like bricks in a wall. Draw one row of small circles, then shift the next row half a space sideways. Skip any dot that would land on a fold, the bow or the edge of the dress. It's the slowest step, so take your time.
💡 Tip: Trace around the end of a pencil cap if your circles keep coming out lumpy.




Step 8: Draw the hanger and the sundress top
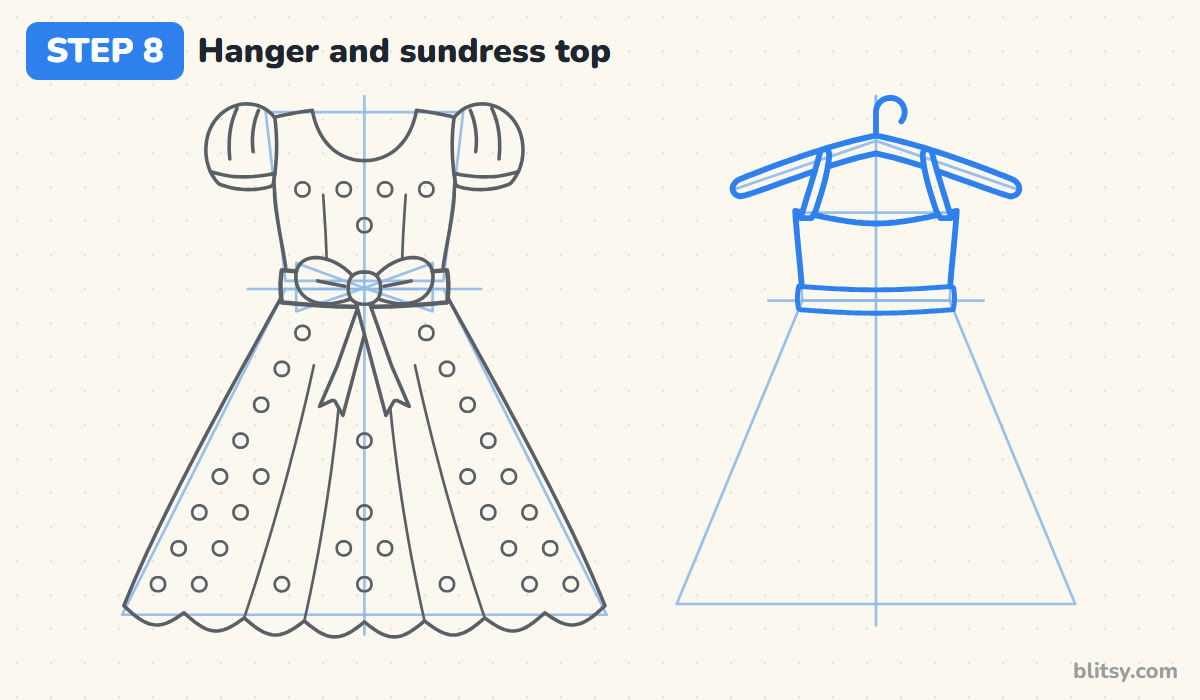
Move to the right-hand guides. Above the box, draw a small question-mark hook, then a wide, curved bar sloping down to both sides like a gentle roof. Below the bar, sketch a short rectangle for the sundress top, and loop two thin straps over the hanger. A narrow ribbon across the waistline finishes the top.
💡 Tip: Let the straps cross over the front of the hanger bar, not behind it.
Step 9: Shape the skirt with a ruffle
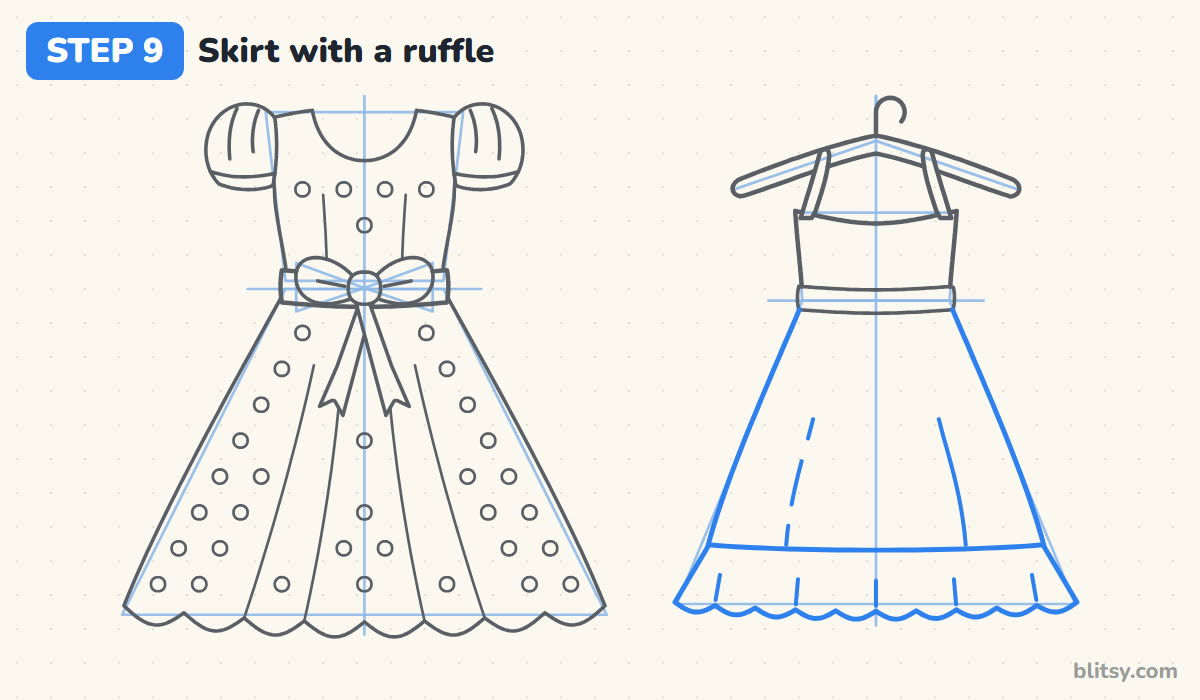
From the ribbon, draw the skirt sides flaring outward, a bit narrower than the party dress so the two look different. Stop a little above the bottom of the guide and draw a straight-ish seam across. Under that seam, add a wider ruffle with a wavy edge, then a few short lines in it to show the gathers.
💡 Tip: Make the ruffle stick out past the skirt on both sides so it looks bouncy.
Step 10: Draw tiny flowers on the sundress
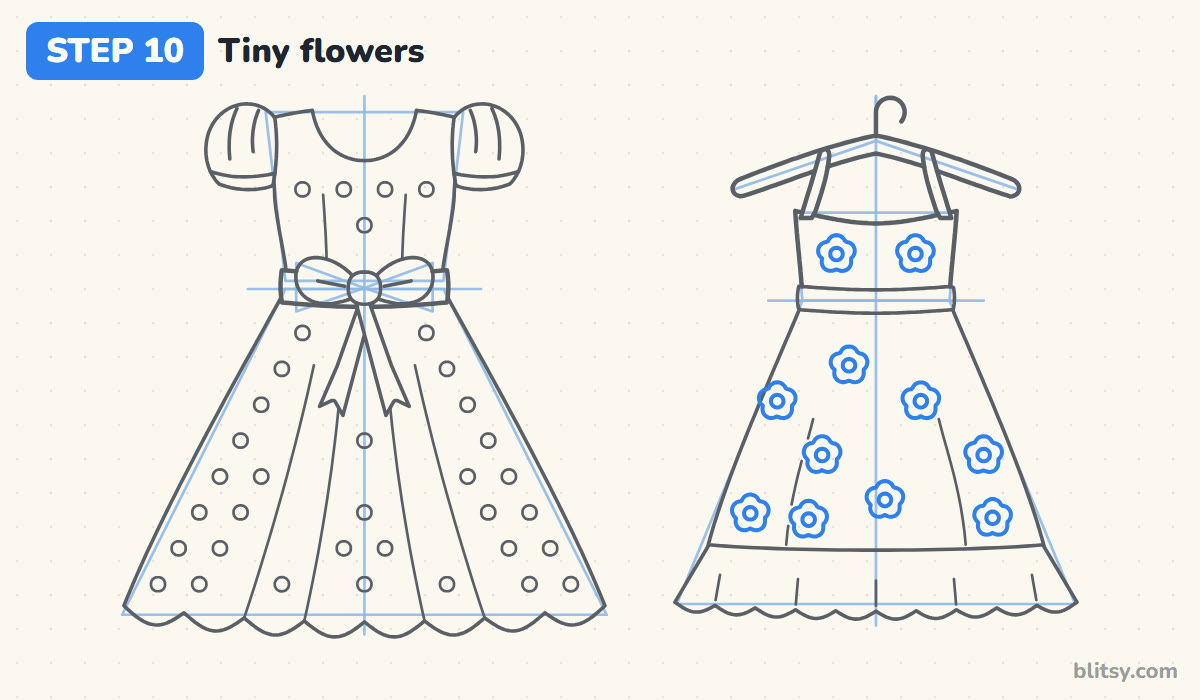
Each flower is five rounded petals around a small circle. My trick is to draw the center circle first, then add the petals around it like the numbers on a clock. Spread about nine flowers over the skirt and two on the top, leaving gaps between them. Keep them clear of the ruffle seam.
💡 Tip: Vary the spacing a little; flowers in perfect rows look like wallpaper.
Step 11: Ink the lines and erase the guides
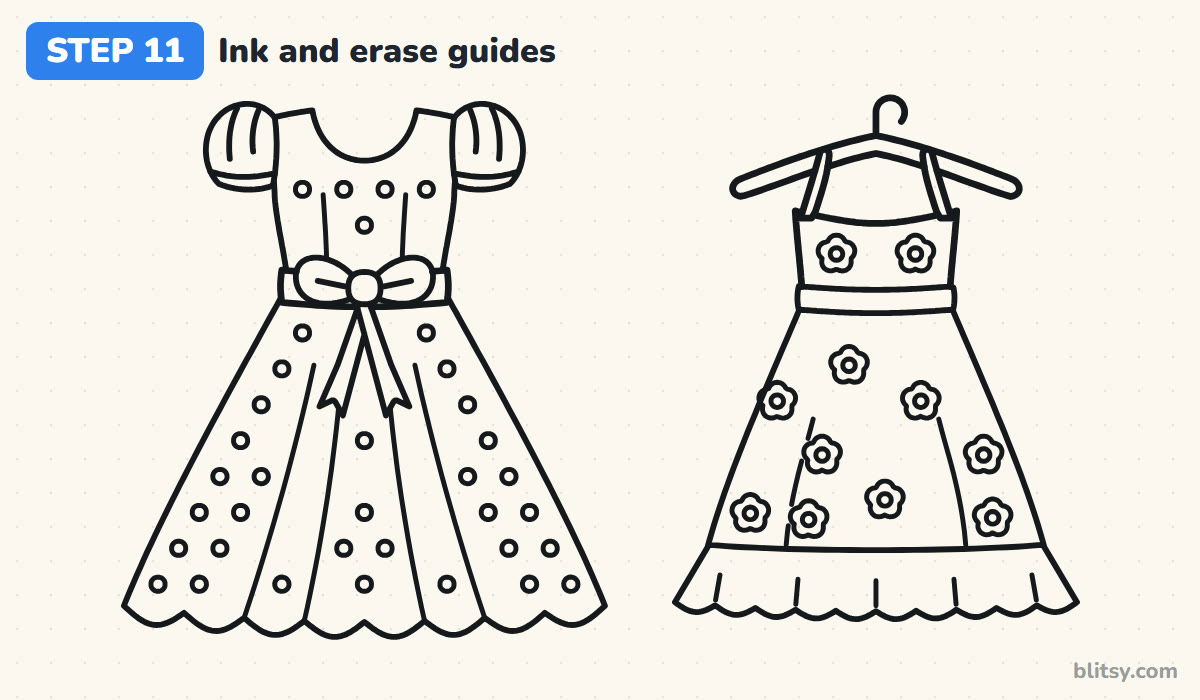
Go over every line you want to keep with your black pen. I ink the long outlines in slow, steady strokes and then switch to a lighter touch for the dots and petals. Leave the boxes and the center lines in pencil. Once the ink dries, erase all the pencil.
💡 Tip: Ink the left side and then its mirror on the right, so both match in weight.




Step 12: Color both dresses
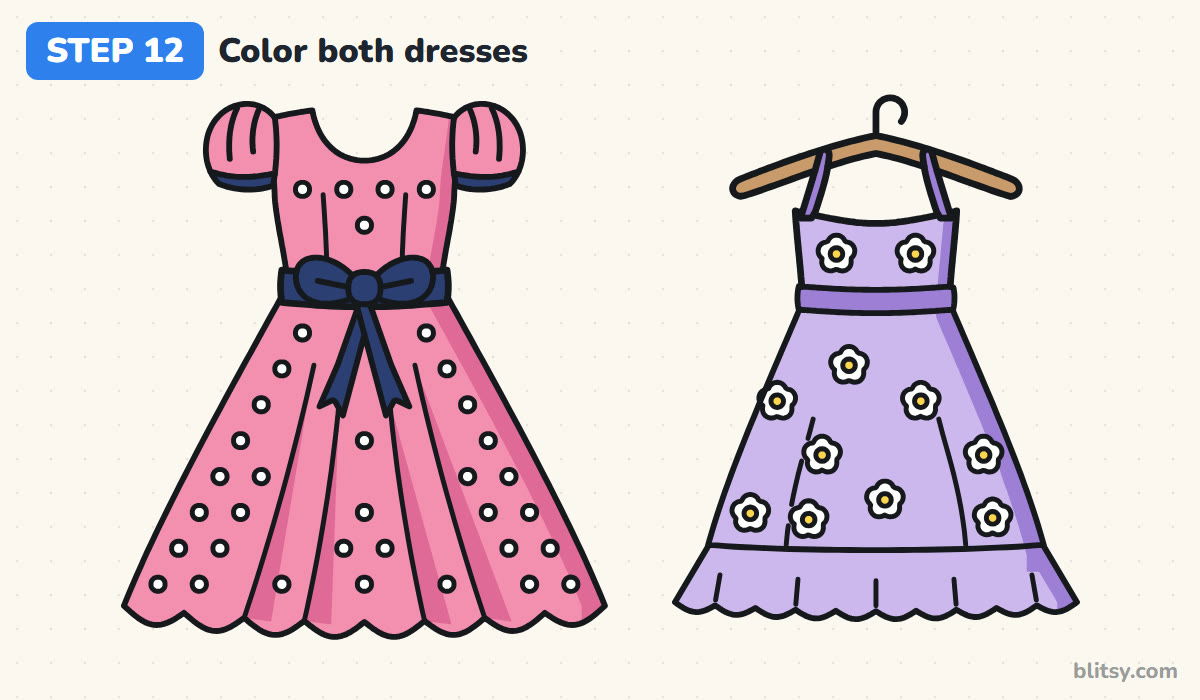
Pink goes on the party dress, with dark pink down the right side and beside each fold for shadow. The sash, bow and cuffs are navy, and the polka dots stay white. For the sundress, use lavender, then purple for the straps and ribbon plus a shadow down its right edge. Fill the flowers white with yellow centers and give the hanger a light brown.
💡 Tip: Color the dots and petals last, or leave them as bare white paper.
Dress Drawings That Turn Out Stiff
- A straight tube for a skirt. Without a flare, the dress looks like a sack. Widen the hem to about three times the waist.
- Sides that don't match. One sleeve bigger than the other makes the dress look lopsided. Measure each part from the center line before inking.
- A waist that sits too low. If the sash lands halfway down, the skirt looks short and the top looks long. Keep the waist about a third of the way down.
- Folds drawn as stripes. Long ruler-straight lines from waist to hem read as a pattern. Curve them slightly and stop them partway up.
- Dots crowding the edges. Circles cut in half by the outline look messy. Leave a small margin of plain fabric along every edge.
Restyle the Dress for Any Occasion
Once you've got the shape, change one thing at a time. Swap the round neckline for a sweetheart shape, lengthen the skirt to the ankles for a ball gown, or trade the polka dots for stripes. I like a mint green version with a white sash for spring. Want to put a dress on someone? The princess drawing tutorial is a natural next step, and how to draw a shirt uses the same center-line trick.
Dress Coloring Page and Printable Drawing Guide
Print the dress coloring page to try different color combinations; it comes with thick outlines and a colored example with a key at the top. The step-by-step guide PDF keeps all 12 steps and tips together and prints fine on Letter or A4.
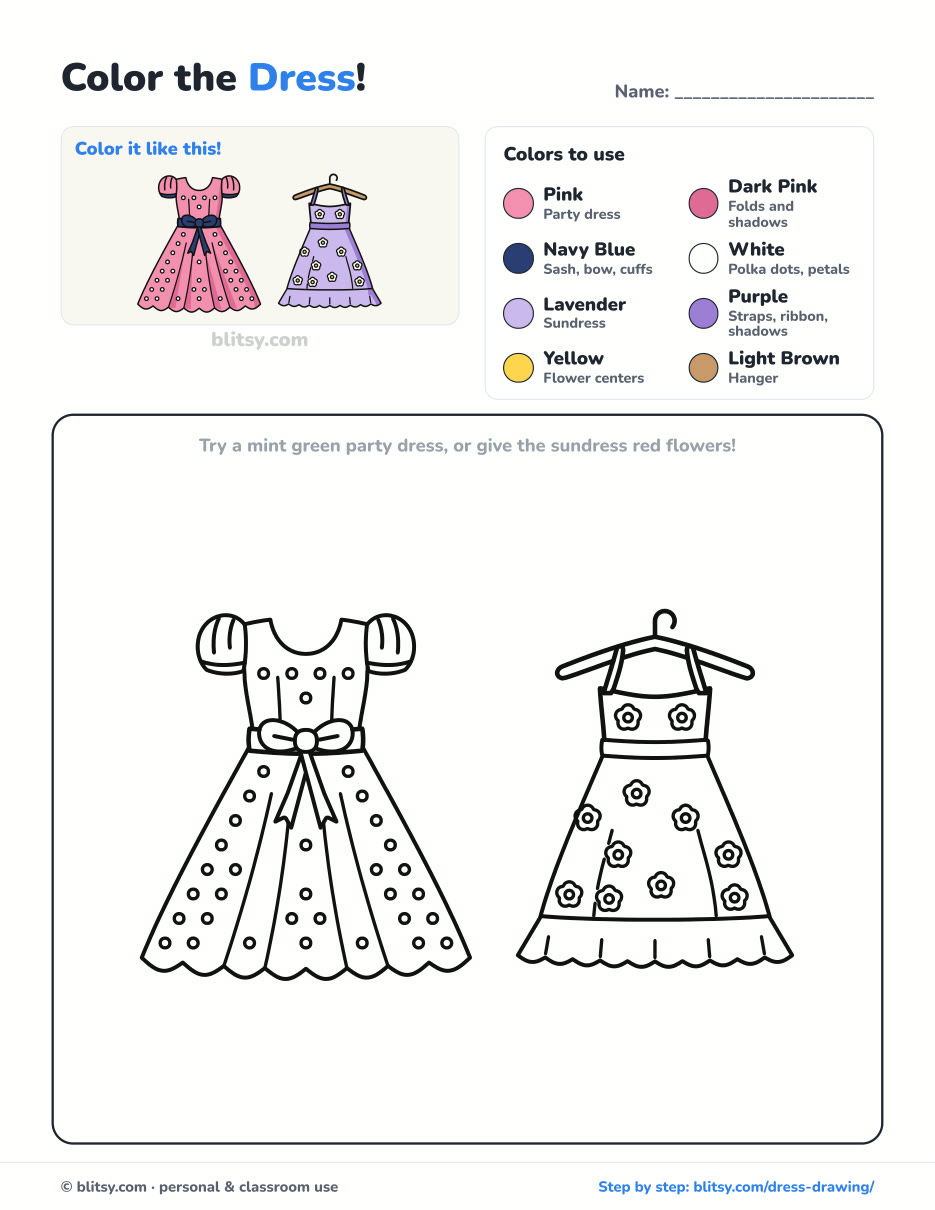
Black outlines with a colored example and the color names at the top. Ready to print and color.
⬇️ Download Coloring PageEvery step picture with its instructions and tips, to keep beside your paper while you draw.
⬇️ Download Drawing Guide📱 On a phone? Tap a download button, then open the file and choose Share → Save to Files or Print. On a computer, the PDF opens or saves straight to your Downloads folder.
Twelve Dress Stages on One Pinterest Pin
Dress Ready? Clothes and Accessories to Draw Next
These step-by-step tutorials cover more clothing and accessories, plus a few other lessons.
- Suit Drawing: A navy jacket, a striped tie and a flash of yellow in the pocket: the suit drawing tutorial.
- Chalk Art: Moving your drawing to the sidewalk, how to do chalk art step by step draws a hopscotch grid and a rainbow.
- Family Drawing: The family drawing step by step guide fits four people, a puppy and a balloon on one page.
- Shoes Drawing: Draw a red high-top and a low-top sneaker in how to draw shoes step by step.
- Shirt Drawing: The shirt drawing tutorial pairs a coral tee with a plaid button-up, sleeves rolled.
- Mask Drawing: A purple masquerade mask with gold trim, pearls and feathers: mask drawing step by step.
- Hoodie Drawing: Draw the front and back of one sage green hoodie in the hoodie drawing tutorial.
- Realistic Drawing: Learn to shade a shiny apple with the realistic drawing step by step lesson.
- Feather Drawing: Two feathers grow from a curved line and a leaf shape when you learn how to draw a feather.
Dress Drawing Questions From Young Artists
What is the easiest way to draw a dress?
Start with a center line, a narrow box for the top and a wide trapezoid for the skirt. After that, you round those shapes off and copy each side across the line.
How do you make a drawn dress look flowy?
Flare the skirt wider than you think it needs, curve the sides outward a little and add a few folds that start at the hem and fade out before the waist.
Can young kids draw this dress?
Yes. Children around 7 can manage the party dress on its own. Smaller kids can skip the polka dots and the sundress, and the dress still looks finished.
What colors look good on a dress drawing?
Pick one main color and one darker accent for the sash or trim. Pink with navy, lavender with purple, or yellow with white all work well, and white dots brighten any of them.
Pick your favorite color, sketch that center line lightly and see whose dress twirls the most. Next time, try designing a third one all your own. 👗✏️
Related posts:
 How to Draw a Balloon Step by Step (Easy Party Bunch)
 How to Draw a Whale Step by Step (Easy for Beginners)
 How to Draw Lungs Step by Step (Easy Science Diagram)
 How to Draw a Pineapple Step by Step (Easy Crown and Slice)
 How to Draw Iron Man Step by Step (Easy Chibi for Kids)
 How to Draw a Hoodie Step by Step (Front and Back View)
 How to Draw a Parrot Step by Step (Easy Scarlet Macaw)
 How to Draw a Police Car Step by Step (Easy for Kids)
 How to Draw a Volcano Step by Step (Easy Erupting Volcano)
 How to Draw a Crow Step by Step (Easy for Beginners)
 How to Draw a Tiger Step by Step (Easy Walking Pose)
 How to Draw a Heart Step by Step (Even, Symmetric Shape)

