
Puffy clouds seem like the easiest thing in the world to draw, right up until yours comes out as a stiff row of identical bumps. The trick is hiding in a few overlapping circles. Below I'll show you how to draw a cloud step by step, starting from a flat line and those circles, then giving the big cloud a sleepy face and three small weather friends: a rain cloud, a sunny one and a little storm.
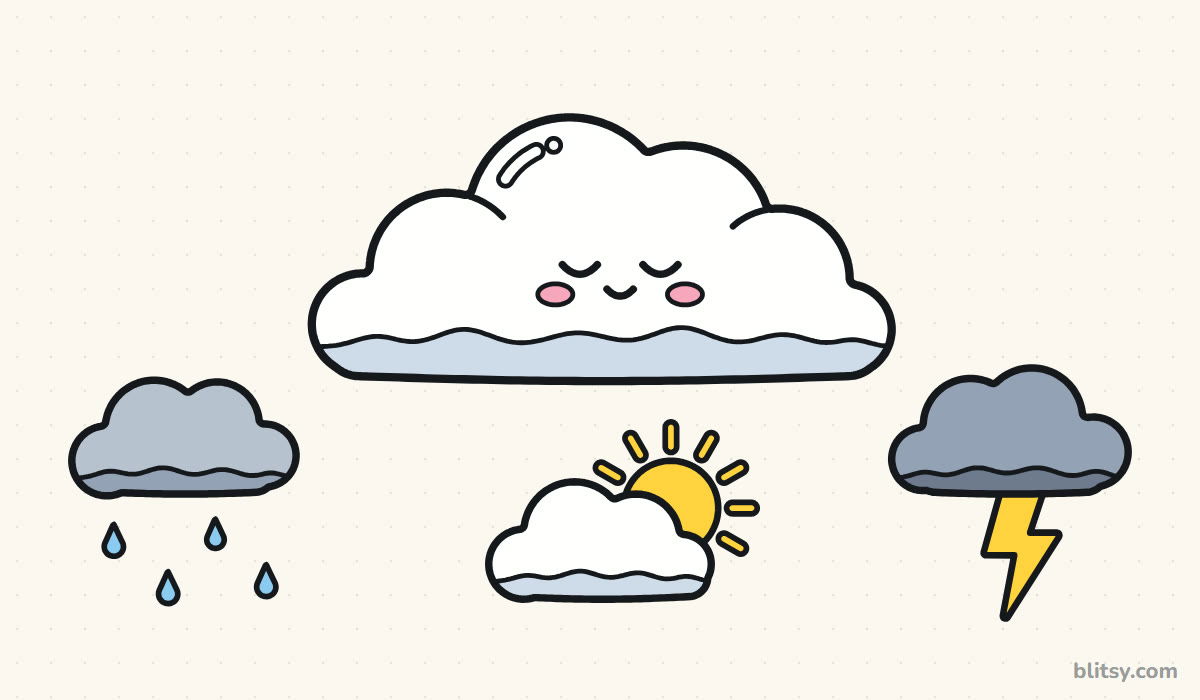
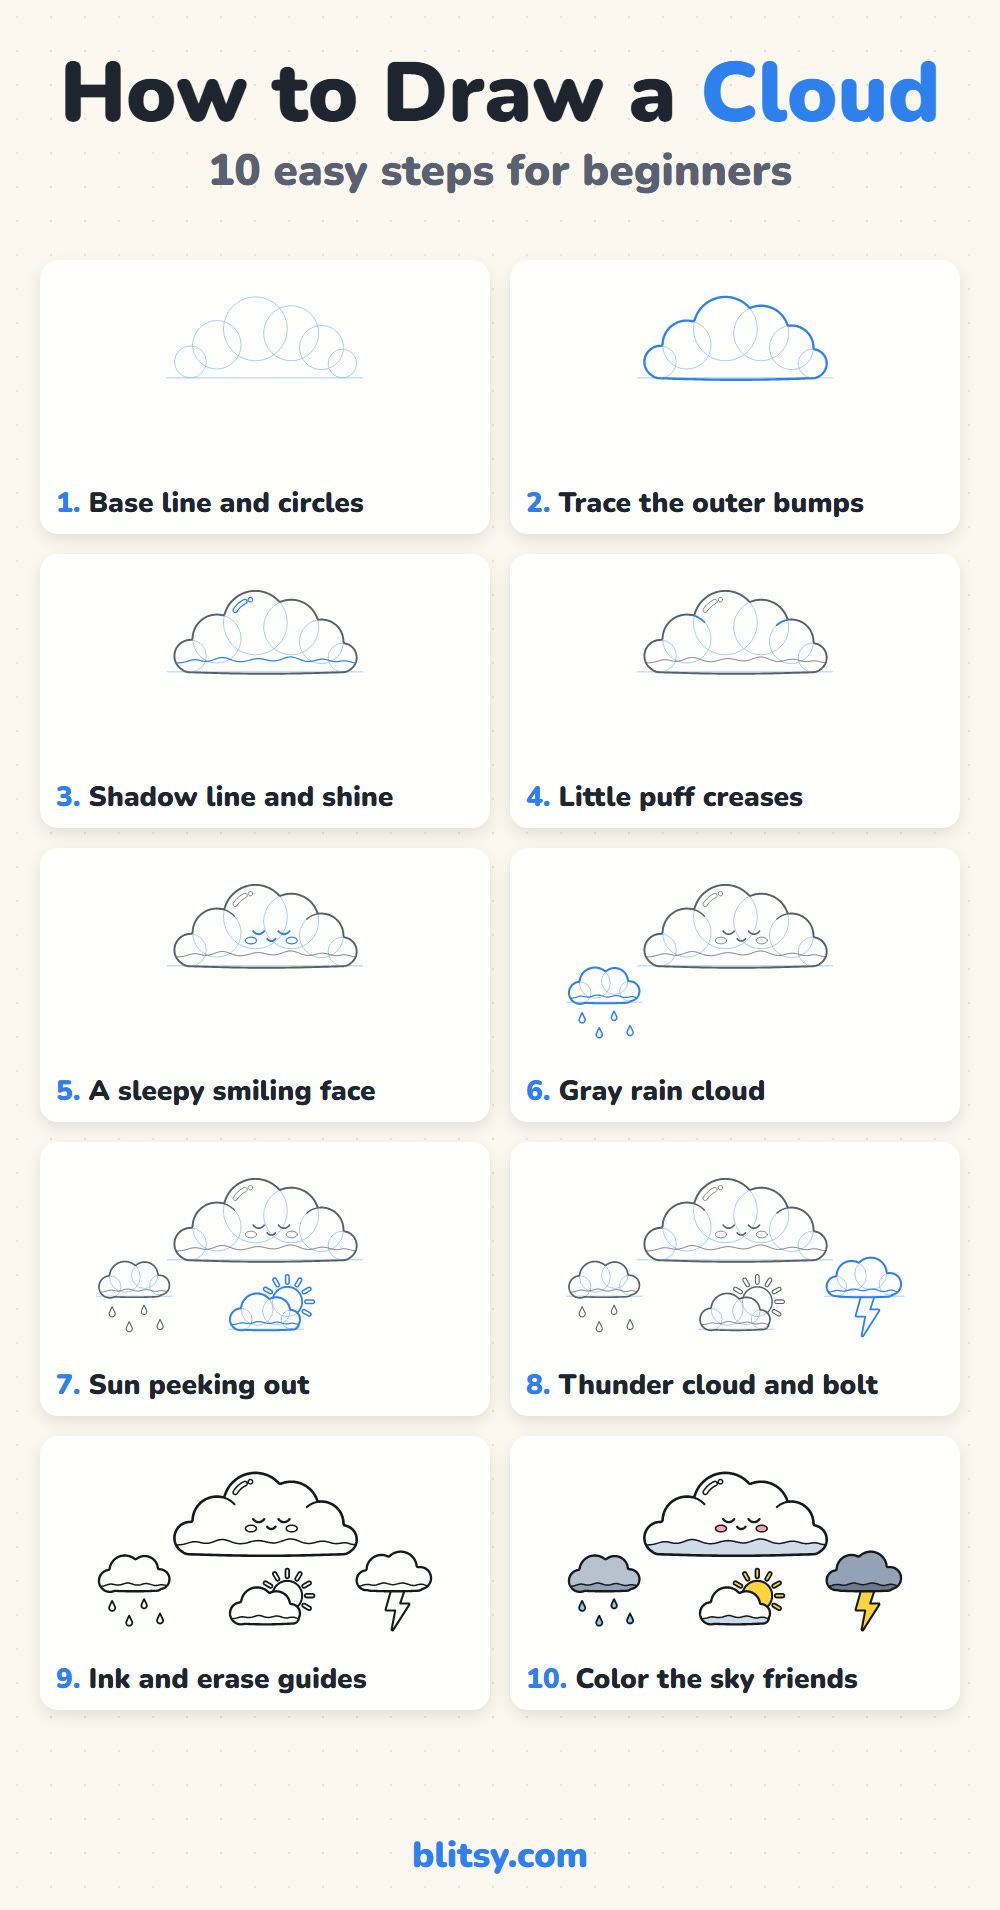
Each picture below shows the new lines for that step in blue. Anything gray was drawn earlier, and the faint light blue circles are helpers you'll erase once the ink goes on.
Quick overview
⏱️ Time: about 20 minutes
🎯 Level: very easy, fine for kids around 5 and up
✏️ Steps: 10
☁️ You'll draw: a sleepy cloud plus rain, sun and thunder clouds
Cloud Sketch Supplies
- A pencil you can press very lightly
- A soft eraser for the guide circles
- A black marker or felt-tip pen
- Coloring pencils or markers (white is optional, since the paper can stay white)
- Plain paper, turned sideways so the clouds have room
No gray pencil? Shade lightly with a regular black colored pencil and it turns into a soft gray.
How to Draw a Cloud Step by Step
Step 1: Lay down a base line and six circles
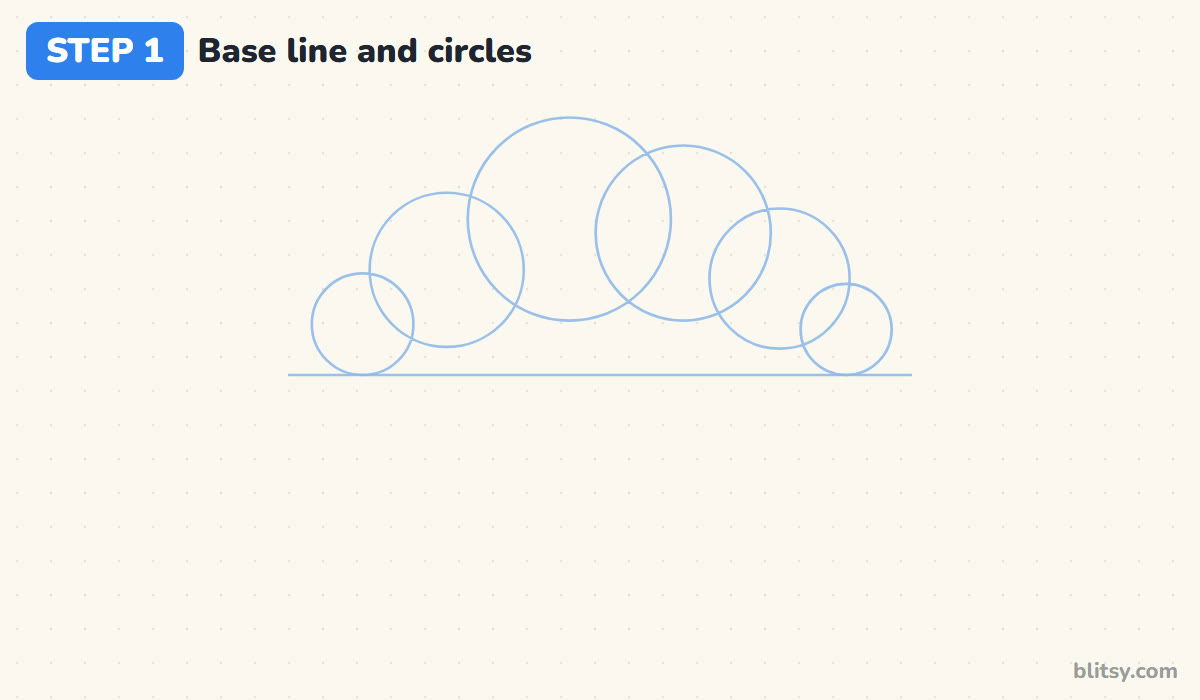
Draw a straight line across the upper half of the page; it's the flat base of the cloud. Now sit six circles on and above it. The two in the middle are the biggest, the ones next to them a bit smaller, and the two at the ends are small and touch the line. Let every circle overlap its neighbors. I make the sizes uneven on purpose, because real clouds never puff up in neat matching balls.
💡 Tip: Press so lightly that you can barely see the circles. They're only scaffolding.
Step 2: Trace only the outer bumps
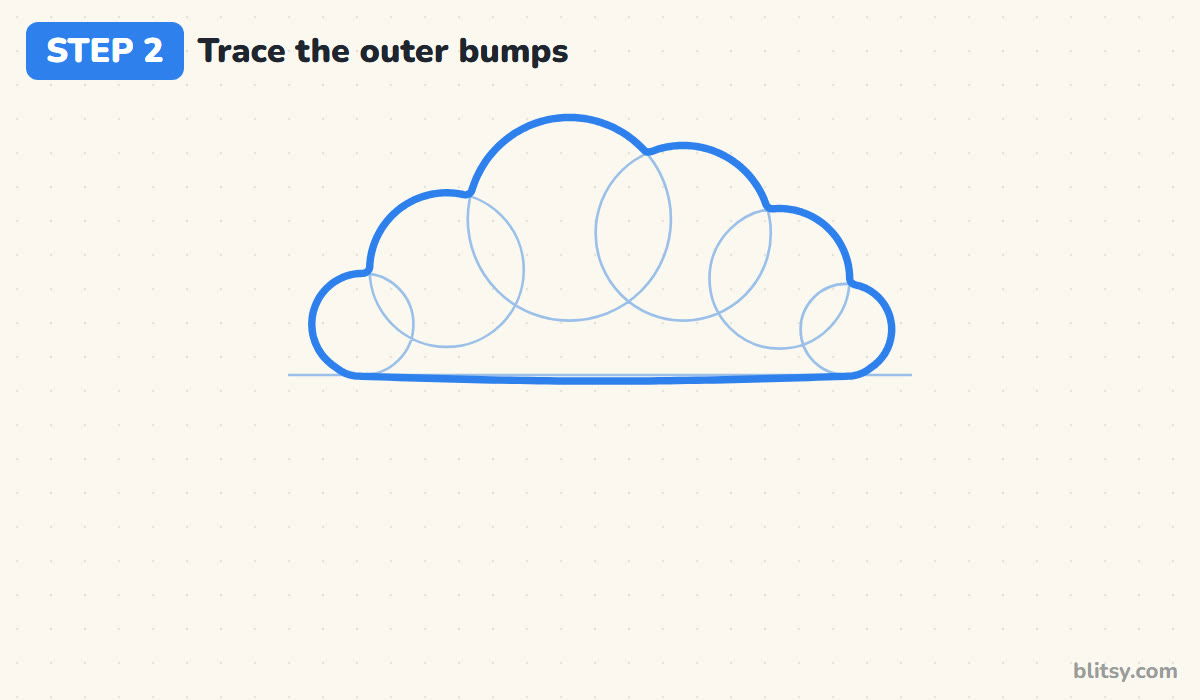
Start at the bottom left and follow the outside edge of the circles, hopping from one to the next where they cross. Ignore every part of a circle that falls inside the cloud. When you reach the right end, curve down and run along the base line back to where you began. The dips between the bumps should be small, soft corners, not deep notches.
💡 Tip: Run a finger along the outside of the circles first so your eye knows the path.
Step 3: Add a wavy shadow line and a shine
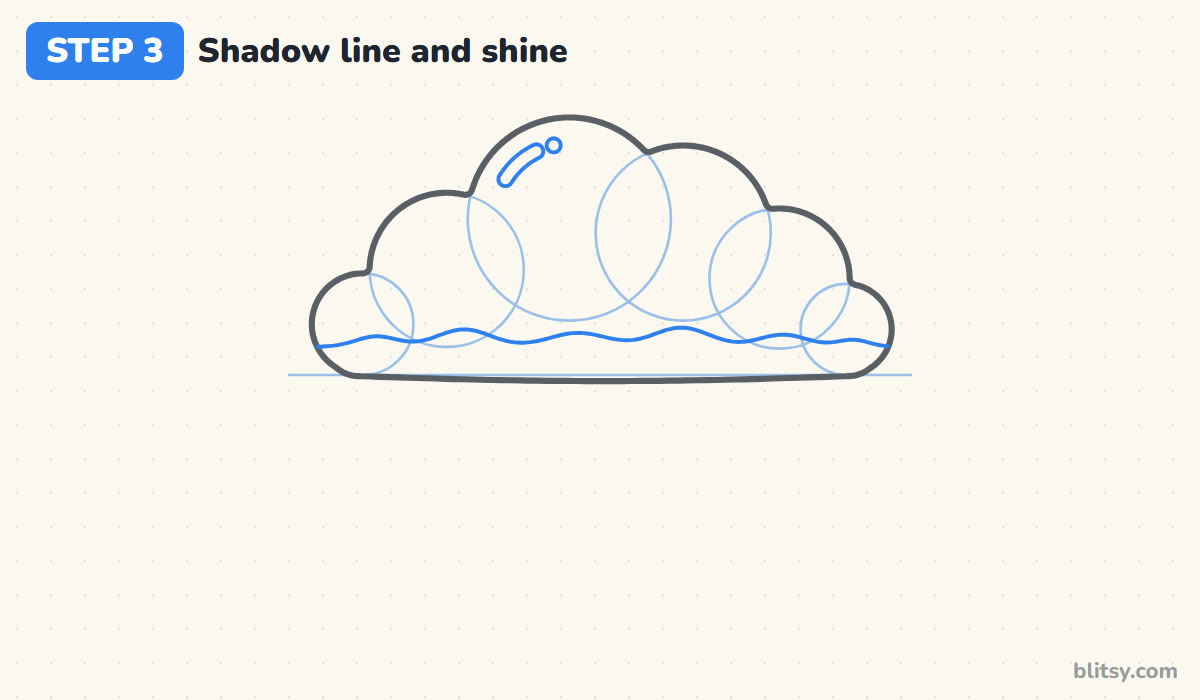
A little above the bottom, draw a gentle wavy line from one side of the cloud to the other. Keep the waves low and uneven; this marks the shady underside that we'll color blue-gray later. Then near the top left of the biggest bump, draw a short curved stroke as a narrow loop, with a tiny circle just after it. That's the shine where the light hits.




💡 Tip: Make the wavy line rise a bit under each big bump and dip between them.
Step 4: Sketch two small puff creases
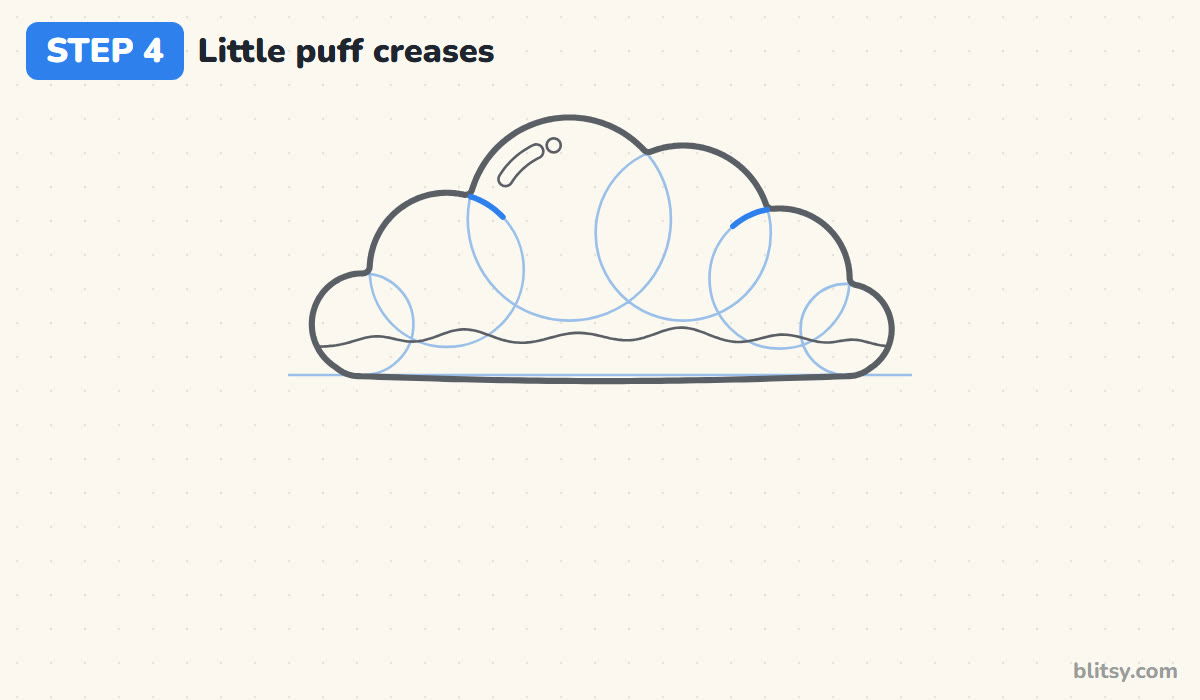
Look at the valley between the left bump and the big middle one. From that dip, let the smaller bump's curve carry on into the cloud for a short distance, like the edge of a cotton ball tucked in front of another. Do the same on the right side. Two creases are plenty; more of them start to look like wrinkles.
💡 Tip: Stop each crease well before it reaches the middle of the cloud.
Step 5: Give it a sleepy smiling face
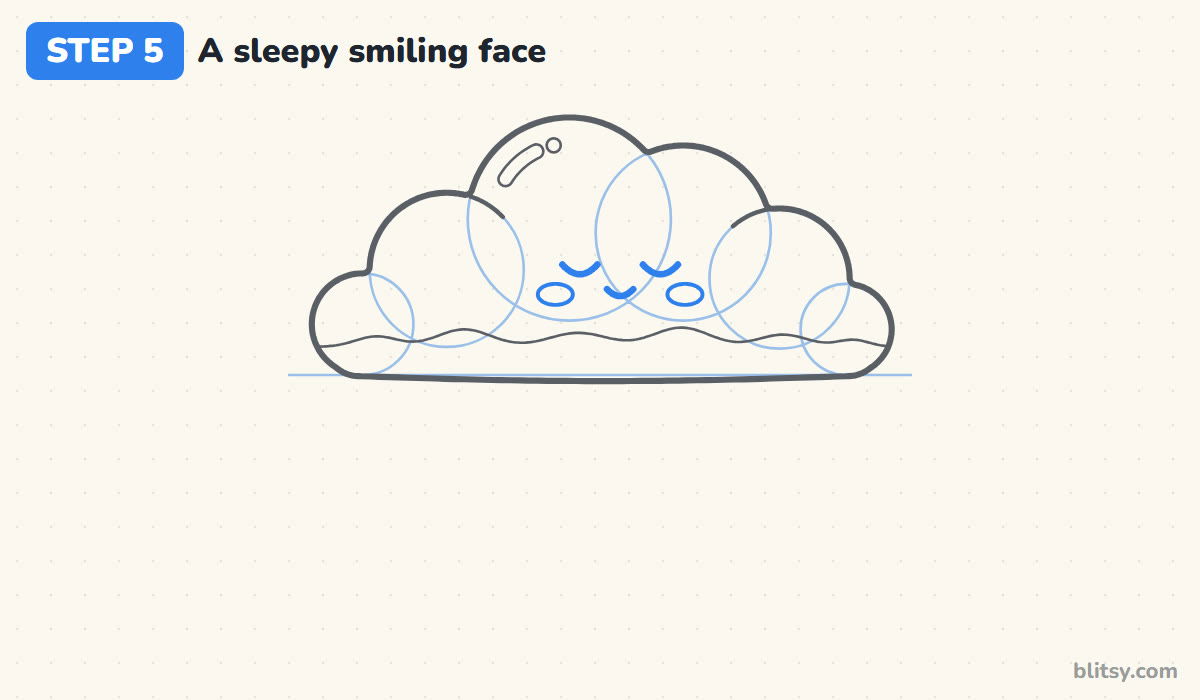
Under the big bumps, about halfway down, draw two small U-shaped curves for closed eyes. Leave roughly one eye's width between them. Center a tiny smile, also shaped like a U, just below the gap and a little lower than the eyes. Finish with a flat oval cheek under the outside corner of each eye. Kids often place the face too high, but sitting low makes the cloud look chubby and sweet.
💡 Tip: Keep the smile smaller than an eye. A big grin hides the sleepy look.
Step 6: Build a rain cloud with drops
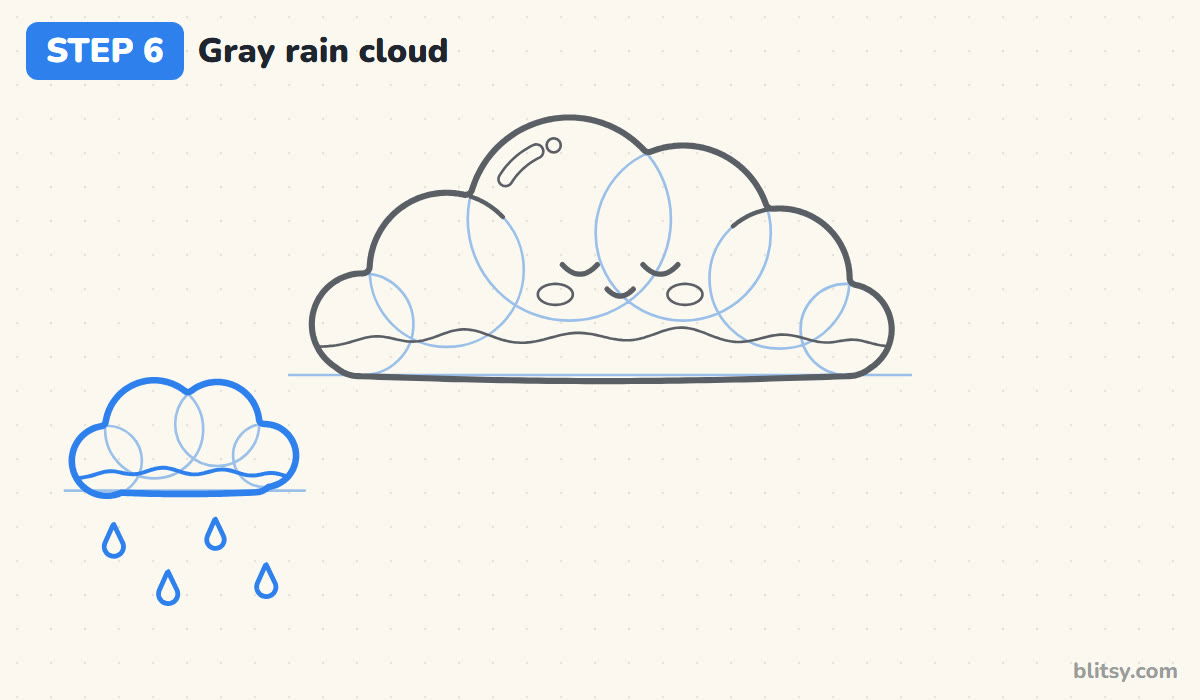
Down on the left, draw a shorter line with four guide circles on it, two middle ones bigger than the ends. Trace the outer bumps the same way as before and add a wavy shadow line near the bottom. Below it, draw four raindrops, round at the bottom and pointed on top, staggered so two hang high and two hang low. This little cloud gets colored darker later.
💡 Tip: Leave a finger's width between the cloud and the first drop so the rain looks like it's falling.
Step 7: Hide a sun behind a cloud
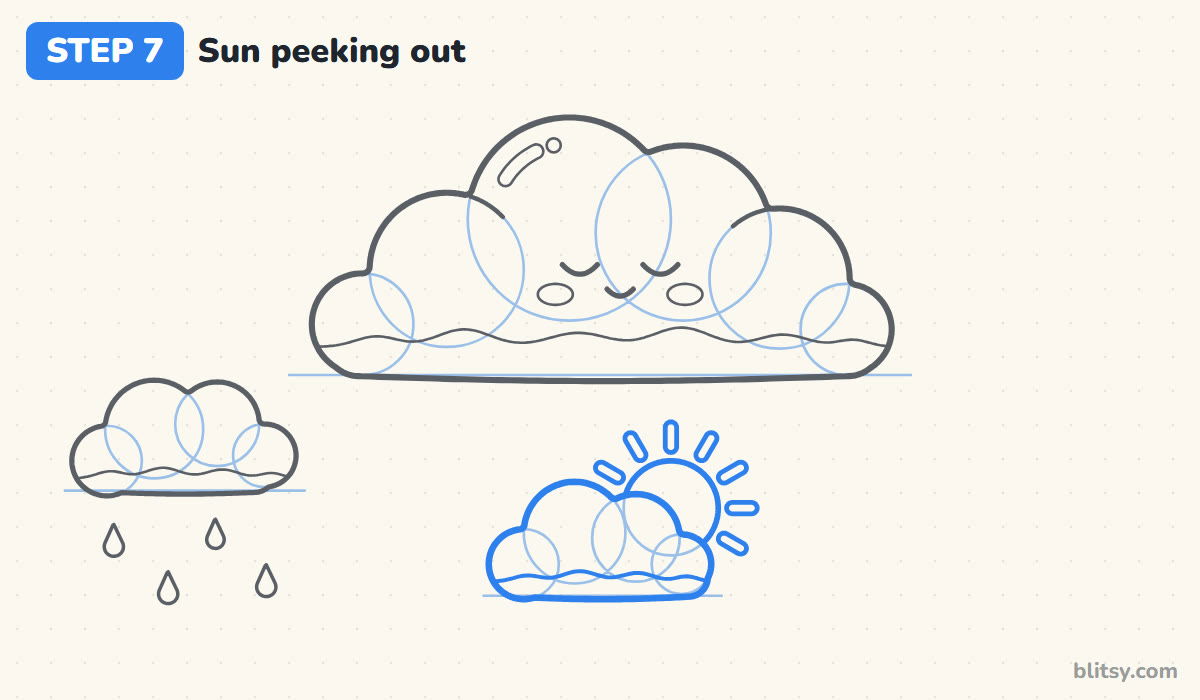
In the bottom middle, set up another base line and four circles, then add one more circle for the sun, overlapping the top right of the group. Trace the cloud's outer bumps first. Now draw only the part of the sun's circle that sticks out above the cloud, and stop where it meets the outline. Around that visible part, add short rounded rays, leaving a small gap between each ray and the sun.

💡 Tip: Draw the cloud before the sun. Then you know exactly where the sun's line has to stop.
Step 8: Drop a bolt from a thunder cloud
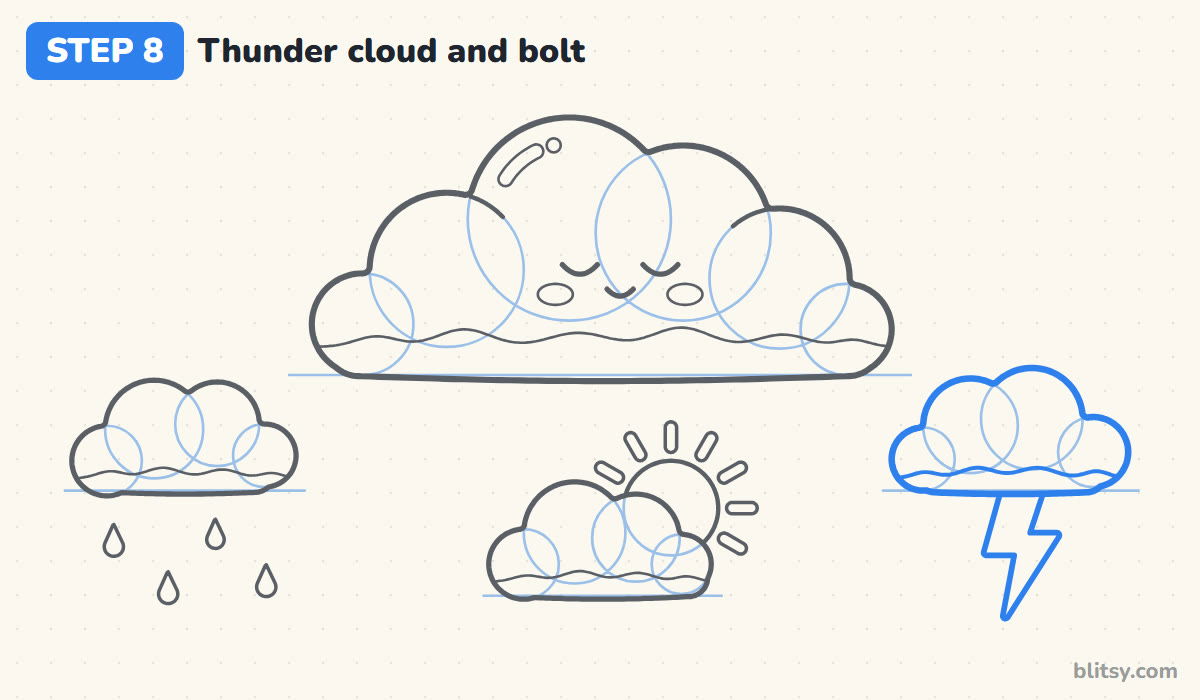
On the right, make one more small cloud from a line and four circles, with its tallest bump a little right of center. Add its wavy shadow line. For the lightning, draw a zigzag shape that starts right at the cloud's bottom edge: wide at the top, a step to the side, then a long sharp point heading down. I like a slight lean so the bolt feels fast.
💡 Tip: Lightning bolts look sharper with only two zigzags. A third one makes it look like a ribbon.
Step 9: Go over the keepers in ink
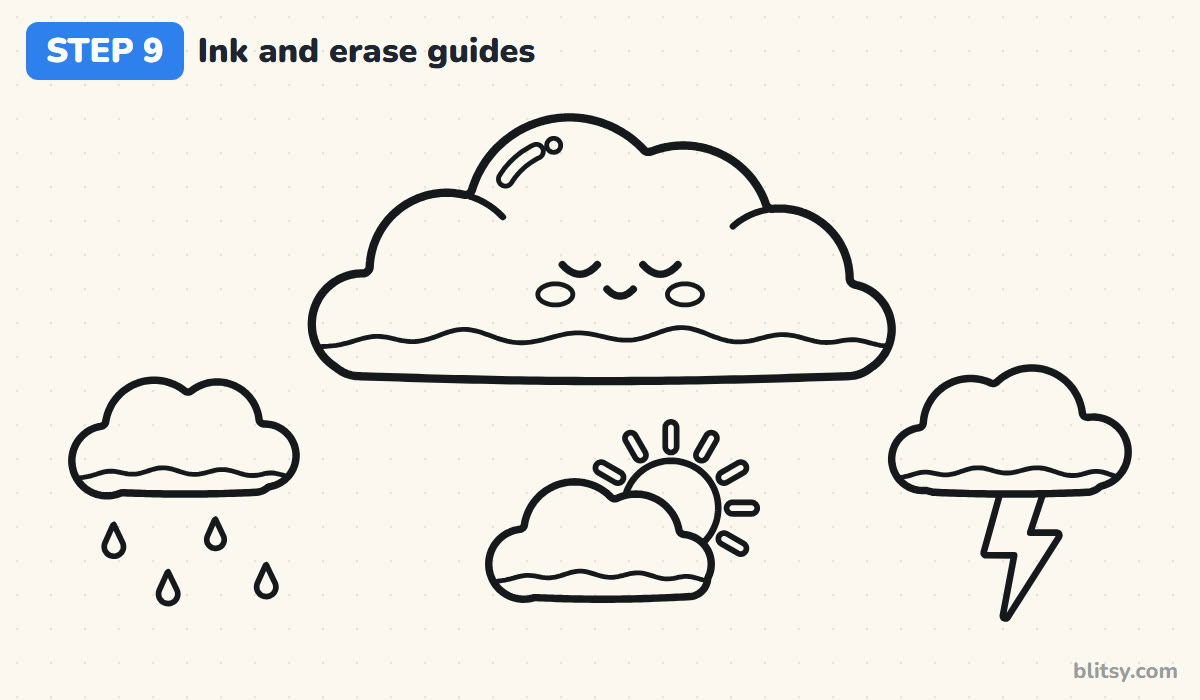
Trace every outline, shadow line, crease and face line with your black marker. The shadow lines can be a touch thinner than the cloud outlines if you have two pens. Wait for the ink to dry completely, then erase all the guide circles and base lines. Erase gently over the ink; scrubbing hard can gray it.
💡 Tip: Lift your marker at each bump's dip instead of going around in one long loop. Your curves stay rounder.
Step 10: Color the sky friends
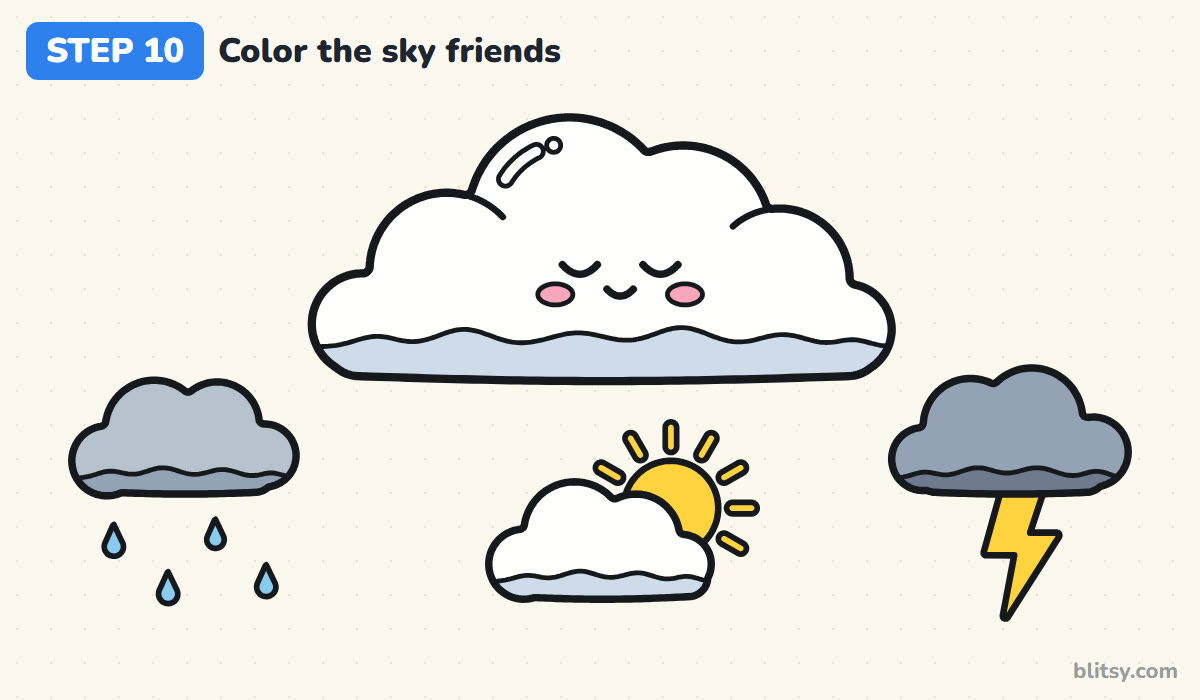
Leave the big cloud white, or color it very lightly. Fill the band below the wavy line with a light blue-gray, both on the big cloud and on the sunny one. Give the rain cloud a medium gray with a darker bottom, and the thunder cloud a dark gray with a charcoal bottom. Then add yellow for the sun and bolt, light blue for the drops and pink for the cheeks.
💡 Tip: Color the gray clouds in small circles, not straight strokes. The texture looks fluffier.
What Makes a Cloud Look Lumpy
- Every bump is the same size. A row of matching bumps looks like a caterpillar. Use a big middle and smaller ends.
- Drawing the inside of each circle. The cloud ends up looking like a pile of bubbles. Trace only the outer edge, then add just two short creases.
- Rounding the bottom like the top. A cloud that's puffy all the way around looks like a sheep. Keep the base nearly flat.
- Pressing hard on the guide circles. They won't erase cleanly and leave dents. Sketch them as faint as you can.
- Drawing the whole sun circle first. Its line then runs through the cloud. Draw the cloud, then only the part of the sun you can see.
Weather Moods for Your Clouds
When I want a cloud to show a mood, I change the face and the color before I change the shape. Raised eyebrows and a little open mouth make a surprised cloud, and a frown with a dark gray fill turns into a grumpy storm. You can stretch the base line for a long, lazy cloud, or stack three circles high for a tall one. A sun goes well behind any cloud, so the smiling sun drawing tutorial is worth a look, and the umbrella drawing tutorial makes a cute pair with the rain cloud.
Cloud Coloring Page and a Printable Drawing Guide
Print the cloud coloring page and match the colors to the small finished example at the top, where each swatch says which cloud it belongs to. The empty space around the outlines is good for a blue sky, birds or a rainbow. The step-by-step guide PDF puts all 10 steps on paper with their tips. Both print on Letter or A4.
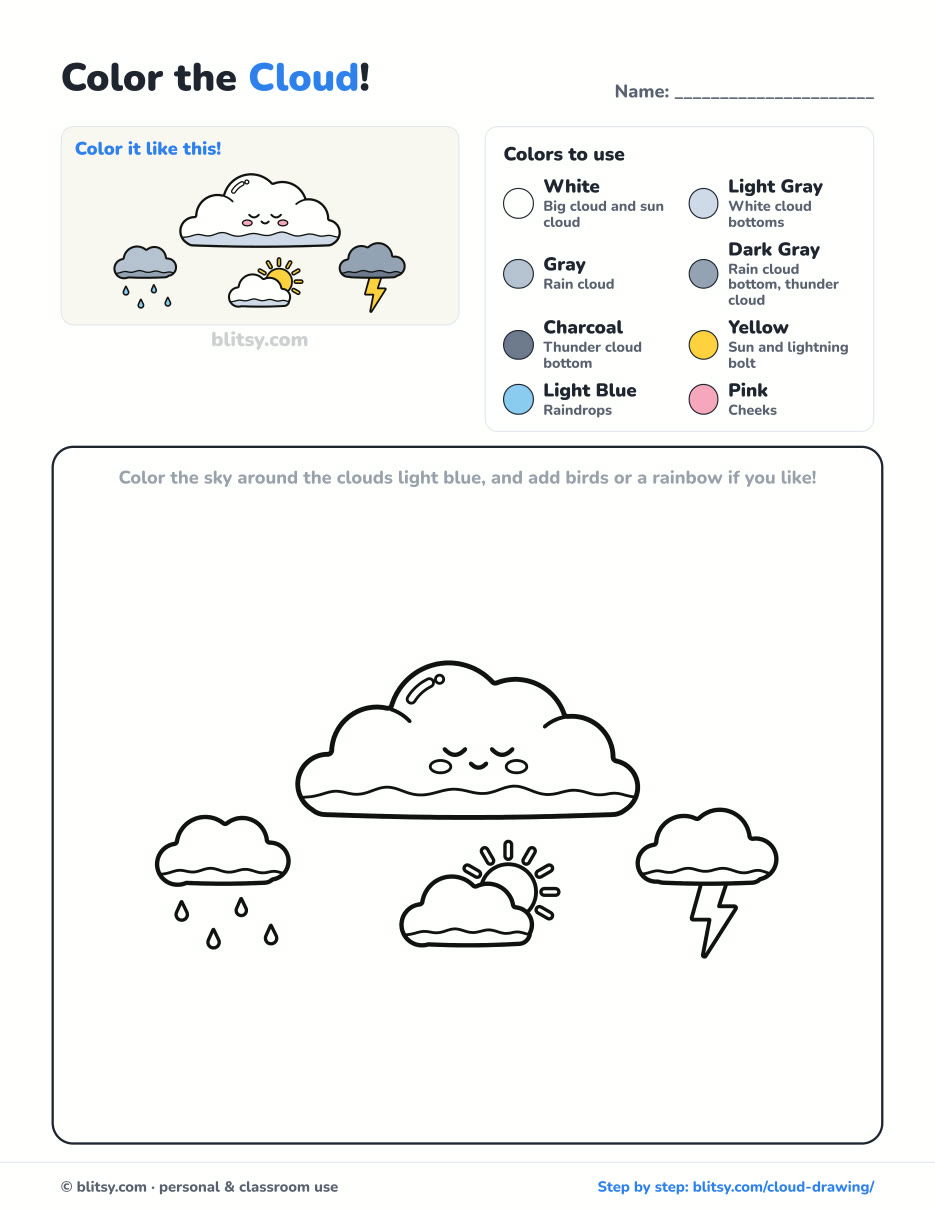
Black outlines with a colored example and the color names at the top. Ready to print and color.
⬇️ Download Coloring Page
Every step picture with its instructions and tips, to keep beside your paper while you draw.
⬇️ Download Drawing Guide📱 On a phone? Tap a download button, then open the file and choose Share → Save to Files or Print. On a computer, the PDF opens or saves straight to your Downloads folder.
Save This Cloud Lesson on Pinterest
Cloud Drawing Questions From Young Artists
What is the easiest way to draw a cloud?
Draw a flat line, put a few overlapping circles on it with the biggest in the middle, and trace only the outer edge. Then erase the circles.
What kind of cloud is a cartoon cloud?
It's based on cumulus, the puffy fair-weather clouds with flat bottoms and rounded tops. Like all clouds, they're made of tiny water droplets or ice crystals.
Why do I color rain clouds gray?
Rain clouds are thick enough to block much of the sunlight, so their undersides look gray from the ground. Darker gray works well for thunder clouds.
Can little kids draw this cloud?
Yes. Five-year-olds can do the big cloud and its face. They can skip the creases and the sun cloud and still end up with a sweet drawing.
Next rainy day, look out the window and try to copy one real cloud shape with your circles. 🌥️
Related posts:
 How to Draw a Tooth Step by Step (Cute and Easy for Kids)
 How to Draw a UFO Step by Step (Cute Alien Saucer)
 How to Draw an Astronaut Step by Step (Cute and Easy)
 How to Draw an Owl Step by Step (Cute Night Owl)
 How to Draw an Axolotl Step by Step (Cute and Easy)
 How to Draw an Octopus Step by Step (Cute and Easy)
 How to Draw a Frog Step by Step (Cute Frog on a Log)
 How to Draw a Jellyfish Step by Step (Cute, Easy Guide)
 How to Draw a Grim Reaper Step by Step (Cute Halloween)
 How to Draw a Care Bear Step by Step (Cute Fan Art for Kids)
 How to Draw Cerberus Step by Step (Cute and Easy)
 How to Draw a Monster Step by Step (Cute and Easy)

