
Fire never holds still, and that's exactly why so many people get stuck drawing it. Here you'll learn how to draw flames step by step by building a cozy campfire, with crossed logs, a ring of stones and a big flame that leaps upward in curvy tongues. The secret is one wiggly line, the S-curve, repeated at different sizes. Once that clicks, you can draw fire anywhere: on candles, torches, dragons or a rocket engine.
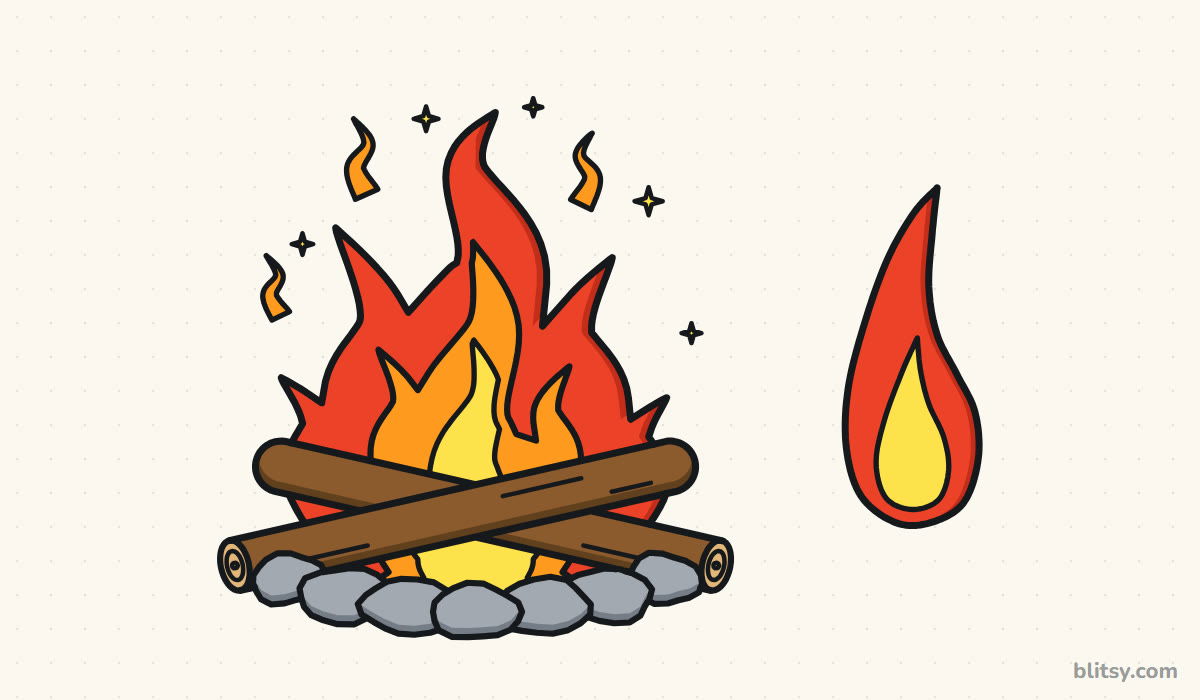
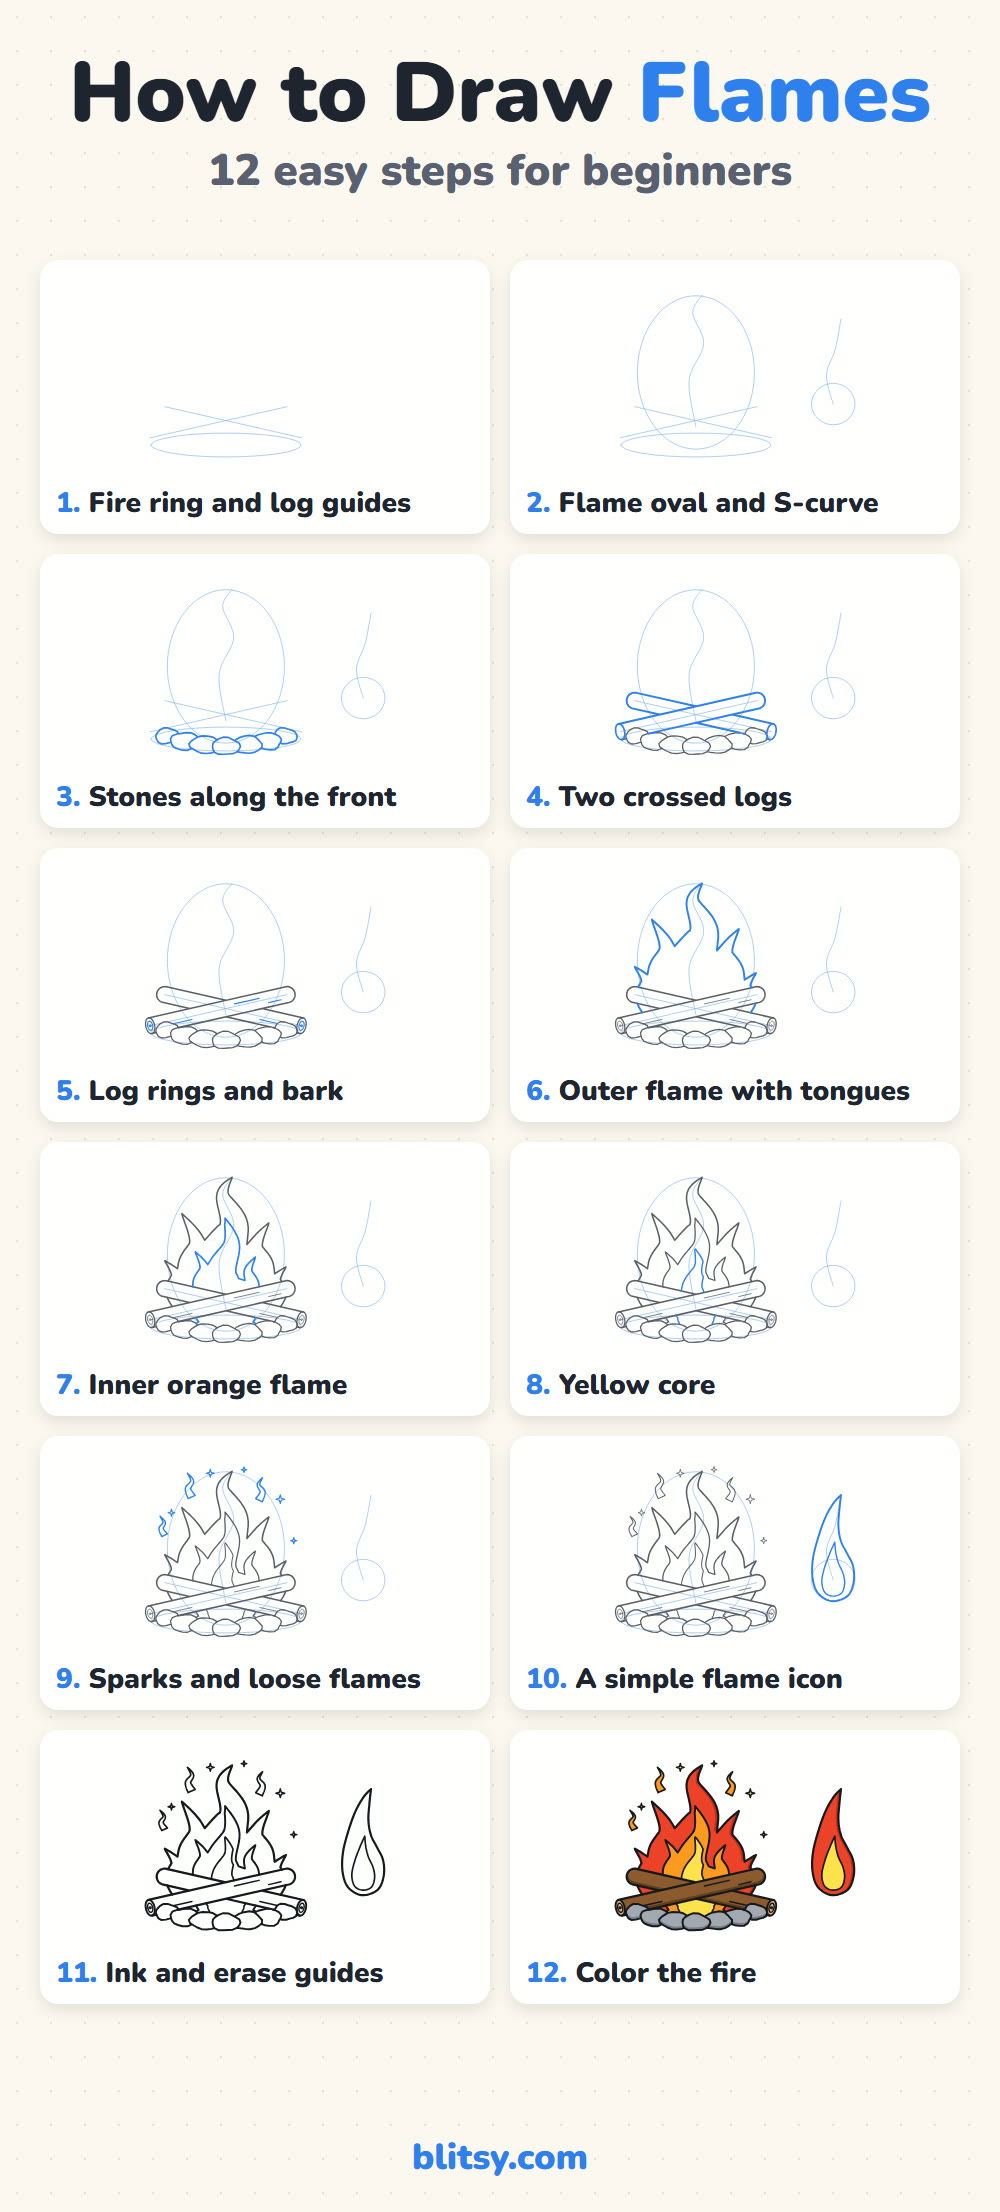
Every picture marks its new part in blue. Anything gray was drawn earlier. The pale blue oval, ring and S-curve at the start are helper lines, so keep them faint and erase them after inking.
Quick overview
⏱️ Time: about 20 to 30 minutes
🎯 Level: easy, good for kids around 6 and up
✏️ Steps: 12
🔥 You'll draw: a campfire with layered flames and a flame icon
Supplies for a Crackling Campfire Sketch
- A pencil with a light touch (HB works well)
- A clean eraser
- A black marker or fineliner for the final lines
- Colored pencils or markers in the warm fire colors, plus brown, tan and gray
- A sheet of plain paper turned sideways
Crayons work too; just press harder on the yellow so it shows through.
How to Draw Flames Step by Step
Step 1: Sketch a fire ring and two log lines
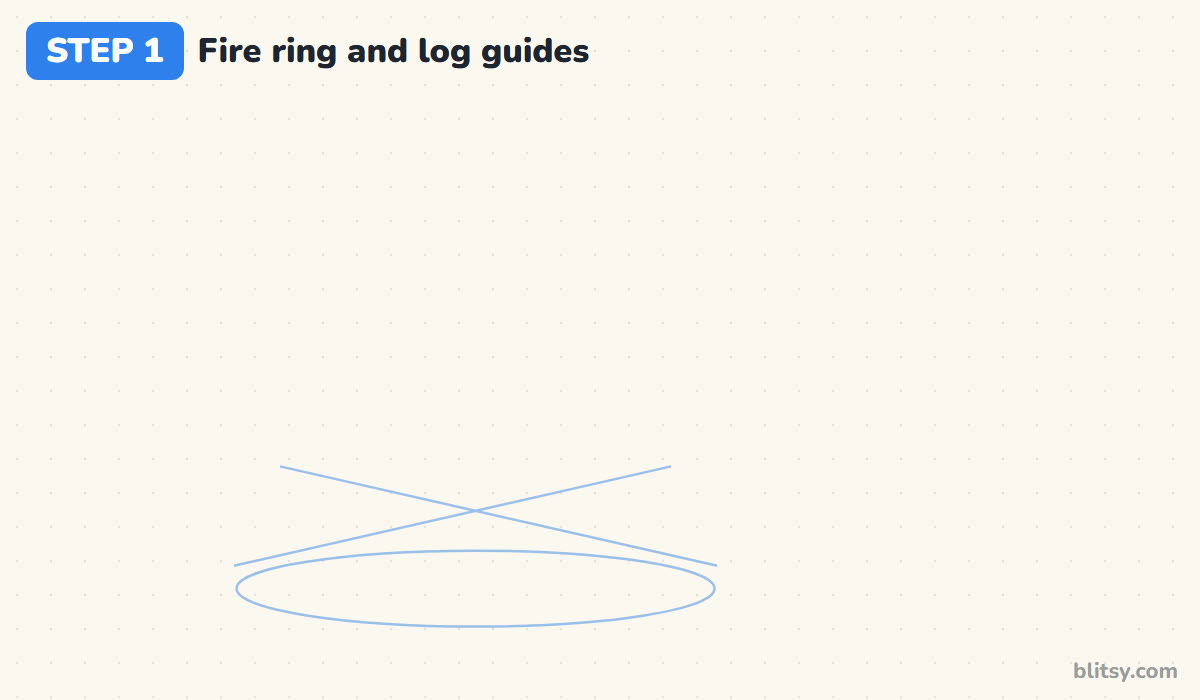
Near the bottom of the page, draw a wide, flat oval. That's the ground where the stones will sit. Then add two long slanted lines that cross above the oval's middle, like a stretched letter X. Each line marks the center of one log, so let them reach a little past the oval on both sides.
💡 Tip: Press so softly that the lines almost disappear.
Step 2: Add a tall flame oval and an S-curve
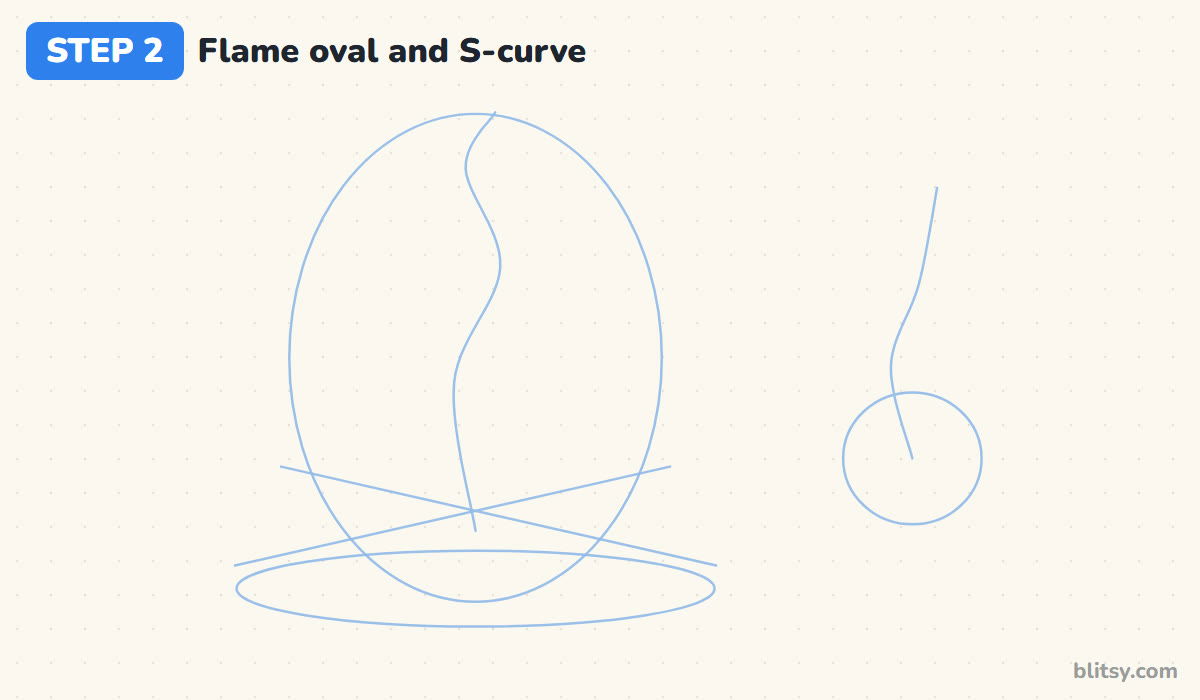
Above the logs, draw a tall egg shape that sits on the ring. It tells you how wide and how high the fire can go. Through its middle, draw one wavy line from bottom to top, bending left, then right, then left again. I call this the S-curve, and every flame tongue in this drawing follows it. To the right, sketch a small circle with a shorter S-curve rising from it for the flame icon.
💡 Tip: Keep the S-curve loose; a stiff line makes stiff fire.
Step 3: Draw the stones along the front
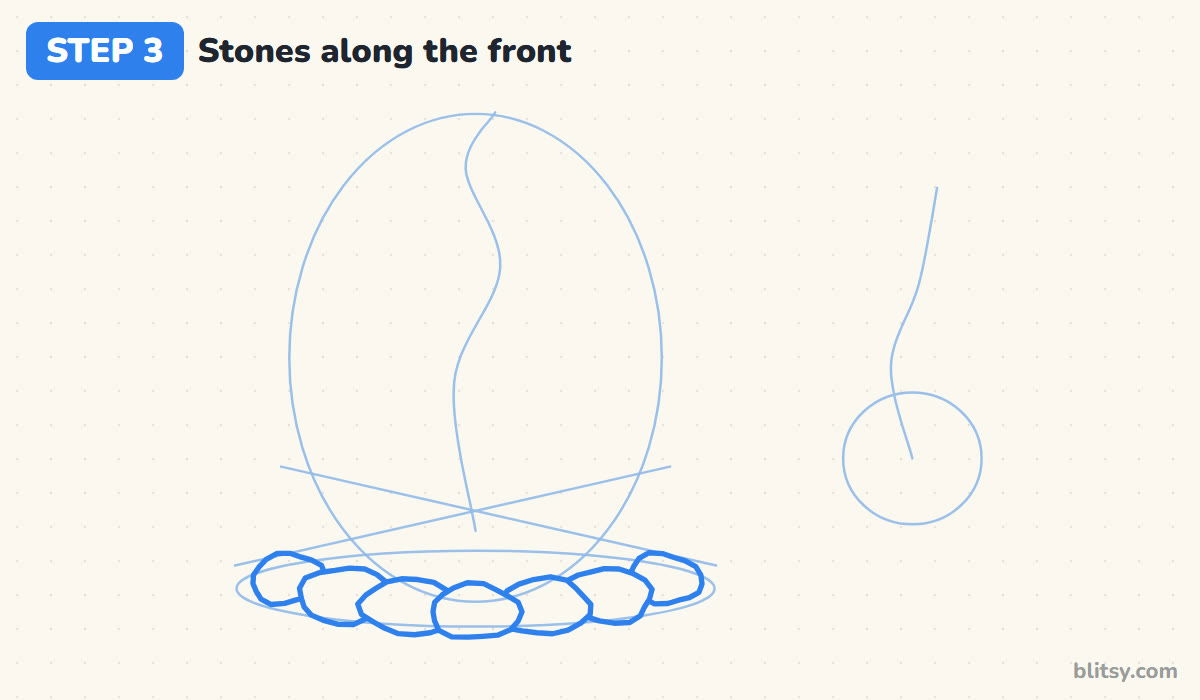
Along the front edge of the ring, draw a row of seven rounded rocks. Make the middle ones the biggest and lowest, and the end ones smaller and a bit higher. That small change makes the row curve around the fire instead of sitting in a flat line. I start with the stones because they're in front of everything, so nothing ever gets drawn through them.


💡 Tip: Lumpy rocks look more natural than perfect ovals.
Step 4: Wrap two crossed logs around the lines
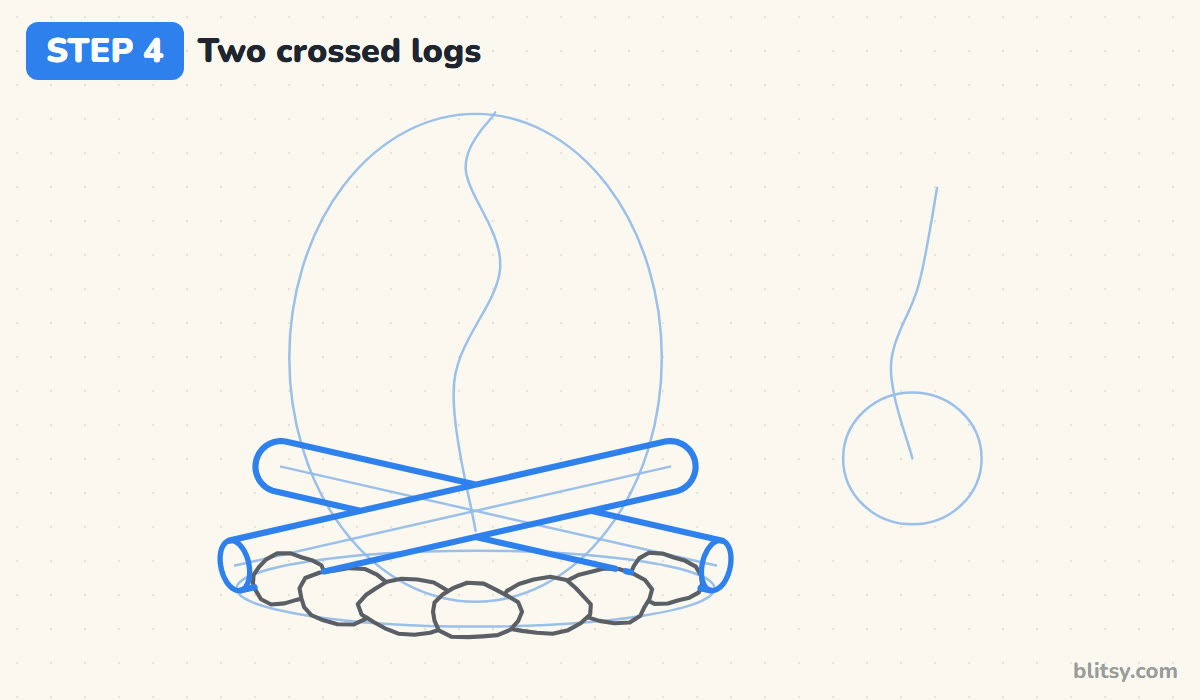
Turn each slanted guide into a thick log by drawing a line above it and one below it, about a finger's width apart. Round off the upper ends. The front log stays whole, while the back log stops where the front one crosses it. At each lower end, close the log with a narrow upright oval. That oval is the cut end you see when wood is sawn.
💡 Tip: Stop the back log's lines right at the front log's edge.
Step 5: Add rings and bark lines to the logs
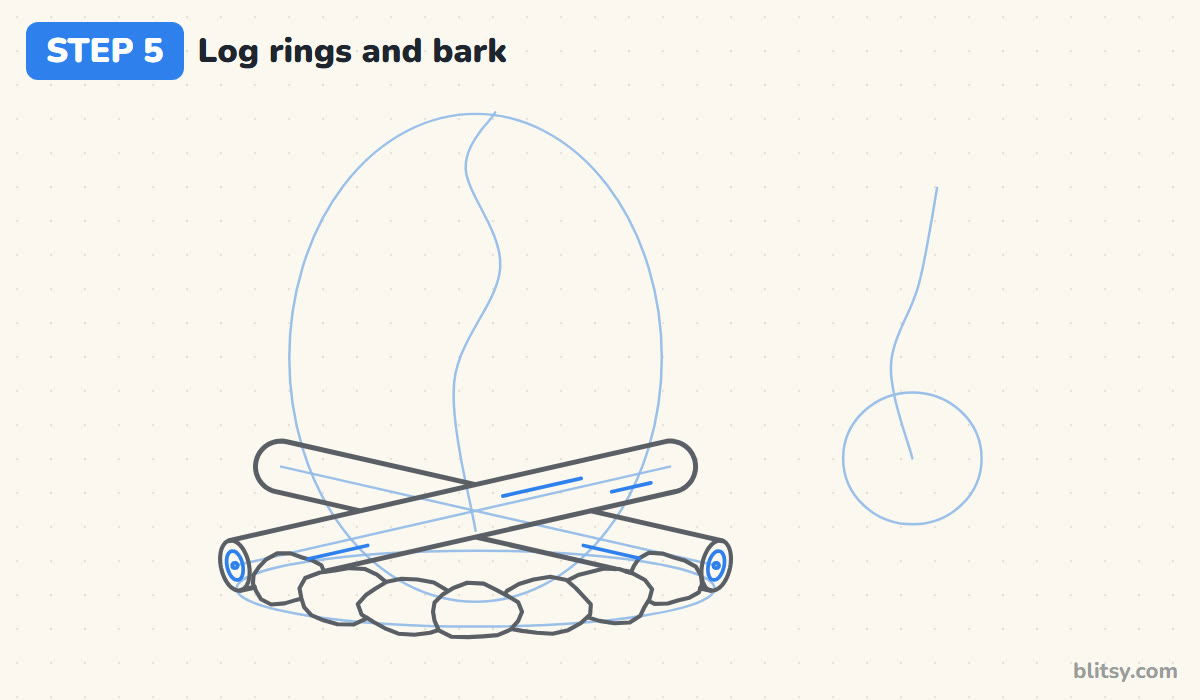
Inside each cut end, draw a smaller oval and a dot in the middle. Those are the tree rings, and they instantly say wood. Then add a few short lines along each log, pointing the same way as the log. Two or three per log is plenty; more than that starts to look like stripes.
💡 Tip: Draw bark lines in short broken strokes, never one long line.
Step 6: Draw the outer flame with S-curved tongues
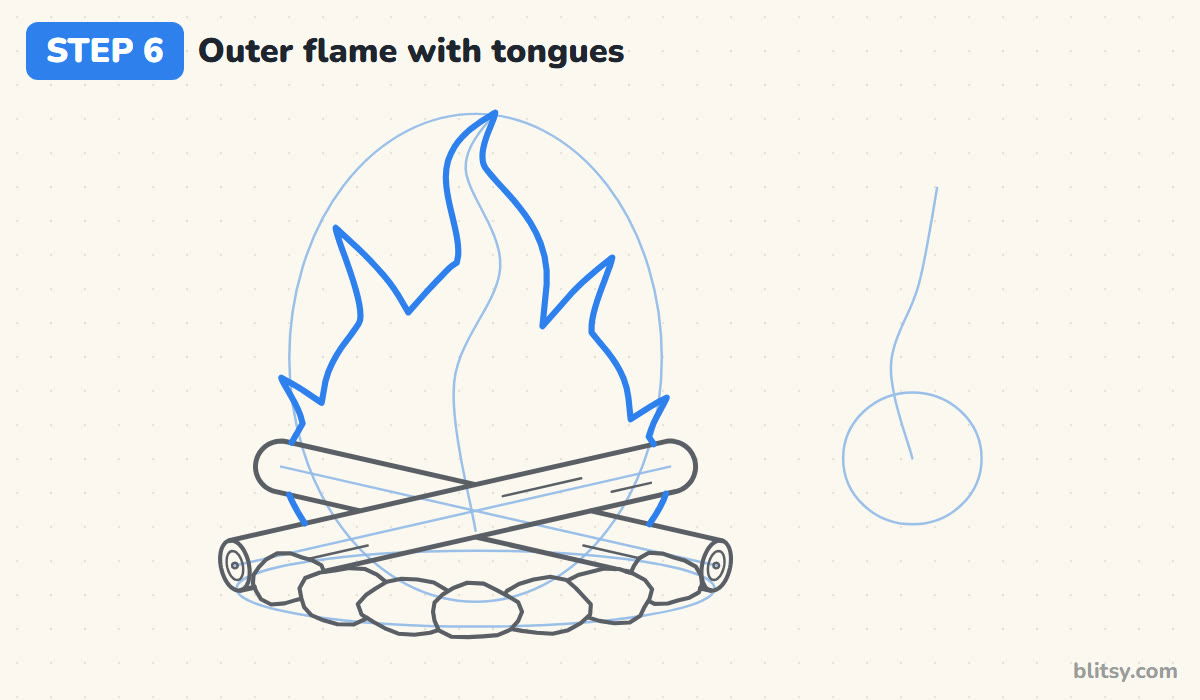
This is the big moment. Start behind the logs and draw the outer flame as five tongues: a tall one in the middle that follows your S-curve to a sharp point, a medium one on each side, and a short one at each outer edge leaning outward. Each edge of a tongue curves in and then out, like a ribbon twisting. Join neighboring tongues with soft round dips, and let the bottom disappear behind the logs.
💡 Tip: Make the tips sharp and the dips between them round.
Step 7: Nest an orange flame inside
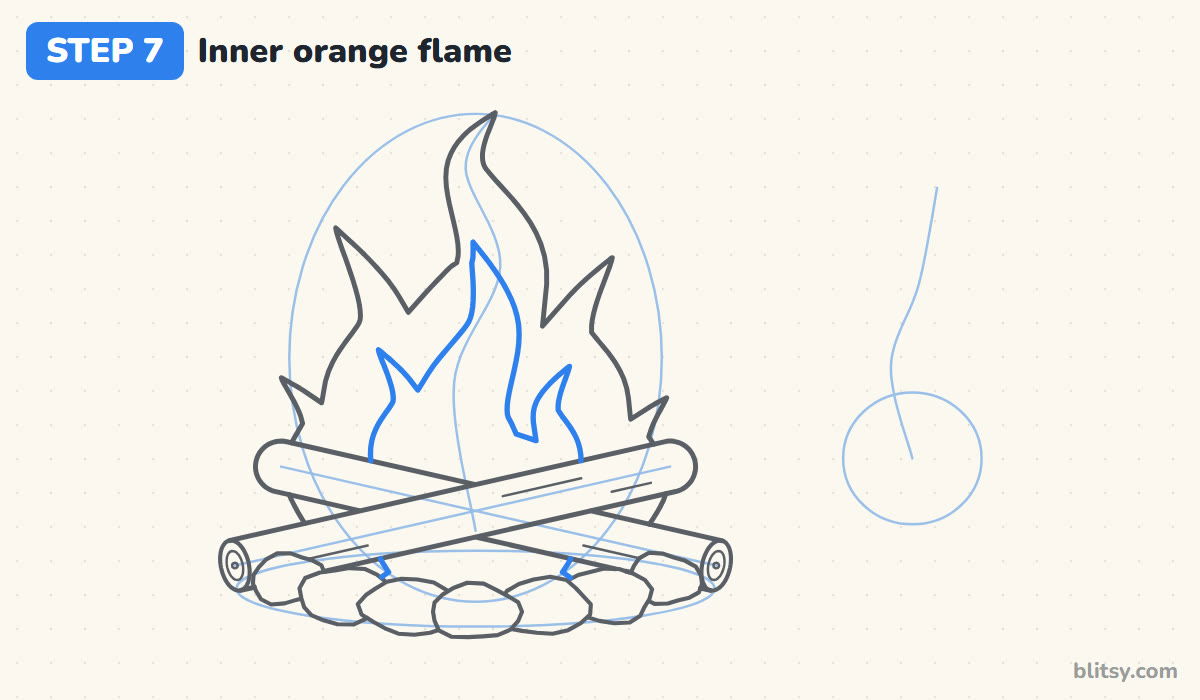
Inside the outer flame, draw a smaller copy with only three tongues. Leave a gap of about a finger's width all around, because that gap becomes the red band later. The center tongue should copy the same S-bend as the big one, just shorter. In my experience this is where the fire starts to look real, because the layers suggest heat glowing inside.


💡 Tip: Copy the bend of the big tongue so the layers move together.
Step 8: Finish with a yellow core
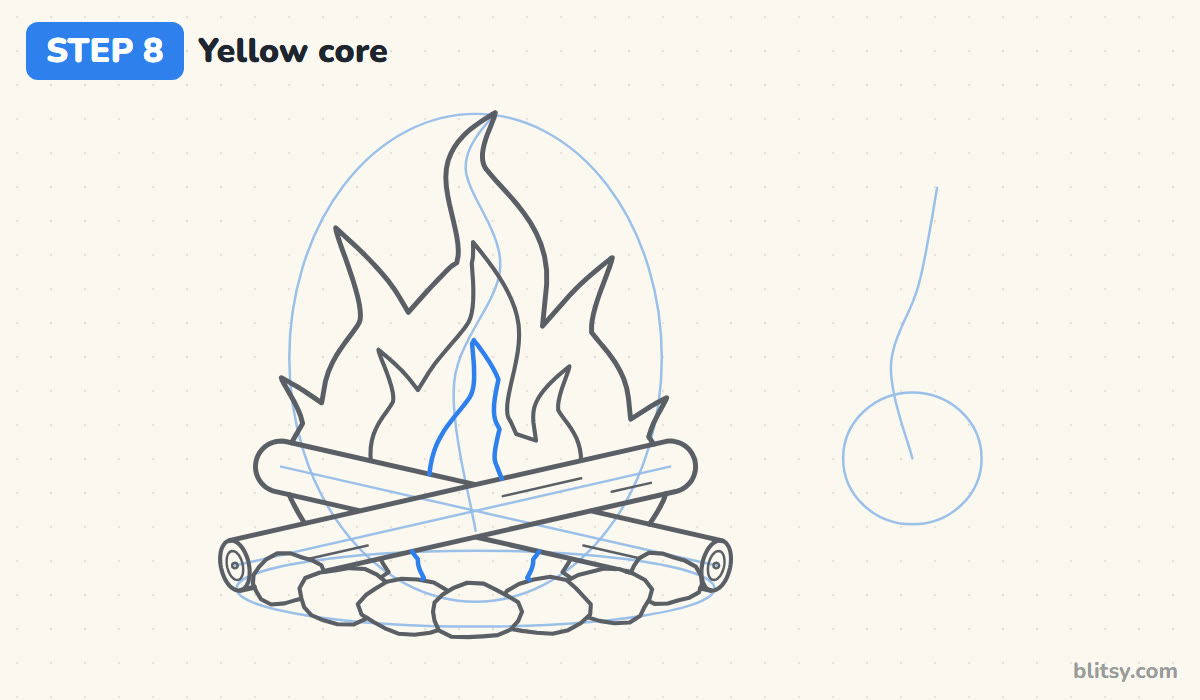
In the center of the orange flame, draw one simple teardrop with a slightly wavy point. Keep it low, about halfway up the orange shape. The core is the hottest part of a real fire, so it sits deep inside, right above the logs. A tall core makes the whole flame look flat.
💡 Tip: Smaller core, hotter look.
Step 9: Scatter sparks and loose flames
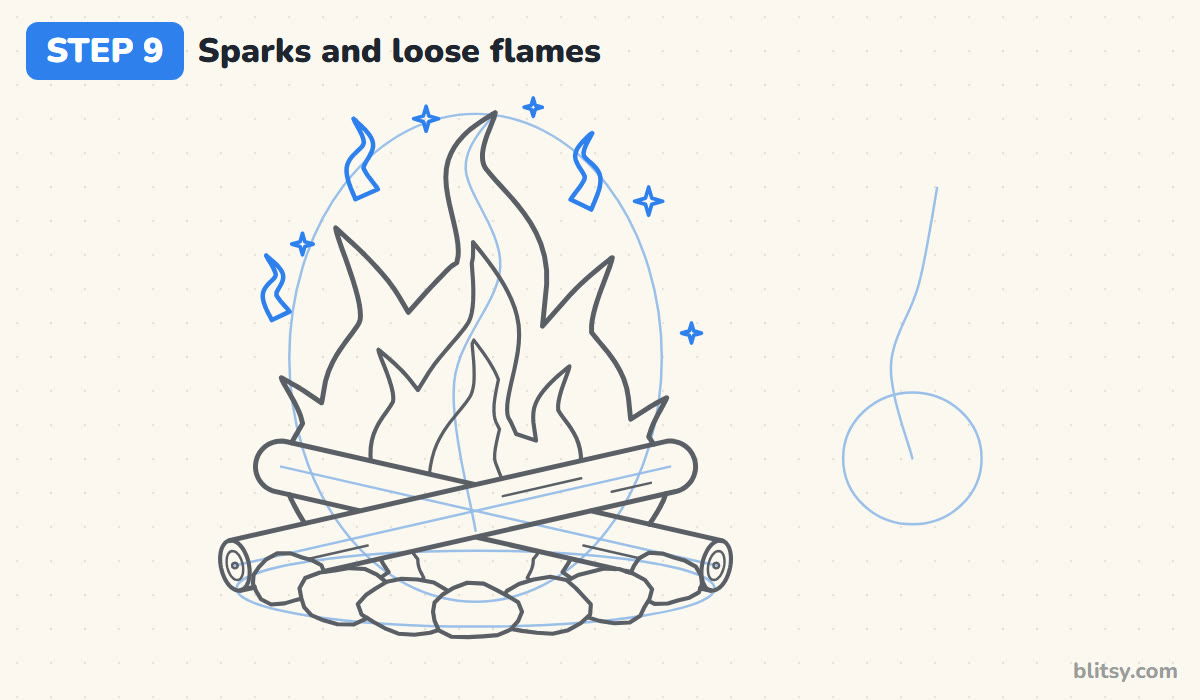
Above the fire, add three tiny wiggly flame shapes floating on their own, each one a mini S-curve with a point on top. Then sprinkle five little four-point sparkles around them. Space them unevenly so the fire seems to pop. Keep every spark clear of the flame outline so the main shape stays clean.
💡 Tip: Odd numbers of sparks look more random than even ones.
Step 10: Draw a simple flame icon
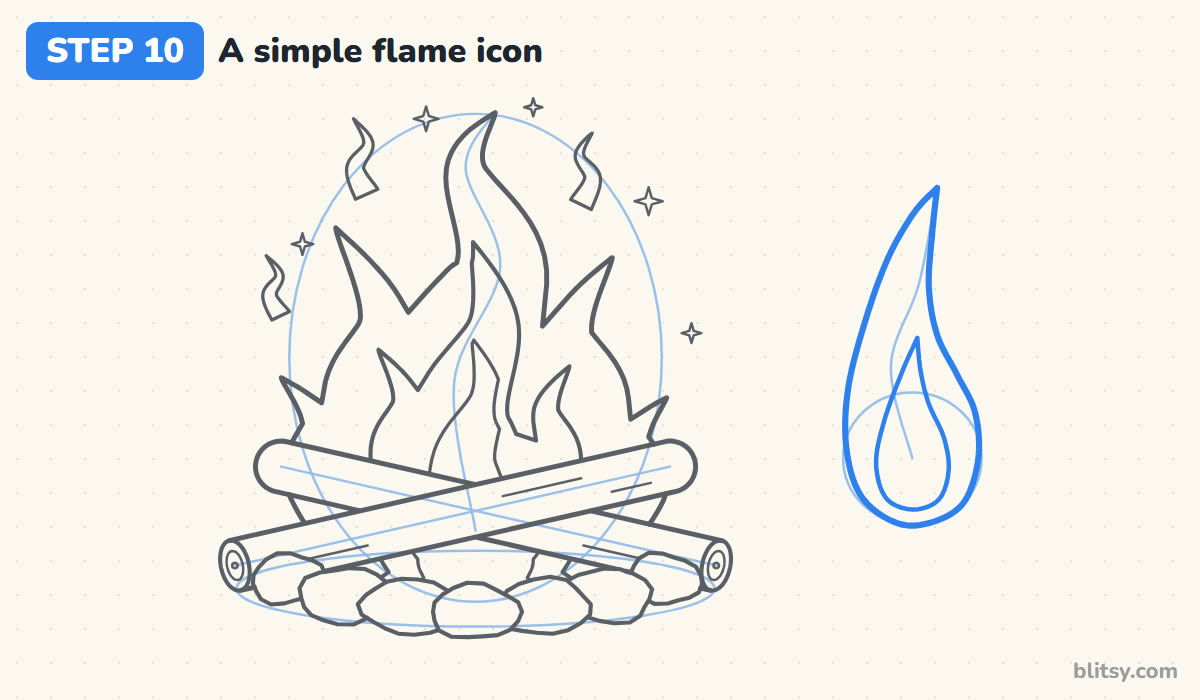
Now use the small circle and S-curve on the right to draw fire in its simplest form. Start at the pointed tip, curve down the left side into a round bottom, then come back up the right side with a gentle inward bend. Add a yellow teardrop inside, low and centered. I like adding this second flame because it shows that one shape alone can still read as fire.
💡 Tip: Practice this icon a few times on scrap paper first.
Step 11: Ink the lines and erase the guides
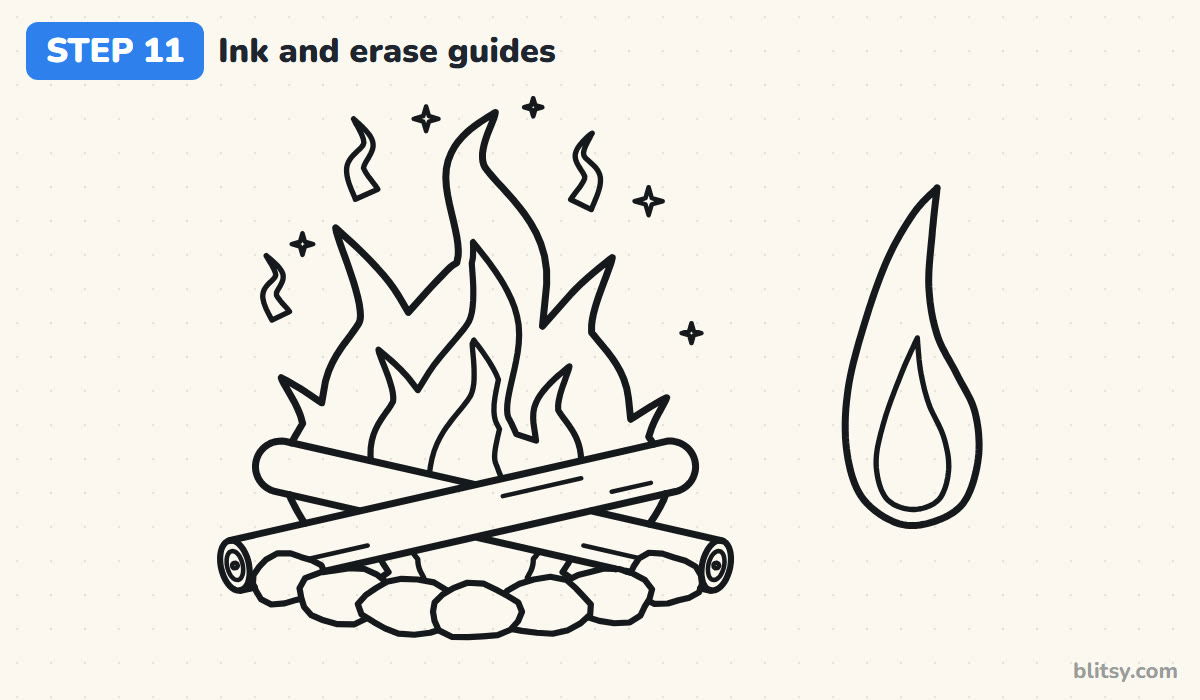
Trace every keeper line with your black marker: the stones, logs, rings, bark, all three flame layers, the sparks and the icon. Use a slightly lighter hand on the small details. When the ink is completely dry, erase the ring, the X lines, the tall oval and both S-curves.



💡 Tip: Wait a full minute before erasing near fresh ink.
Step 12: Color the campfire
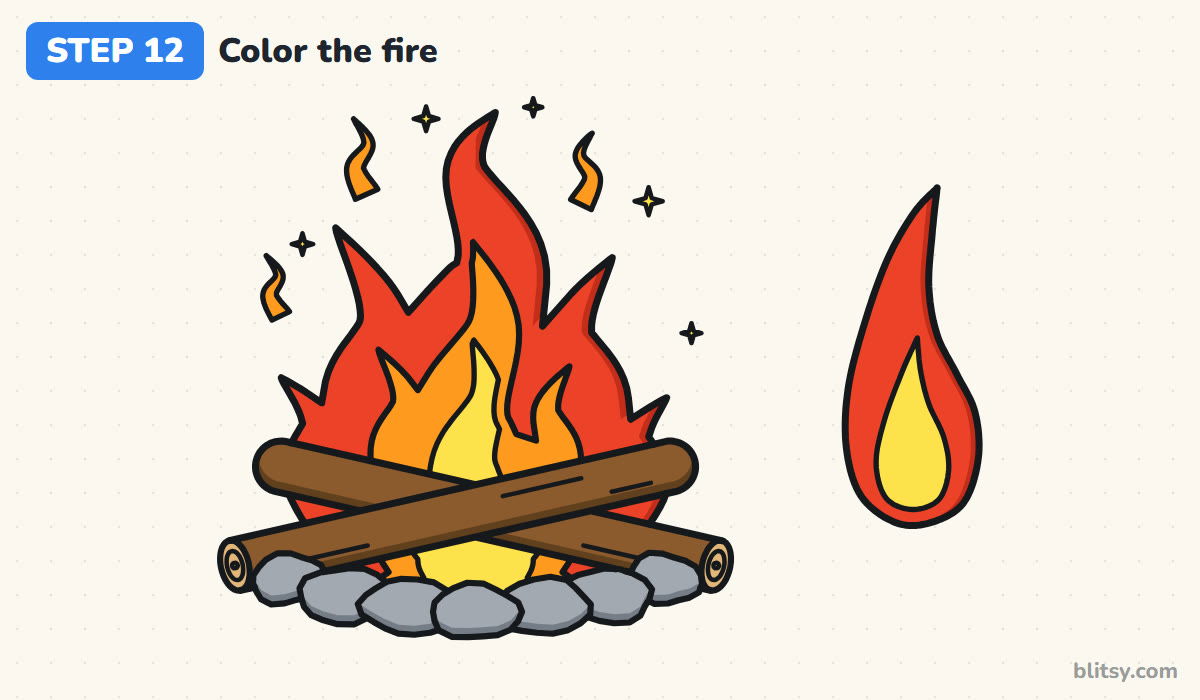
Color the yellow core first, then the orange layer, then the red outer flame, adding a darker red along the right edges for depth. Give the logs a medium brown with a darker strip underneath, and make the cut ends tan. Use gray for the stones with a darker gray along their bottoms. Finish the loose flames in orange, the sparks in yellow and the icon in red and yellow.
💡 Tip: Work from light colors to dark so yellow stays bright.
Where Campfire Flames Usually Go Wrong
- Zigzag flames. Straight saw-tooth edges look like a crown, not fire. Curve every edge in and out along an S so the tongues seem to sway.
- Tongues all the same height. Even spikes look like a fence. Make the middle tongue the tallest and let the side ones step down.
- Layers touching each other. If the orange flame hugs the red line, there's no room to color. Leave an even gap between each layer.
- Drawing the flame on top of the logs. Fire burns behind and between the wood. Draw the logs first and stop your flame lines at their edges.
- Coloring red first. Red smears into yellow and turns it muddy. Start with the lightest color in the middle and work outward.
Other Places to Put Your Flames
Once the S-curve feels natural, try the same flame on a birthday candle, a torch or a fireplace. Or lean all the tongues one way, as if a breeze is blowing. If you'd like a creature made of fire, the phoenix drawing tutorial uses these same tongue shapes for feathers, and how to draw a dragon step by step gives your new flames something to breathe out.
Free Campfire Coloring Page and Flame Drawing PDF
Print the flames coloring page for a quiet table activity. A small colored example and a color key sit at the top, with a big bold outline below for crayons or markers. The step-by-step PDF guide has all 12 steps and tips, sized for Letter or A4 paper.
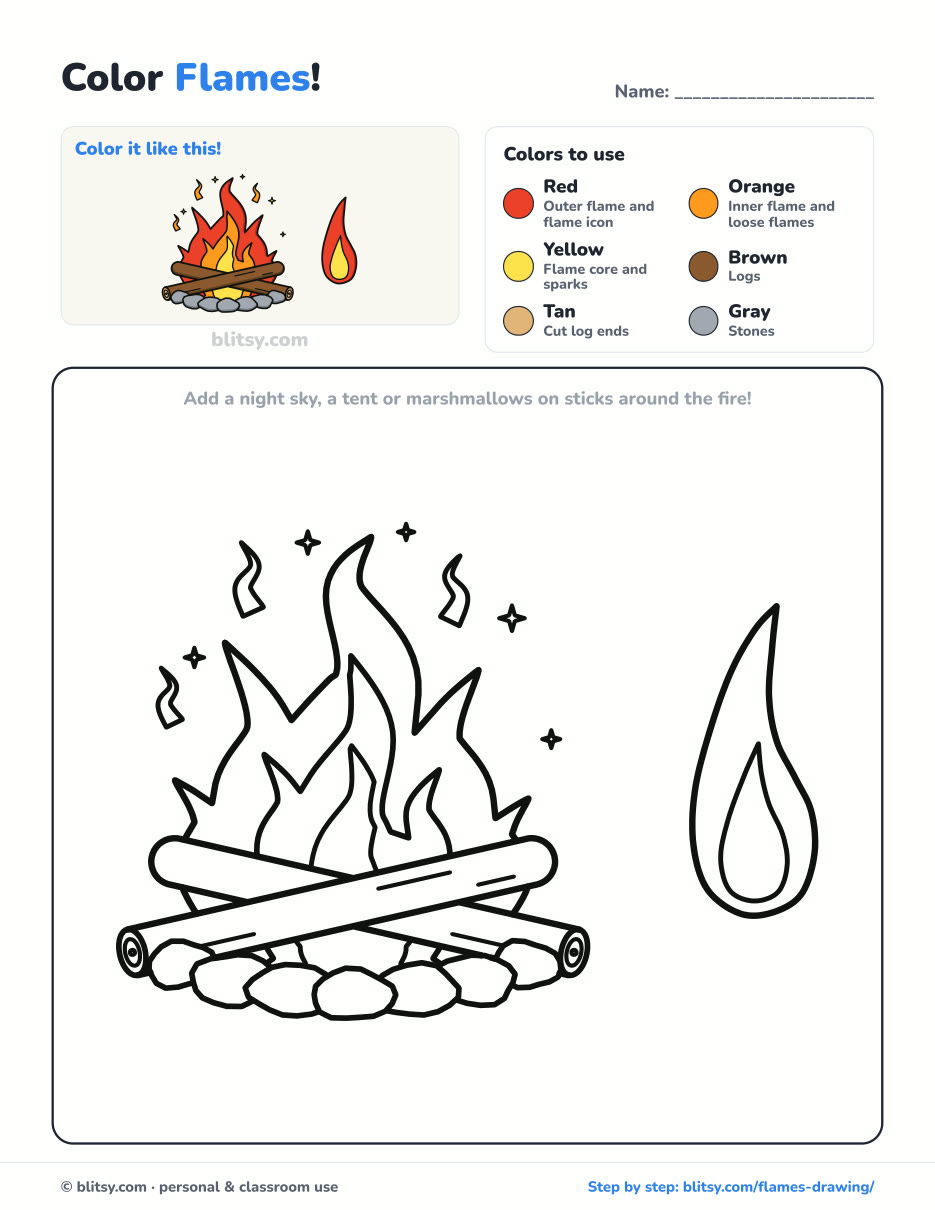
Black outlines with a colored example and the color names at the top. Ready to print and color.
⬇️ Download Coloring PageEvery step picture with its instructions and tips, to keep beside your paper while you draw.
⬇️ Download Drawing Guide📱 On a phone? Tap a download button, then open the file and choose Share → Save to Files or Print. On a computer, the PDF opens or saves straight to your Downloads folder.
A Pinnable Copy of the Campfire Steps
Flames Burning Bright? Lessons to Try Next
These are step-by-step tutorials as well, with patterns, scenes and objects to practice.
- Mandala Drawing: Six rings and eight repeats grow from a center dot in the mandala drawing tutorial.
- Wave Drawing: Draw a curling ocean wave with claw-shaped foam in how to draw a wave step by step.
- School Drawing: The school drawing tutorial draws a brick schoolhouse with a bell tower and a clock.
- Halloween Drawing: A cute haunted house with glowing windows: Halloween drawing step by step.
- Light Bulb Drawing: The light bulb drawing tutorial draws a glowing bulb with rays and sparkles.
- Realistic Drawing: Practice light and shadow on an apple with realistic drawing step by step.
- Snowman Drawing: For the opposite of fire, learn how to draw a snowman with a hat and a flying scarf.
- Mountain Drawing: Three peaks, a lake and six pines make up the mountain drawing tutorial.
- Basketball Drawing: Draw a ball mid-flight with a hoop and net in the basketball drawing step by step lesson.
- Money Drawing: The money drawing tutorial stacks play bills, a full sack and a coin tower.
Fire Drawing Questions From Young Artists
What is the easiest way to draw a flame?
Draw a teardrop with a pointed tip that bends a little to one side, then add a smaller teardrop inside it. Color the outside red and the inside yellow, and you have a flame.
How do you draw realistic-looking flames for kids?
Use S-shaped edges instead of zigzags, and nest two or three layers inside each other. Kids can skip the loose sparks and the log rings and still get a fire that looks alive.
What colors do you use to draw fire?
Yellow in the middle, orange around it and red on the outside is the classic order. A darker red along one edge adds depth. Some artists add a touch of blue at the very bottom for a hot gas flame.
Is it safe to draw a real campfire from life?
Only with an adult in charge, and from a safe distance. Never play with real fire or matches to get ideas; a photo or this drawing works just as well.
Grab your warmest colors and light up the page, then try a lone candle flame next time. 🔥
Related posts:
 How to Draw a Car Step by Step (Easy Drawing for Beginners)
 How to Draw a Rocket Step by Step (Easy Blast-Off Drawing)
 How to Draw Rocks Step by Step (Easy Boulder Drawing)
 How to Draw a Scarecrow Step by Step (Easy Fall Drawing)
 Oil Pastel Drawing Step by Step (Easy Sunset for Beginners)
 Summer Drawing Step by Step (Easy Beach Scene for Beginners)
 Halloween Drawing Step by Step (Cute Haunted House for Kids)
 Realistic Drawing Step by Step (Shade a Shiny Apple)
 Love Drawing Step by Step: Two Hugging Bears (Easy)
 How to Draw a UFO Step by Step (Cute Alien Saucer)
 How to Draw a Volcano Step by Step (Easy Erupting Volcano)
 How to Draw a Crow Step by Step (Easy for Beginners)

