
Summer is a feeling more than a single object, so I had to choose one picture that says it at a glance. I went with a day at the beach: a red and white umbrella over a towel, a beach ball, a sandcastle with a flag and a bucket and spade, all in front of the sea. This summer drawing step by step lesson builds that scene from two straight lines and a few plain shapes, so it works even if you've never drawn a landscape.
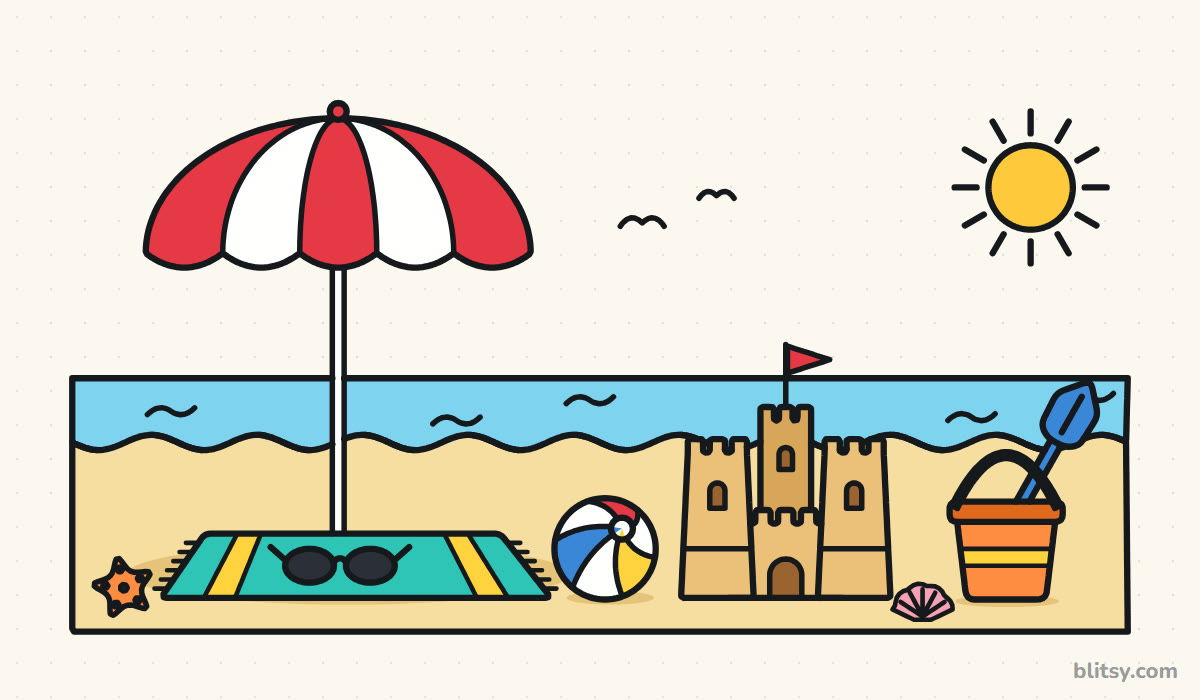
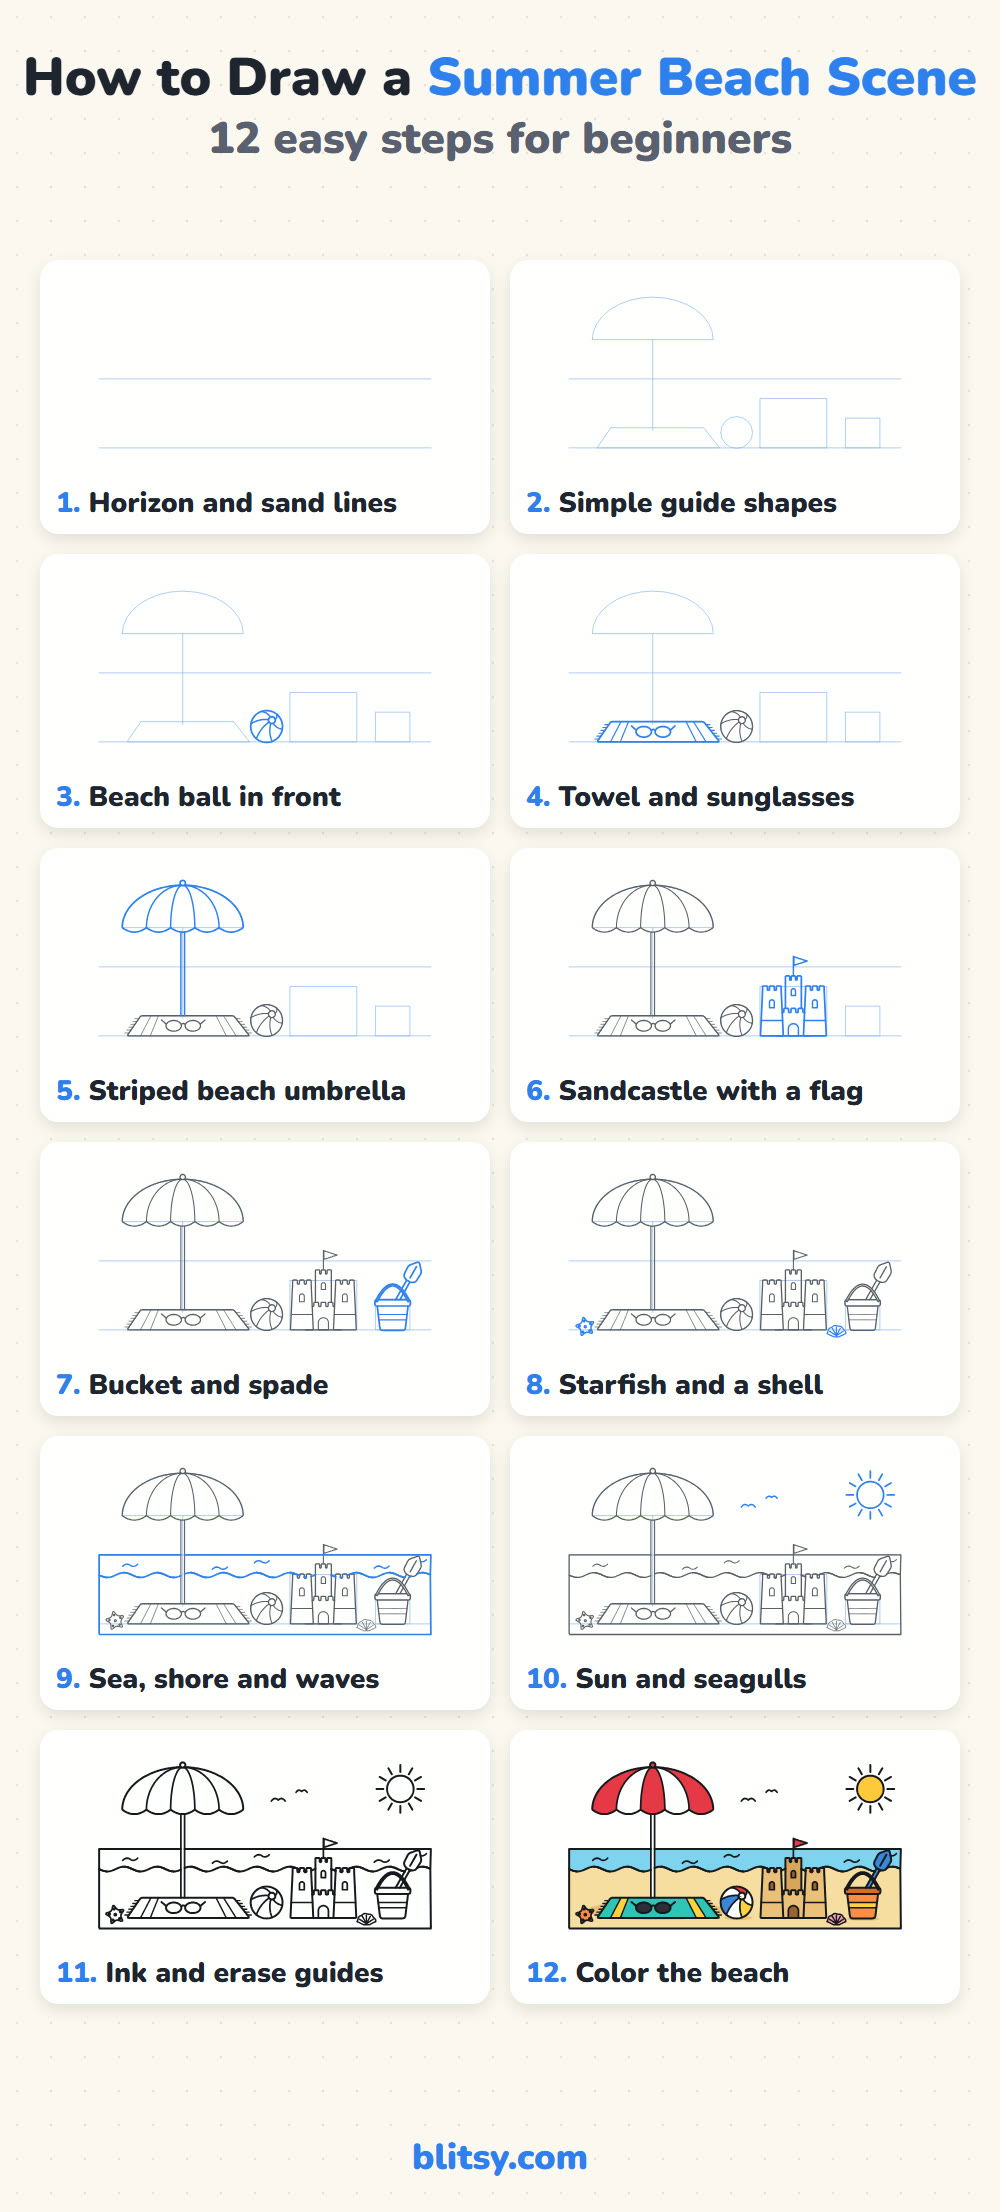
In every step picture, the lines you add right now are blue and the finished parts turn gray. The pale blue shapes are only helpers, so sketch them very lightly; you'll rub them out in step 11.
Quick overview
⏱️ Time: about 35 to 45 minutes, coloring included
🎯 Level: easy, fine for kids from about 7 and grown-up beginners
✏️ Steps: 12
🏖️ You'll draw: a beach umbrella, a towel with sunglasses, a beach ball, a sandcastle, a bucket and spade, a starfish and a shell by the sea
Beach Day Supplies for the Sketch
- A soft pencil, such as an HB or a 2B
- A clean eraser
- A black marker or fineliner for the final lines
- Colored pencils or markers: red, yellow, turquoise, light blue, blue, orange, tan and pink
- Plain paper turned sideways, since a beach is a wide scene
A ruler makes the horizon neat, but a careful freehand line is completely fine.
Summer Drawing Step by Step
Step 1: Draw the horizon and the sand line
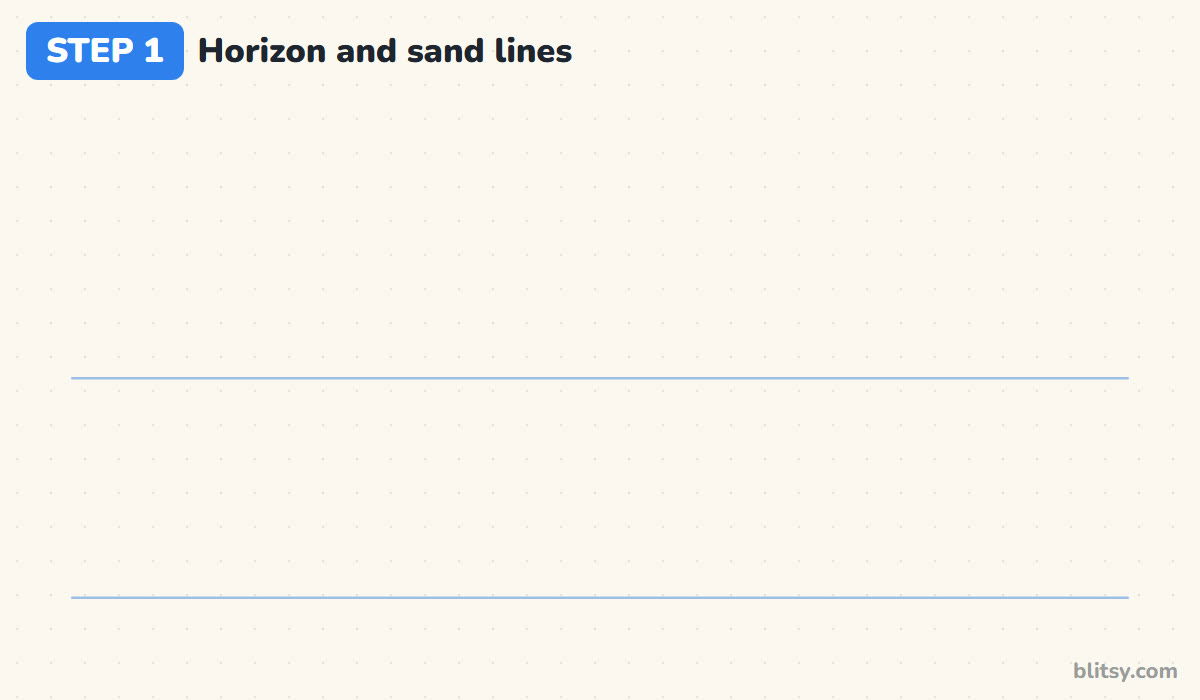
With the paper sideways, draw a long, light line a little below the middle. That's where the sea meets the sky. A second line near the bottom marks where everything stands on the sand. Keep both level, since the whole beach lives between them.
💡 Tip: Hold the pencil far back from the tip. Your lines come out lighter and easier to erase.
Step 2: Sketch the guide shapes
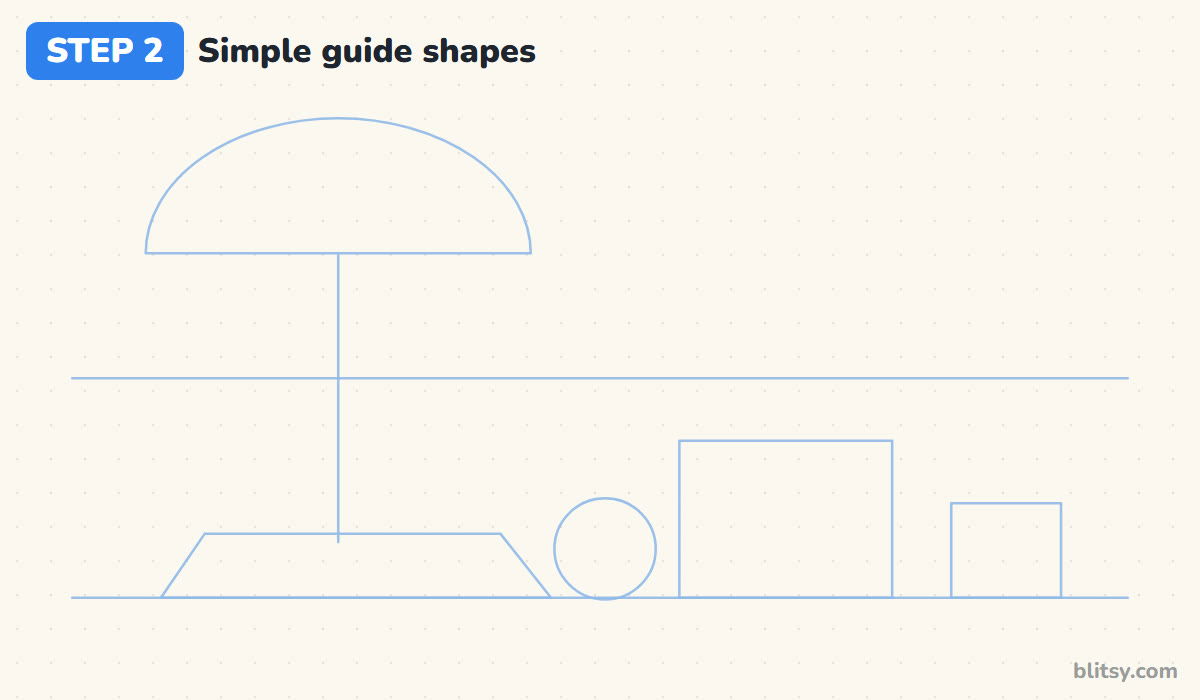
Now block in where each object goes. On the left, draw a wide half circle high up for the umbrella, with a straight line from its middle down to the sand line. Under it, sketch a flat, slanted shape for the towel. Then add a circle for the ball, a tall box for the sandcastle and a small box on the right for the bucket.
💡 Tip: Leave a little gap between the shapes so every object gets its own space to breathe.
Step 3: Draw the beach ball
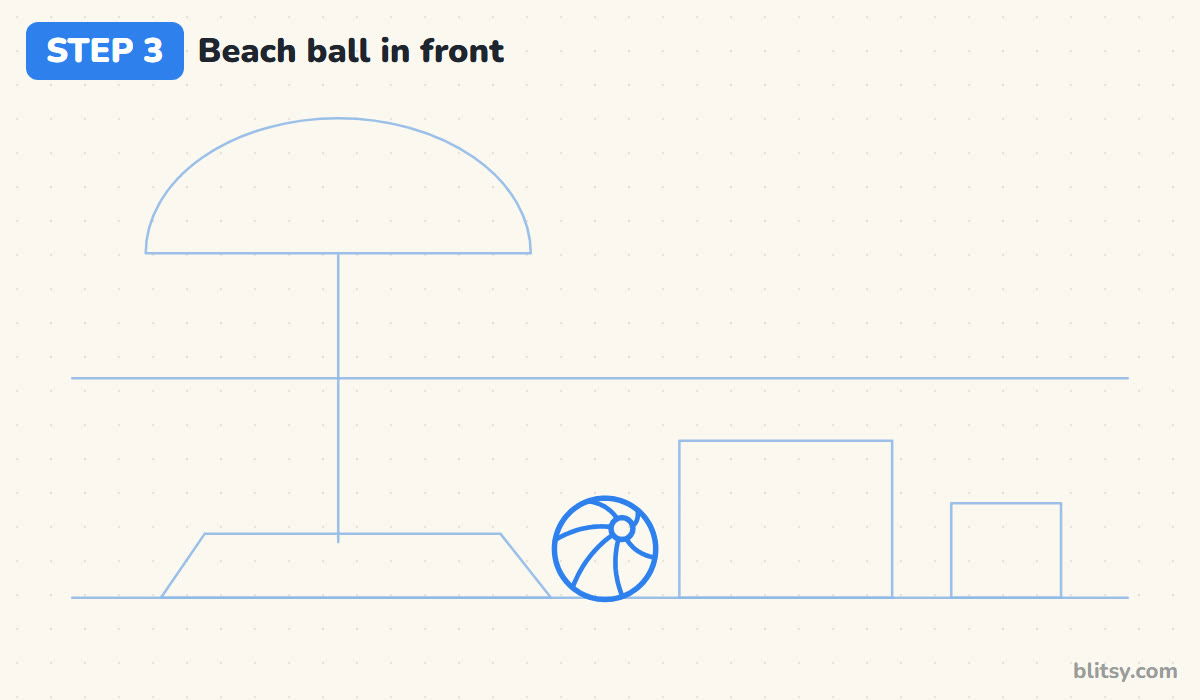
I always start with the ball because it sits in front, so nothing will ever cross it. Go over the guide circle, then draw a tiny circle near the top right for the cap. From the cap, pull six gently curved lines out to the edge. Curving them the same way makes the ball look round.


💡 Tip: Space the six seam ends like the hours on a clock face: about two hours apart each.
Step 4: Add the towel and the sunglasses
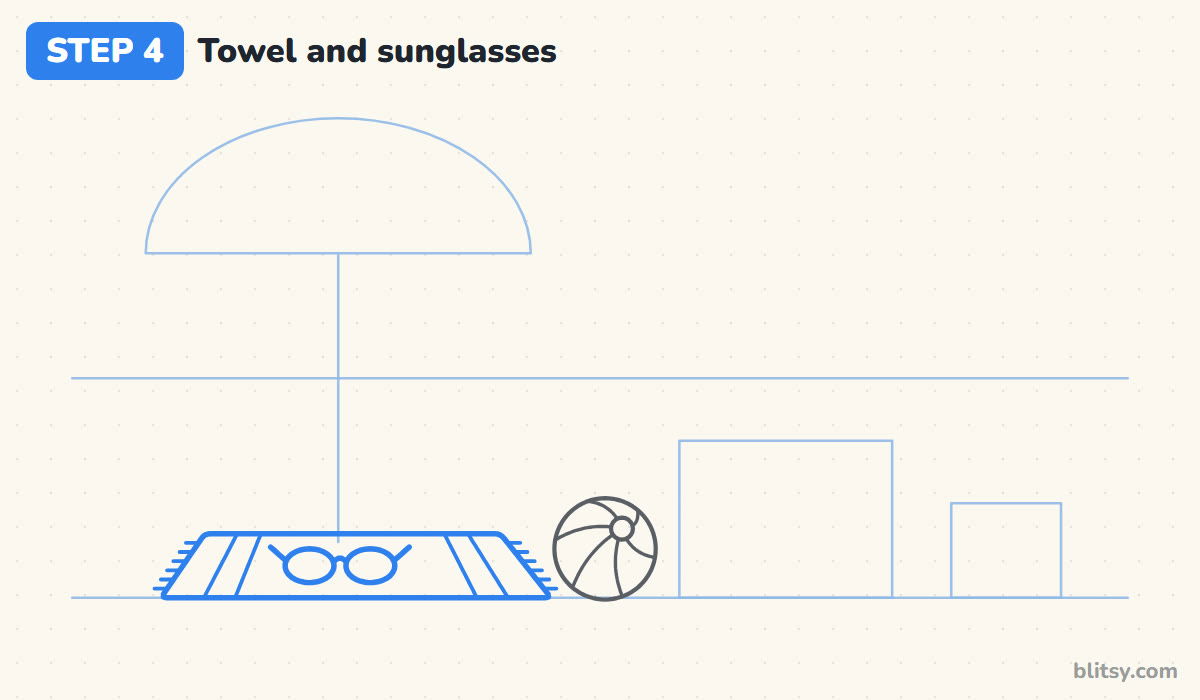
Trace the towel shape with slightly rounded corners. It's narrower at the back than at the front, which makes it look like it's lying flat. Draw a stripe near each end and short fringe lines on both sides. Then put a pair of sunglasses on top: two wide ovals, a little bridge between them and two short arms.
💡 Tip: Keep the stripes parallel to the towel's slanted ends, not straight up and down.
Step 5: Draw the striped beach umbrella
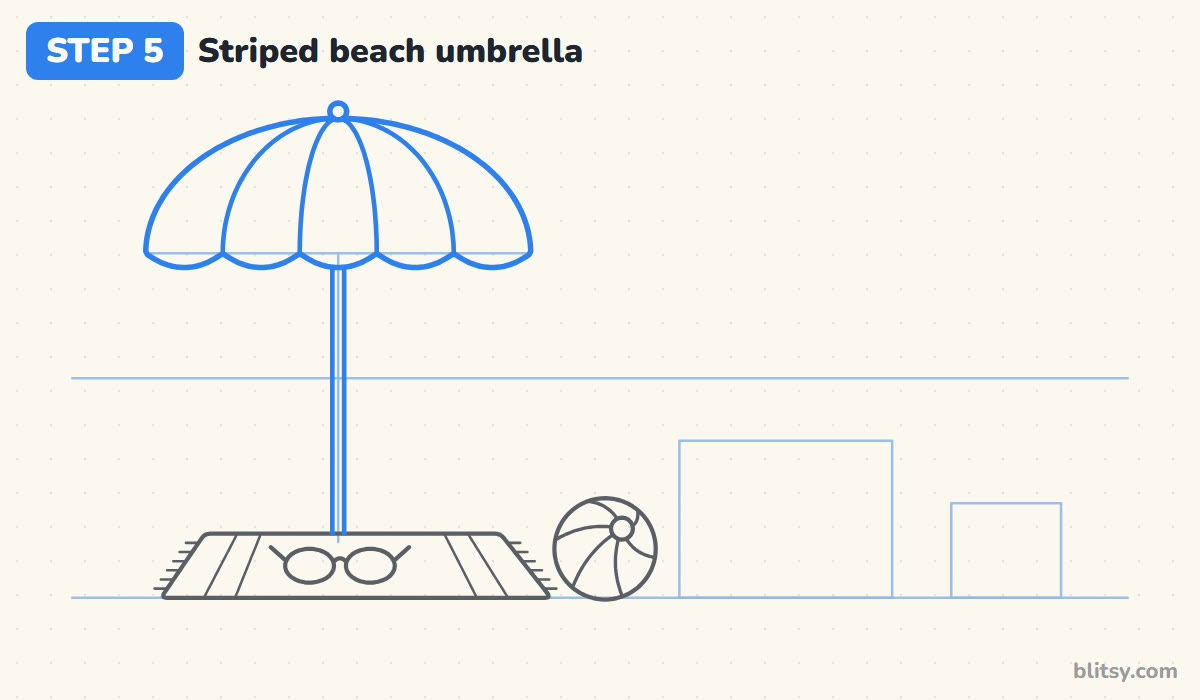
Follow the half circle for the top of the umbrella, then give the bottom edge five drooping scallops instead of a straight line. From the tip, draw four curved lines down to the points between the scallops; these divide it into panels. Add a small knob on top and a thin pole that disappears behind the towel.
💡 Tip: Bend the panel lines outward a little, like the ribs of a real umbrella, never in a straight line.
Step 6: Build the sandcastle with a flag
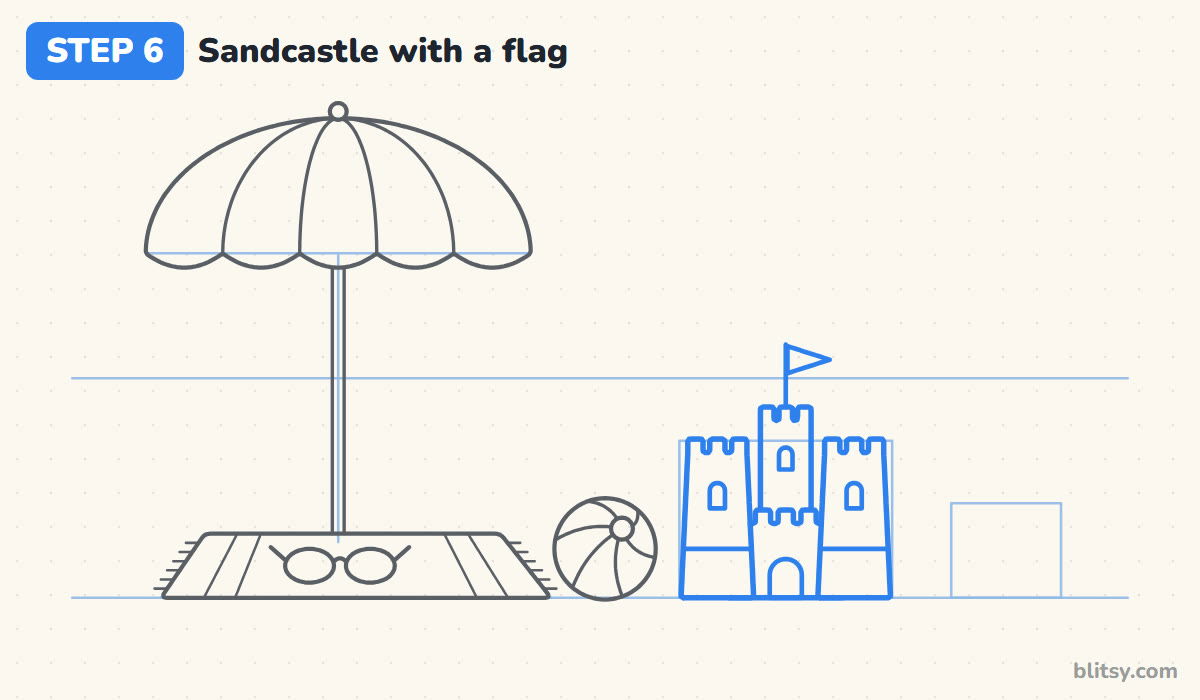
Start with two towers that are slightly wider at the bottom, like sand packed in a bucket. Give each one a row of little square bumps on top. Between them, draw a lower wall with a round door, then a taller tower peeking out behind it. Add small arched windows and a flag on a thin pole.
💡 Tip: Draw the bumpy tops as square teeth with equal gaps, and they'll read as a castle at once.
Step 7: Add the bucket and spade
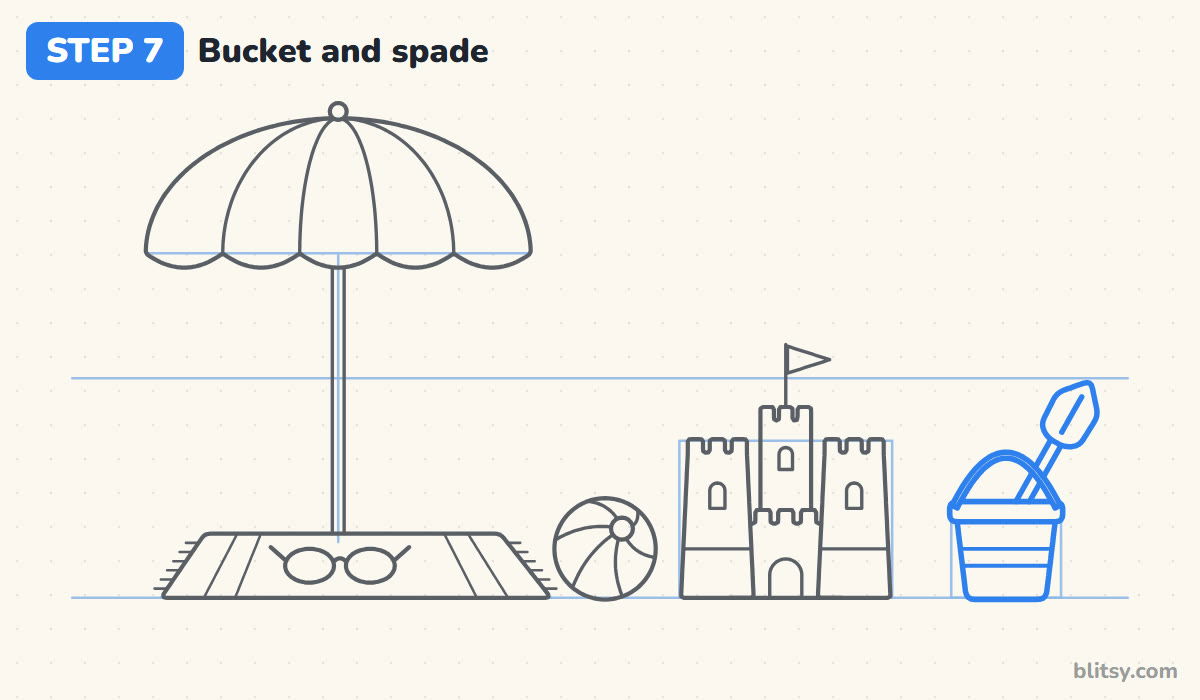
Inside the small box, draw a bucket that gets narrower toward the bottom, with a thick rim on top. A curved handle arches over it. Then draw a spade poking out at an angle, its pointed blade up in the air. Two lines around the middle of the bucket make a stripe.




💡 Tip: Tilt the spade. Standing straight up, it looks stiff and gets lost against the castle.
Step 8: Place a starfish and a shell
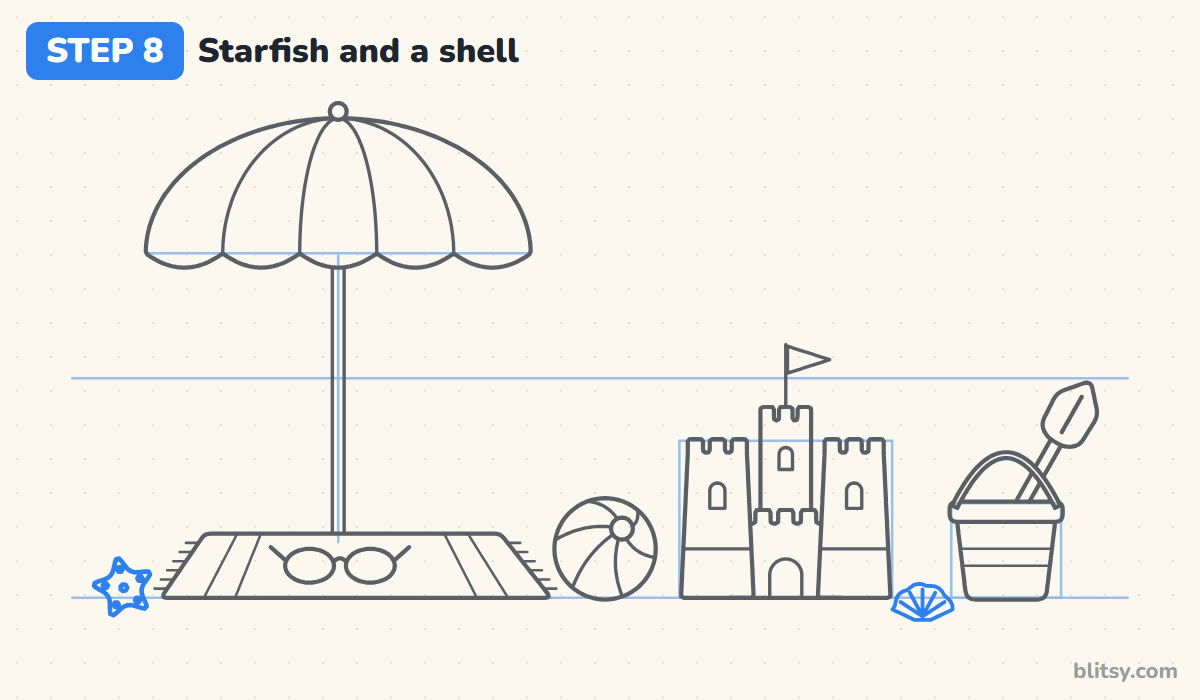
Draw a five-armed starfish in the bottom left, with soft, rounded points and a few dots down the middle. Between the castle and the bucket, add a fan-shaped shell with a bumpy top edge and a handful of lines meeting at its base.
💡 Tip: Round off the tips of the starfish arms. Sharp points make it look like a sheriff's badge.
Step 9: Draw the sea, the shore and the waves
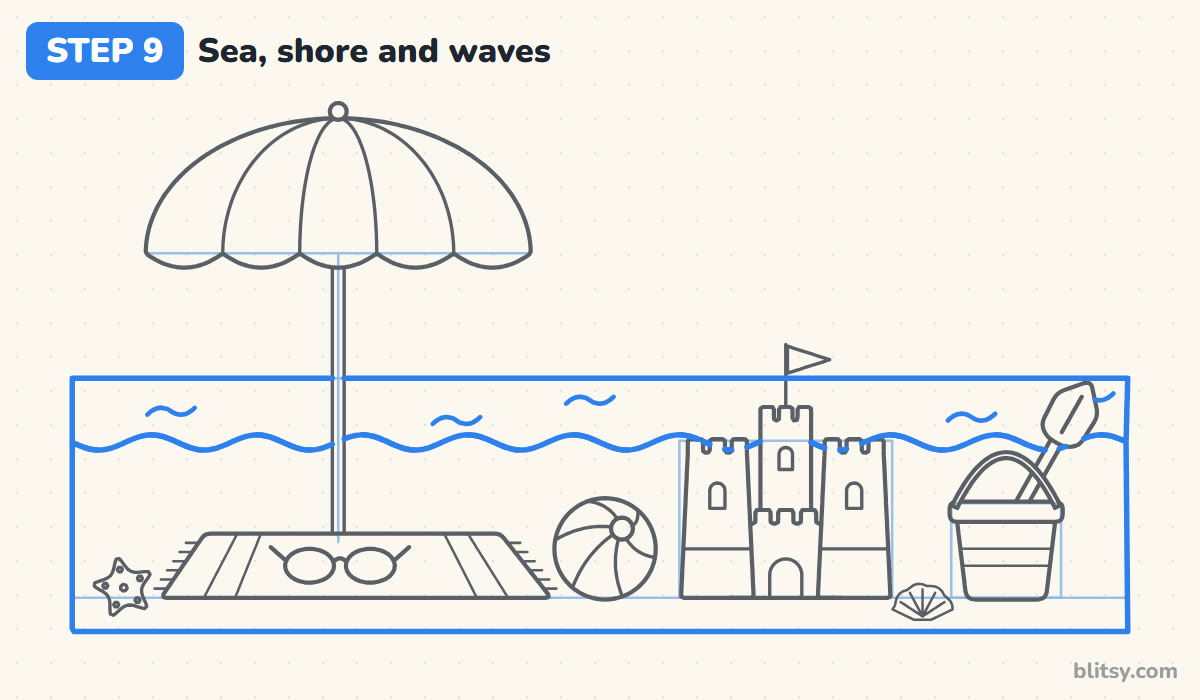
Go over the horizon line, then draw a gentle wavy line a bit lower for the edge of the water. Close both bands with short lines at the sides and a straight line along the bottom, like a picture frame. Stop every line when it meets the umbrella pole, the castle or the bucket.
💡 Tip: Draw the wavy shore in a slow rhythm: up, down, up, down, with every bump the same size.
Step 10: Add the sun and two seagulls
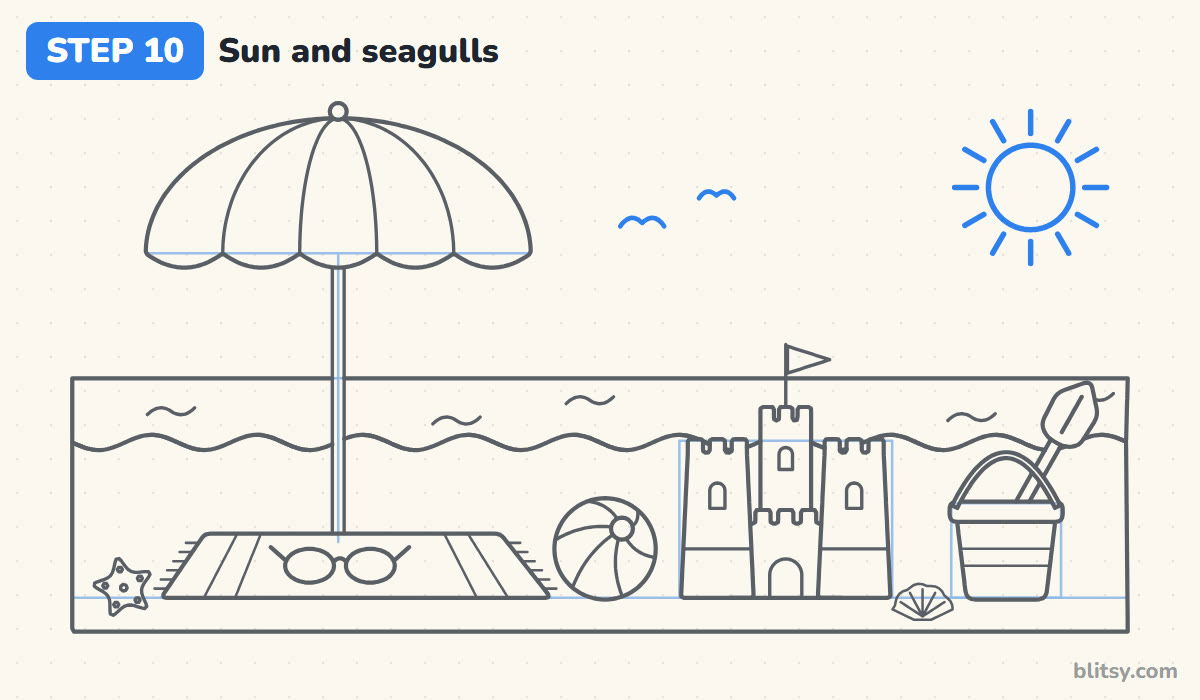
High in the top right corner, draw a circle for the sun with twelve short rays around it. Then add two seagulls in the open sky: each one is just two little curves joined in the middle, like a stretched letter M.
💡 Tip: Make the second gull a bit smaller. It looks farther away, and the sky gains depth.
Step 11: Ink the lines and erase the guides
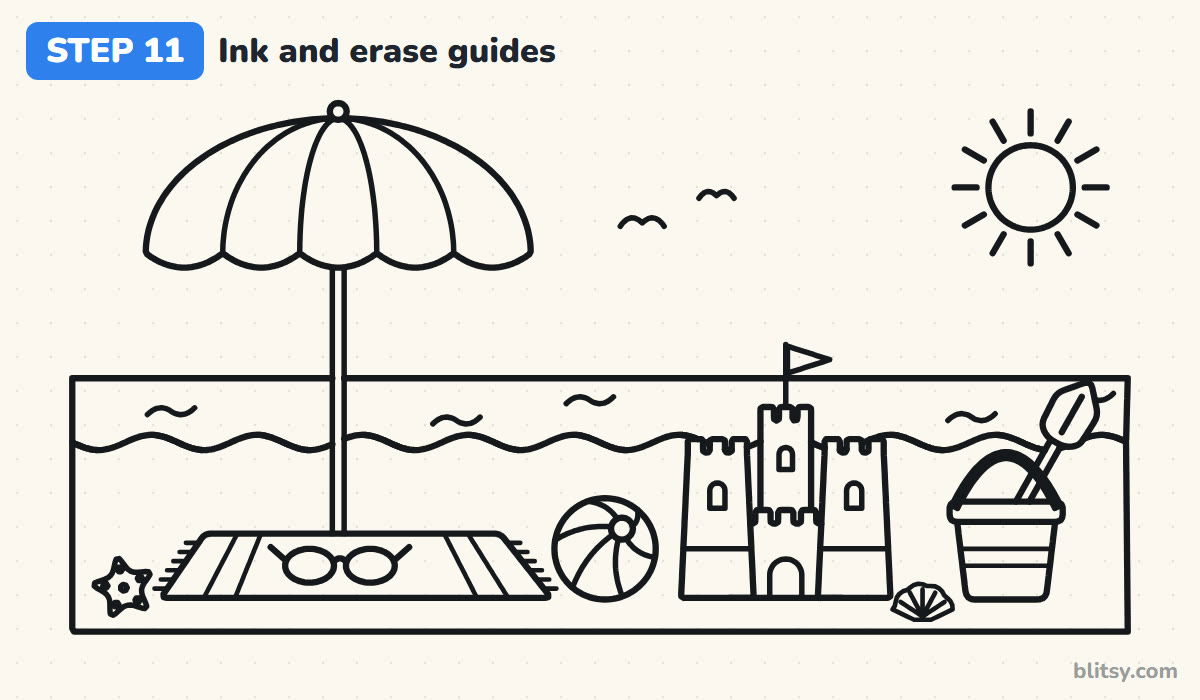
Trace over every line you want to keep with the black marker. Most beginners rush here, so slow down on the scallops and castle tops. Give the ink a minute to dry, then erase the guide lines and the helper shapes.

💡 Tip: Ink from the top of the page toward the bottom so your hand never drags across wet lines.
Step 12: Color your beach
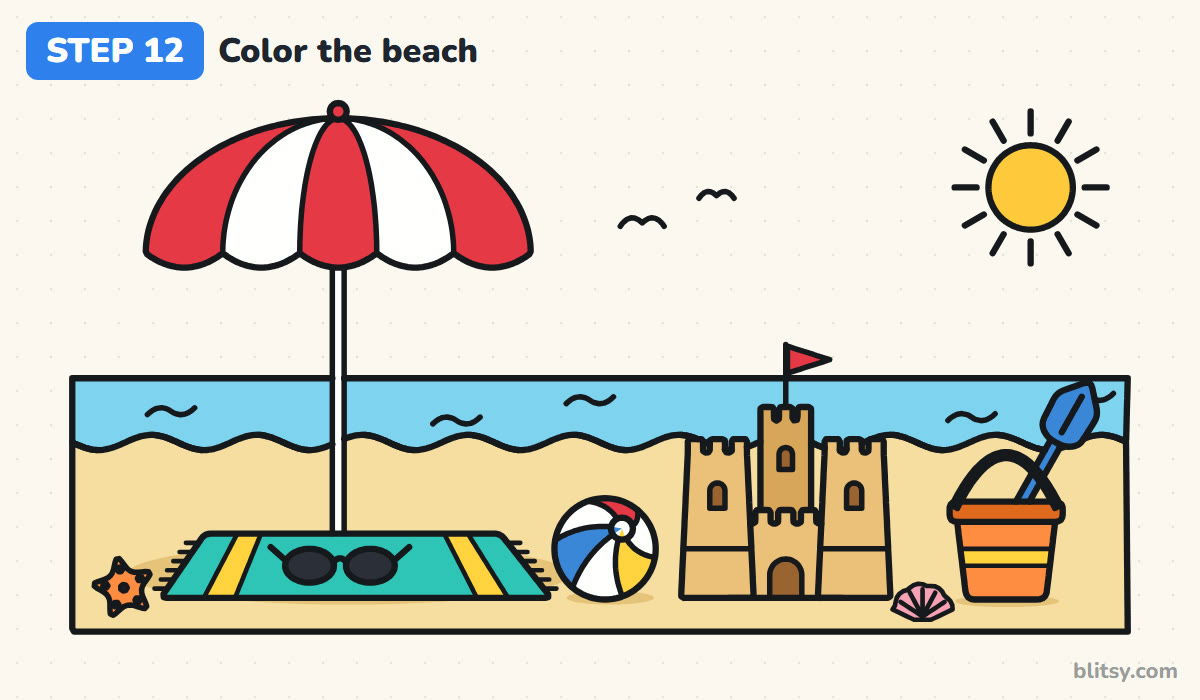
Color the sea light blue and the sand tan, then press a little harder on the sand around the towel to make the umbrella's shade. Make every other umbrella panel red and leave the rest white. The towel goes turquoise with yellow stripes, the castle a darker tan and the bucket orange with a yellow band. Give the ball red, yellow and blue panels with white between, then color the spade, shell and sun.
💡 Tip: Use light, even strokes in one direction on the big sand area so it doesn't look scribbly.
Where Beach Scenes Lose Their Sunshine
- Drawing the sea first. Then the waves run straight through the castle and the pole. Draw the objects on the sand first and fit the sea in behind them.
- A towel drawn as a rectangle. It looks like it's standing up. Make the back edge shorter than the front so it lies flat on the sand.
- A flat umbrella edge. A straight lower edge makes it look like a lampshade. The drooping scallops are what make it read as fabric.
- Everything lined up in one row. The scene feels like a shelf. Let the umbrella stand tall, keep the toys low and tuck the starfish into a corner.
- Coloring the sand too dark. Dark sand swallows the castle. Keep the sand pale and save the darker tan for the castle and the shade.
Swapping in Your Own Summer Favorites
This scene is easy to change once you know the order. Swap the beach ball for a slice of watermelon, give the castle a moat or put a little sailboat on the horizon. To practice parts of the scene on their own, try the sun drawing tutorial or this how to draw a wave lesson for a bigger, wilder sea.
Summer Beach Coloring Page and Step Guide PDF
Prefer to skip straight to coloring? Print the free summer beach coloring page. A small colored sample at the top shows which color goes where, and the big outline below has thick lines that are easy to stay inside. The step-by-step guide PDF has all 12 steps with tips, two per page, and both files print on Letter or A4 paper.
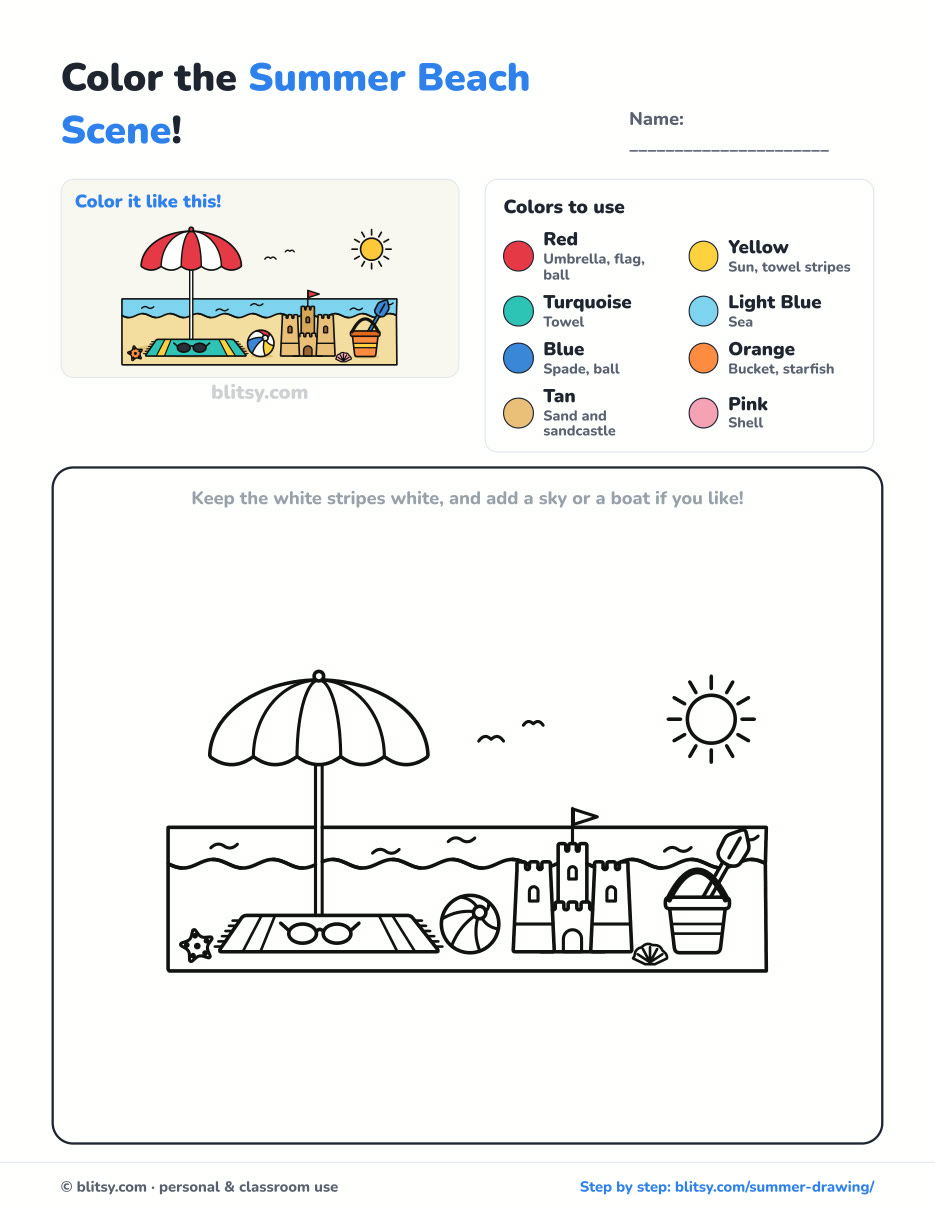
Black outlines with a colored example and the color names at the top. Ready to print and color.
⬇️ Download Coloring PageEvery step picture with its instructions and tips, to keep beside your paper while you draw.
⬇️ Download Drawing Guide📱 On a phone? Tap a download button, then open the file and choose Share → Save to Files or Print. On a computer, the PDF opens or saves straight to your Downloads folder.
Pin the Beach Steps for a Rainy Day
Summer Break Projects: Scenes, Vehicles and Space
Each link opens a step-by-step tutorial with a picture for every stage, good for long summer afternoons at the table.
- Realistic Drawing: Shade one shiny red apple under a single lamp and learn light and shadow in this realistic drawing tutorial.
- Diamond Drawing: A brilliant-cut diamond and two small gems are built from straight lines in this how to draw a diamond step by step lesson.
- Halloween Drawing: Plan ahead for autumn with a friendly haunted house under a full moon in this Halloween drawing tutorial.
- Fire Truck Drawing: A long red fire engine with a roof ladder and a hose reel is made from boxes and circles in this fire truck drawing step by step guide.
- Room Drawing: Draw a cosy kid's bedroom from a single vanishing point with this room drawing tutorial in one-point perspective.
- Solar System Drawing: Put every planet in the right order on its own curved path with this how to draw the solar system lesson.
- Police Car Drawing: A black-and-white patrol car with a light bar and a gold star takes 11 steps in this police car drawing tutorial.
- School Drawing: Get ready for the new term with a red-brick school, bell tower and picket fence in this school drawing step by step lesson.
- Race Car Drawing: A low formula car with the number 7 on its side grows from two circles and a wedge in this race car drawing tutorial.
- Volcano Drawing: Draw an island volcano in full eruption, palm trees and all, with this volcano drawing step by step guide.
Sunny Questions From Young Beach Artists
What is an easy summer drawing for beginners?
A beach scene made from simple shapes is a great start: a half circle umbrella, a circle ball and box-shaped towers for a sandcastle. Draw the front objects first and the sea last.
What should I draw for a summer theme?
Pick things people link with warm days: the sun, the beach, ice cream, watermelon or a pool. One clear scene with three or four of these reads better than a page crowded with ideas.
How do you draw a beach for kids?
Draw a horizon line, a wavy shore line below it and a sand area at the bottom. Younger kids can leave out the towel fringe and the shell and still get a sunny beach.
How long does this summer drawing take?
About 25 minutes for the pencil and ink, and 15 to 20 more to color.
Next time you're on the sand, look at what's lying around you, then come home and add your own treasures to this beach. ☀️
Related posts:
 How to Draw a Garden Step by Step (Easy Flower Bed Scene)
 How to Draw a Car Step by Step (Easy Drawing for Beginners)
 Oil Pastel Drawing Step by Step (Easy Sunset for Beginners)
 How to Draw a Whale Step by Step (Easy for Beginners)
 How to Draw a Rat Step by Step (Easy for Beginners)
 How to Draw an Arctic Fox Step by Step (Easy for Beginners)
 How to Draw a Shark Step by Step (Easy for Beginners)
 How to Draw a Chicken Step by Step (Easy for Beginners)
 How to Draw a Fish Step by Step (Easy Goldfish for Beginners)
 How to Draw a Light Bulb Step by Step (Easy for Beginners)
 How to Draw a Crow Step by Step (Easy for Beginners)
 How to Draw an Eagle Step by Step (Easy for Beginners)

