
Water never holds still, so a wave seems like the hardest thing to put on paper. The trick is to freeze one moment, the second the crest tips over, and build it from two ovals and a sea line. Here you'll learn how to draw a wave step by step, inspired by the famous Japanese great-wave prints but kept simple enough for a first try. I like it for nervous beginners, because an uneven line just looks like moving water.
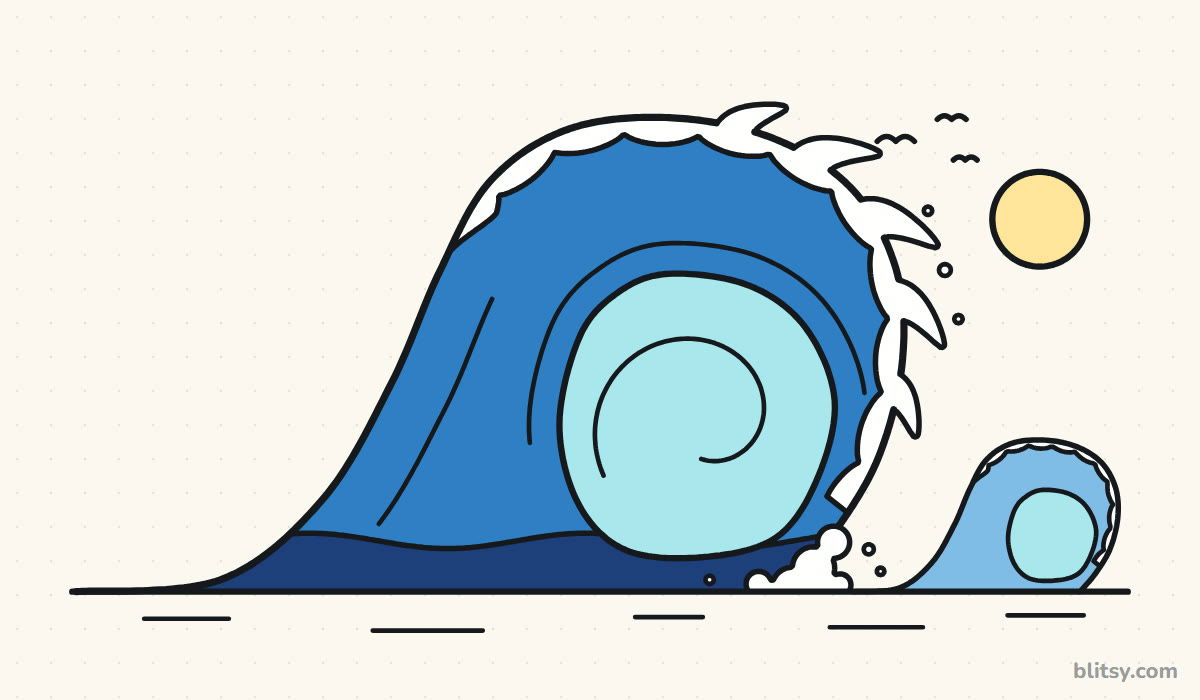
Watch the colors in every picture: bright blue lines are the ones you draw in that step, while gray ones were already there. The pale blue ovals and the light sea line are helpers, so keep them faint, because they disappear in step 11.
Quick overview
⏱️ Time: roughly 30 to 40 minutes, coloring included
🎯 Level: easy, fine for kids from about 7 with a steady hand
✏️ Steps: 12
🌊 You'll draw: a big curling ocean wave with foam claws, a small wave, a sun and birds
Ocean Blues and a Sharp Pencil
- A regular HB pencil
- A clean eraser
- A black felt-tip pen or fineliner
- Colored pencils or markers in blue, navy, light aqua, sky blue and pale yellow
- A sheet of paper turned sideways
No white pencil needed: the foam is simply the paper you leave uncolored.
How to Draw a Wave Step by Step
Step 1: Draw a sea line and a big oval
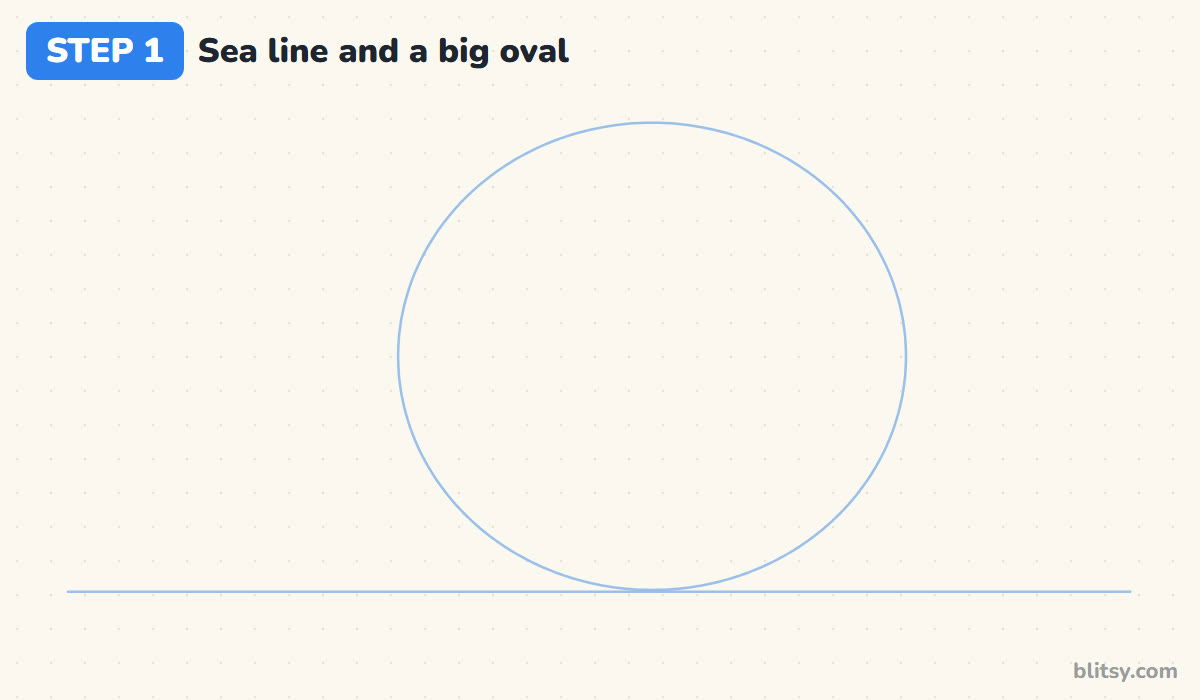
Turn the paper sideways and draw a long, light line across the lower part of the page. Now place a big oval on top of it, a little right of center, so its bottom just touches the line. The oval should take up about half the width of the paper. Your wave will roll over it.
💡 Tip: Press so lightly that you can barely see the pencil. These lines get erased.
Step 2: Add an egg shape and a small oval
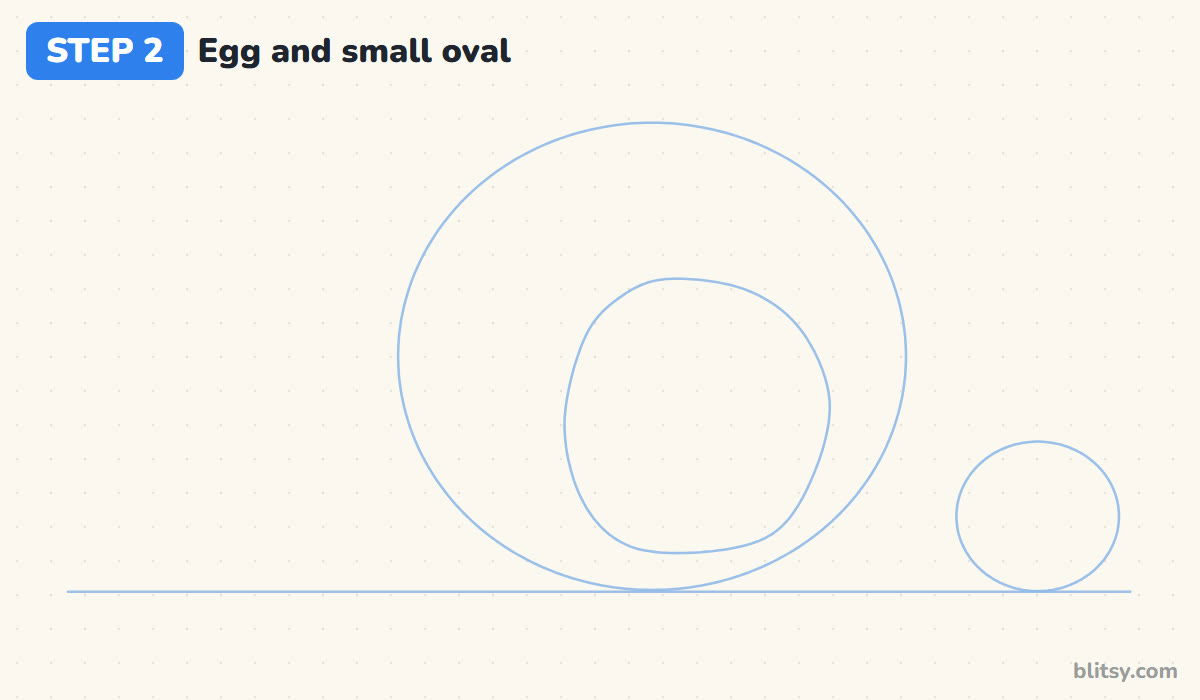
Inside the big oval, sketch an upright egg shape that sits low and toward the right, with its flat-ish bottom just above the sea line. This will become the hollow tube under the curl. Then, to its right, draw a much smaller oval resting on the sea. I make it about a third of the size, so the second wave reads as farther away.
💡 Tip: Leave a thicker gap above the egg than beside it; the crest needs the extra room.
Step 3: Roll the wave over the oval
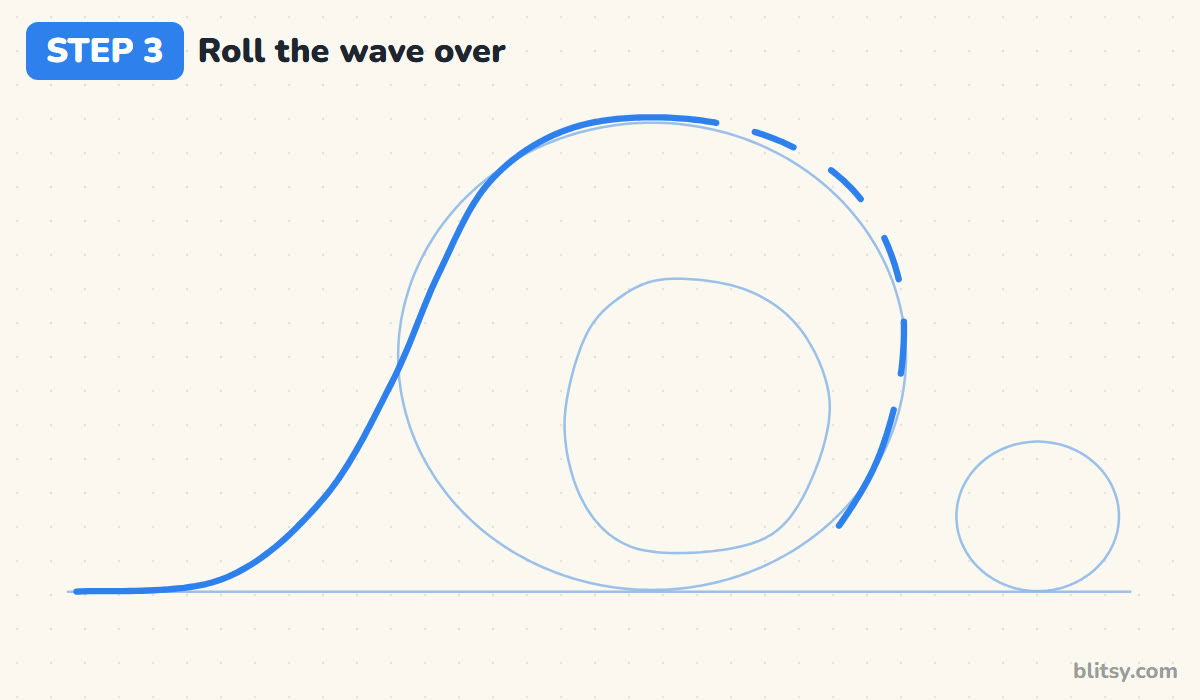
Start at the far left on the sea line. Draw a long, low slope that rises slowly at first, then climbs steeply up the left side of the big oval. Follow the top of the oval over and down the right side. As you come down the front, leave five short gaps where the foam claws will reach out, and stop a little above the sea, because a splash covers the bottom.




💡 Tip: Draw the back slope in one sweep from your shoulder for a smooth rise.
Step 4: Trace the hollow tube
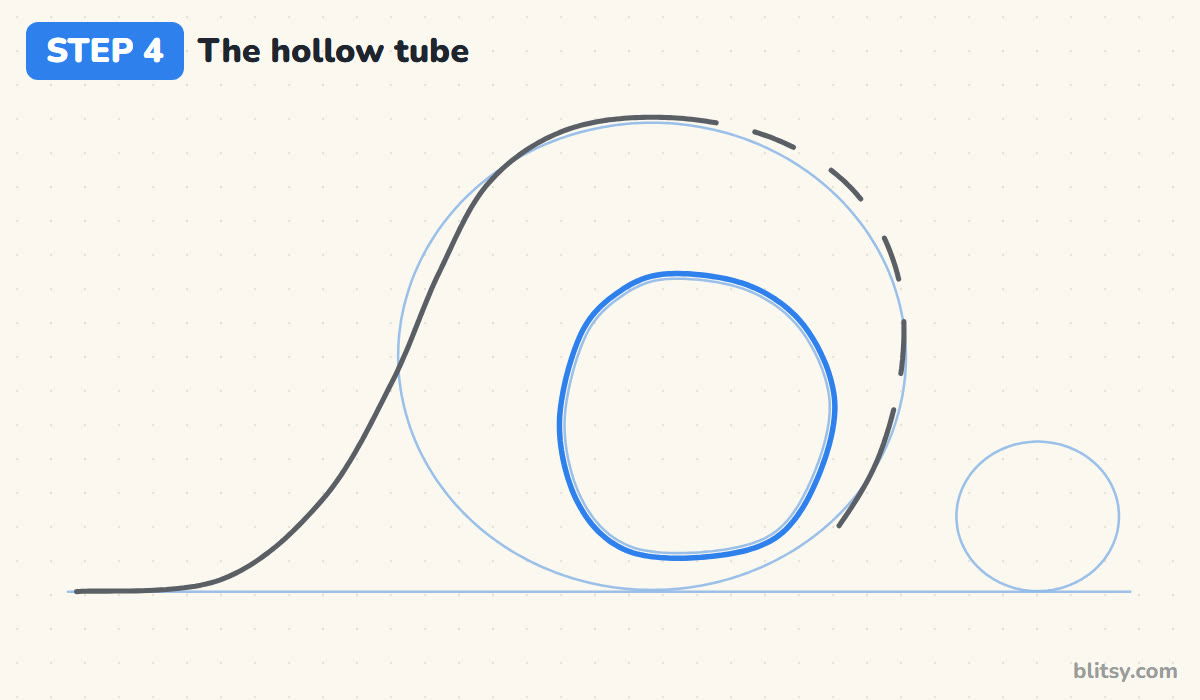
Go over the egg guide with a firm line. This hollow is the space inside the curl, where the falling water traps a pocket of air. Keep the line smooth and close the shape at the bottom.
💡 Tip: Turn the paper as you go so your hand always pulls the pencil toward you.
Step 5: Draw foam with claw fingers
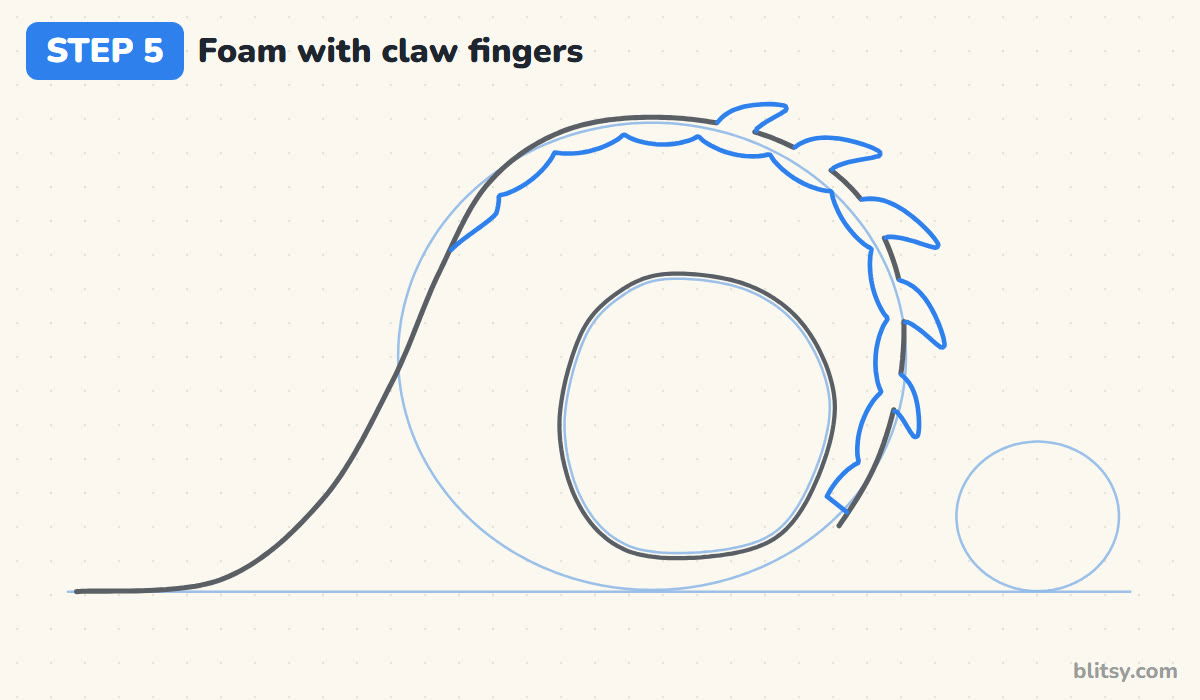
Just inside the top edge, draw a wavy line of small bumps, starting partway up the back and running over the crest. The strip between this line and the outline is the foam. At each gap on the front, add a curved finger that reaches out and hooks downward, like a claw grabbing the air.
💡 Tip: Hook every claw downward so the whole wave seems to fall.
Step 6: Add the splash, the sea and ripples
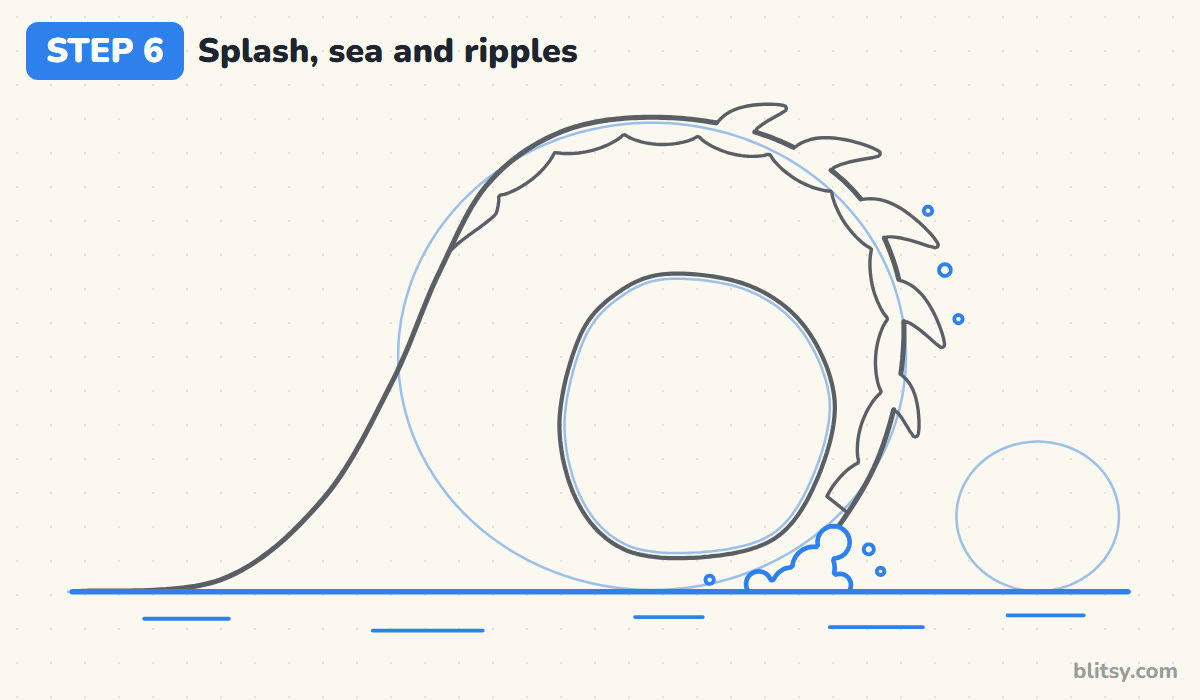
Where the front of the wave meets the water, draw a little cluster of round bumps for the splash. Add three or four small circles flying off the front as spray. Then trace a firm sea line across the whole page and draw a few short dashes underneath it. These ripples make the flat sea look wet.
💡 Tip: Keep the spray circles different sizes. Matching ones look like a necklace.
Step 7: Draw a small wave behind
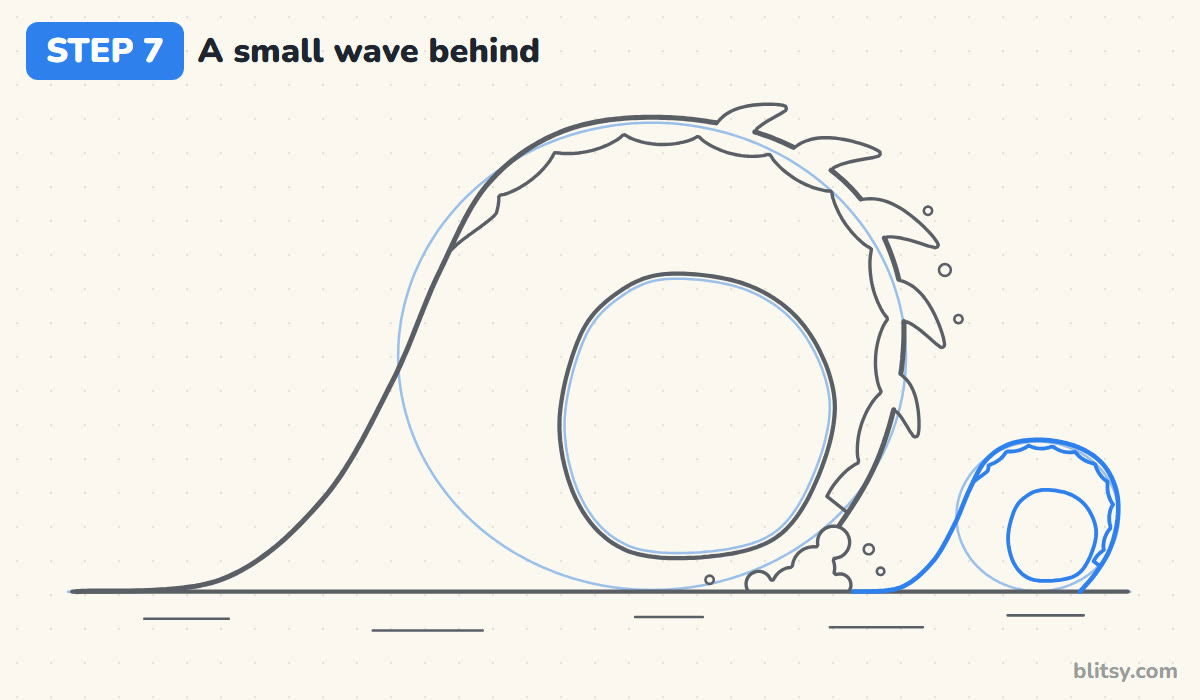
Use the small oval to repeat the big wave in miniature: a gentle back slope, a rounded top, a tiny tube and a thin bumpy foam line. Skip the claws here, since they'd be too small to read. Start its back slope behind the splash so the big wave overlaps it. Overlapping is my favorite way to show distance.



💡 Tip: Smaller and simpler pushes it back. Don't add more detail than the big wave has.
Step 8: Add curl lines in the water
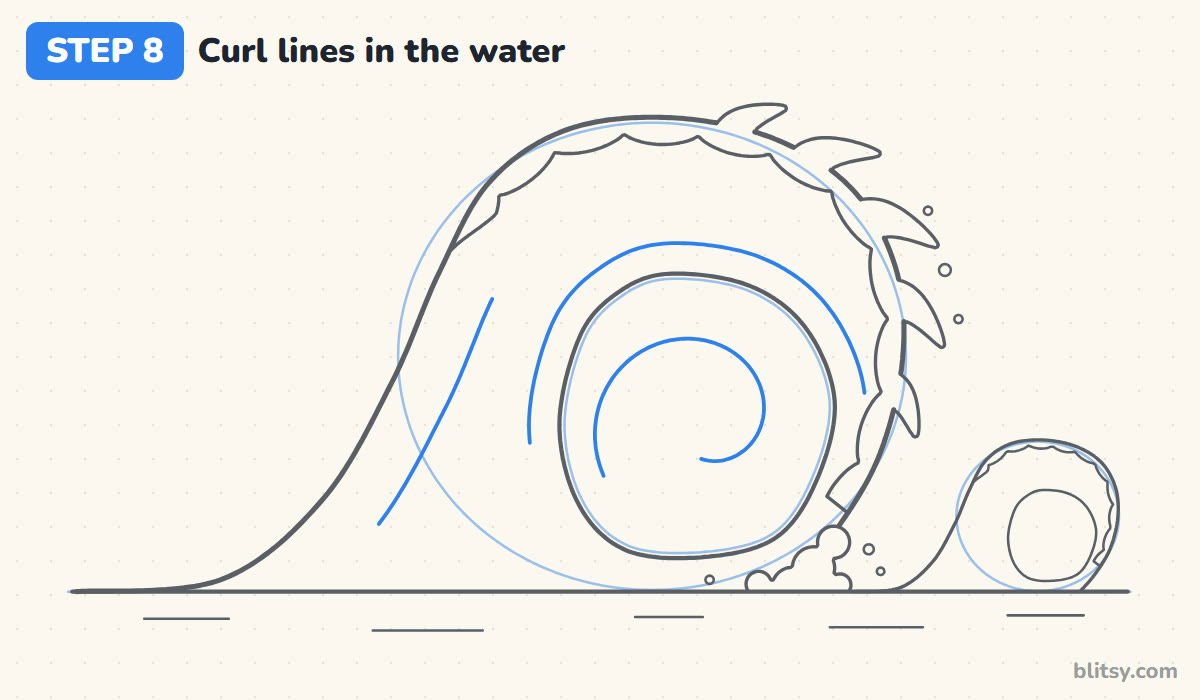
Now show which way the water moves. Draw one curved line that follows the tube around its top, a finger's width away from it. Add a second line running up the back slope, parallel to the outline. Inside the tube, draw a spiral that starts near the lower left wall and turns inward clockwise, the same direction the wave is rolling.
💡 Tip: Stop each curl line before it touches another line. The gaps keep it light.
Step 9: Mark the dark water at the base
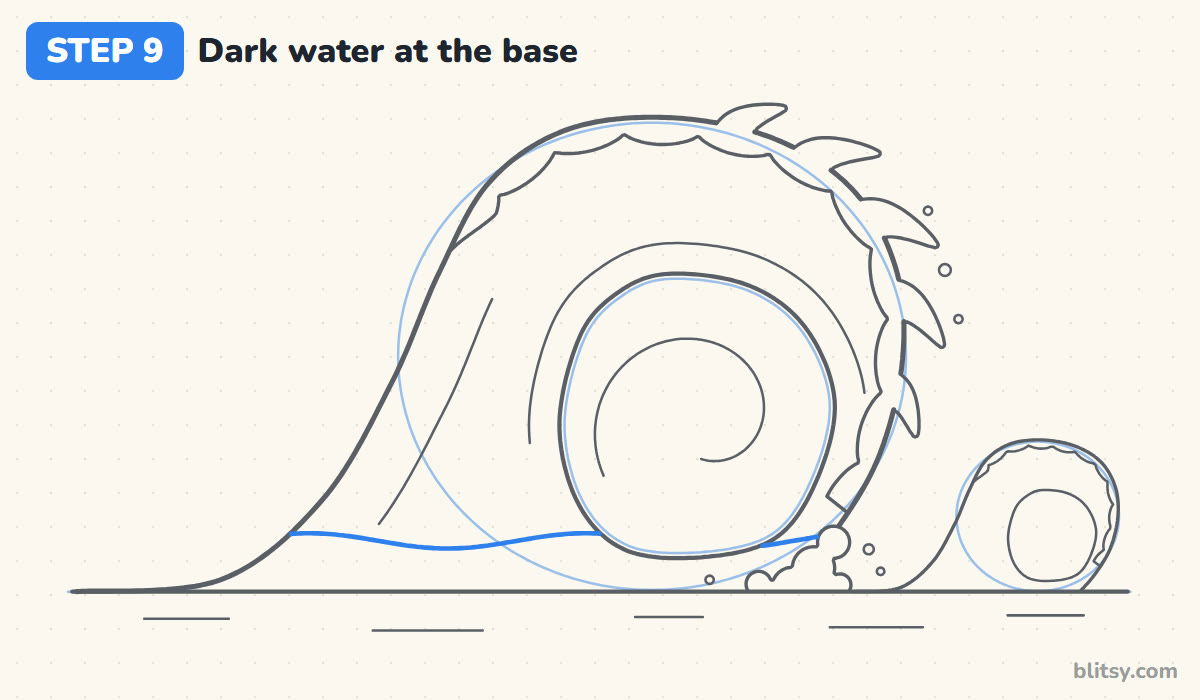
Draw a gently wavy line across the bottom of the big wave, roughly a quarter of the way up from the sea. It runs from the back slope to the tube, then continues on the other side of the tube to the front. Everything below it will be colored navy. Deep water looks darkest, so this band makes the wave feel heavy.
💡 Tip: Let the line rise and dip softly. A ruler-straight line looks like a painted stripe.
Step 10: Draw the sun and three birds
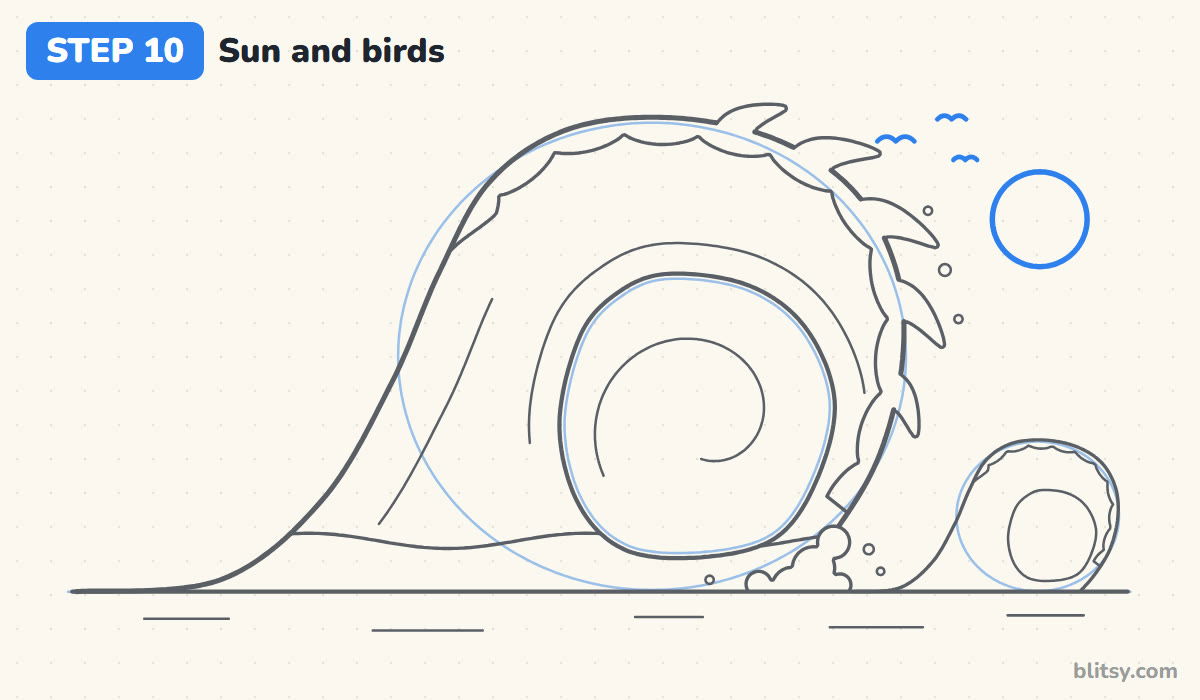
In the empty sky to the upper right, draw a circle for the sun, placed away from the claws so they don't crowd each other. Between the sun and the wave, add three small birds as soft letter M shapes. I make one smaller and higher than the others.
💡 Tip: A coin or bottle cap traced lightly gives you a clean sun circle.
Step 11: Ink the lines and erase the guides
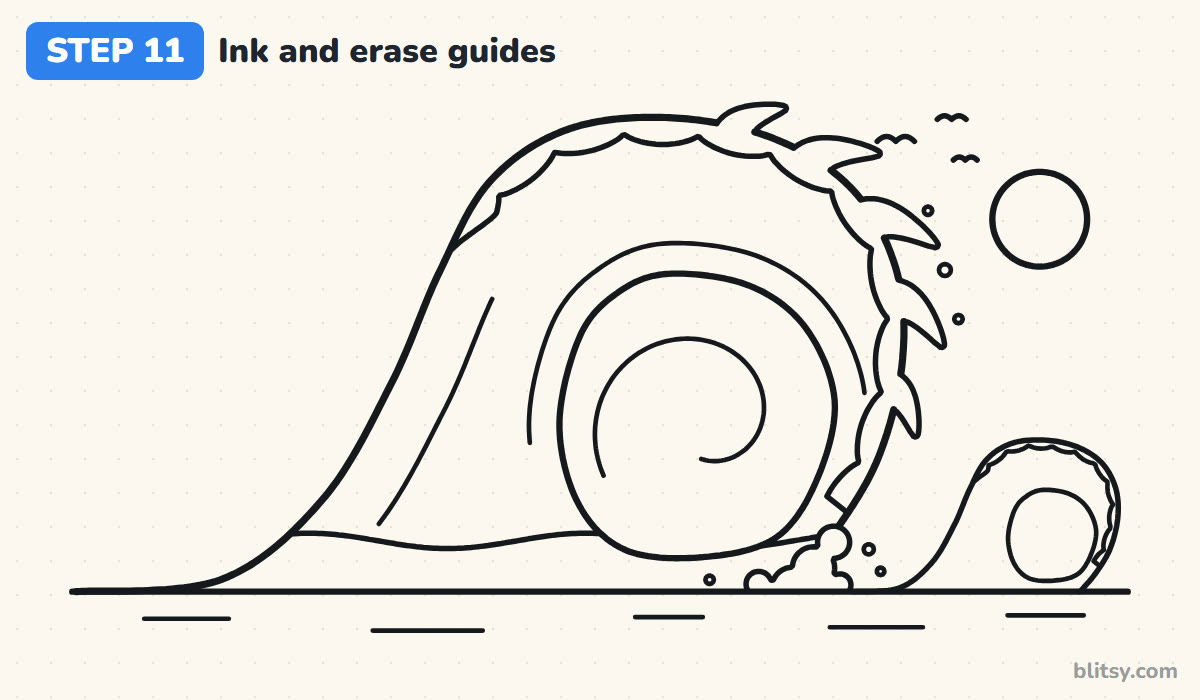
Trace every line you want to keep with the black pen: the outline, tube, foam, claws, splash, sea, small wave, curl lines and the sun with its birds. Skip the faint ovals, and let the ink dry for a minute. Then erase all the pencil, and you'll have a crisp outline that's ready to color or to copy.




💡 Tip: Ink the long outline first while your hand is fresh, details after.
Step 12: Color the water, foam and sun
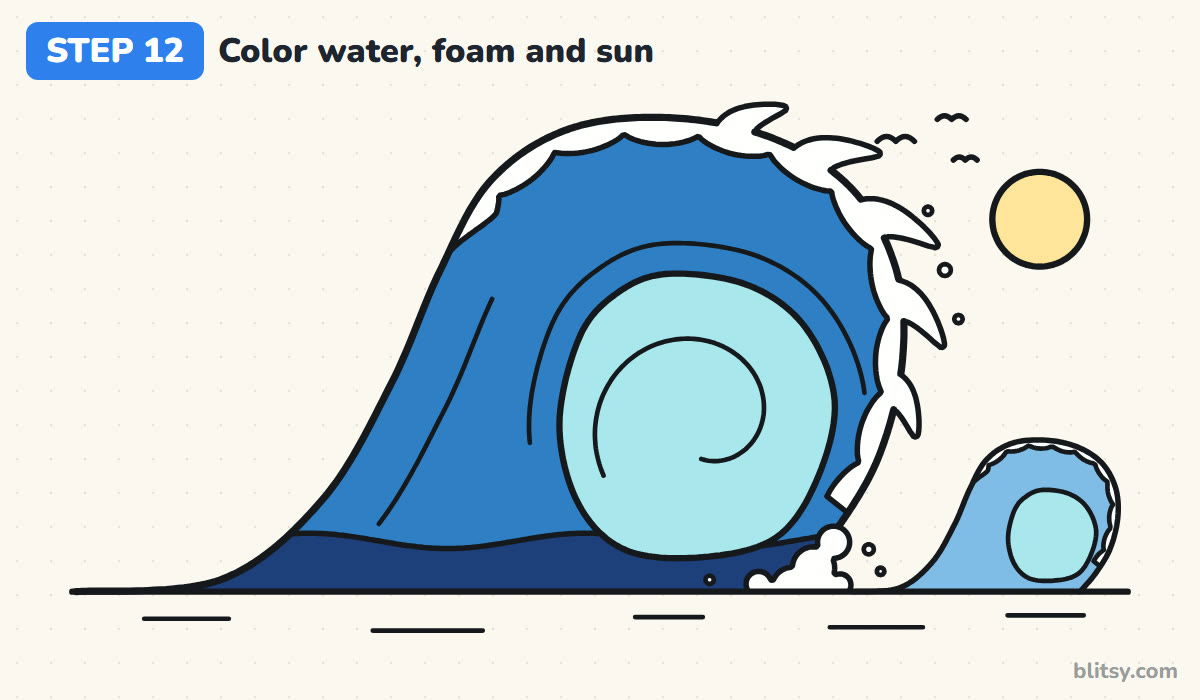
Color the big wave blue and the band at the base navy. Fill the tube with light aqua, which makes it glow like sunlight shining through thin water. The small wave gets sky blue with an aqua tube. Leave all the foam and spray white, then finish with a pale yellow sun. I color the navy band first.
💡 Tip: Stroke the color along the curl, not across it, to keep the motion going.
Wave Drawings That Flop Instead of Curl
- A crest that sits straight up. A wave that doesn't lean looks like a hill. Push the top forward past the base so it hangs over the tube.
- A tube that fills the whole wave. With almost no water around it, the curl looks like a ring. Keep a thick band of blue above the tube.
- Claws pointing every which way. Mixed directions look like spikes. Hook every claw down and forward.
- Coloring the foam blue. The white parts give the wave its sparkle. Leave the foam and splash as bare paper.
- Two waves the same size. Equal waves fight for attention. Keep the back wave about a third as big.
Ride the Same Curl Into New Seascapes
Once the curl feels comfortable, flip it so the wave breaks to the left, or add a tiny surfer riding inside the tube. A stormy gray sky turns the same drawing moody. Younger kids can leave out the claws and the spiral and still get a wave that reads clearly. If you'd like something sailing on your sea, this easy sailboat drawing tutorial fits right in, and the summer beach scene tutorial gives your wave a whole beach to roll onto.
Great Wave Coloring Page and a Printable Lesson PDF
Prefer to skip straight to coloring? Print the free wave coloring page. A small colored example at the top shows which blue goes where, with a key that names each color and its part, and the big outline below is waiting for your pencils. The PDF drawing guide holds all 12 steps with their tips and prints on Letter or A4 paper.
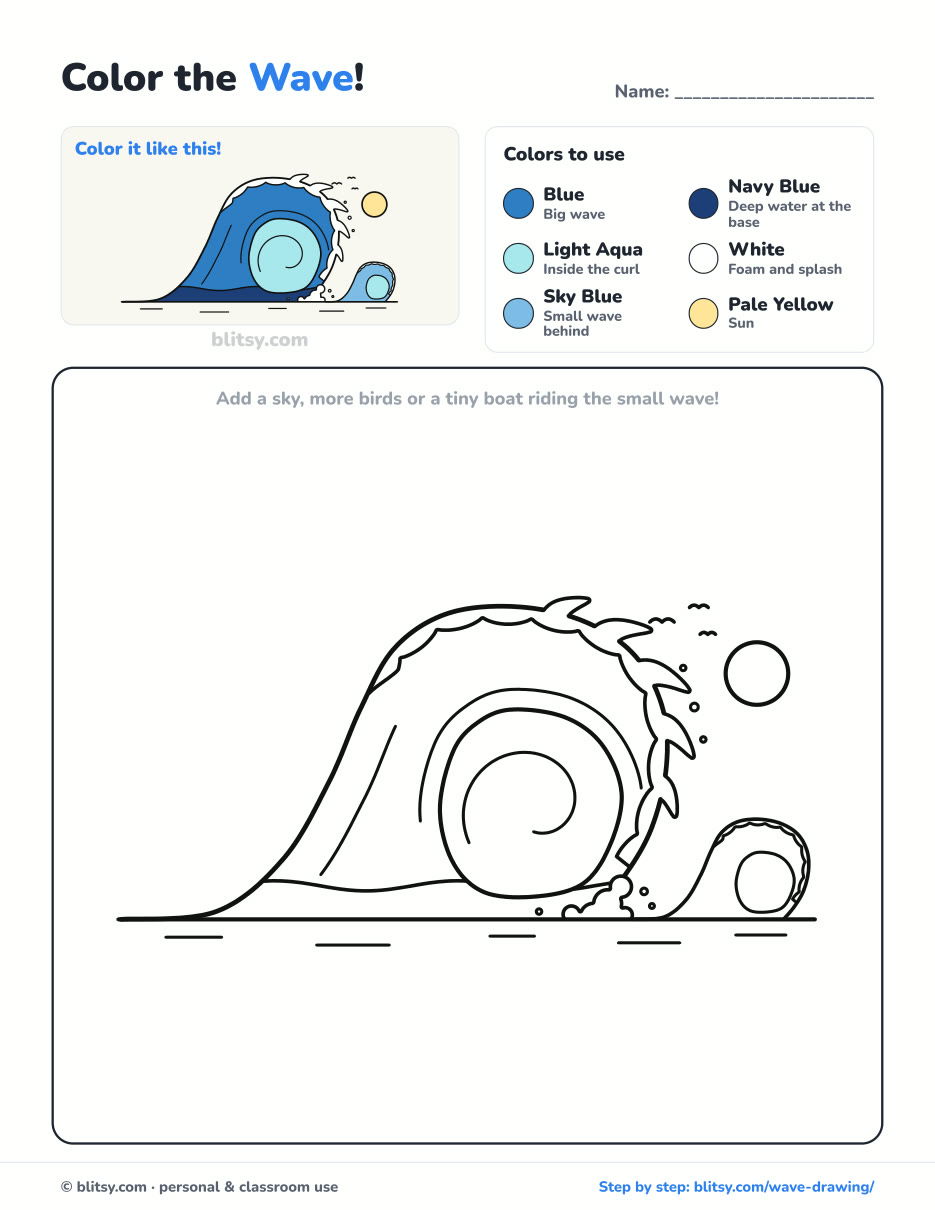
Black outlines with a colored example and the color names at the top. Ready to print and color.
⬇️ Download Coloring PageEvery step picture with its instructions and tips, to keep beside your paper while you draw.
⬇️ Download Drawing Guide📱 On a phone? Tap a download button, then open the file and choose Share → Save to Files or Print. On a computer, the PDF opens or saves straight to your Downloads folder.
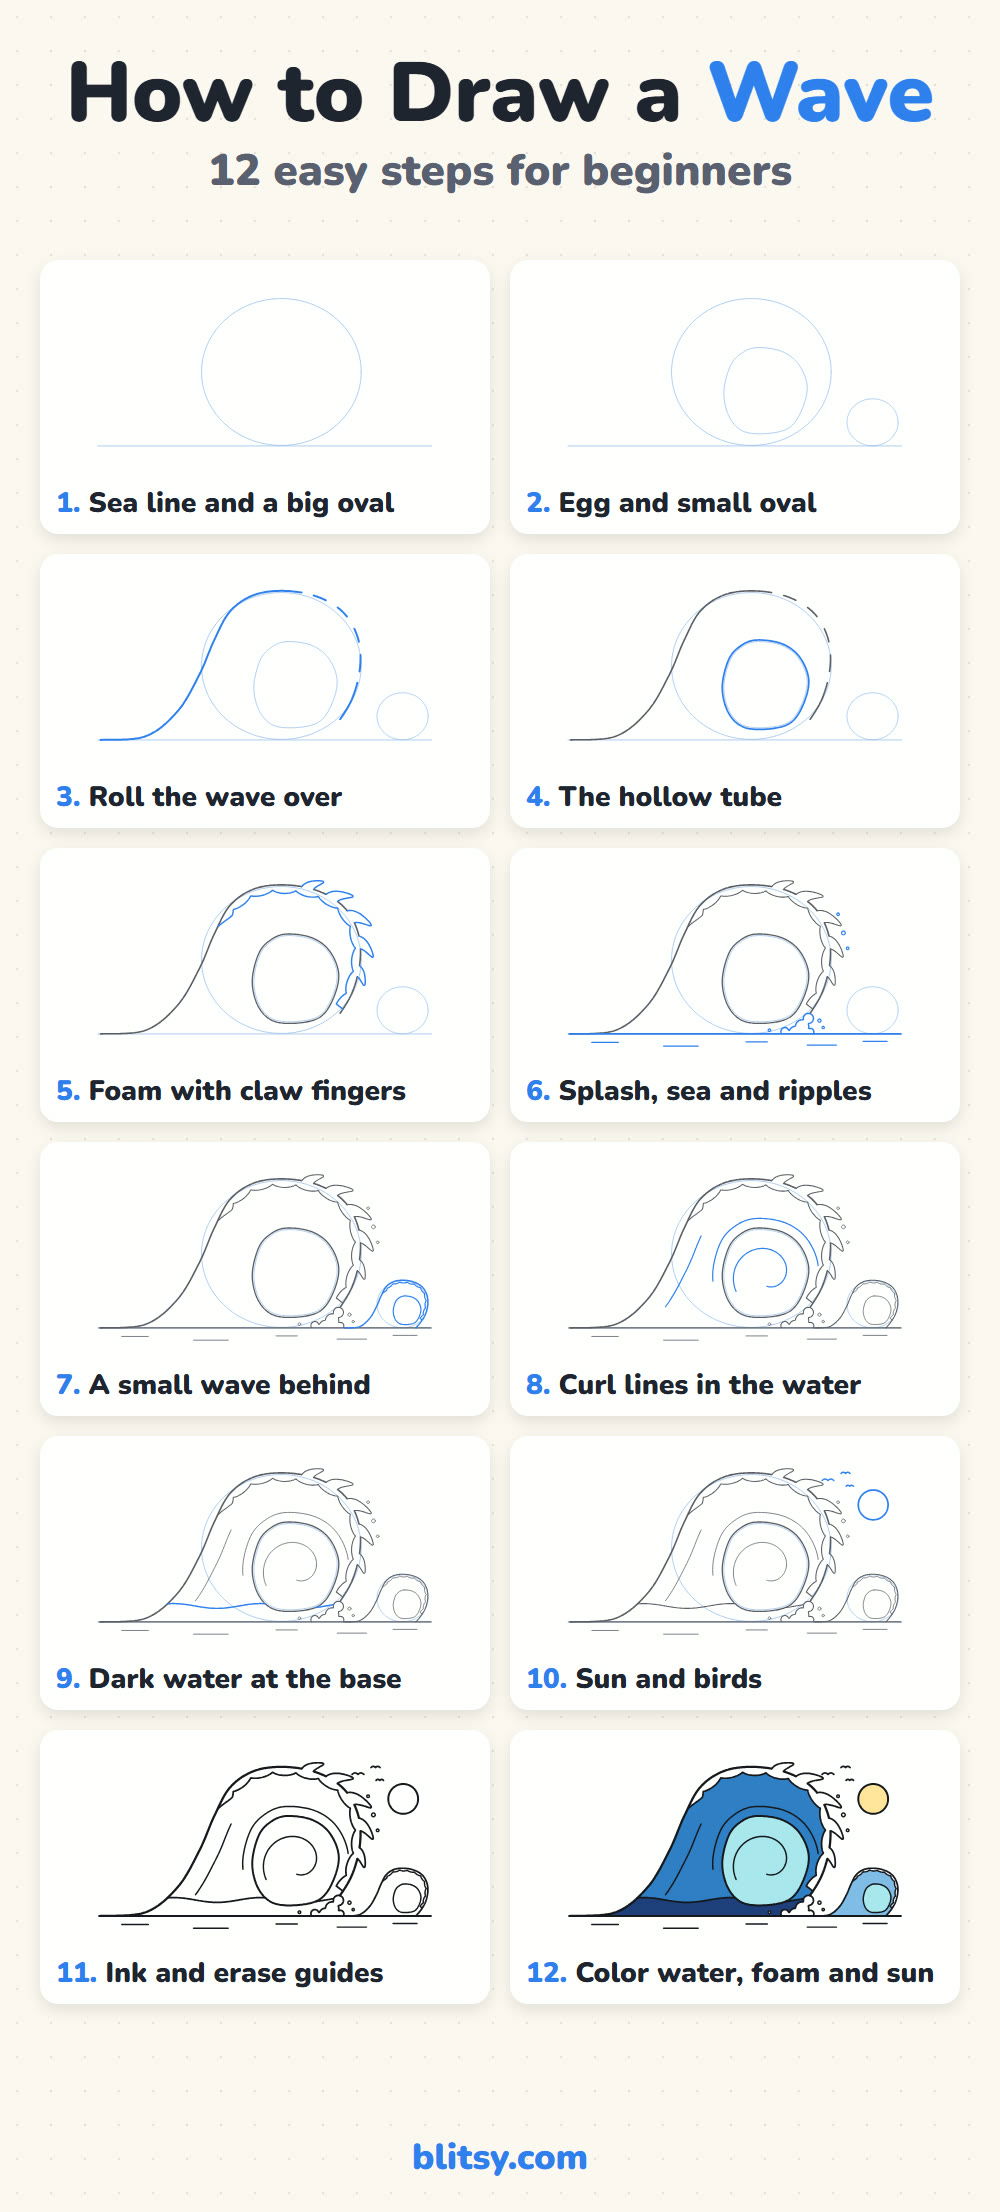
Every Curl and Claw on One Pin
Wave Drawn? Paint These Scenes and Objects Next
Below are more step-by-step tutorials, each one with numbered pictures from the first line to the last color.
- Flames Drawing: A campfire and a flame icon both start from the same S-curve in this how to draw flames step by step lesson.
- Money Drawing: Draw play bills, a full sack and a coin tower with the money drawing tutorial.
- Light Bulb Drawing: A glowing bulb with rays and sparkles comes together in the light bulb drawing tutorial.
- Basketball Drawing: Send an orange ball flying toward a hoop in this basketball drawing step by step guide.
- Snowman Drawing: Water in another form: the snowman drawing tutorial builds a snowman with a flying scarf.
- Mountain Drawing: Three peaks, a lake and six pines make up the how to draw a mountain landscape.
- Realistic Drawing: Shade one shiny apple under a single lamp with the realistic drawing step by step lesson.
- School Drawing: A brick schoolhouse with a bell tower and a picket fence is the goal of this school drawing tutorial.
- Halloween Drawing: Draw a cute haunted house with glowing windows in the Halloween drawing step by step guide.
- Mandala Drawing: The curl of a wave repeats nicely in a circle. Try it with the how to draw a mandala tutorial, built ring by ring from the center.
Surf-Sized Questions About Drawing Waves
What is the easiest way to draw a wave?
Draw a big oval on a sea line, then a slope that climbs up the back of the oval and over the top. Add an egg shape inside for the tube and a bumpy line of foam along the crest.
How do you draw a wave for kids?
Stick to the oval, the slope and the tube, then color it in blues with white foam. The claws and the spiral can wait until the main curl feels easy.
How long does it take to draw a wave?
About 30 to 40 minutes with inking and coloring. The pencil part takes about 15.
What colors do you use for an ocean wave?
A medium blue for the body, navy for the deep water at the base and light aqua for the inside of the curl. Leave the foam white and add a pale sky or sun for contrast.
Next time you're at the beach, watch one wave all the way in; you'll spot the slope, the tube and the falling lip you just drew. 🌊
Related posts:
 How to Draw a Whale Step by Step (Easy for Beginners)
 How to Draw Lungs Step by Step (Easy Science Diagram)
 How to Draw a Pineapple Step by Step (Easy Crown and Slice)
 How to Draw Iron Man Step by Step (Easy Chibi for Kids)
 How to Draw a Dress Step by Step (Easy Party Dress)
 How to Draw a Chicken Step by Step (Easy for Beginners)
 How to Draw a Police Car Step by Step (Easy for Kids)
 How to Draw a Volcano Step by Step (Easy Erupting Volcano)
 How to Draw a Crow Step by Step (Easy for Beginners)
 How to Draw a Tiger Step by Step (Easy Walking Pose)
 How to Draw a Heart Step by Step (Even, Symmetric Shape)
 How to Draw a Jellyfish Step by Step (Cute, Easy Guide)

