
A mandala looks complicated until you notice the secret: it's one small shape repeated around a circle. Once you set up a few circles and some spoke lines, how to draw a mandala step by step becomes a simple question of filling one ring, then the next. The word mandala is Sanskrit for circle, and these round designs have a long history in Hindu and Buddhist art. Our version is a friendly beginner pattern with six rings and bright colors.

New work shows up in blue in every picture, and the gray lines are your work so far. That way you always know exactly which part to add next.
Quick overview
⏱️ Time: about 40 to 50 minutes, plus coloring
🎯 Level: easy, good for patient kids from about 8 and for adults
✏️ Steps: 12
🌸 You'll draw: an 8-part mandala with petals, dots and big outer arches
Tools That Make Mandala Circles Easier
- A sharp pencil, pressed lightly
- A good eraser
- A compass, or a few round things to trace like cups and lids
- A ruler for the spoke lines
- A black fineliner or thin marker
- Colored pencils or markers in five or six colors
- A square sheet of paper, or a normal sheet with a square marked on it
No compass? Tie a string to a pencil, pin the other end in the middle with your finger, and swing it around.
How to Draw a Mandala Step by Step
Step 1: Draw six guide circles
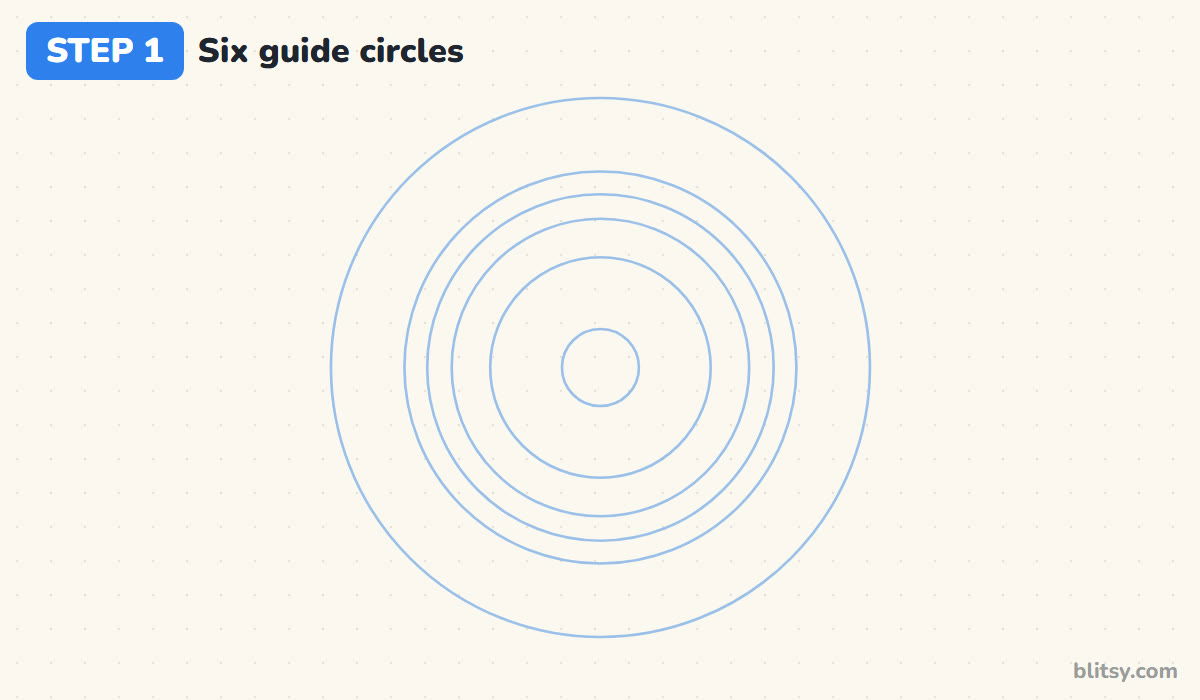
Mark a dot in the middle of the page. Draw six circles around it, very lightly: a tiny one in the center, a medium one, then three close together, and one big circle near the edge of the paper. Keep the three close circles only a finger width apart.
💡 Tip: Use a compass if you have one. Freehand circles drift, and a lopsided circle throws off every ring after it.
Step 2: Add eight spoke lines
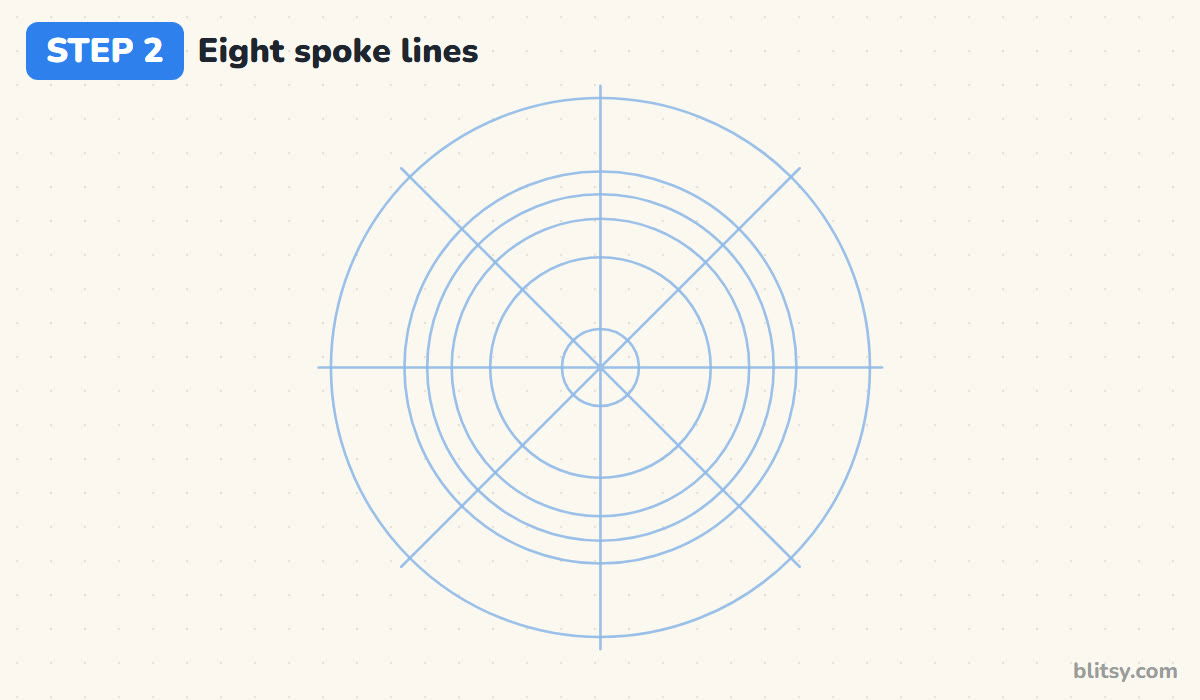
Lay your ruler across the center dot and draw a line straight up and down, then one straight across. Next, draw two diagonal lines through the middle, halfway between the first two. That gives eight spokes, like pizza slices. I line up every later shape with them, and that's what keeps a mandala even.
💡 Tip: Fold the paper in half twice and then along the diagonals. The creases make perfect spokes without any measuring.
Step 3: Draw a small flower center
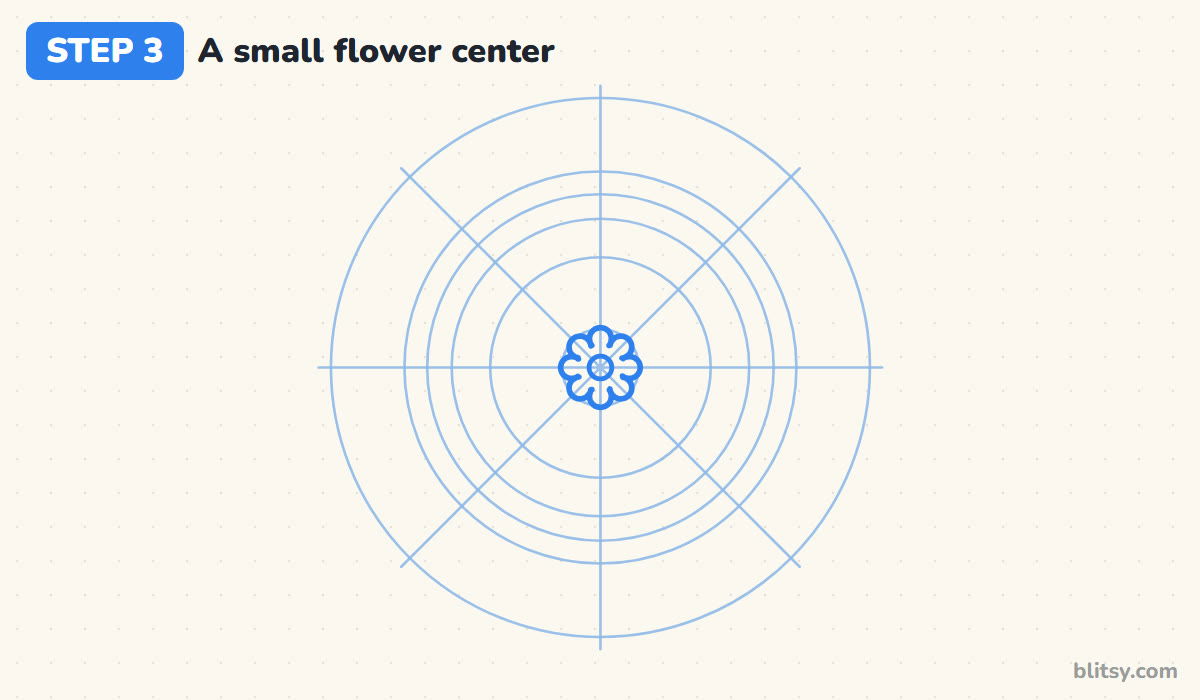
Start with a small circle right on the center dot. Around it, draw a slightly bigger circle with eight little bumps, one bump on each spoke. I treat this tiny flower as a warm-up for the whole mandala, because it teaches the same habit you'll repeat later: one shape on every spoke, all the same size.




💡 Tip: I always place the four straight bumps first and fit the diagonal ones between them.
Step 4: Add eight rounded petals
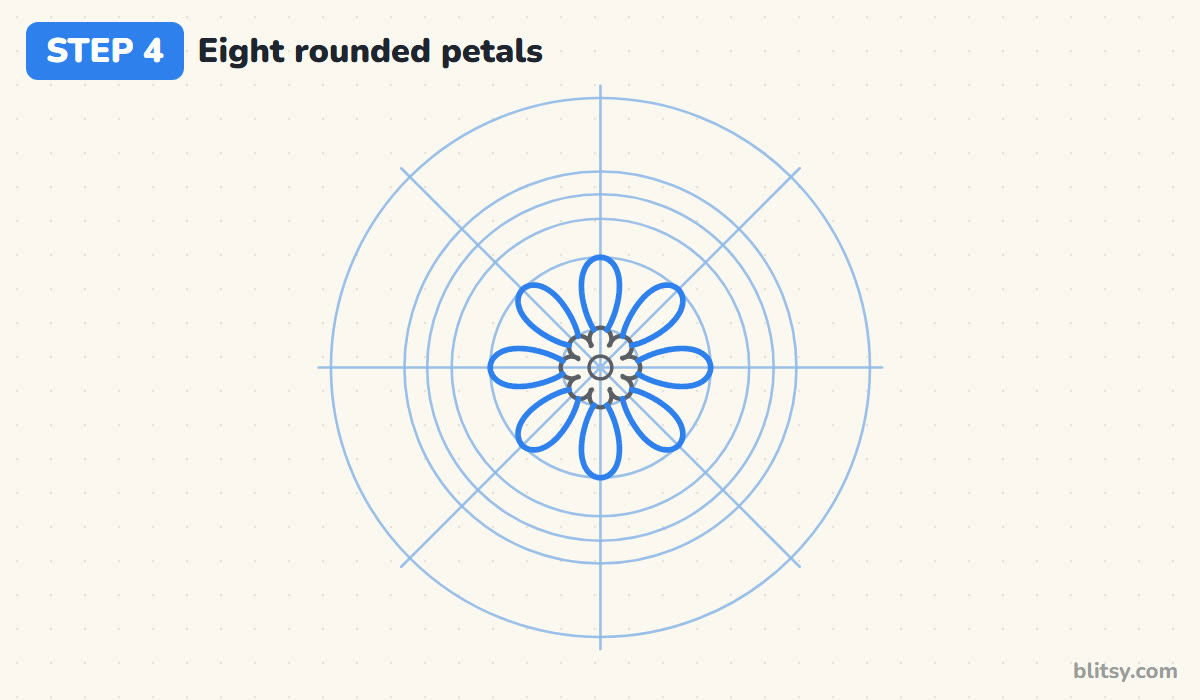
On each spoke, draw a petal that starts narrow at the flower and grows round at its tip, ending on the second guide circle. The spoke runs through the middle, so both sides should bulge the same. Leave a small gap between neighboring petals. Those gaps are where the next ring tucks in.
💡 Tip: Turn the paper as you go so you always draw the petal at the same angle. Your hand repeats a shape better than your eye does.
Step 5: Tuck pointed petals between
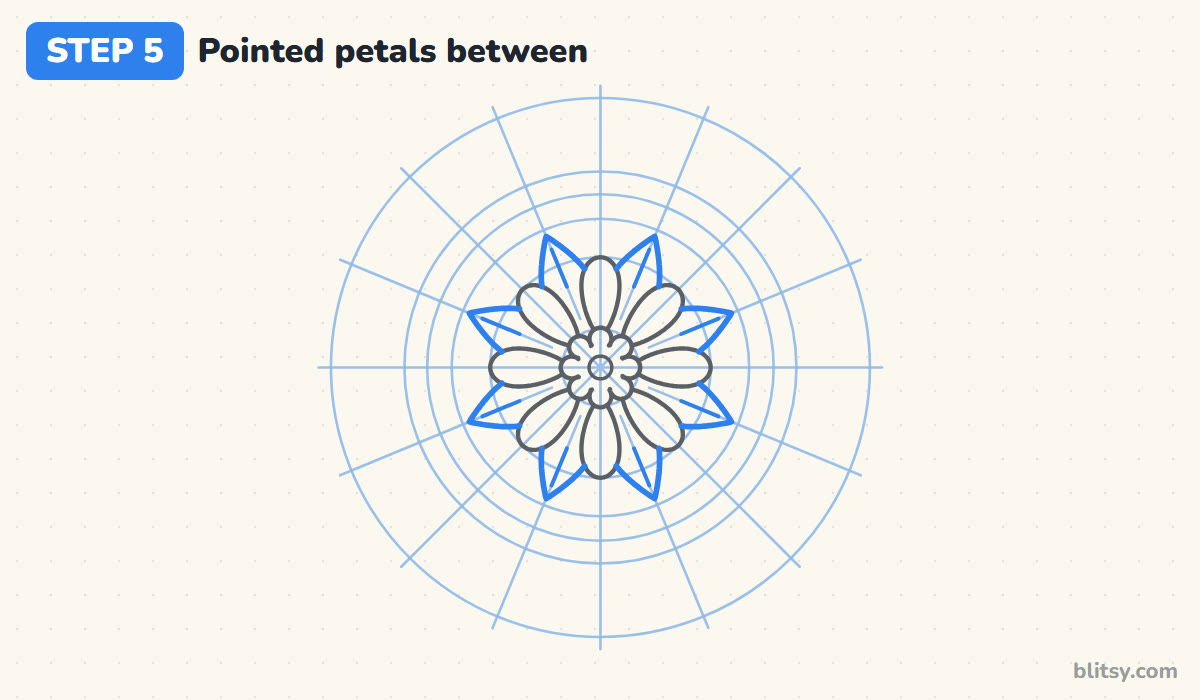
Halfway between every pair of spokes, draw a light extra line from the center outward. On each of these new lines, draw a pointed petal that peeks out from behind the rounded ones, with its sharp tip reaching almost to the third circle. Only draw the part you can see: stop the line where it meets a rounded petal. Finish with a short center line in each point.
💡 Tip: Offsetting by half a step is the trick that makes rings look woven. Layered petals always alternate like this.
Step 6: Draw a band with a ring of dots
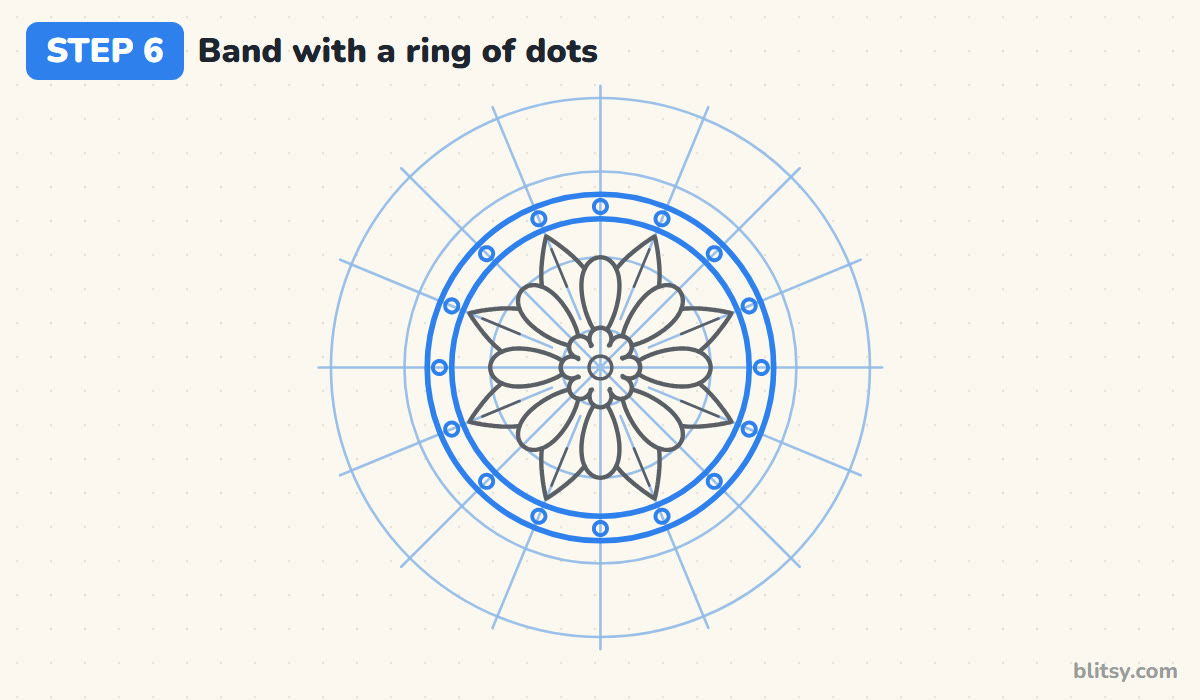
Go over the third and fourth guide circles with firm lines to make a narrow band. Inside it, put a small circle on every spoke and on every halfway line, sixteen in all. Most beginners make the dots too big here. Keep each one well inside the band, with a little space above and below, so the band still reads as a clean stripe.
💡 Tip: Place the four dots on the straight spokes first. The rest then space themselves almost by eye.
Step 7: Add a scalloped ring
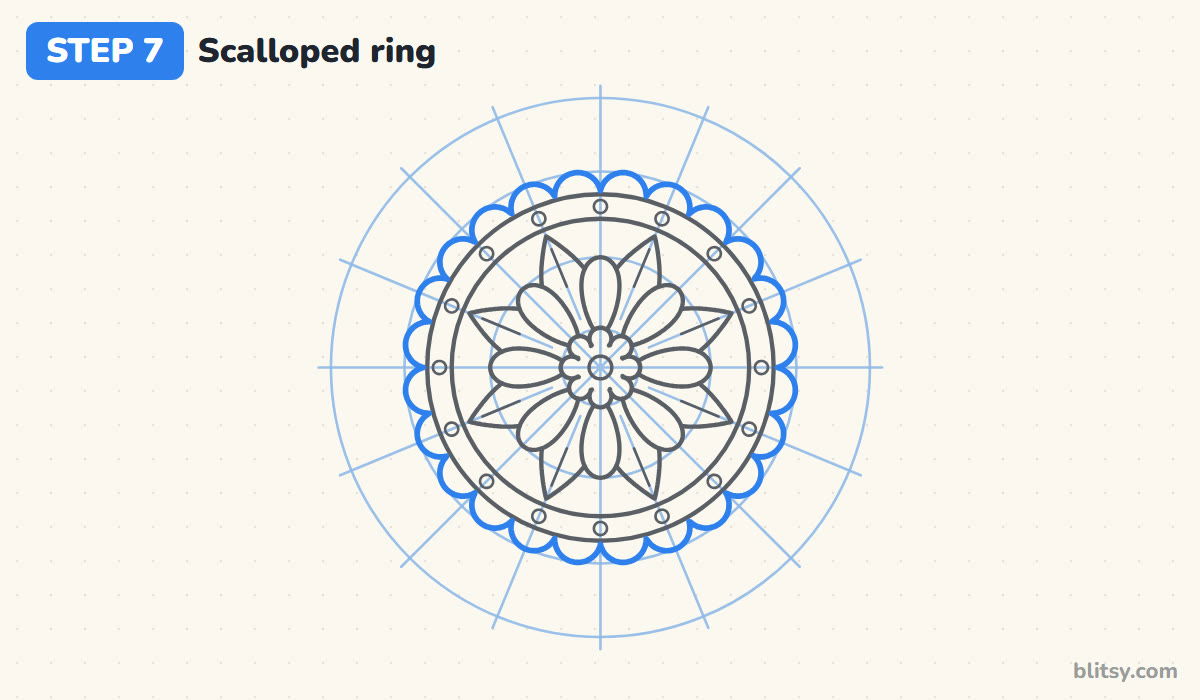
Around the outside of the band, draw small half-circle bumps that sit side by side, touching each other. Put three bumps between every pair of spokes. They should all reach the fifth guide circle, which keeps them the same height. One wide bump squeezes the others, so check each section of three.


💡 Tip: Mark the three bump centers in a section with tiny ticks before you draw any curves.
Step 8: Draw the big outer petals
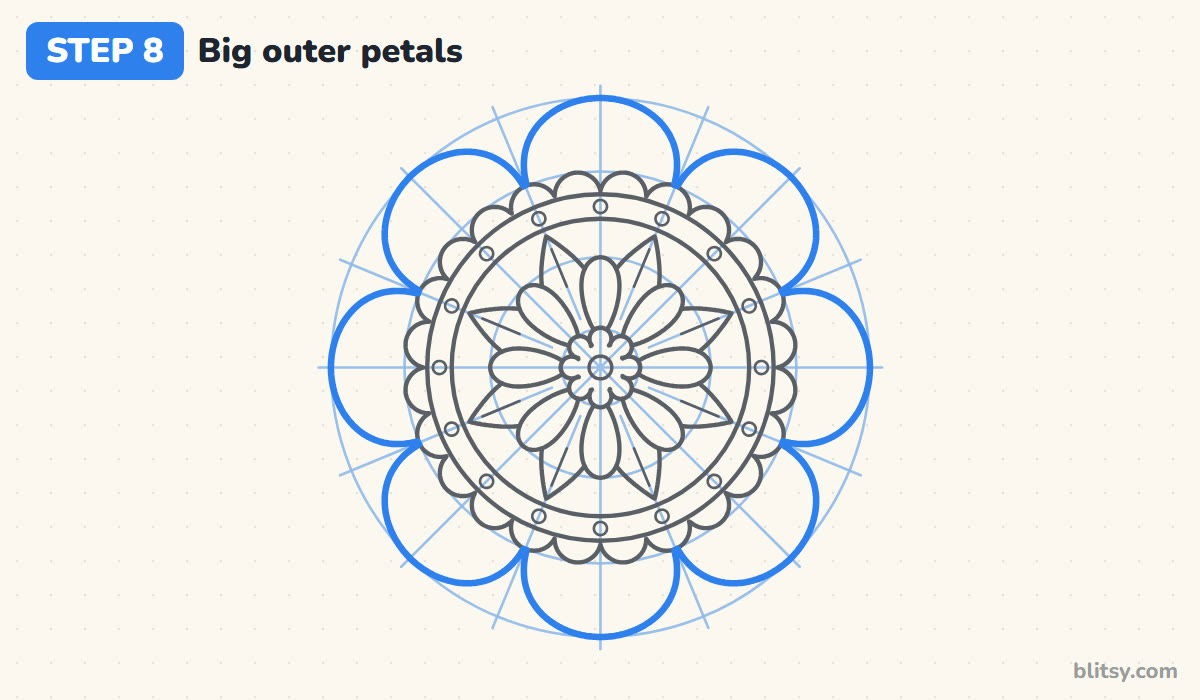
Now the largest shapes. On each of the eight spokes, draw a wide rounded arch that rises from behind the scallops and touches the outer guide circle at its top. Neighboring arches meet down at the scallops, so the edge of the mandala becomes a row of eight soft bumps. I draw the top and bottom arches first, because the gaps left over tell me how wide the diagonal ones should be.
💡 Tip: Each arch should cross the outer circle exactly once, right where its spoke hits it. That's your height check.
Step 9: Draw arches inside the petals
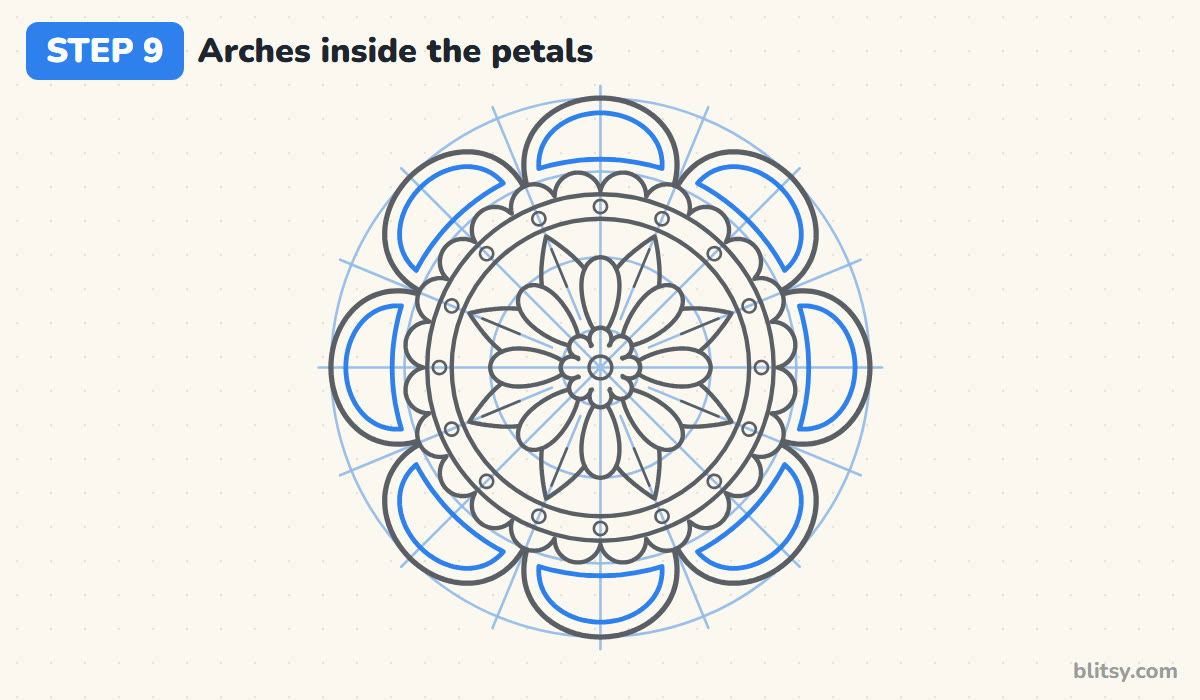
Inside every big petal, draw a second arch that follows the outer edge about a finger width in. Close it at the bottom with a gentle curve that follows the circles. It gives each petal a border and two areas to color. Keep the border the same width all the way around each arch.
💡 Tip: Slide your little finger along the outer edge as you draw, as a built-in spacer.
Step 10: Sprinkle tiny accent dots
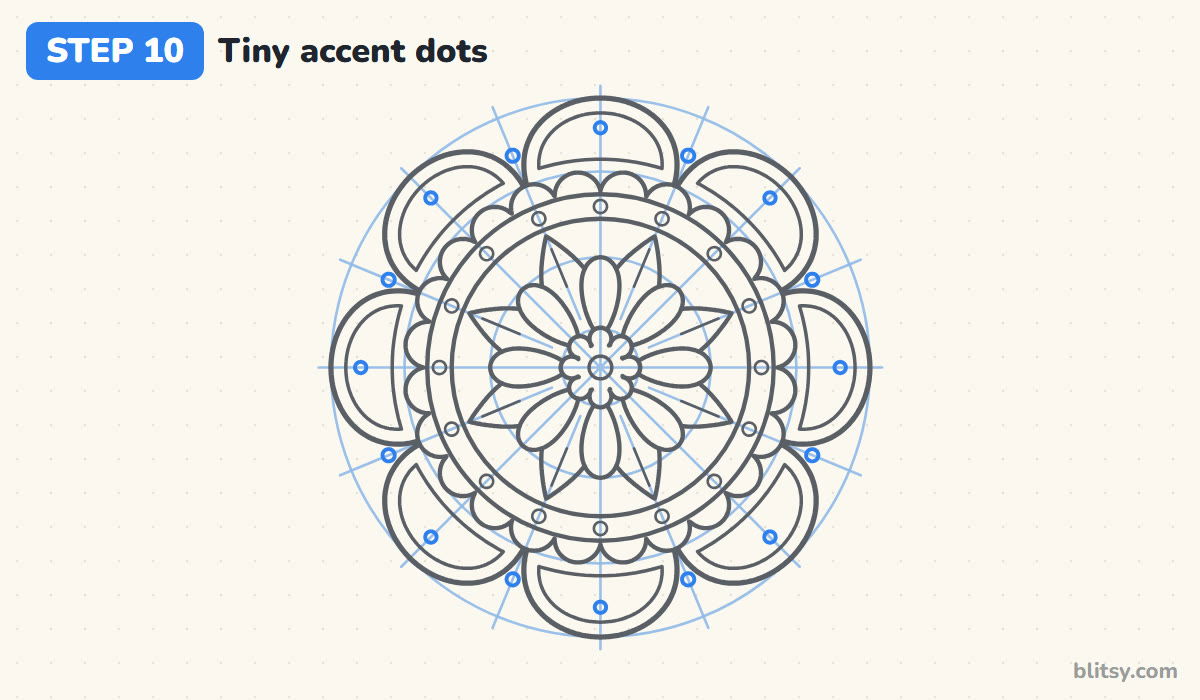
Add one small dot inside each inner arch, sitting on the spoke near the top. Then put a dot in each gap between two big petals, just outside the scallops. These dots add detail without making it busy.
💡 Tip: Twist the pencil slightly as you draw a tiny dot. It comes out rounder than a quick circle.
Step 11: Ink the lines and erase guides
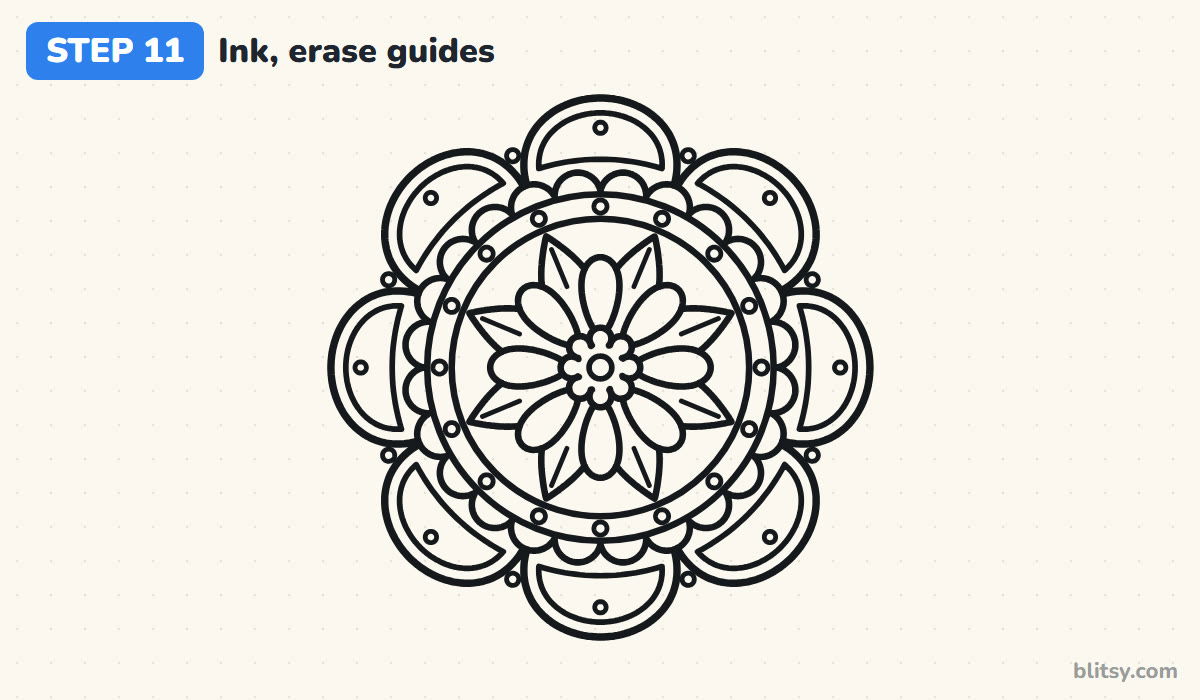
Trace every keeper line with a black fineliner. Skip the guide circles and the spoke lines. Wait a few minutes until the ink is dry, then erase all the pencil, and the mandala suddenly looks clean and finished.

💡 Tip: Ink from the center outward so your hand never rests on fresh lines.
Step 12: Color it one ring at a time
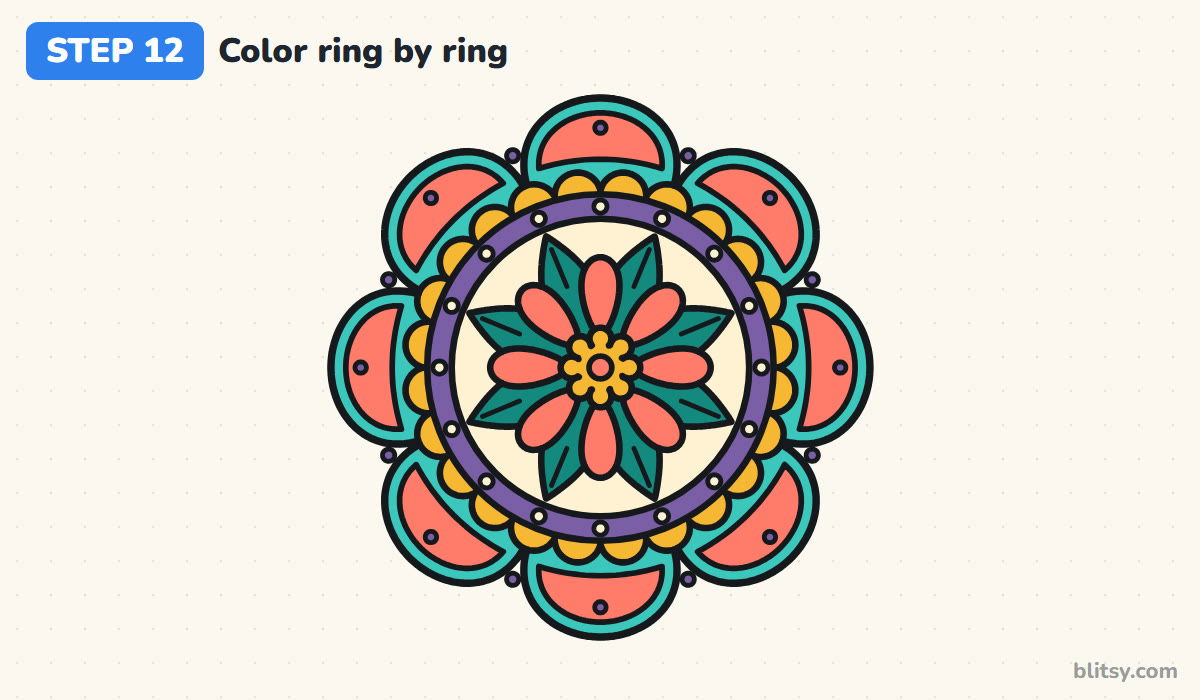
Color ring by ring, using the same color for every shape in a ring. Our palette goes gold in the middle, coral petals, teal points, a cream circle, a purple band with cream dots, gold scallops, then turquoise petals with coral arches. My rule is warm, then cool, then warm again, so each layer stays easy to see. Go around the whole ring before you switch pencils.
💡 Tip: Color the darker rings last so the dark pigment doesn't smudge into the light ones.
Why Mandalas Come Out Lopsided
- Drawing the circles freehand. A wobbly circle makes every ring after it uneven. Trace a cup or use a compass for the guides.
- Finishing one side first. If you complete the top half, the bottom never quite matches. Go around the whole ring before starting the next one.
- Shapes that drift off the spokes. Each petal should sit centered on its line. Check by looking down the spoke: both sides of the petal should bulge equally.
- Pressing hard on the guide lines. Dark guides won't erase and show through the color. Keep them so light you can barely see them.
- Too much detail too soon. Packing every gap with lines makes a beginner mandala muddy. Finish the six rings first, then decide if it needs more.
Swapping Shapes Inside the Rings
Once the spokes are in place, every ring can be swapped. Try twelve spokes instead of eight for a finer pattern, swap the rounded petals for hearts or leaves, or replace the scallops with a zigzag of small triangles. Younger kids can stop after the scallops; it still looks complete. The petal rings here are close cousins of the ones in this easy flower drawing tutorial, and the sunflower drawing tutorial is another round design that grows ring by ring from the middle.
Free Mandala Coloring Page and Printable Steps
The free mandala coloring page shows a colored example at the top with a key that names each color and the ring it belongs to, then a large outline below for your own color choices. The printable step-by-step guide collects all 12 steps with their pictures and tips, and fits Letter or A4 paper.
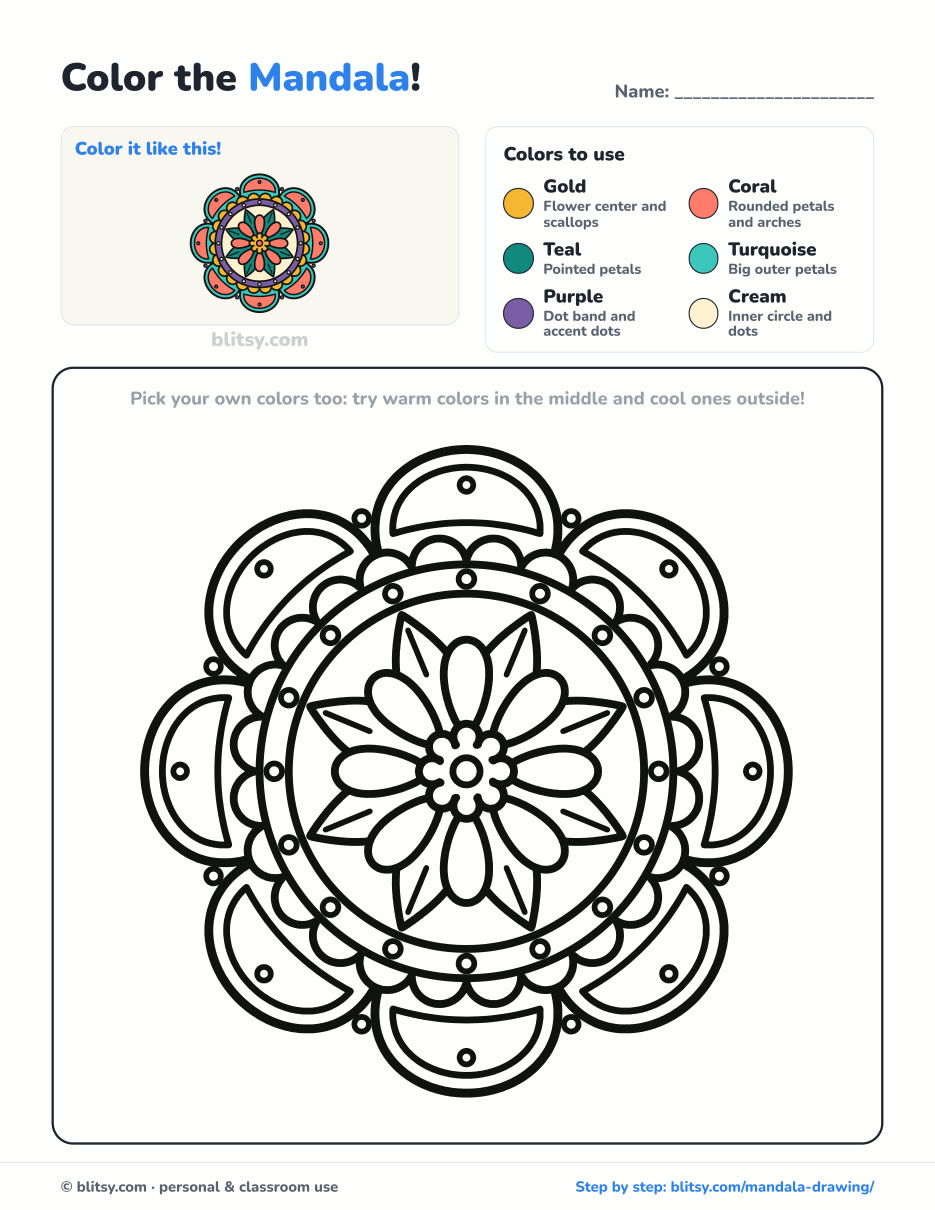
Black outlines with a colored example and the color names at the top. Ready to print and color.
⬇️ Download Coloring PageEvery step picture with its instructions and tips, to keep beside your paper while you draw.
⬇️ Download Drawing Guide📱 On a phone? Tap a download button, then open the file and choose Share → Save to Files or Print. On a computer, the PDF opens or saves straight to your Downloads folder.
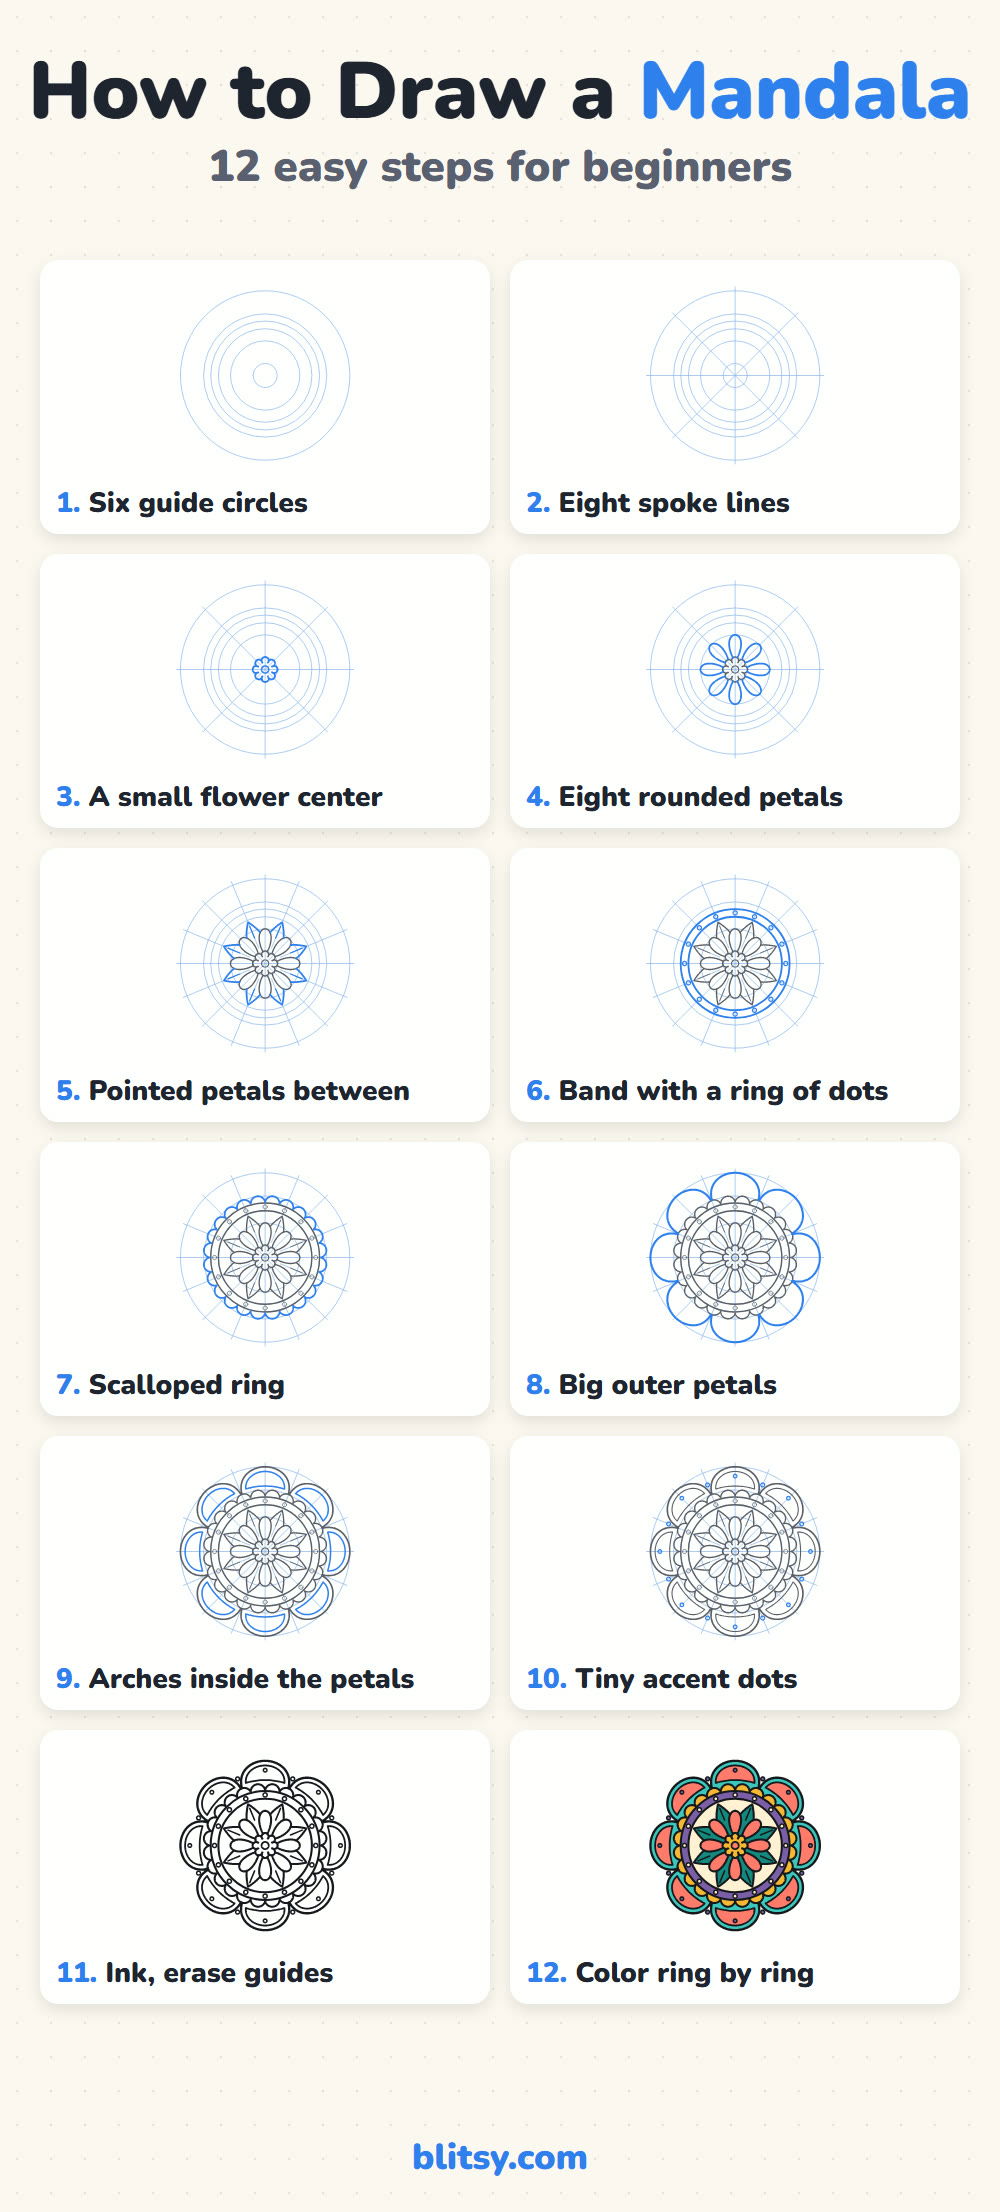
The Whole Mandala on One Pin
Mandala Colored? Here Is What to Draw Next
Each link opens a full step-by-step tutorial, so every object and scene comes with a picture for each step.
- Money Drawing: Draw a stack of play bills, a full sack and a coin tower with the how to draw money step by step lesson.
- Realistic Drawing: Swap pattern for light and shadow in the realistic drawing tutorial, where you shade one shiny apple.
- Snowman Drawing: A snowman in a hat with his scarf flying takes 12 short steps in this snowman drawing tutorial.
- Mountain Drawing: Draw three peaks over a lake lined with pines in the mountain drawing step by step landscape.
- Flames Drawing: Use one S-curve to build a campfire in this flames drawing tutorial.
- Wave Drawing: Curl a deep blue ocean wave with claw-shaped foam using how to draw a wave.
- Halloween Drawing: Draw a haunted house with a grinning pumpkin in the Halloween drawing tutorial.
- Light Bulb Drawing: The light bulb drawing step by step lesson ends with a glowing bulb, rays and sparkles included.
- School Drawing: A brick schoolhouse with a bell tower is the goal of the school drawing tutorial.
- Basketball Drawing: Draw a ball in mid-flight and a hoop with a net in this basketball drawing tutorial.
Mandala Questions From New Drawers
What is the easiest way to draw a mandala?
Draw a few circles around one center point, add spoke lines through the middle, and then repeat one simple shape on every spoke. Work outward one ring at a time.
What does the word mandala mean?
Mandala is a Sanskrit word meaning circle. Round designs called mandalas appear in Hindu and Buddhist art, and today the word is also used for any circular, repeating pattern.
Can I draw a mandala without a compass?
Yes. Trace round objects like lids and cups, or tie a pencil to a piece of string and swing it around a fixed center point.
How long does it take to draw a mandala?
About 40 minutes to draw this one and another 30 to color it. Detailed mandalas can take hours.
Start with one quiet dot in the middle, go around ring by ring, and see which colors you pick when nobody tells you what to choose. 🌸✏️
Related posts:
 How to Draw a Car Step by Step (Easy Drawing for Beginners)
 How to Draw a Whale Step by Step (Easy for Beginners)
 How to Draw a Rat Step by Step (Easy for Beginners)
 How to Draw an Arctic Fox Step by Step (Easy for Beginners)
 How to Draw a Shark Step by Step (Easy for Beginners)
 How to Draw a Dog Step by Step (Easy Side View for Beginners)
 How to Draw a Chicken Step by Step (Easy for Beginners)
 How to Draw a Fish Step by Step (Easy Goldfish for Beginners)
 How to Draw a Light Bulb Step by Step (Easy for Beginners)
 How to Draw a Snowman Step by Step (Easy for Beginners)
 How to Draw a Crow Step by Step (Easy for Beginners)
 How to Draw an Eagle Step by Step (Easy for Beginners)

