
A steam train looks busy and impressive, yet it's really a row of boxes sitting on a row of circles. This lesson shows you how to draw a train step by step, starting with the track and the wheels and finishing with puffs of steam. I picked an old-fashioned steam locomotive pulling a coal tender, since its parts are easy to tell apart and fun to color. You don't need any drawing experience, just a little patience with the wheels.
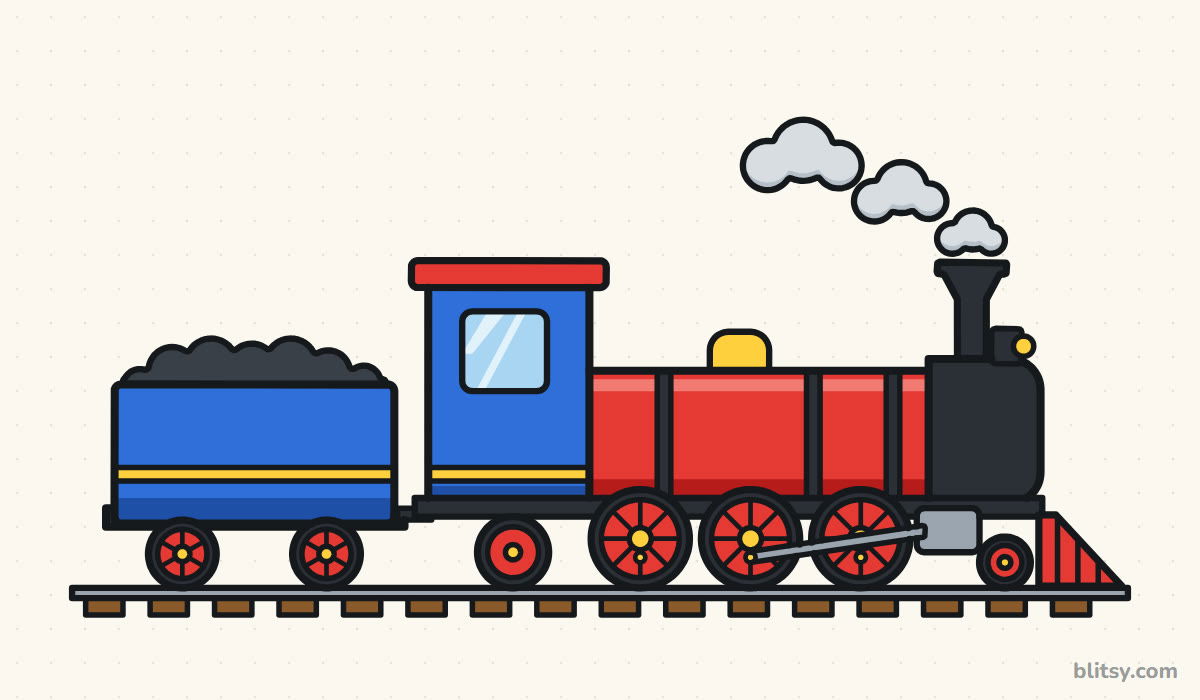
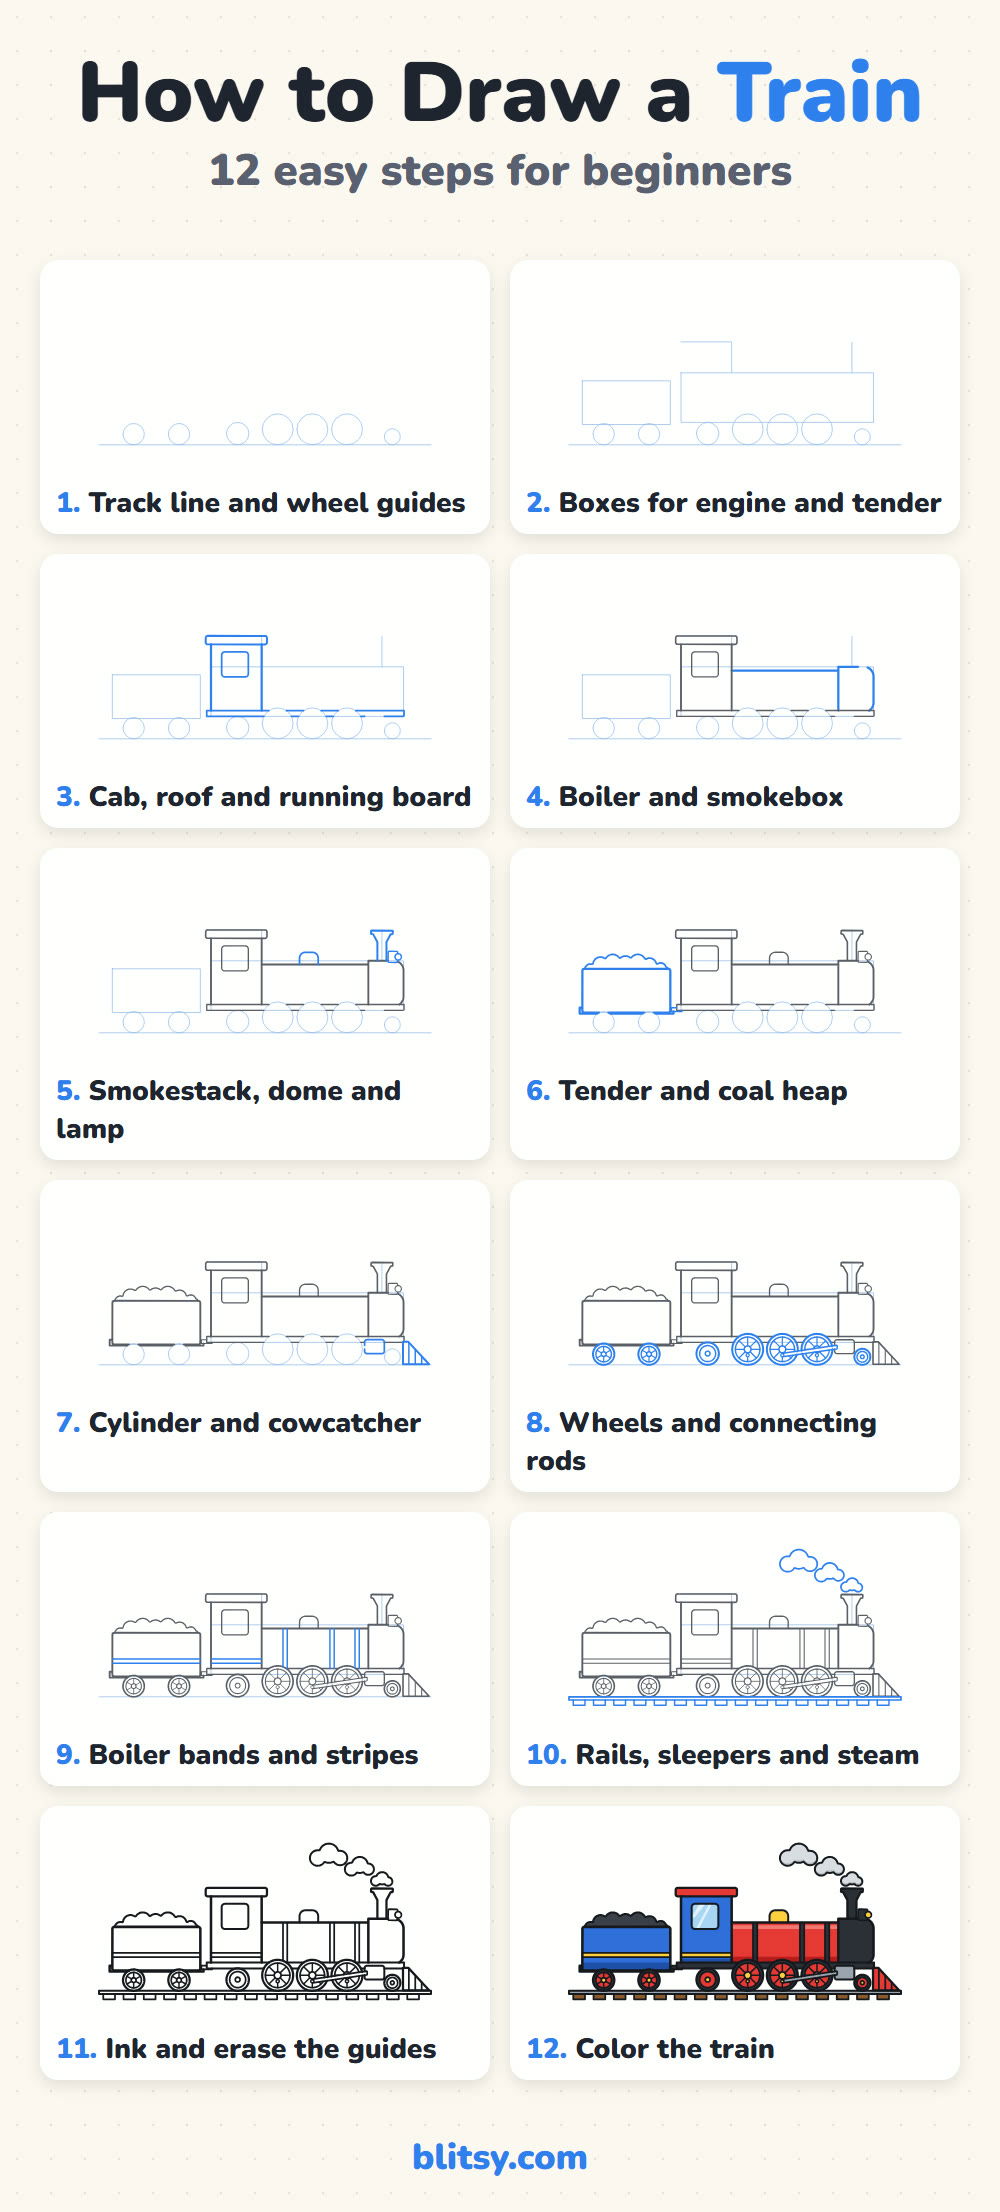
Each picture uses blue for the lines you add in that step and gray for everything already on your page. The pale guide shapes at the start get rubbed out later, so keep your pencil light for them.
Quick overview
⏱️ Time: around 40 minutes, including coloring
🎯 Level: easy to medium, best for kids 7 and older
✏️ Steps: 12
🚂 You'll draw: a steam locomotive with a coal tender on a railroad track
Supplies to Get Your Train Rolling
- A regular pencil
- An eraser that doesn't smudge
- A black fineliner or felt-tip pen
- Colored pencils or markers (red, blue, yellow, black plus gray and brown)
- A sheet of paper turned the long way
- A ruler for the rails and the boxes (helpful, not required)
A ruler helps with long straight lines, but freehand trains look great too.
How to Draw a Train Step by Step
Step 1: Draw the track line and wheel guides
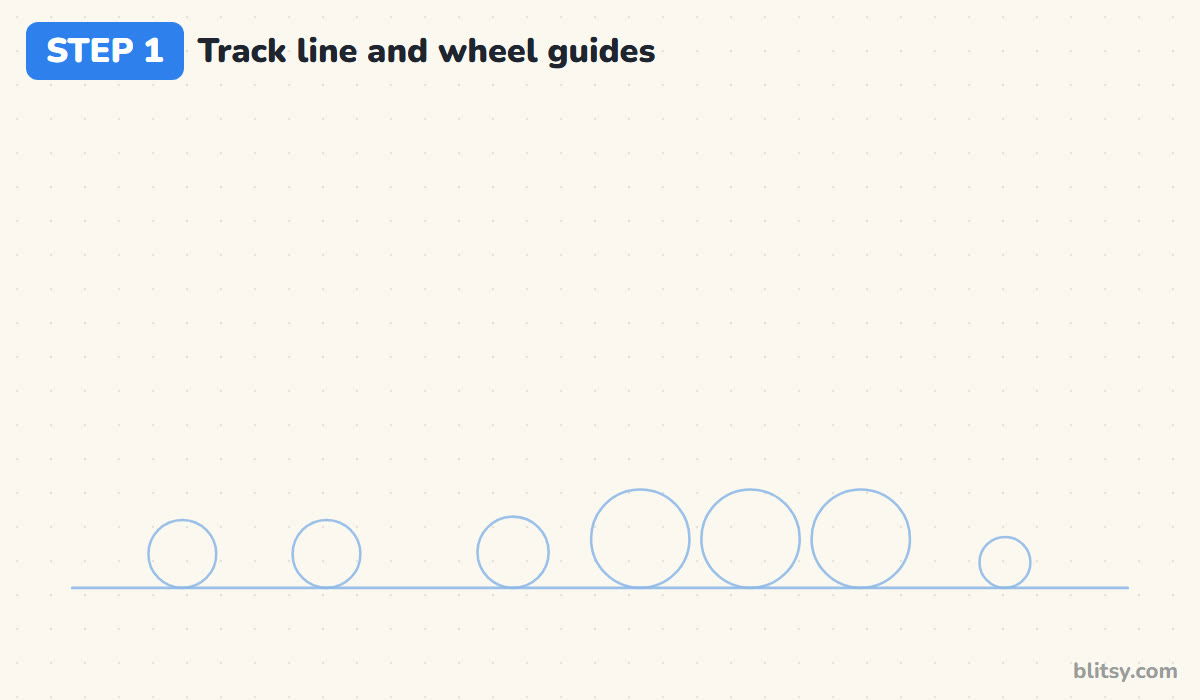
Turn your paper sideways and draw one long straight line near the bottom for the top of the rail. Sit circles on it: three big ones in the middle for the driving wheels, a small one to their right, a medium one to their left, and two on the far left for the tender. Every circle must touch the line, or the wheels look like they float.
💡 Tip: Trace a coin or a bottle cap if your circles keep coming out lumpy.
Step 2: Sketch boxes for the engine and the tender
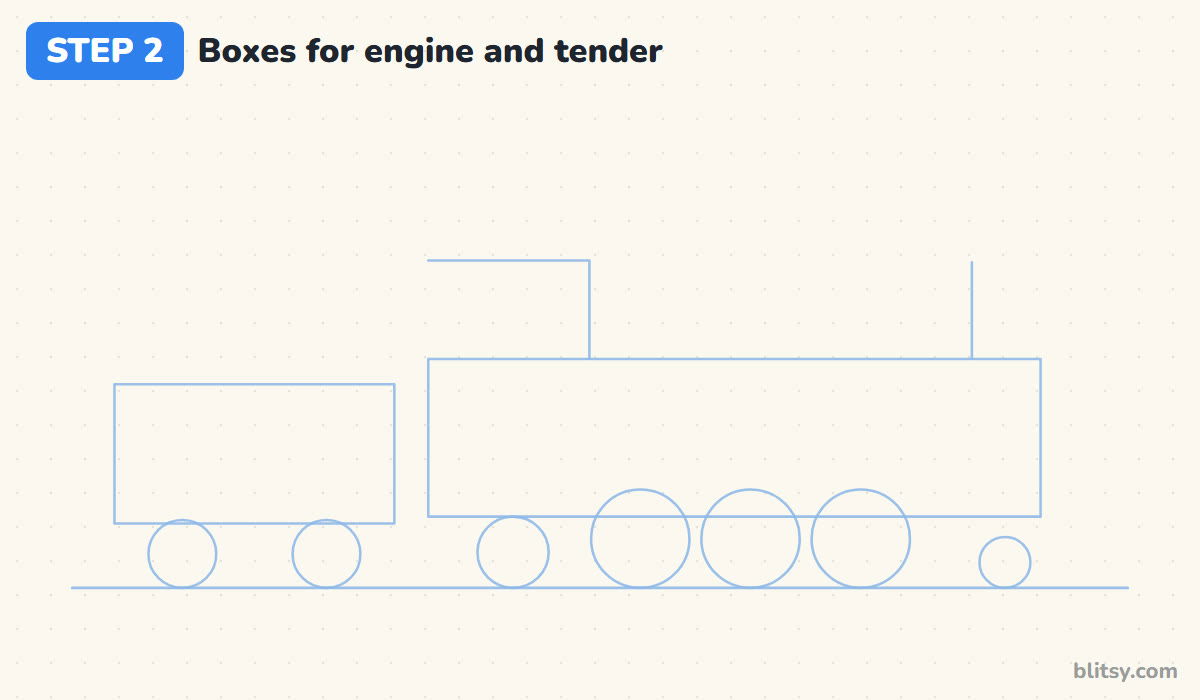
Above the right-hand wheels, draw one long, low rectangle for the engine. Over its left end, add a taller corner shape for the cab. On the left, draw a shorter box above the two tender wheels, then a short upright line near the engine's front where the smokestack will stand.
💡 Tip: Press so lightly that you can barely see these boxes.
Step 3: Draw the cab, its roof and the running board
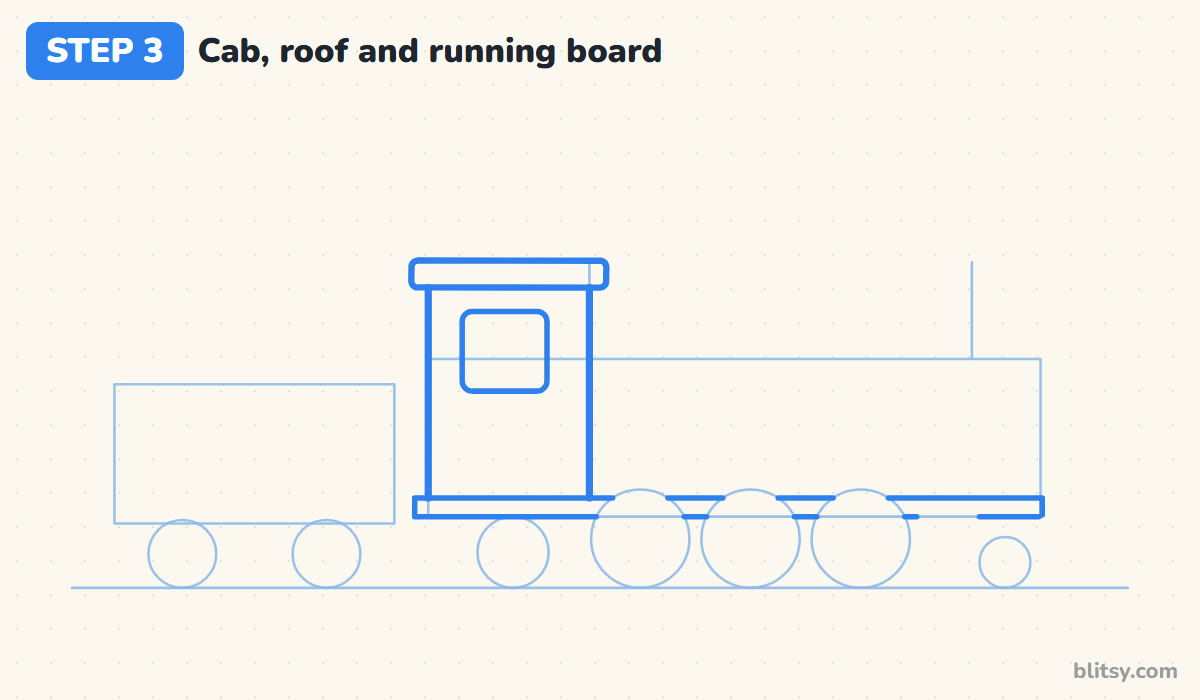
Inside the tall corner guide, draw the cab as a tall rectangle. Give it a flat roof that sticks out a little on both sides and a square window near the top. Then draw a long thin strip along the bottom of the engine. That's the running board the boiler and cab rest on. Leave gaps where the big wheels will overlap it.


💡 Tip: Let the roof hang over the cab walls by about a finger's width.
Step 4: Add the boiler and the smokebox
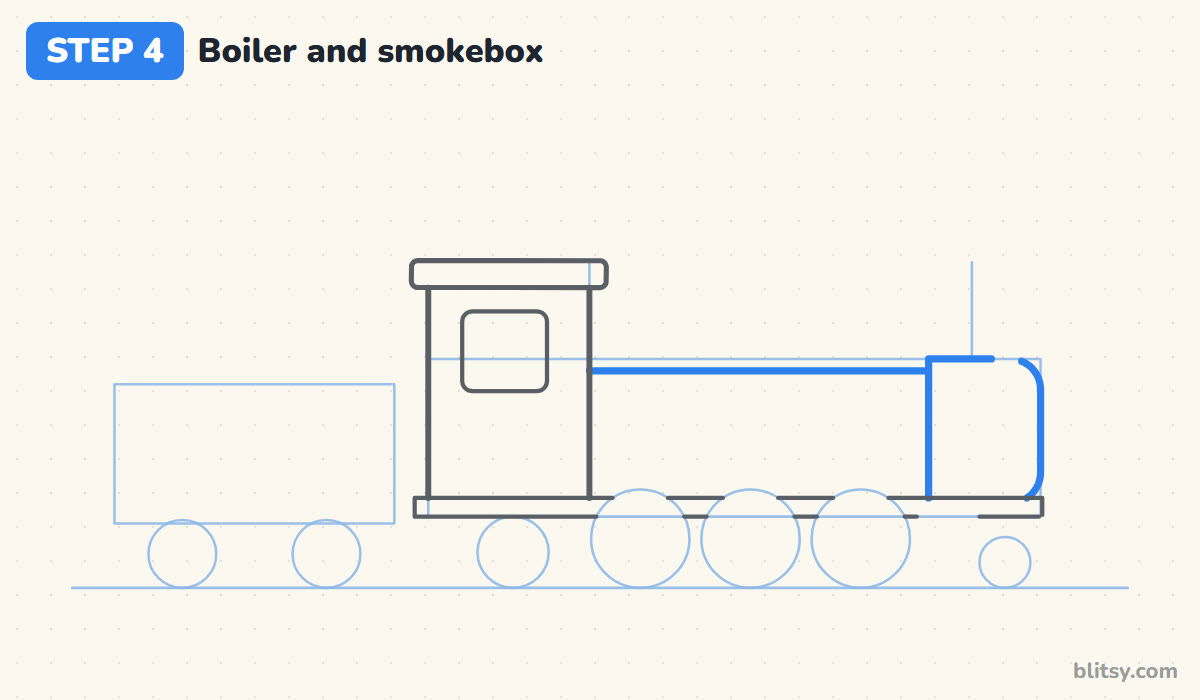
From the front of the cab, draw a long straight line forward for the top of the boiler, the big tube where water was heated to make steam. Near the front, draw a slightly taller section with a rounded nose: the smokebox. I make it a touch higher than the boiler so the front looks strong and heavy. Skip the short bits of its top edge where the stack and lamp will go.
💡 Tip: Round the front corners generously; sharp corners make it look like a truck.
Step 5: Shape the smokestack and dome, then the lamp
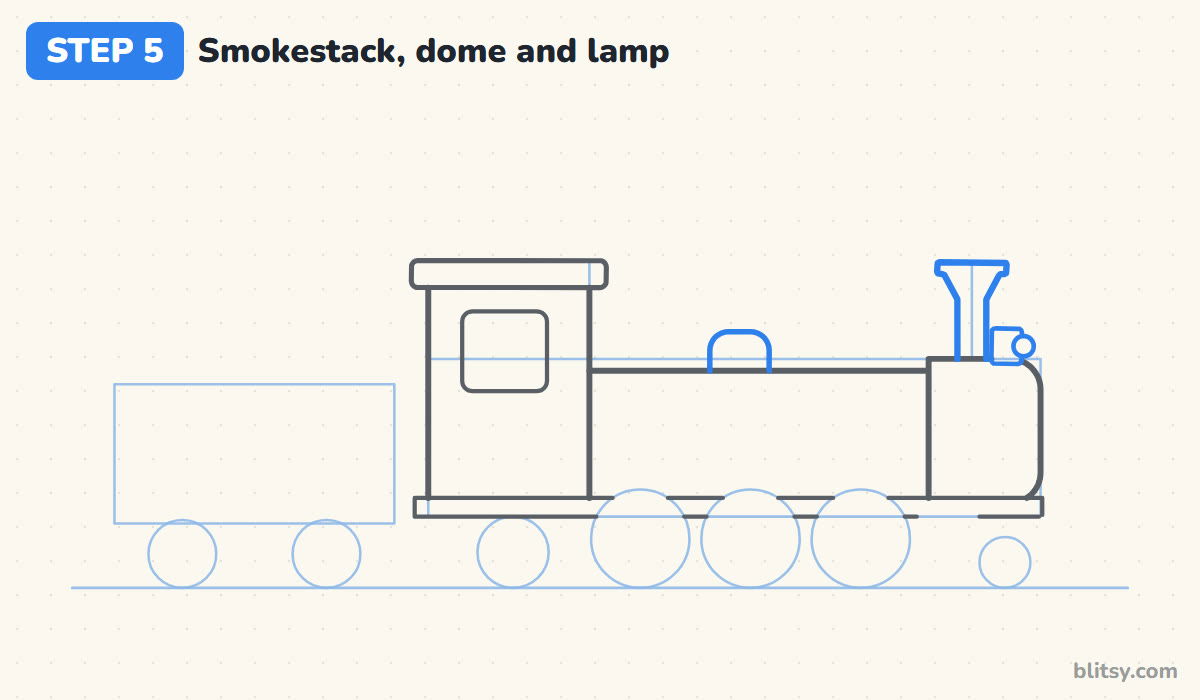
On top of the smokebox, draw a narrow chimney that flares out wide at the top, with a flat cap. Halfway along the boiler, add a small rounded hump for the steam dome. Then put a tiny box with a circle on its front at the tip of the smokebox for the headlamp. Small kids can leave the lamp off.
💡 Tip: Draw both sides of the flared top as mirror images.
Step 6: Draw the tender and its coal heap
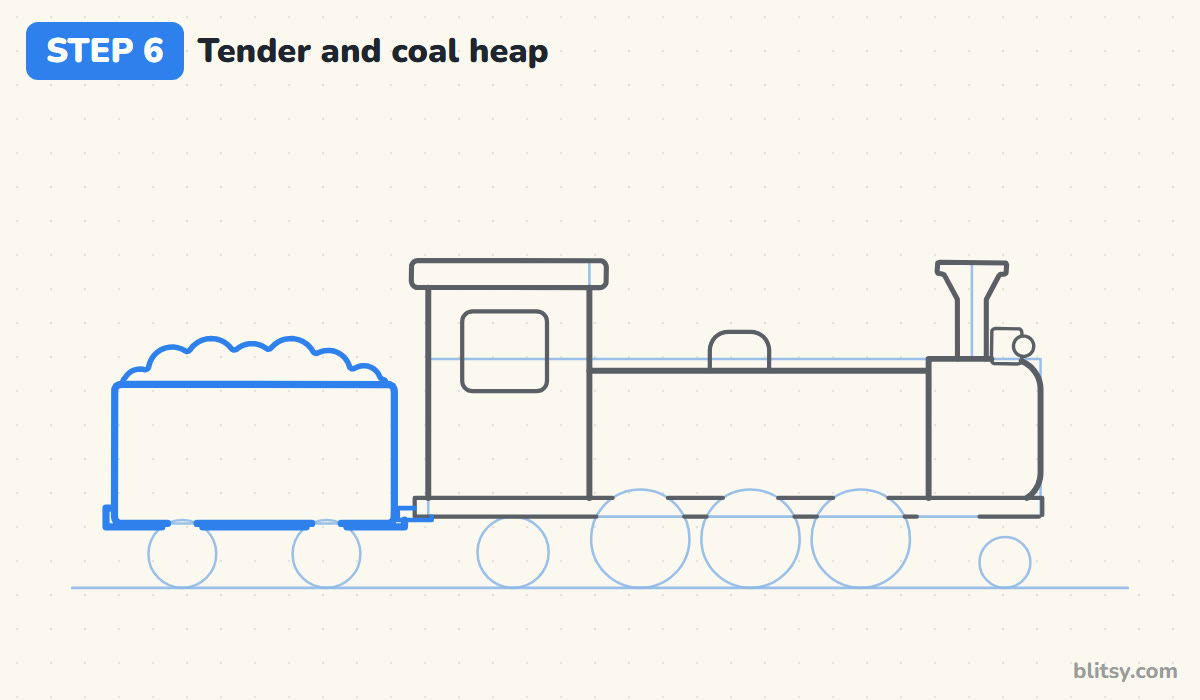
Use the left box to draw the tender, the wagon that carries coal and water for the engine. Give it soft corners and a thin frame strip underneath. Along the top, draw a row of round bumps for the coal peeking over the edge. Join the tender to the cab with a short bar, the coupling.
💡 Tip: Vary the size of the coal bumps so they look like real lumps.
Step 7: Add the cylinder and the cowcatcher
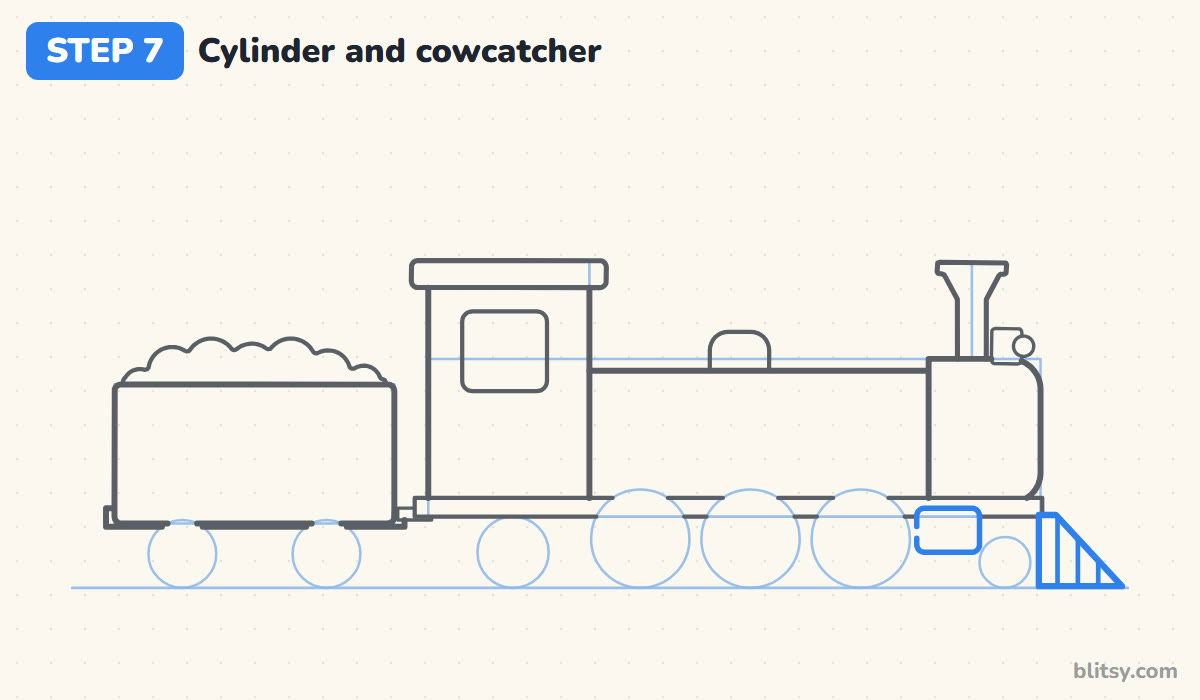
Just under the smokebox, draw a small rounded box. That's the cylinder, where steam pushes a piston back and forth. At the front of the running board, draw a slanted shape reaching down toward the rail and add three short lines inside it. This cowcatcher was built to push things off the track. Stop its bottom just above the rail.

💡 Tip: Slope the cowcatcher forward, so its bottom is further out than its top.
Step 8: Draw the wheels and the connecting rods
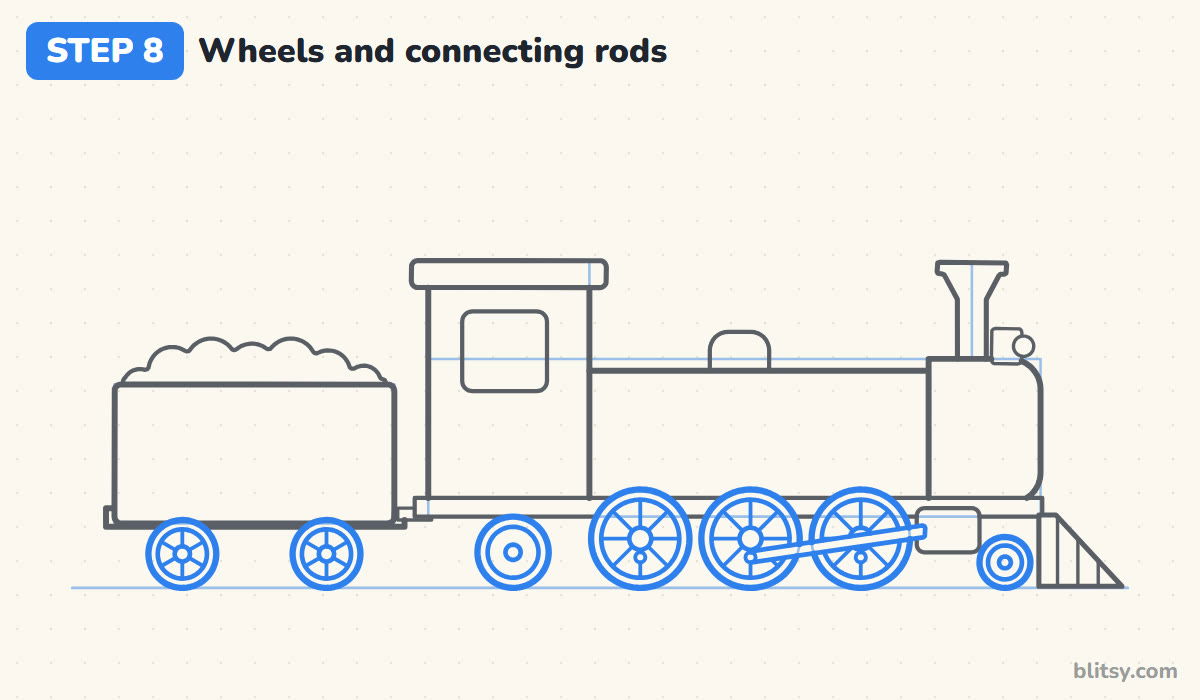
Go over the wheel guides with firm lines. In each big wheel, add a smaller ring, a tiny hub and eight spokes like the slices of a pizza. Give the small wheels a ring and a hub too. Then draw a flat bar joining the three big wheels just below their hubs, plus a second rod from the cylinder to the middle wheel. I always draw the spokes after the rings are in place.
💡 Tip: Draw opposite spokes as one straight line through the hub.
Step 9: Mark the boiler bands and side stripes
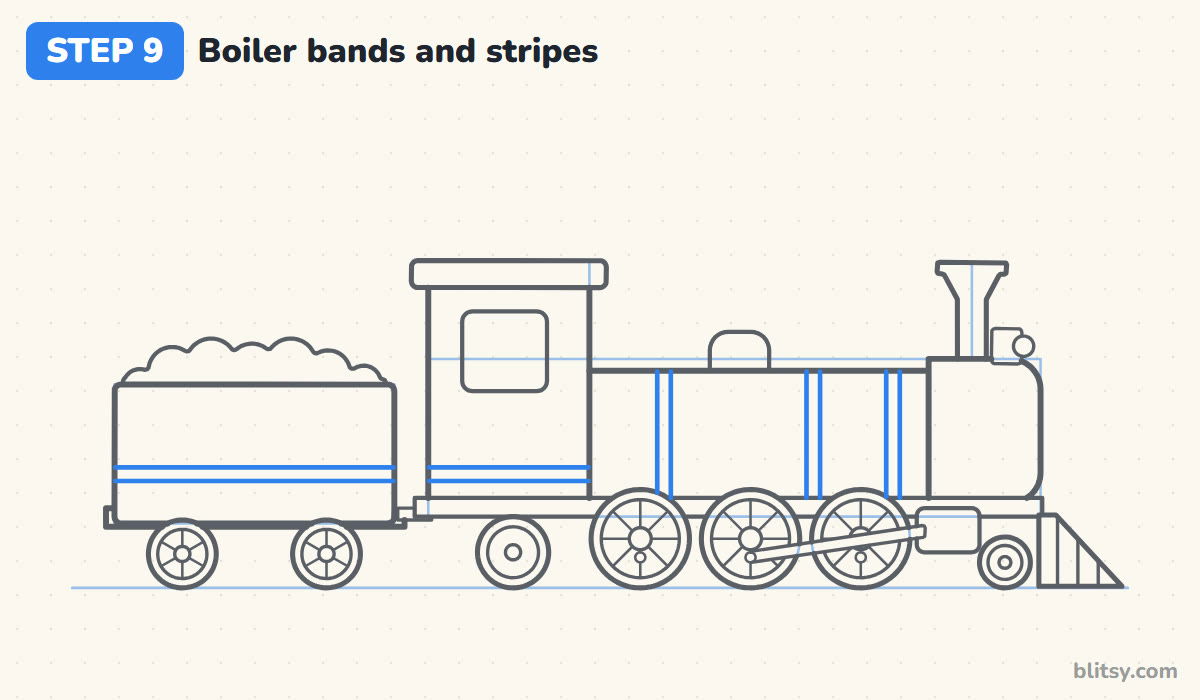
Draw three pairs of upright lines across the boiler for the metal bands that wrap around it. Next, draw two close lines across the lower cab and carry them across the tender at the same height. When the stripes line up, the train looks like one matching set.
💡 Tip: Hold a ruler level so both stripes sit at exactly the same height.
Step 10: Add the rails and sleepers, then the steam
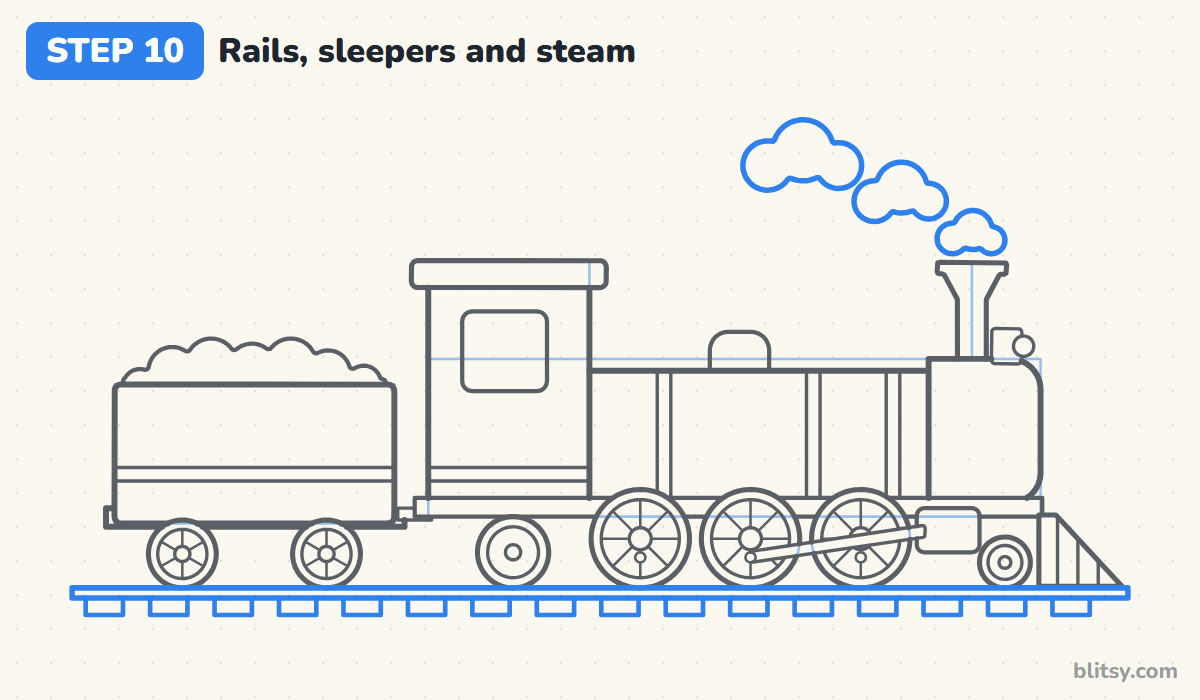
Turn the track line into a thin rail with a second line just below it. Under it, draw a row of short, evenly spaced blocks for the sleepers, also called railroad ties. Last, draw three fluffy clouds drifting up and back from the smokestack, small first and bigger after, because steam spreads out as it rises.
💡 Tip: Space the sleepers by eye first with tiny dots, then draw the blocks.
Step 11: Ink the lines and erase the guides
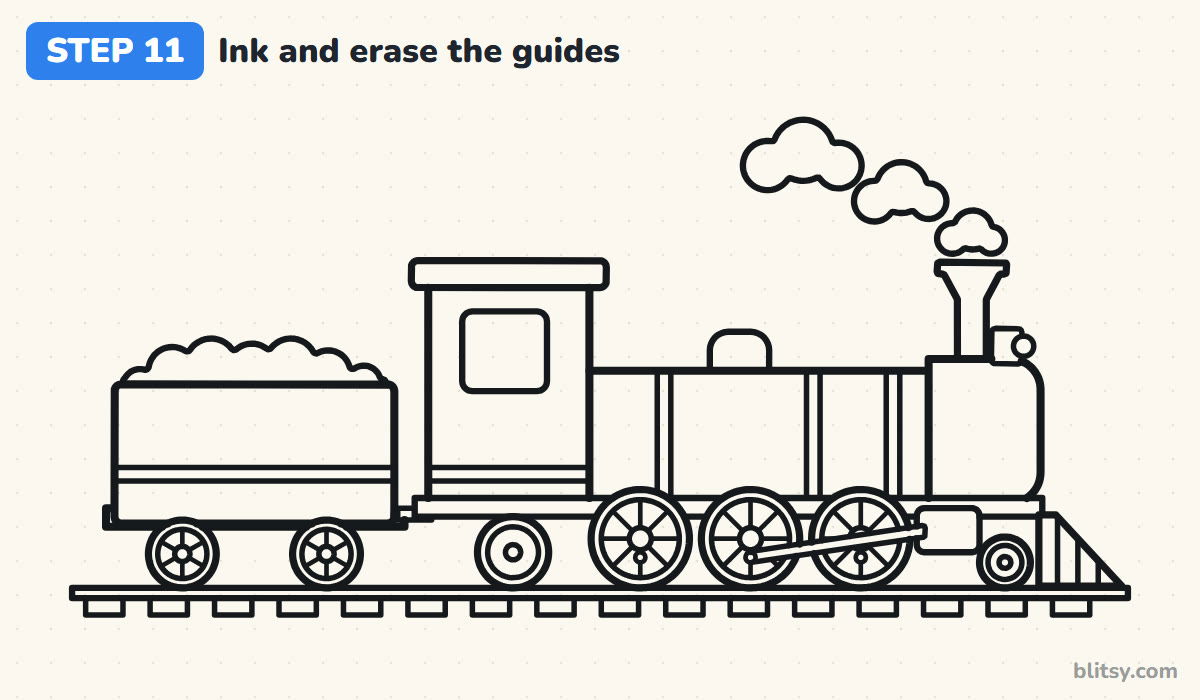
Trace every line you want to keep with your black pen. I start at the top with the steam and the stack and work down, so my hand never rests on wet ink. Go slowly around the wheels. Once the ink has dried for a minute, erase the boxes, the stack line and the guide circles.


💡 Tip: Turn the page as you ink each wheel so your hand stays comfortable.
Step 12: Color the train
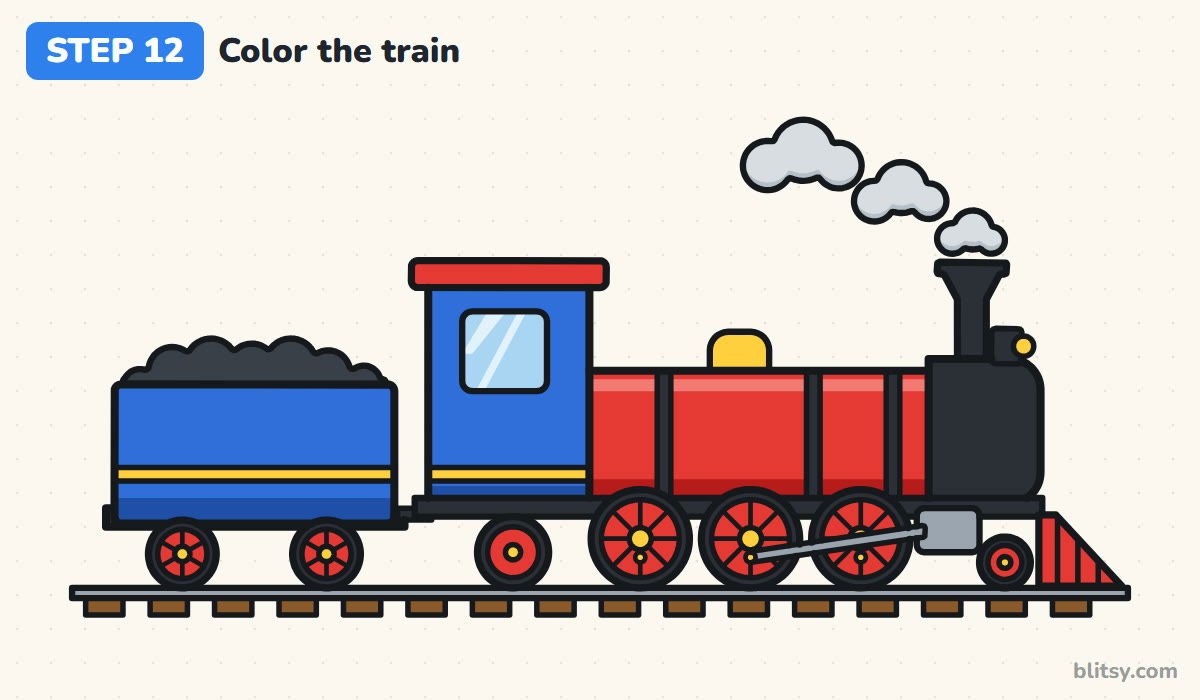
Color the boiler red, with darker red along its bottom and a lighter strip near the top so it looks round. The roof, cowcatcher and wheel centers are red too, while the cab and tender are blue. Black goes on the smokebox, stack, bands, frame and tires, plus the coal. Yellow is for the dome, lamp, stripes and hubs. Add light blue on the window, gray on the steam and rails, and brown on the sleepers.
💡 Tip: Color the black parts last so dark smudges don't spread onto the red.
Where Train Drawings Tend to Jump the Track
- Wheels that hover above the rail. The train looks like it's flying. Draw the track line first and make every circle touch it.
- Big wheels that overlap. Leave a small, even gap between the three circles before you add spokes.
- A smokestack that's too tall. The engine looks top-heavy. Keep its top level with the cab roof or a little below.
- A tiny, cramped cab. Make the cab clearly taller than the boiler so a driver could stand inside.
- Spokes that miss the hub. The wheel looks broken. Aim every spoke at the center dot.
Passenger Cars, Night Trains and Other Ideas
When the steam engine feels easy, swap the tender for a little passenger coach with a row of windows, or hook on three or four freight cars in different colors. I also like drawing it heading into a tunnel with only the front half showing. If you enjoy vehicles with big wheels and bright paint, try the fire truck drawing tutorial next, and for something that travels through the sky instead, the easy airplane drawing step by step lesson has a jet climbing past the clouds.
Printable Train Coloring Page and Step-by-Step PDF
The free train coloring page has a colored example and the colors to use at the top, then a big bold outline with room for hills or a station. The step-by-step PDF guide holds all 12 steps and tips for Letter or A4 paper.
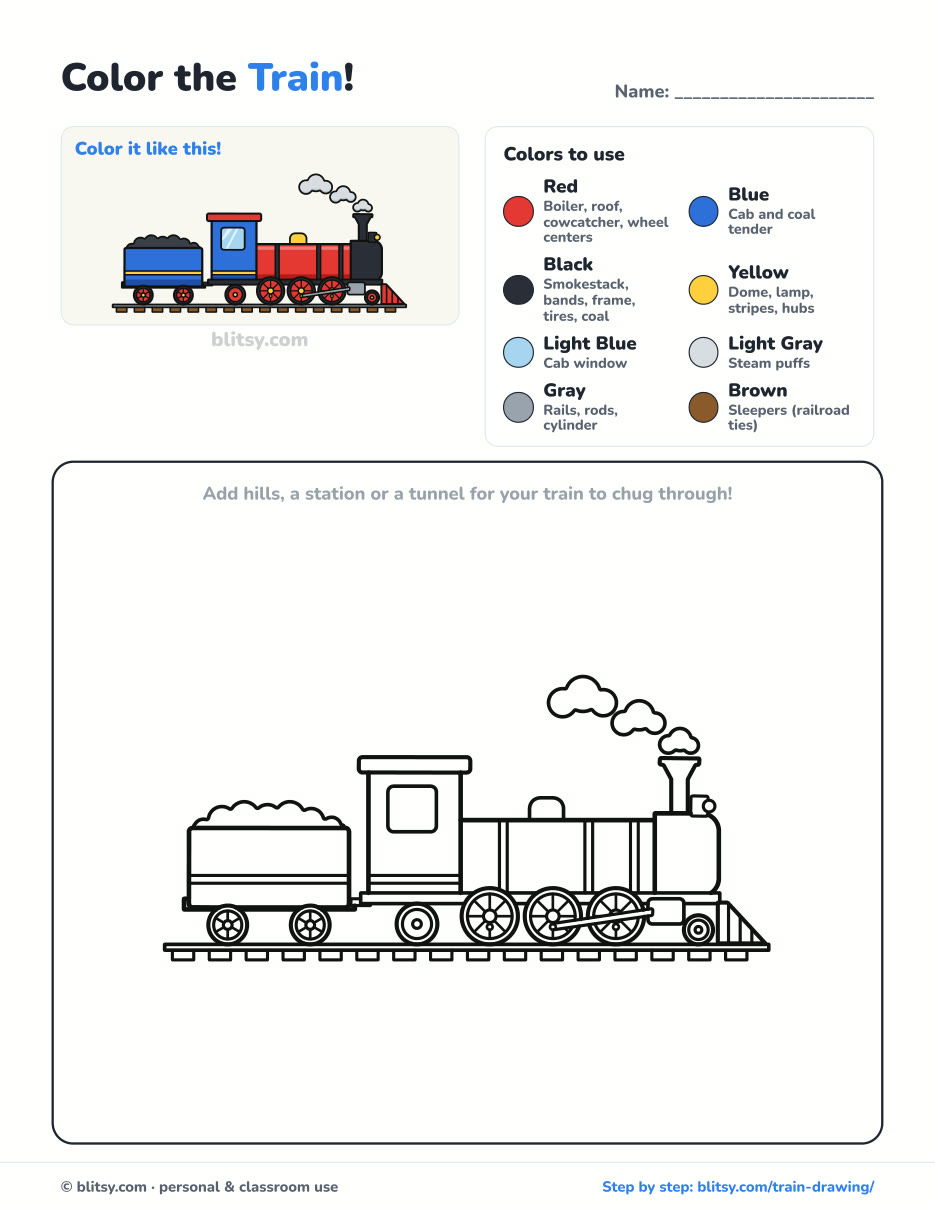
Black outlines with a colored example and the color names at the top. Ready to print and color.
⬇️ Download Coloring PageEvery step picture with its instructions and tips, to keep beside your paper while you draw.
⬇️ Download Drawing Guide📱 On a phone? Tap a download button, then open the file and choose Share → Save to Files or Print. On a computer, the PDF opens or saves straight to your Downloads folder.
Keep the Train Steps on Your Pinterest Board
All Aboard for More Vehicle and Object Tutorials
Below you'll find step-by-step tutorials with a picture for each stage, many of them built from the same boxes and circles as the train.
- Monster Truck Drawing: Two circles and a box become a flame-painted truck rolling over a dirt mound in this how to draw a monster truck lesson.
- Baseball Bat Drawing: The baseball bat drawing step by step guide draws a taped wooden bat with a ball and glove.
- Tank Drawing: Draw a friendly olive tank with tread marks and storage boxes using the cartoon tank drawing tutorial.
- Realistic Drawing: The realistic drawing tutorial teaches light, value and shadow on one red apple.
- Rocket Drawing: Blast off past a ringed planet with this rocket drawing step by step lesson.
- Bed Drawing: A cosy double bed with two plump pillows is drawn in perspective in the easy bed drawing tutorial.
- Rocks Drawing: Learn how to draw rocks from flat sides, a boulder and two neighbors in 11 steps.
- Diamond Drawing: Straight lines are all you need for the diamond drawing step by step guide and its sparkling gems.
- UFO Drawing: Draw a flying saucer with colored lights and a green alien on board in the UFO drawing tutorial.
- Castle Drawing: The how to draw a castle step by step lesson ends with purple cone roofs and a drawbridge over the moat.
Train Drawing Questions Kids Often Ask
What is the easiest way to draw a train for kids?
Start with a straight line for the track and a few circles on it for wheels. Put a long box on the wheels, a taller box at the back for the cab and a tube on top for the chimney. The rest is detail.
Why do steam trains have big wheels and small wheels?
The big wheels are the driving wheels. Rods from the cylinder push them around, and that moves the train. The small wheels carry some of the weight and help the engine steer into curves.
How long does it take to draw this train?
Most kids need about 40 minutes with coloring. The spoked wheels take the longest, so rest your hand before you start them.
What is the coal car behind a steam engine called?
It's called a tender. It carries the coal that is burned to heat the water in the boiler, and usually a tank of water as well.
Give your engine a number on the cab, add a station sign, and your train is ready to leave on time. 🚂
Related posts:
 How to Draw a Whale Step by Step (Easy for Beginners)
 How to Draw Lungs Step by Step (Easy Science Diagram)
 How to Draw a Pineapple Step by Step (Easy Crown and Slice)
 How to Draw Iron Man Step by Step (Easy Chibi for Kids)
 How to Draw a Dress Step by Step (Easy Party Dress)
 How to Draw a Chicken Step by Step (Easy for Beginners)
 How to Draw a UFO Step by Step (Cute Alien Saucer)
 How to Draw a Volcano Step by Step (Easy Erupting Volcano)
 How to Draw a Crow Step by Step (Easy for Beginners)
 How to Draw a Tiger Step by Step (Easy Walking Pose)
 How to Draw a Heart Step by Step (Even, Symmetric Shape)
 How to Draw a Jellyfish Step by Step (Cute, Easy Guide)

