
Dragons scare a lot of beginners off before the pencil even touches the paper. Wings, horns, claws, spikes: it sounds like a week of work. In this lesson I'll show you how to draw a dragon step by step by treating him as a chubby lizard first and a dragon second. You'll end up with a cheerful green dragon on four feet, wings up, blowing a small puff of fire.
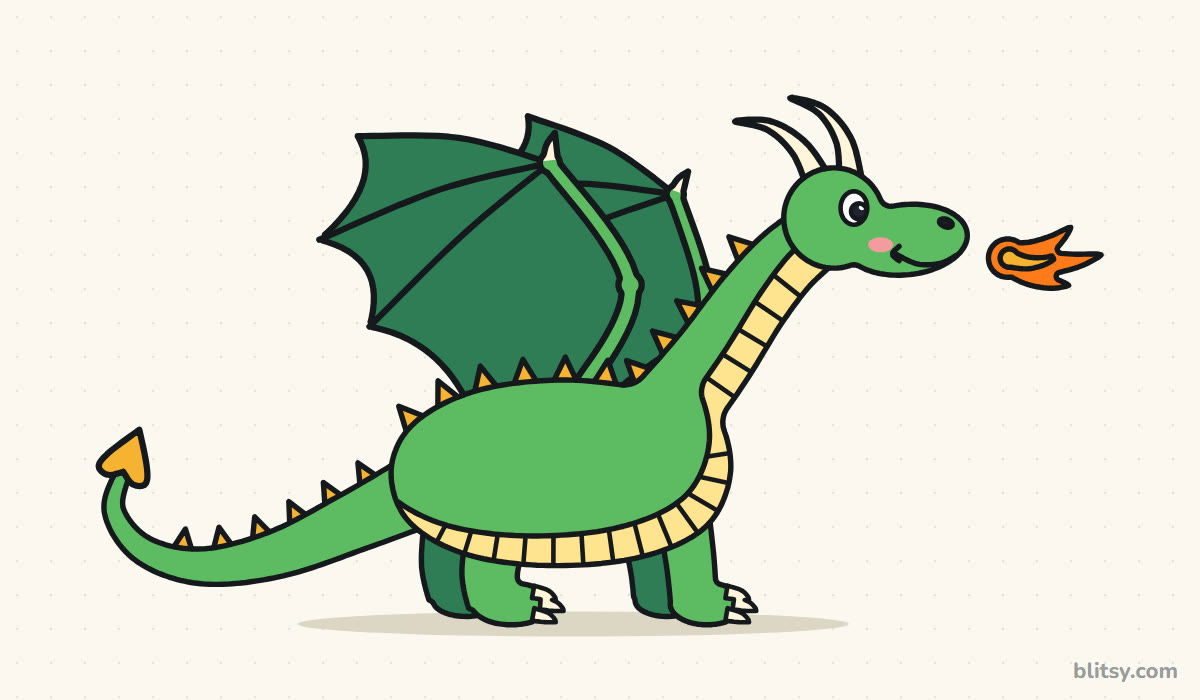
Each new line in a picture shows up in blue. Gray lines come from steps you've finished. The very light blue shapes are helper guides that disappear when you ink in step 11, so draw them softly.
Quick overview
⏱️ Time: about 40 to 50 minutes, coloring included
🎯 Level: easy to medium, good for kids from about 8
✏️ Steps: 12
🐉 You'll draw: a full-body cartoon dragon in side view, wings up and puffing fire
Dragon Sketching Kit for Your Desk
- A regular HB pencil for light guide lines
- A clean eraser that won't smear
- A black fineliner or felt-tip pen for the final lines
- Colored pencils or markers in two greens, light yellow, gold, orange and pink
- A sheet of paper laid sideways, since this drawing is wide
Two shades of green really help, because the far legs and wing skin need a darker green than the body.
How to Draw a Dragon Step by Step
Step 1: Sketch guide shapes for the body and head
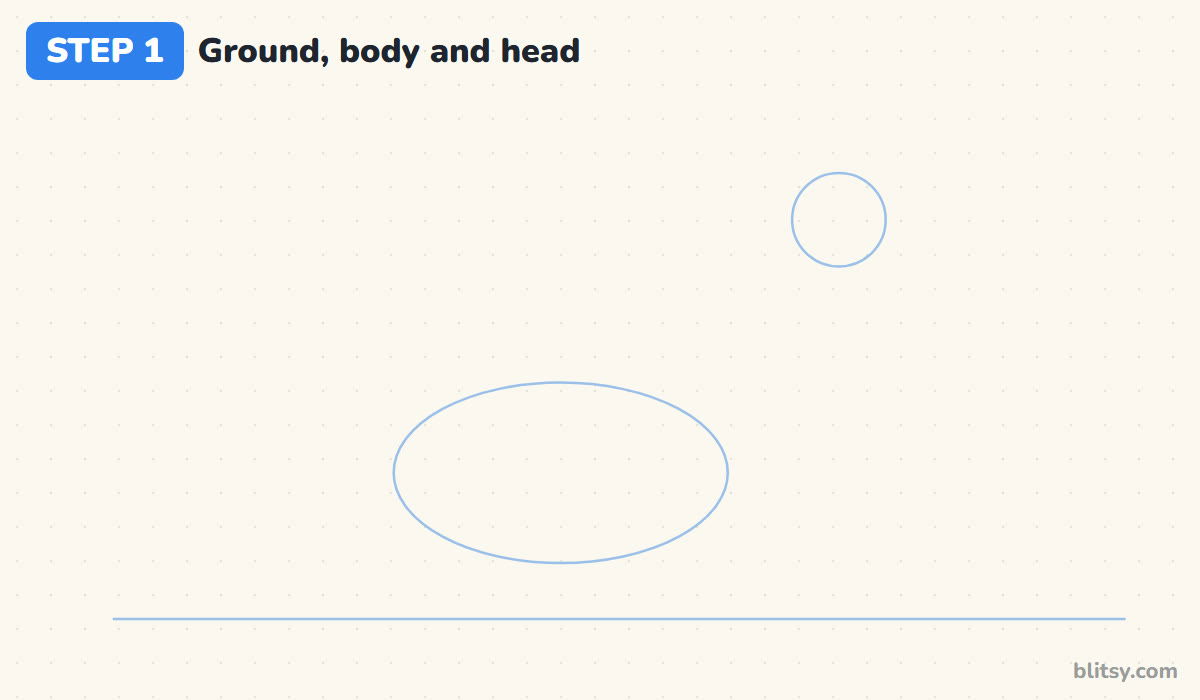
Draw a long, flat line near the bottom of the page for the ground. Above it, a little left of center, sketch a wide oval for the body, about twice as wide as it is tall. Put a small circle up and to the right for the head, leaving a big gap for the long neck.
💡 Tip: Press so lightly that you can barely see the lines. They're only scaffolding.
Step 2: Add guide lines for the limbs and neck
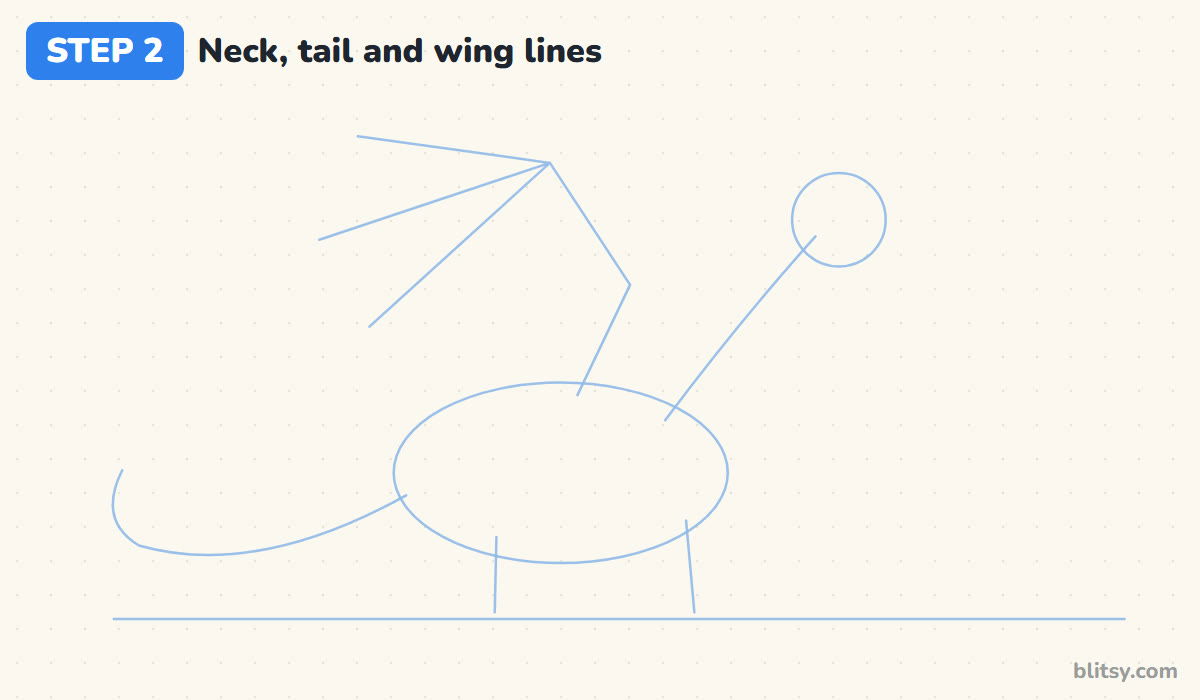
Connect the oval to the head circle with one curved line for the neck. From the left end of the oval, sweep a long curve down and left, hooking it up at the end for the tail. Drop two short lines to the ground for legs. Then draw a bent line rising from the back for the wing arm, with three lines fanning out from its top.
💡 Tip: Think of the wing guide as an open hand: one arm, three long fingers.
Step 3: Draw the head with a snout and horns
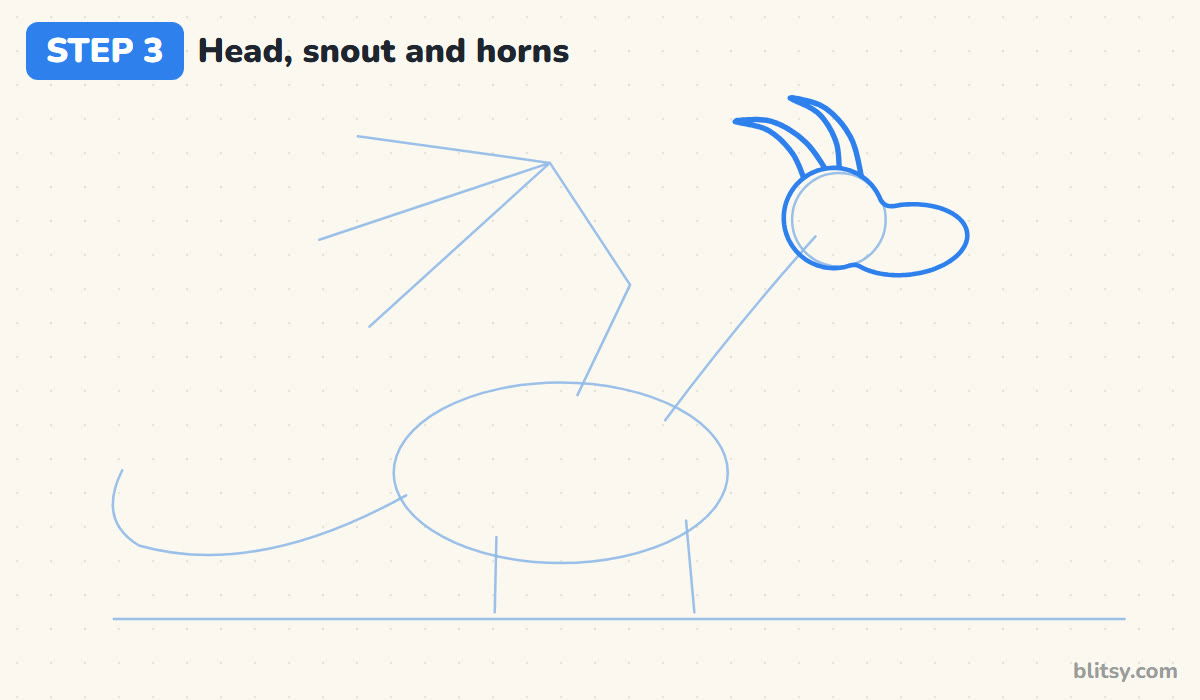
Trace the head circle with a firmer line and stretch a rounded snout out to the right, like a bean on its side. Keep the snout as tall as the lower half of the head so the face stays friendly. On top, draw two horns curving backward. Start with the front horn and stop the back one where it meets it.



💡 Tip: Curve the horns back, not up. Straight-up horns make him look like a goat.
Step 4: Outline the long neck and round body
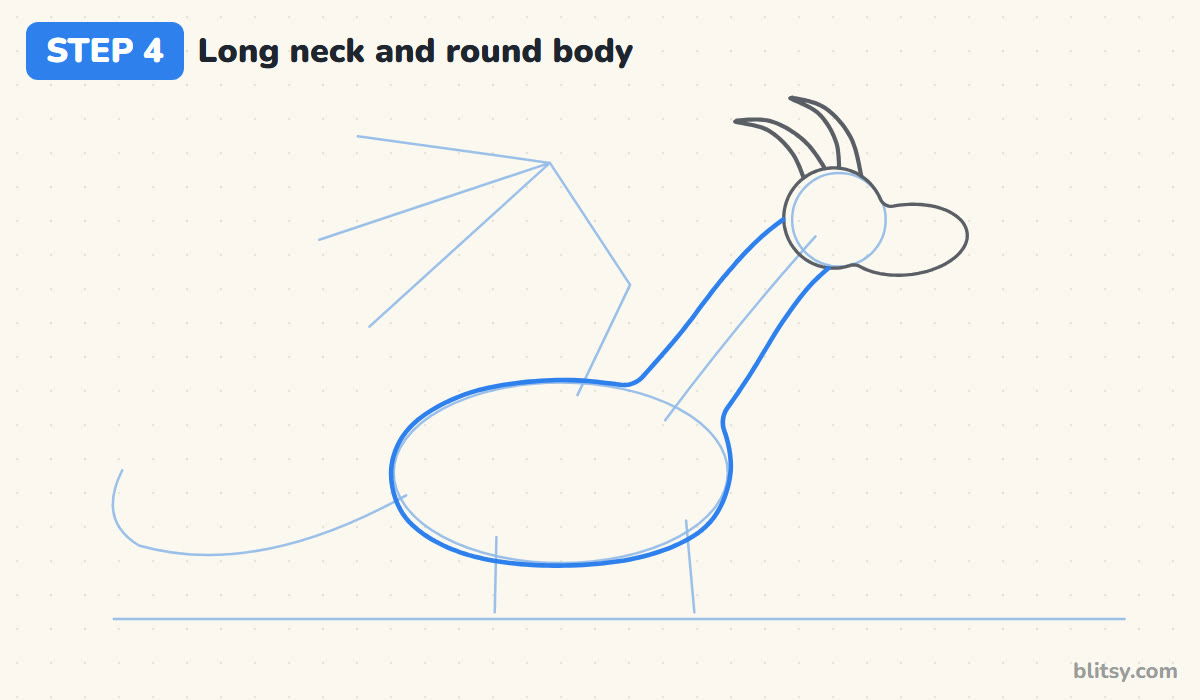
Follow the neck guide with two lines that start wide at the chest and narrow toward the head, tucking both under the jaw. Then go around the body oval, letting the chest bulge forward and keeping the bottom fairly flat. I let the neck flow into the back in one smooth curve, because a sharp corner there makes the neck look glued on.
💡 Tip: Turn your paper sideways for the long neck curve; your hand moves better that way.
Step 5: Add four legs with claws
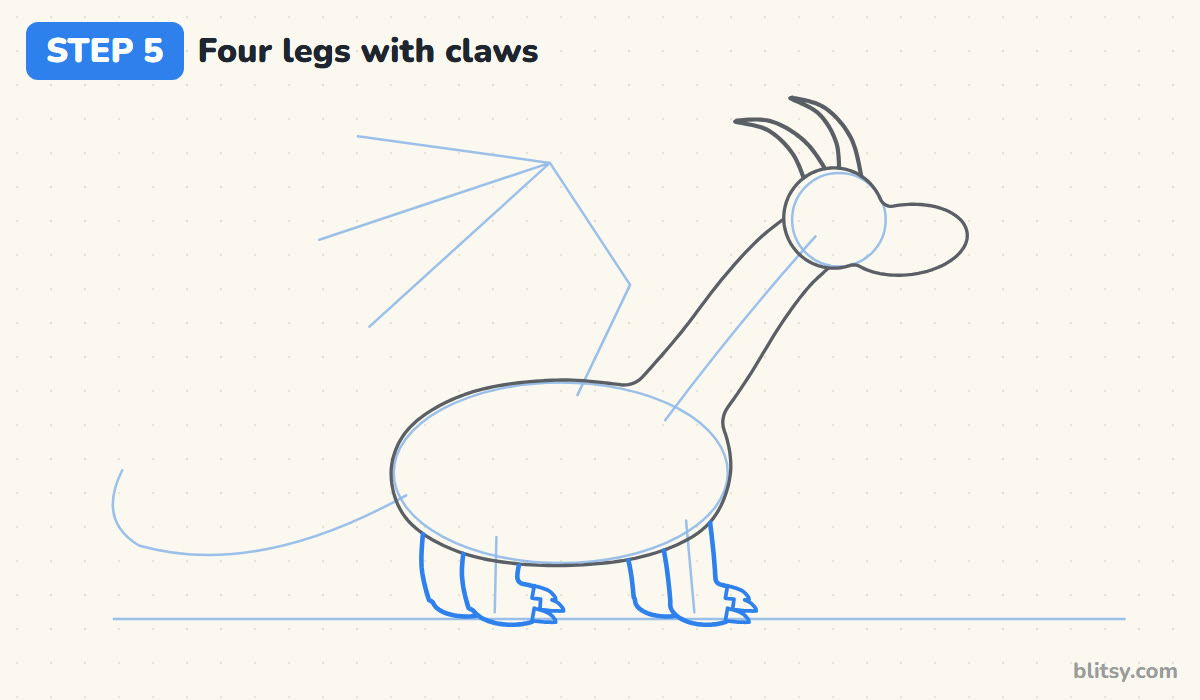
Under the body, draw two thick legs in front: one near the chest and one near the rump, each with a rounded foot pointing forward. Add two more legs just behind them, peeking out to the left. These are the far legs, so they stop where the near legs cover them. Finish each front foot with three small hooked claws.
💡 Tip: Short, sturdy legs suit a cartoon dragon. Long thin ones make him wobble.
Step 6: Draw the tail, spade tip and back spikes
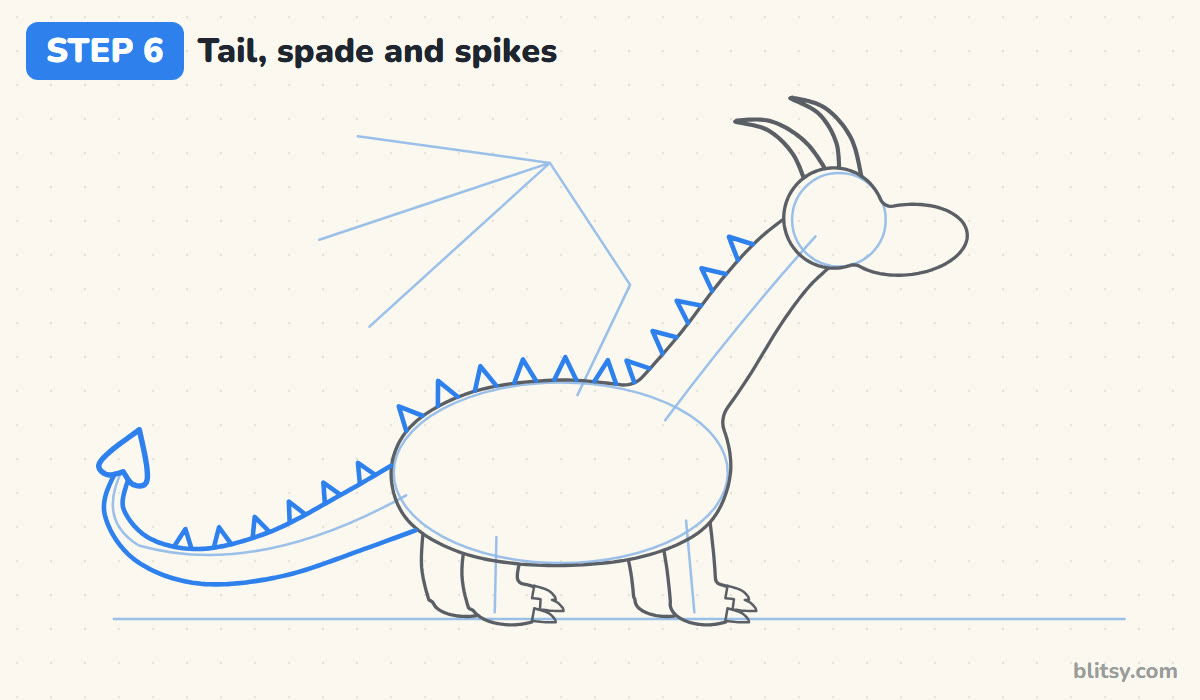
Wrap the tail guide with two lines, thick where it leaves the body and thin at the tip, and let it curl up at the end. Add a spade shape on the tip, like an arrowhead with a notch at the bottom. Then line the top of the neck, back and tail with small triangles. I make them all about the same size and lean them slightly back, so they look like they ride along the spine.
💡 Tip: Space the spikes by eye, about one spike width apart, and don't worry about a perfect count.
Step 7: Draw the wing arms and finger bones
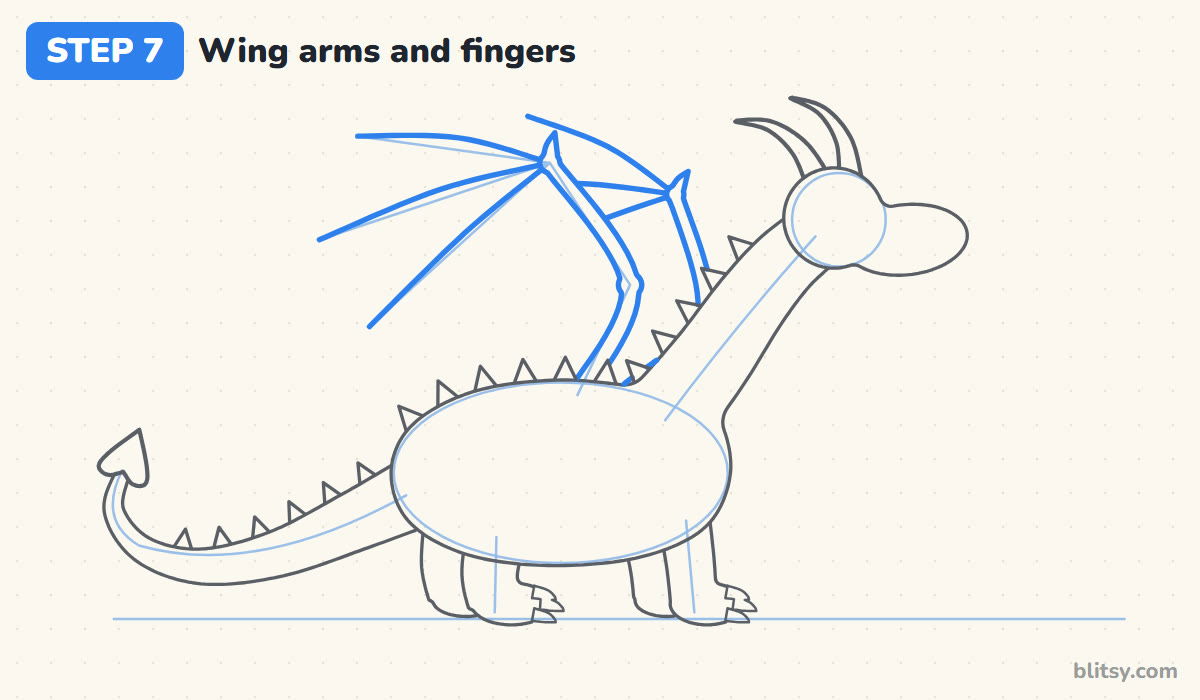
Go over the bent wing guide with a double line to make a thin arm with a knobby elbow, and add a small hooked claw at the wrist. From there, draw three long, slightly curved finger bones along the fan guides. Repeat a smaller set just to the right for the far wing, peeking out behind. This is the trickiest step, so take it slowly.




💡 Tip: Curve each finger bone a tiny bit outward. Ruler-straight bones look stiff.
Step 8: Connect the wing skin with scallops
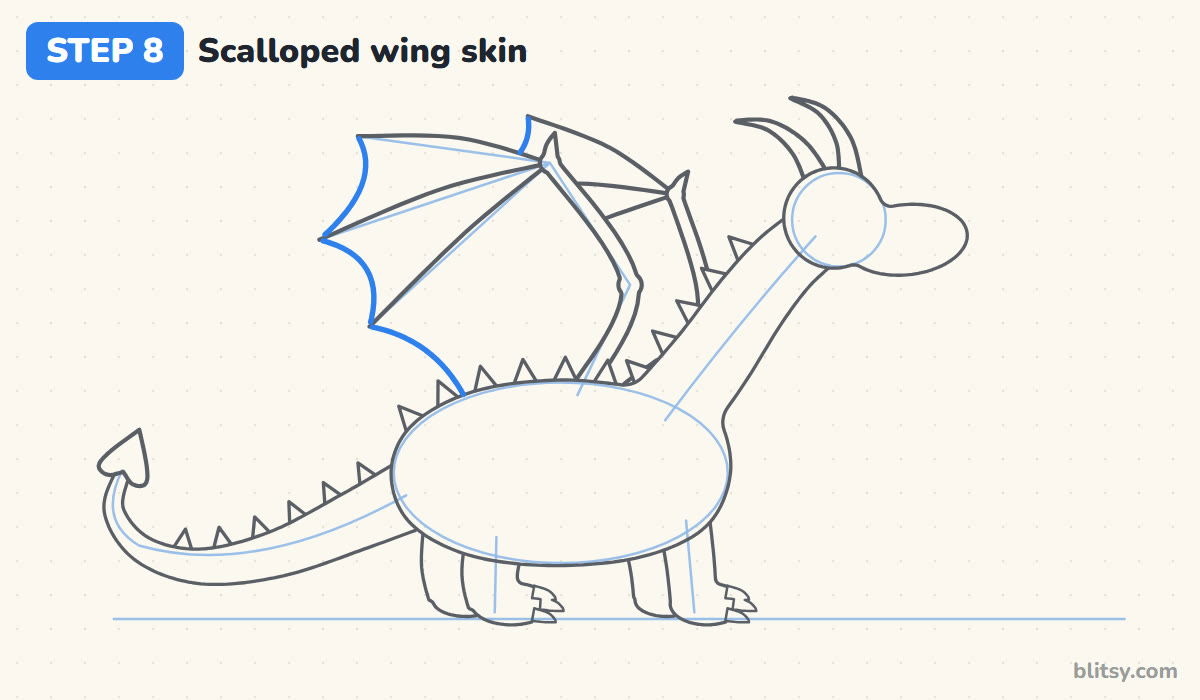
Join the finger tips with curves that dip inward toward the wrist, like shallow bites. The last curve runs from the lowest finger back down to the dragon's back. Do the same on the far wing where it shows. I always point out these inward scallops, since they make the wing read as bat skin instead of a sail.
💡 Tip: Dip every scallop by about the same amount so the edge looks even.
Step 9: Mark the belly and the belly plates
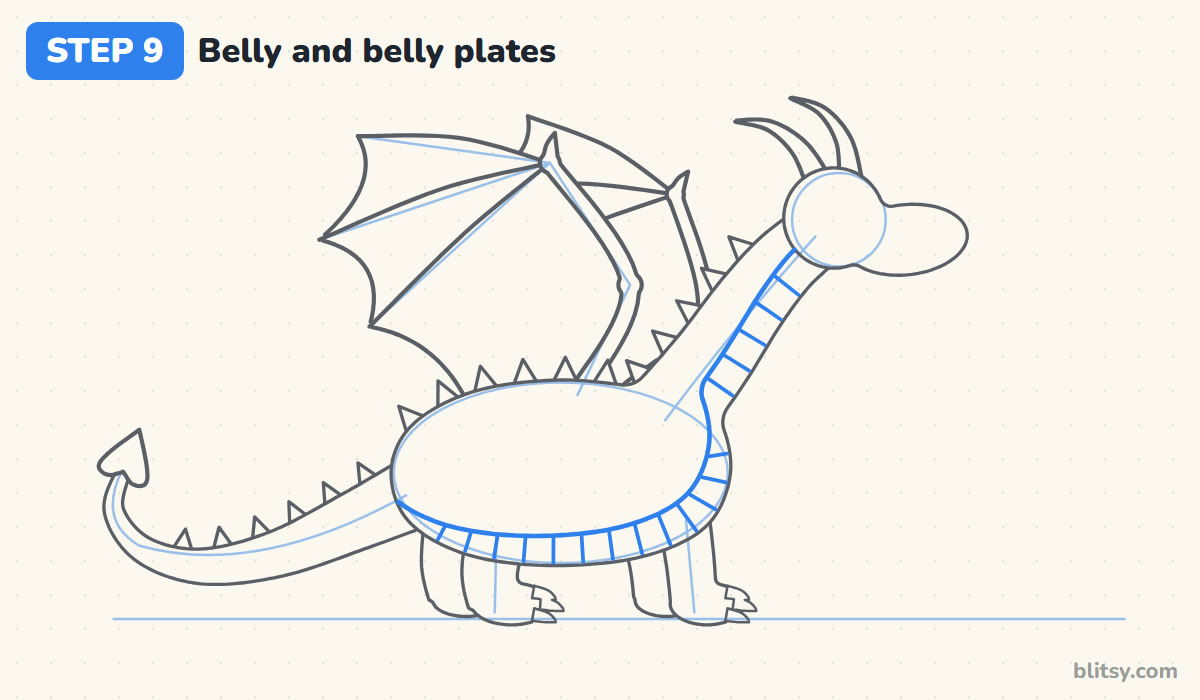
Draw a second line inside the front of the neck and along the bottom of the body, parallel to the outline. That band becomes the light belly. Divide it into plates with short lines across it, like ladder rungs, a little narrower on the neck where the band thins.
💡 Tip: Draw the plate lines across the band, never along it, so they read as plates.
Step 10: Add the eye, the smile and a puff of fire
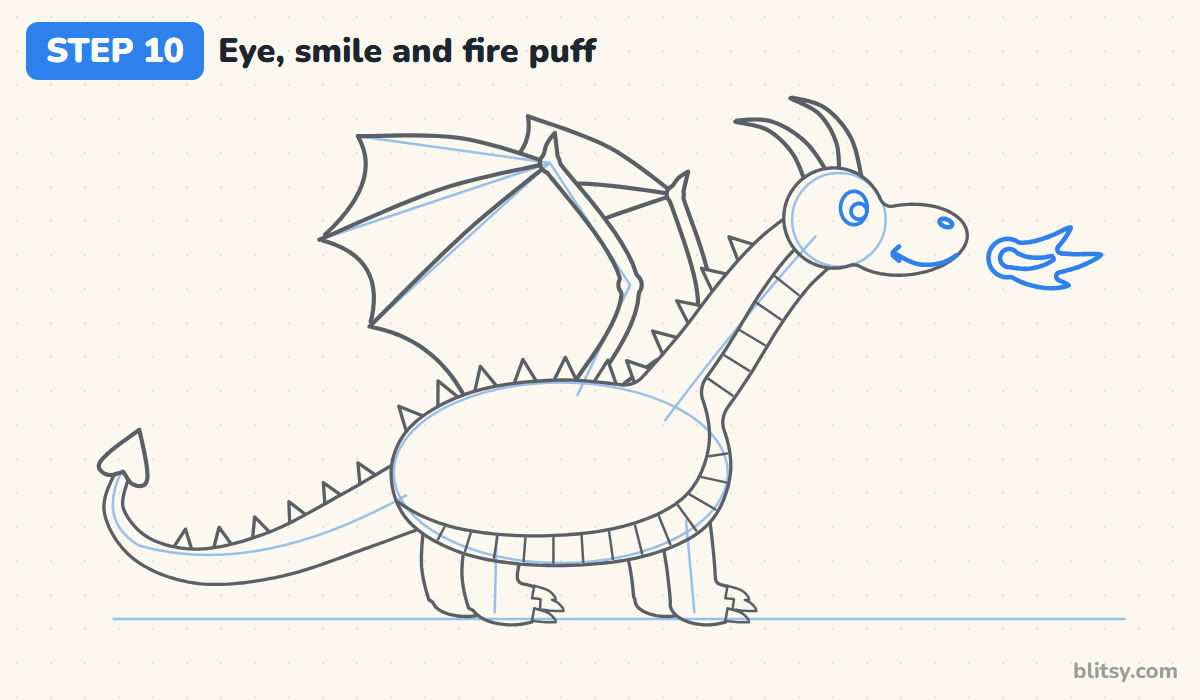
Place a big round eye high on the head, just behind the snout, with a dark pupil and a white shine. A large eye with a shine keeps a dragon friendly instead of fierce. Add a little nostril near the tip of the snout and a gentle smile. In front of the mouth, leave a small gap and draw a puff of fire with three pointed flames.
💡 Tip: Look toward the fire with the pupil, so the dragon seems pleased with his own puff.
Step 11: Ink the lines and erase the guides
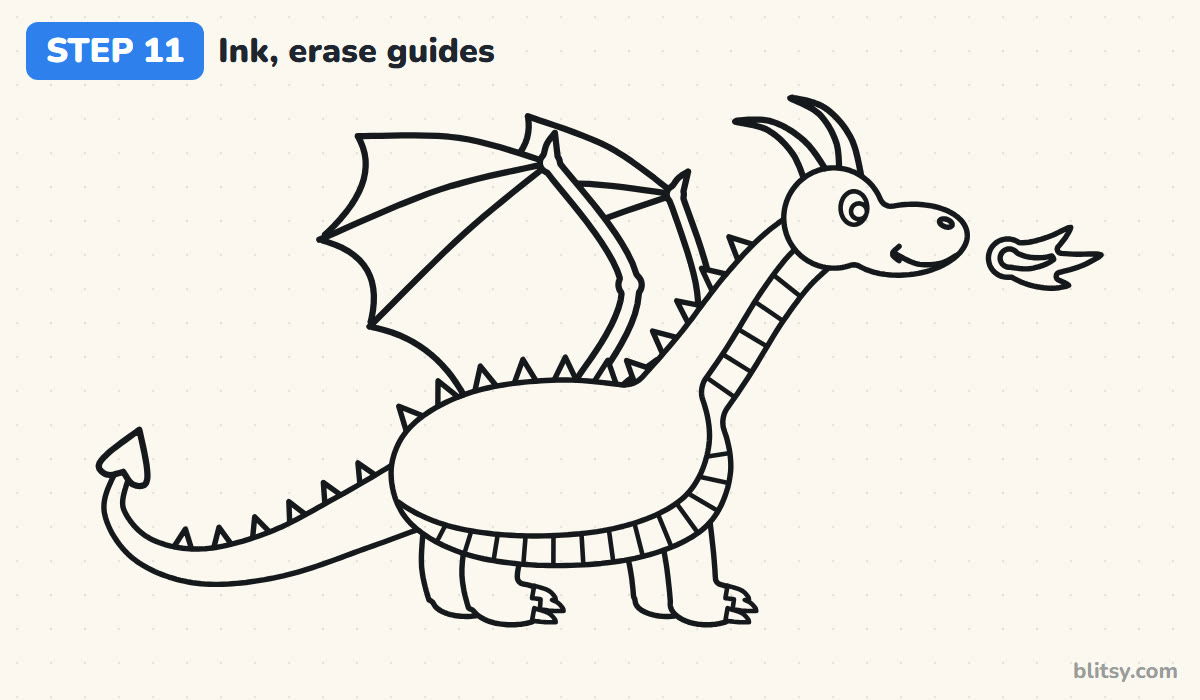
Trace every line you want to keep with the black pen, skipping the ground line, oval, head circle and wing and leg guides. Ink the small spikes and claws with short, careful strokes. Let the ink dry for a minute before you erase the pencil.




💡 Tip: Ink from left to right if you're right-handed, so your hand never drags across wet ink.
Step 12: Color your dragon
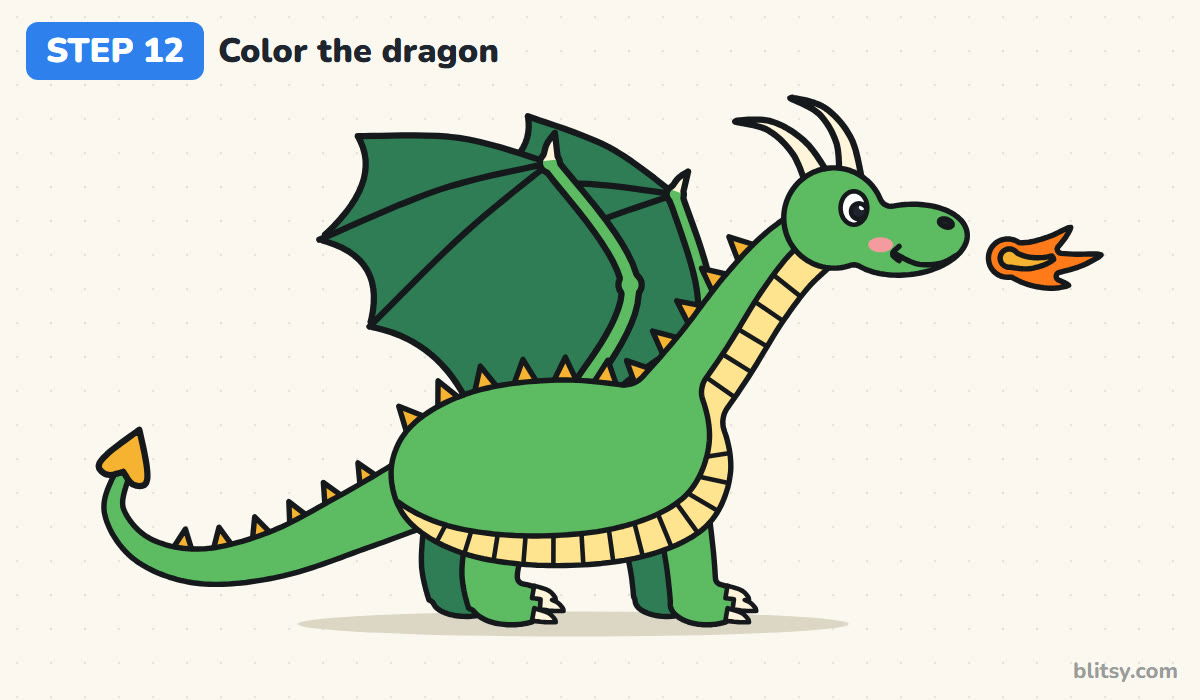
Color the body, head, tail and near legs bright green. Use a darker green for the wing skin, far wing and far legs, which pushes them back. Fill the belly light yellow and the spikes and tail tip gold. Horns and claws stay white, the fire is orange with a gold center, and I add a pink cheek last.
💡 Tip: Color in small circles instead of back-and-forth lines for smooth, streak-free green.
Where a Dragon Drawing Turns into a Dinosaur
- Wings that are too small. Tiny wings make the drawing read as a lizard or a dinosaur. Let the wing tips reach about as high as the horns.
- Wing edges drawn as straight lines. Straight edges between the fingers look like a kite. Curve each edge inward toward the wrist.
- A short, stiff neck. A stubby neck hides the dragon's shape. Make it about as long as the body is tall, and let it curve.
- Belly plates drawn the wrong way. Lines running along the belly look like stripes. Draw short lines across the band instead.
- An angry face by accident. Small eyes and slanted brows turn the dragon mean. Keep the eye big and round with a white shine.
Dragon Variations for Another Sheet of Paper
Next time, try a purple dragon with a lilac belly, or swap the fire for a smoke curl. Younger kids can leave out the far legs and the far wing; the drawing still works. For a close-up of the face, the dragon head drawing tutorial is a good next step, and a castle drawing tutorial gives your dragon somewhere to guard.
Printable Dragon Coloring Page and Step Guide
Want to color away from the screen? The free dragon coloring page has a small colored example at the top with a key showing which color goes on each part. The step-by-step PDF guide holds all 12 steps with tips and prints on Letter or A4 paper.
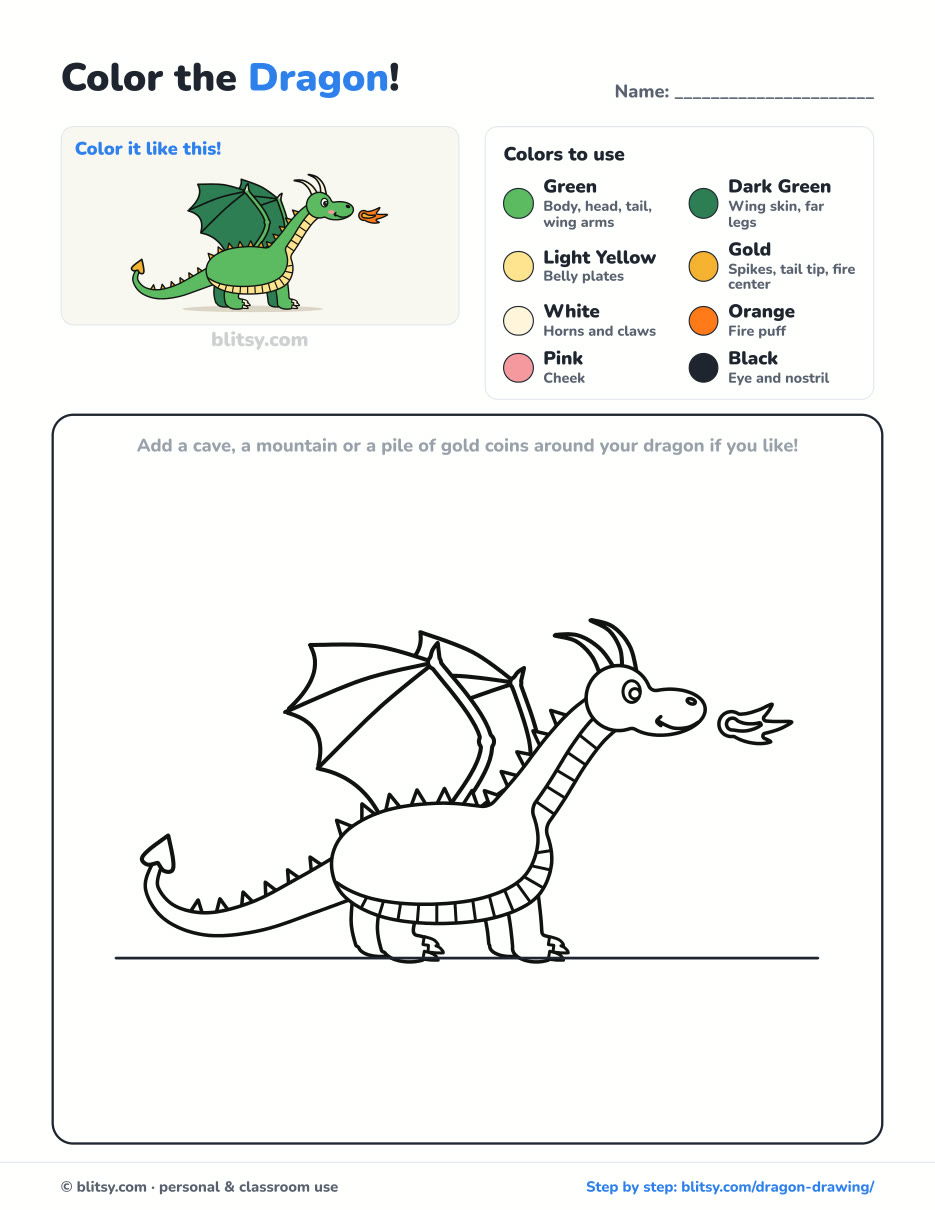
Black outlines with a colored example and the color names at the top. Ready to print and color.
⬇️ Download Coloring PageEvery step picture with its instructions and tips, to keep beside your paper while you draw.
⬇️ Download Drawing Guide📱 On a phone? Tap a download button, then open the file and choose Share → Save to Files or Print. On a computer, the PDF opens or saves straight to your Downloads folder.
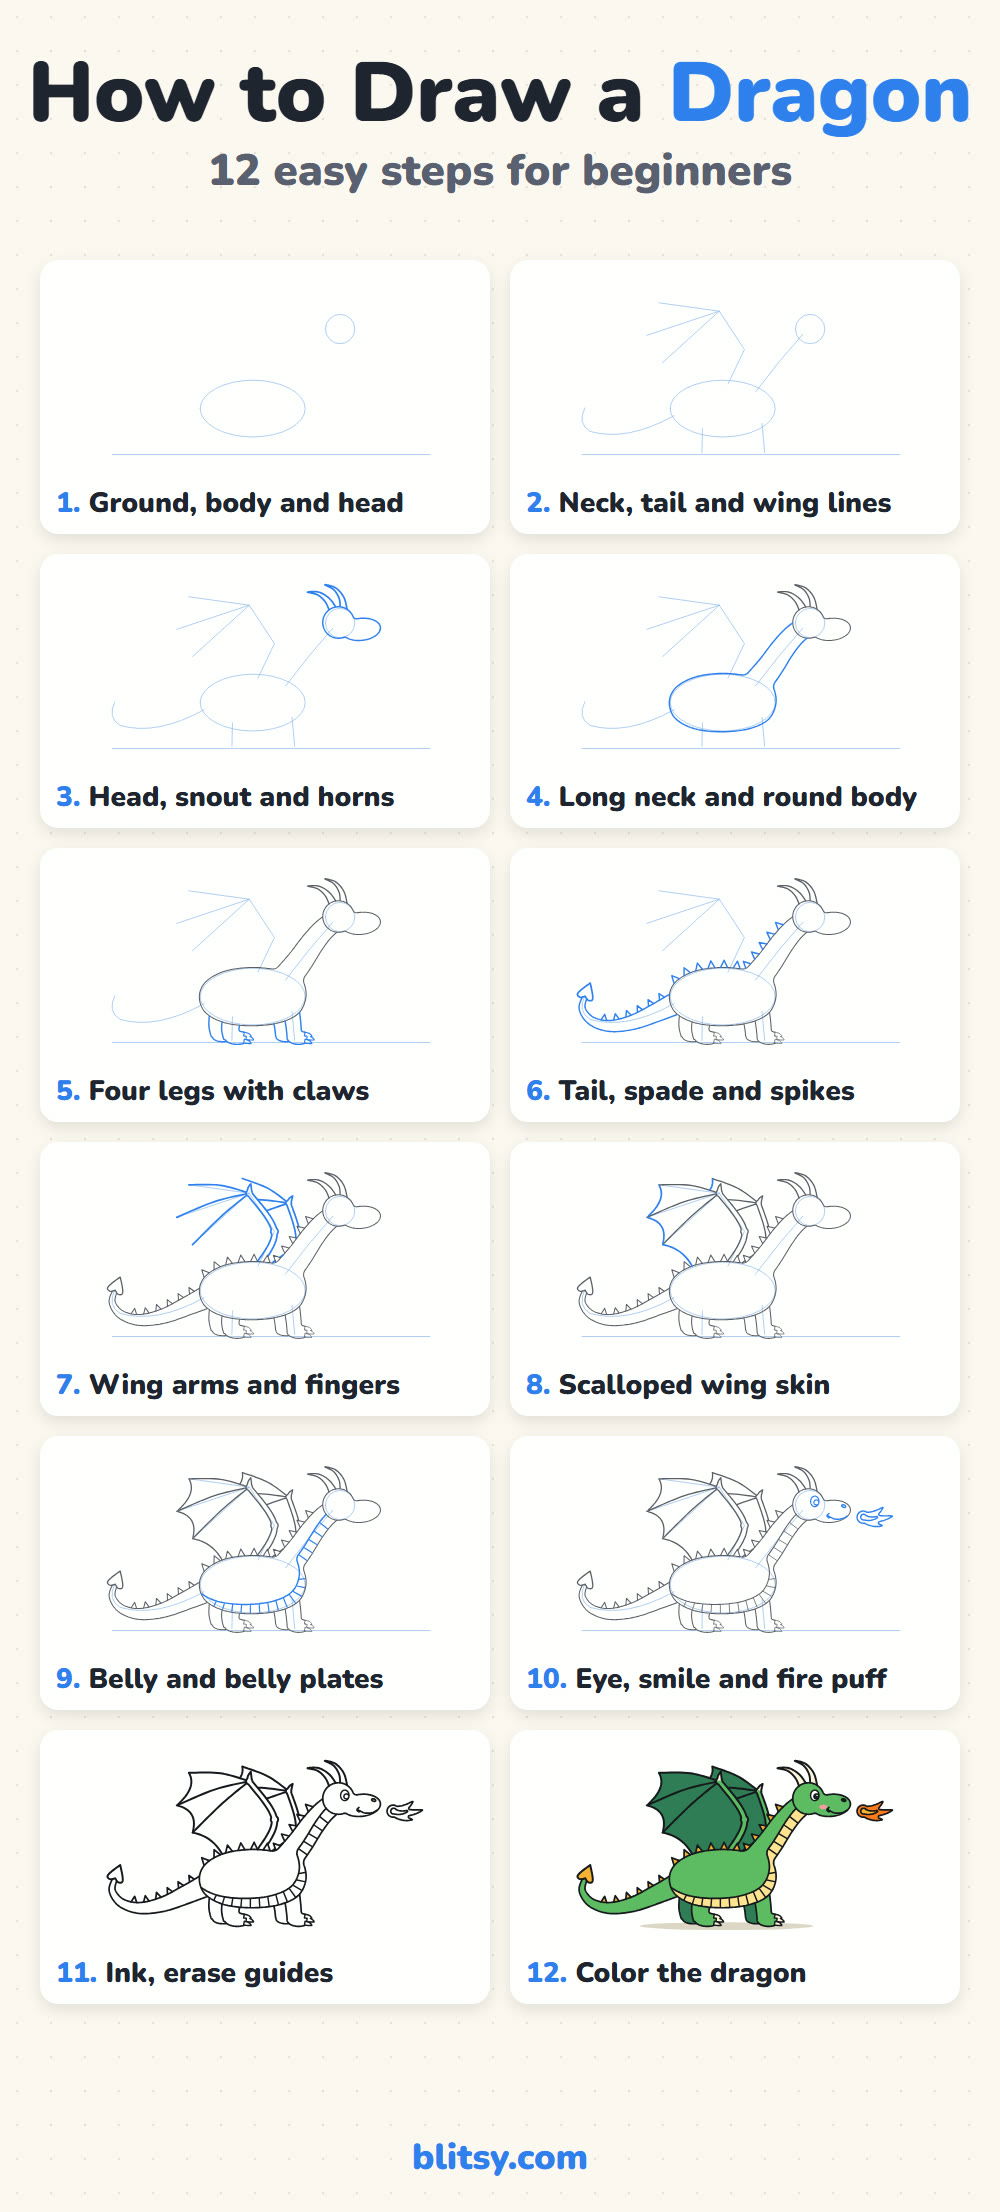
Pin the Dragon Steps for Later Practice
Dragon Drawing Questions from Beginners
What is the easiest way to draw a dragon?
Draw it from the side. Start with an oval body and a circle head, join them with a curved neck, and add the wings last. From the side you only plan one face and one main wing.
How do you draw a dragon for kids?
Keep the shapes chunky. A round body, short legs, two horns and one wing with three fingers are enough; skip the far legs and far wing.
How do you draw dragon wings?
Think of a bat wing. Draw a bent arm, three long finger bones fanning out from the wrist, then connect the tips with curves that dip inward.
How long does it take to draw a dragon?
Most beginners need 40 to 50 minutes with inking and coloring. The wings take longest, so it's fine to stop after step 8 and finish another day.
Give your dragon a name, pick his colors, and let him guard your fridge door for a while. 🐉✏️
Related posts:
 How to Draw a Peacock Step by Step (Easy Fanned Tail)
 How to Draw a Dragon Head Step by Step (Easy Side View)
 How to Draw a Whale Step by Step (Easy for Beginners)
 How to Draw Lungs Step by Step (Easy Science Diagram)
 How to Draw a Pineapple Step by Step (Easy Crown and Slice)
 How to Draw Iron Man Step by Step (Easy Chibi for Kids)
 How to Draw a Dress Step by Step (Easy Party Dress)
 How to Draw a Chicken Step by Step (Easy for Beginners)
 How to Draw a UFO Step by Step (Cute Alien Saucer)
 How to Draw Flames Step by Step (Easy Campfire Drawing)
 How to Draw a Crow Step by Step (Easy for Beginners)
 How to Draw a Tiger Step by Step (Easy Walking Pose)

