
Cartoon cash is one of the friendliest things to draw, because almost every part is a rectangle or an oval. This lesson shows you how to draw money step by step as a small still life: three green bills stacked on top of each other, a round money bag tied with a brown cord, and a short tower of gold coins with a few strays lying around. The bills are made-up play money, not a copy of any real banknote, so there are no faces or serial numbers to worry about.

Follow the colors in every picture. The lines you draw in that step are blue, and everything from earlier steps turns gray so you can see where you are. Pale blue boxes and ovals are helper shapes; press lightly on those, since step 11 erases them.
Quick overview
⏱️ Time: about 25 to 30 minutes
🎯 Level: easy, fine for kids from around 6
✏️ Steps: 12
💵 You'll draw: a stack of three bills, a money bag and a pile of gold coins
Supplies to Gather Before Drawing Cash
- A regular pencil for light helper lines
- A soft eraser
- A black marker or fineliner for the final outline
- Coloring pencils or markers: greens, tans and browns, plus yellow and gold
- Plain paper turned sideways
- A ruler for the bill edges (optional)
A ruler helps with the bills, but slightly wobbly edges look friendly and cartoony, so don't stress if you draw them by hand.
How to Draw Money Step by Step
Step 1: Draw a ground line and three offset boxes
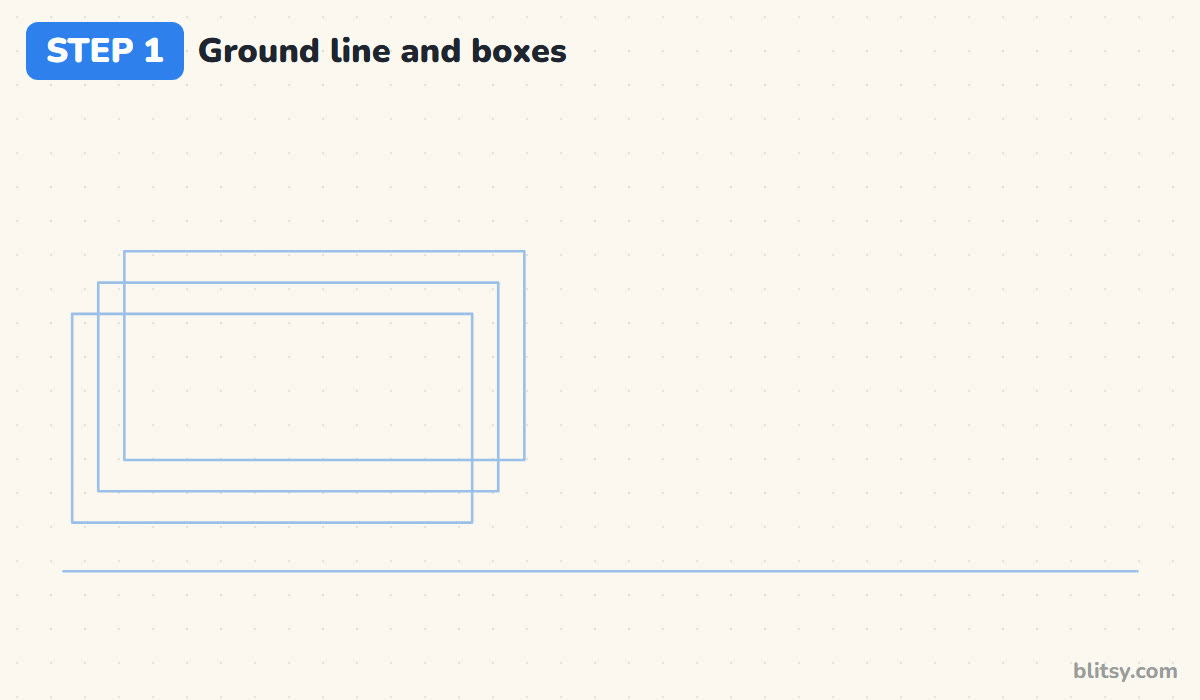
Start with a long, light line near the bottom of your page. On the left half, draw one wide rectangle about twice as long as it is tall. Then draw the same rectangle again, shifted a little up and to the right, and once more after that. Those three overlapping boxes are the whole secret of a stack.
💡 Tip: Shift every box by the same small amount, about a finger's width, so the stack looks tidy.
Step 2: Add a big oval and a coin cylinder
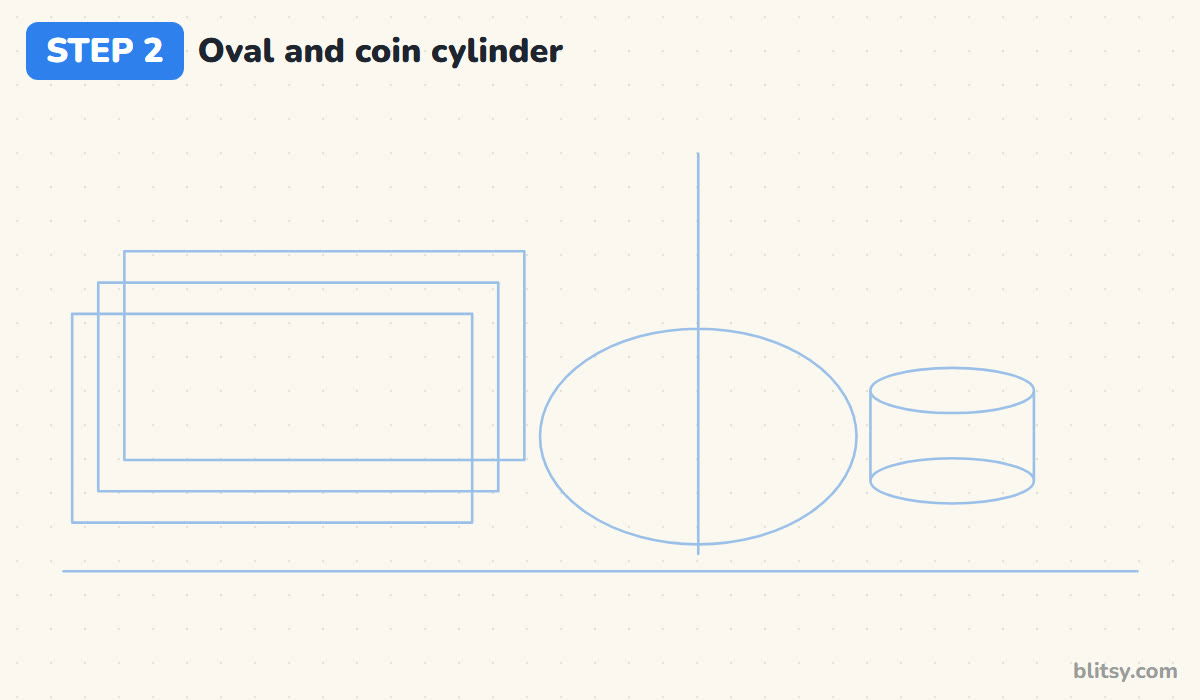
In the middle, draw a wide oval sitting just above the ground line, plus a light vertical line through its center. This oval sets the round belly of the money bag. To the right, sketch a short cylinder: an oval on top, the same oval lower down, and two straight sides joining them.
💡 Tip: Make the bottom oval of the cylinder exactly as wide as the top one.
Step 3: Outline the three stacked bills
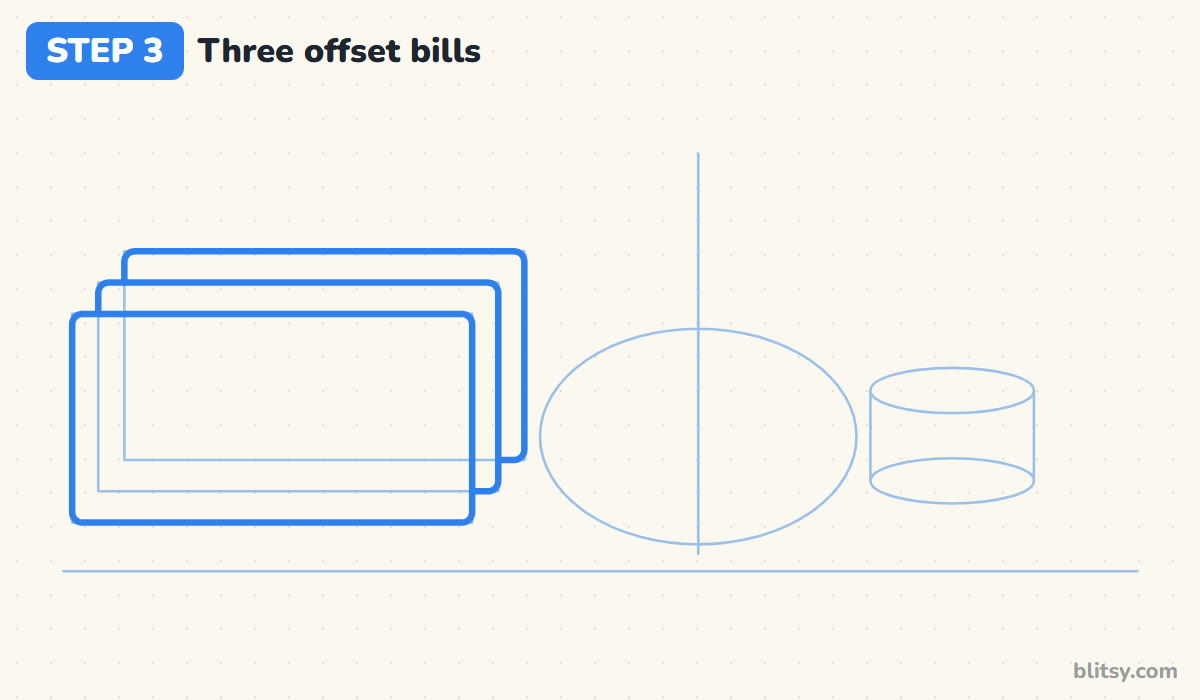
Go over the front box with a firmer line and round its corners slightly. For the two bills behind it, draw only the parts you can actually see: a thin strip along the top and down the right side. I always draw the front bill first, because it decides where the others get cut off.




💡 Tip: Stop each back line the moment it touches the bill in front of it.
Step 4: Draw the round money bag
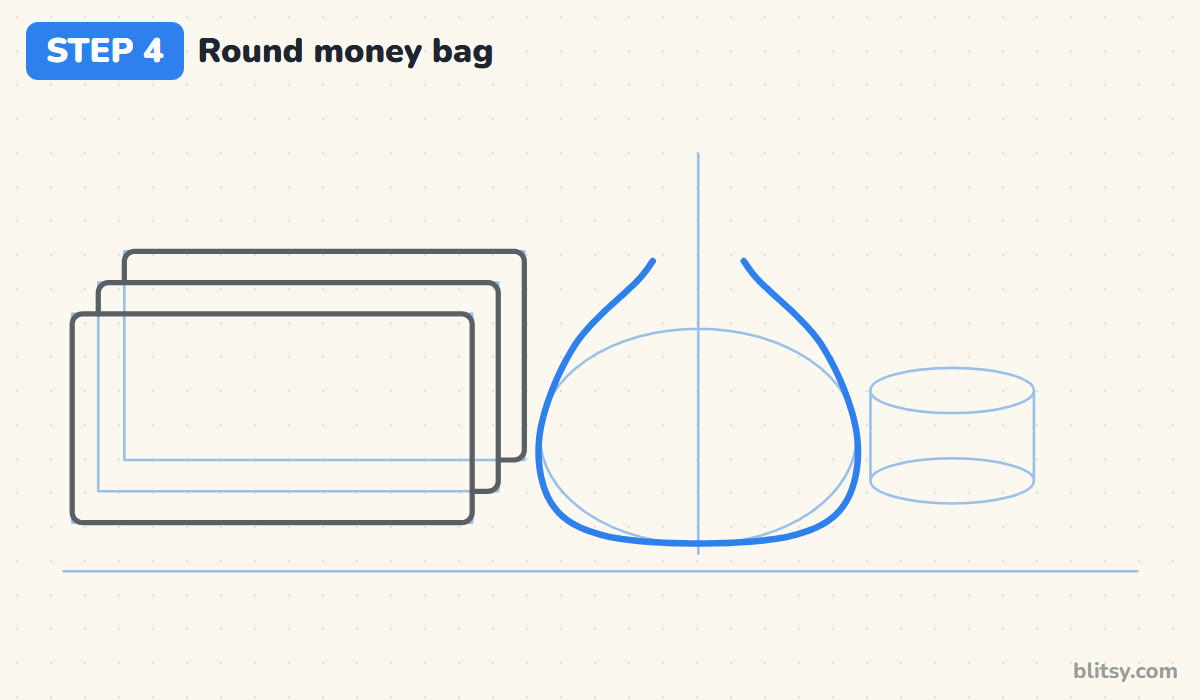
Use the oval as a guide for the bag's belly, but let the bottom go a little flatter, as if the bag is heavy and resting on the table. From the sides, pull two curves up and inward so they almost meet at a narrow neck. Leave the neck open, since the tie will cover it.
💡 Tip: Bulge the sides slightly past the oval so the bag looks stuffed full.
Step 5: Add the tie and the ruffled top
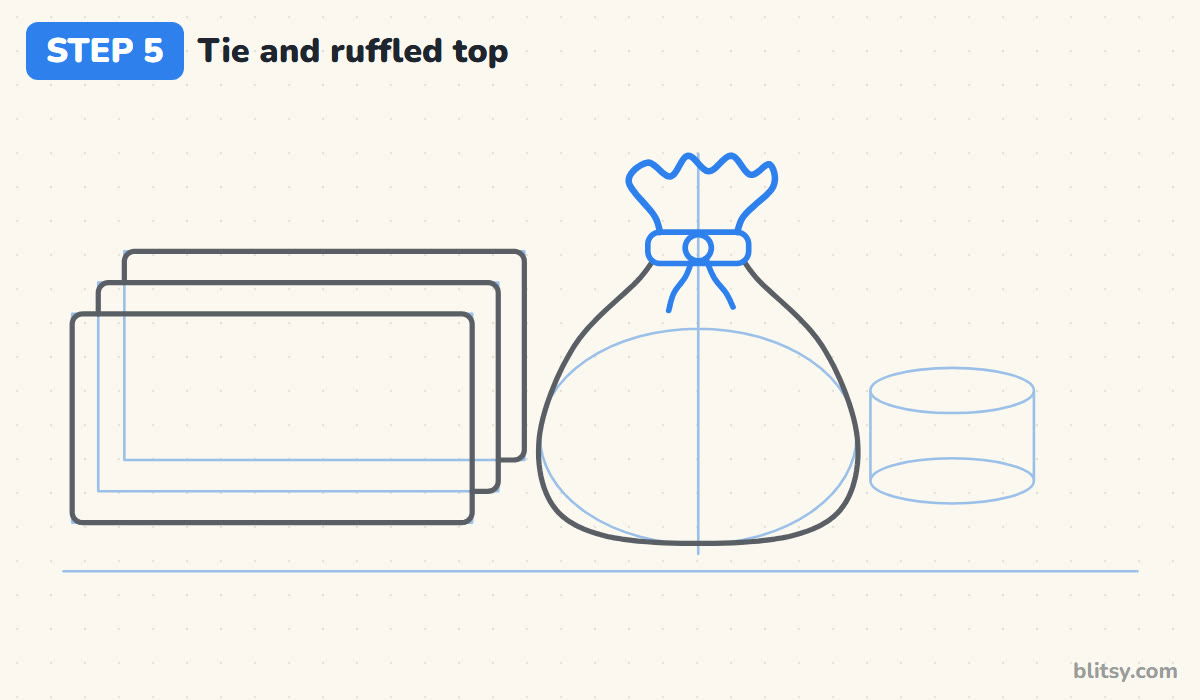
Across the neck, draw a short rounded band for the cord, with a small circle in the middle for the knot. Two loose cord ends hang down from the knot onto the bag. Above the band, the cloth fans out: draw a wavy top edge with four or five bumps, and bring its sides down to the tie.
💡 Tip: Let the ruffle be wider than the tie, like a bunch of flowers coming out of a vase.
Step 6: Turn the cylinder into a coin stack
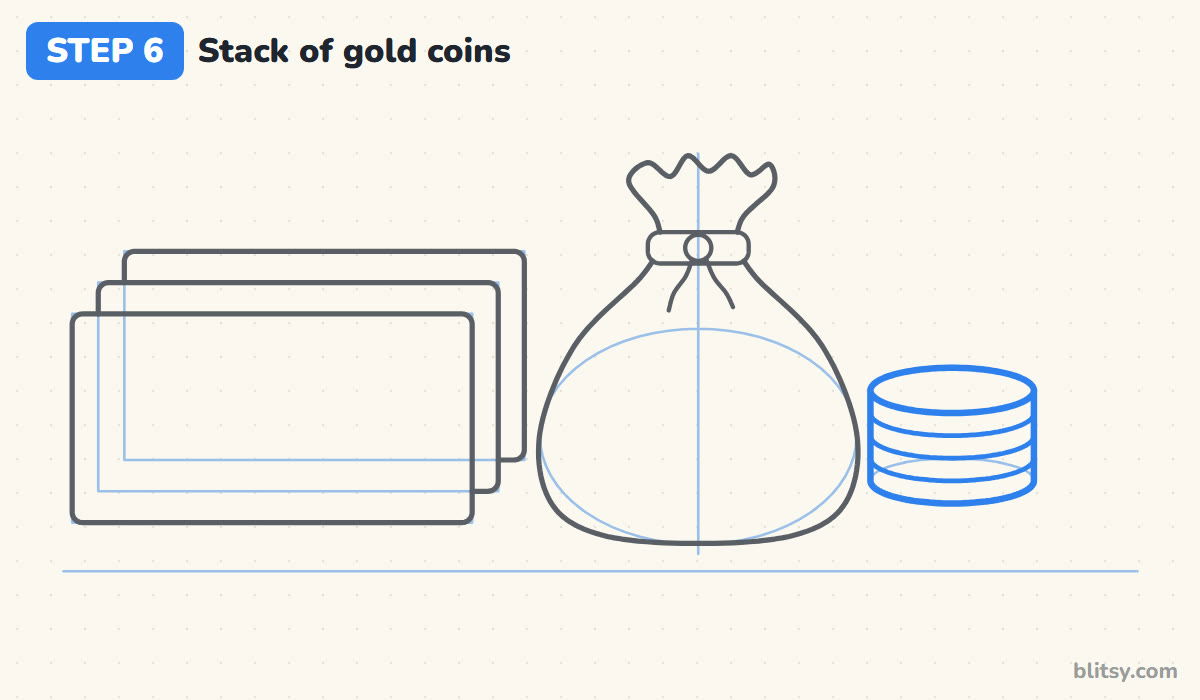
Darken the outline of your cylinder. Then split the side into four coins by drawing three curved lines across it. Each curve should bend the same way as the bottom edge, because each one is really the front half of an oval.
💡 Tip: Space the coin lines evenly; uneven gaps make the stack look like it's sliding.
Step 7: Draw three loose coins on the ground
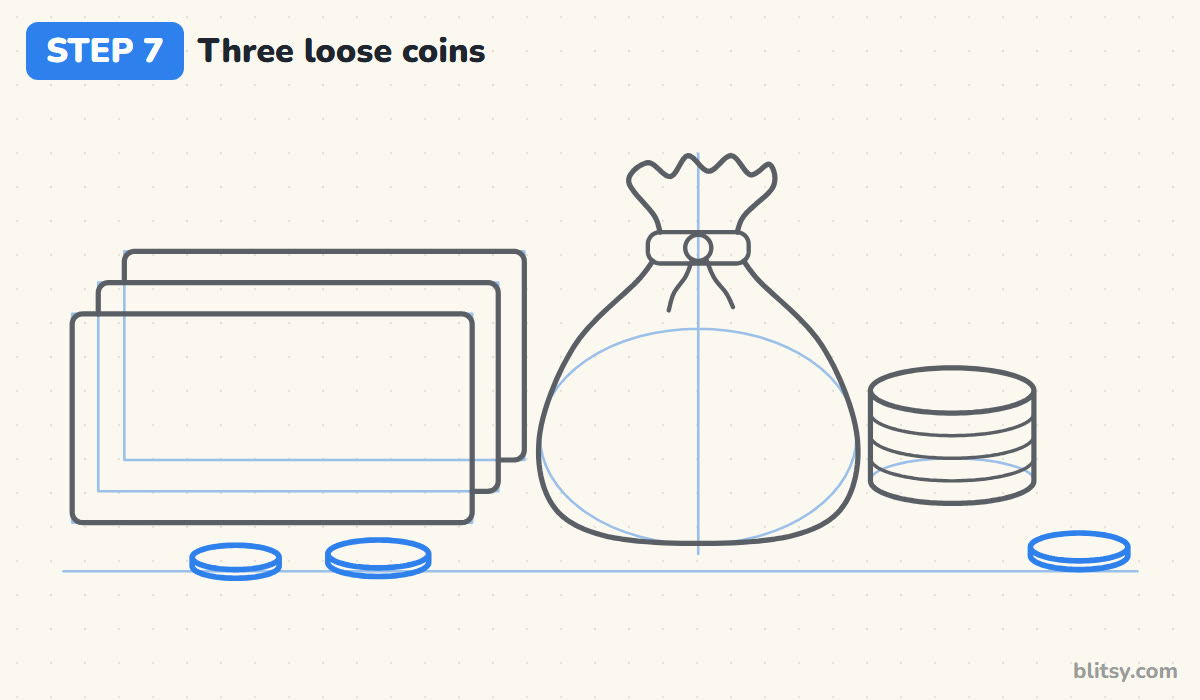
A coin lying flat is just a squashed oval with a thin edge. Draw two of them in front of the bills and one to the right of the stack, sitting on the ground line. I keep them a bit smaller than the stack coins and never line them up perfectly.



💡 Tip: Draw the thin edge as a second oval curve just below the front of the first.
Step 8: Decorate the bills with borders and a circle
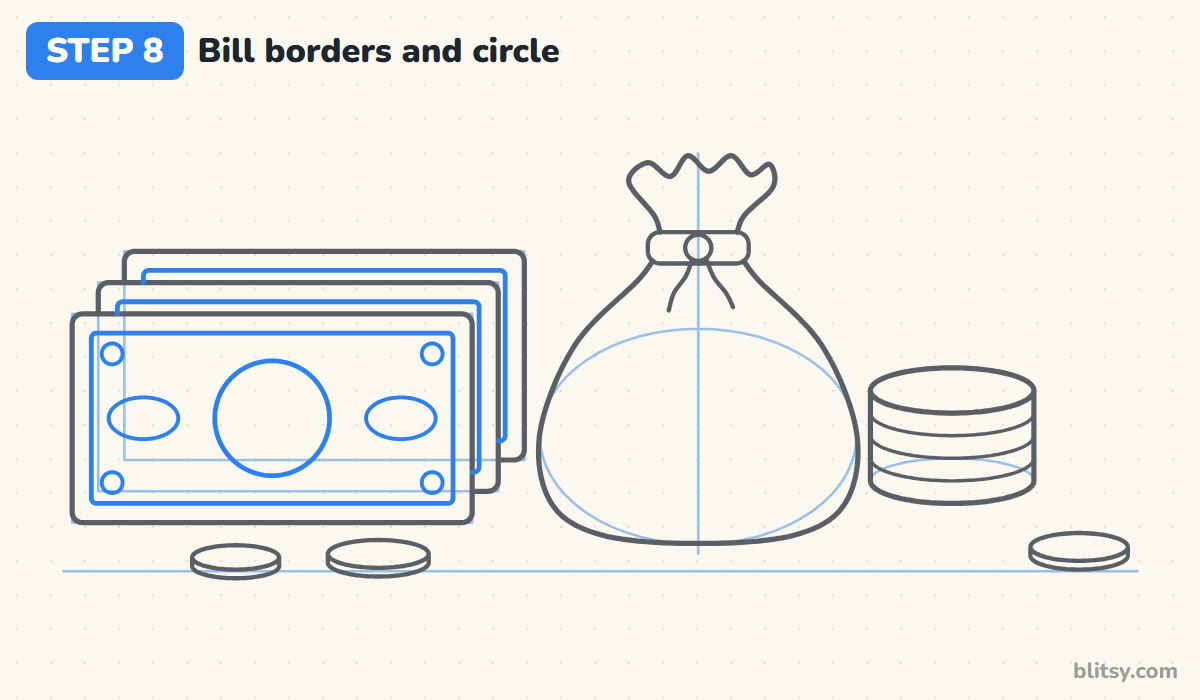
Inside every bill, draw a second rectangle a little way in from the edge. That band is the border. On the front bill, add a circle in the middle, a flat oval on each side and a small dot in each corner. My goal here is a pattern that says money without copying a real note.
💡 Tip: Keep the border band the same thickness all the way round by checking each side.
Step 9: Draw two dollar signs and the bag folds
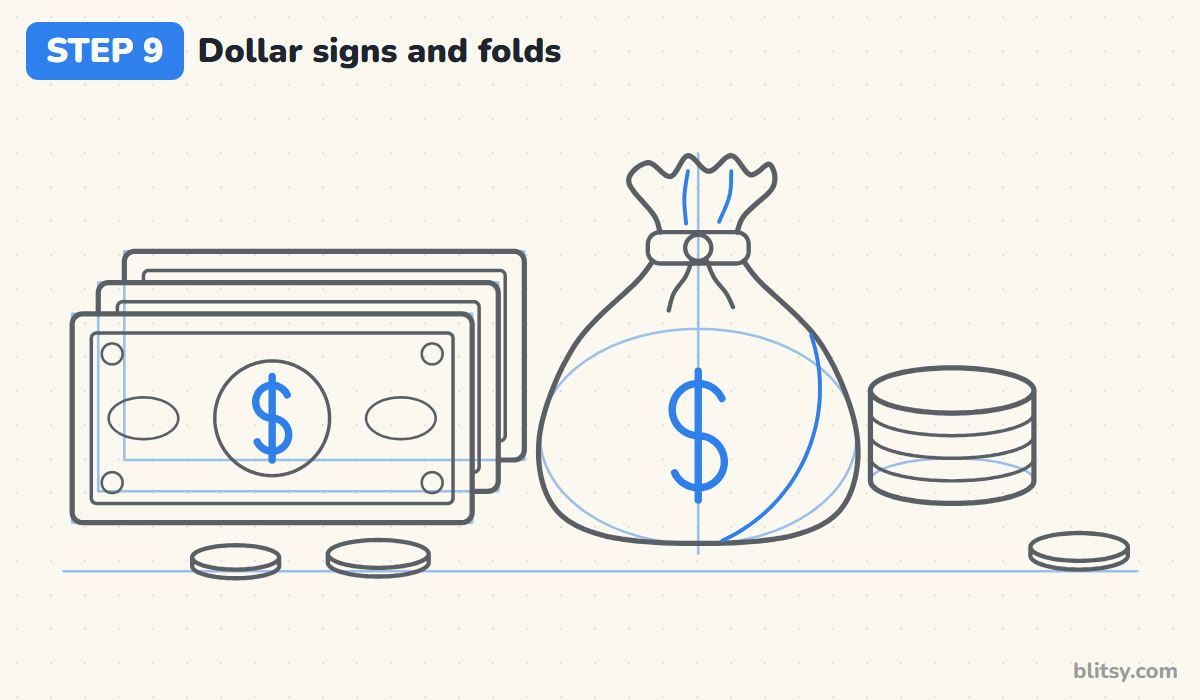
A dollar sign is an S with a straight line through it. Draw a small one inside the bill's circle and a bigger one on the middle of the bag. Next, add a long curve on the right side of the bag for its shadow edge, and two short lines in the ruffle for folds.
💡 Tip: Draw the S first, then the line, so the line passes through its middle.
Step 10: Add coin rings and edge ridges
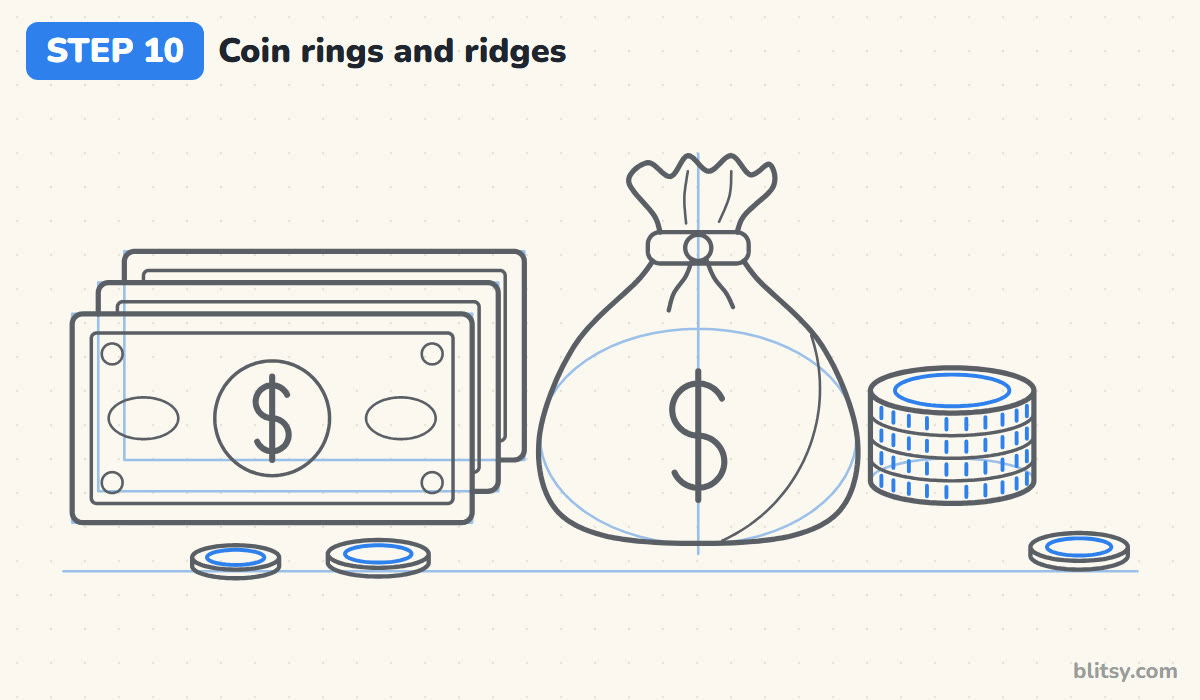
On the top coin and on each loose coin, draw a smaller oval inside the first one to make a raised rim. Then fill the side of the stack with short upright ticks, row after row. In my experience, the ticks are what make the stack read as coins instead of a can.
💡 Tip: Keep the ticks short so a gap stays above and below each one.
Step 11: Ink every line and erase the guides
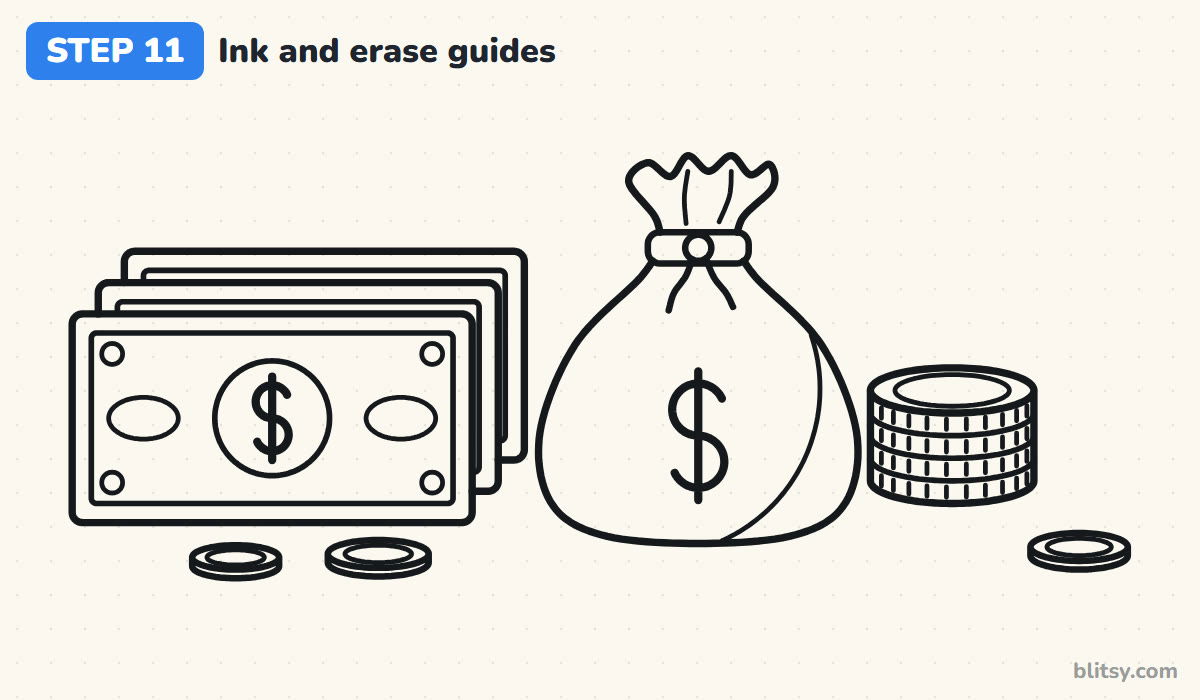
Trace all the keeper lines with your black marker, working from left to right. Give the ink a minute to dry. After that, erase the ground line, the three boxes, the oval and the cylinder sketch.




💡 Tip: Ink the long straight bill edges in one smooth pull rather than many short strokes.
Step 12: Color the bills, the bag and the coins
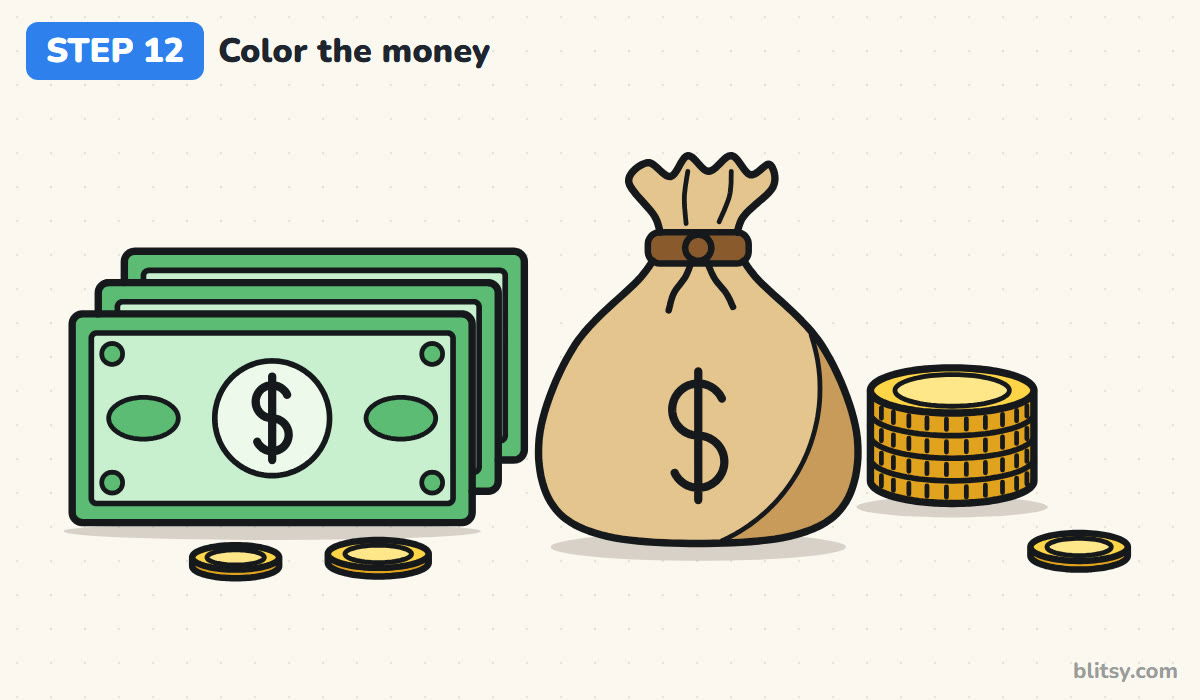
Color the middle of each bill mint green and the border band plus the side ovals and dots a stronger green. Leave the dollar circle very pale. The bag is tan with a light brown shadow on the right, and the tie is brown. For coins, yellow on top and darker gold on the edges.
💡 Tip: Color the coin edges a shade darker than the tops so the stack looks solid.
Where Money Drawings Tend to Go Wrong
- Drawing every bill as a full rectangle. The back lines then cut across the front bill and the stack looks see-through. Stop each hidden line where the bill in front begins.
- Coin lines that bend the wrong way. A smile-shaped curve across the stack points the right way; a frown-shaped one makes the coins look upside down. Copy the curve of the bottom edge.
- A bag with no neck. If the sides go straight up into the tie, it looks like a pillow. Pinch the top in until it's narrower than the tie.
- A dollar sign that's too small. A tiny sign on a big bag gets lost. Make the S about a third of the bag's height.
- Copying a real banknote. Faces and seals take ages and aren't needed. Simple shapes read as money just as well.
Fun Ways to Change Up the Money Pile
Fan the three bills out like playing cards, or roll one into a tube with a band around it. The bag can lean over with coins spilling out of its top, and a small piggy bank or a wallet fits nicely beside the coin stack. If shiny things are your favorite, the diamond drawing tutorial and this crystal drawing tutorial are good next steps for practicing sparkle.
Money Coloring Page and PDF Steps to Print
Want it on paper? The money coloring page has a small colored example and a key with each color word at the top, then a big black outline of the whole pile below. The step-by-step guide PDF holds all 12 steps with their tips, so kids can work through them away from a screen. Both print on Letter or A4.
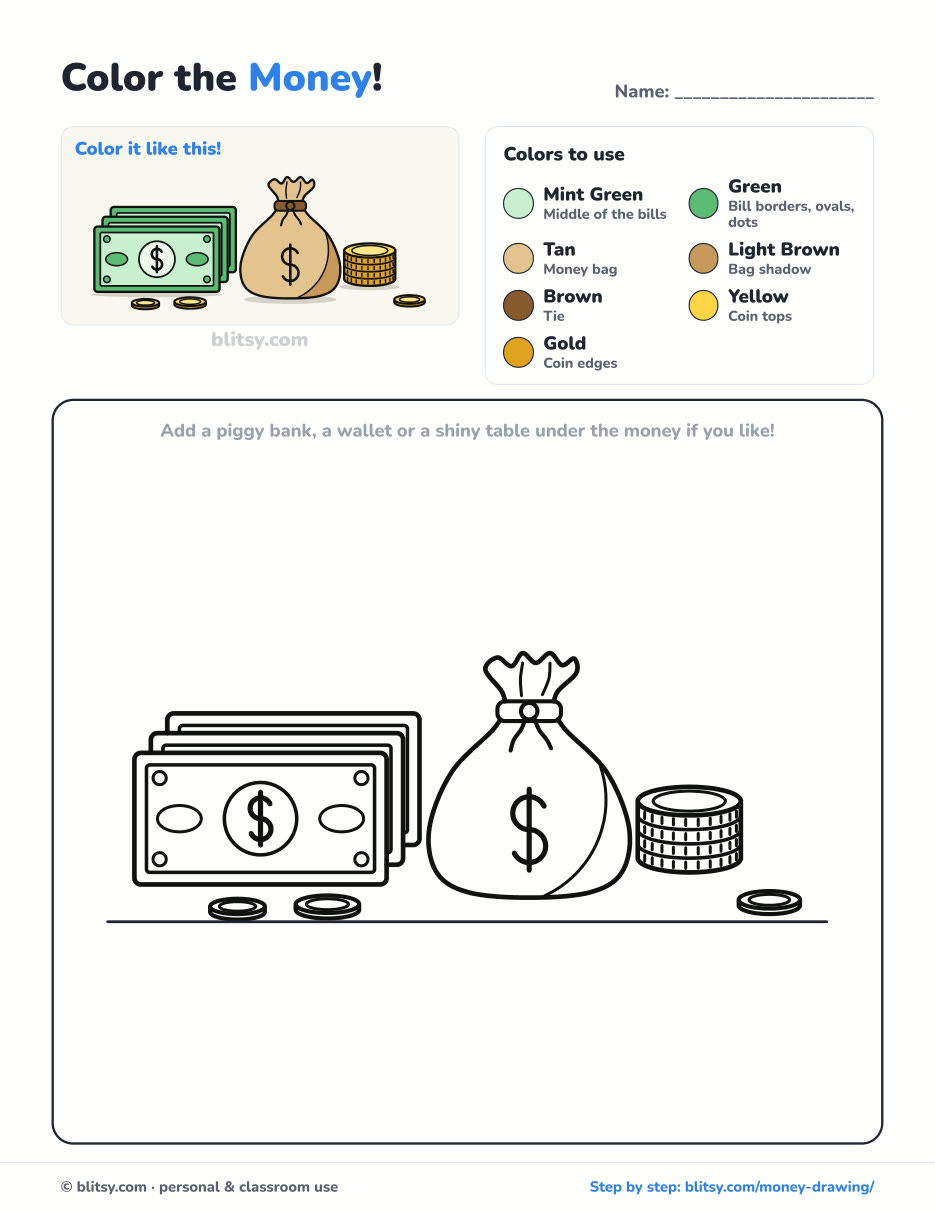
Black outlines with a colored example and the color names at the top. Ready to print and color.
⬇️ Download Coloring PageEvery step picture with its instructions and tips, to keep beside your paper while you draw.
⬇️ Download Drawing Guide📱 On a phone? Tap a download button, then open the file and choose Share → Save to Files or Print. On a computer, the PDF opens or saves straight to your Downloads folder.
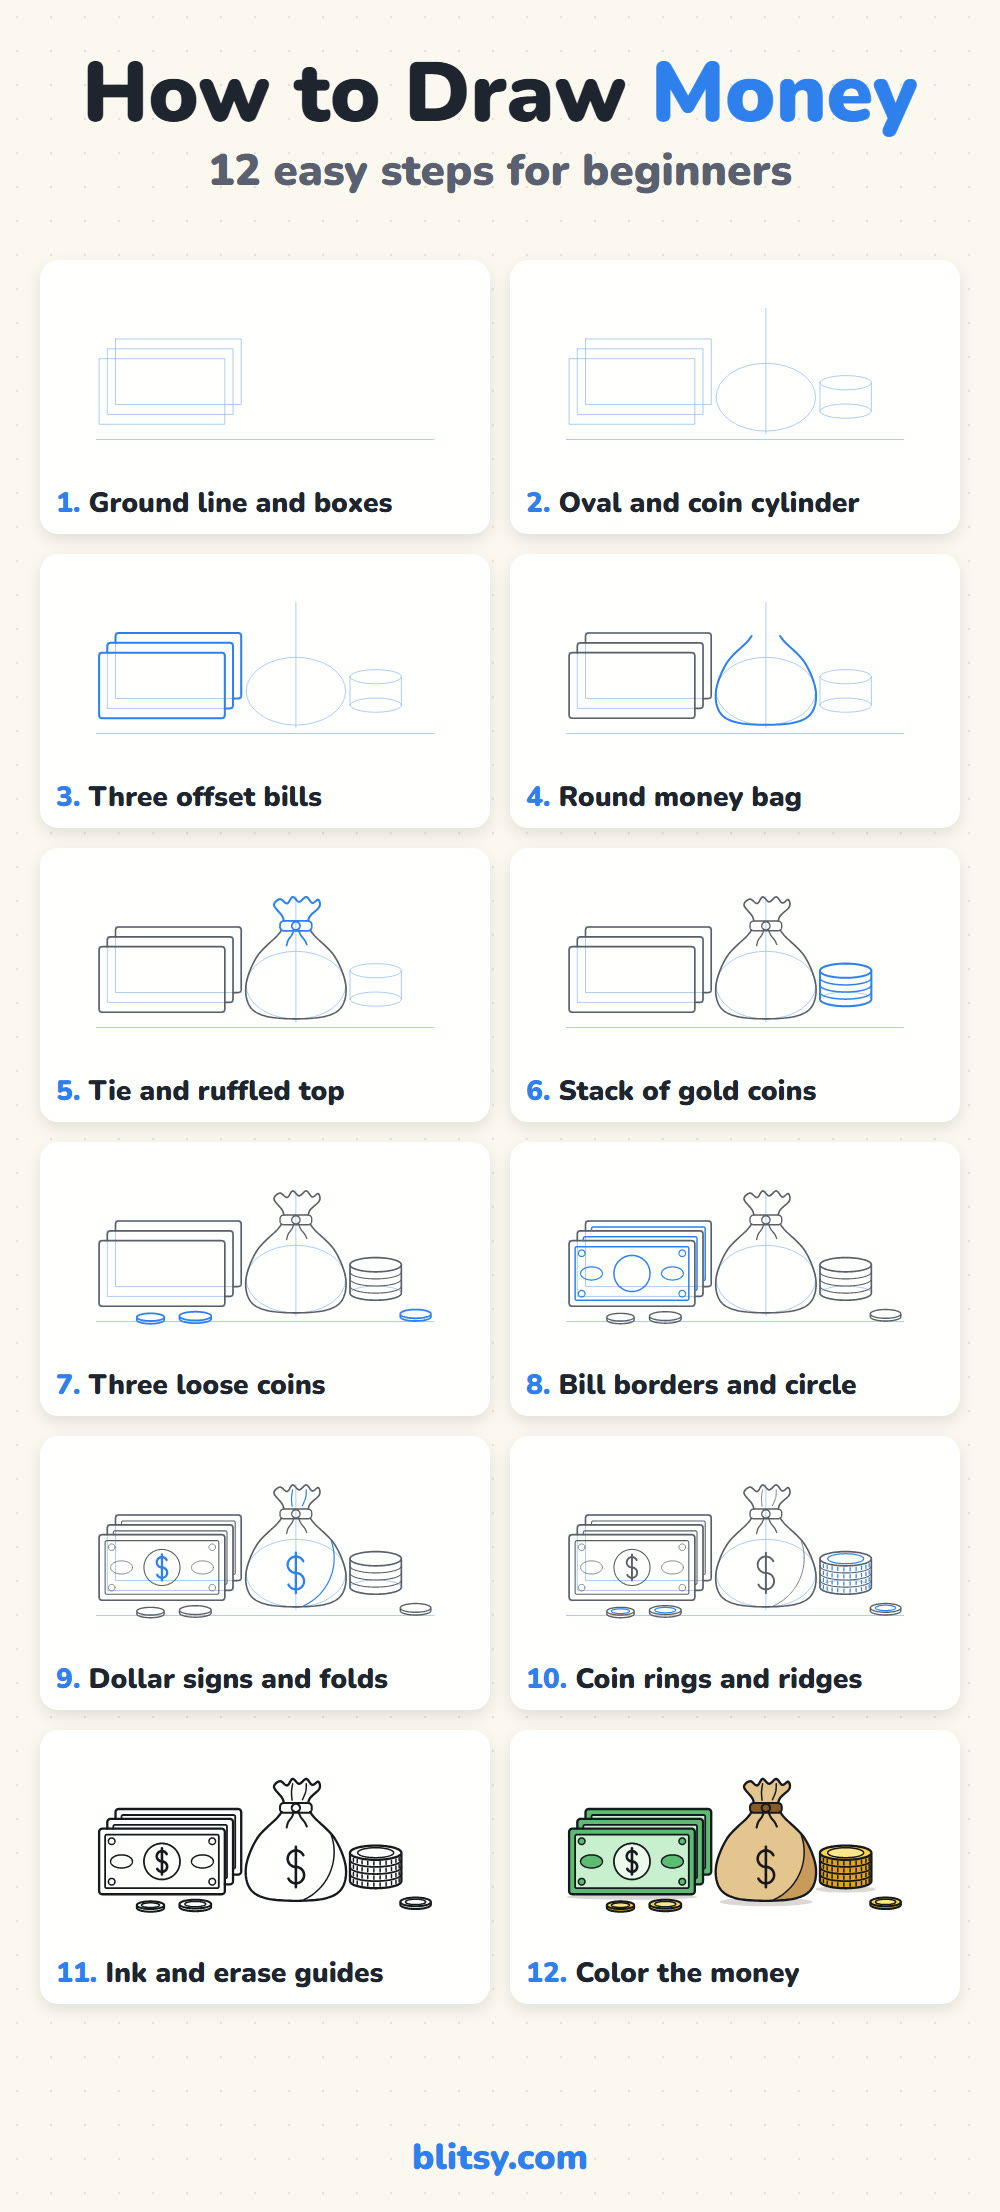
Pin the Money Steps for Your Next Art Session
Money Pile Done? Here Is What to Draw Next
Each link below is a step-by-step tutorial, from patterns and objects to whole scenes, so pick whatever fits your mood.
- Mandala Drawing: Build an eight-part mandala one ring at a time in this how to draw a mandala step by step lesson.
- Flames Drawing: A campfire and a flame icon share the same S-curve in the flames drawing tutorial.
- Wave Drawing: The wave drawing step by step guide curls a big ocean wave into a hollow tube.
- Halloween Drawing: Draw a friendly haunted house under a full moon with this Halloween drawing tutorial.
- Light Bulb Drawing: A glowing old-style bulb with a curly filament is the goal of the light bulb drawing tutorial.
- Basketball Drawing: Learn how the seams wrap around the ball in the how to draw a basketball lesson, hoop and net included.
- Snowman Drawing: Three light circles turn into a snowman in a top hat in this snowman drawing tutorial.
- Mountain Drawing: The mountain drawing step by step lesson starts with three triangles and ends with a lake and pines.
- Realistic Drawing: Shading is the next skill after shiny coins, and the realistic drawing tutorial teaches it on an apple.
- School Drawing: Draw a red-brick school with a clock and a bell tower in the school drawing tutorial.
Money Drawing Questions Kids Often Ask
What is the easiest way to draw money?
Start with a single cartoon bill: a rectangle, a smaller rectangle inside it and a circle with a dollar sign in the middle. Once that's easy, copy it twice behind itself to make a stack.
How do you draw a stack of coins?
Draw a short cylinder, an oval on top with two straight sides and a curved bottom. Then add evenly spaced curves across the side, each one bending like the bottom edge.
What colors should I use for cartoon money?
I use two greens for the bills and tan with brown for the bag. Coins get yellow with a deeper gold. Any colors work for play money, though, so pink bills are fine.
How long does this money drawing take?
Around 25 to 30 minutes including coloring. Younger kids can leave out the coin ridges and the bill dots to finish faster.
Next time, try drawing your own play money with a made-up name and design for a pretend shop at home. 🪙
Related posts:
 How to Draw a Whale Step by Step (Easy for Beginners)
 How to Draw Lungs Step by Step (Easy Science Diagram)
 How to Draw a Pineapple Step by Step (Easy Crown and Slice)
 How to Draw Iron Man Step by Step (Easy Chibi for Kids)
 How to Draw a Dress Step by Step (Easy Party Dress)
 How to Draw a Chicken Step by Step (Easy for Beginners)
 How to Draw a Police Car Step by Step (Easy for Kids)
 How to Draw a Volcano Step by Step (Easy Erupting Volcano)
 How to Draw a Crow Step by Step (Easy for Beginners)
 How to Draw a Jellyfish Step by Step (Cute, Easy Guide)
 How to Draw Cerberus Step by Step (Cute and Easy)
 How to Draw a Taco Step by Step (Easy Kawaii Taco)

