
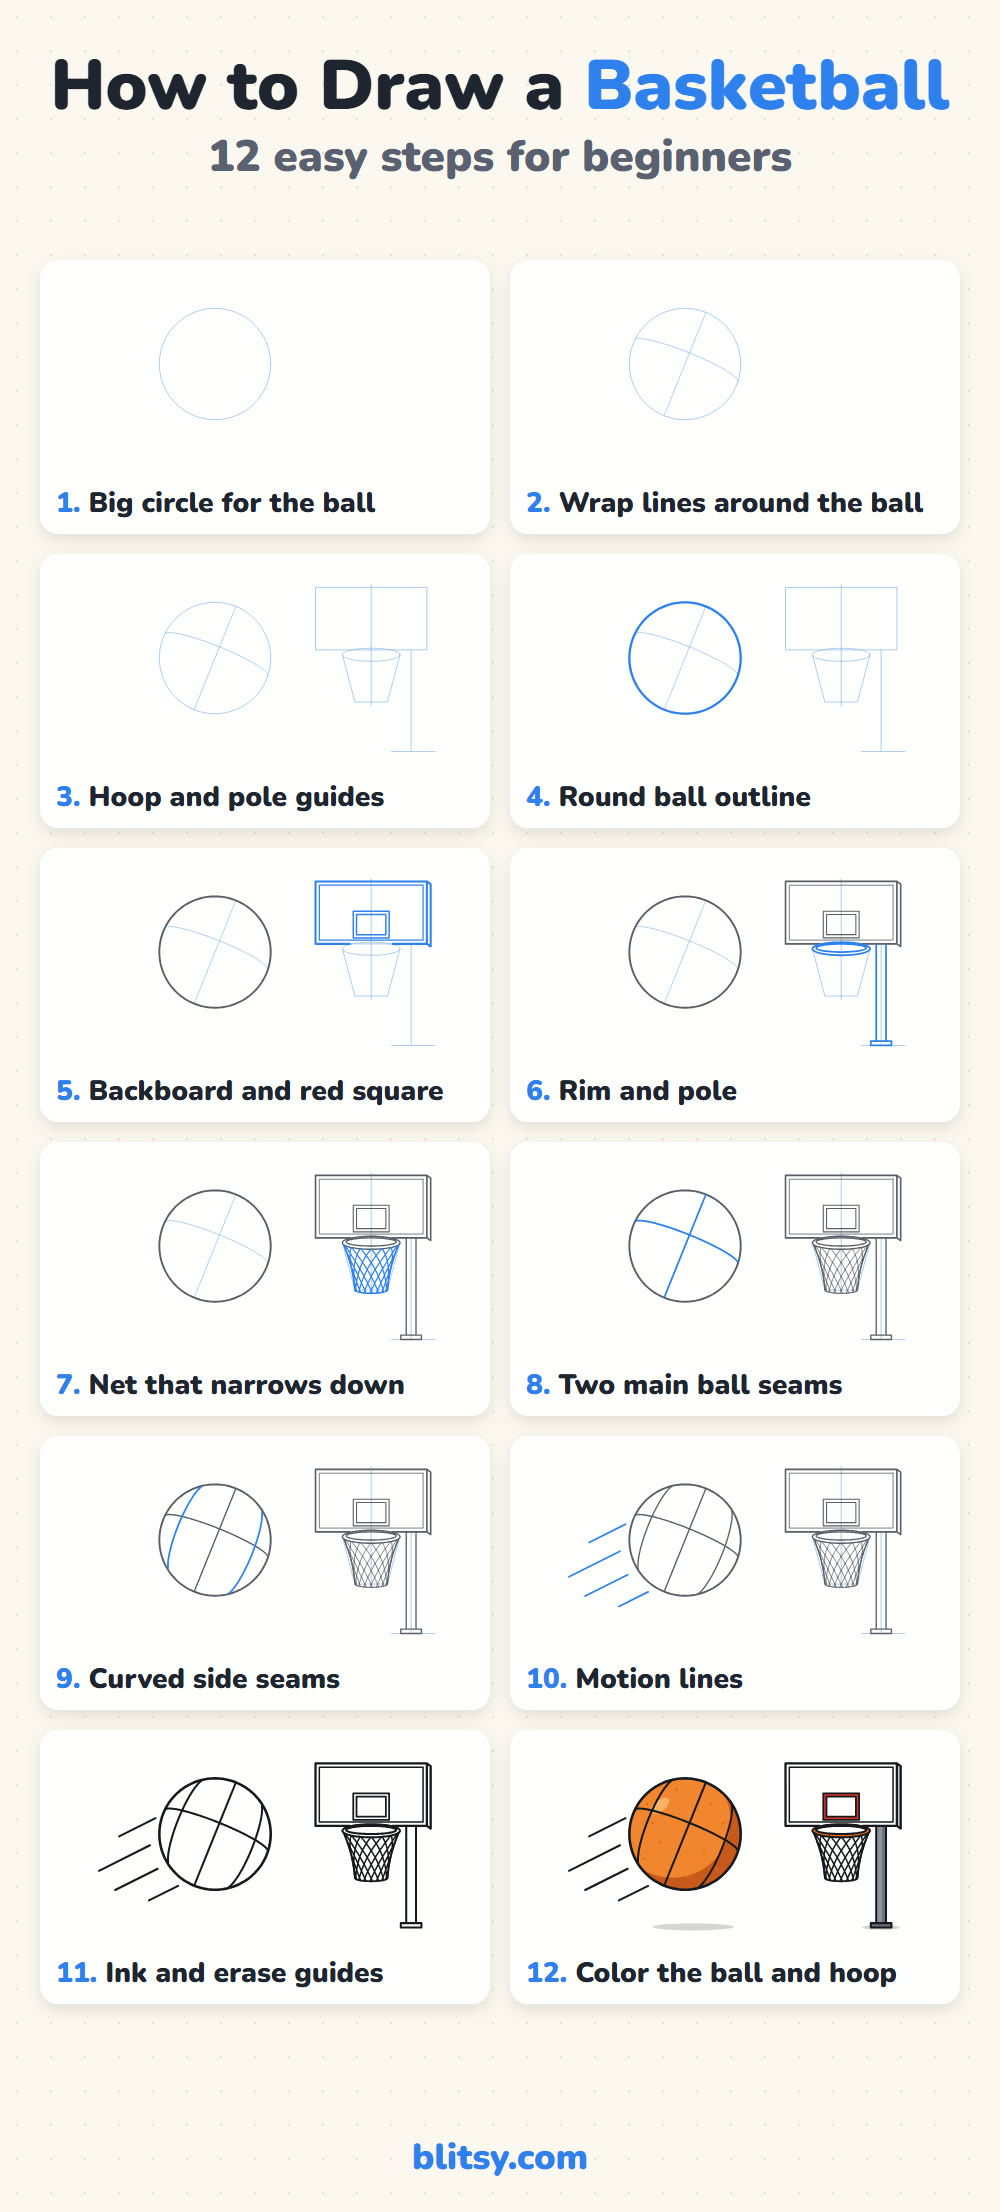
A basketball starts as a plain circle, so it seems like the easiest ball to draw. Then the seams go on, and suddenly the ball looks flat, like a pizza cut into slices. This lesson shows you how to draw a basketball step by step with two light wrap lines that make the seams curve around the ball, and then we send it flying toward a hoop with a backboard and a net.
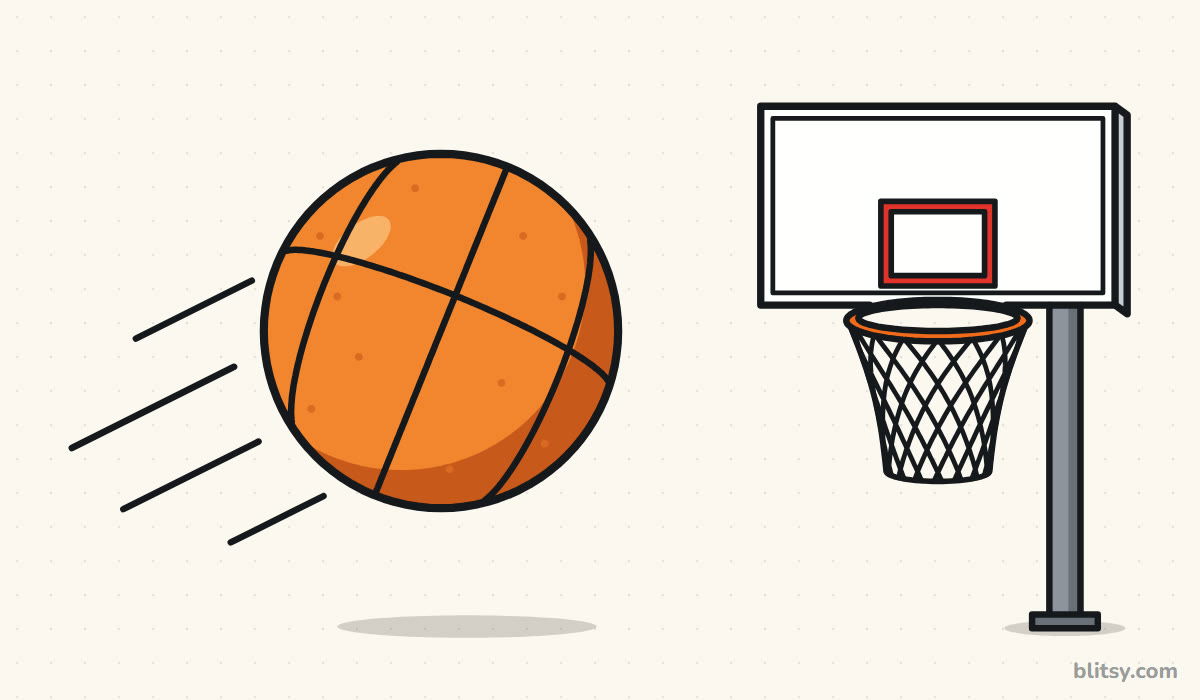
Look for the bright blue: those are the lines you add in that step, and older lines sit in gray behind them. The pale blue lines are pencil helpers, so keep them faint; they get erased before the color goes on.
Quick overview
⏱️ Time: about 30 minutes, or 15 for the ball on its own
🎯 Level: easy; the ball suits kids from 6, the net is a nice challenge for 9 and up
✏️ Steps: 12
🏀 You'll draw: a basketball with curved seams, a backboard, a rim with a net and a pole
Tools to Grab Before Tip-Off
- A pencil you can press very lightly (HB is fine)
- A soft eraser
- A ruler for the backboard and the pole
- A round lid or a roll of tape for the ball circle (optional)
- A black fineliner or marker
- Colored pencils or markers in orange, dark orange, red and gray
- Plain paper turned sideways
Freehand circles are fine too; a slightly wobbly ball still looks like a ball once the seams wrap around it.
How to Draw a Basketball Step by Step
Step 1: Draw a big circle for the ball
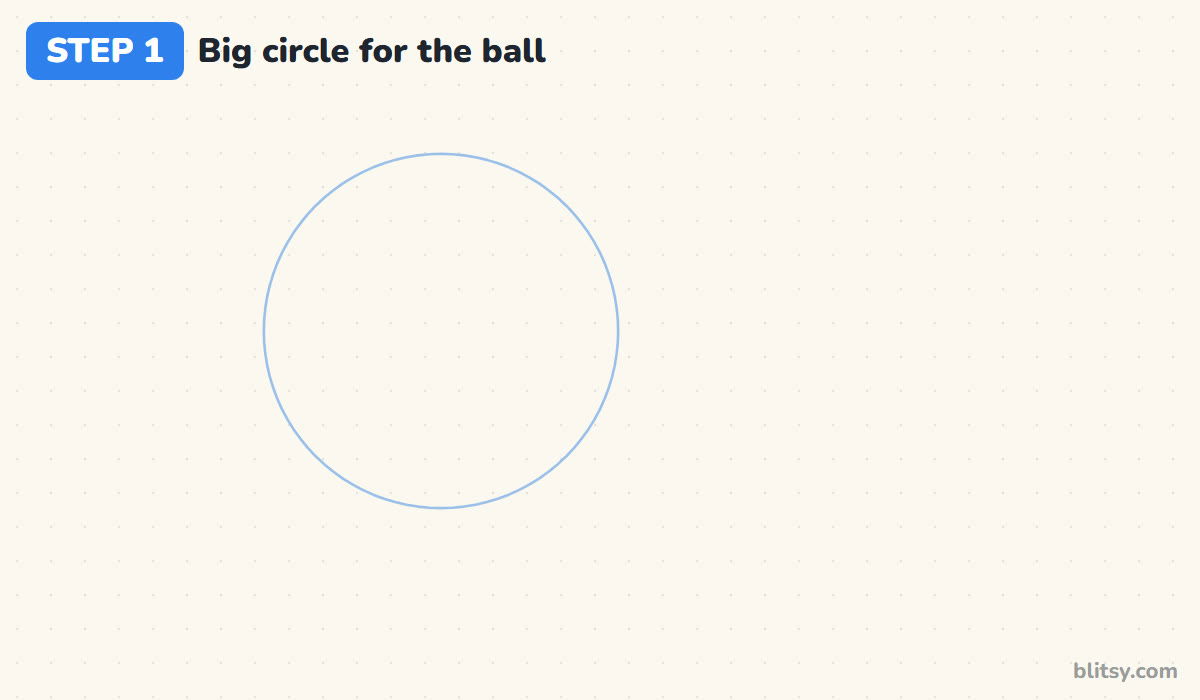
On the left half of the page, draw a large circle that takes up a bit more than half the paper's height. Keep a hand's width of space to its left for the motion lines. I trace a lid when I want a clean ball, but a light freehand circle works just as well.
💡 Tip: Draw from your elbow, not your wrist, and the curve comes out rounder.
Step 2: Add two wrap lines that cross
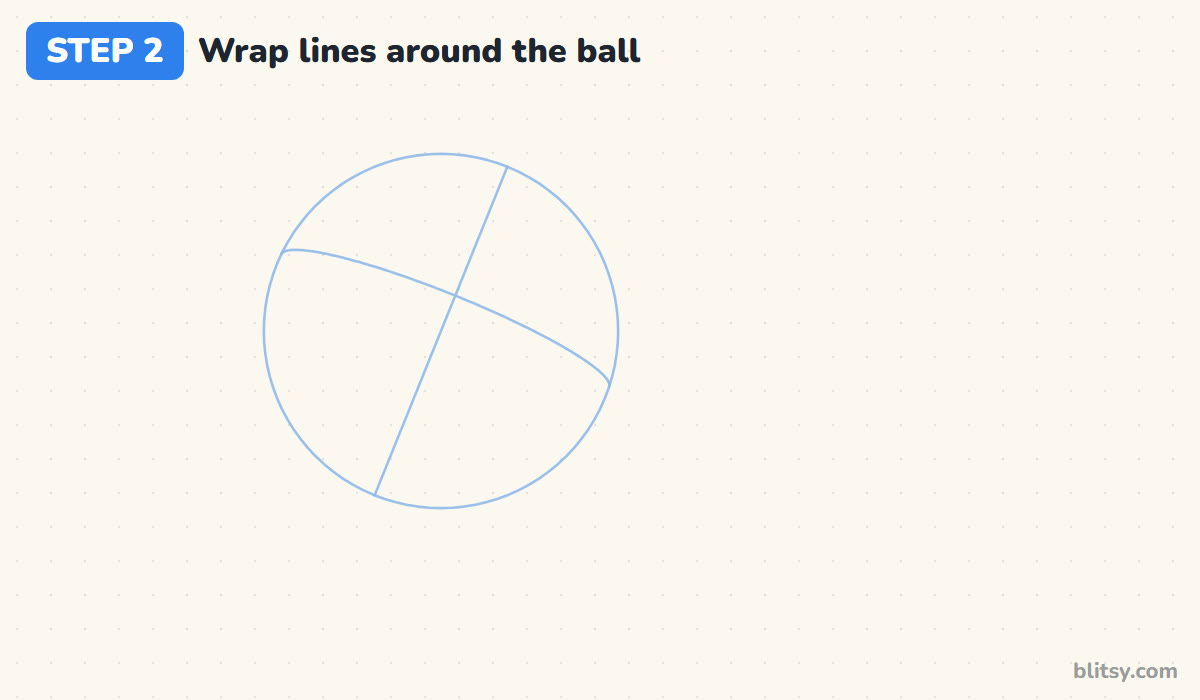
These two lines are the secret to a round ball. Draw one line from near the top of the circle down to near the bottom, leaning a little to the right. Then draw a second line across it from the left edge to the right edge, sloping gently downward and curving slightly. They should cross just above the middle. Their bend makes the ball look like it's turning.
💡 Tip: If your cross is perfectly straight and level, tilt it; a leaning cross looks like a spinning ball.
Step 3: Block in the hoop and pole
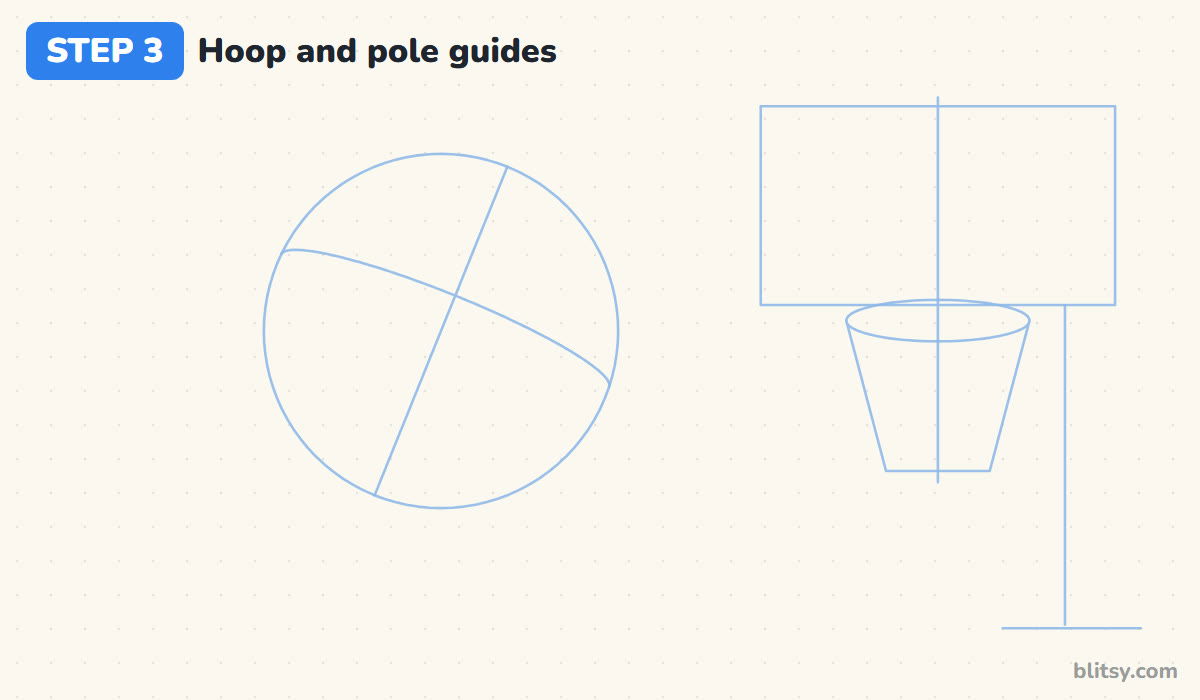
On the right side, rule a wide rectangle for the backboard, its top roughly level with the top of the ball. Draw a light vertical line through its middle. Where that line meets the bottom edge, sketch a flat oval for the rim, then a bucket shape under it that narrows toward the bottom. Add a vertical line under the right end of the board for the pole and a short ground line.




💡 Tip: Make the rim oval about half the backboard's width; a smaller rim looks like a teacup.
Step 4: Go over the ball outline
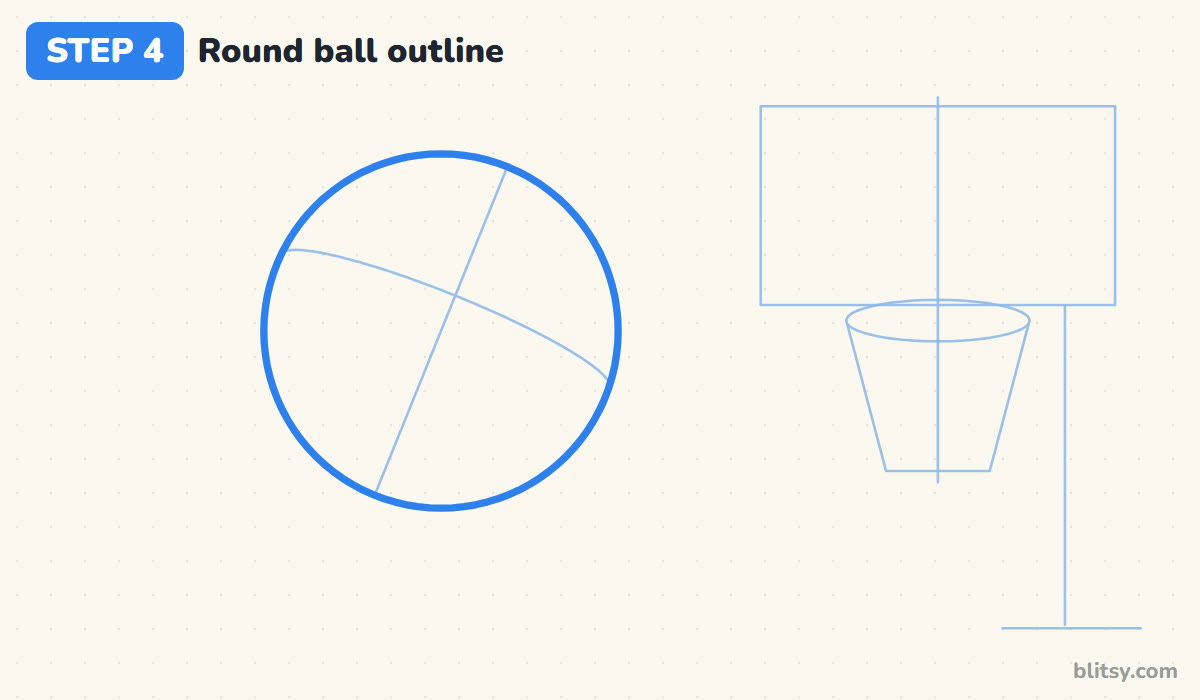
Now press a bit harder and trace the circle with one smooth line. Most beginners scratch around it in tiny strokes, and the edge ends up hairy. Turn the paper as you go so your hand can sweep along the curve comfortably.
💡 Tip: Stop and turn the paper whenever your hand feels cramped.
Step 5: Outline the backboard and the red square
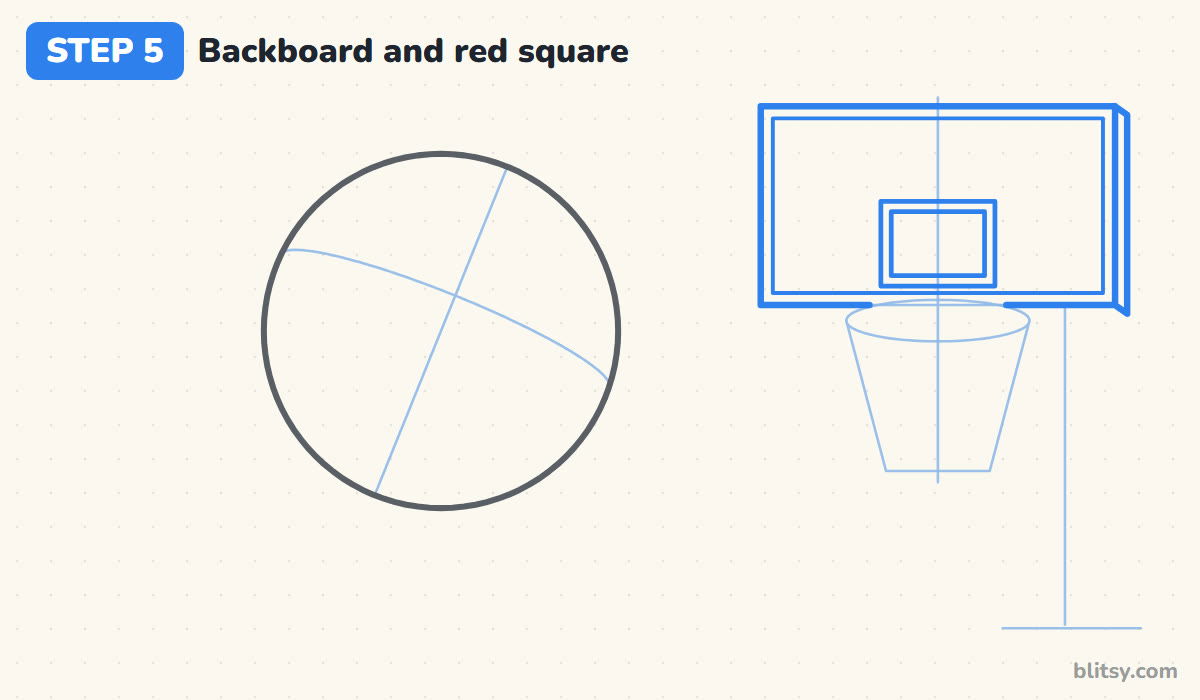
Trace the rectangle, then draw a second one just inside it to make a thin frame. Add a narrow side strip on the right edge so the board has some thickness. In the lower middle, draw a small rectangle with another one inside it; the gap between them becomes the red square. Leave the board's bottom edge open where the rim sits in front.
💡 Tip: Use the ruler for every board line; wobbly edges make the board look like paper.
Step 6: Draw the rim and the pole
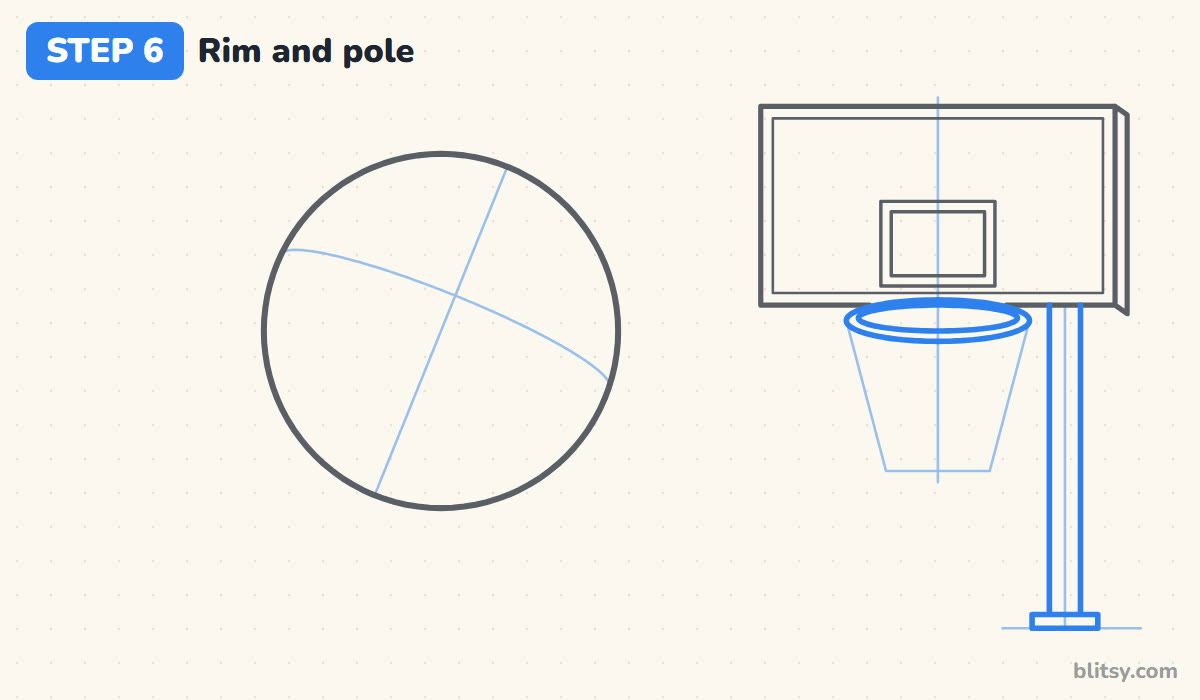
Go over the rim oval, then draw a slightly smaller oval inside it, a touch higher, so the rim looks like a metal ring with thickness. The pole is two straight lines from the bottom of the board down to the ground, with a small flat block at the foot. I keep the pole to the right of the net so the two never tangle.
💡 Tip: Leave the ring a little thicker at the front than at the back, since the front is closer to you.
Step 7: Weave a net that narrows down
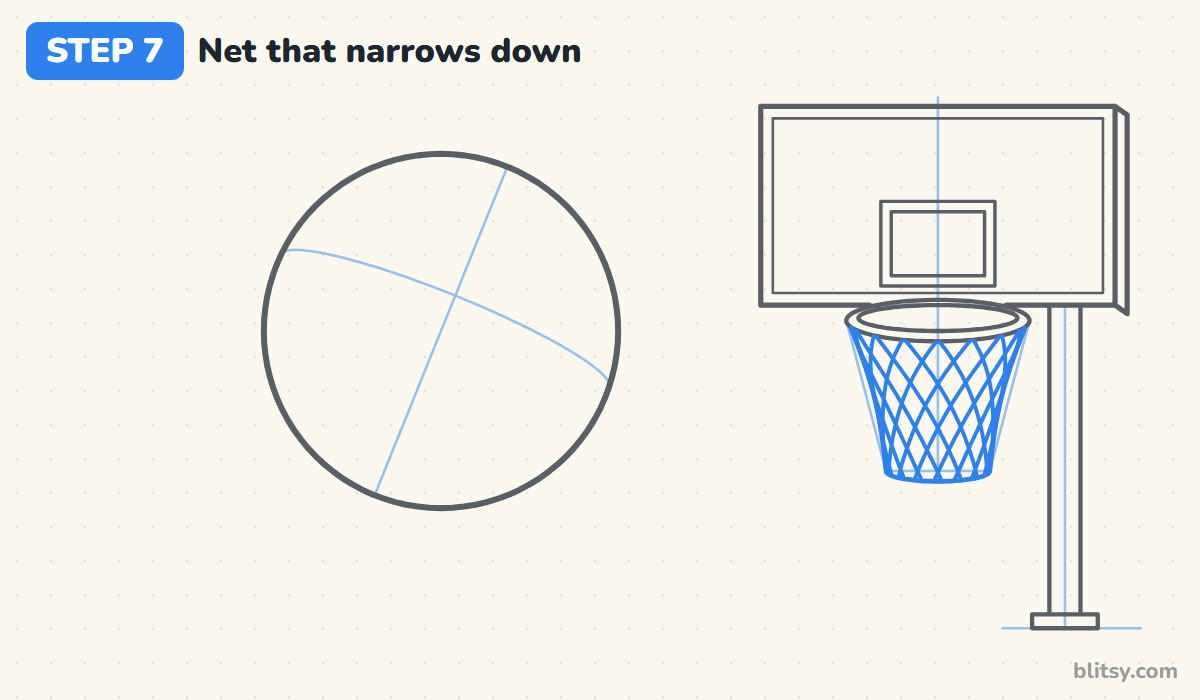
Draw the two sides of the net from the ends of the rim down to a small oval at the bottom. Then fill the middle with slanted lines: one set leaning left, one set leaning right, so they cross and form diamonds. The diamonds get smaller toward the bottom because the net narrows. Ten or so lines each way is enough.



💡 Tip: Draw all the left-leaning lines first, then all the right-leaning ones, so the pattern stays even.
Step 8: Ink the two main seams
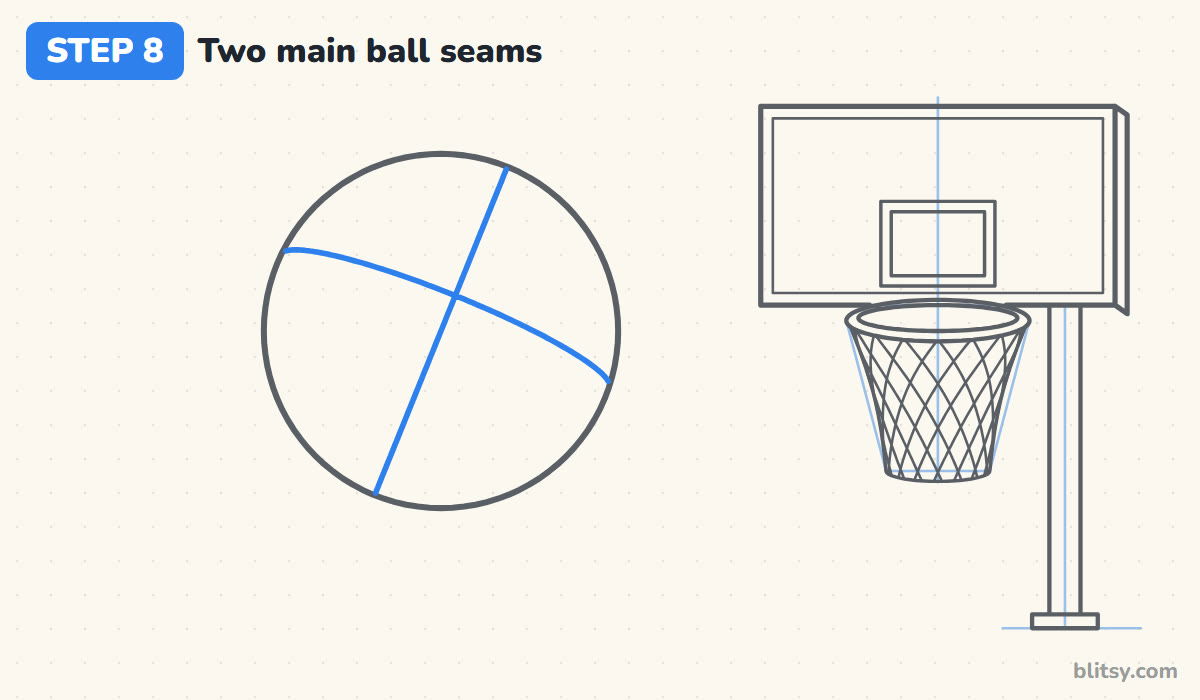
Trace both wrap lines from step 2 with a firm pencil line. Make sure each one runs all the way to the outline at both ends, because a seam that stops short in the middle of the ball looks like a crack. These two seams cut the ball into four parts.
💡 Tip: Let each seam touch the outline exactly; small gaps there show up a lot.
Step 9: Add the curved side seams
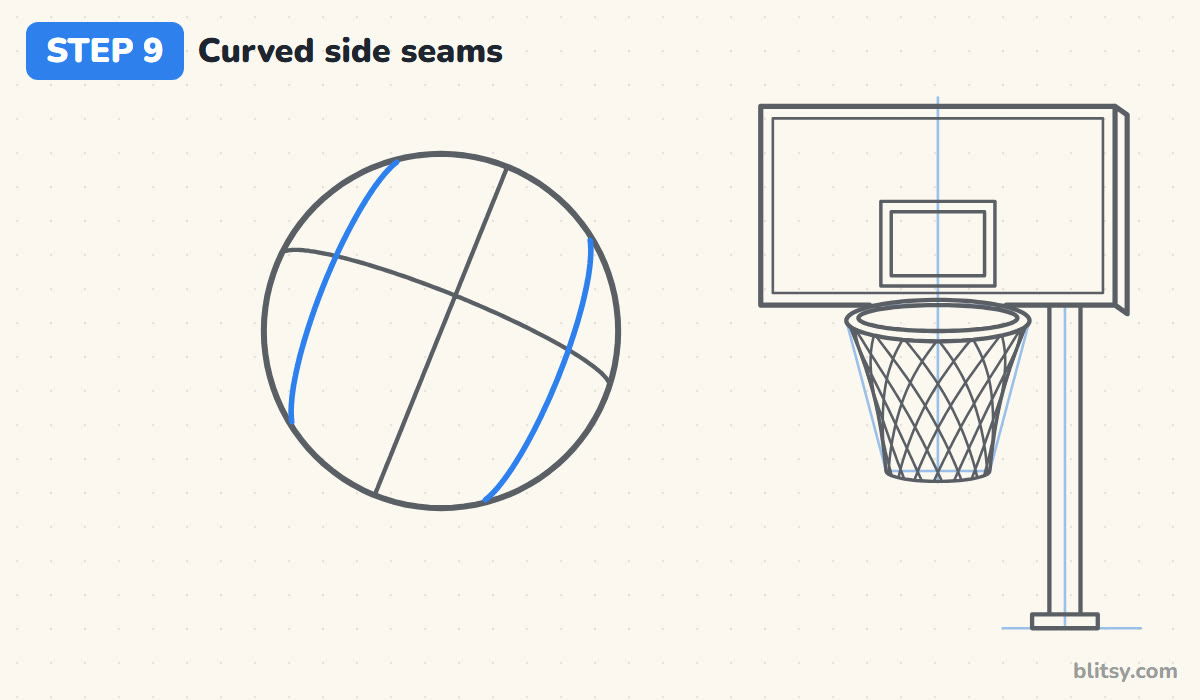
A real basketball has two more seams, one on each side. Draw a curved line on the left part of the ball, running from the top edge to the lower edge and bowing out toward the outline. Mirror it on the right. Both cross the horizontal seam but never touch the vertical one. That outward bend keeps the ball round instead of striped.
💡 Tip: Keep both side seams the same distance from the middle seam.
Step 10: Sketch the motion lines
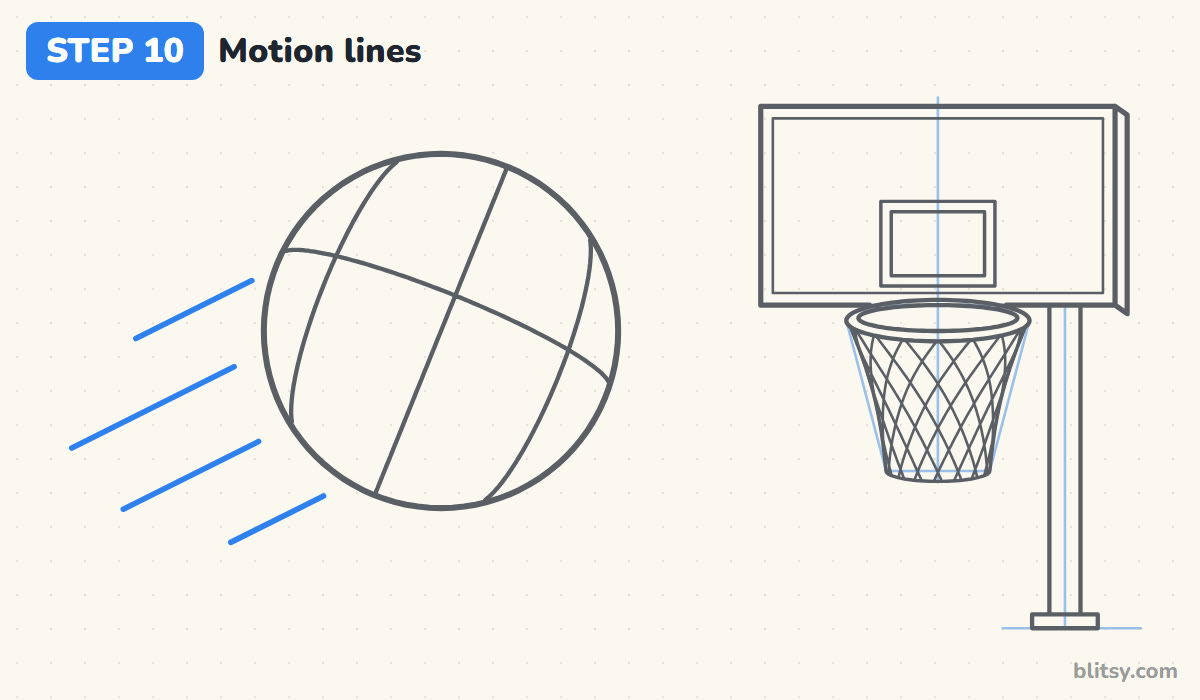
Behind the ball, on its lower left, draw four short straight lines that all point the same way the ball is flying, up toward the hoop. Start each one a little away from the ball and vary their lengths. That small gap matters, since lines that touch the ball look glued on.
💡 Tip: Make the middle motion lines longest and the outer ones shorter.
Step 11: Ink everything and erase the guides
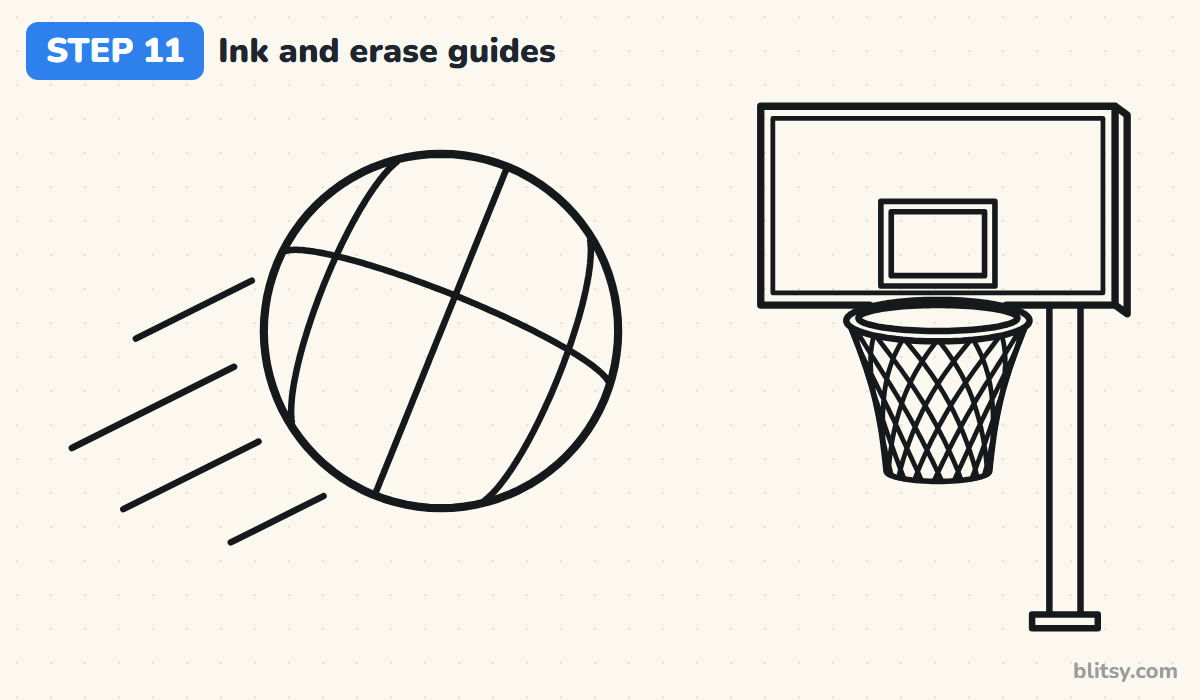
Trace every keeper line with the black pen: the ball, the seams, the board, the square, the rim, the net, the pole and the motion lines. Slow down on the net. Once the ink is dry, erase the guide circle, the cross and the hoop guides.



💡 Tip: Ink the net last, when your hand is warmed up and steady.
Step 12: Color the ball and the hoop
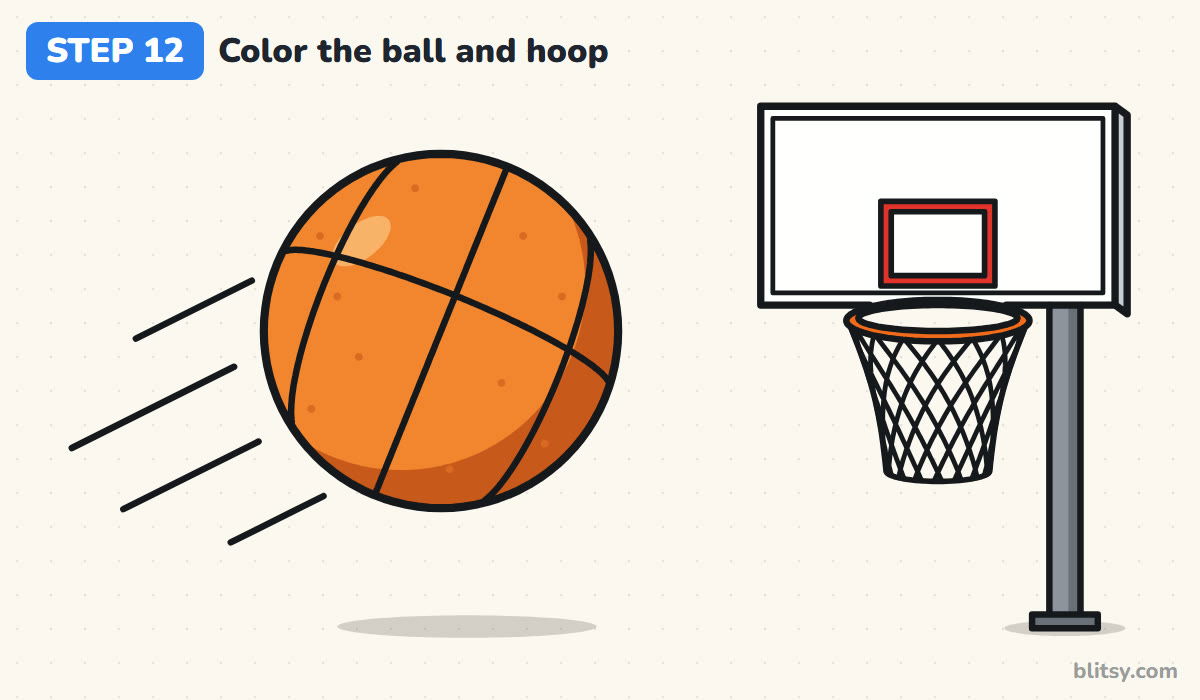
Fill the ball with orange and leave a small light patch near the top left for shine. Add dark orange along the lower right edge to make it round. Color the square red and the rim a bright orange, then the pole gray with a darker stripe on one side. I leave the backboard and the net white, plus a soft shadow on the ground under the ball.
💡 Tip: Color the ball in curved strokes that follow its outline, and it looks rounder.
Why a Basketball Sketch Can Look Flat
- Seams drawn as a straight plus sign. A flat cross makes the ball look like a sliced pie. Tilt the cross and let both lines bend a little.
- Side seams that bow inward. On a round ball the side seams bulge out toward the edge. Turned the other way, they look like a beach ball.
- A rim as wide as the backboard. The rim sits under the square and is only about half the board's width.
- A net shaped like a box. Real nets narrow toward the bottom. Make the bottom oval clearly smaller than the rim.
- Motion lines touching the ball. Leave a small gap so they read as air rushing past.
Fresh Spins on Your Hoop Scene
Once the ball clicks, I like dropping it right into the net, with the motion lines curving down from above. You could also swap the pole for a brick wall, add a player's hands, or color the ball in your team's colors. If you're filling a sports page, the baseball bat drawing tutorial is a good next step, and a pair of high-tops from the shoe drawing tutorial fits nicely on the court.
Basketball Coloring Page and Printable Hoop Guide
The basketball coloring page has the ball, the hoop and the net in thick outlines, with a colored example and a color key at the top so kids can match the shades. The step-by-step guide PDF holds all 12 steps with their tips, and it prints on Letter or A4 paper.
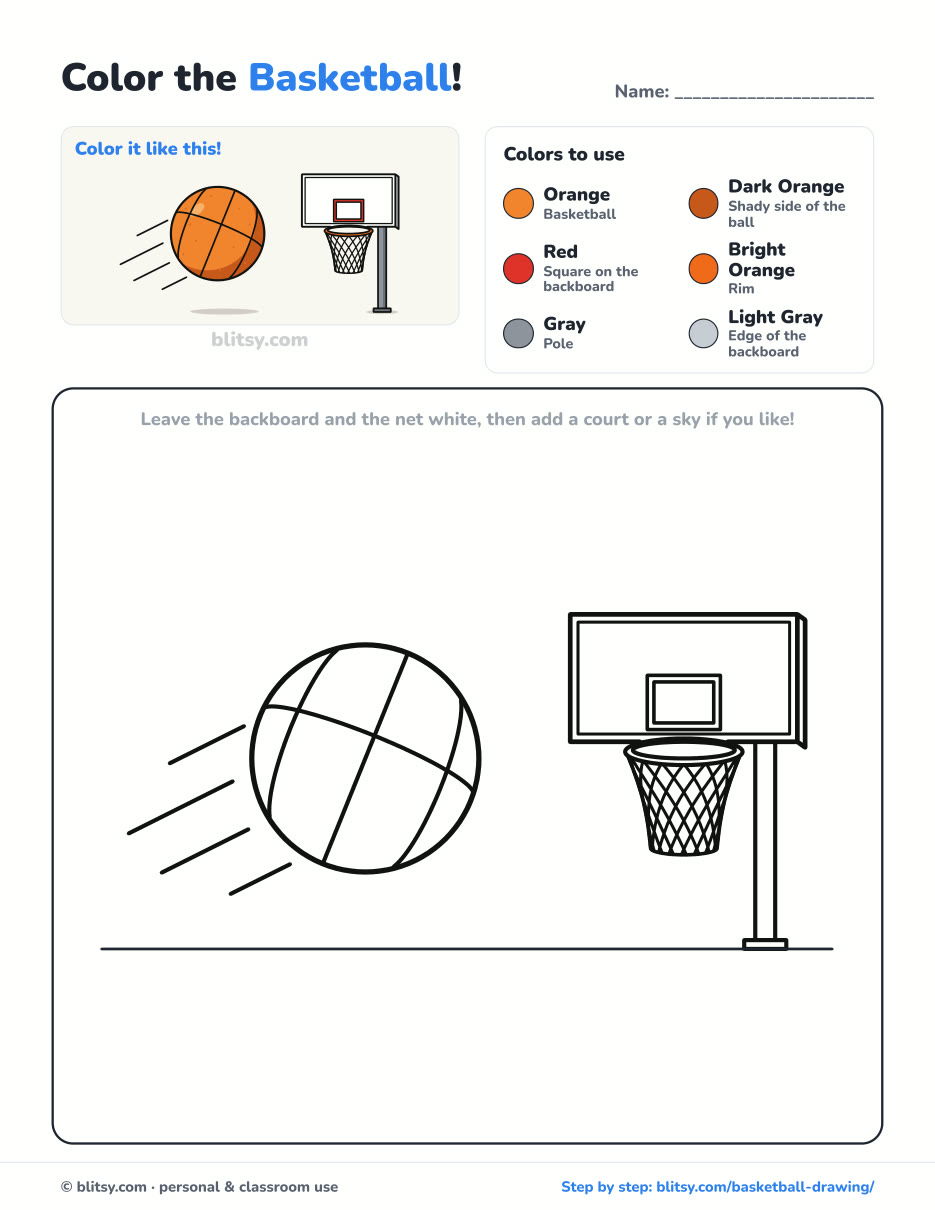
Black outlines with a colored example and the color names at the top. Ready to print and color.
⬇️ Download Coloring PageEvery step picture with its instructions and tips, to keep beside your paper while you draw.
⬇️ Download Drawing Guide📱 On a phone? Tap a download button, then open the file and choose Share → Save to Files or Print. On a computer, the PDF opens or saves straight to your Downloads folder.
Keep the Basketball Steps on Pinterest
Nothing but Net? Keep Drawing With These Lessons
Each link below is a full step-by-step tutorial, so you can choose a subject and work through it from the first line.
- Light Bulb Drawing: A glowing bulb with rays and sparkles takes 11 calm steps in the light bulb drawing tutorial.
- Realistic Drawing: Shade a round apple the way you shaded the ball, but with five kinds of light, in this realistic drawing tutorial.
- School Drawing: Learn how to draw a school step by step, bell tower, clock and picket fence included.
- Snowman Drawing: Draw a snowman with his hat on and scarf flying using the easy snowman drawing tutorial.
- Mountain Drawing: Three peaks, one lake and six pines make the mountain landscape drawing tutorial.
- Flame Drawing: A crackling campfire and a single flame icon share the same S-curve in the flames drawing step by step lesson.
- Money Drawing: Play bills, a full sack and a small coin tower come together in this money drawing tutorial.
- Wave Drawing: Draw a deep blue curling wave with claw-shaped foam using how to draw a wave.
- Mandala Drawing: Six rings and eight repeats grow from a single dot in the beginner mandala drawing tutorial.
- Halloween Drawing: A haunted house with a witch-hat tower and a grinning pumpkin is the goal of the Halloween drawing step by step guide.
Ball and Hoop Questions From Beginners
What is the easiest way to draw a basketball?
Draw a circle, then a slightly tilted cross through it, then one curved line on each side that bows toward the edge. That gives you the classic seam pattern in four lines.
How many lines are on a basketball?
You usually see four seams: one running up and down, one running across, and one curved seam on each side.
How do you draw a basketball net?
Draw the two sides narrowing from the rim to a smaller oval, then fill the space with slanted lines going both ways so they cross into diamonds.
Can young kids draw this basketball?
Yes. Kids around 6 can manage the ball and its seams. The net has many small lines, so younger artists can draw just the rim and a few lines hanging down.
Grab that pencil, draw your circle and take the shot. Your first ball might bounce off the rim, and the second one usually swishes. 🏀✏️
Related posts:
 How to Draw a Baseball Bat Step by Step (With Ball and Glove)
 How to Draw a Princess Step by Step (Easy Ball Gown Cartoon)
 How to Draw a Whale Step by Step (Easy for Beginners)
 How to Draw Lungs Step by Step (Easy Science Diagram)
 How to Draw a Pineapple Step by Step (Easy Crown and Slice)
 How to Draw Iron Man Step by Step (Easy Chibi for Kids)
 How to Draw a Dress Step by Step (Easy Party Dress)
 How to Draw a Chicken Step by Step (Easy for Beginners)
 How to Draw a UFO Step by Step (Cute Alien Saucer)
 How to Draw a Volcano Step by Step (Easy Erupting Volcano)
 How to Draw a Crow Step by Step (Easy for Beginners)
 How to Draw a Tiger Step by Step (Easy Walking Pose)

