
Eight planets sounds like a lot to fit on one sheet of paper. The trick is that every planet starts as a plain circle, and the Sun only needs half of one. Below you'll learn how to draw the solar system step by step, with the planets lined up in their real order and a few simple marks that make each one easy to recognize. It works for a science poster or simply a space picture for your wall.
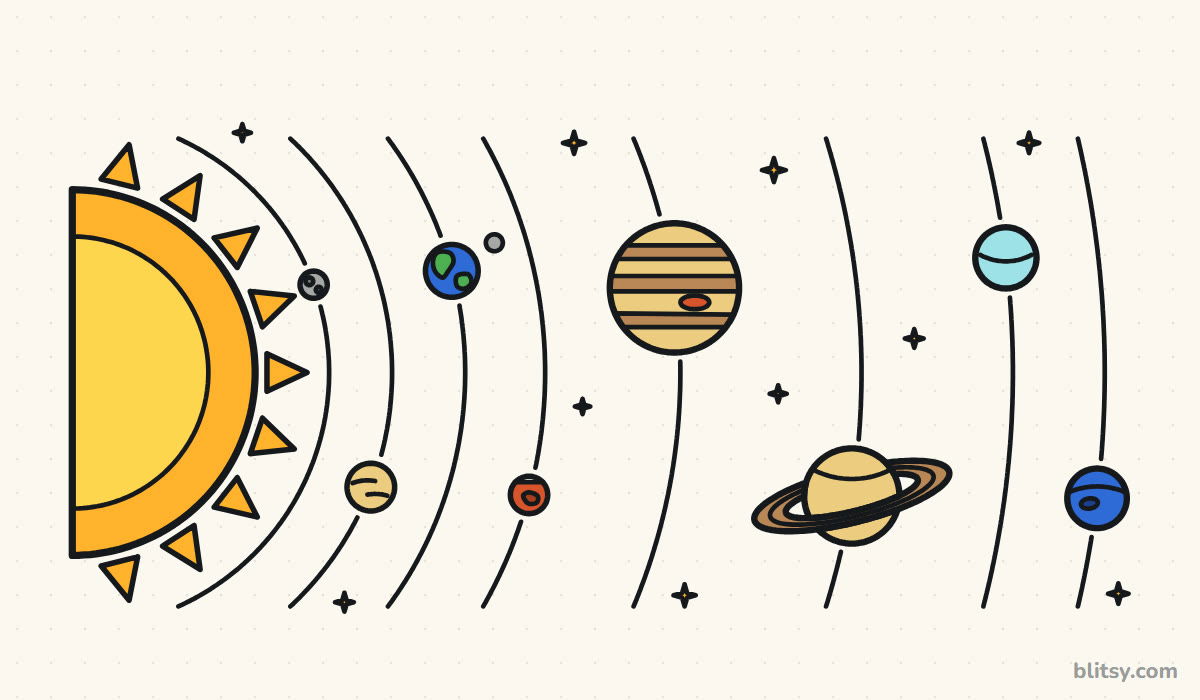
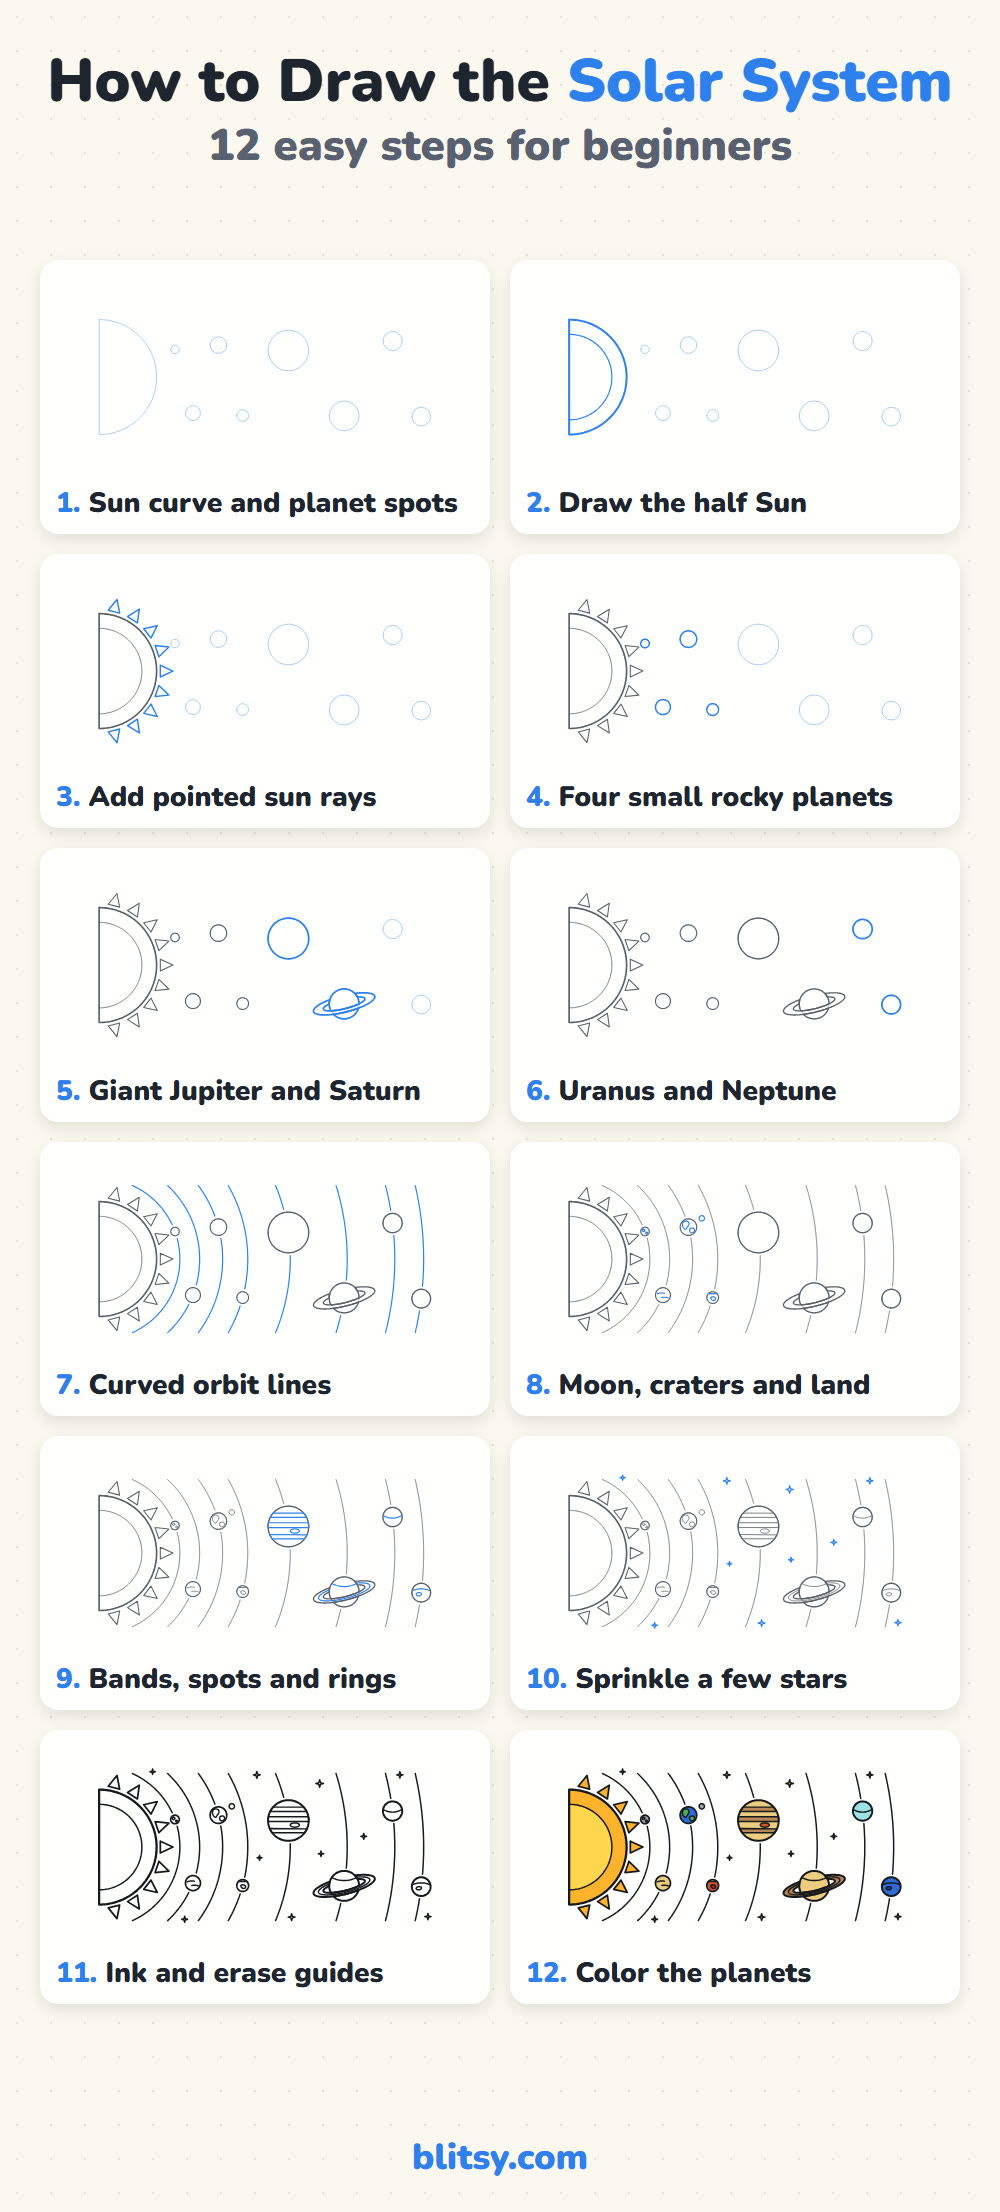
Every step picture paints the new part in blue. Gray lines are what you already drew, so you can line the new shape up against them.
Quick overview
⏱️ Time: about 40 minutes, plus 20 for coloring
🎯 Level: beginner, fine for ages 8 and up
✏️ Steps: 12
🪐 You'll draw: the Sun, eight planets, the Moon, orbit lines and stars
Gear for Your Space Diagram
- A pencil with a light touch for the first circles
- An eraser that doesn't smudge
- A black fineliner or thin marker
- Colored pencils: yellow orange, gray, light gold, tan, blue, green, red orange and light blue
- A wide sheet of paper turned sideways
- Coins, bottle caps or a circle stencil for the round planets
If you only have a basic box of colored pencils, it will still cover all eight planets.
How to Draw the Solar System Step by Step
Step 1: Mark the Sun and the planet spots
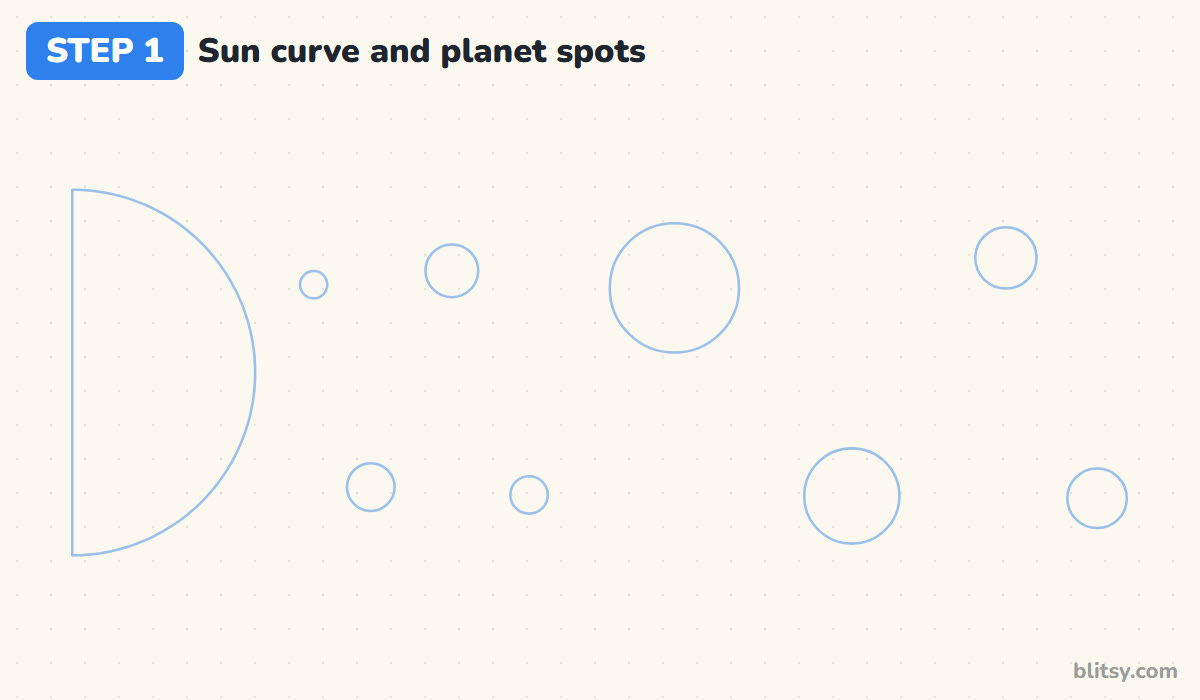
Turn your paper sideways. On the left edge, draw a big half circle that takes up about two thirds of the page height. Then sketch eight faint circles moving to the right, zigzagging a little up and down. Mercury is the tiniest, Jupiter the biggest, Saturn next, then Uranus and Neptune about the same. Keep these light, since you'll erase them later.
💡 Tip: Plan the spacing first: leave the most room between Mars and Jupiter.
Step 2: Draw the half Sun
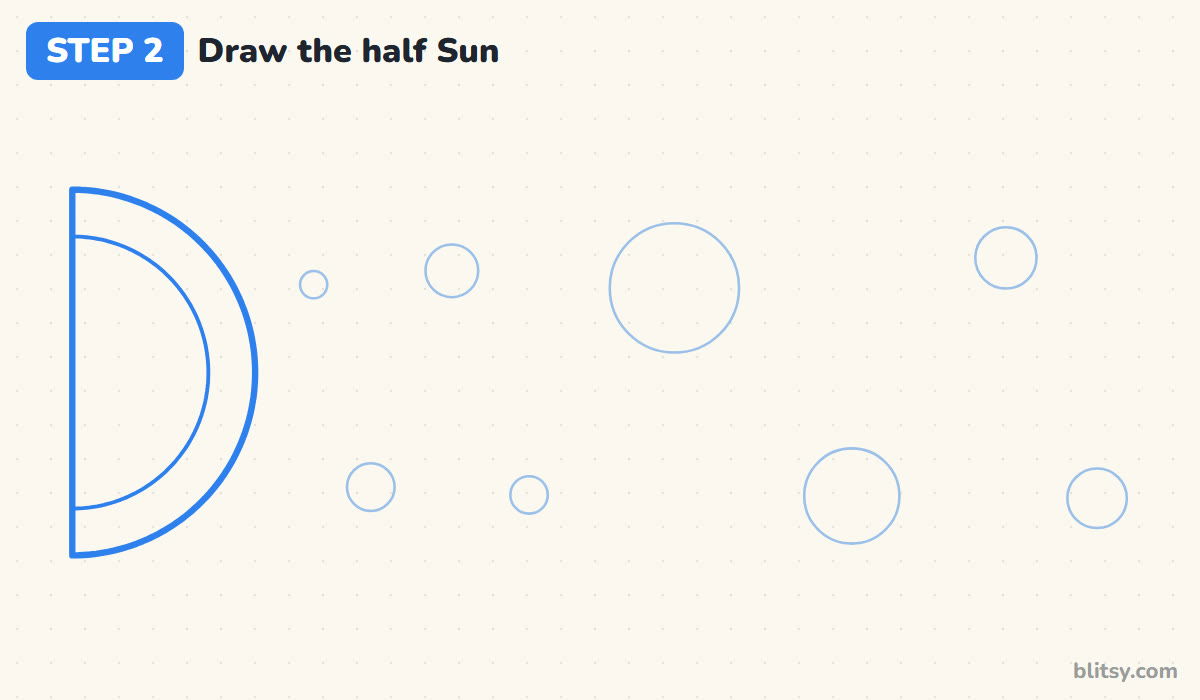
Trace the big half circle with a firm line and close it with a straight edge on the left of the page. Inside it, draw a second, smaller curve about three quarters of the way out. That inner curve lets you color the middle a paler yellow later, so the Sun looks like it glows. I draw only half the Sun, because a whole one would push the planets off the page.
💡 Tip: Pull curves toward your body. Turning the paper a little helps more than twisting your wrist.
Step 3: Add pointed sun rays
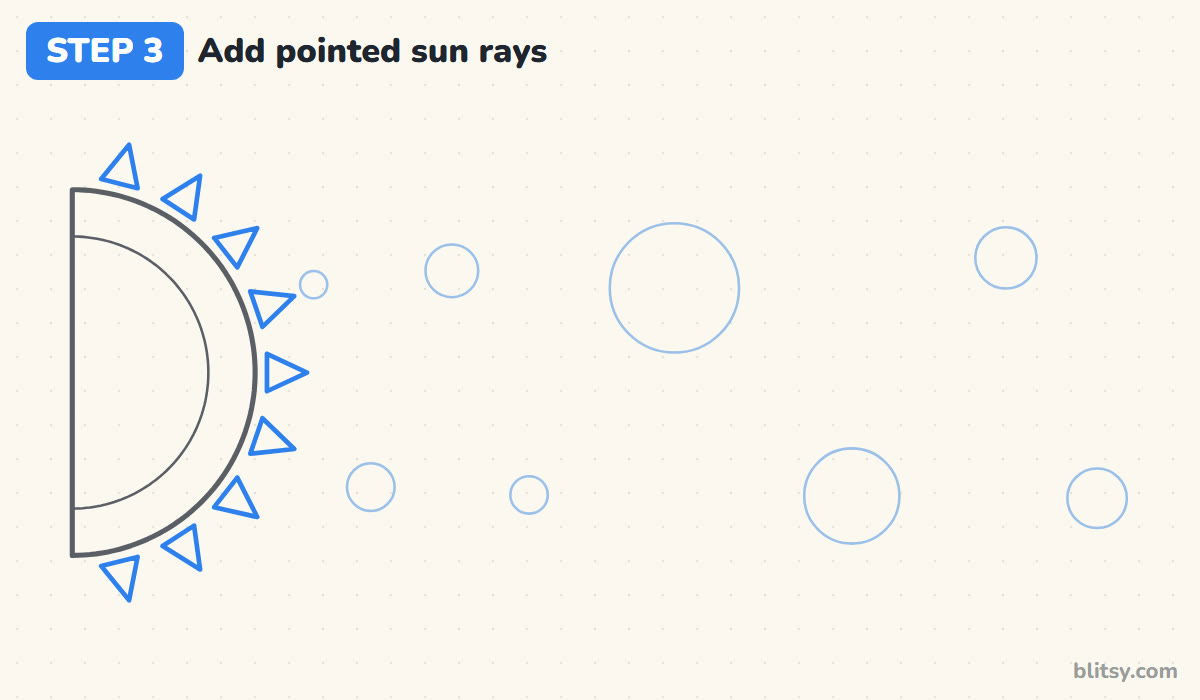
Around the outside of the Sun, draw nine small triangles that point outward like spikes on a crown. Leave a small gap between each triangle and the Sun's edge. Space them evenly. Small rays work better than long ones here, since long rays would crash into Mercury's path.



💡 Tip: Draw the middle ray first, then one at the top and one at the bottom, then fill in between.
Step 4: Draw the four rocky planets
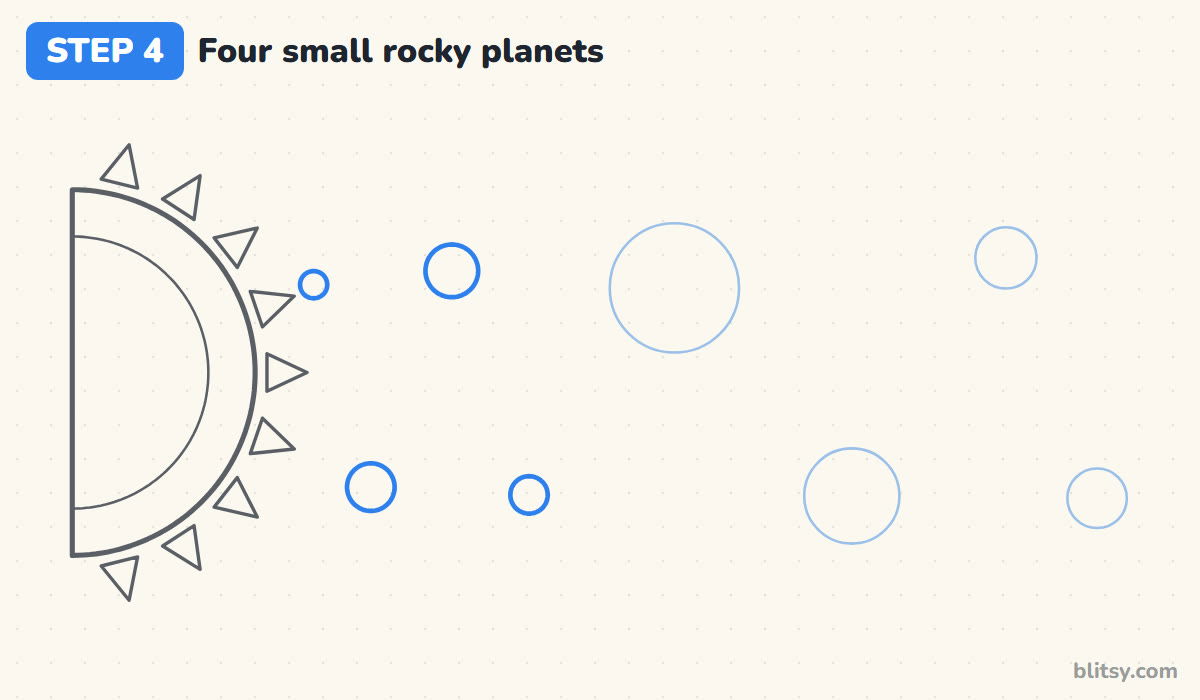
Go over the first four guide circles with a clean line. These are the small rocky planets closest to the Sun: Mercury and Venus first, then Earth and Mars. Most beginners draw them all the same size, but they aren't. Make Earth a touch bigger than Venus, Mars clearly smaller than Earth, and Mercury the smallest of the eight.
💡 Tip: Trace a small coin for Earth, then judge the others against it by eye.
Step 5: Draw Jupiter and ringed Saturn
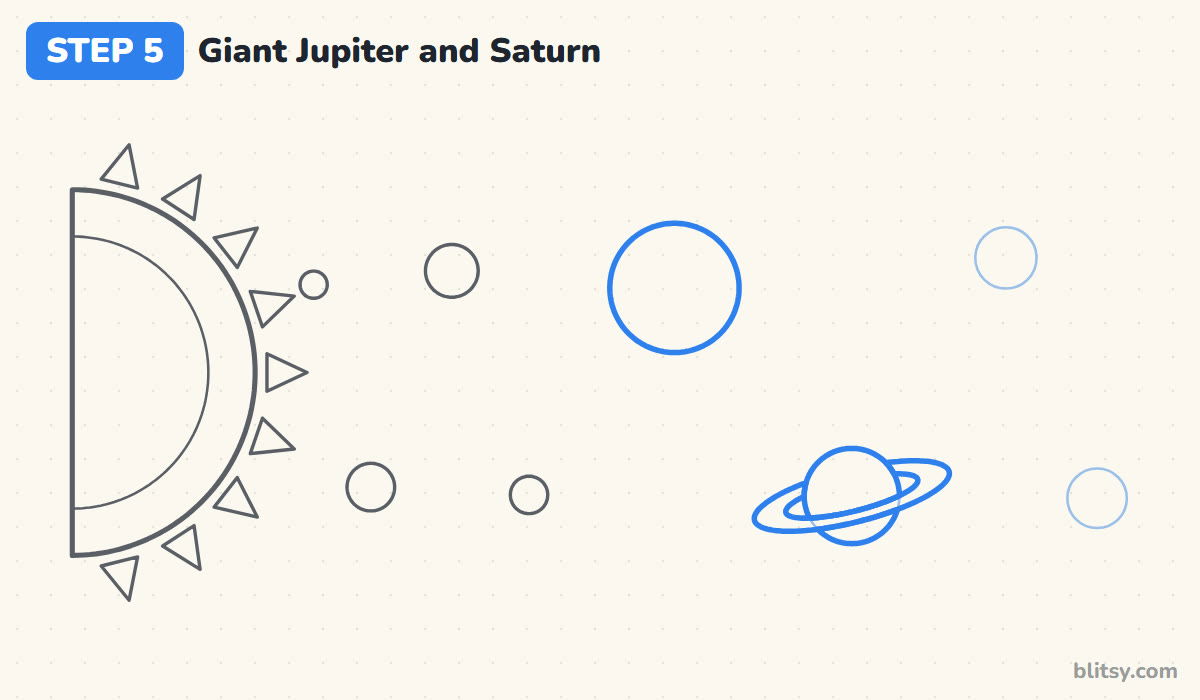
Jupiter is the biggest planet, so give it the largest circle, a bit above the middle line. Saturn sits lower and to the right. Draw its round body first, then a long tilted oval ring around it with a second oval inside. Here's the part that confuses people: erase the ring where it passes behind the top of the planet, and let the front of the ring cross over the bottom.
💡 Tip: The ring should be roughly twice as wide as Saturn itself. Narrower looks like a hat brim.
Step 6: Add Uranus and Neptune
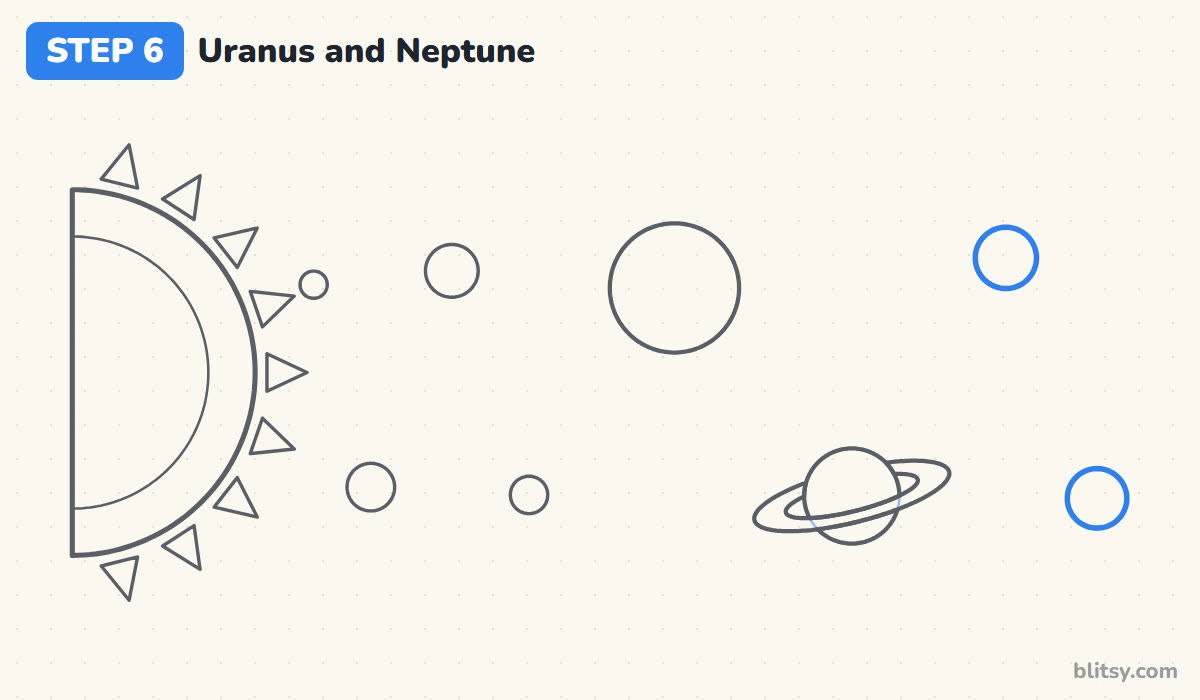
The last two planets are ice giants. They're smaller than Saturn but much bigger than Earth, and close to each other in size. Put Uranus high and Neptune low near the right edge, so the zigzag keeps going. Neptune is the farthest planet, so it gets the last spot.
💡 Tip: Leave at least a finger's width between Neptune and the paper's edge.
Step 7: Draw the curved orbit lines
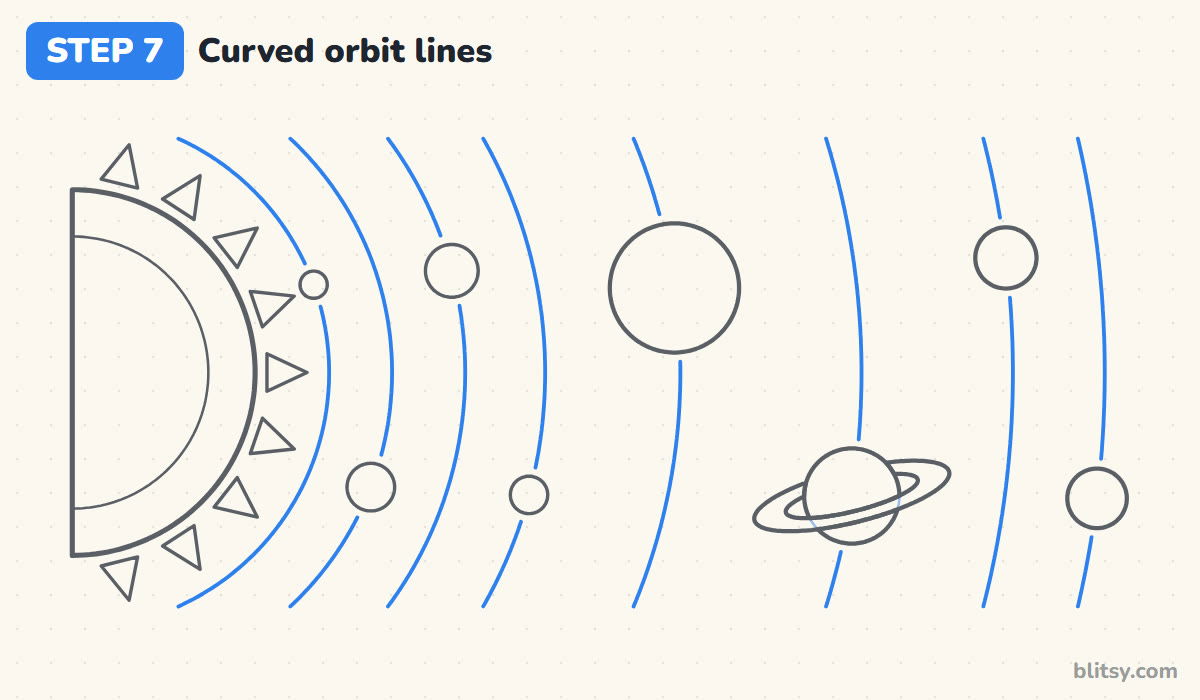
Now draw a long curve through each planet, every curve bending around the Sun like ripples in a pond. Each line is that planet's orbit, the path it travels around the Sun. Stop the line just before it touches a planet and start it again on the other side. I find that tiny gap keeps the planets easy to read after inking.




💡 Tip: Draw each orbit in two or three short strokes rather than one long one.
Step 8: Add the Moon and surface marks
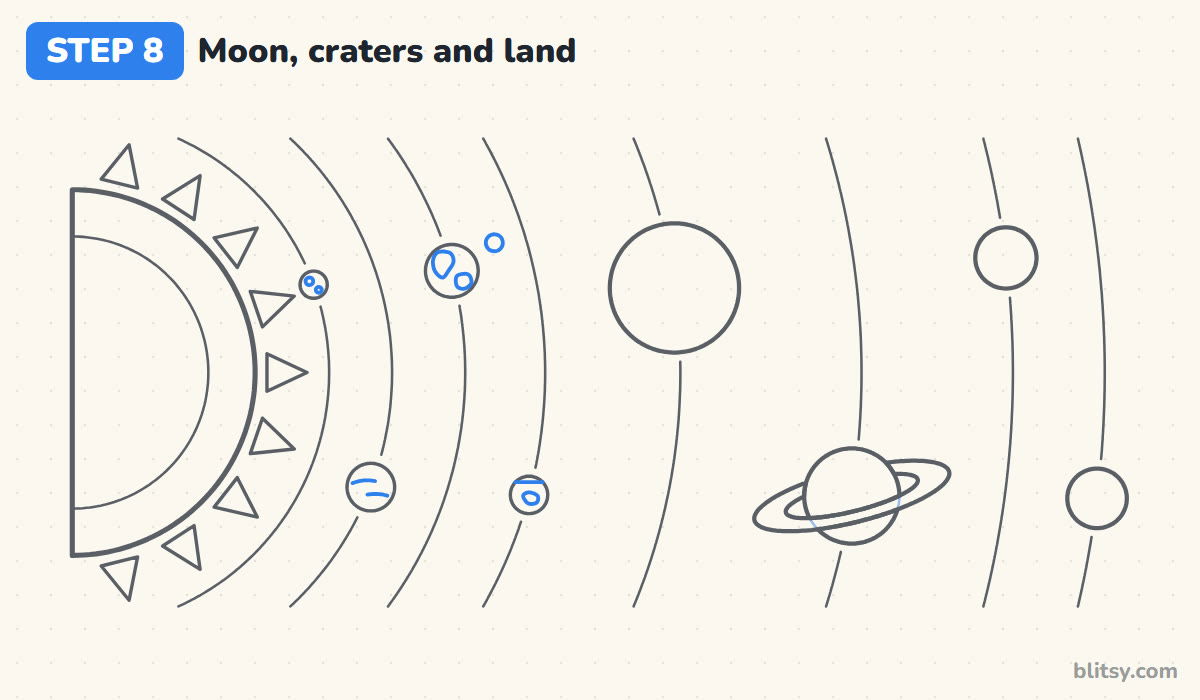
Up and to the right of Earth, draw a small circle for the Moon. Give Mercury two little crater circles. Inside Earth, sketch two rounded blobs for land. Venus is wrapped in thick clouds, so two short curved lines are enough. On Mars, draw a line across the top for its white polar ice cap and one dark patch.
💡 Tip: On tiny planets, fewer details look neater. Two craters beat ten.
Step 9: Mark the giant planets
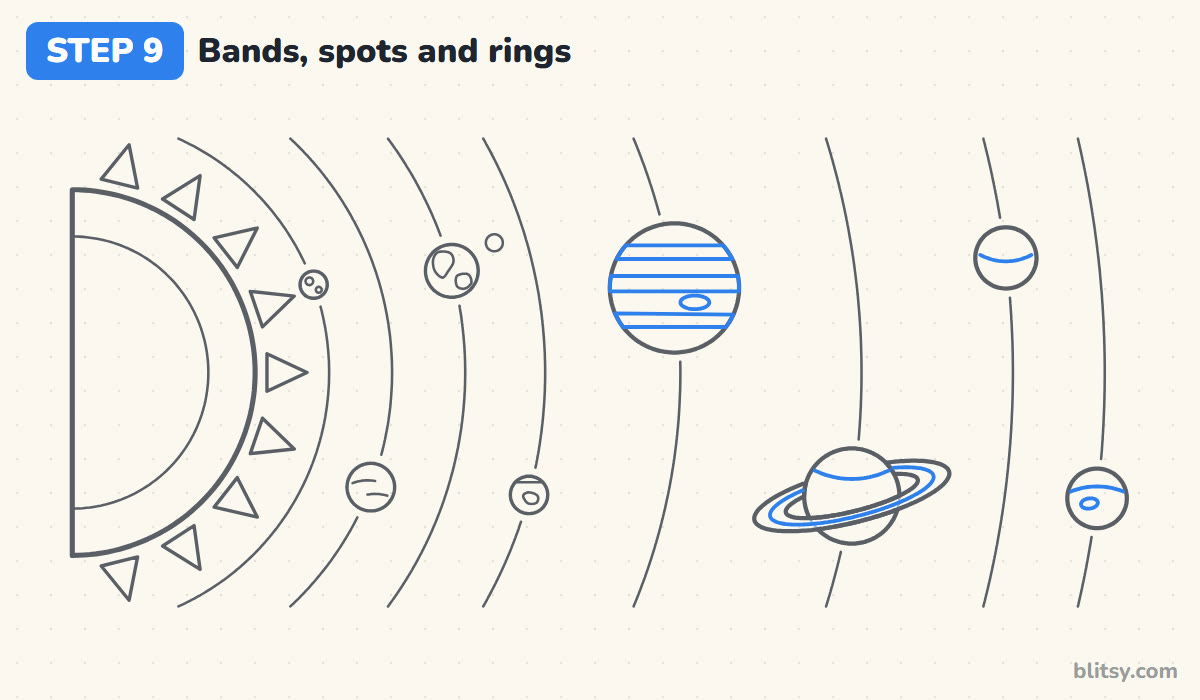
Across Jupiter, draw three pairs of straight lines for its cloud bands, then a small oval between two bands for the Great Red Spot, a giant storm. Add a thin line along the middle of Saturn's ring. Give Saturn and Uranus each one soft curved band. On Neptune, add a light streak and a small dark storm spot.
💡 Tip: Keep Jupiter's bands parallel. Wavy stripes make the planet look bumpy.
Step 10: Sprinkle a few stars
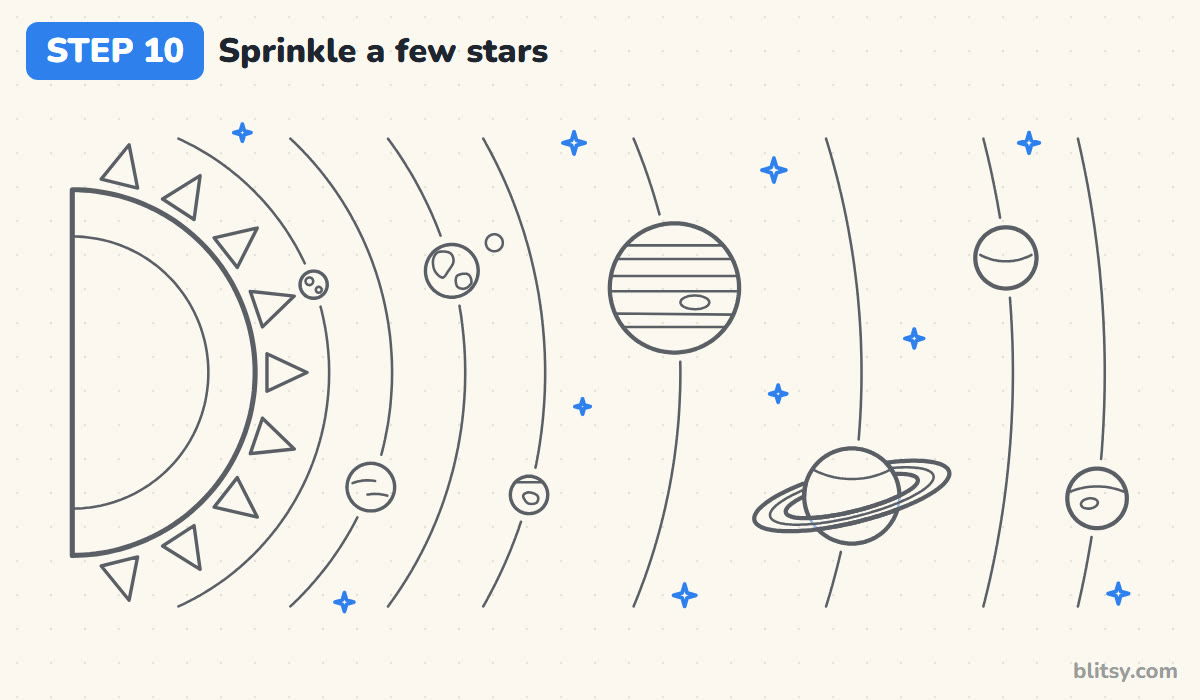
Fill some of the empty space with small four-pointed sparkles. Ten is plenty. Put them in the gaps between orbits and above and below the planets, never touching a line. Real stars sit far outside the solar system, so here they're only decoration.
💡 Tip: Vary the star sizes a little. Identical stars in a grid look like wallpaper.
Step 11: Ink the lines and erase the guides
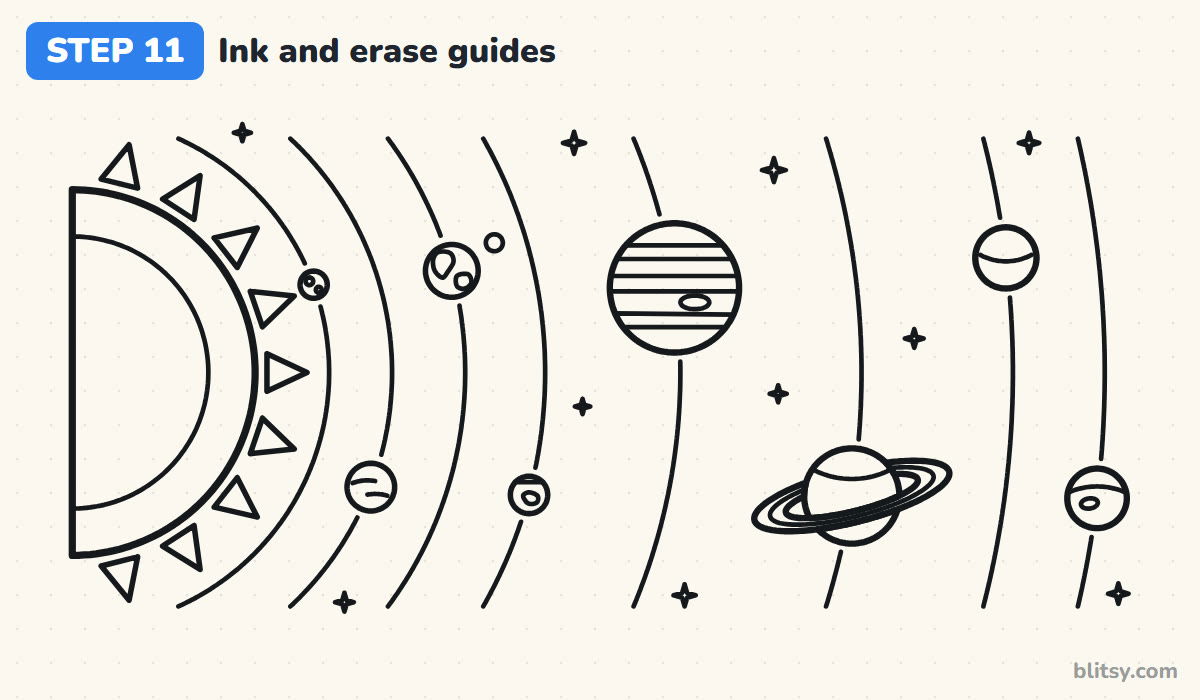
Trace every keeper line with your fineliner. I start with the Sun and the big planets while my hand is fresh, then the orbits, then the small details and stars last. Let the ink dry for a minute. Then erase the faint guide circles.



💡 Tip: Rotate the page as you ink the orbits so your hand never smears wet lines.
Step 12: Color the planets
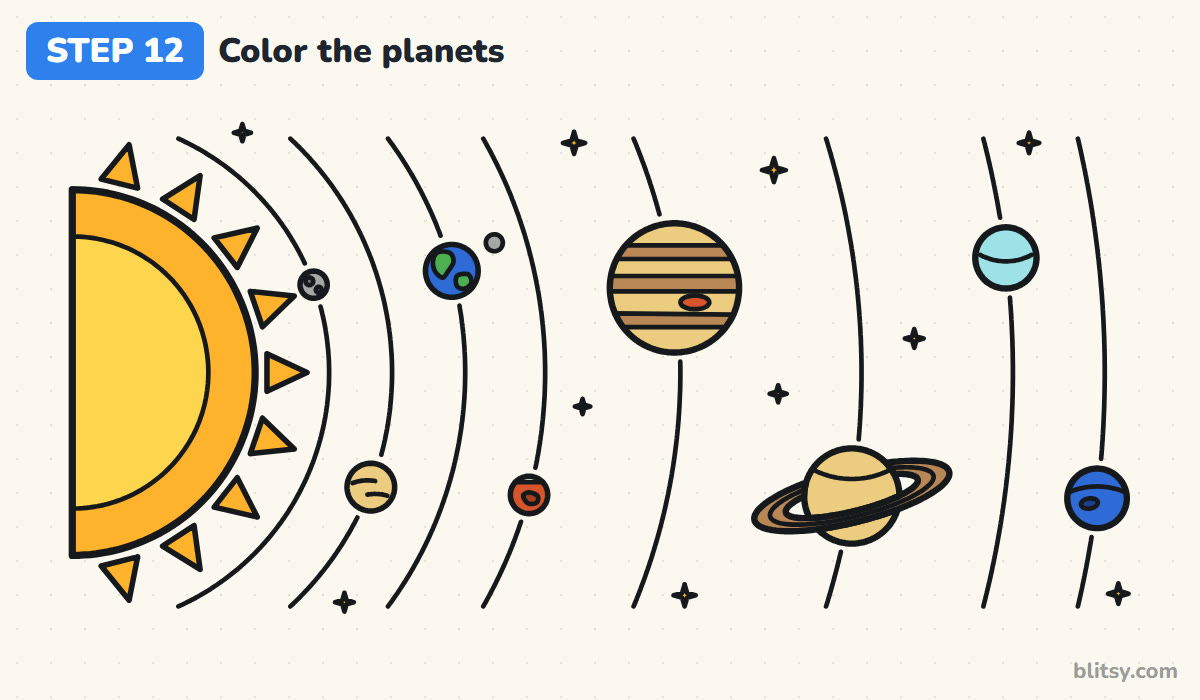
Use yellow orange for the Sun and its rays, plus the stars, with paler yellow in the middle. Make Mercury and the Moon gray. Venus takes light gold, and so do Jupiter and Saturn, with tan for Jupiter's bands and Saturn's rings. Earth gets blue oceans and green land. Color Mars and the red spot red orange, Uranus light blue and Neptune a deep blue.
💡 Tip: Leave the space white, or color it dark blue after the planets are done.
Solar System Slip-Ups Teachers Notice
- Planets in the wrong order. The order from the Sun is Mercury, Venus, Earth, Mars, Jupiter, Saturn, Uranus, Neptune. Say "My Very Educated Mother Just Served Us Noodles" and check each planet against it.
- Every planet the same size. Equal circles hide the most interesting fact about the planets. Make Jupiter clearly the largest and Mercury the smallest.
- Adding Pluto as the ninth planet. Pluto is now called a dwarf planet. If your project wants it, draw it small, past Neptune, and label it as a dwarf planet.
- A Saturn ring that floats on top. If the whole ring sits over the planet, Saturn looks flat. Hide the back part of the ring behind the top of the planet.
- Orbits that cross each other. Each path should sit outside the one before it.
Turn the Planets Into a Class Project
For a labeled poster, write each planet's name above or below it and draw a short line to the planet. You could also add an asteroid belt as a band of tiny dots between Mars and Jupiter, a comet with a long tail, or faint rings around Uranus. A straight row of planets instead of a zigzag fits a long strip of paper well. If one planet is your favorite, zoom in on our home with the Earth drawing tutorial, or send a ship out to visit the planets using the rocket drawing step by step lesson.
Solar System Coloring Page and Step Guide PDF
Want a version you can hand out in class? The solar system coloring page shows a small colored example and a color key at the top, with a large outline of the Sun and all eight planets below. The step-by-step PDF guide has the 12 steps with their tips. Both print on Letter or A4 paper.
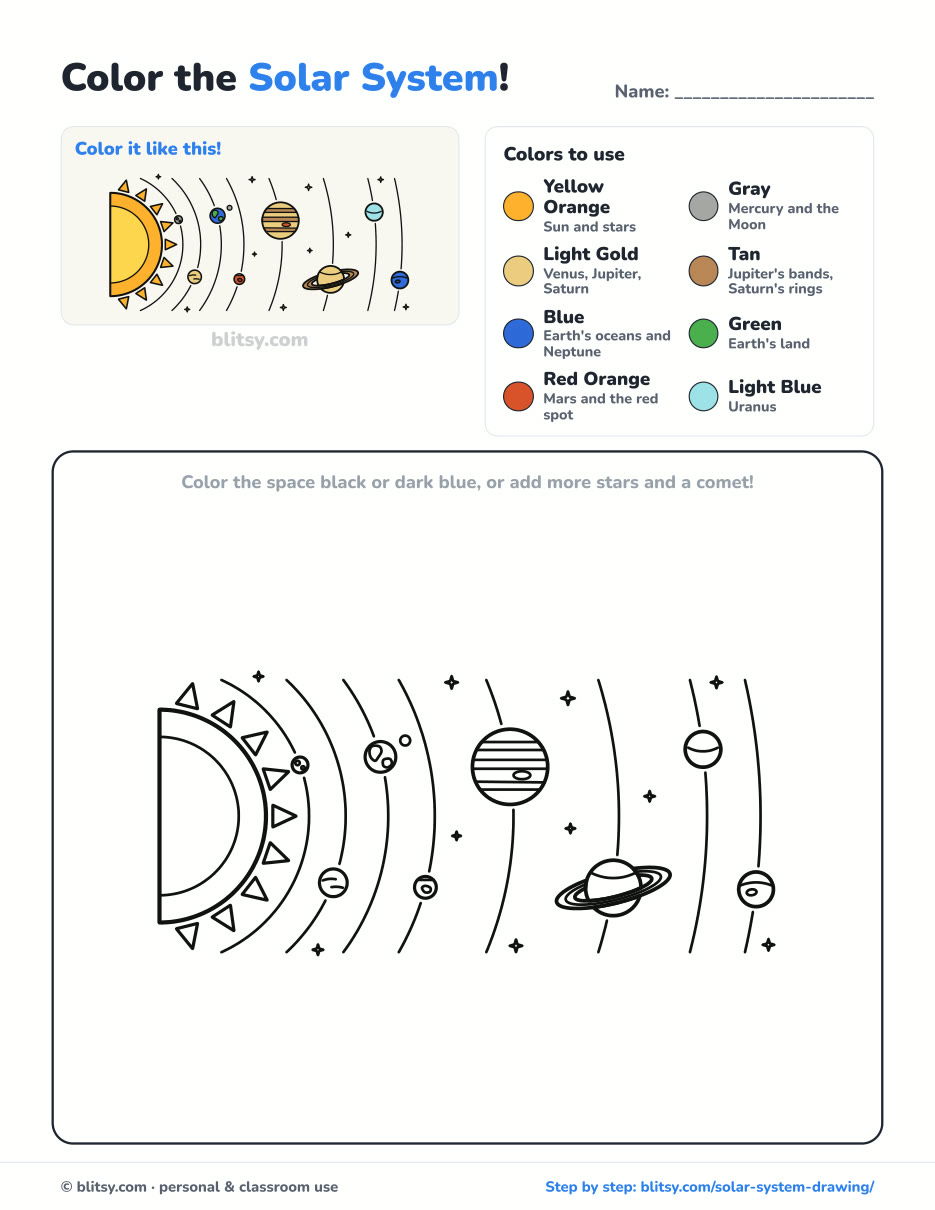
Black outlines with a colored example and the color names at the top. Ready to print and color.
⬇️ Download Coloring PageEvery step picture with its instructions and tips, to keep beside your paper while you draw.
⬇️ Download Drawing Guide📱 On a phone? Tap a download button, then open the file and choose Share → Save to Files or Print. On a computer, the PDF opens or saves straight to your Downloads folder.
Pin the Planet Steps for Science Week
Planets Done? More Step-by-Step Projects
Each link opens a step-by-step tutorial with numbered pictures, good for school projects and rainy afternoons alike.
- Room Drawing: Set up one vanishing point and draw a whole bedroom with this room drawing tutorial in one-point perspective.
- Summer Drawing: The summer drawing step by step lesson packs an umbrella, a beach ball and a sandcastle onto one sunny beach.
- Halloween Drawing: Draw a friendly haunted house under a full moon, bats and pumpkin included, in this Halloween drawing tutorial.
- Realistic Drawing: Like the Sun lighting each planet, one lamp lights a shiny apple in the realistic drawing step by step guide.
- Diamond Drawing: Learn how to draw a diamond from one trapezoid and one V, with two smaller gems beside it.
- Volcano Drawing: An island volcano erupts with lava rivers and an ash cloud in this volcano drawing tutorial.
- School Drawing: The school drawing step by step lesson builds a brick schoolhouse with a bell tower from three boxes and a triangle.
- Race Car Drawing: Draw a red formula car with the number 7 on its side using the how to draw a race car tutorial.
- Fire Truck Drawing: A long red fire engine with a roof ladder and hose reel waits in the fire truck drawing step by step guide.
- Police Car Drawing: The easy police car drawing tutorial ends with a black-and-white patrol car and a gold star on the door.
Space Project Questions About Drawing Planets
What is the order of the planets from the Sun?
Mercury, Venus, Earth, Mars, Jupiter, Saturn, Uranus and Neptune. The sentence "My Very Educated Mother Just Served Us Noodles" helps you remember it.
Is this solar system drawing to scale?
No. The sizes are simplified so everything fits on one page. In real life the Sun is about 109 times wider than Earth, and the distances between planets are far too large to draw on paper.
What is the easiest way to draw the solar system for kids?
Start with half a Sun on the left and eight circles of different sizes. Younger kids can skip the orbit lines and surface details and just color the planets.
How long does it take to draw the solar system?
Around 40 minutes for the drawing and another 20 to color it. The planet details take the most patience.
Grab a coin for your circles, put the Sun on the left, and see how far out to Neptune your page can stretch. 🪐✏️
Related posts:
 How to Draw Lungs Step by Step (Easy Science Diagram)
 How to Draw a Cell Step by Step (Easy Animal Cell Diagram)
 How to Draw a Whale Step by Step (Easy for Beginners)
 How to Draw a Pineapple Step by Step (Easy Crown and Slice)
 How to Draw Iron Man Step by Step (Easy Chibi for Kids)
 How to Draw a Dress Step by Step (Easy Party Dress)
 How to Draw a Chicken Step by Step (Easy for Beginners)
 How to Draw a Police Car Step by Step (Easy for Kids)
 How to Draw a Volcano Step by Step (Easy Erupting Volcano)
 How to Draw a Crow Step by Step (Easy for Beginners)
 How to Draw a Tiger Step by Step (Easy Walking Pose)
 How to Draw a Heart Step by Step (Even, Symmetric Shape)

