
Rooms look tricky because every wall and floorboard seems to tilt a different way. The secret is that in this view they all tilt toward one dot. In this lesson you'll learn how to draw a room step by step using one-point perspective, and the room I picked is a cosy bedroom with a bed, a desk and chair, a curtained window and a rug. Once the dot does its job, the rest is mostly boxes.
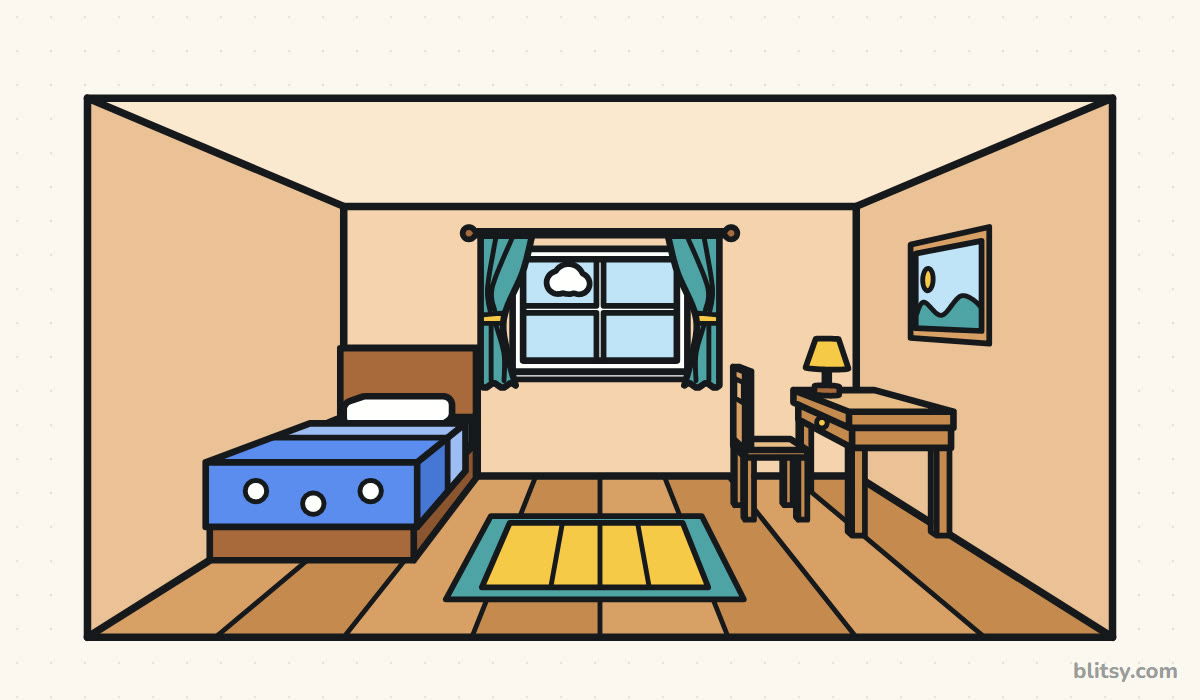
In every step picture the new lines are blue and older ones gray. Light blue lines are construction guides, so keep them faint; you'll erase them near the end.
Quick overview
⏱️ Time: about 40 to 50 minutes with coloring
🎯 Level: easy to medium, good for kids from about 9 and for adult beginners
✏️ Steps: 12
🛏️ You'll draw: a cosy bedroom in one-point perspective with a bed, a desk and chair, a window and a rug
Desk Kit for a Perspective Bedroom
- A pencil you can press very lightly
- A ruler, because almost every line in a room is straight
- A clean eraser for the guide lines
- A black marker or fineliner
- Colored pencils or markers: peach, brown, blue, teal plus yellow
- A sheet of paper turned sideways
You can draw it freehand, but I really do recommend the ruler for this one.
How to Draw a Room Step by Step
Step 1: Draw the frame, the eye level and the vanishing point
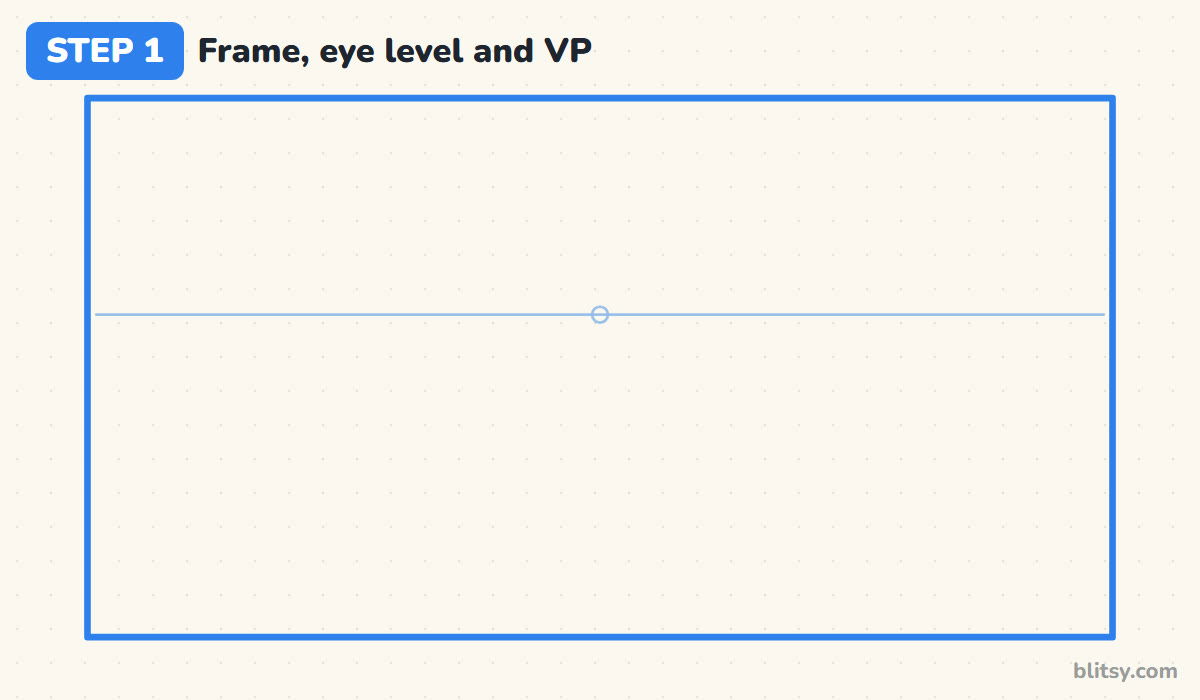
Start with a big rectangle that fills most of the page, the opening you look through into the room. Draw a faint level line a little above the middle for eye level and put a small dot in its center. That dot is the vanishing point, and every depth line will run to it.
💡 Tip: Placing the eye level higher shows more floor. A lower one shows more ceiling.
Step 2: Add the corner lines and the back wall
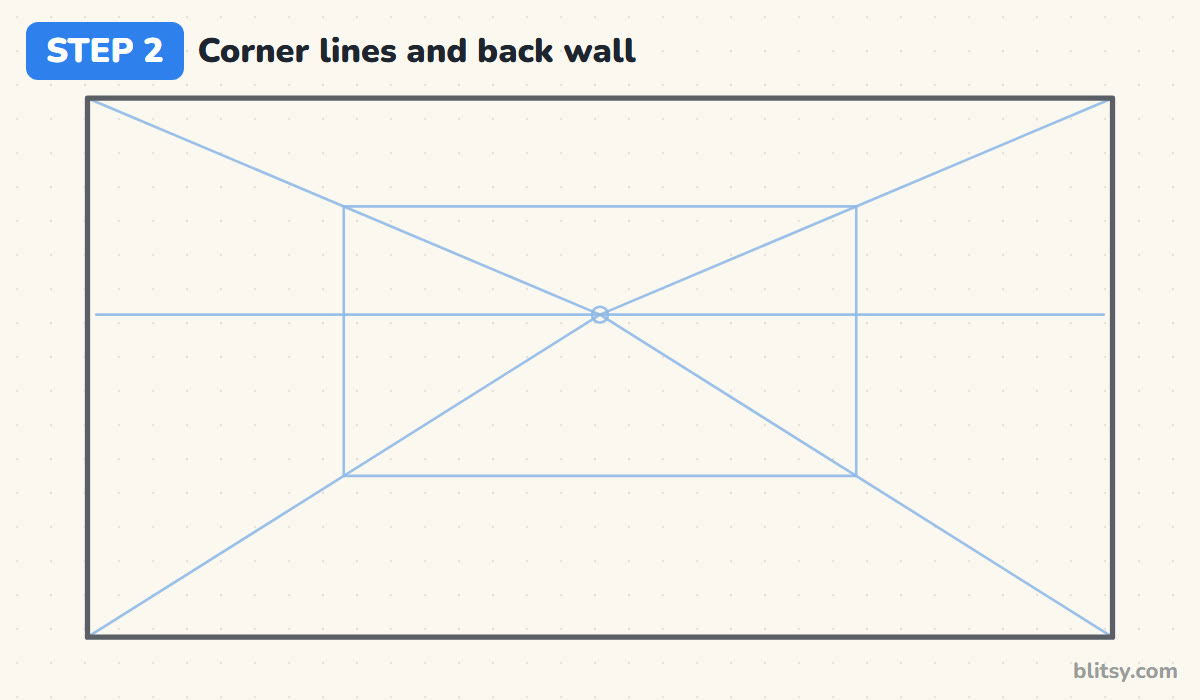
With your ruler, connect each corner of the frame to the vanishing point using light lines. Then draw a smaller rectangle around the dot, its four corners sitting exactly on those diagonals. That's the back wall. I make it about half the width of the frame, since a tiny back wall turns the room into a hallway.
💡 Tip: Check that the back wall's corners touch the diagonal lines, not just come near them.
Step 3: Draw the window and curtains
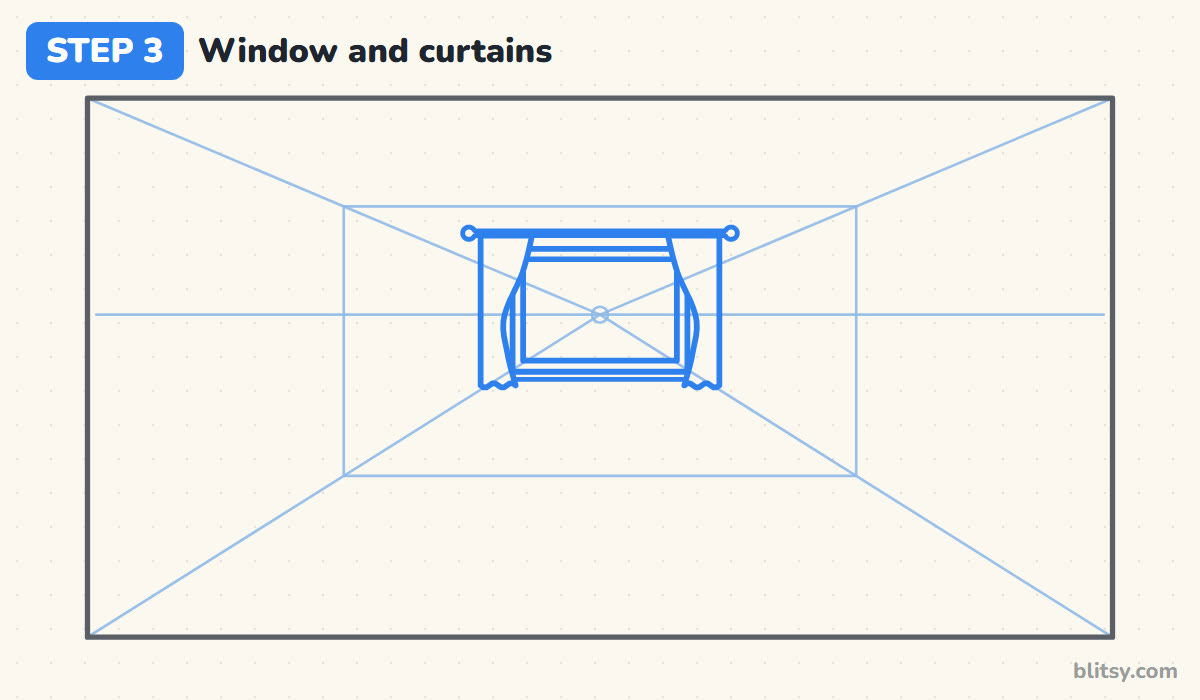
The back wall faces you straight on, so nothing on it needs perspective. Draw the window as a flat rectangle with a thinner one inside for the glass, plus a slim sill. Add the curtain rod above it, then hang a curtain from each side, curving the inner edge where it's tied back.




💡 Tip: Let the curtains overlap the window frame a little. That overlap is what makes them hang in front.
Step 4: Sketch light boxes for the furniture
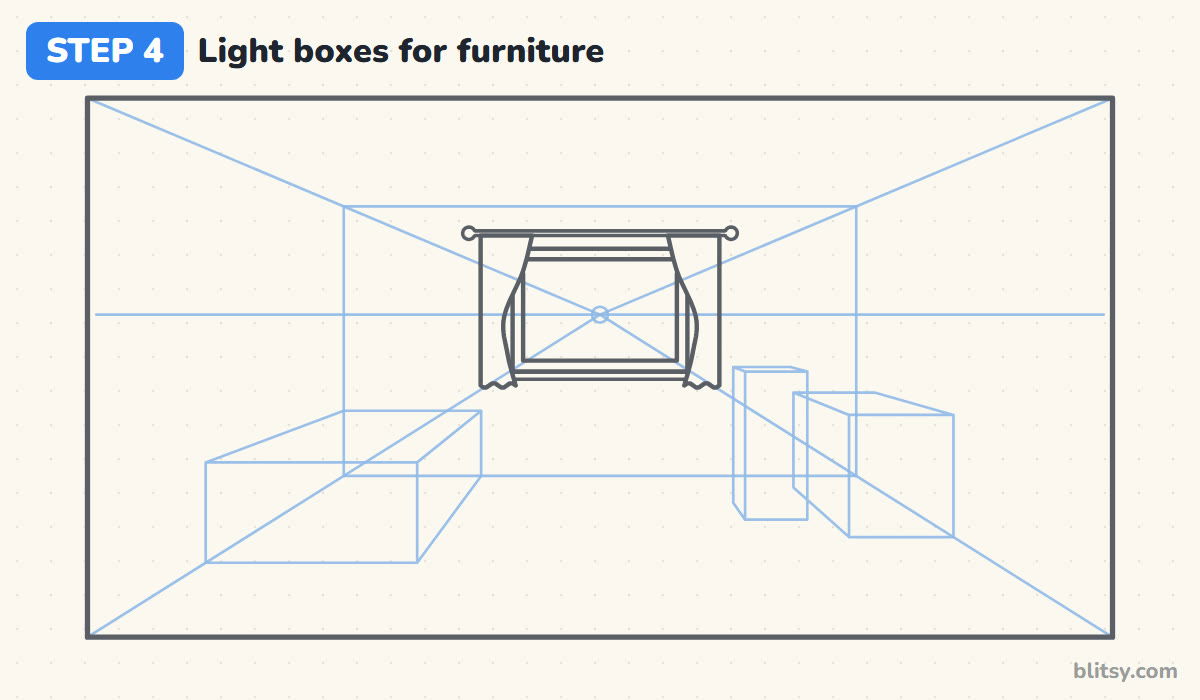
Here's the main perspective trick. For the bed, draw a flat rectangle low on the left: that's its foot end. From its corners, run light lines toward the vanishing point and stop them where the bed should end. Do the same on the right for the desk and the chair. Every piece of furniture starts as a box like this.
💡 Tip: Front faces stay as true rectangles. Only the lines going back into the room aim at the dot.
Step 5: Turn the left box into a bed
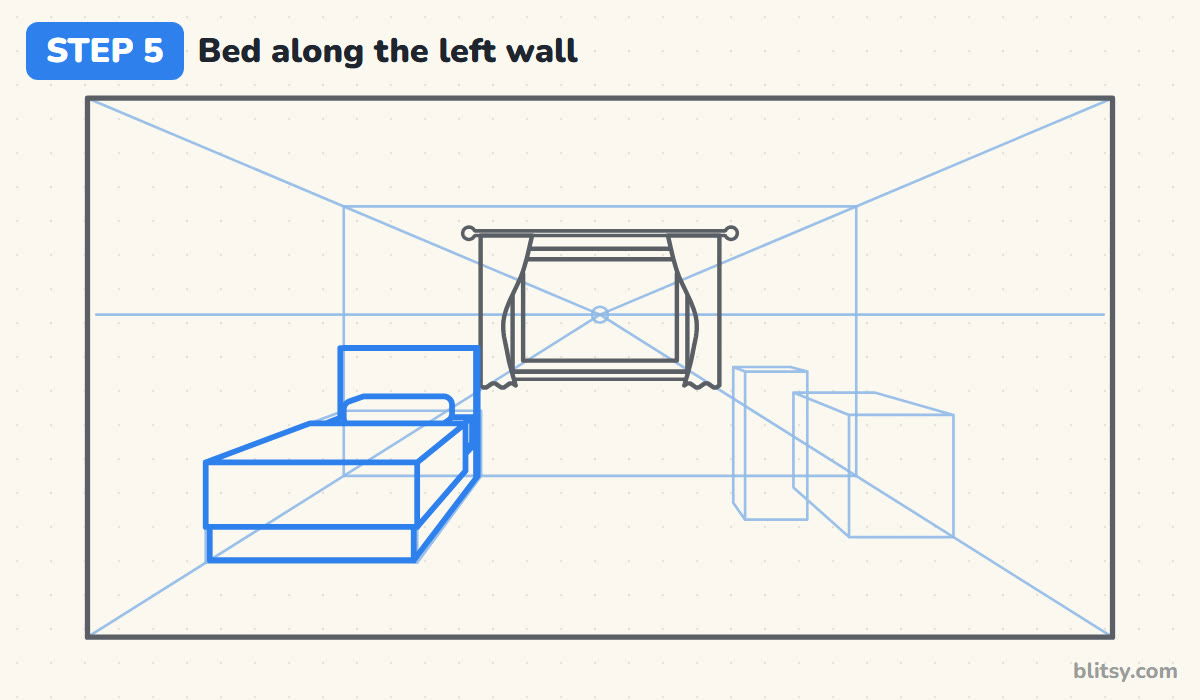
Go over the front of the box as the blanket, then draw a wooden base peeking out underneath. The blanket stops partway back, showing a strip of mattress behind it. Put a puffy pillow there and a plain headboard against the back wall. Most beginners make the bed too short, so let it reach well toward the back wall.
💡 Tip: Let every side edge of the bed line up with your ruler and the vanishing point.
Step 6: Draw the desk and chair
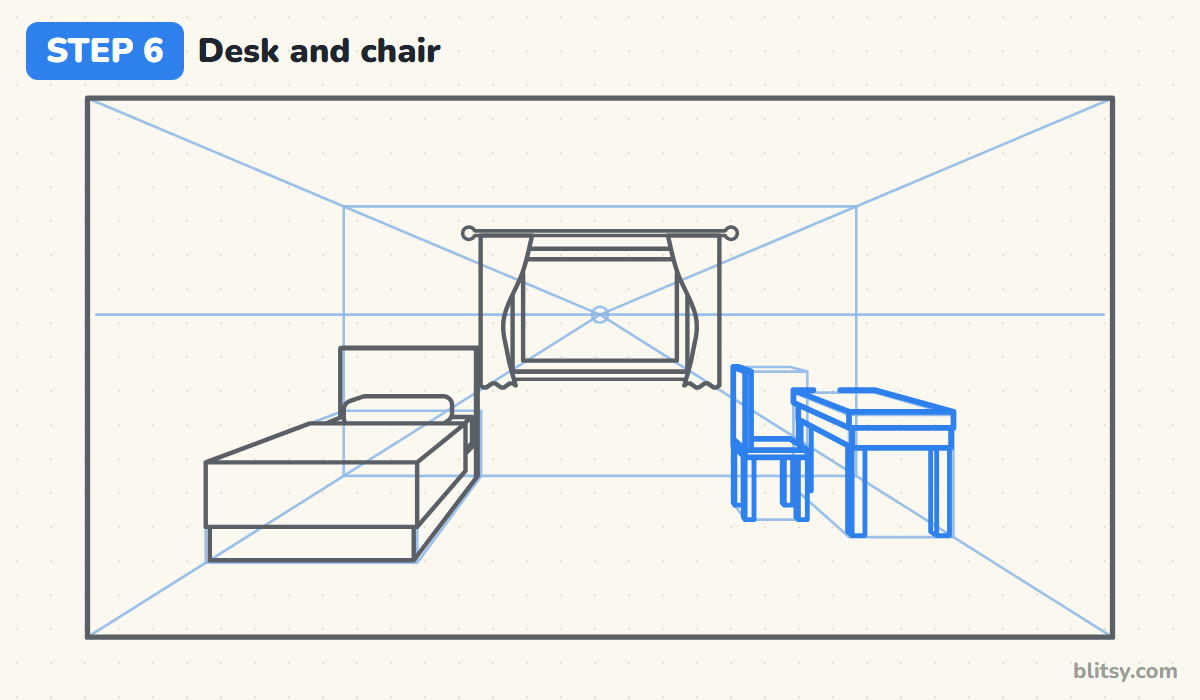
On the right, the desk is a thick tabletop on legs, with a shallow drawer box under the top. Draw the chair in front of it as a seat, four legs and a tall backrest. I draw the chair first because it stands in front, so the desk lines simply stop where they meet it.
💡 Tip: Make the legs thick enough to color inside. Thin sticks turn into black lines after inking.
Step 7: Add the lamp and a framed picture
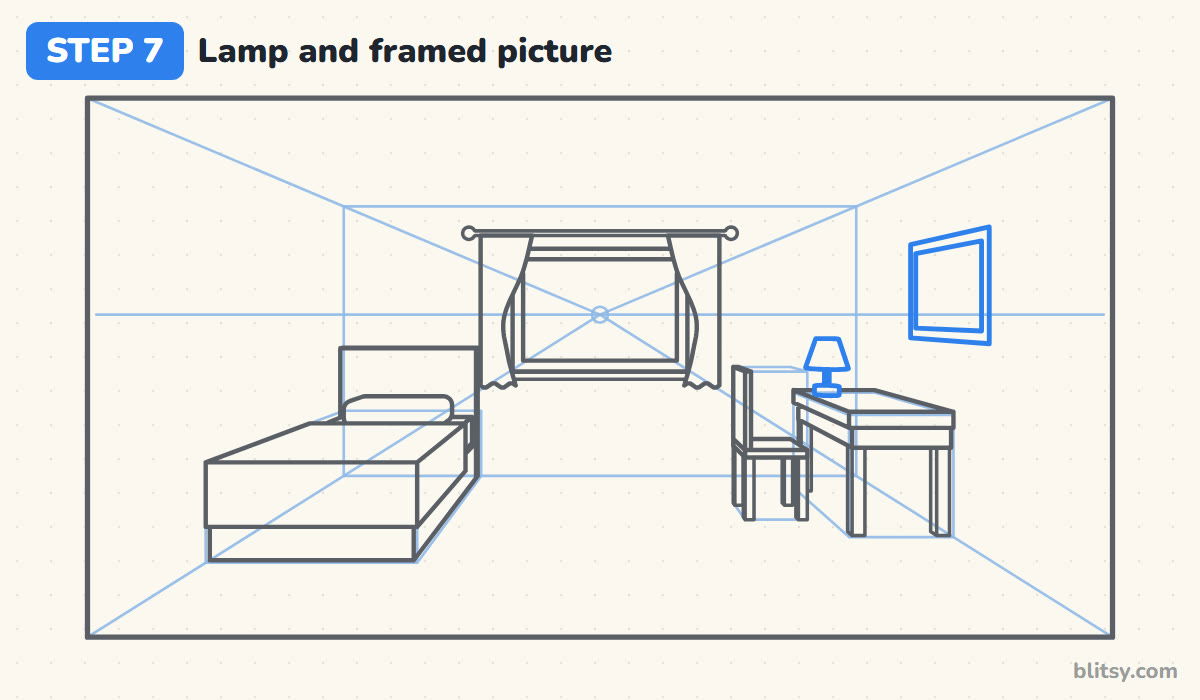
Set a small lamp near the back of the desk: a flat base, a short stem and a shade wider at the bottom. The picture hangs on the right wall, so its top and bottom edges slant toward the vanishing point while its sides stay upright. Draw a smaller frame inside.




💡 Tip: Hold your ruler from the dot to each corner of the picture before drawing its top and bottom.
Step 8: Lay a rug on the floor
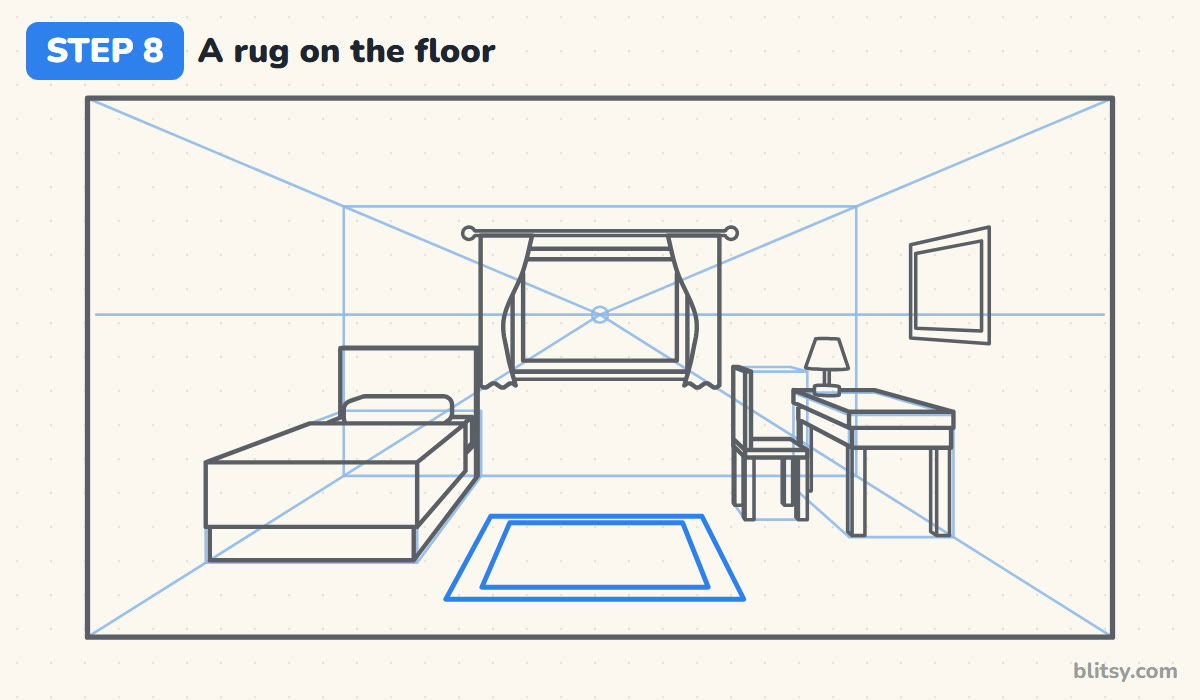
Draw the rug in the middle of the floor. Its front and back edges stay level while its sides lean toward the vanishing point, so it's wider at the front. Add a smaller rug shape inside for a border, and leave a gap between the rug and the bed.
💡 Tip: If your rug looks like it's standing up, flatten it by bringing the back edge down closer to the front.
Step 9: Firm up the wall edges and add floorboards
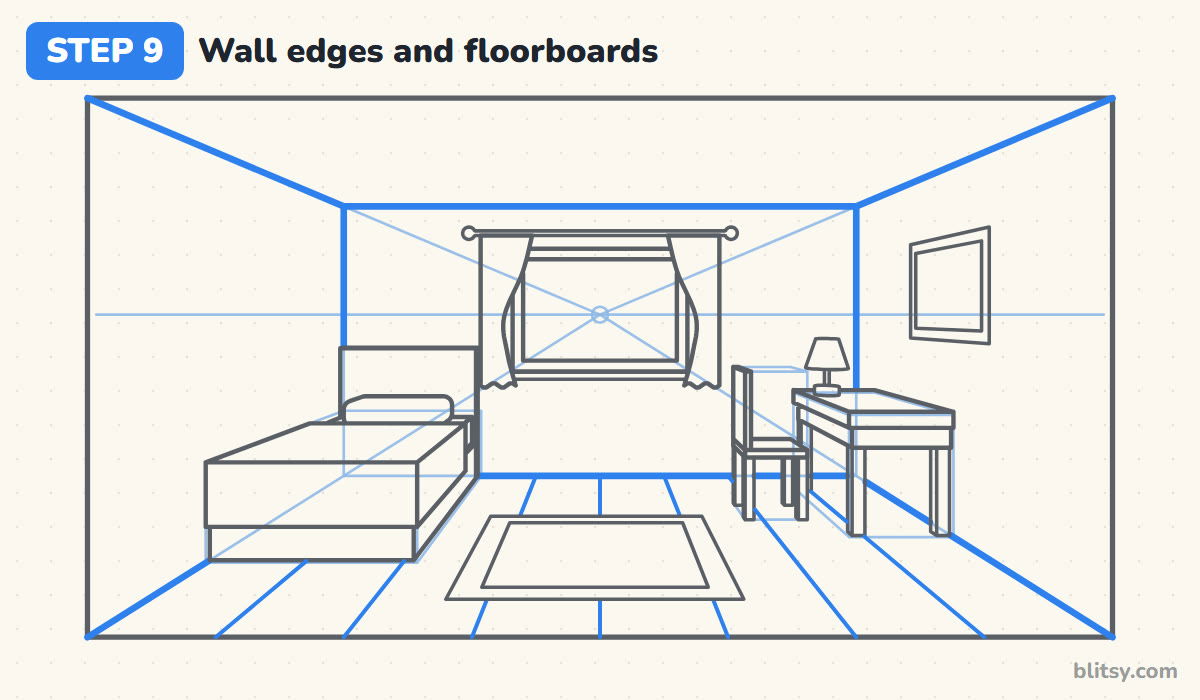
Now press harder and go over the back wall and the four corner lines, stopping wherever a piece of furniture stands in front. Then draw the floorboards: lines that start on the bottom edge of the frame, spaced evenly, and all aim at the vanishing point. Lift your pencil at the rug and at furniture legs.
💡 Tip: Mark equal spaces along the bottom edge first. The boards then fan out evenly on their own.
Step 10: Add the small details
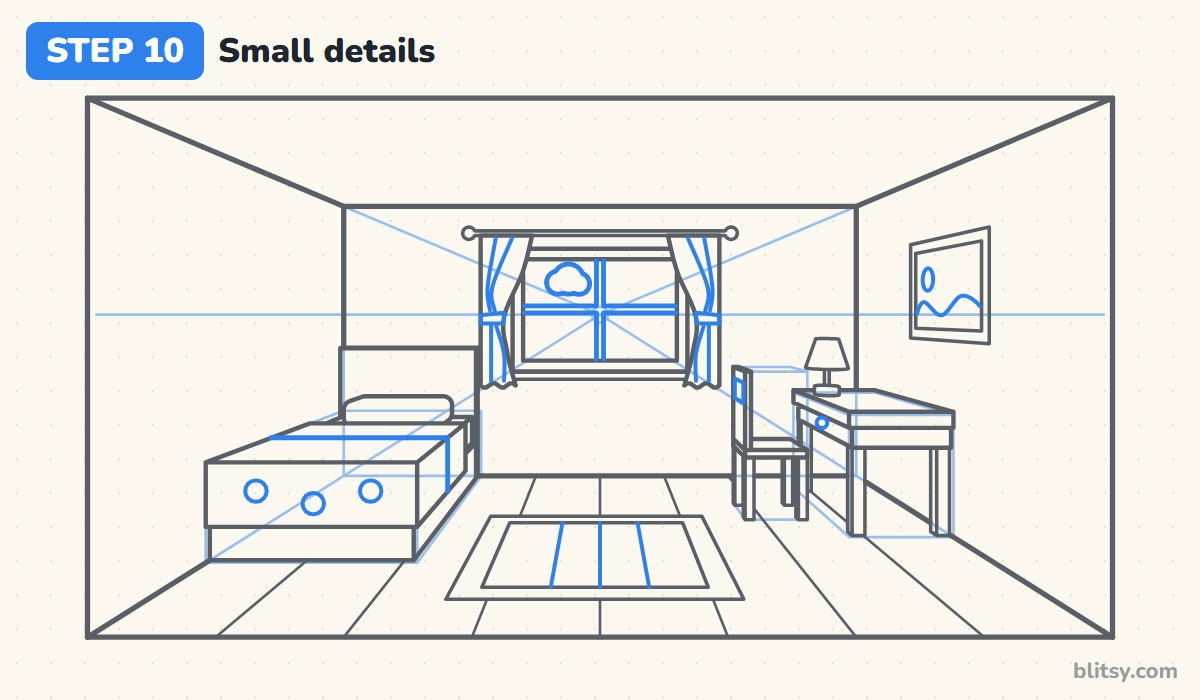
Divide the window into four panes with a cross and float a little cloud in one pane. Give the curtains soft fold lines and a tie band. On the bed, add the folded top of the blanket and three round dots. Then a sun and hills in the picture, stripes on the rug and a knob on the drawer.
💡 Tip: Details are where a room starts to feel lived in, so add one thing that's in your own room too.
Step 11: Ink the lines and erase the guides
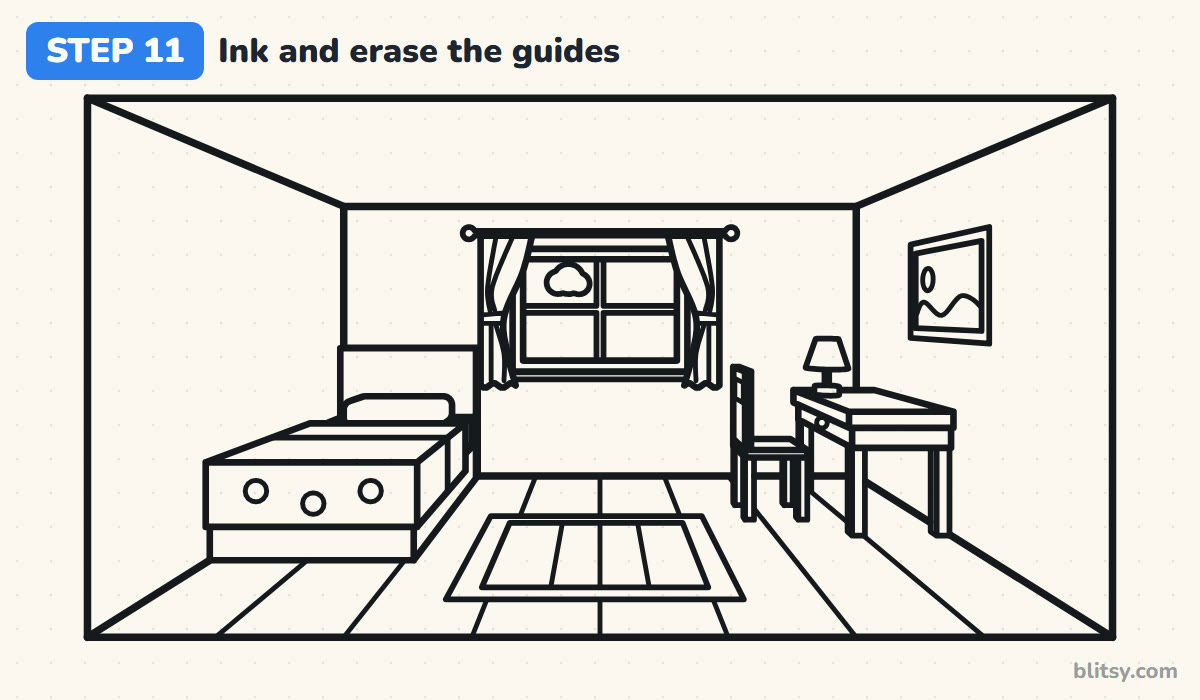
Trace every keeper line with the black marker, using the ruler again for the long straight ones. Let the ink dry for a minute, then erase the diagonals, the eye-level line, the dot and the furniture boxes. The room looks much cleaner once they're gone.




💡 Tip: Wipe your ruler's edge before inking so it doesn't drag a smear across fresh lines.
Step 12: Color the room
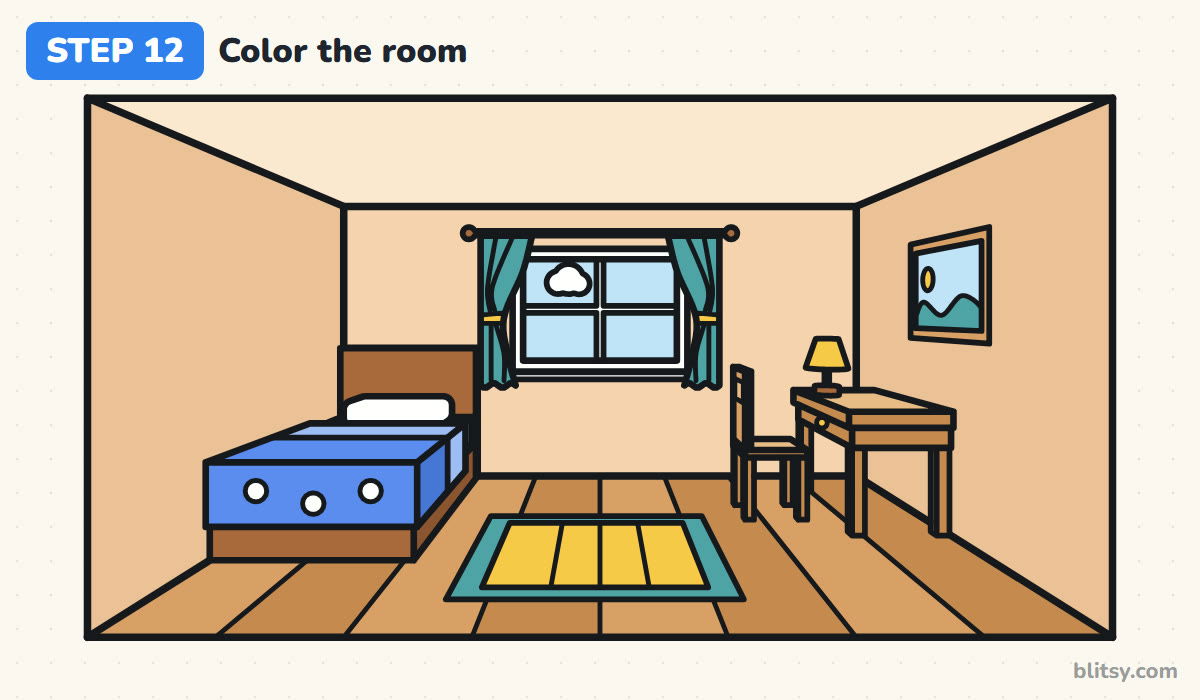
I color the big areas first: peach for the back wall, a slightly darker peach on the side walls and a pale cream ceiling. The floor is light brown with every other board a bit darker. After that come teal curtains, a yellow rug middle and lampshade, a blue blanket and light blue glass.
💡 Tip: Making the side walls a shade darker than the back wall adds depth without any shading.
Perspective Slips That Bend a Bedroom
- Depth lines that miss the dot. One stray line makes the whole room look warped. Lay your ruler on the vanishing point every time you draw a line going back into the room.
- Tilted front faces. The front of the bed and desk should be plain rectangles. If you slant them as well, the furniture seems to twist. Keep those edges level and upright.
- Drawing the walls dark too early. Then the wall lines run straight through the bed. Keep the room box light until the furniture is in, then firm up only what you can see.
- Furniture floating above the floor. Legs and bed bases need to sit on the floor area. If a leg ends on a wall, slide the piece forward.
- Everything shoved against the back wall. The room looks empty. Bring the bed forward so it reaches toward you.
Rearranging Your Paper Bedroom
Once the vanishing point feels easy, try moving it. Slide it to the left and the right wall grows bigger, which is a nice way to show off a bookshelf. You could also swap the desk for a toy chest or add a door on a side wall. If you want to practice a single piece first, the bed drawing tutorial is a good warm-up, and this door drawing tutorial will help when you add one to your room.
Bedroom Coloring Page and a Lesson PDF
Prefer to start with coloring? Print the room coloring page: a small colored version at the top shows which color goes where, and the big outline has thick lines. The step-by-step guide PDF holds all 12 steps with tips. Both print on Letter or A4.
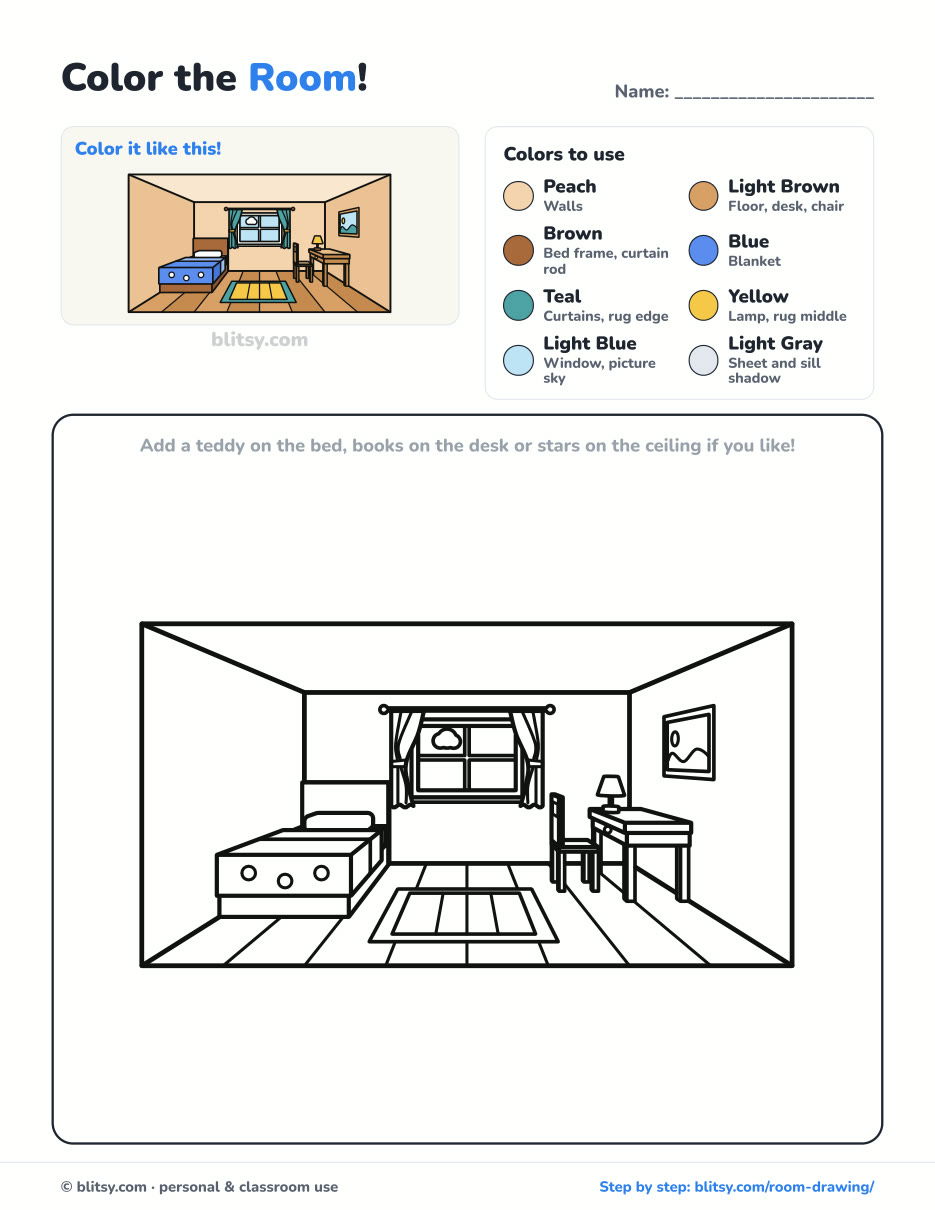
Black outlines with a colored example and the color names at the top. Ready to print and color.
⬇️ Download Coloring PageEvery step picture with its instructions and tips, to keep beside your paper while you draw.
⬇️ Download Drawing Guide📱 On a phone? Tap a download button, then open the file and choose Share → Save to Files or Print. On a computer, the PDF opens or saves straight to your Downloads folder.
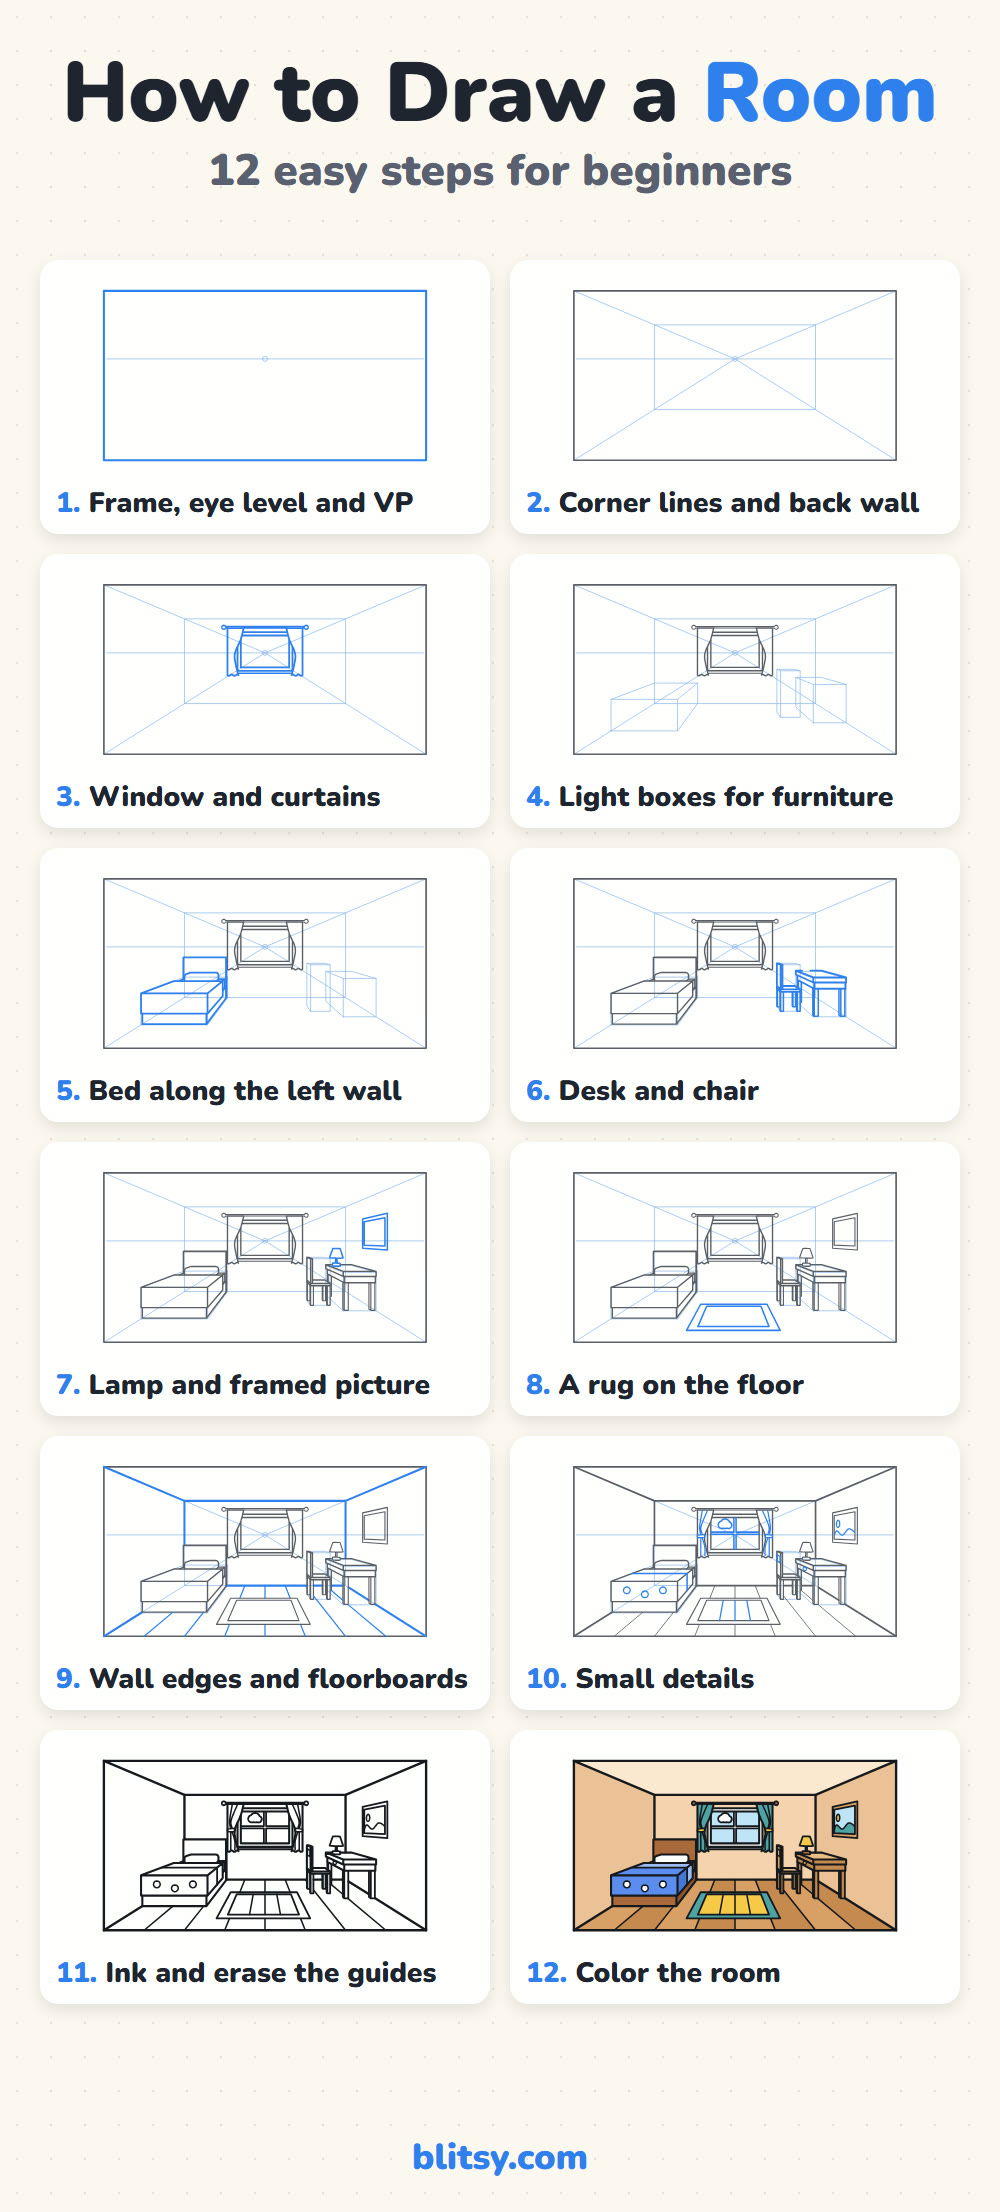
Every Room Step on One Tall Pin
Room Finished? Fill Your Sketchbook With These
Below are step-by-step tutorials for vehicles, scenes and objects. Each one starts with a few simple shapes.
- Solar System Drawing: Put every planet on its own curved path in this how to draw the solar system step by step lesson.
- School Drawing: Practice boxes and a roof triangle on a bigger building with the school drawing tutorial: a brick schoolhouse with a bell tower and a clock.
- Fire Truck Drawing: The fire truck drawing tutorial builds a long red engine with a ladder and a hose reel.
- Realistic Drawing: Try shading a shiny apple under one lamp in the realistic drawing tutorial.
- Diamond Drawing: Facets are just straight lines in this diamond drawing step by step guide.
- Race Car Drawing: Draw a red formula car with the number 7 on its side in the race car drawing tutorial.
- Summer Drawing: An umbrella, a beach ball and a sandcastle fill the summer beach drawing tutorial.
- Volcano Drawing: The how to draw a volcano lesson ends with lava rivers and palm trees.
- Police Car Drawing: A black-and-white patrol car gets its light bar in this police car drawing tutorial.
- Halloween Drawing: Draw a friendly haunted house on a hill with the Halloween drawing step by step guide.
Room Drawing Questions I Hear Often
What is one-point perspective in a room drawing?
It's a way of drawing where all the lines going back into the room meet at one dot on the eye level. The back wall faces you flat, while the side walls and floor slant toward that dot.
What is the easiest way to draw a room?
Draw a frame, a back wall in the middle and four lines joining their corners. That gives you a floor, a ceiling and two walls in a minute. Add furniture as boxes afterward.
How do you draw furniture in perspective?
Draw the front face as a normal rectangle, then run lines from its corners to the vanishing point and cut them off where the piece ends. Shape the box into a bed, desk or chair.
Can kids draw a room in perspective?
Yes, children from about nine usually manage it with a ruler. Younger kids can skip the furniture and draw just the room shell with a window and rug.
Sit in a doorway sometime and look for the vanishing point in your own room, then put it on paper. 🛏️
Related posts:
 How to Draw a Whale Step by Step (Easy for Beginners)
 How to Draw Lungs Step by Step (Easy Science Diagram)
 How to Draw a Pineapple Step by Step (Easy Crown and Slice)
 How to Draw Iron Man Step by Step (Easy Chibi for Kids)
 How to Draw a Dress Step by Step (Easy Party Dress)
 How to Draw a Chicken Step by Step (Easy for Beginners)
 How to Draw a UFO Step by Step (Cute Alien Saucer)
 How to Draw a Volcano Step by Step (Easy Erupting Volcano)
 How to Draw a Crow Step by Step (Easy for Beginners)
 How to Draw a Tiger Step by Step (Easy Walking Pose)
 How to Draw a Heart Step by Step (Even, Symmetric Shape)
 How to Draw a Jellyfish Step by Step (Cute, Easy Guide)

