
Most kids who try to draw our planet end up with a blue circle and a few green blobs that could be anywhere. Two faint guide lines fix that. This lesson shows you how to draw the earth step by step as it looks from space, with Africa in the middle, Europe above it and a slice of the Americas on the left edge. If you can draw a circle and a wiggly line, you can do this.
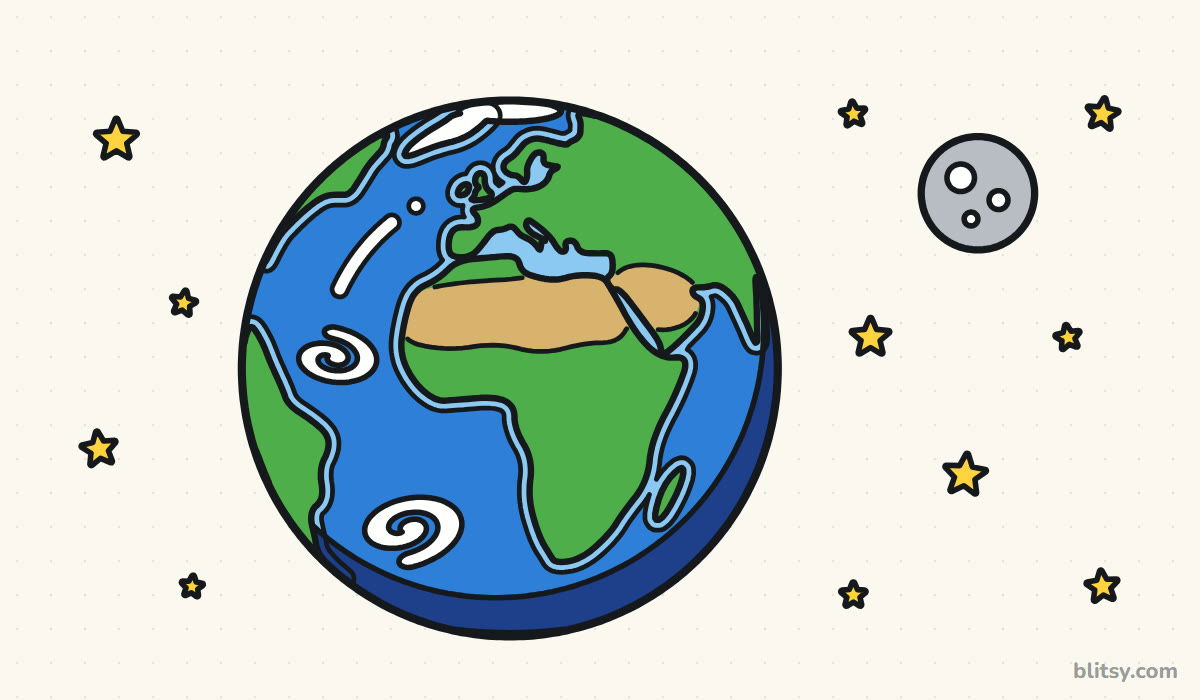
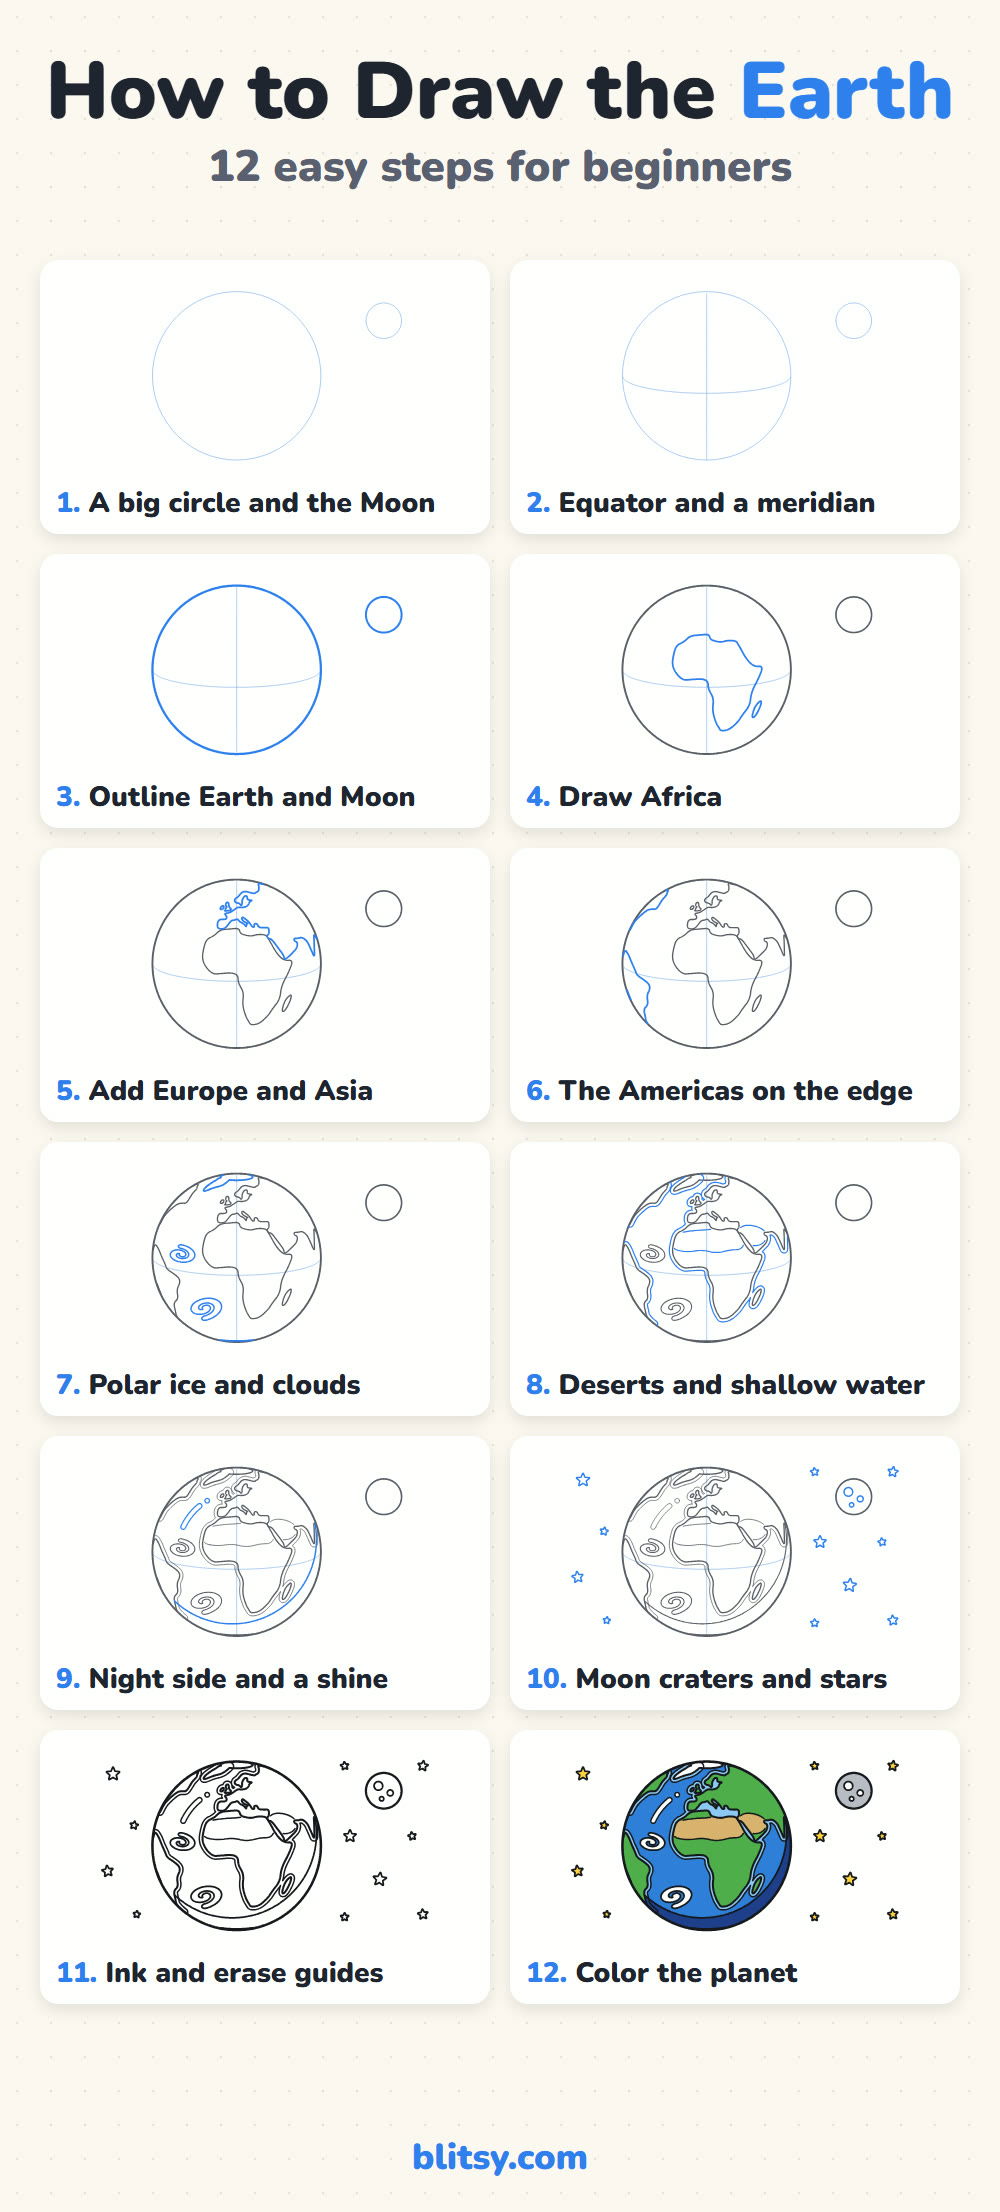
Each picture paints the part to add right now in blue. Gray marks earlier work, and the pale blue circles and lines are light helpers that disappear in step 11.
Quick overview
⏱️ Time: about 35 minutes, plus 15 for coloring
🎯 Level: beginner, best for ages 7 and up
✏️ Steps: 12
🌍 You'll draw: Earth from space with its continents, ice caps, clouds, the Moon and stars
Supplies for a Planet Portrait
- A sharp pencil you can press very lightly
- A soft eraser
- A black fineliner or thin marker
- Colored pencils in blue, light blue, green, tan, dark blue, gray and yellow (white is the paper)
- Plain paper turned sideways
- A world map to peek at (optional)
A map nearby really helps with the coastlines, but the shapes here are simplified, so nobody expects every bay and island.
How to Draw the Earth Step by Step
Step 1: Draw a big circle and a small one
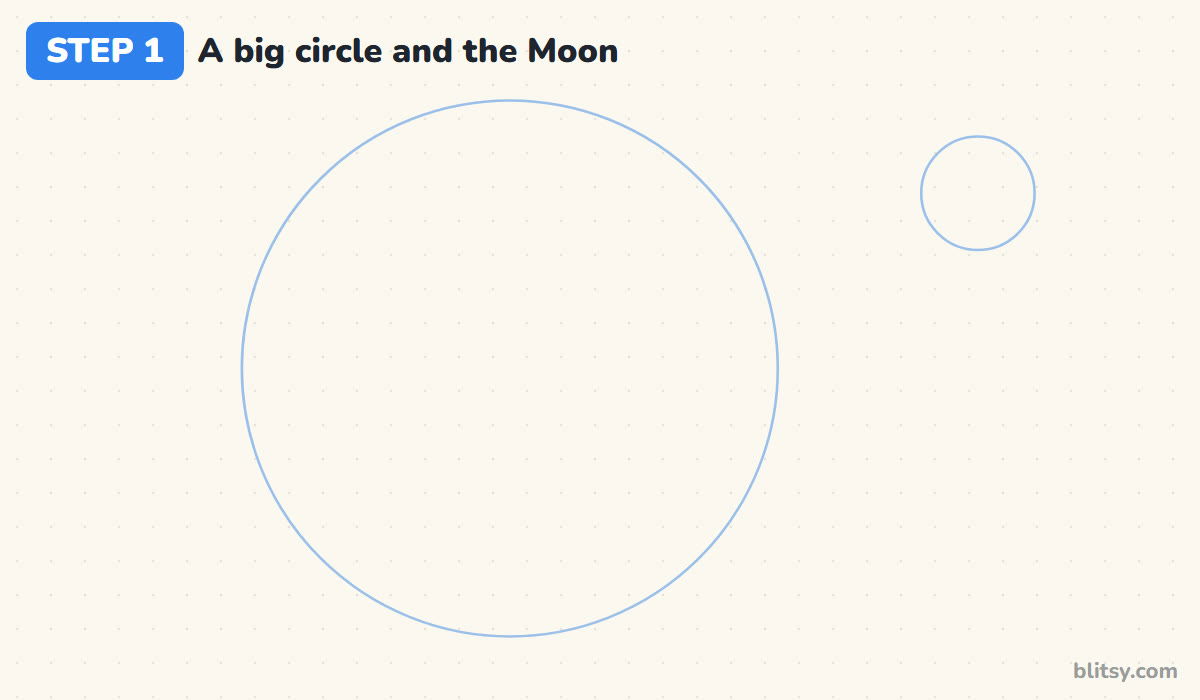
Turn your paper sideways and draw a large circle a little left of centre, reaching from near the top edge to near the bottom. In the top right corner, add a much smaller circle for the Moon. I trace a dinner plate for the Earth, because a wobbly globe makes every continent look wrong later.
💡 Tip: Press so lightly that you can barely see the line; these circles get cleaned up later.
Step 2: Add the equator and a meridian
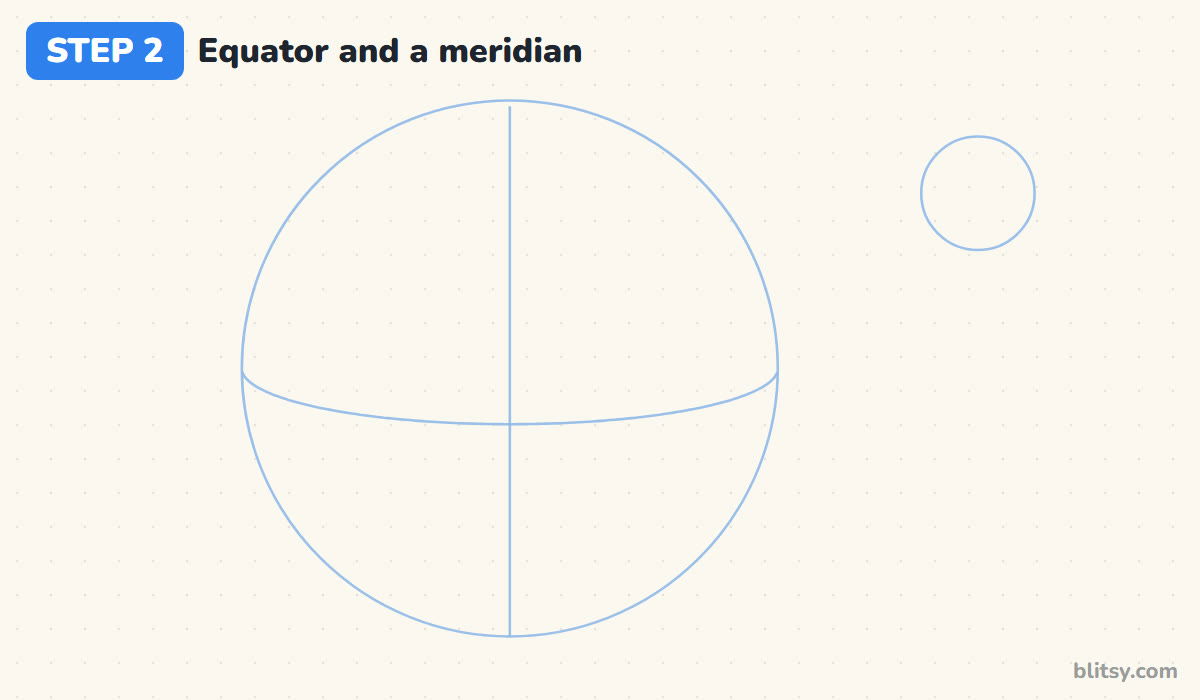
Draw a gentle curve across the middle of the globe that sags a little toward the bottom. That's the equator, and the sag shows we are looking slightly down on the planet. Then draw a straight line from top to bottom through the middle. These two guides are your map grid.
💡 Tip: Where the two guide lines cross is roughly the Gulf of Guinea, the dent in Africa's west side.
Step 3: Outline the Earth and the Moon
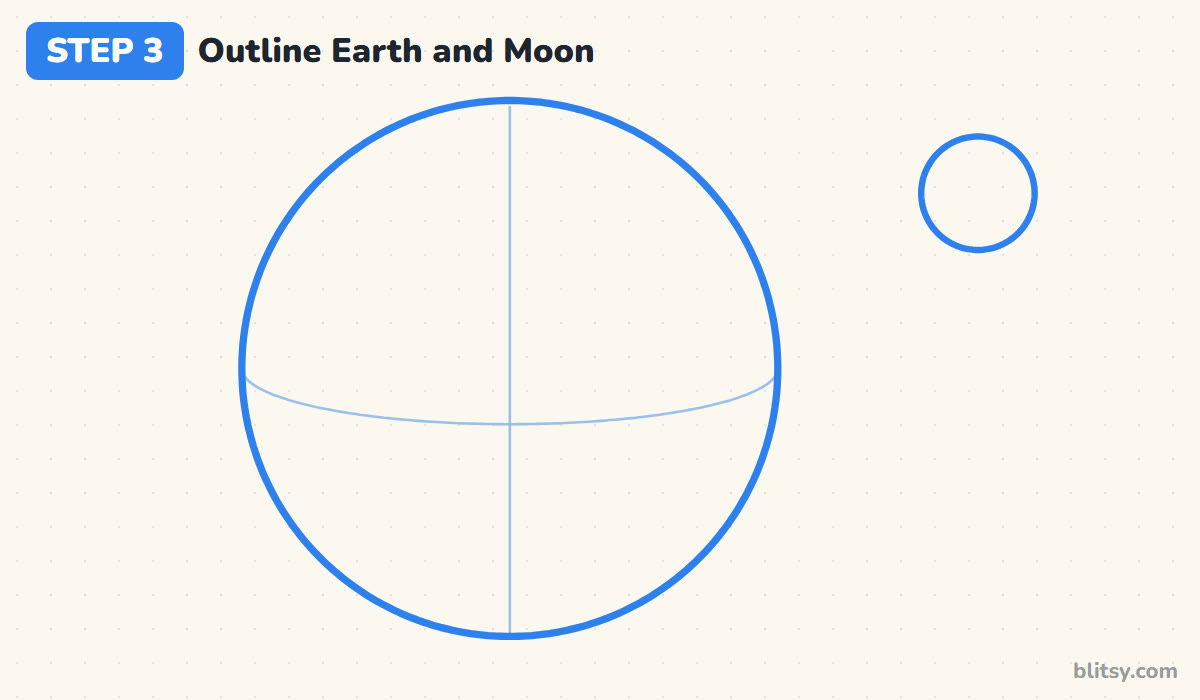
Trace over both circles with a firmer, smooth pencil line, and keep the equator and the meridian faint. I like a clear rim early, since every coastline in the next steps has to stop exactly at the edge of the planet.



💡 Tip: Turn the paper as you go so your hand always draws the curve from the same comfortable angle.
Step 4: Draw Africa in the middle
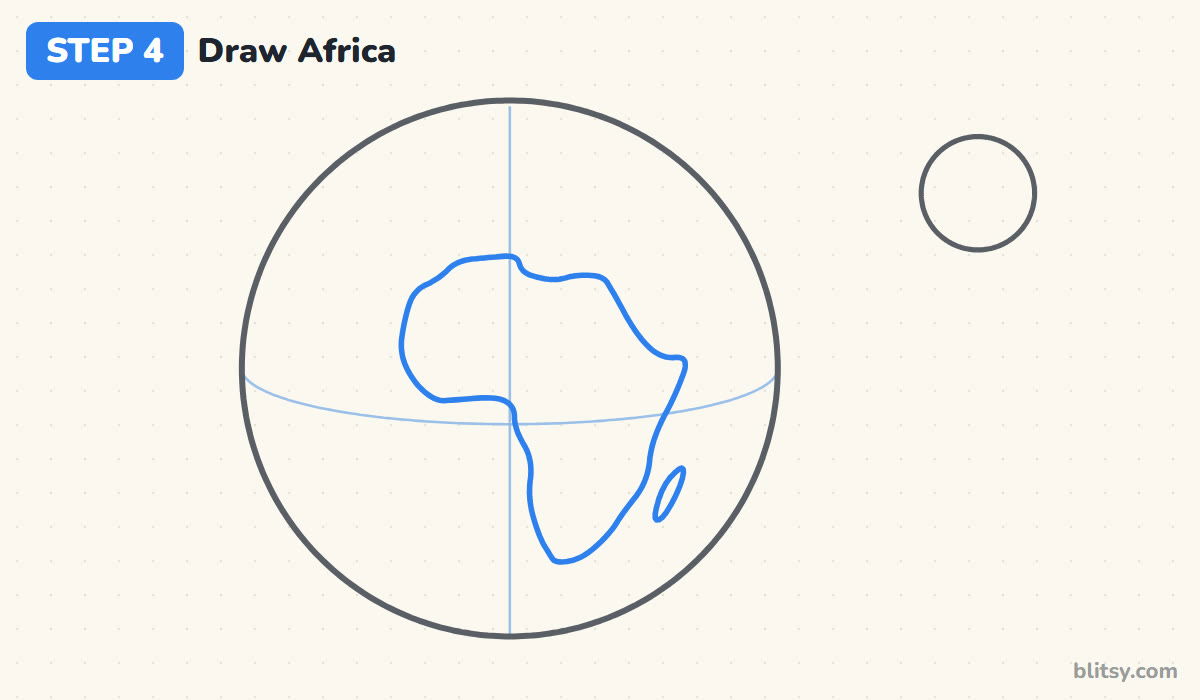
Africa is the anchor of this view, so it goes first. Start above the equator, left of the meridian, and draw the wide rounded top bulging to the left. Then let the shape narrow as it heads down, ending in a rounded point well below the equator. Add Madagascar as a small oval off the lower right coast.
💡 Tip: Think of Africa as a fat question mark without the dot: wide on top, slim at the bottom.
Step 5: Add Europe and Asia above it
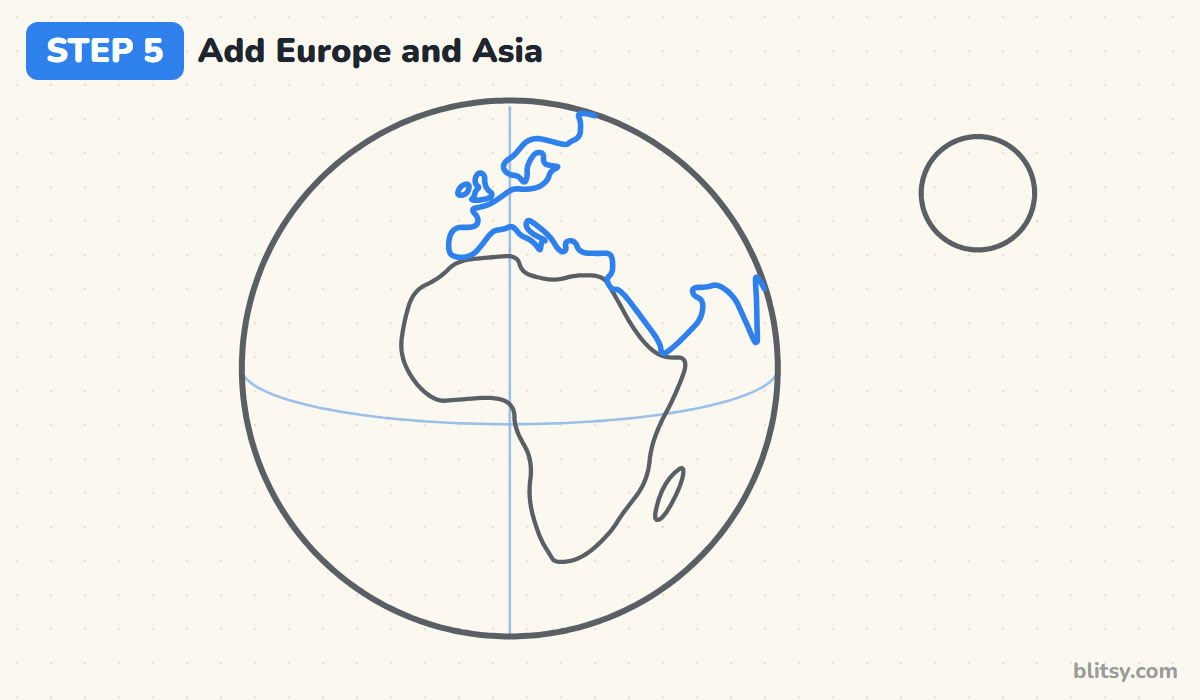
Leave a narrow gap of sea above Africa for the Mediterranean. Draw Spain as a square bump above Africa's top left corner, the coast of France going up, and a thin boot for Italy. Britain and Ireland are two small islands off the top left, and Scandinavia curls over like a thumb. On the right, add Arabia beside Africa and let India poke down at the edge.
💡 Tip: Keep the gap between Africa and Arabia thin; it's the Red Sea and it makes the map read instantly.
Step 6: Show the Americas on the left edge
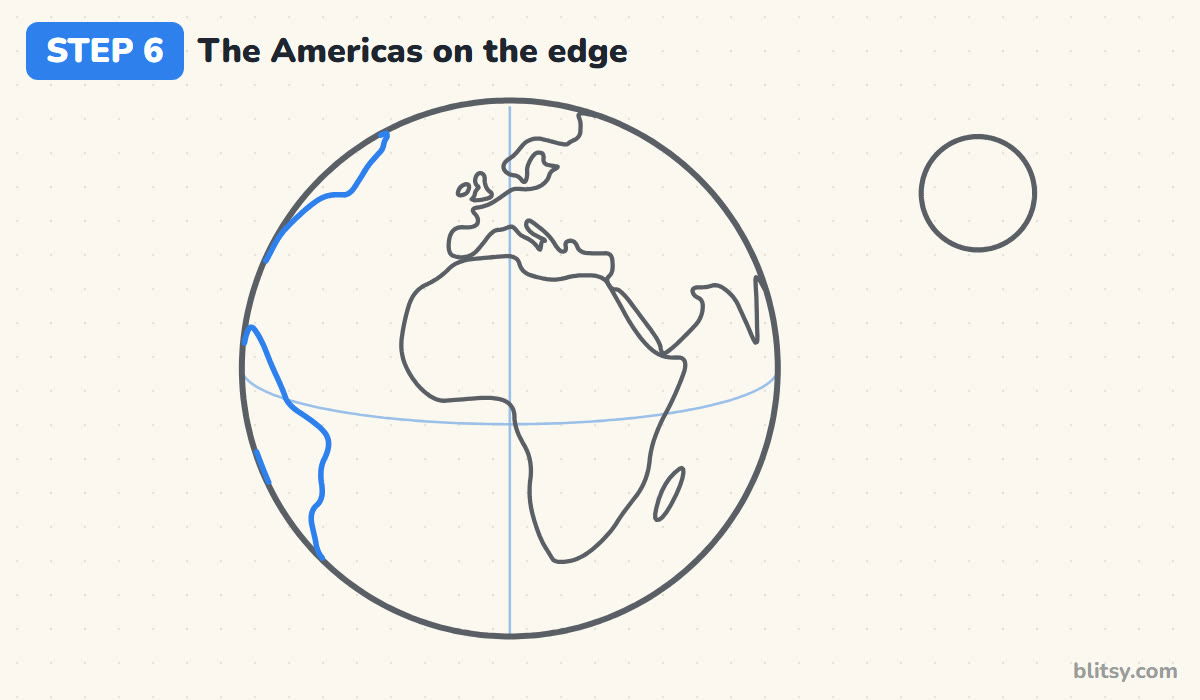
From this side you only see part of the Americas. Draw the bulging east coast of South America on the lower left so it ends at the rim. Higher up, add a short stretch of North America's coast curving into the edge. These partial shapes make the drawing look round instead of like a flat map.
💡 Tip: Let each coastline run right into the rim rather than closing it into an island.
Step 7: Add polar ice and cloud swirls
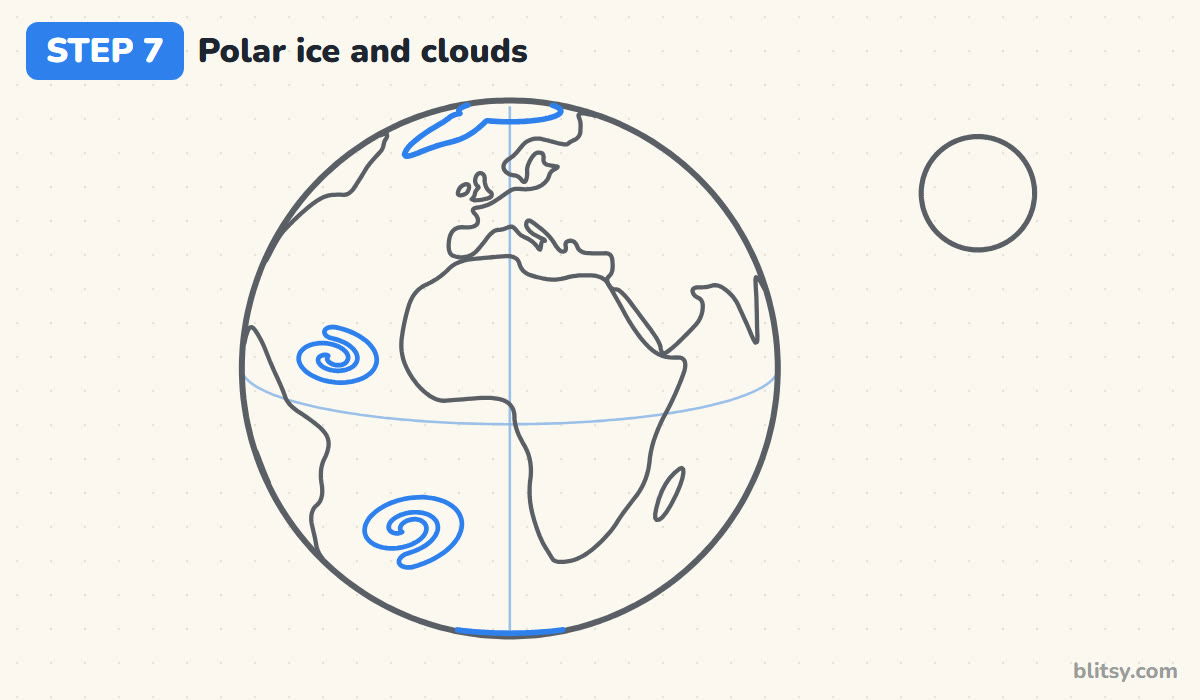
At the top, draw Greenland as a long rounded shape near the rim, with the curved edge of the Arctic ice beside it. At the very bottom, a short arc marks Antarctica peeking over the horizon. Then draw two spiral clouds over the open Atlantic. I keep them away from the coasts so the lines don't tangle.



💡 Tip: Draw each swirl like a snail shell that is slightly stretched sideways.
Step 8: Mark deserts and shallow water
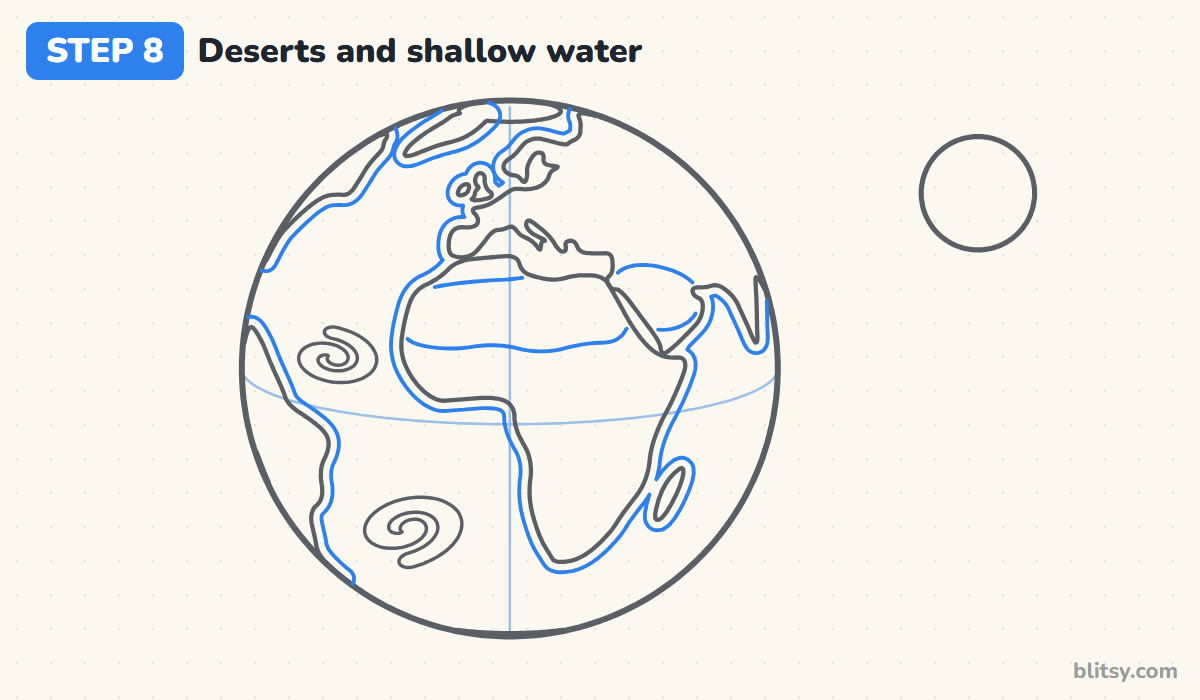
Across the top of Africa, draw a wavy line from coast to coast; above it is the Sahara. Continue a similar line into Arabia. Next, follow every coastline with a second line a short way out to sea for the lighter shallow water. It takes patience, so small kids can skip it.
💡 Tip: Keep the shallow-water line the same distance from the coast all the way around.
Step 9: Draw the night side and a shine
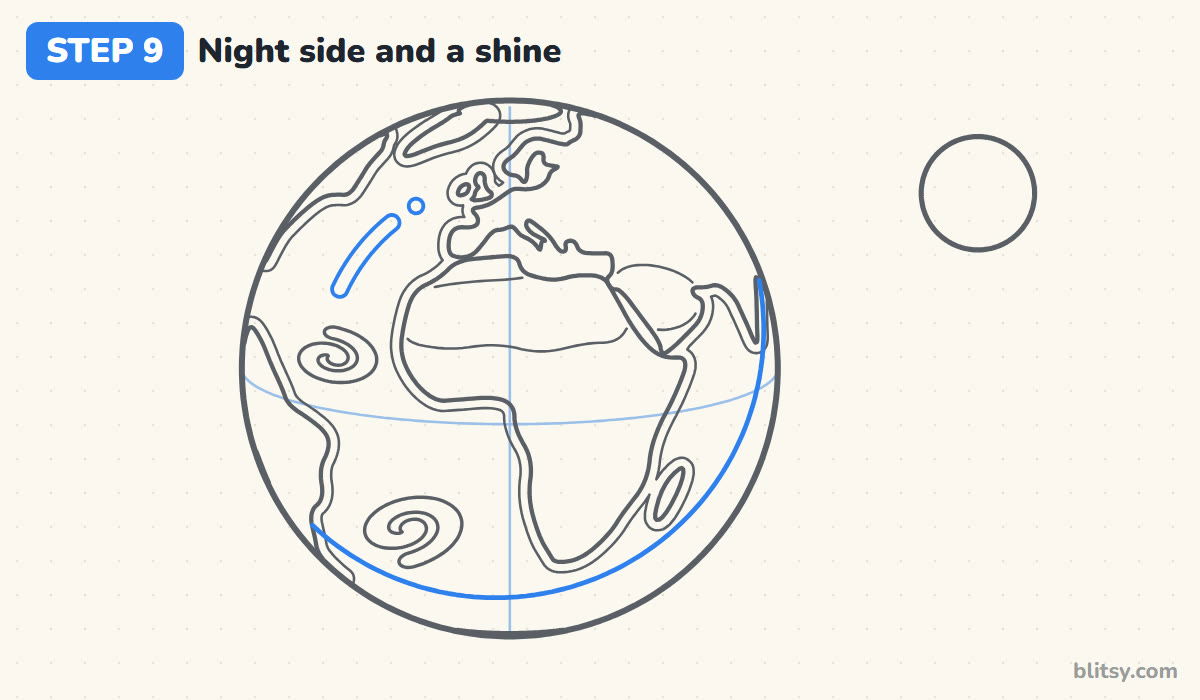
Only half of the Earth faces the Sun at any time. Show that with a thin curve along the lower right, parallel to the rim, where the shadow starts. On the upper left, draw a short curved stripe and a dot for a shine. Light and shadow on opposite sides turn a flat circle into a ball.
💡 Tip: Decide where your sun is first, then put the shine on that side and the shadow on the other.
Step 10: Add Moon craters and stars
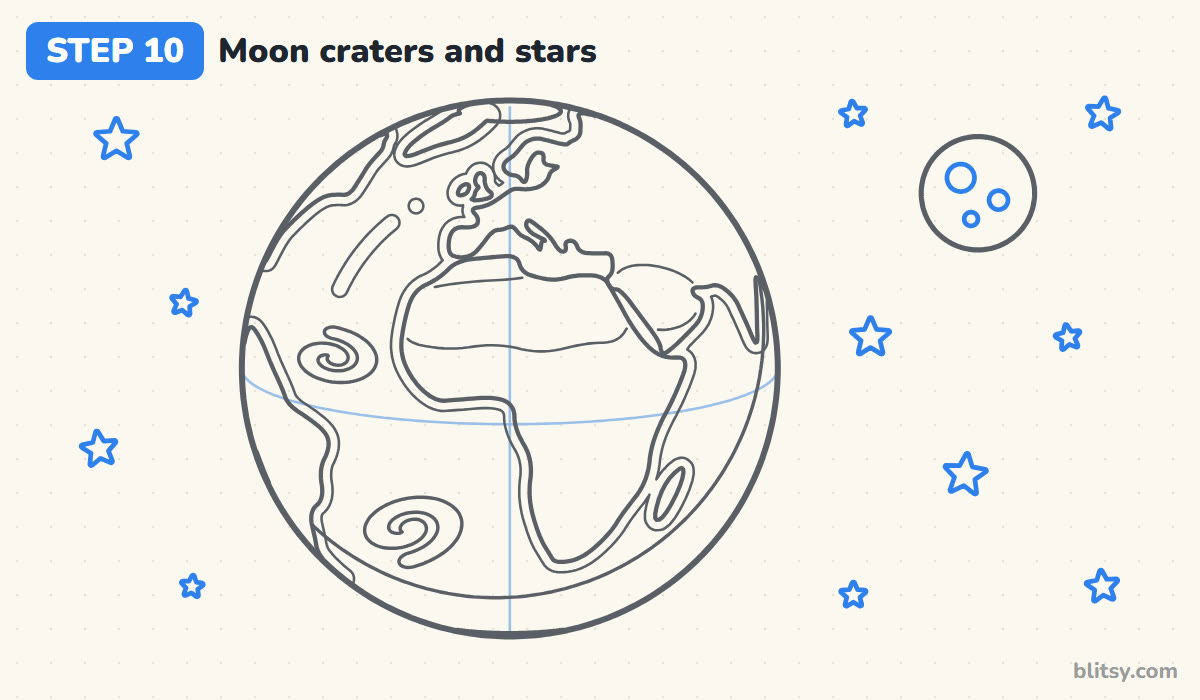
Draw three craters of different sizes on the Moon. Then scatter five-pointed stars around both bodies, a few large and several tiny, with more on the wide open sides. Keep stars away from the Earth's rim, where they would crowd the outline.
💡 Tip: Leave a little empty space too; a sky packed with stars looks noisy.
Step 11: Ink the lines and erase the guides
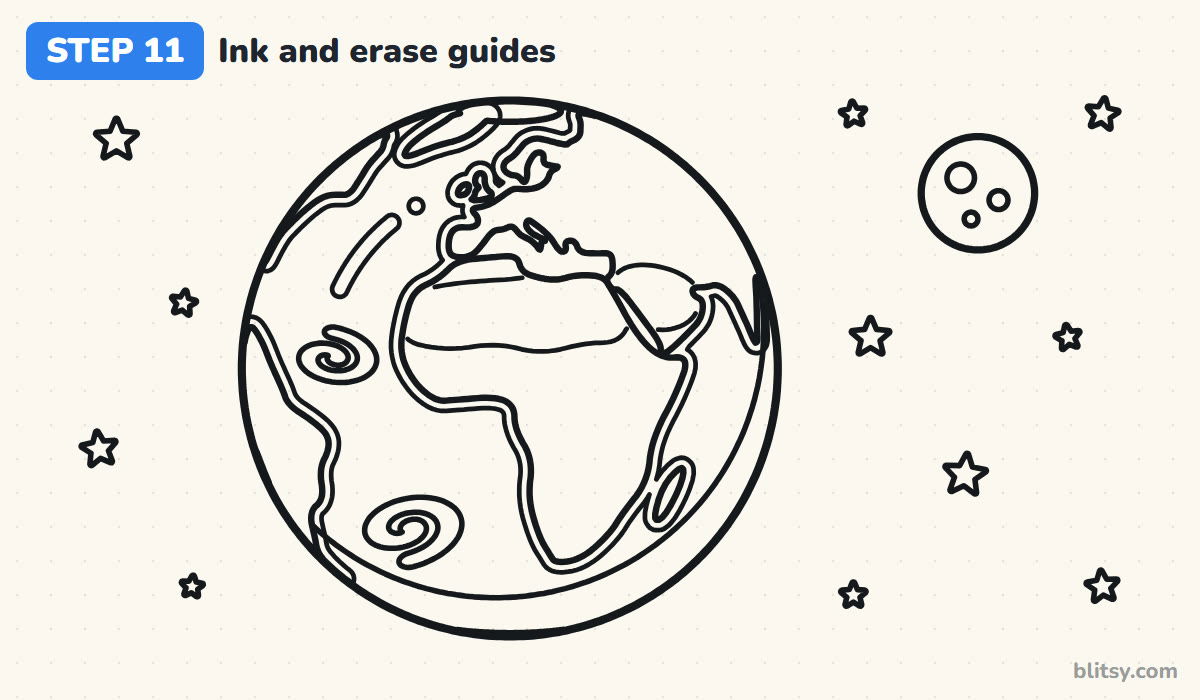
Go over every keeper line with a black fineliner, from the rim and continents to the clouds, the shadow line and the stars. Let the ink dry for a minute. Then erase the guide circles, the equator and the meridian. Once the grid is gone, the planet suddenly looks real.




💡 Tip: Ink the long coastlines slowly in short strokes; a shaky hand shows most on long lines.
Step 12: Color the planet
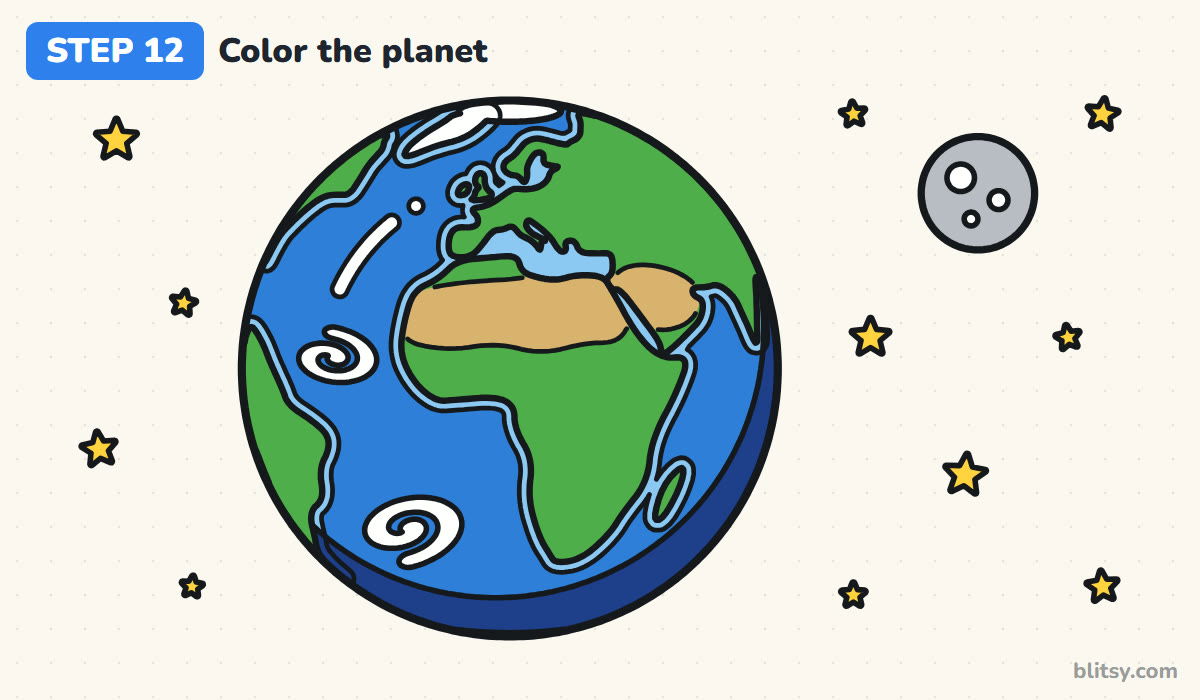
Color the open ocean blue and the coastal bands light blue. Land is green, with tan for the Sahara and Arabia. Leave the ice, clouds and shine white. Fill the night strip dark blue, the Moon gray with white craters, and make the stars yellow. I color the ocean in small circles to avoid streaks.
💡 Tip: Press harder in the dark blue night strip so it clearly reads as shadow next to the brighter ocean.
Why Homemade Globes Often Look Like Flat Maps
- Closing every continent into an island. On a round planet, land disappears over the edge. Let the Americas and India run into the rim.
- Placing land without the guides. Africa ends up too high or too small. Use the equator and the meridian; they cross near the dent on Africa's west coast.
- Drawing every tiny bay and island. The planet turns into a scribble. A smooth, simple coastline is easier to recognize from a distance.
- Making the land bigger than the sea. About 71% of Earth's surface is water, so the blue should win on your drawing too.
- Putting the shine and the shadow on the same side. The ball looks confusing. Light comes from one side, so the shadow belongs on the opposite edge.
Other Faces of Our Planet to Try Next
Once this view feels comfortable, turn the globe. Centre a new drawing on the Americas, or on Asia and Australia, using the same equator and meridian trick. You could also add a thin glowing ring for the atmosphere or a tiny satellite in orbit. To show Earth's neighbours, try the solar system drawing tutorial, and give the Moon its own picture with the moon drawing tutorial.
Free Earth Coloring Page and Step Guide PDF
Print the Earth coloring page for a science lesson or a quiet afternoon. A small colored example and a color key sit at the top, so kids can match the blues, the green land and the tan deserts, and the big outline below leaves room to color space and add more stars. The step-by-step guide PDF holds all 12 steps with their tips, and both files print well on Letter or A4.
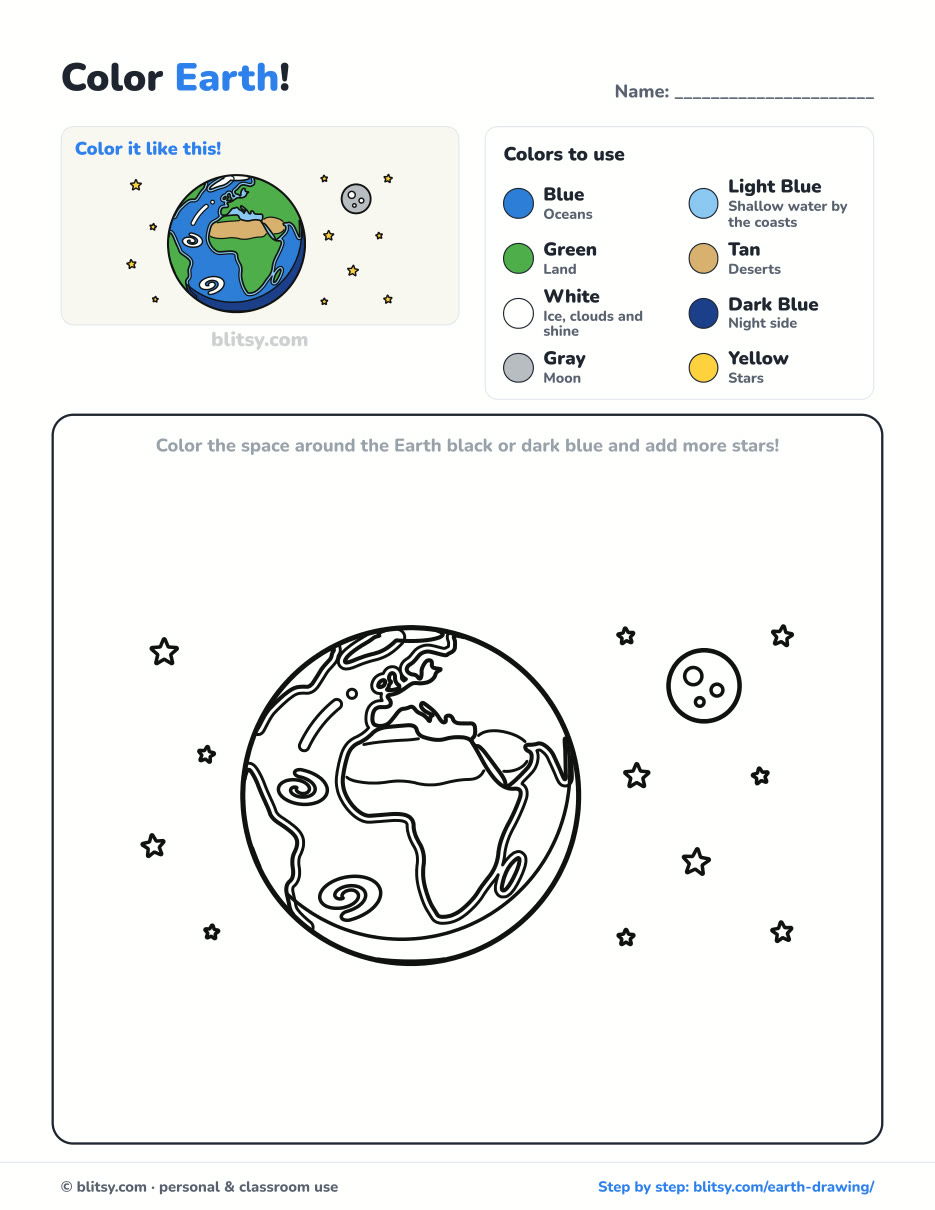
Black outlines with a colored example and the color names at the top. Ready to print and color.
⬇️ Download Coloring PageEvery step picture with its instructions and tips, to keep beside your paper while you draw.
⬇️ Download Drawing Guide📱 On a phone? Tap a download button, then open the file and choose Share → Save to Files or Print. On a computer, the PDF opens or saves straight to your Downloads folder.
Keep the Globe Lesson for Science Day
Earth Drawing Questions From Young Artists
What is the easiest way to draw the Earth?
Draw a circle, add a curved equator and a straight line down the middle, then place Africa where the two lines cross. Every other continent is easier to position once Africa is in.
How many continents should my Earth drawing show?
Earth has 7 continents, but no single view shows them all. From this side you see Africa, Europe and part of Asia, the edge of the Americas and a sliver of Antarctica.
Why is part of the Earth dark?
The Sun can only light the half of the planet facing it. The other half is in night, which is why the edge of my drawing gets a dark blue strip.
Is the Moon really that close to the Earth?
No. The real Moon is roughly a quarter of Earth's width and very far away, about 30 Earths could fit in the gap between them. In this drawing it is moved closer so both fit on the page.
Hang your planet next to a world map and see how many countries your family can point to on it. 🌍
Related posts:
 How to Draw a Whale Step by Step (Easy for Beginners)
 How to Draw Lungs Step by Step (Easy Science Diagram)
 How to Draw a Pineapple Step by Step (Easy Crown and Slice)
 How to Draw Iron Man Step by Step (Easy Chibi for Kids)
 How to Draw a Dress Step by Step (Easy Party Dress)
 How to Draw a Chicken Step by Step (Easy for Beginners)
 How to Draw a UFO Step by Step (Cute Alien Saucer)
 How to Draw Flames Step by Step (Easy Campfire Drawing)
 How to Draw a Moon Step by Step (Sleepy Crescent + Phases)
 How to Draw a Tiger Step by Step (Easy Walking Pose)
 How to Draw a Heart Step by Step (Even, Symmetric Shape)
 How to Draw a Jellyfish Step by Step (Cute, Easy Guide)

