
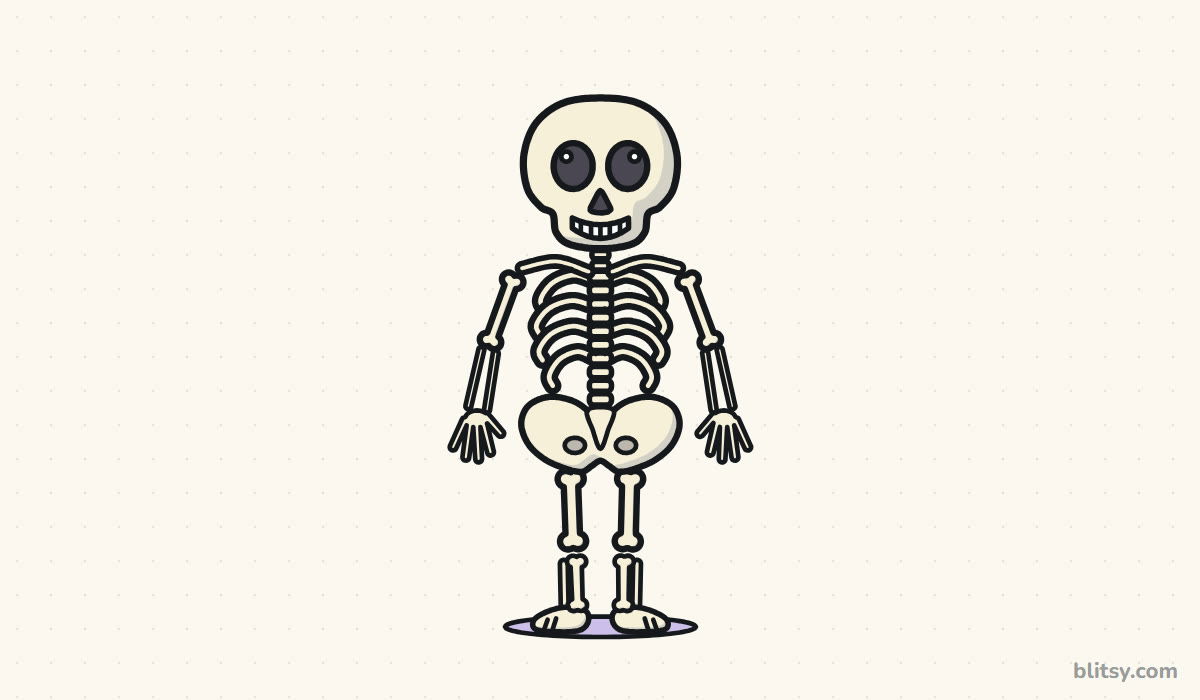
Skeletons look complicated until you notice that every bone hangs on a simple stick figure. Once that frame is on the page, you add one bone at a time. This lesson shows you how to draw a skeleton step by step, from a head circle to a grinning cartoon skeleton with curved ribs and little bony hands. I kept him friendly on purpose, so he suits a Halloween card or a science notebook.
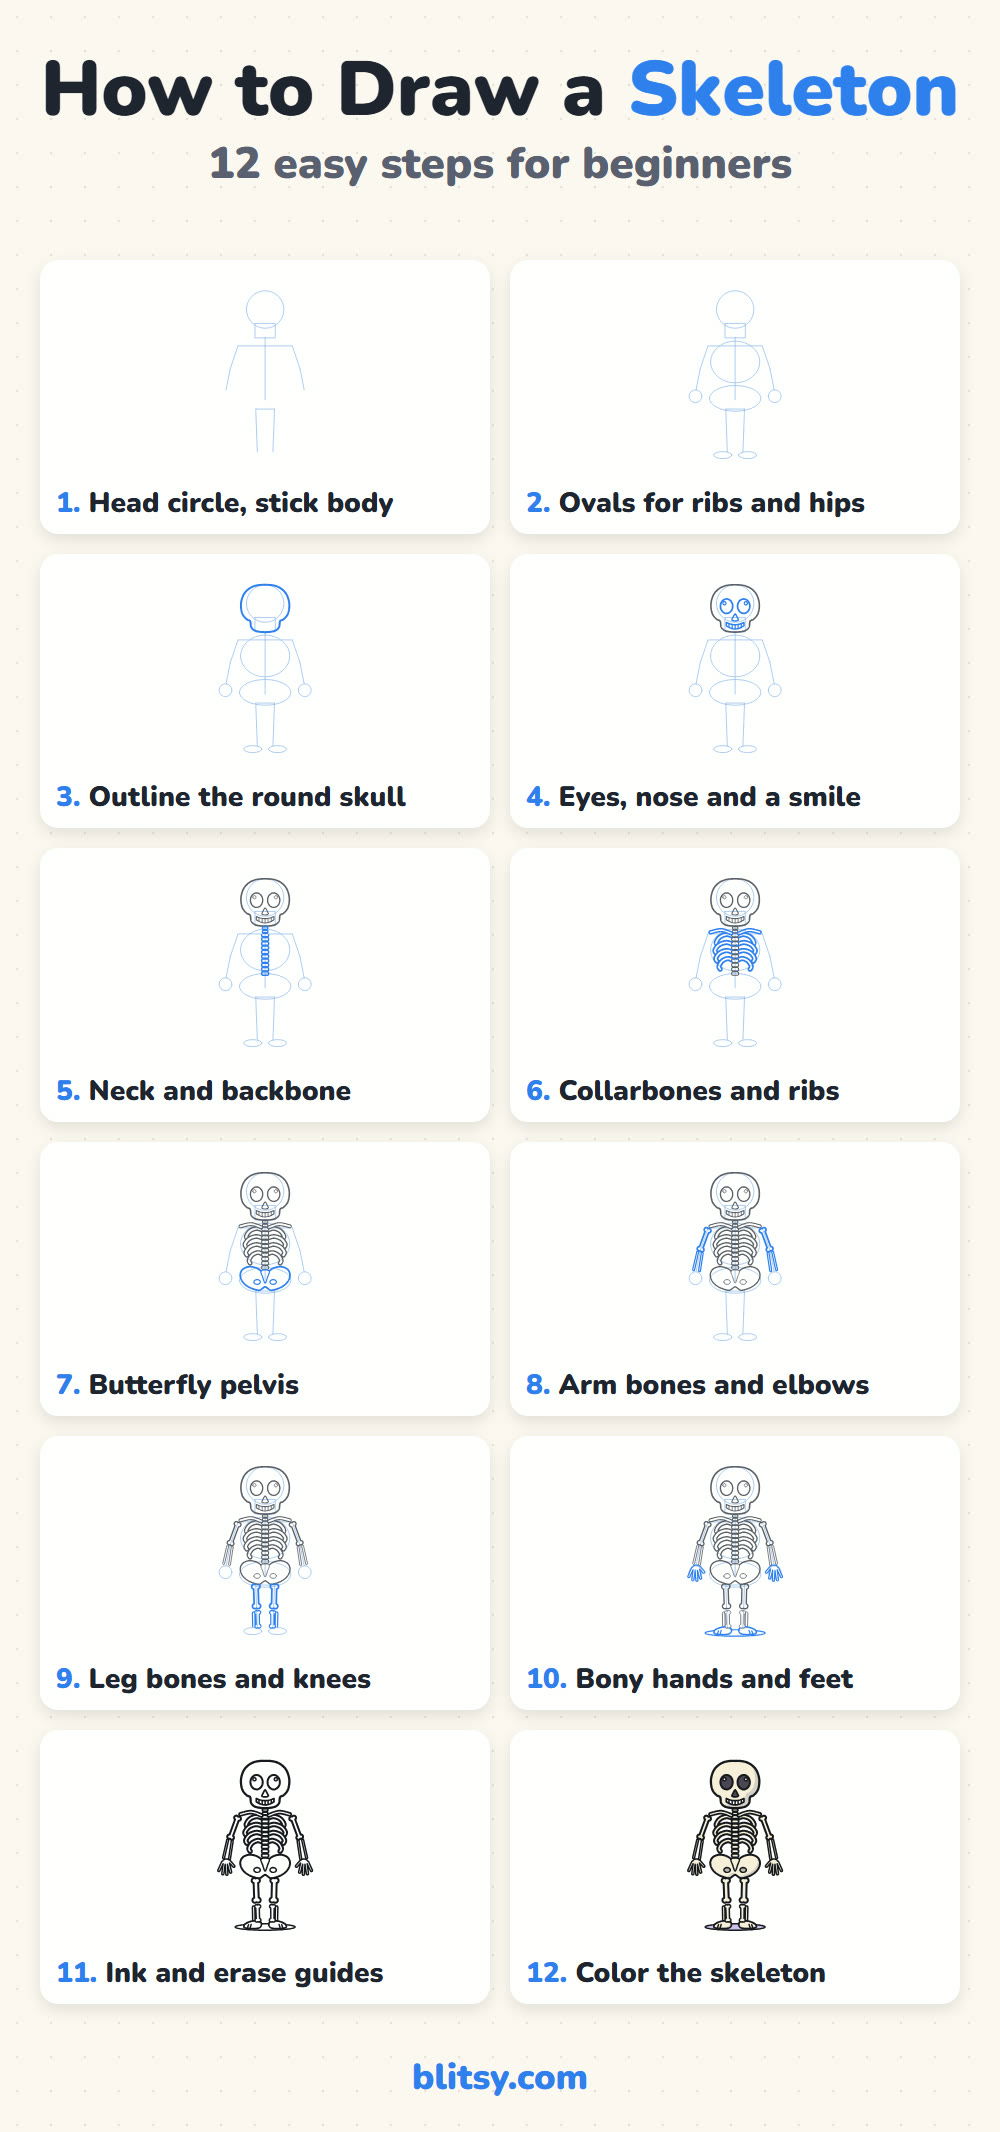
Blue in a picture is the part you draw in that step. Gray is work you already did, and the very light blue shapes are helper guides. Keep those guides faint, because they get erased in step 11.
Quick overview
⏱️ Time: about 30 to 40 minutes
🎯 Level: easy to medium, fine for kids around 7 and up
✏️ Steps: 12
💀 You'll draw: a friendly cartoon skeleton standing on a soft shadow
Skeleton Sketch Supplies to Set Out
- A pencil with a light touch, such as an HB
- A clean eraser for the many guide lines
- A black fineliner or felt tip for the final lines
- Colored pencils in cream, light gray, dark gray and lavender
- A sheet of paper turned upright, since a skeleton is tall
- A ruler if you want straight stick lines
Bones need very little color, so this is a good drawing for a nearly empty pencil case.
How to Draw a Skeleton Step by Step
Step 1: Sketch a head circle and a stick body
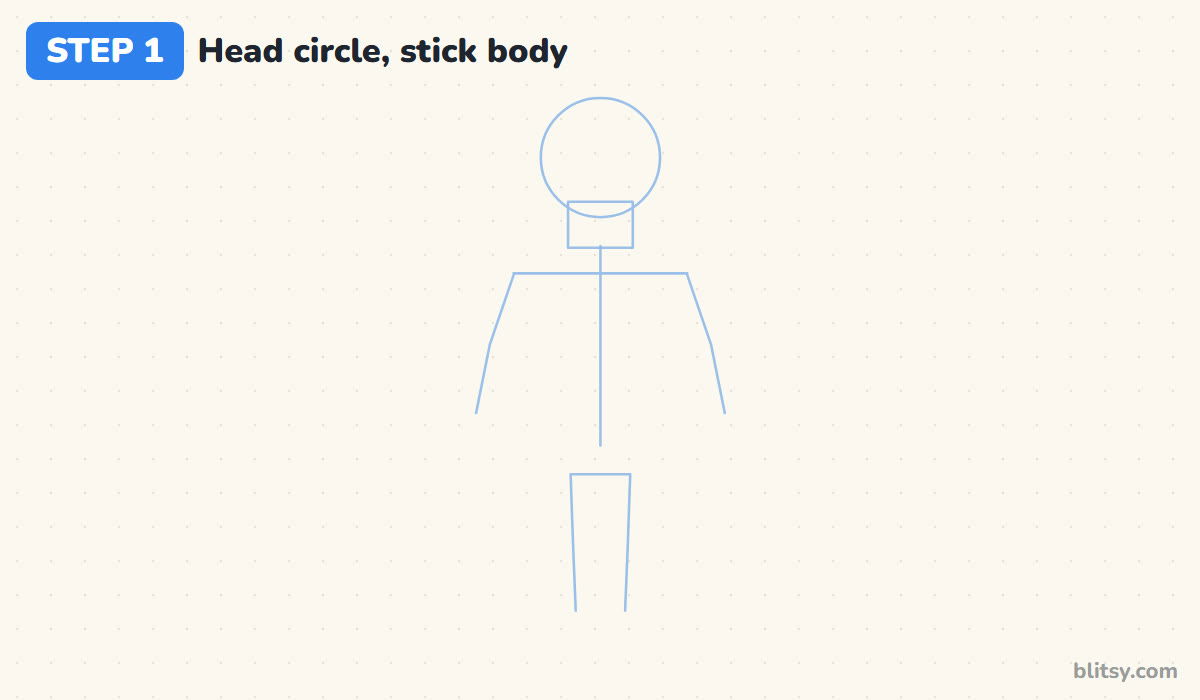
Draw a circle near the top of the page, then a small box under it for the jaw. From the box, run a straight line down the middle for the backbone. Add a short level shoulder line, two bent arm lines and two leg lines. The head is big in this cartoon style, about a quarter of the whole height, which keeps the skeleton cute.
💡 Tip: Mark the top of the head and the bottom of the feet first, so the whole figure fits on the paper.
Step 2: Add ovals for the ribs and hips
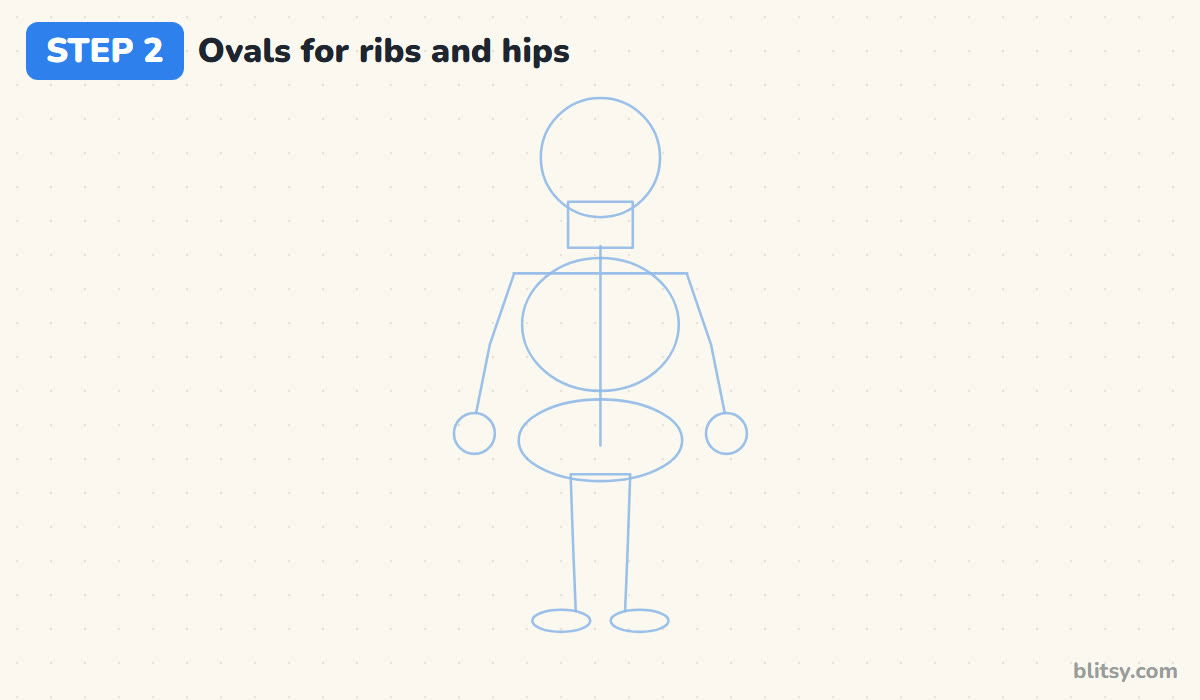
Place a tall oval over the upper backbone for the rib cage. Under it, draw a wide flat oval for the hips. Add a small circle at the end of each arm and a flat oval under each leg for the feet. These shapes only show size and position, so keep them soft.
💡 Tip: Leave a short gap of plain backbone between the two ovals. That gap becomes the lower spine.
Step 3: Outline the round skull
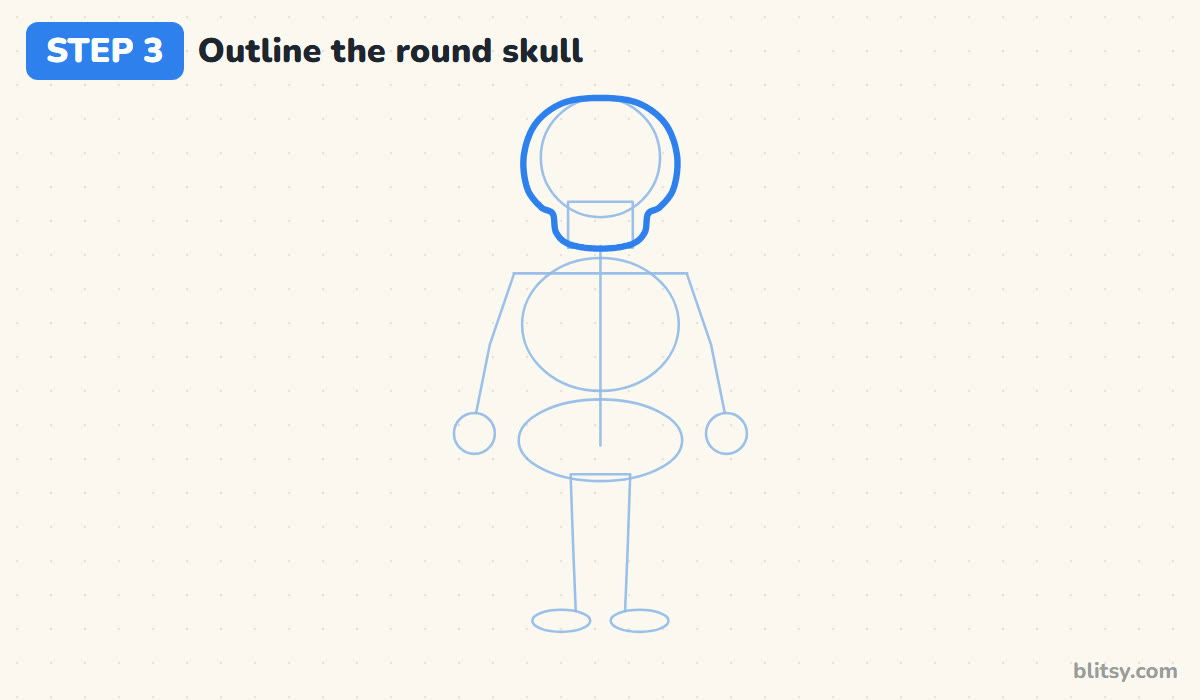
Trace around the head circle to make the skull. Keep the top round, push the sides out a little at the cheekbones, then step in to a narrower jaw at the bottom of the box. I think of it as a light bulb with soft corners. A wide, rounded skull reads as friendly, while a long pointed one looks spooky.



💡 Tip: Draw the left half, then copy each bump on the right side so the skull stays even.
Step 4: Draw the eyes, nose and smile
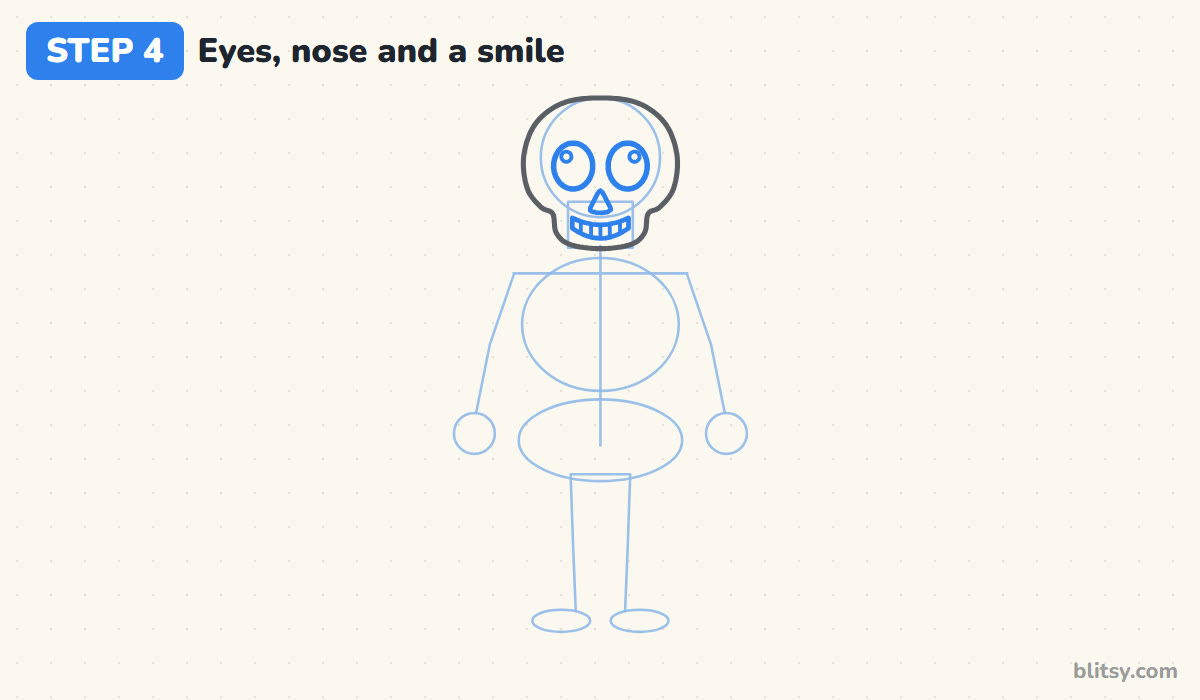
Inside the skull, draw two big oval eye sockets side by side with only a small gap between them. Add a tiny shine circle in each one. Below the eyes, a small rounded triangle makes the nose hole. For the mouth, draw a curved band that bends up like a smile, then split it with short vertical lines into teeth.
💡 Tip: Those tiny shine circles are what make the face look kind instead of creepy, so don't skip them.
Step 5: Stack the neck bones and backbone
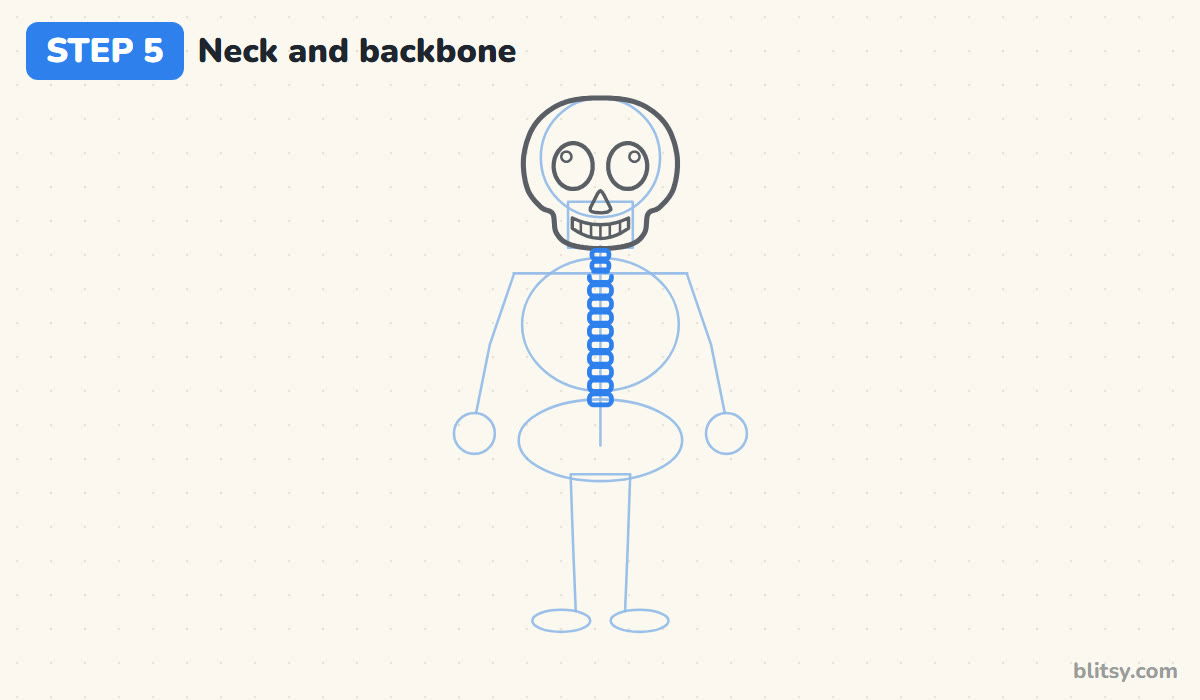
Follow the center line down from the jaw and stack small rounded rectangles like a pile of coins. Make the top two a bit smaller for the neck, then keep going with wider pieces until you reach the hip oval. Most beginners rush this. A thin gap between each piece is what makes it read as a spine and not a ladder.
💡 Tip: Count as you stack. Around a dozen pieces looks right for this size.
Step 6: Add the collarbones and four pairs of ribs
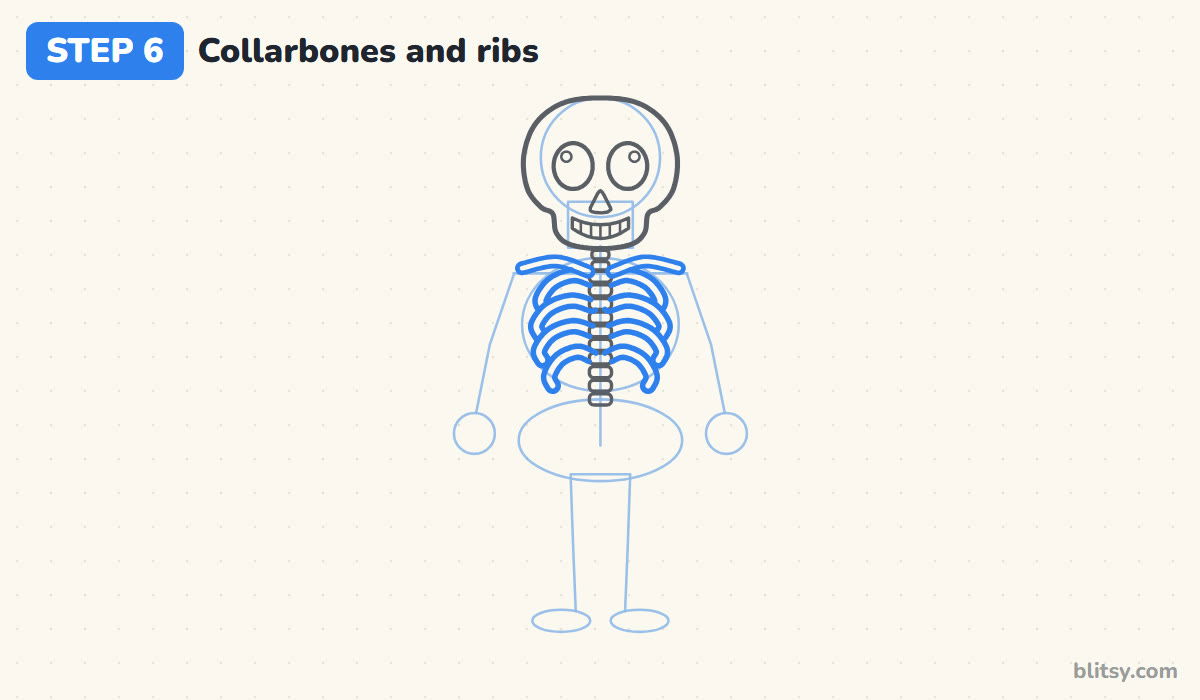
From the top of the backbone, draw a thin curved collarbone out to each shoulder. Then add the ribs as curved bands that leave the spine, swing outward and bend down at the ends. Draw four on each side inside the tall oval, with the bottom pair shorter than the rest.
💡 Tip: Keep the same small gap between each rib so the cage looks even from top to bottom.
Step 7: Shape the butterfly pelvis
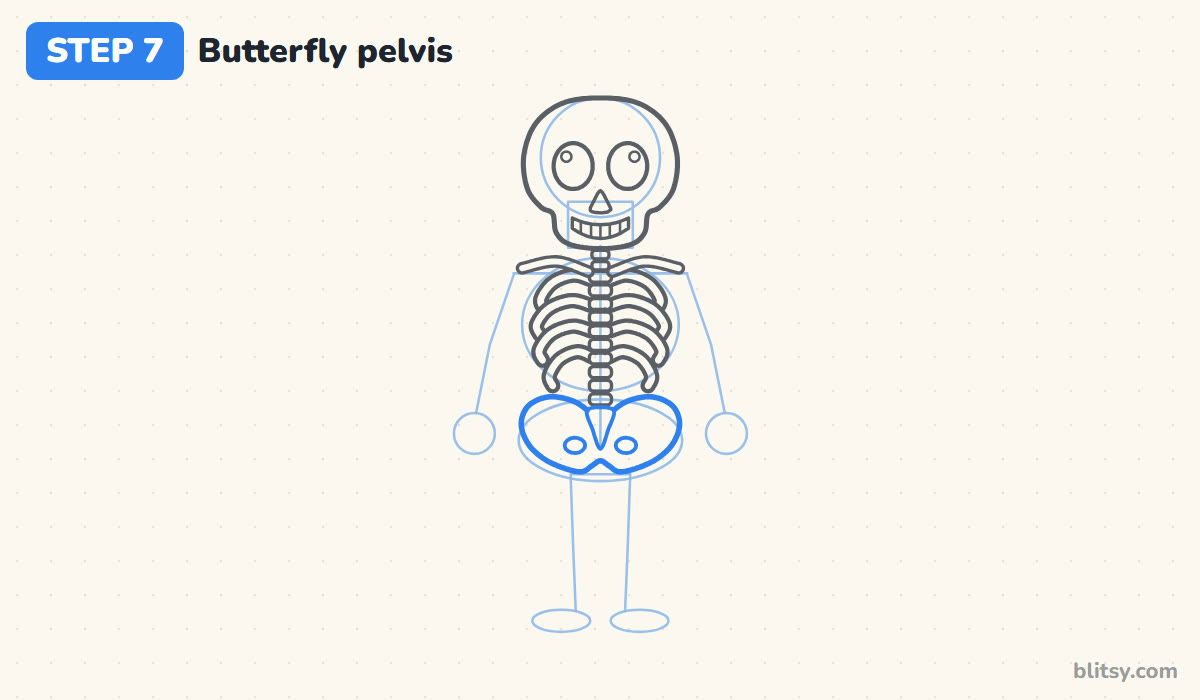
Inside the hip oval, draw the pelvis as two rounded wings joined in the middle, a bit like a butterfly. Dip the top edge down in the center where the spine meets it, and notch the bottom edge up a little too. Add a small pointed shape in the middle for the tailbone and a little oval hole in each wing.


💡 Tip: Make the pelvis about as wide as the rib cage. Wider than that, and he looks like he's wearing a tutu.
Step 8: Draw the arm bones and elbows
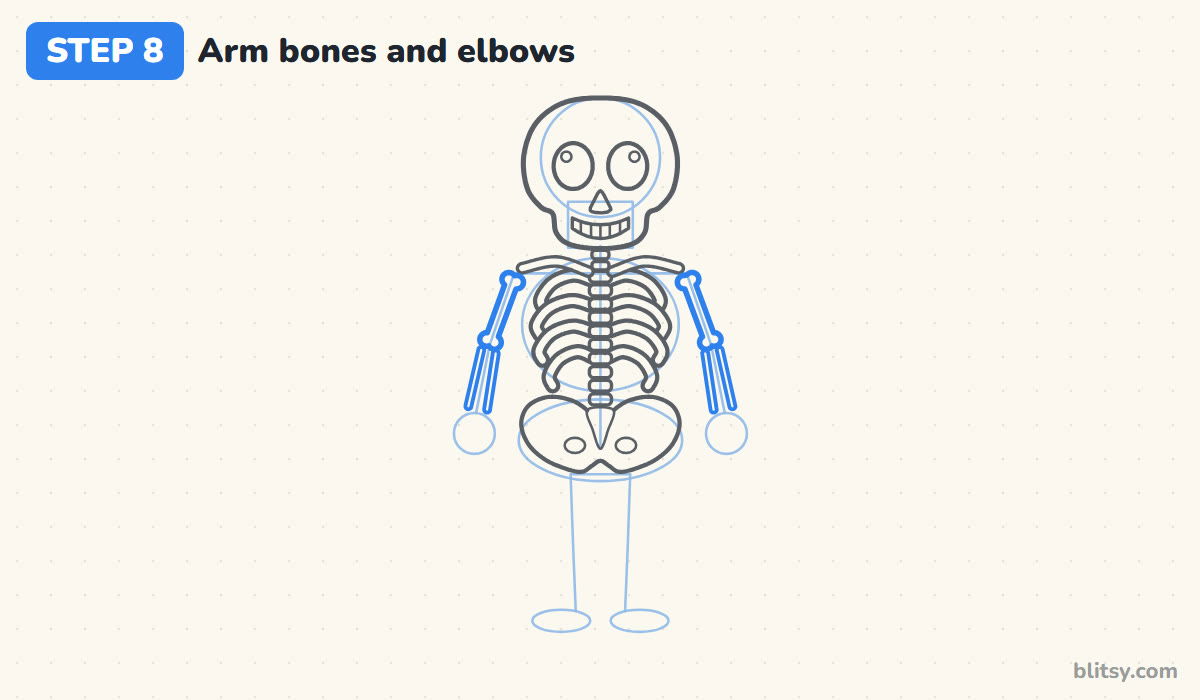
Each upper arm is one bone with two little knobs at each end, like a cartoon dog bone. Start it at the end of the collarbone and follow the guide down to the elbow. Below the elbow, draw two slim bones side by side down to the wrist. Real forearms have two bones too, so this detail is both cute and correct.
💡 Tip: Keep the two forearm bones apart with a narrow strip of paper between them.
Step 9: Draw the leg bones and knees
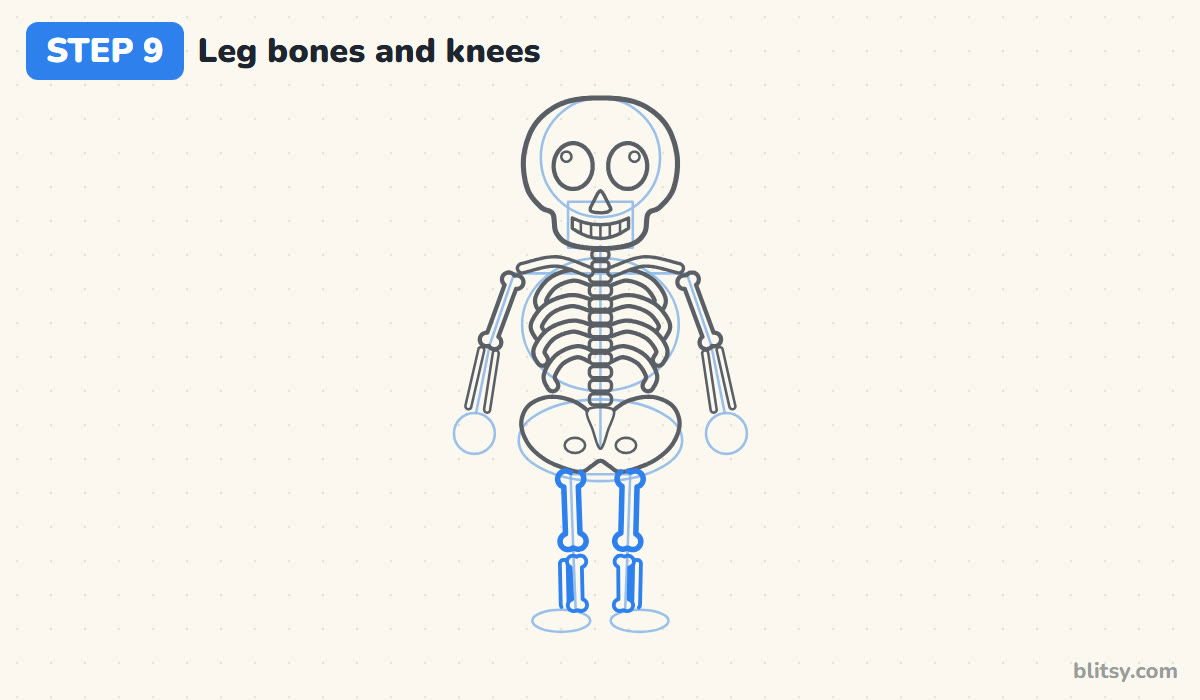
Tuck the top of each thigh bone just under the pelvis so the knob peeks out at the side. Follow the leg guide down and finish at the knee with another pair of knobs. Under the knee, draw a thinner shin bone plus a skinny second bone on its outer side. The thigh should be a touch longer than the shin.
💡 Tip: Line the knees up at the same height by checking them against a ruler held sideways.
Step 10: Add bony hands, feet and a shadow
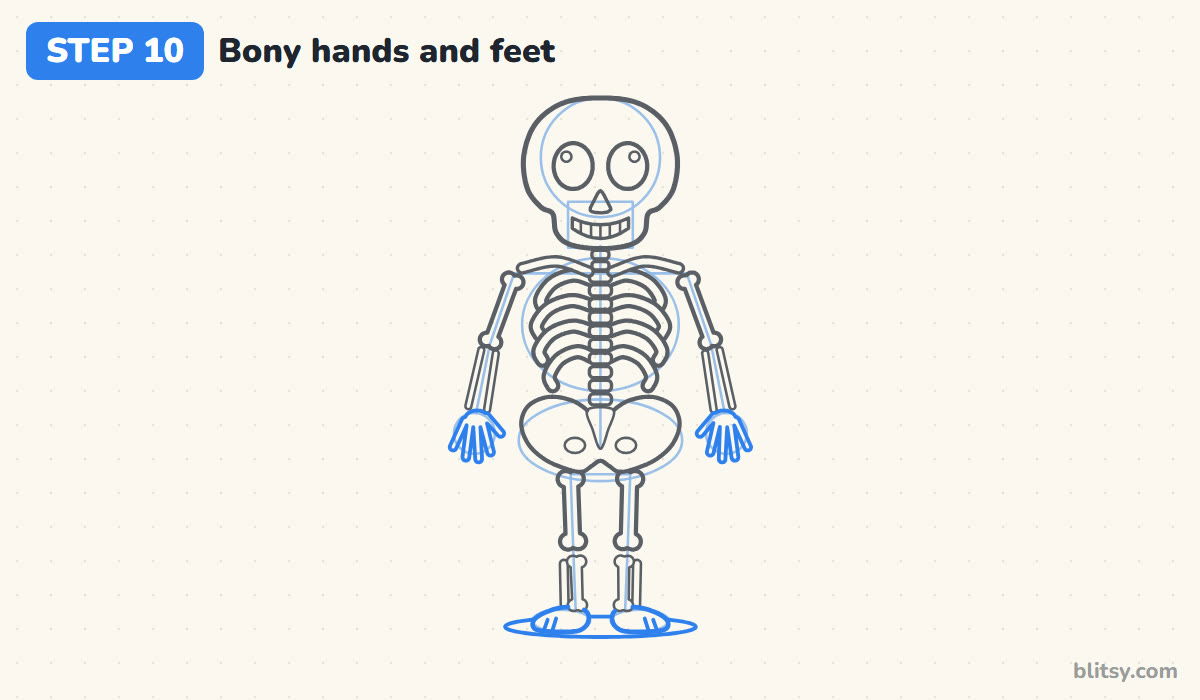
At each wrist, draw a small oval palm. Fan out four thin finger bones below it and add a short thumb pointing toward the body. For the feet, draw rounded shapes that point slightly outward, with two short toe lines. A flat oval under both feet gives him a shadow, so he doesn't float.
💡 Tip: Spread the fingers like a small fan rather than drawing them side by side, so each one stays visible.
Step 11: Ink the bones and erase the guides
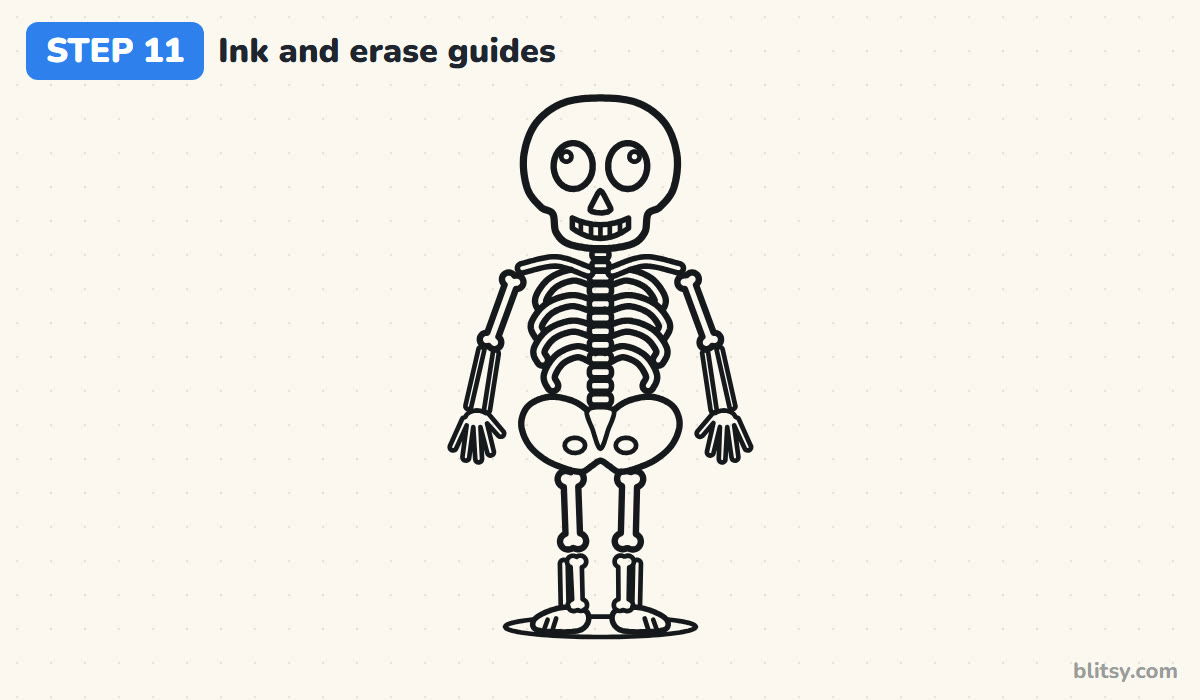
Go over every bone outline with your black pen, plus the face, the hip holes and the shadow. Skip the guides. Wait a minute for the ink to dry before you erase, or it will smear across the ribs. You should end up with a clean skeleton and no stray pencil marks.



💡 Tip: Use a thicker line for the skull outline than for the small bones. It pulls the eye to the face first.
Step 12: Color the skeleton
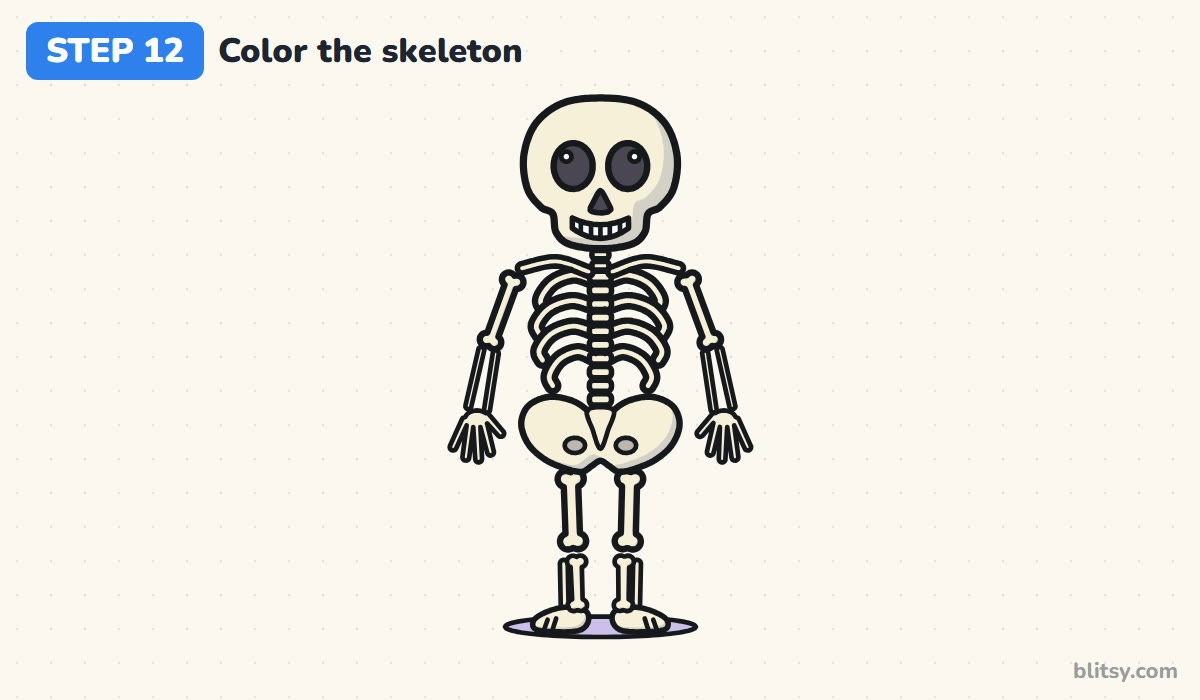
Shade all the bones with a light cream, pressing gently. Add light gray along the lower right edge of the skull, the pelvis and the bigger bones, as if light came from the upper left. Fill the eye sockets and nose with dark gray but leave the shines white. Use gray in the hip holes and lavender for the shadow.
💡 Tip: Color the cream first and the gray on top. The other way round, the gray smudges into the bones.
Bone Mix-Ups That Make a Skeleton Look Off
- Ribs drawn as straight lines. Flat lines look like a ladder. Curve every rib out and down, and the chest suddenly looks round.
- A tiny head. Realistic proportions make a cartoon skeleton look thin and eerie. Keep the skull large.
- No gaps between the vertebrae. A solid stripe down the middle reads as a pole. Leave a thin space between each little block.
- Arms that start at the neck. The upper arm hangs from the outer end of the collarbone, not from the spine. Check the shoulder line from step 1.
- Dark, heavy coloring. Gray all over turns him gloomy. Keep the bones cream and use gray only for the shading.
Halloween Poses and Other Skeleton Spins
Once the standing pose feels easy, bend the elbows and draw him waving or holding a pumpkin. A top hat or sunglasses gives him a whole new character. For a science page, label the main bones with little arrows. My favorite twist is a skeleton dog sitting beside him, made with the same knobby bones. To practice the head alone, try the skull drawing tutorial, and the skeleton hand drawing tutorial helps with the trickier finger bones.
Skeleton Coloring Page and a Printable Bone Guide
Prefer paper over a screen? The skeleton coloring page has a small colored example and a key with each color word at the top, plus a large bold outline ready for crayons. The step-by-step PDF guide holds all 12 steps with their tips, two to a page. Both print fine on Letter or A4 paper.
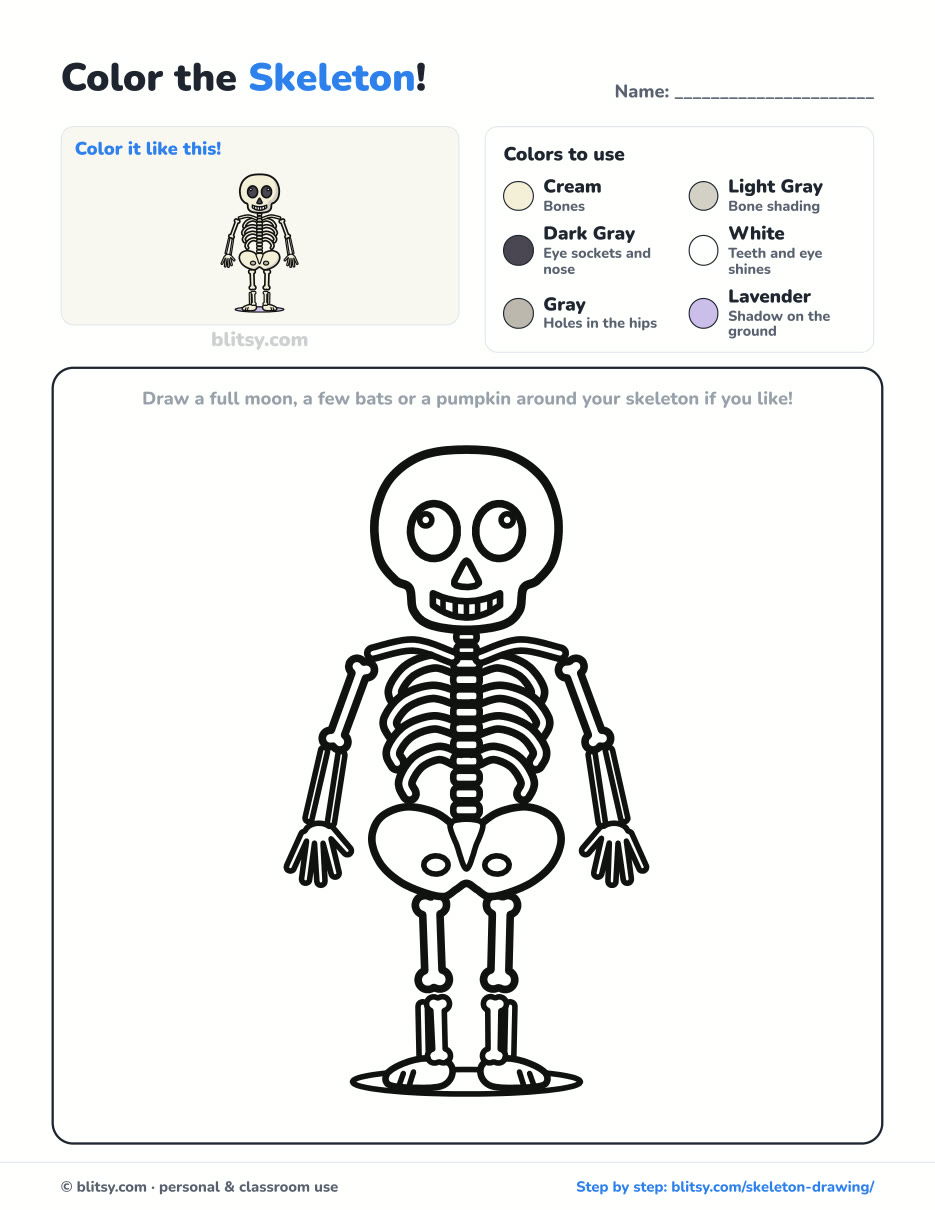
Black outlines with a colored example and the color names at the top. Ready to print and color.
⬇️ Download Coloring PageEvery step picture with its instructions and tips, to keep beside your paper while you draw.
⬇️ Download Drawing Guide📱 On a phone? Tap a download button, then open the file and choose Share → Save to Files or Print. On a computer, the PDF opens or saves straight to your Downloads folder.
All Twelve Bone Steps on a Single Pin
Bones, Faces and Bodies: Tutorials to Try Next
Each link opens a single step-by-step tutorial. Several of them use the same guide-line thinking you just used for the skeleton.
- Side Profile Drawing: The side profile drawing tutorial starts with a plain circle and uses measuring lines to place every feature.
- Hand Drawing: Learn how to draw a hand step by step in palm view, with five fingers and three palm lines.
- Ghost Drawing: A big waving ghost, a baby ghost and a pumpkin all start from one circle in this cute ghost drawing tutorial.
- Realistic Drawing: Shade a shiny apple under a single lamp with the realistic drawing step by step lesson.
- Male Face Drawing: Every feature sits on a guide line in the male face drawing tutorial, finished with short brown hair.
- Smile Drawing: Draw one big grin and three smaller variations with this how to draw a smile guide.
- Chalk Art: The chalk art tutorial walks you through a hopscotch grid, a rainbow on two clouds and a sun.
- Family Drawing: Four people, a puppy and a red balloon come from a few shapes in the family drawing tutorial.
- Tooth Drawing: A grinning molar with its toothbrush and sparkles takes ten steps in the tooth drawing step by step lesson.
- Lung Drawing: For a science page, the lungs drawing tutorial draws the trachea and branching airways, ready for labels.
- Emoji Drawing: Three yellow faces grow from the same three circles in this emoji drawing tutorial.
- Woman Drawing: Mark six head lengths first, then build the figure, in the how to draw a woman tutorial.
- Skull Drawing: Practice the head alone with the skull drawing step by step lesson, finished with two little marigolds.
- Heart Drawing: The heart drawing tutorial shows how to keep both sides even, then adds three small heart friends.
Skeleton Questions I Get Around Halloween
What is the easiest way to draw a skeleton?
Start with a stick figure and a big head circle. Then replace each stick with a bone, add curved ribs around the spine and a butterfly shape for the hips.
How many ribs should a cartoon skeleton have?
A real person has 12 pairs, but that crowds a small drawing. Three to five pairs on each side is plenty for a cartoon.
How do I make a skeleton drawing look cute and not scary?
Draw a large round skull, big eye sockets with shine dots and a curved smile. Soft cream colors help too.
How long does it take to draw a skeleton?
Most beginners need about half an hour for the pencil work and another ten minutes to ink and color it.
Pin your finished skeleton on the fridge this October and see who notices he's smiling at them. 💀
Related posts:
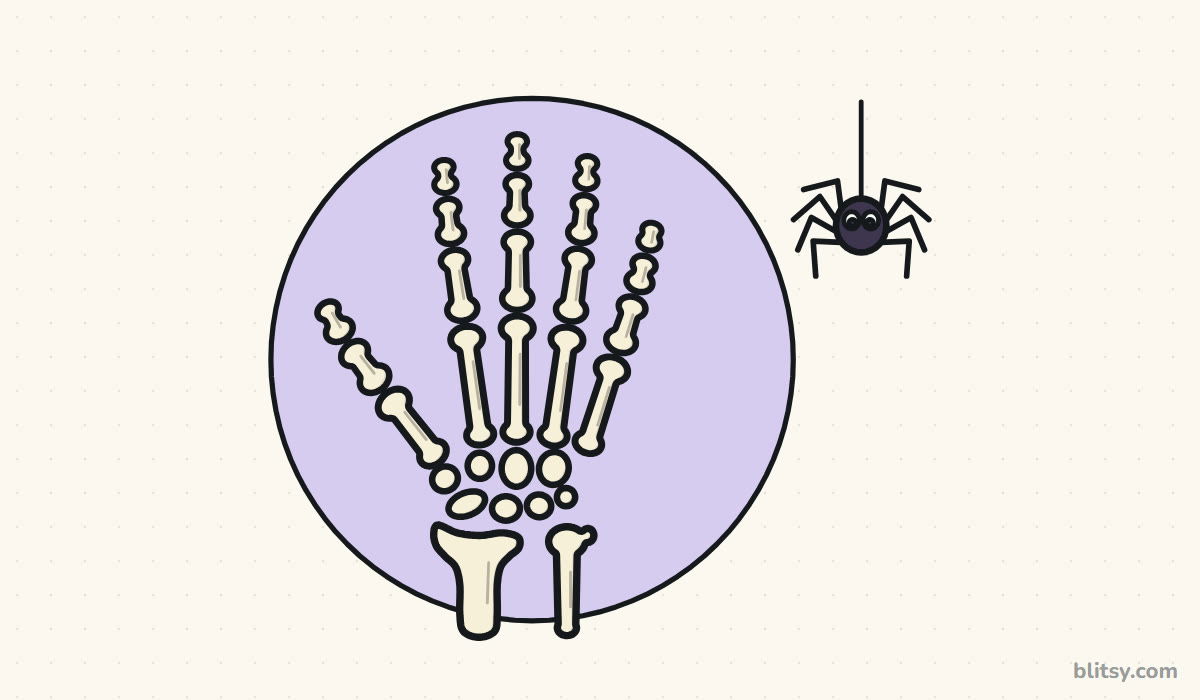 How to Draw a Skeleton Hand Step by Step (Easy Spooky Bones)
 How to Draw a Whale Step by Step (Easy for Beginners)
 How to Draw a Woman Step by Step (Easy Body Proportions)
 How to Draw a Plant Step by Step (Easy Potted Monstera)
 How to Draw the Fortnite Llama Step by Step (Easy Fan Art)
 How to Draw a Hoodie Step by Step (Front and Back View)
 How to Draw a Parrot Step by Step (Easy Scarlet Macaw)
 How to Draw a Police Car Step by Step (Easy for Kids)
 How to Draw a Volcano Step by Step (Easy Erupting Volcano)
 How to Draw a Crow Step by Step (Easy for Beginners)
 How to Draw a Tiger Step by Step (Easy Walking Pose)
 How to Draw a Heart Step by Step (Even, Symmetric Shape)

