
A bony hand looks like a pile of tiny pieces, and that is exactly why it scares people off. The trick is to stop seeing pieces and start seeing five lines with dots on them. In this lesson I show you how to draw a skeleton hand step by step, beginning with a light palm shape and ending with a spooky but friendly hand in front of a purple moon. You'll draw all 27 bones, and none of them is harder than a small rounded stick.
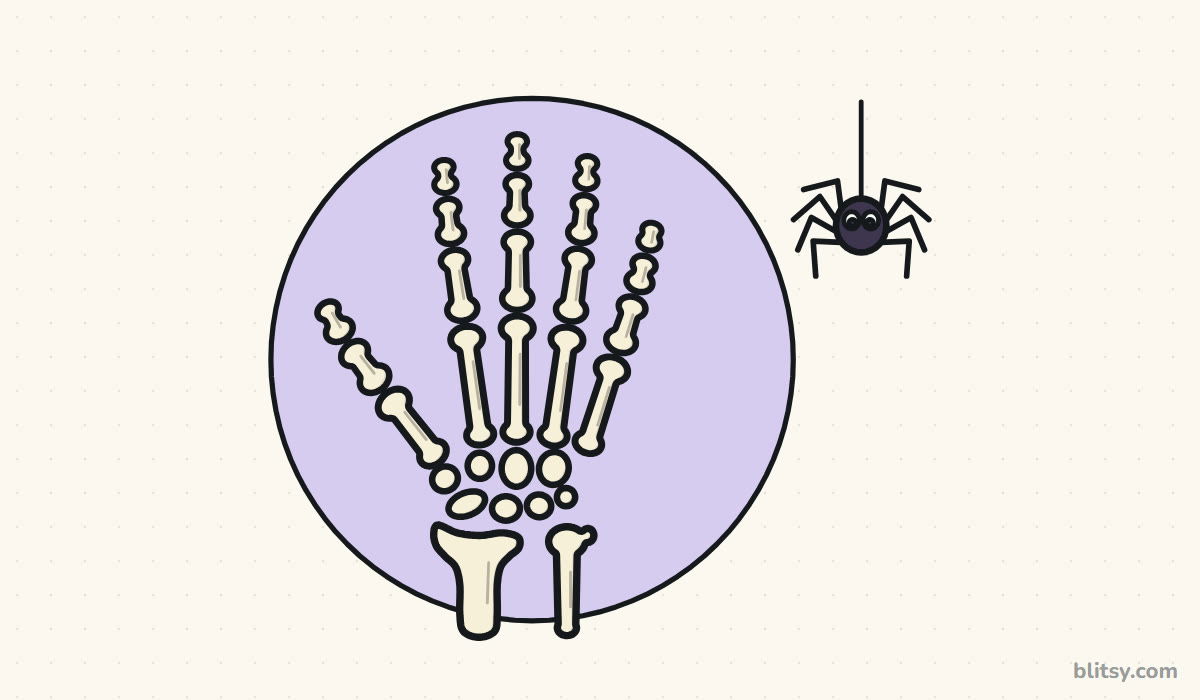
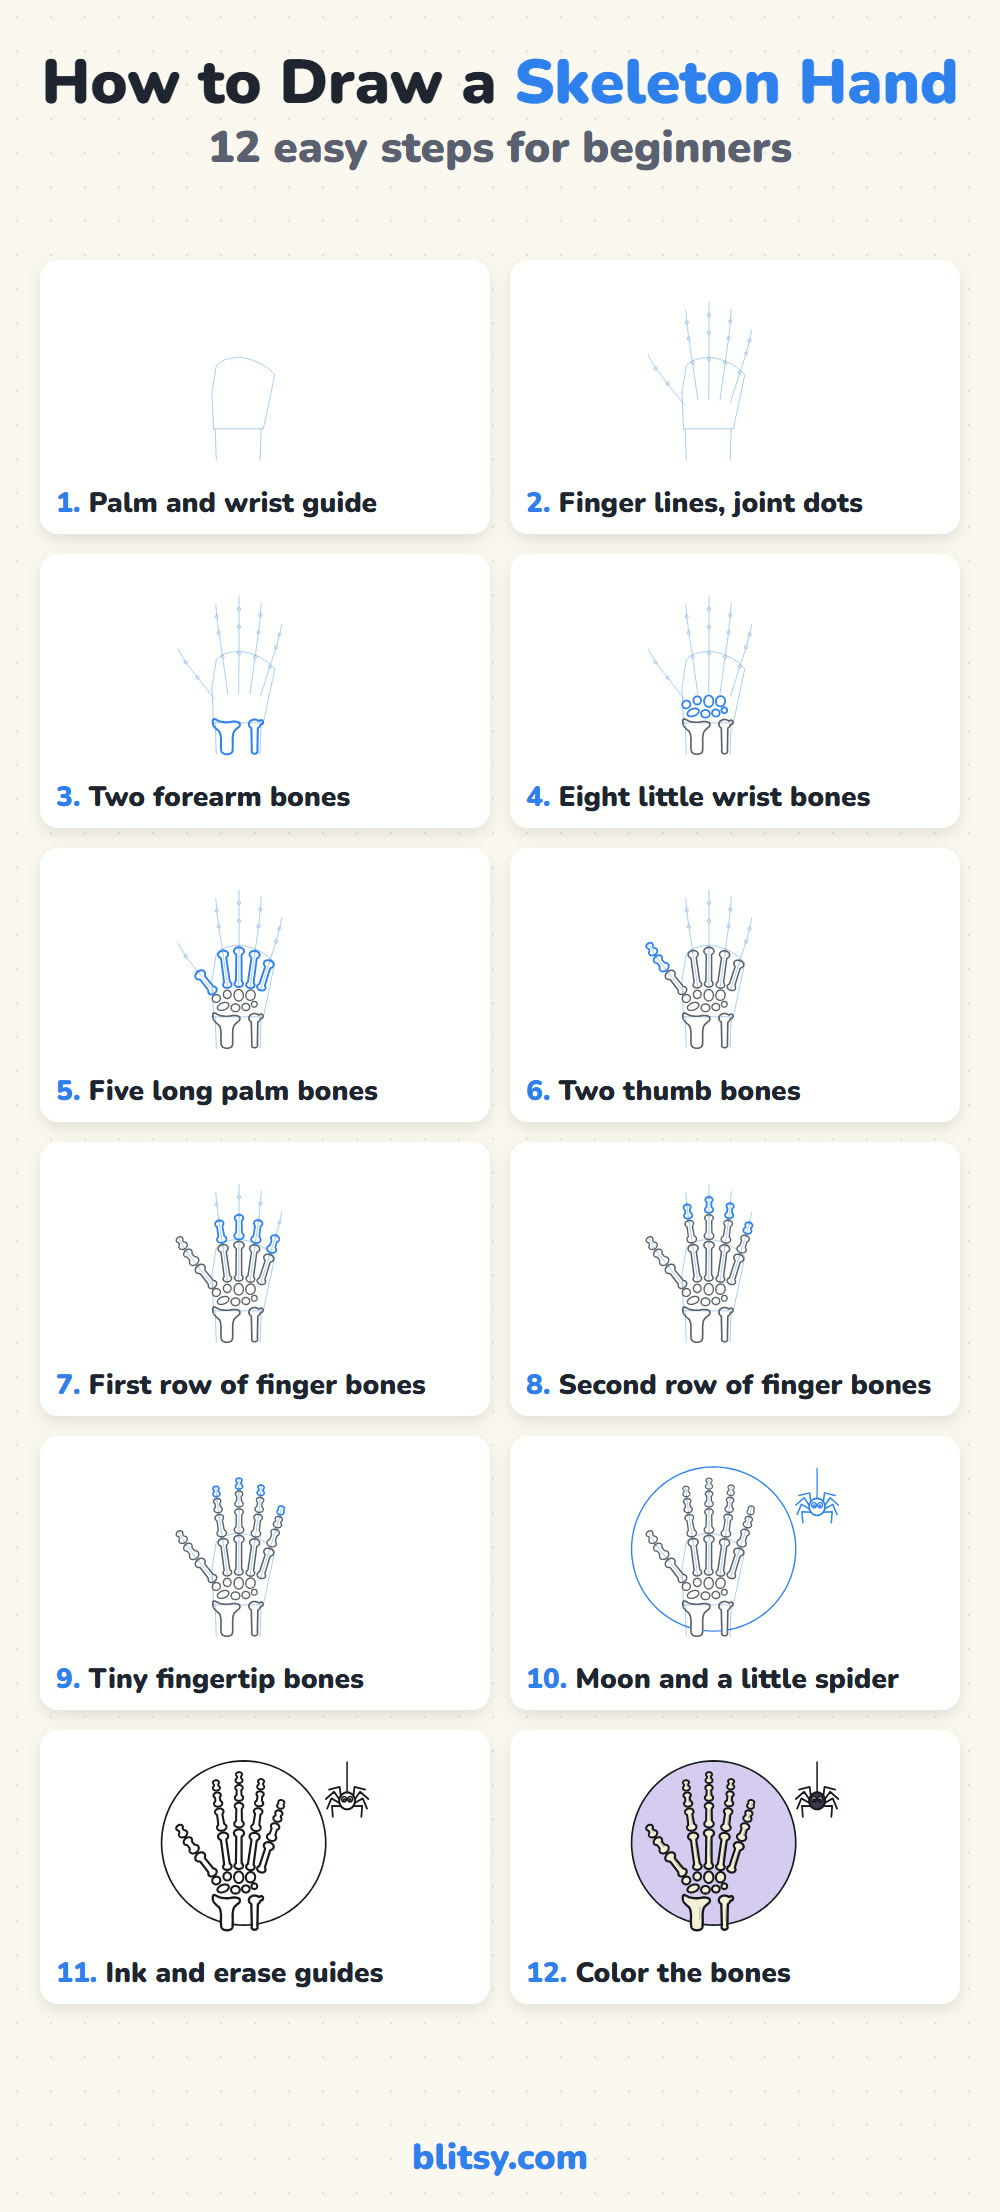
Each picture adds only the bones shown in blue. Anything gray was drawn in an earlier step, and the faint blue lines are helpers that get rubbed out near the end, so press very softly when you draw them.
Quick overview
⏱️ Time: roughly 35 to 45 minutes
🎯 Level: easy to medium, good for kids from about 8 who can count joints
✏️ Steps: 12
🦴 You'll draw: an open skeleton hand with its wrist bones, a lavender moon and a small spider
Bits and Bobs for a Bony Hand
- An HB pencil, or any pencil you can hold with a light grip
- A soft eraser that won't tear the paper
- A black fineliner for the final outlines
- Colored pencils: cream, light gray, gray, lavender and dark purple
- A sheet of plain paper held upright
- Something round to trace for the moon, like a small plate (optional)
If you only own a gray pencil and a purple one, you can still finish this drawing and it will look good.
How to Draw a Skeleton Hand Step by Step
Step 1: Sketch a palm shape and the wrist
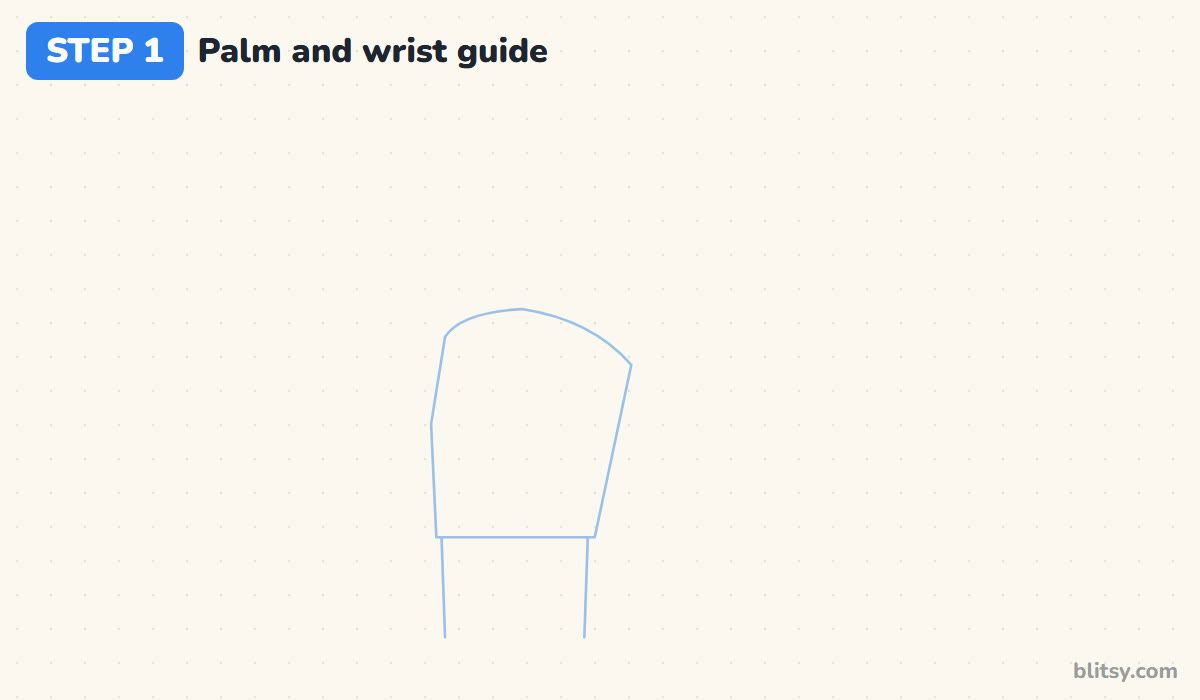
Start in the lower middle of the page with a soft shape for the palm. It is narrow at the bottom, wider at the top, and the top edge curves like a gentle hill. From the bottom corners, run two lines straight down to the edge of the page for the wrist and forearm.
💡 Tip: Leave more room above the palm than below it. The fingers take up almost half the hand's height.
Step 2: Add finger lines and joint dots
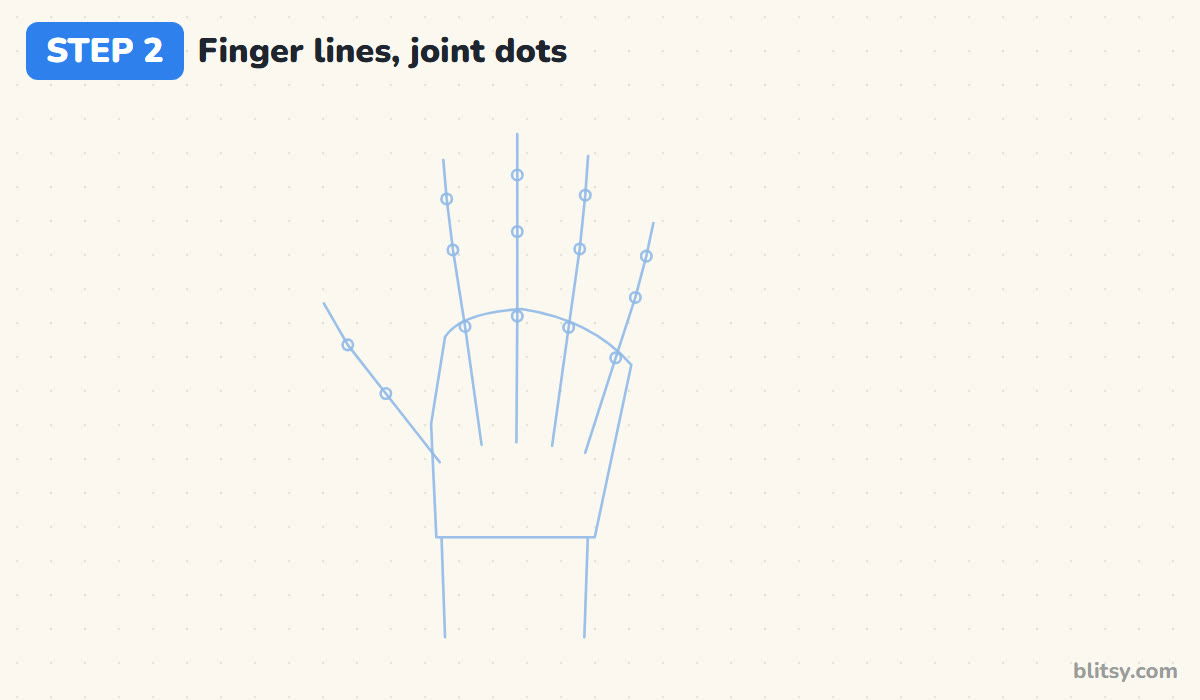
Draw five lines that start low inside the palm and fan out upward. The middle one is the longest, the little finger is the shortest, and the thumb line leans out to the left at a wide angle. Put small circles where each knuckle bends: three on every finger line and two on the thumb. The first row of dots sits near the top of the palm shape, where the knuckles are.
💡 Tip: Spread the lines a little wider at the top than at the bottom, so the fingers don't crowd each other.
Step 3: Draw the two forearm bones
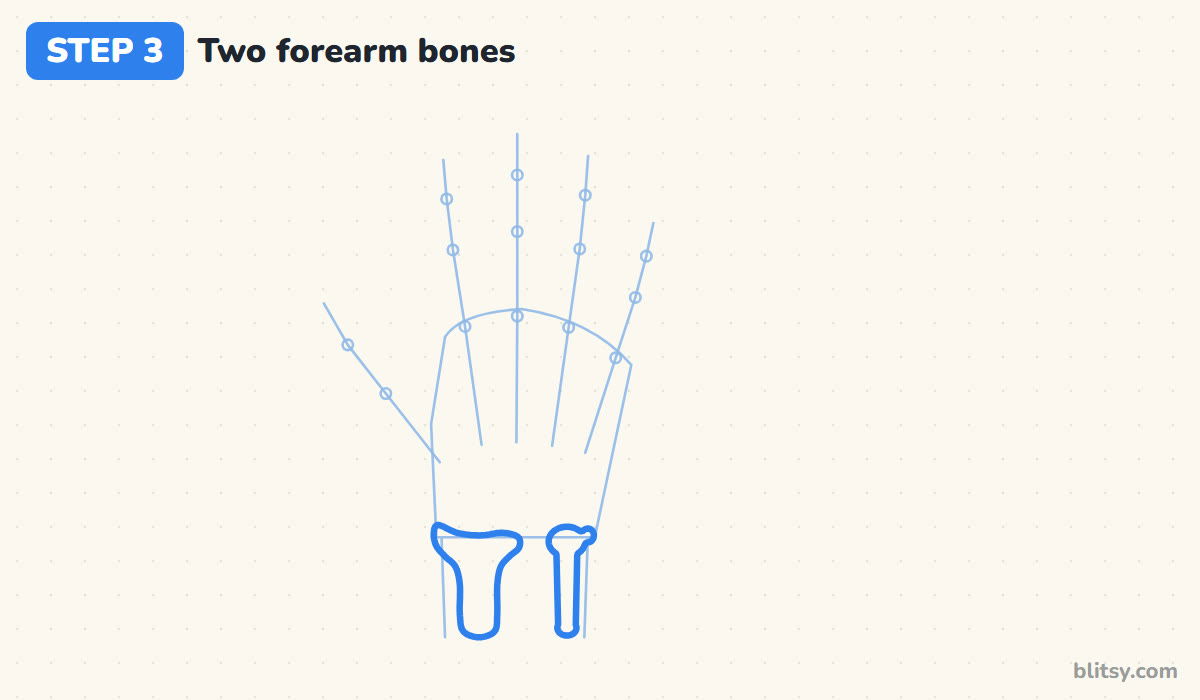
On the thumb side, draw the radius: a wide top that narrows into a straight shaft, a bit like a tall cup. On the little finger side, draw the ulna, a slimmer bone with a round head and a tiny knob on its outer edge. Keep a clear gap between them.




💡 Tip: Make the radius roughly twice as wide as the ulna. That size difference is what makes it look real.
Step 4: Fit in the eight little wrist bones
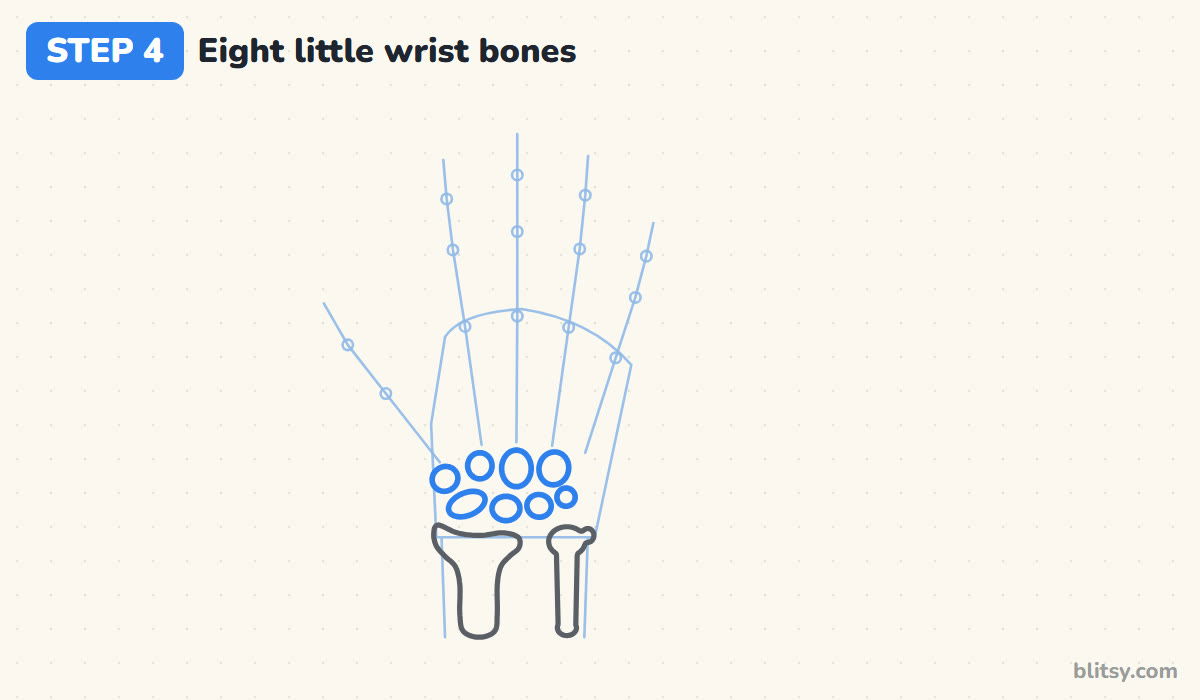
Just above the forearm bones, draw two rows of small rounded shapes, four in each row. In the top row, the third one from the thumb side is the biggest. In the bottom row, the bone on the thumb side is a longer oval and the one on the far right is a tiny dot. Real wrist bones are lumpier, but pebbles read well and are easier.
💡 Tip: Think of a little pile of pebbles. Each one should have a thin ring of paper around it.
Step 5: Draw the five long palm bones
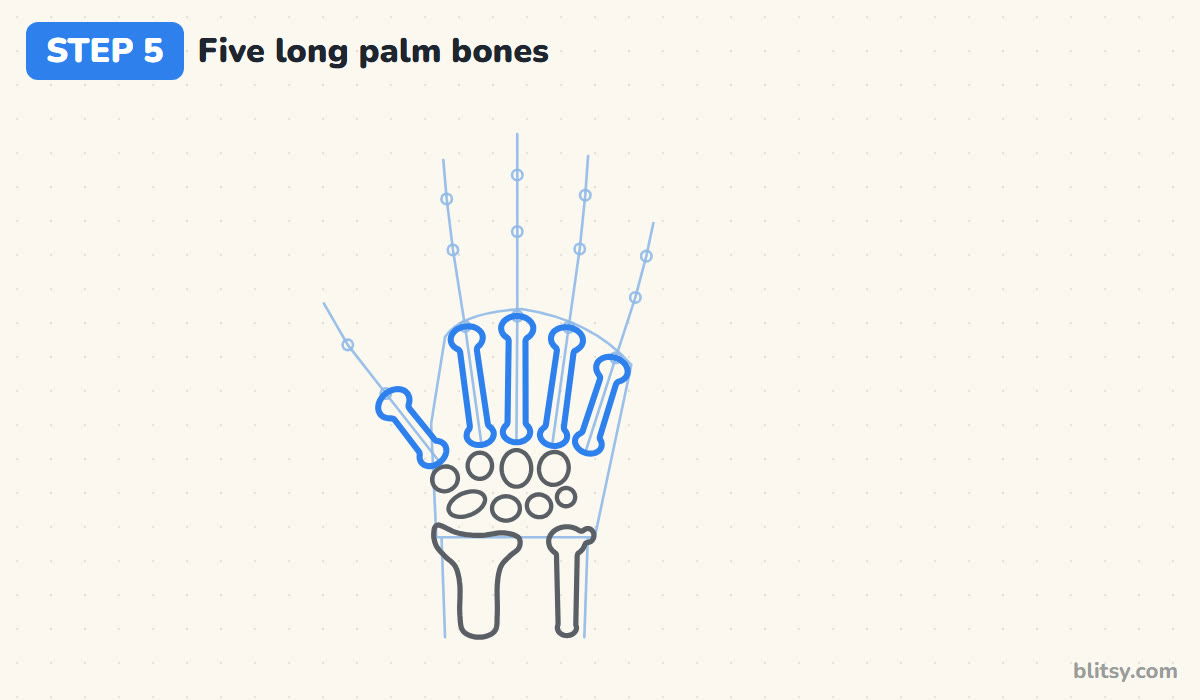
These are the metacarpals, one for each finger. Start each one at the top of the wrist bones and follow its guide line up to the first joint dot. Give every bone a slightly flat base, a thin middle and a round knob at the top, where the knuckle is. The thumb bone is shorter, starts at the lowest pebble on the far left and points out to the left.
💡 Tip: Draw the middle palm bone first and use it as a ruler for the others.
Step 6: Add the two thumb bones
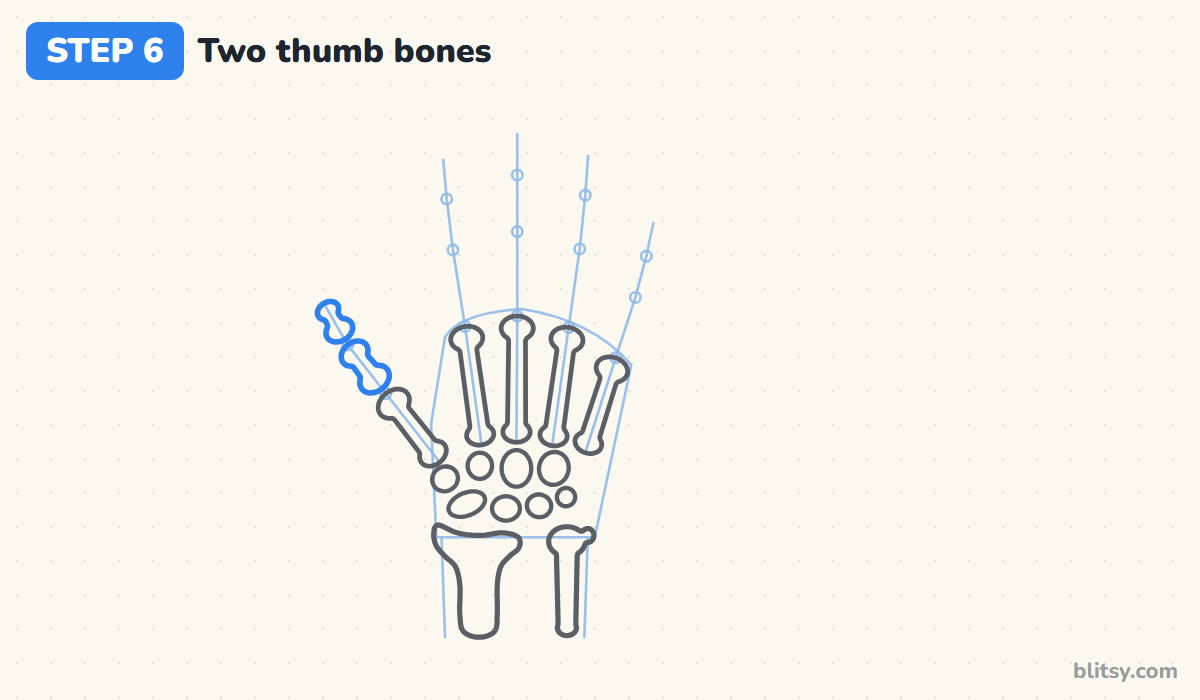
Keep following the thumb line out past the knuckle. Leave a small gap, draw one bone up to the next joint dot, leave another gap, then finish with a shorter bone that ends in a soft round tip. Only two bones here, not three. Most beginners I watch expect three.
💡 Tip: Tilt the second thumb bone up a tiny bit more than the first, which gives the thumb a relaxed bend.
Step 7: Draw the first row of finger bones
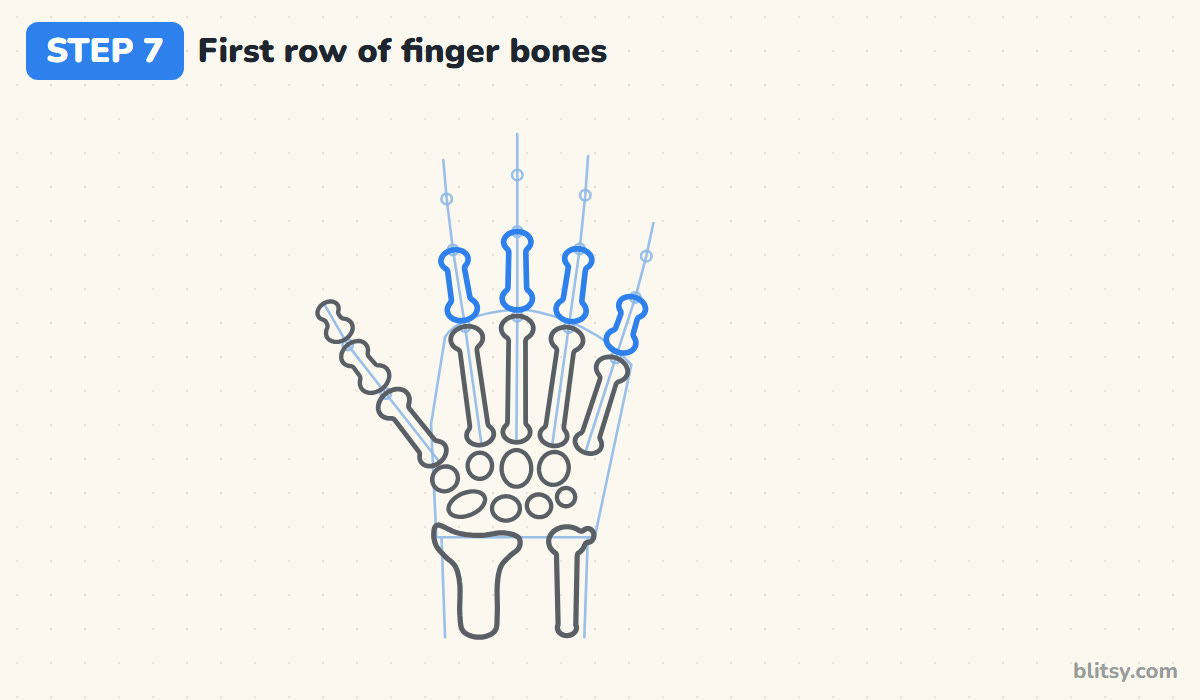
Now go to the four fingers. Right above each palm knuckle, after a small gap, draw the first finger bone up to the next dot. The middle finger gets the longest one and the little finger the shortest.




💡 Tip: Check the gaps by eye. If one gap is twice as big as the rest, the finger will look broken.
Step 8: Add the second row of finger bones
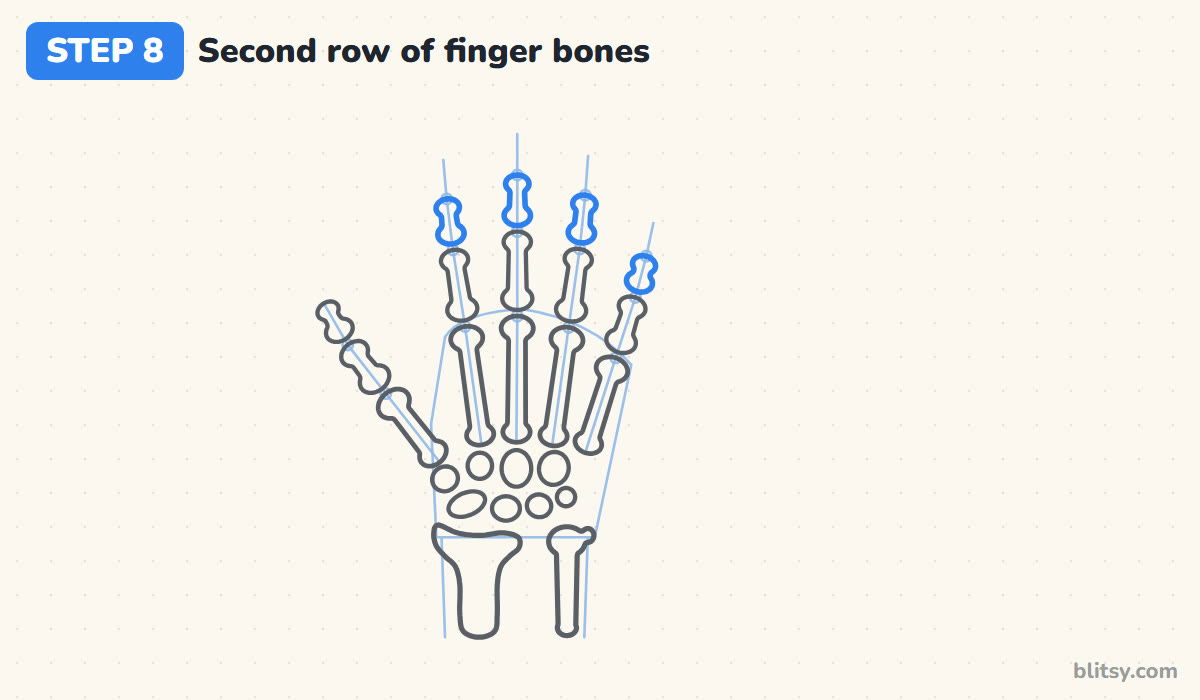
Each finger gets a second, shorter bone above the first. I make it about two thirds the length of the bone below it, with the same round ends but a thinner middle. Follow the fan of the guide lines.
💡 Tip: Turn your paper sideways if your hand blocks the view of the little finger.
Step 9: Finish with the tiny fingertip bones
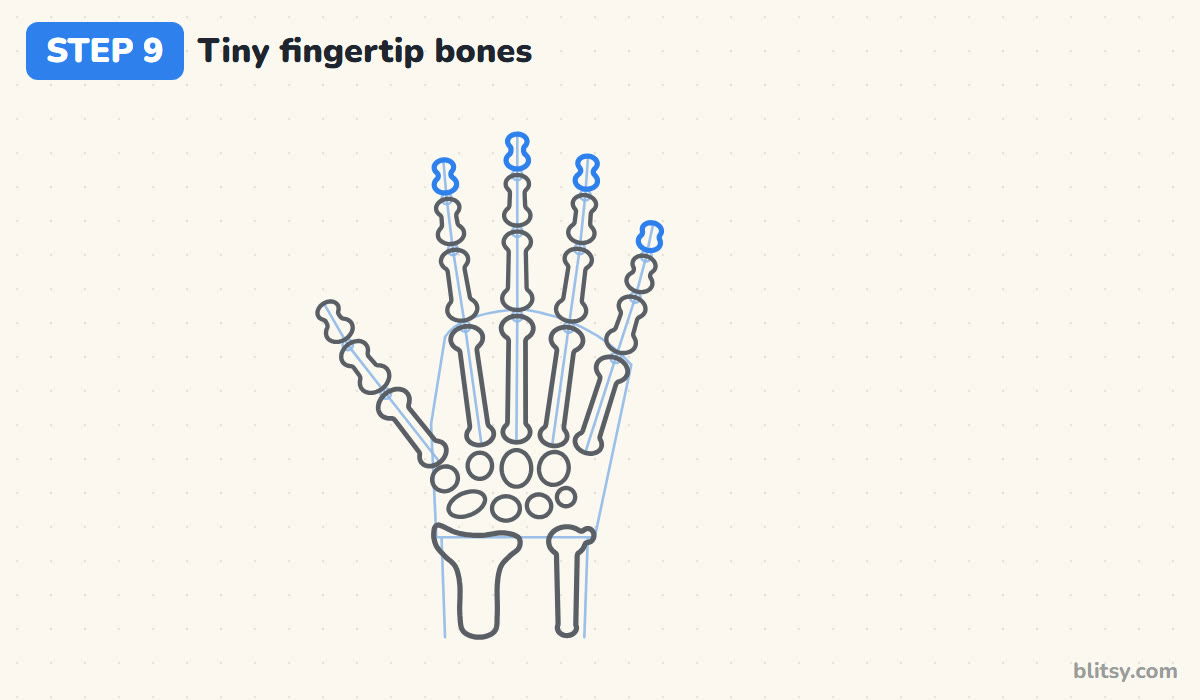
The last bone on each finger is the smallest of all. Draw it short, with a round base and a slightly blunt tip. Count the finger bones once you're done: three on each finger plus two on the thumb makes 14. Together with the 8 wrist bones and 5 palm bones, that is all 27 bones of a real hand.
💡 Tip: Stop and count before you ink. Fixing a missing bone in pencil takes seconds.
Step 10: Draw a moon and a little spider
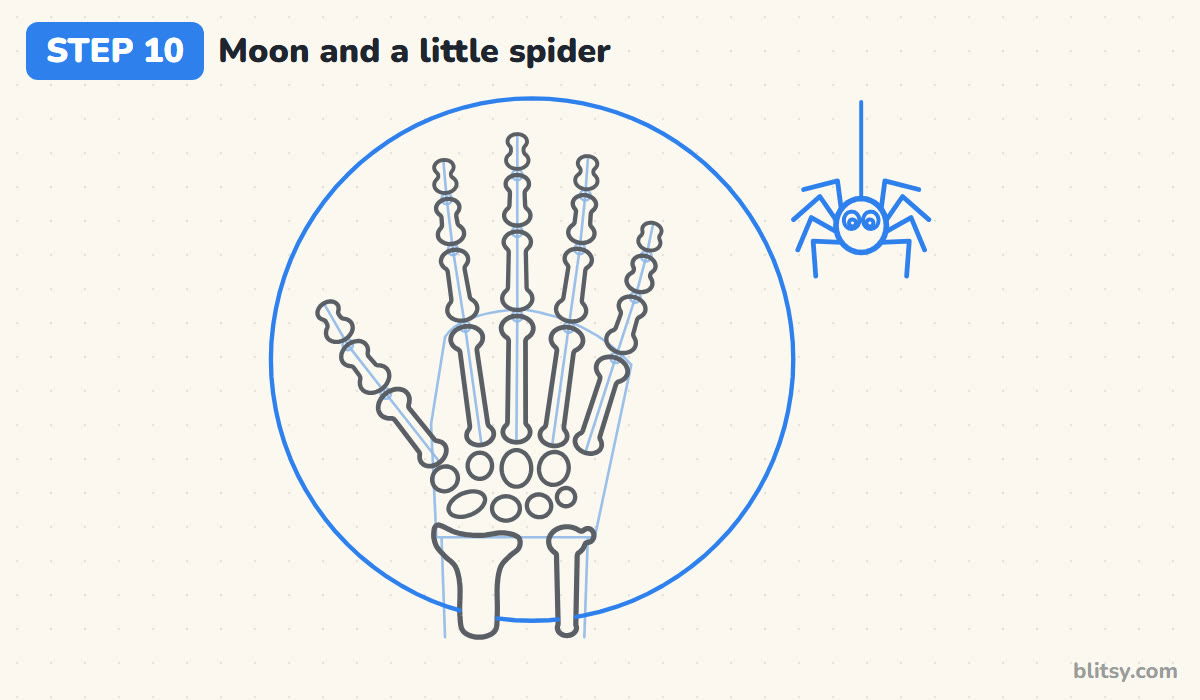
For a Halloween mood, draw a big circle behind the hand, centered a little above the wrist. Stop the line wherever it touches a bone, so the bones stay in front. On the right, hang a spider from a straight thread: a round body, two eye circles with dots, and four bent legs on each side that go up to a knee and then down.
💡 Tip: Skip the spider if small details frustrate you. The moon alone already frames the hand.
Step 11: Ink the bones and erase the guides
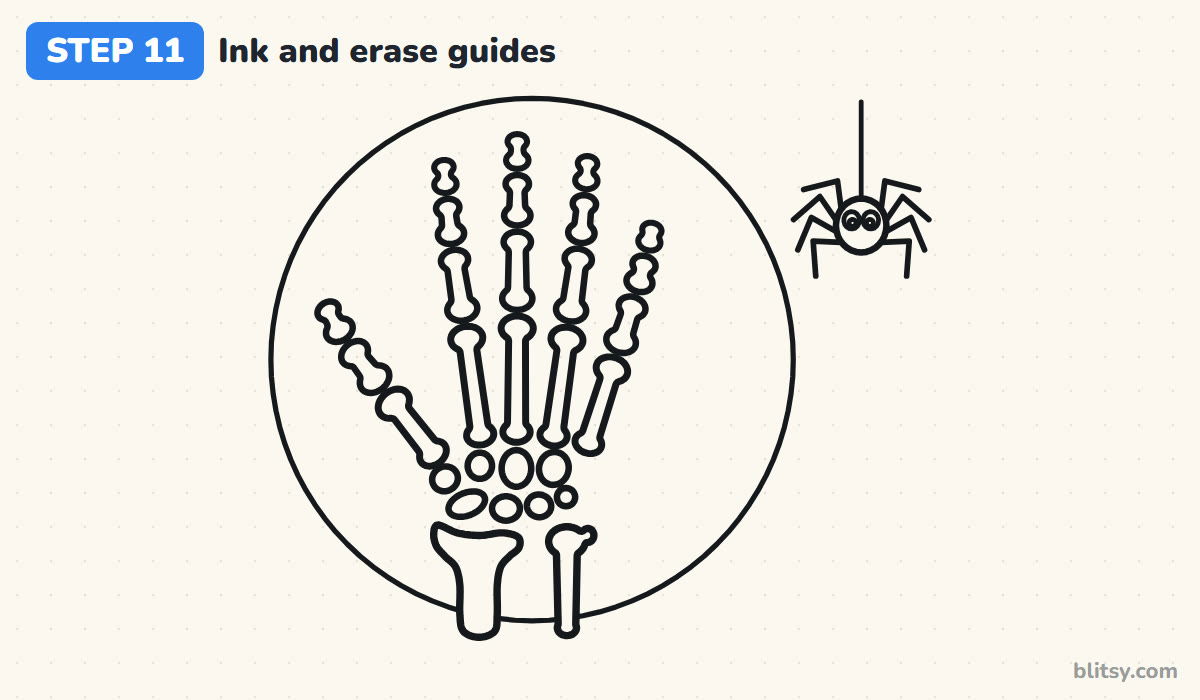
Trace every bone, the moon, the thread and the spider with your black pen. Leave out the palm shape, the finger lines and the joint dots. Let the ink dry for a minute, then erase all the pencil guides. Without them, the gaps between bones look clean.




💡 Tip: Go around small bones in one slow loop instead of short scratchy strokes.
Step 12: Color the bones and the moon
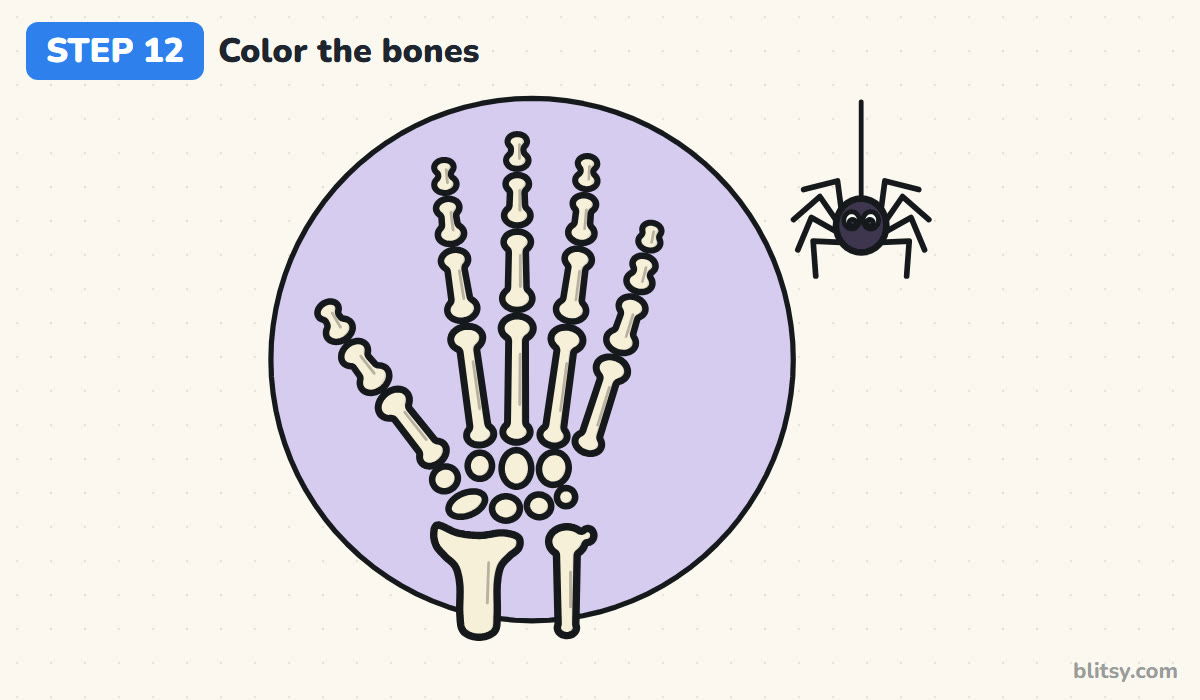
Color every bone a soft cream. Add light gray along the right edge of each bone, as if light came from the upper left, then draw a thin gray line inside the longer bones. Fill the moon with lavender, working around the bones carefully. The spider is dark purple with white eyes.
💡 Tip: Color the lavender in small circles. It hides the pencil strokes on a large area.
Where Bony Fingers Tend to Go Wrong
- Three bones in the thumb. The thumb has only two finger bones. Its third long bone is the palm bone hidden in the hand.
- Short, stubby palm bones. Each palm bone runs from the wrist pebbles all the way up to the knuckle, about one and a half times the length of the first finger bone. Follow the dots from step 2.
- Bones glued together. With no gaps at the joints, the finger turns into a long sausage. Leave a thin space at every knuckle.
- All the fingers the same length. The middle finger reaches highest and the little finger stops lowest. Compare the tips before you ink.
- A blob for the wrist. One big shape loses the bony look. Small separate pebbles in two rows tell the eye it is a wrist.
Spooky Twists for Your Bone Hand
Once the open hand feels easy, try bending one finger down so the skeleton waves or points at the viewer. A hand rising out of the ground with grass around the wrist makes a classic Halloween card. For a science notebook, skip the moon and write the three bone group names next to the hand. To build a matching head, practice with the easy skull drawing tutorial, and for the living version with skin and nails, my pick is the how to draw hands step by step lesson.
Free Skeleton Hand Coloring Page and Step Guide
Want it on paper? The skeleton hand coloring page shows a small colored example and a key with each color word at the top, with a big thick-lined hand underneath. The step-by-step PDF guide has all 12 steps and tips, two per page. Both fit Letter and A4 paper.
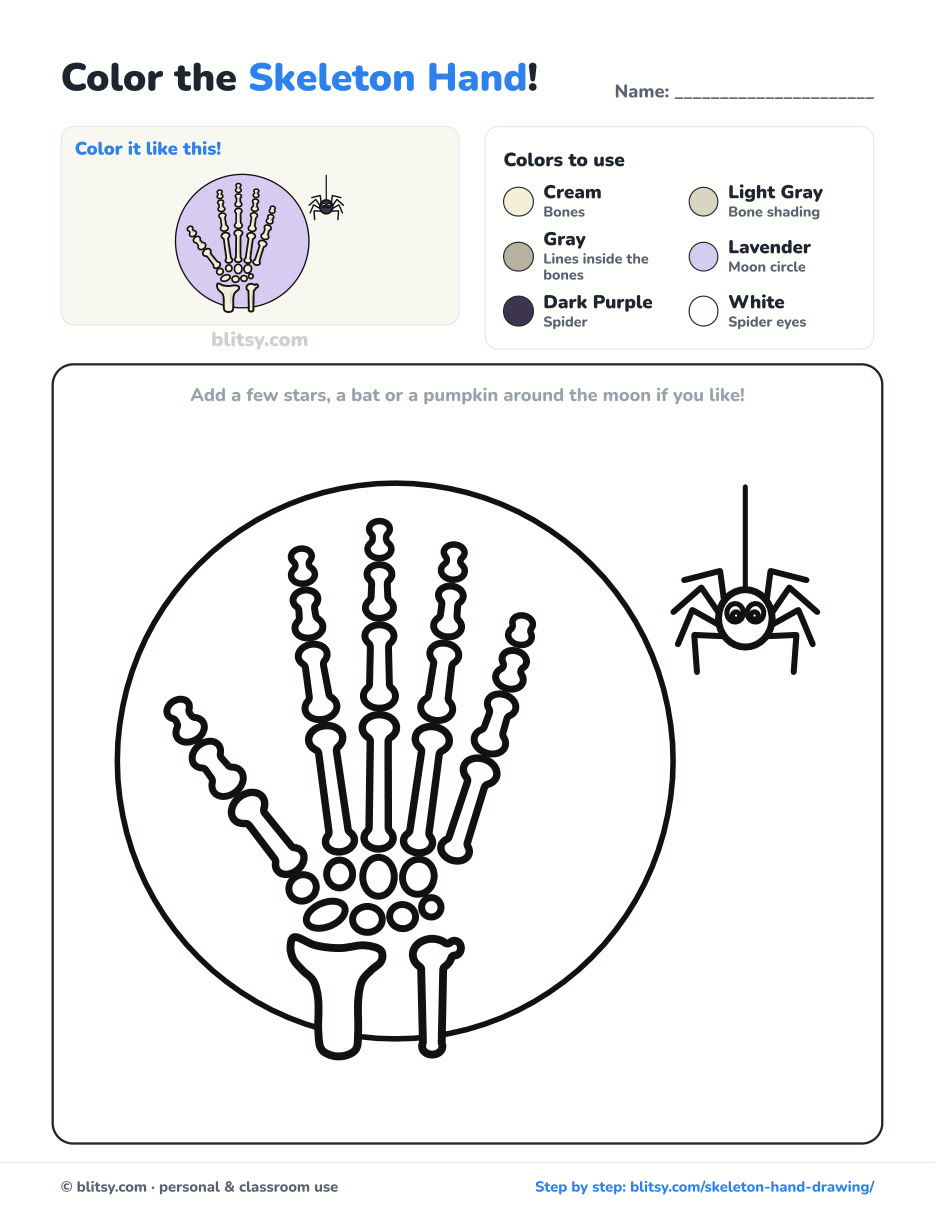
Black outlines with a colored example and the color names at the top. Ready to print and color.
⬇️ Download Coloring PageEvery step picture with its instructions and tips, to keep beside your paper while you draw.
⬇️ Download Drawing Guide📱 On a phone? Tap a download button, then open the file and choose Share → Save to Files or Print. On a computer, the PDF opens or saves straight to your Downloads folder.
Bone by Bone on a Single Pin
Bone Questions Kids Ask Me About Hands
How many bones are in a human hand?
There are 27: 8 small wrist bones (carpals), 5 palm bones (metacarpals) and 14 finger bones (phalanges). The thumb has two finger bones and every other finger has three.
What is the easiest way to draw a skeleton hand?
Draw five guide lines with joint dots first. Then put one slim bone between every pair of dots and leave a small gap at each joint.
Is a skeleton hand drawing good for kids?
Yes, for kids around 8 and up. Younger children can draw fewer wrist pebbles and skip the spider.
How long does it take to draw a skeleton hand?
Plan on about half an hour for the pencil stage and ten to fifteen minutes for inking and coloring.
Hold your own hand next to the finished drawing and wiggle your fingers. Those bones are moving in there right now. 🦴
Related posts:
 How to Draw a Skeleton Step by Step (Easy and Friendly)
 How to Draw a Whale Step by Step (Easy for Beginners)
 How to Draw Lungs Step by Step (Easy Science Diagram)
 How to Draw a Pineapple Step by Step (Easy Crown and Slice)
 How to Draw Iron Man Step by Step (Easy Chibi for Kids)
 How to Draw a Dress Step by Step (Easy Party Dress)
 How to Draw a Chicken Step by Step (Easy for Beginners)
 How to Draw a UFO Step by Step (Cute Alien Saucer)
 How to Draw Flames Step by Step (Easy Campfire Drawing)
 How to Draw a Moon Step by Step (Sleepy Crescent + Phases)
 How to Draw a Sunflower Step by Step (Big and Bright)
 How to Draw a Heart Step by Step (Even, Symmetric Shape)

