
Birds sitting on a branch are easy to sketch, but a bird in the air feels much harder, mostly because of the wings. Here you'll learn how to draw a flying bird step by step, using a small barn swallow with one wing swept up and a long forked tail. The secret is one point on the wing called the wrist: once you know where it sits, every long feather simply fans out from it.
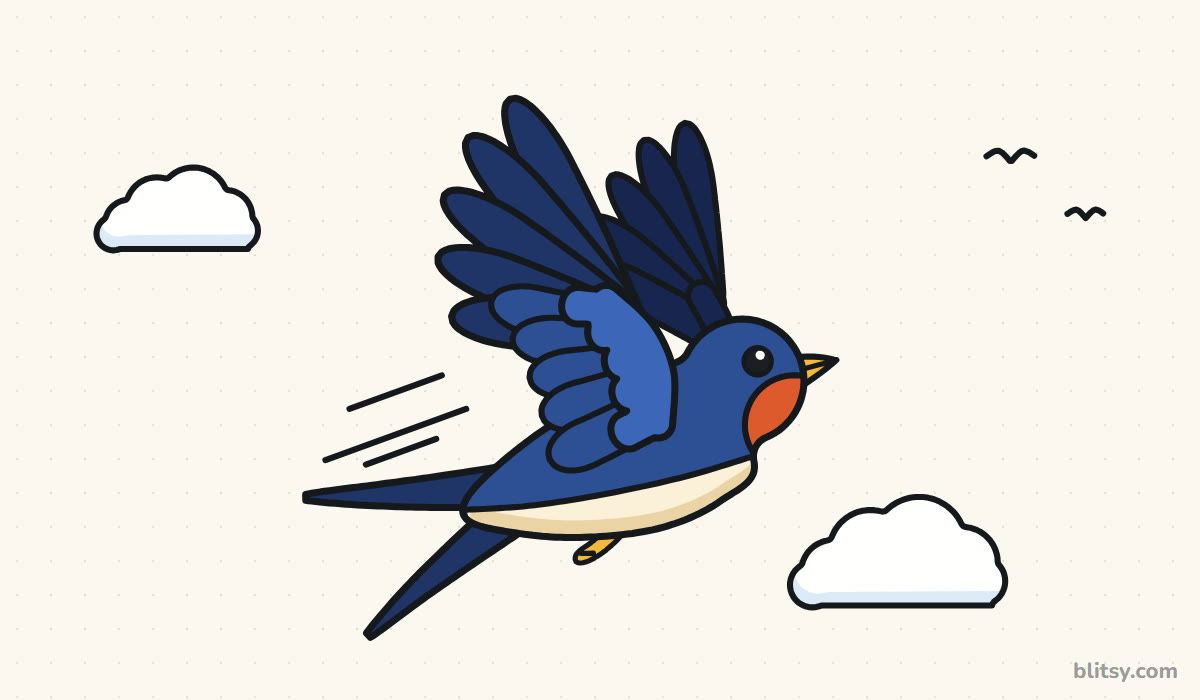
Bright blue strokes in every picture are the new lines for that step. Gray means already drawn, and the pale blue construction lines are temporary helpers you'll rub out near the end.
Quick overview
⏱️ Time: roughly 30 to 40 minutes
🎯 Level: easy to medium, fine for kids about 8 and older
✏️ Steps: 12
🐦 You'll draw: a barn swallow in flight with clouds and motion lines
Supplies Before Your Swallow Takes Off
- A regular HB pencil for light sketching
- A soft eraser that won't smear
- A black fineliner or thin marker for the final lines
- Colored pencils or markers: three blues, plus orange red, cream, tan, yellow and black
- A sheet of plain paper turned sideways
I always turn the paper sideways for this one, since the tail and the raised wing both need room to stretch.
How to Draw a Flying Bird Step by Step
Step 1: Sketch the flight line and body guides
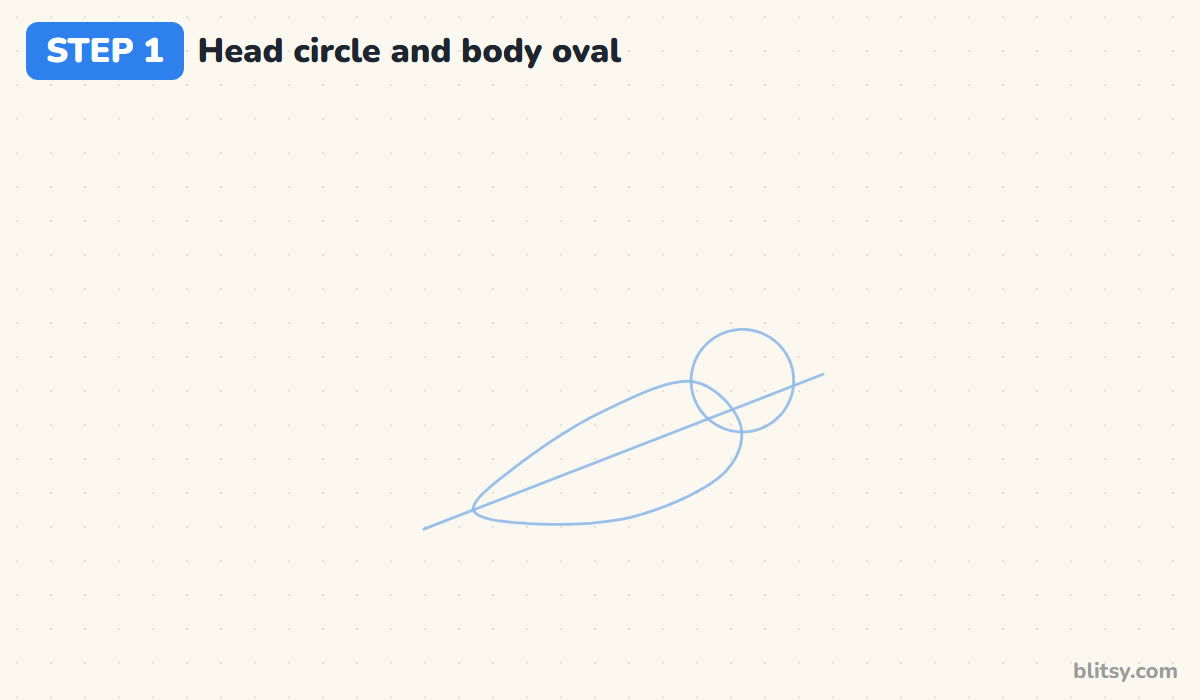
Start with one long slanted line rising from the lower left to the upper right. That's the direction of flight. Near the right end, draw a circle for the head, then a teardrop body along the line, with its round end touching the head and its point aiming down to the left.
💡 Tip: Tilt the whole bird upward. A level body looks like it's gliding, while a slanted one looks like it's climbing.
Step 2: Add guide lines for the wing and tail
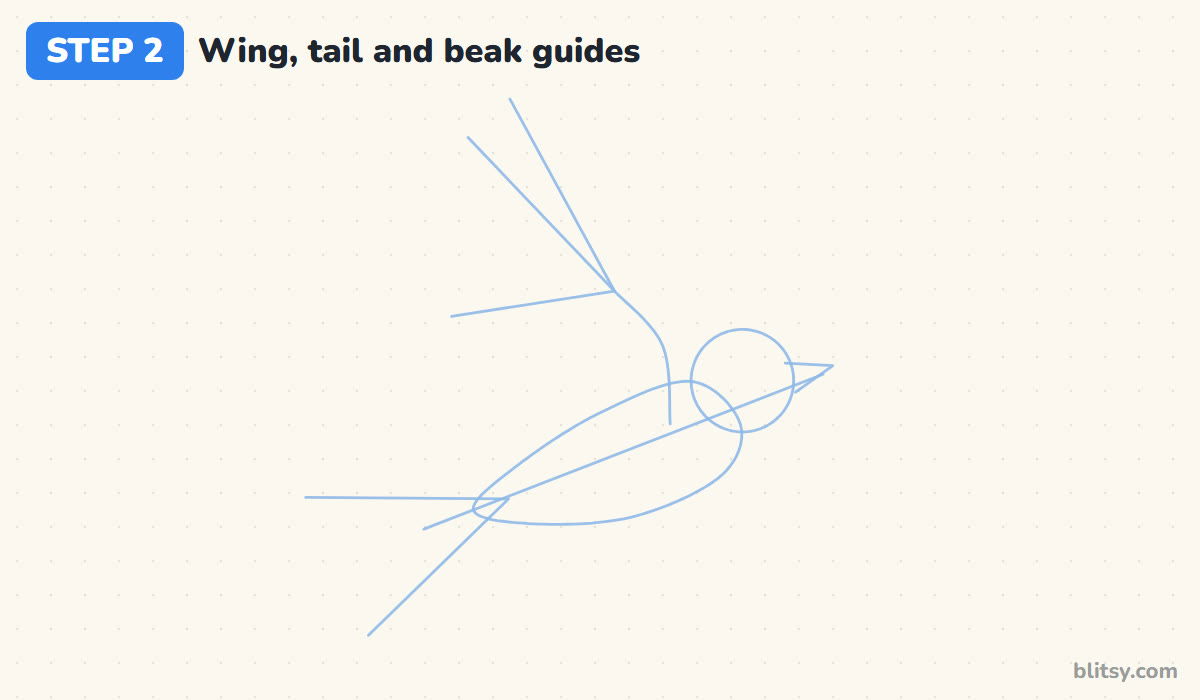
From the top of the body, just behind the head, draw a short curve going up. Where it stops is the wrist. From that point, draw three lines spreading up and back like a paper fan. Add a wide V at the tail end and a small sideways triangle for the beak.
💡 Tip: Put a tiny dot at the wrist so you can find it again when the feathers go in.
Step 3: Draw the round head and teardrop body
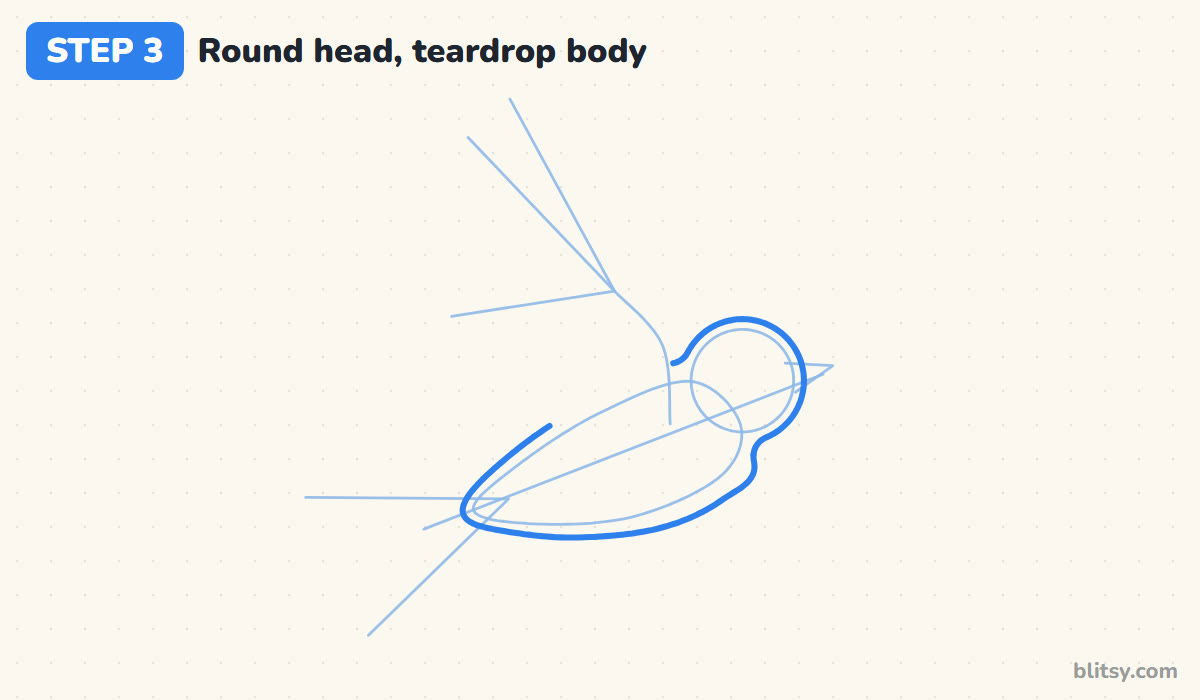
Go over the head circle with a smooth line, then follow the teardrop around the chest and belly. Leave the top of the back open where the wing will cover it. I make the head much bigger than a real swallow's, because a large head is what makes a small bird look cute.

💡 Tip: Draw long curves in one slow stroke rather than many short scratchy ones.
Step 4: Add the beak, eye and throat
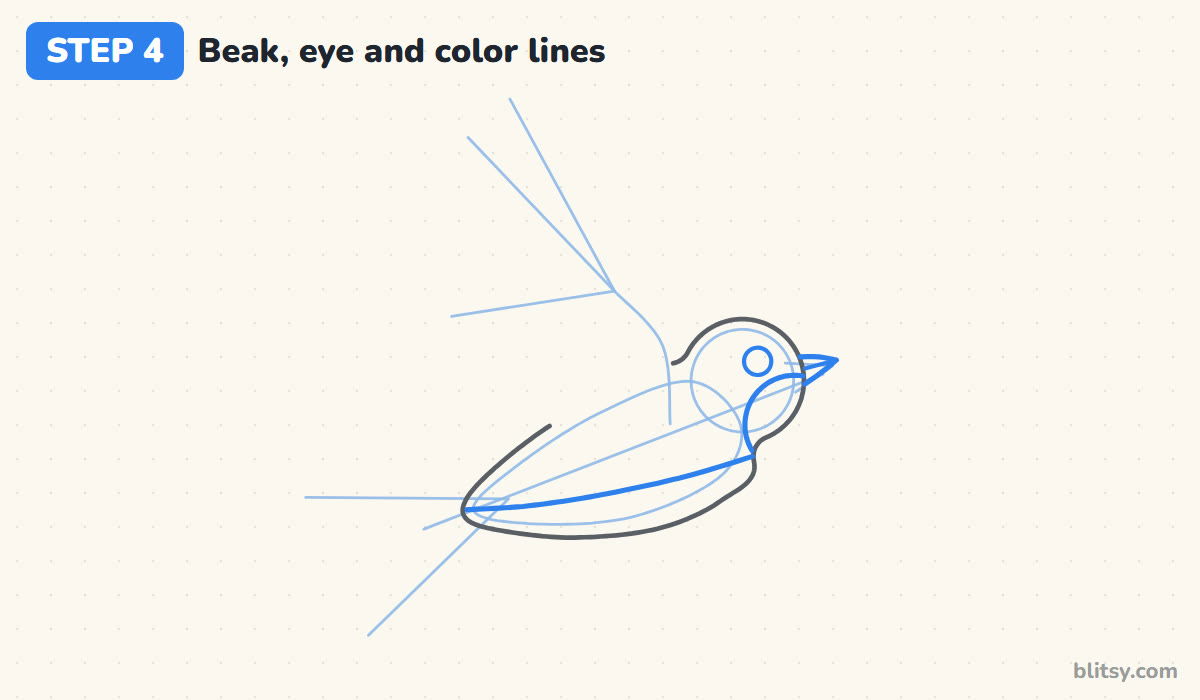
Draw a short pointed beak over the triangle with a thin line through the middle. Place a round eye high on the head, just behind the beak. Then draw a curve from under the beak to the chest for the orange red throat, and one long curve to the tail end that splits the dark back from the pale belly.
💡 Tip: Keep the beak short. A long beak quickly turns a songbird into a heron or a kingfisher.
Step 5: Shape the top of the wing
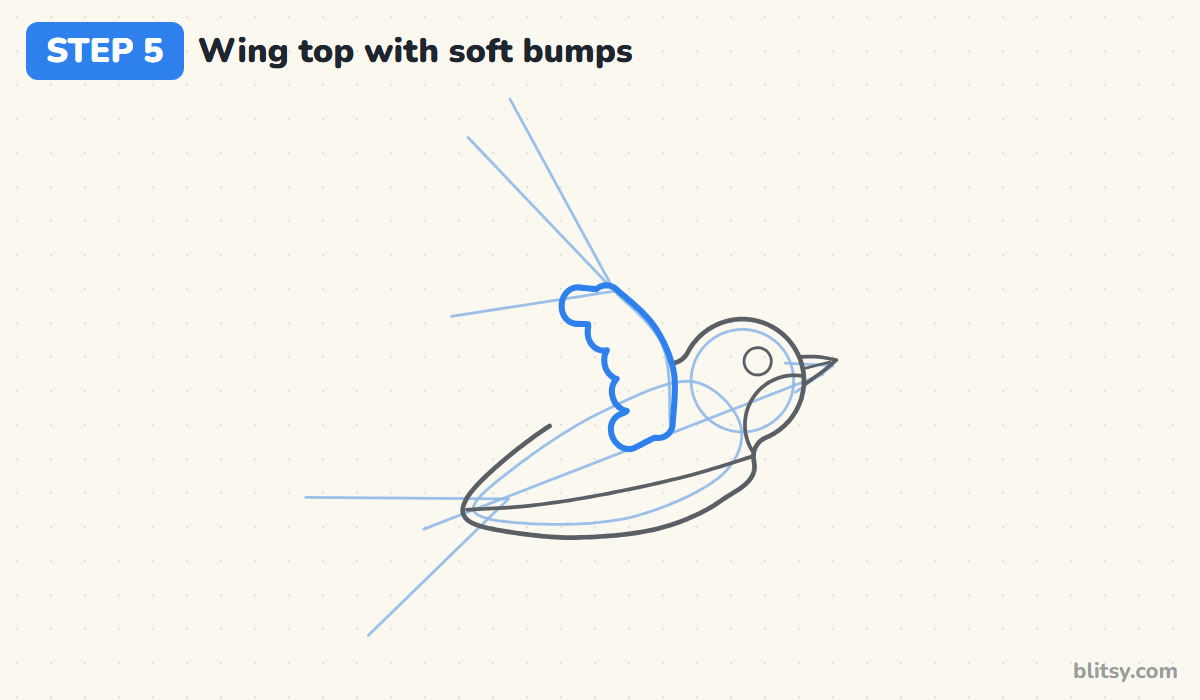
From the shoulder, draw the front edge of the wing up to the wrist dot. Come back down the other side with a row of small soft bumps. Those are the short covering feathers on top of the wing, and they make it look thick and feathery instead of flat.
💡 Tip: Make the bumps a little uneven in size so they look like real feathers, not a scalloped border.
Step 6: Draw the inner wing feathers
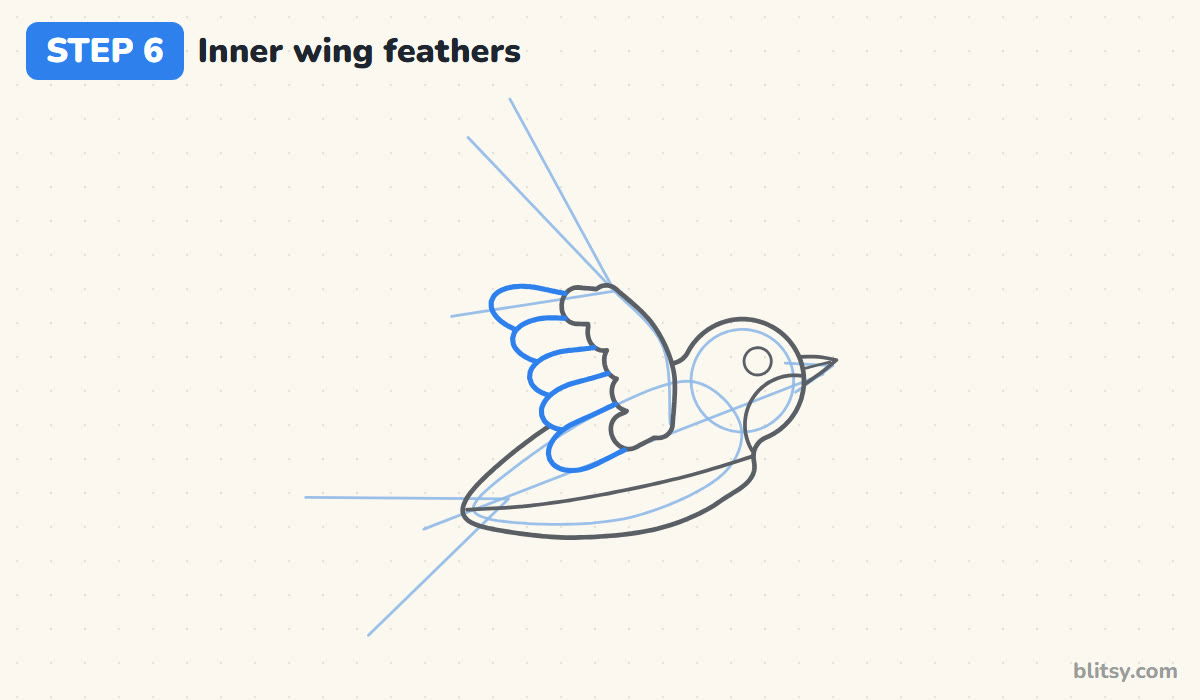
Under the bumpy row, add five rounded feathers in a stack, working from the body up toward the wrist. Each one points back toward the tail. These grow along the forearm, so I keep them fairly short.
💡 Tip: Overlap each feather slightly with its neighbour. Gaps between them make the wing look broken.
Step 7: Fan the long feathers out from the wrist
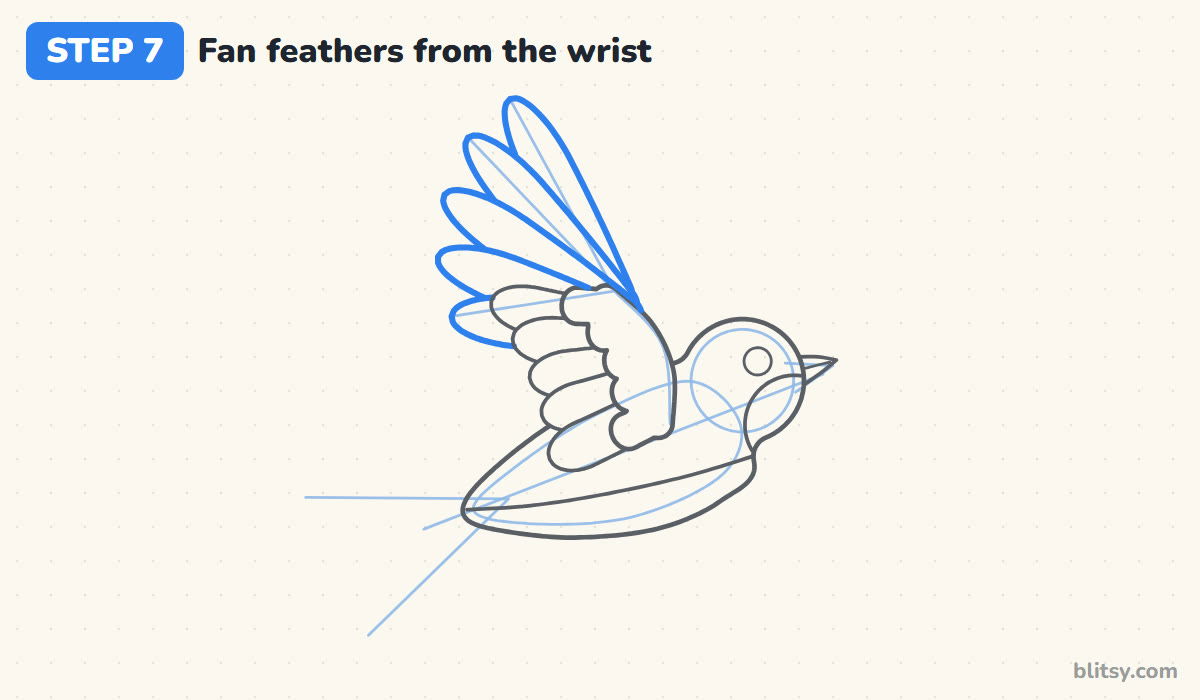
This is the step that makes the bird fly. Draw five long feathers with rounded tips, all starting near the wrist and following your fan guides. The front one is the tallest; each one behind it tilts further back and gets a little shorter. Beginners often draw them parallel like fingers, which makes the wing look stiff.




💡 Tip: Check that the feathers spread apart at the tips and squeeze together at the wrist.
Step 8: Show the far wing behind the back
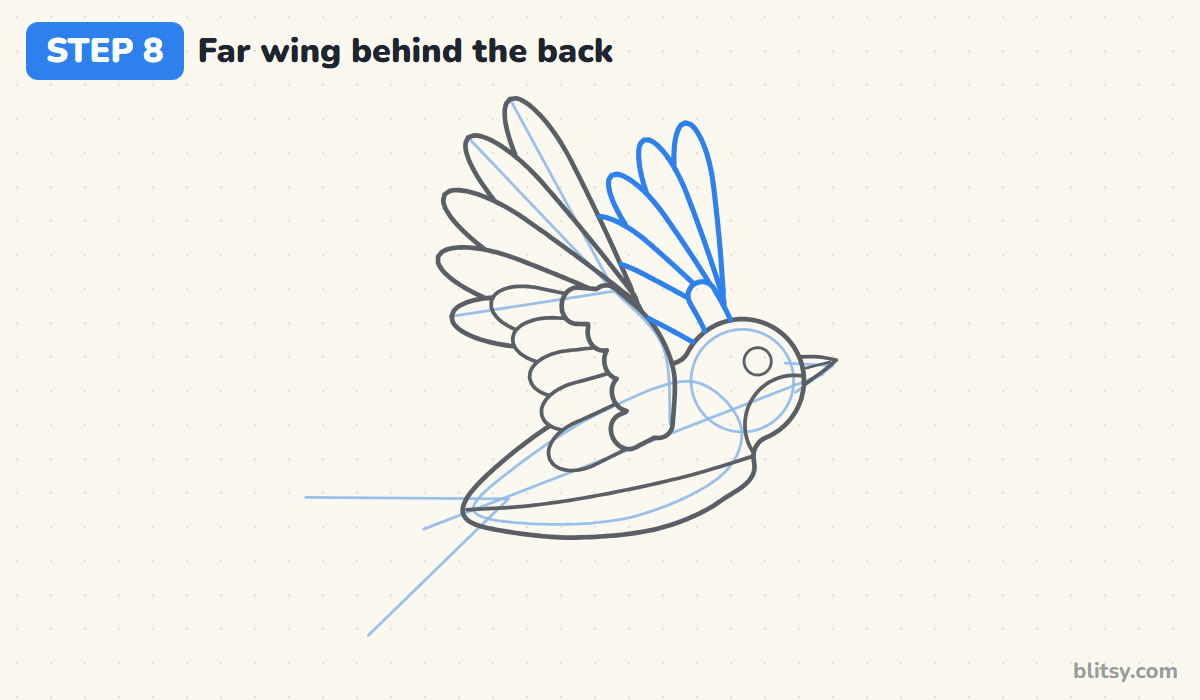
The other wing is raised too, but it's further away, so only part of it shows between the near wing and the head. Draw a smaller fan of long feathers there. Stop every line where it meets the near wing or the head, because those are in front.
💡 Tip: Smaller and partly hidden reads as further away, so resist drawing the far wing full size.
Step 9: Add the forked tail and tucked feet
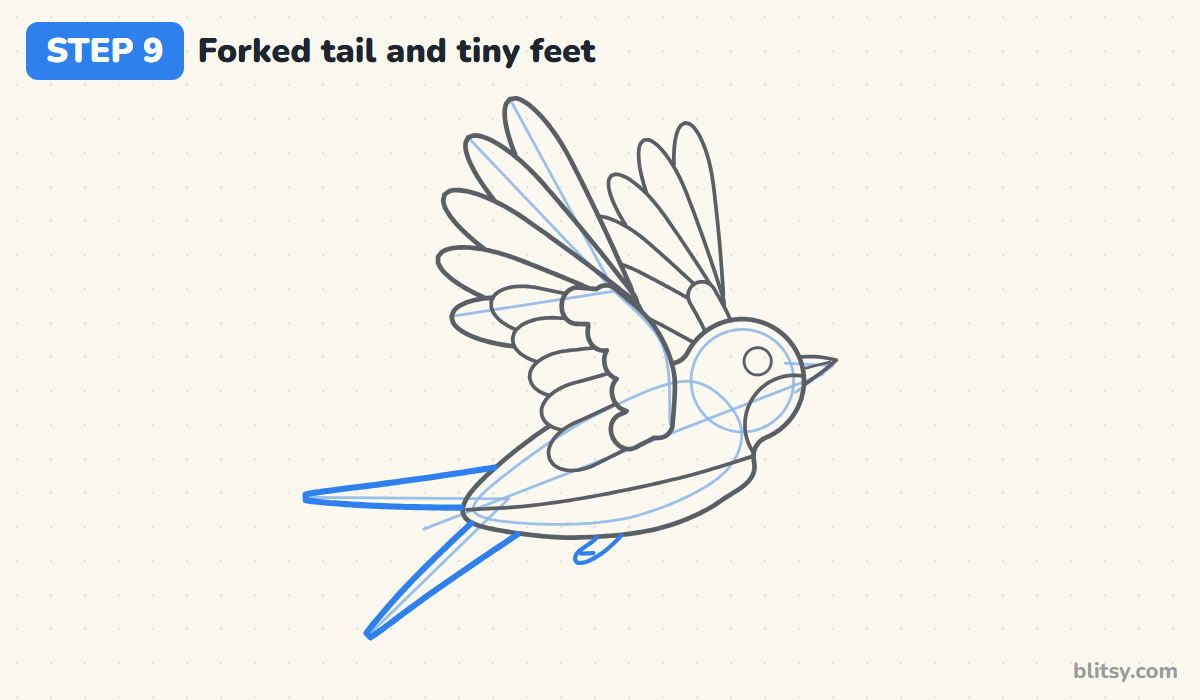
A deeply forked tail with two long streamers is the detail people recognise first on a barn swallow. Draw two long, thin points along your V guide, wide at the body and narrow at the tips. Under the belly, add a tiny foot pointing backward, since a flying bird folds its feet up close.
💡 Tip: Let the lower streamer be a touch longer and steeper than the upper one for a sense of depth.
Step 10: Draw clouds and motion lines
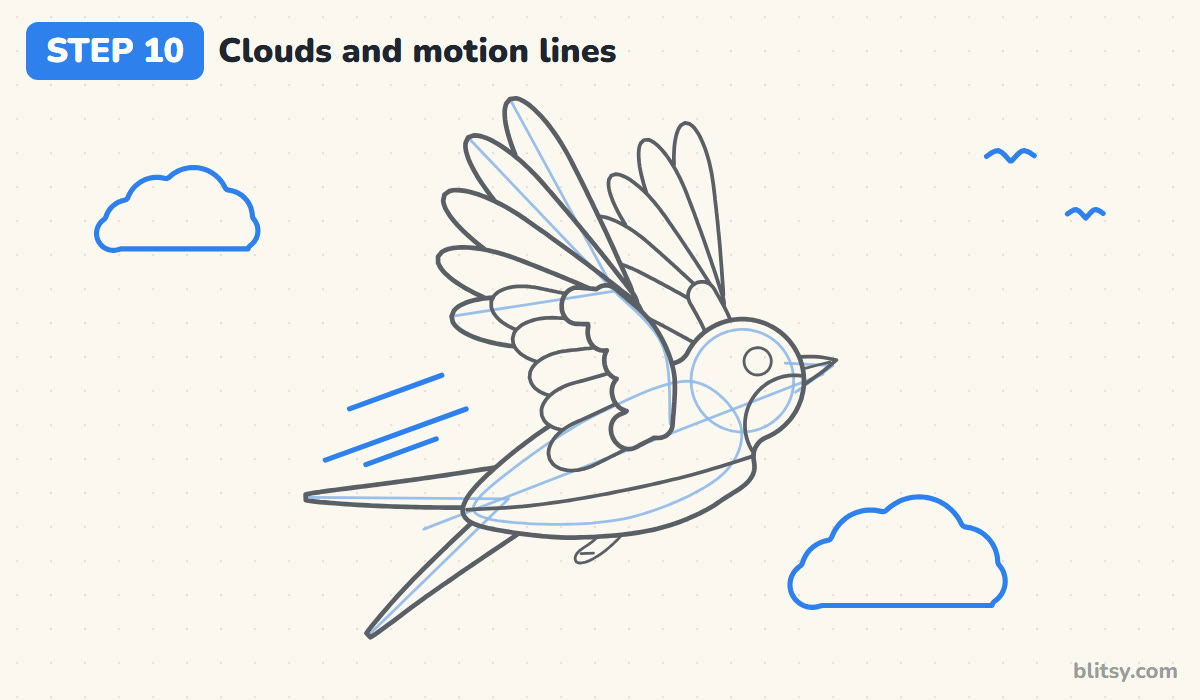
Behind the bird, add three short lines that follow the slant of the flight line. Then draw two puffy clouds with bumpy tops and flat bottoms, one on each side of the bird, and a pair of tiny curved V shapes far off for distant birds.
💡 Tip: Keep the motion lines away from the bird's outline so they don't look like part of the tail.
Step 11: Ink the lines and erase the guides
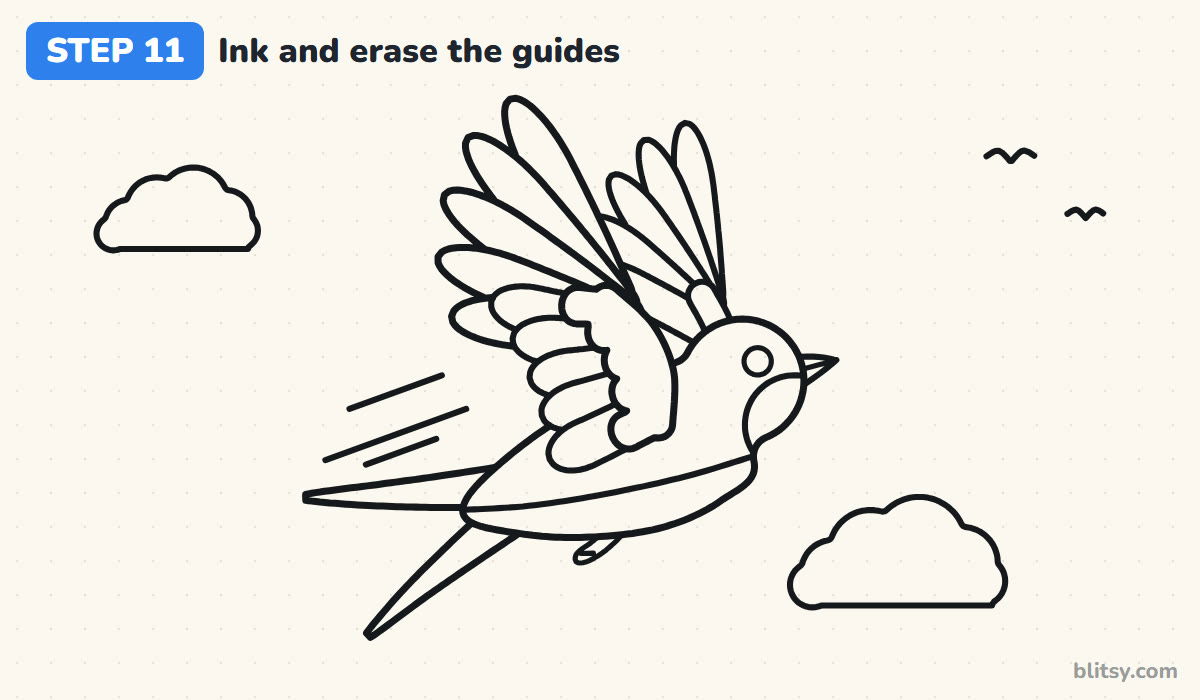
Trace every keeper line with your black pen, from the beak to the tail tips, plus the clouds and motion lines. Wait until the ink is dry, then erase all the light guides, including the flight line and the fan lines. What's left should look like a clean coloring page.




💡 Tip: Ink the wing feathers from the wrist outward so your hand doesn't drag across wet lines.
Step 12: Color the swallow
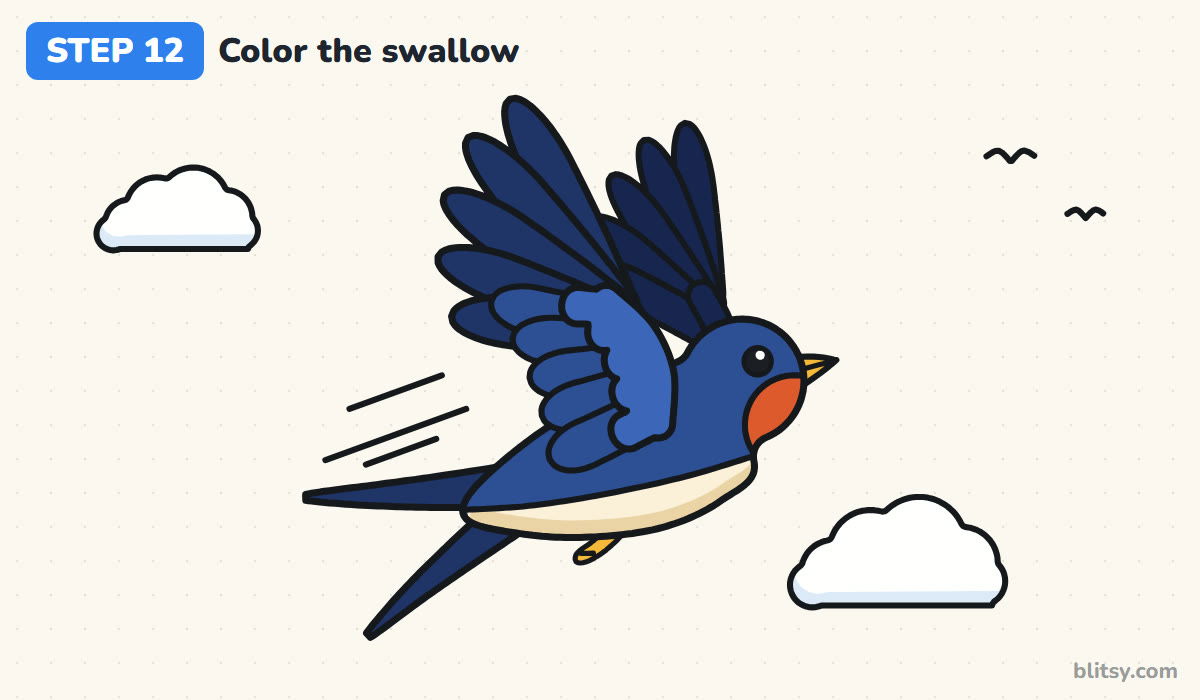
I color the long flight feathers and tail dark blue, the back and inner feathers medium blue, and the bumpy top row light blue. The throat gets orange red and the belly cream with a tan band along the bottom. Use yellow for the beak and foot and black for the eye, leaving the clouds white with a pale blue shadow.
💡 Tip: Leave a small white dot in the eye uncolored. That tiny highlight makes the bird look alive.
Why Flying Bird Sketches Often Look Stiff
- All the long feathers point the same way. Real flight feathers spread like a fan from the wrist. Start every one near that point and change the angle a little each time.
- The wing grows out of the middle of the back. Attach it high, right behind the head, where the shoulder is. A wing set too far back makes the bird look like it's tipping over.
- The body is drawn flat and level. Tilt the teardrop so the head is higher than the tail. That one change gives the drawing a sense of climbing.
- The tail is a short square stub. For a swallow, stretch the fork into two long thin points.
- The far wing is drawn as big as the near one. Shrink it and hide its base behind the body, or the bird looks flat and pasted on.
Fresh Flight Poses and Swallow Variations
Once this pose feels easy, try the downstroke: point both wings down and forward, and the same bird looks like it's pushing off. You could also turn it into a bluebird with an orange chest and a short fanned tail, or add the small rusty patch on the forehead that real barn swallows have. The bird drawing tutorial covers a perched bird, and the dove drawing tutorial is good practice for broad, rounded wings.
Free Swallow Coloring Page and Step-by-Step PDF
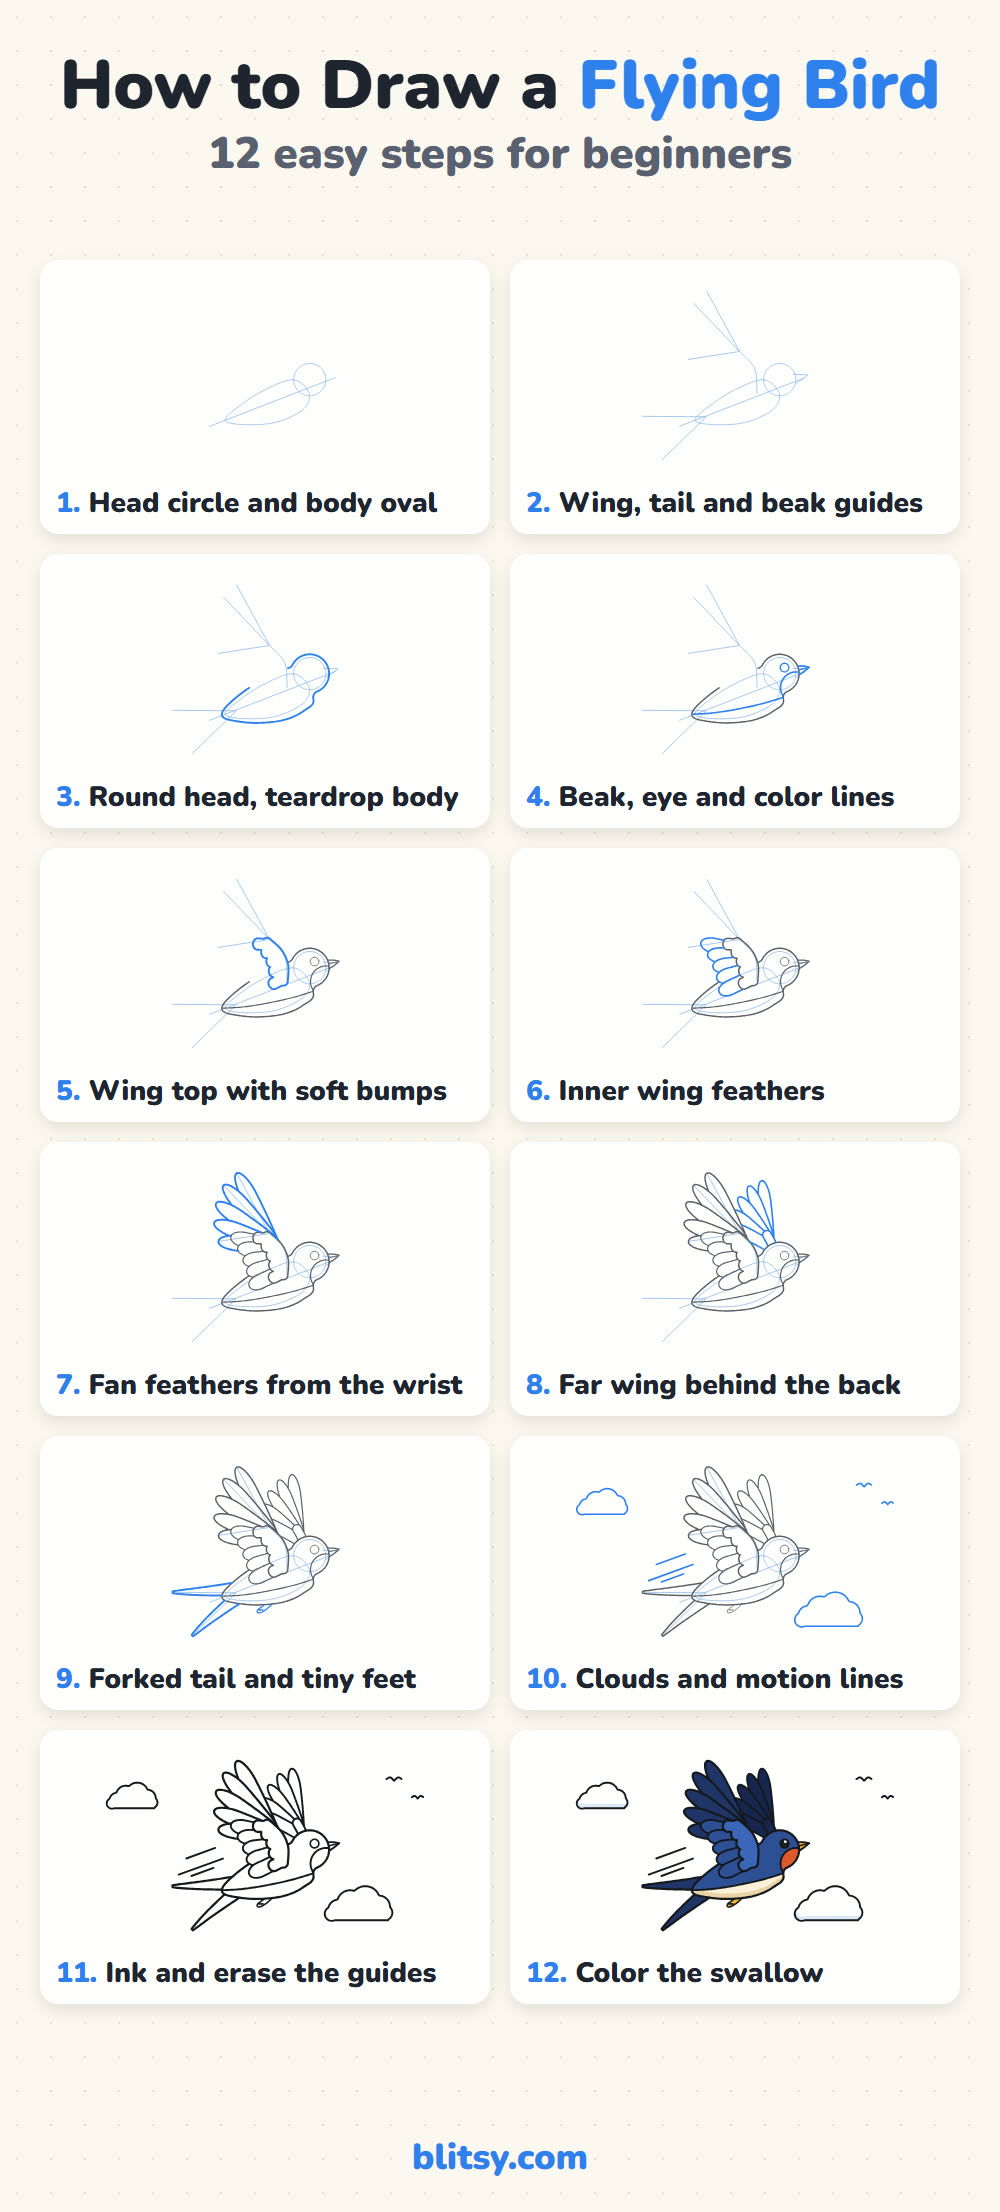
Want to practise away from the screen? The free swallow coloring page shows a small colored example and a key with each color and where it goes, above a big clean outline. The PDF drawing guide has all 12 steps with their tips, ready to print on Letter or A4 paper.
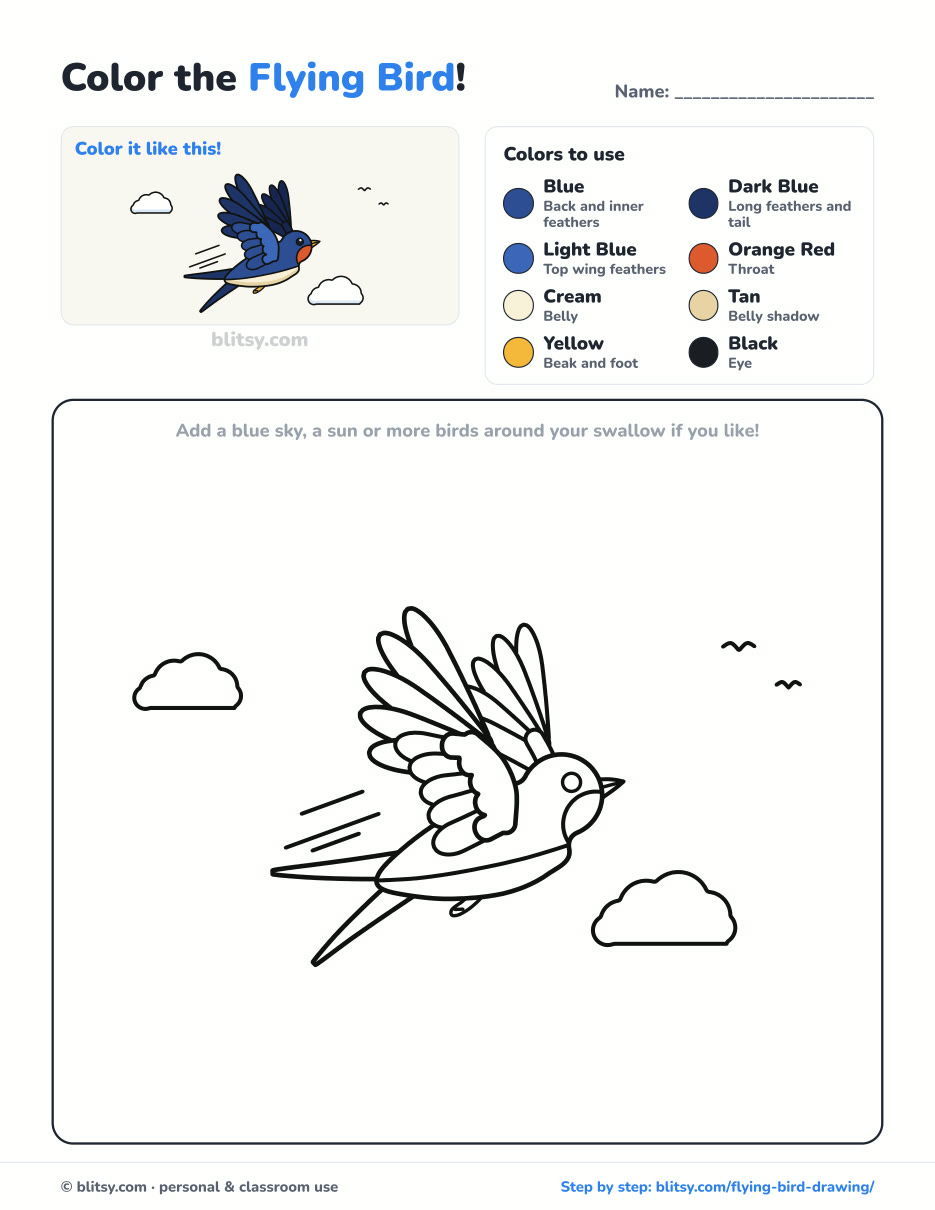
Black outlines with a colored example and the color names at the top. Ready to print and color.
⬇️ Download Coloring PageEvery step picture with its instructions and tips, to keep beside your paper while you draw.
⬇️ Download Drawing Guide📱 On a phone? Tap a download button, then open the file and choose Share → Save to Files or Print. On a computer, the PDF opens or saves straight to your Downloads folder.
Twelve Swallow Steps to Keep Handy
Swallow and Flying Bird Drawing Questions
What is the easiest way to draw a flying bird?
Start with a slanted line for the direction of flight, a circle for the head and a teardrop for the body. Then find the wrist and fan the long feathers out from that one point.
How do you make a bird look like it's flying and not falling?
Tilt the body so the head is higher than the tail, lift a wing and tuck the feet up. Dangling legs and a head pointing down make a bird look like it's dropping.
Is this flying bird drawing good for kids?
Yes, for most children around 8 and older. Younger kids can skip the far wing and draw three long feathers instead of five, and the bird still reads clearly as flying.
How long does it take to draw a flying swallow?
Plan on about 30 to 40 minutes including coloring. The fanned feathers in step 7 take the longest, so give yourself extra time there instead of rushing.
Grab a pencil, find that wrist point, and let your swallow take off across the page. 🐦
Related posts:
 How to Draw Tinkerbell Step by Step (Easy Flying Chibi)
 How to Draw a Phoenix Step by Step (Easy Fire Bird)
 How to Draw a Bird Step by Step (Easy Singing Bluebird)
 How to Draw a Whale Step by Step (Easy for Beginners)
 How to Draw Lungs Step by Step (Easy Science Diagram)
 How to Draw a Pineapple Step by Step (Easy Crown and Slice)
 How to Draw Iron Man Step by Step (Easy Chibi for Kids)
 How to Draw a Dress Step by Step (Easy Party Dress)
 How to Draw a Chicken Step by Step (Easy for Beginners)
 How to Draw a UFO Step by Step (Cute Alien Saucer)
 How to Draw Flames Step by Step (Easy Campfire Drawing)
 How to Draw a Moon Step by Step (Sleepy Crescent + Phases)

