
Almost every small bird you see in a garden is really two shapes stacked together: a round head and a bigger, rounder body. Once you notice that, birds stop being scary to draw. In this lesson I'll show you how to draw a bird step by step using that two-circle trick, and we'll turn it into a cheerful bluebird singing on a fence post. If you can draw a circle and an egg shape, you can finish this one.
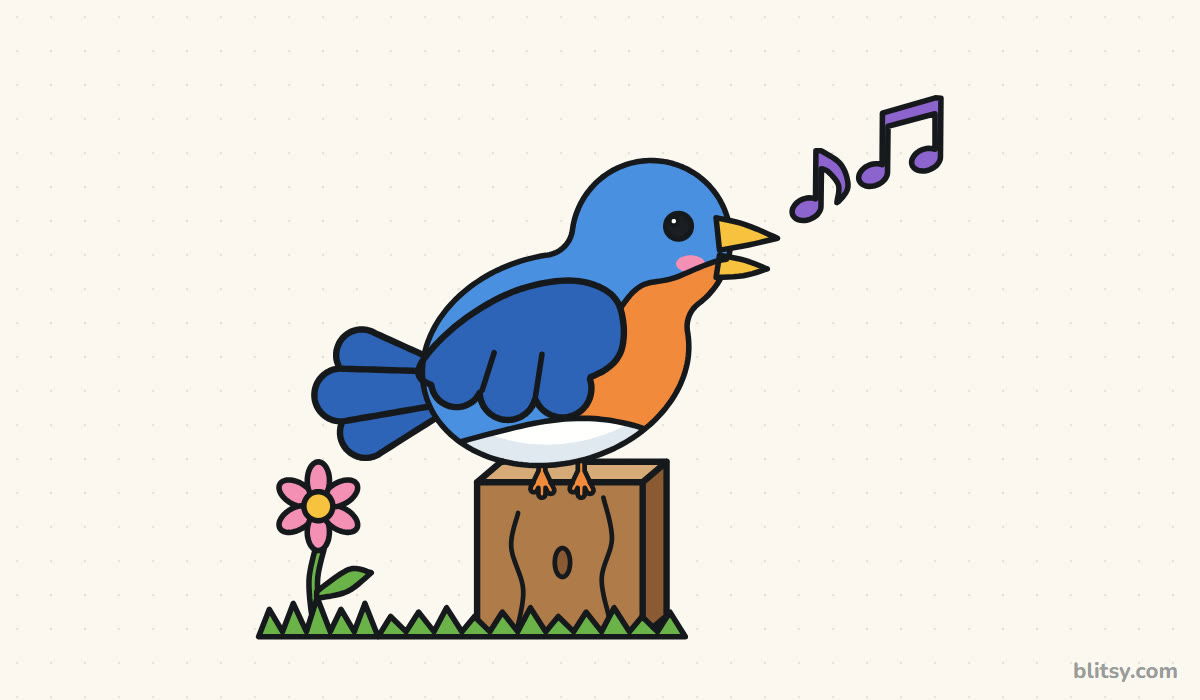
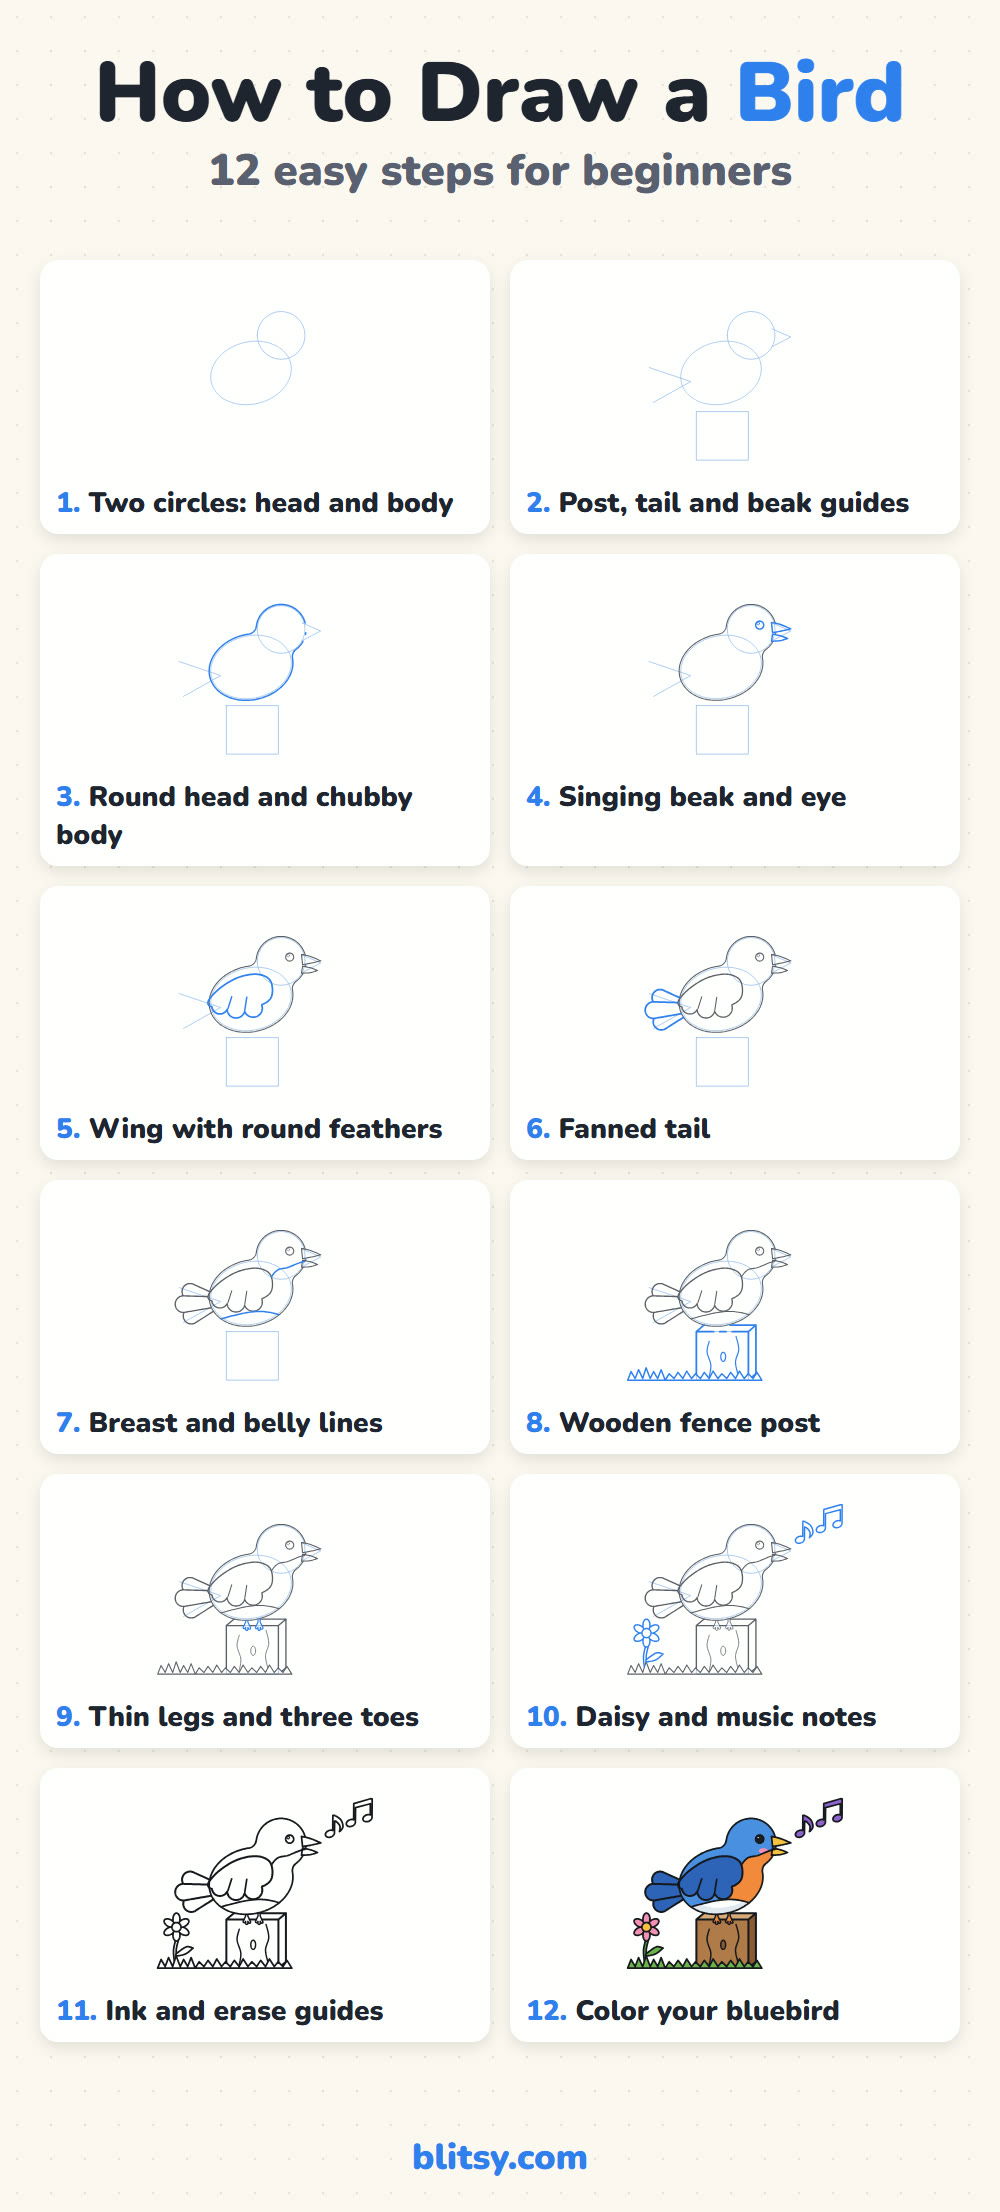
Blue strokes in a picture are the new part of that step, gray strokes are finished work, and the pale blue shapes are light guides that vanish in step 11.
Quick overview
⏱️ Time: about 25 to 35 minutes
🎯 Level: easy, fine for kids around 6 and up
✏️ Steps: 12
🐦 You'll draw: a chubby bluebird singing on a wooden fence post
Bluebird Sketching Supplies
- A regular HB pencil for light guides
- An eraser that won't smudge
- A black marker or fineliner for the final lines
- Colored pencils or markers: blue, dark blue, orange, yellow, brown, green, pink and purple
- A sheet of plain paper, turned sideways
No blue at home? Any color works for a made-up bird, so pick the one you like best.
How to Draw a Bird Step by Step
Step 1: Draw a circle and an oval
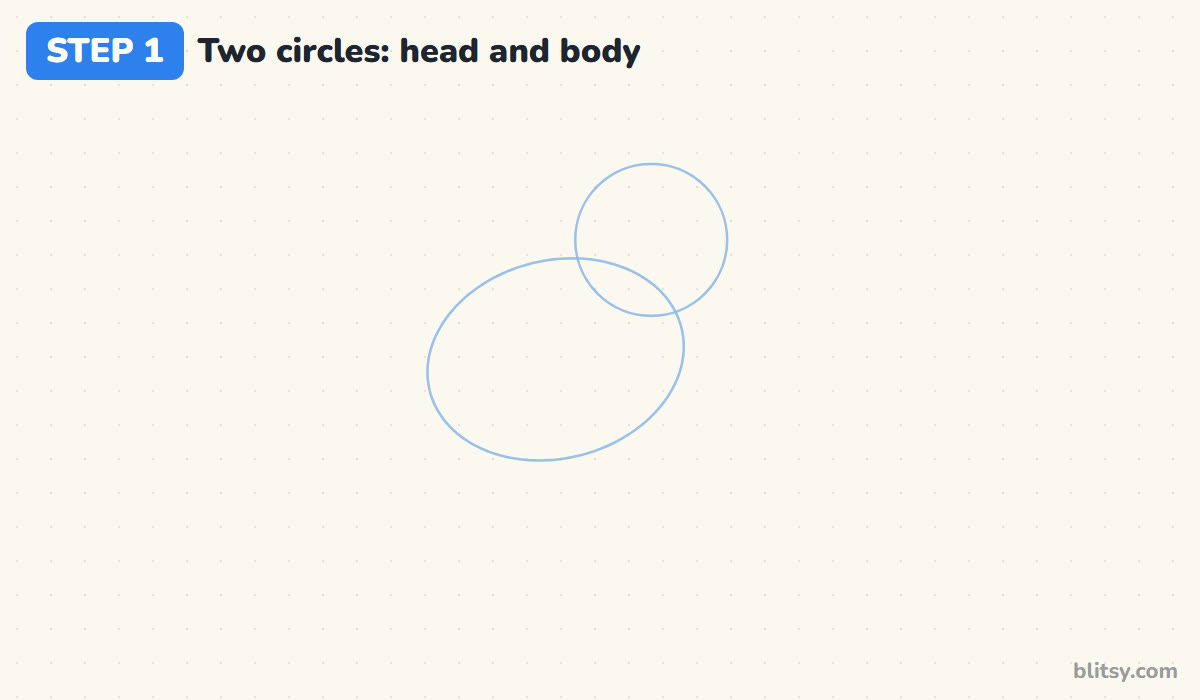
A little above the middle of the page, draw a circle for the head. Below and to the left, draw an oval about one and a half times as wide, tilted so its right end sits higher. Let the two shapes overlap a bit. That overlap becomes the neck, so the head never floats.
💡 Tip: Draw with loose arm movements, not tiny wrist scribbles. Round shapes come out smoother that way.
Step 2: Add guides for the post, tail and beak
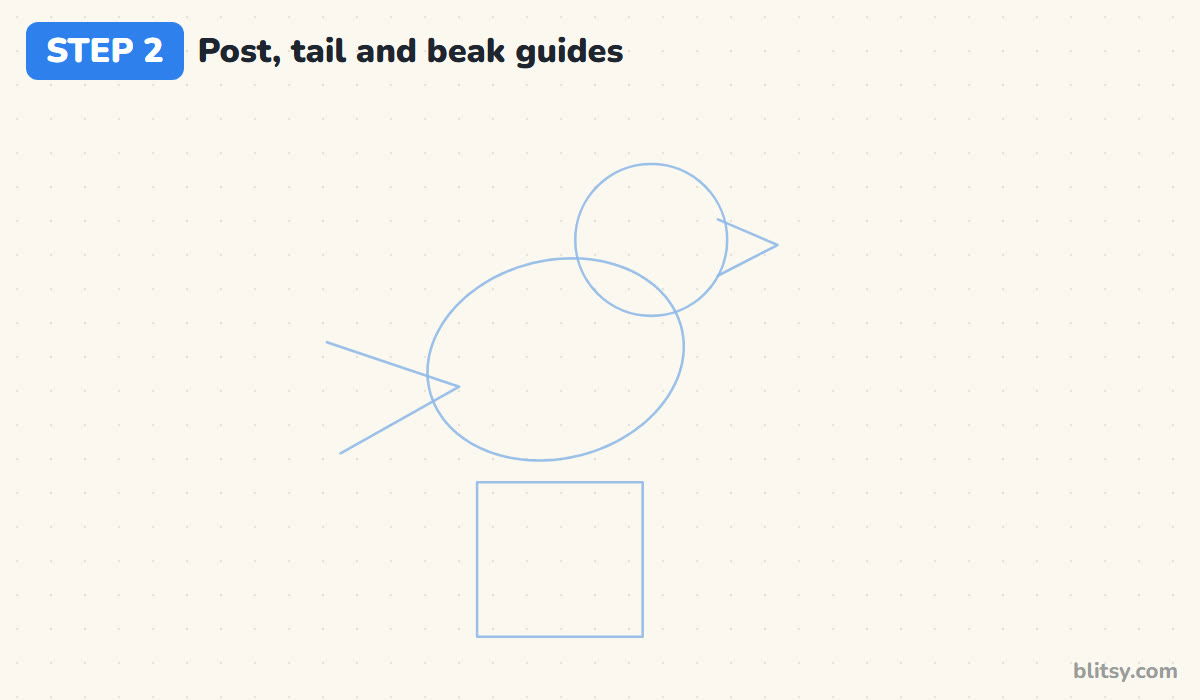
Under the oval, sketch a square box for the fence post, leaving a small gap between the box and the bird. On the left end of the oval, draw two lines spreading out like an open pair of scissors; the tail goes between them. On the right side of the head, add a small sideways V for the beak.
💡 Tip: Keep the post narrower than the bird's body. A tiny perch makes the bird look round and plump.
Step 3: Draw the round head and chubby body
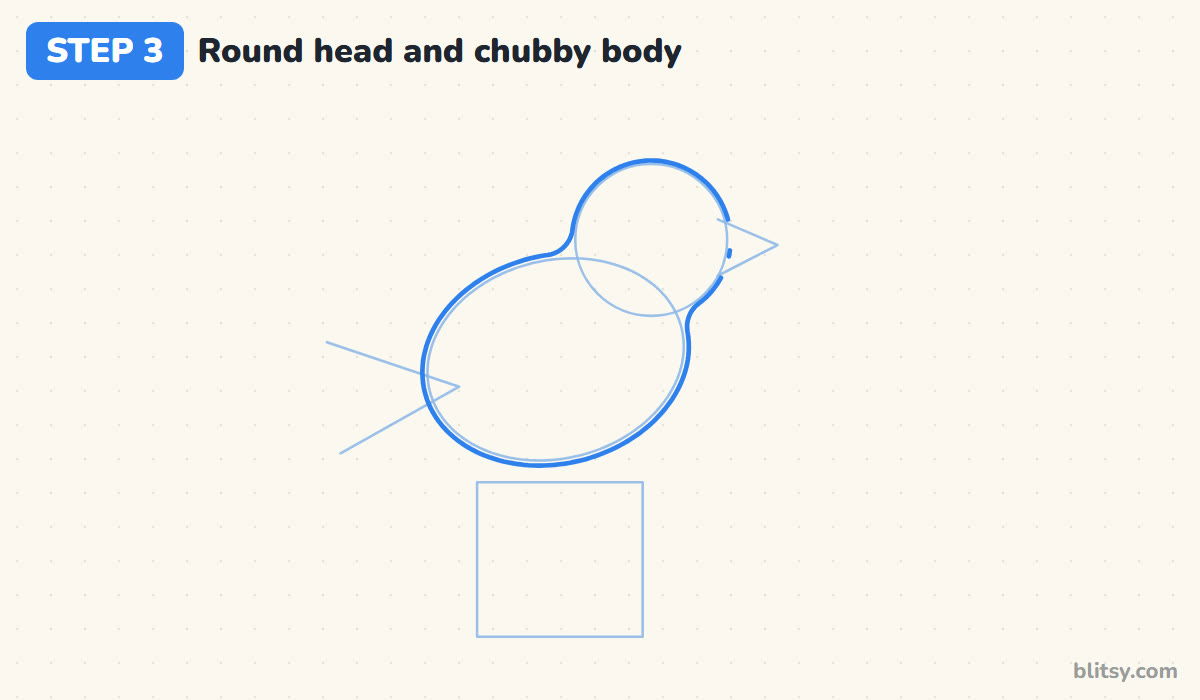
Now trace one smooth outline around both guide shapes. Follow the top of the head, dip gently into the back of the neck, then curve along the back and around the belly. At the front, the throat curves in a little under the beak. I keep this shape extra round, since a plump bird looks friendlier.


💡 Tip: Stop and turn your paper whenever your hand starts to feel twisted.
Step 4: Add the singing beak and the eye
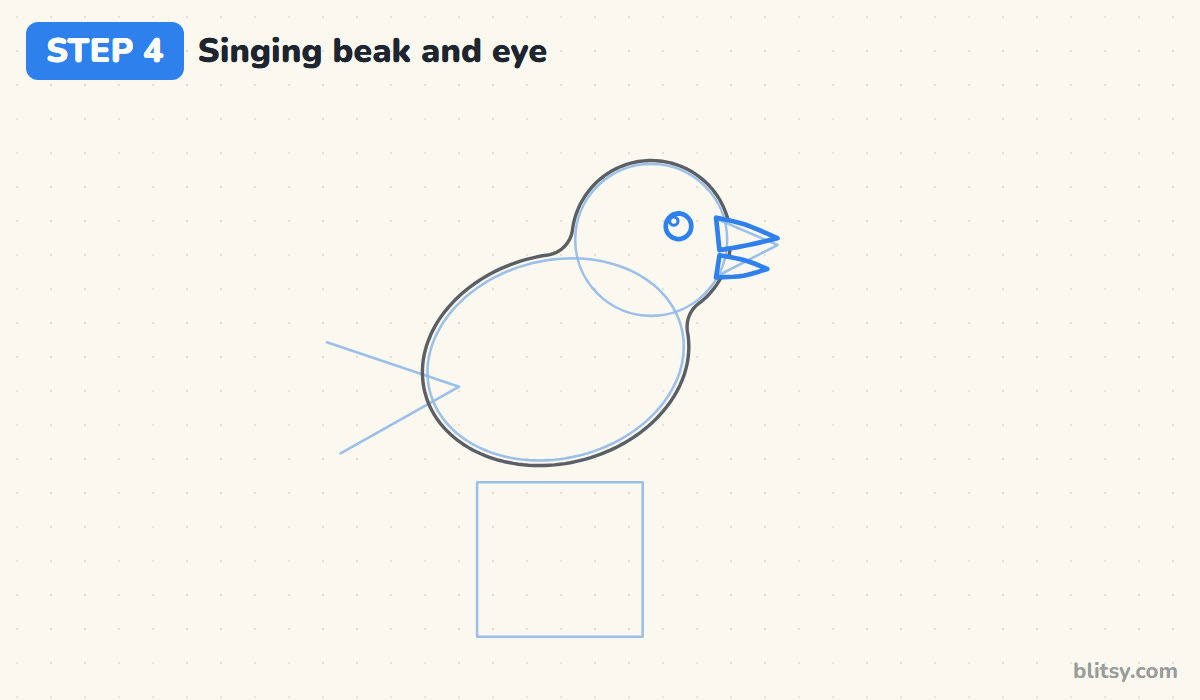
Following the V guide, draw the beak in two parts: a longer top piece and a shorter bottom piece with a gap between them. That open gap is what makes the bird look like it's singing. Then place the eye in the upper front part of the head, as a small circle with an even smaller circle inside for the shine.
💡 Tip: Set the eye closer to the beak than to the back of the head. It keeps the face young and cute.
Step 5: Draw the wing with round feathers
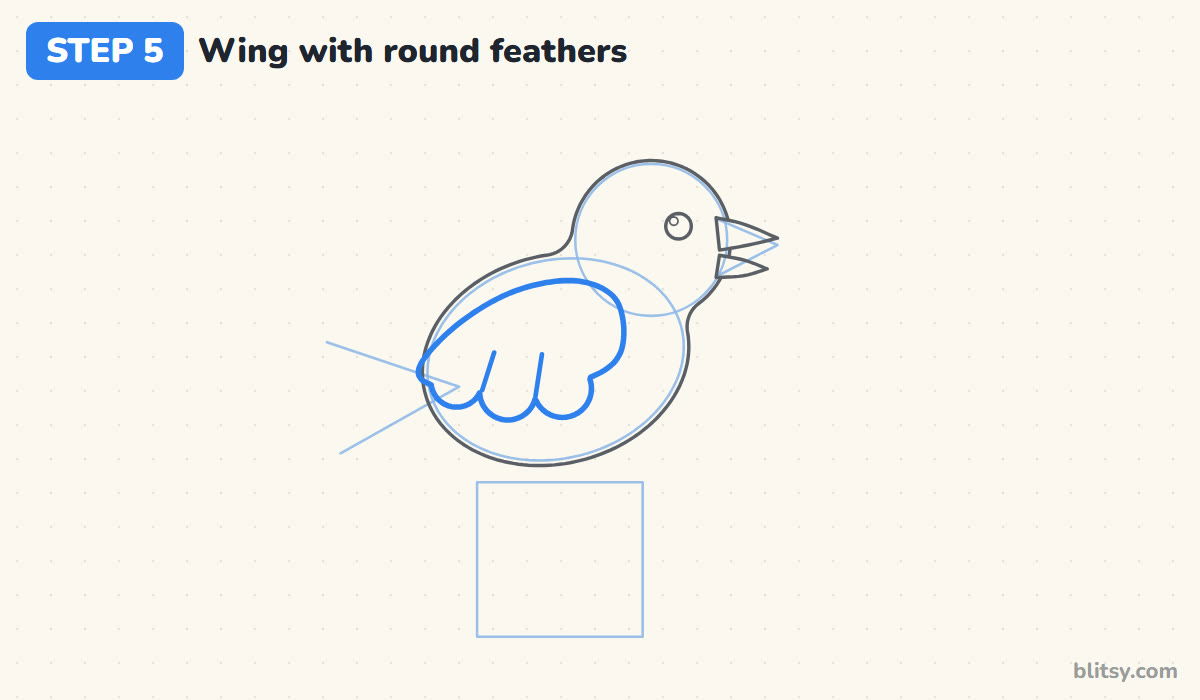
Start the wing near the chest and draw its top edge sweeping back along the body toward the tail. Bring the lower edge back to the front as three round bumps, like a row of clouds. Add two short lines between the bumps so each one reads as a separate feather.
💡 Tip: Make the bumps grow a little bigger toward the front of the wing.
Step 6: Add a fanned tail
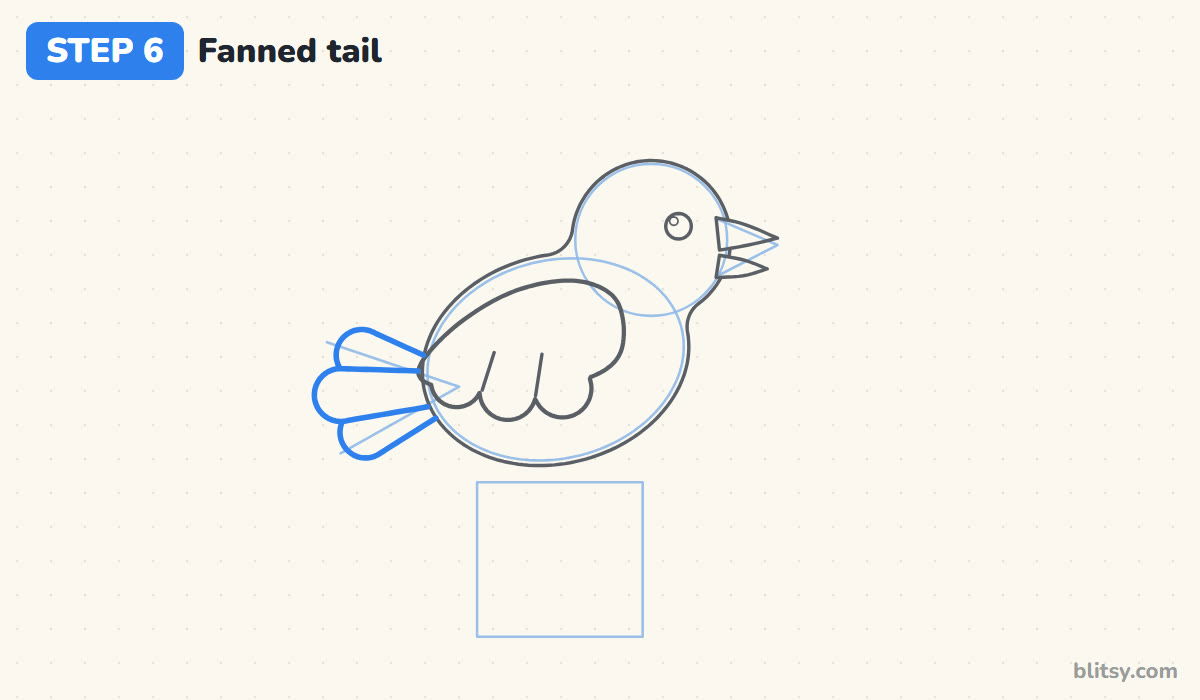
Between the two tail guides, draw three long feathers with rounded ends, spreading out like a small hand fan. Draw the middle one first, since it's the longest, then add one above and one below. Where a feather tucks behind the body or another feather, simply stop the line.
💡 Tip: Three feathers are plenty. More than that and the tail starts to look like a broom.
Step 7: Draw the breast and belly lines
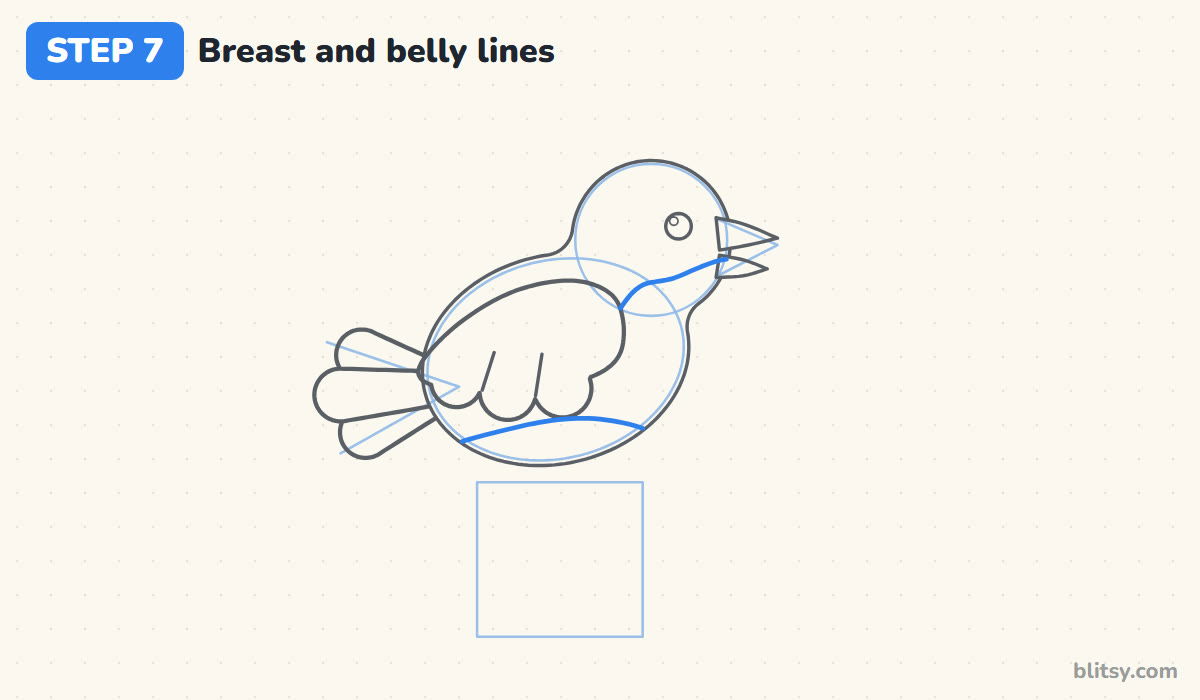
Bluebirds have an orange chest, so mark where it starts. Draw a soft wavy line from the bottom of the beak down to the front of the wing. Then add a gentle curve across the bottom of the body for the white belly. These two lines don't change the shape at all, but they split the bird into color areas.



💡 Tip: Curve the belly line upward like a smile so it follows the round body.
Step 8: Draw the wooden fence post
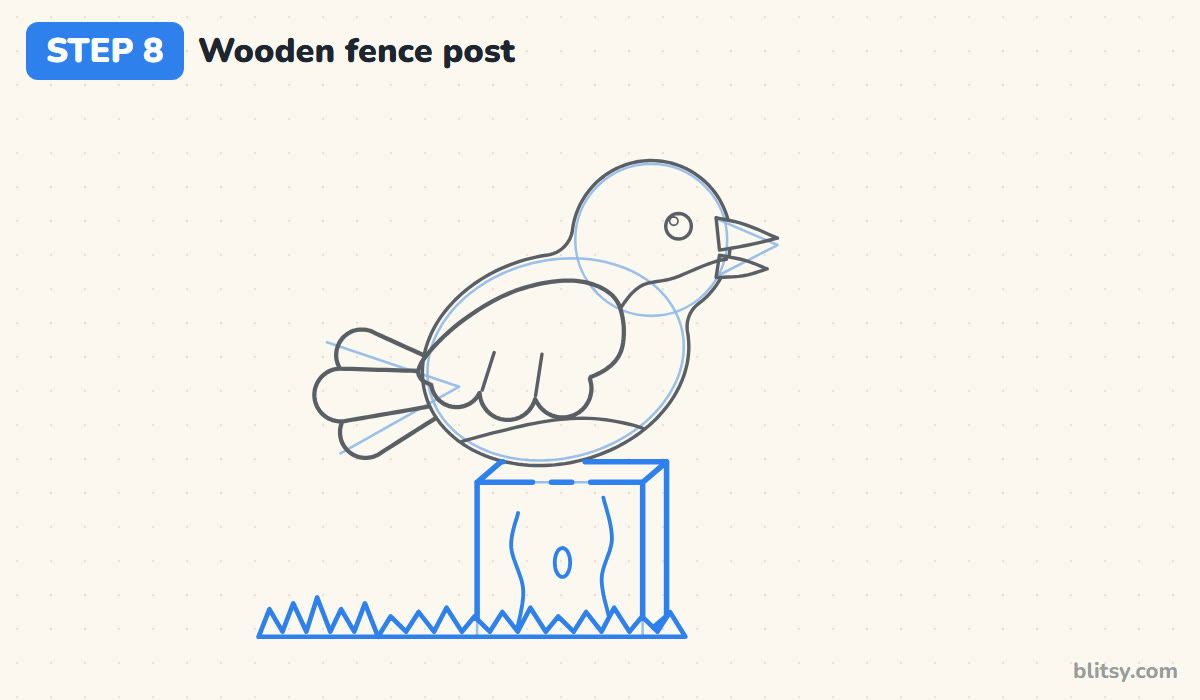
Trace the post guide for the front of the post. Add a thin slanted top above it and a narrow side face on the right, which turns the flat square into a solid block. Draw two wavy grain lines and a small oval knot. Finish with a row of pointy grass along the bottom.
💡 Tip: Draw the grain lines a bit wobbly. Perfectly straight lines make wood look like plastic.
Step 9: Add thin legs and three toes
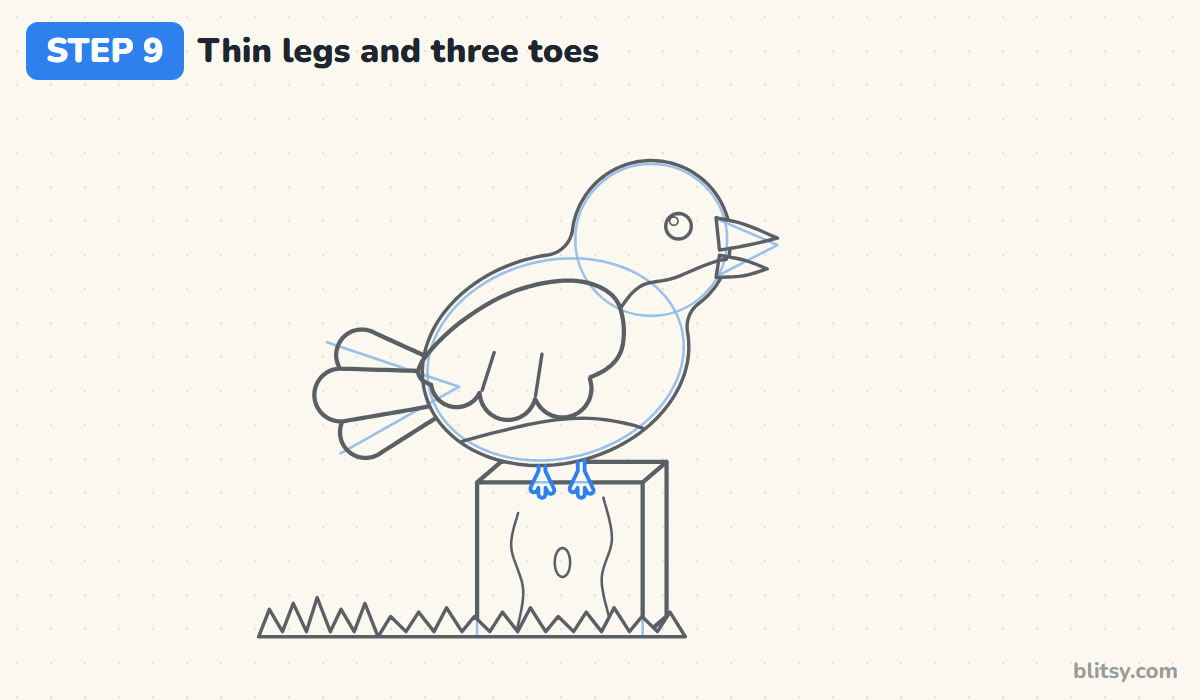
Under the body, draw two very short, thin legs reaching down to the top of the post. At the end of each one, add three tiny toes curling over the front edge, as if the bird is holding on. Most beginners make the legs too long here. On a round songbird they barely peek out.
💡 Tip: Put both legs near the middle of the belly so the bird looks balanced, not tipping over.
Step 10: Draw a daisy and music notes
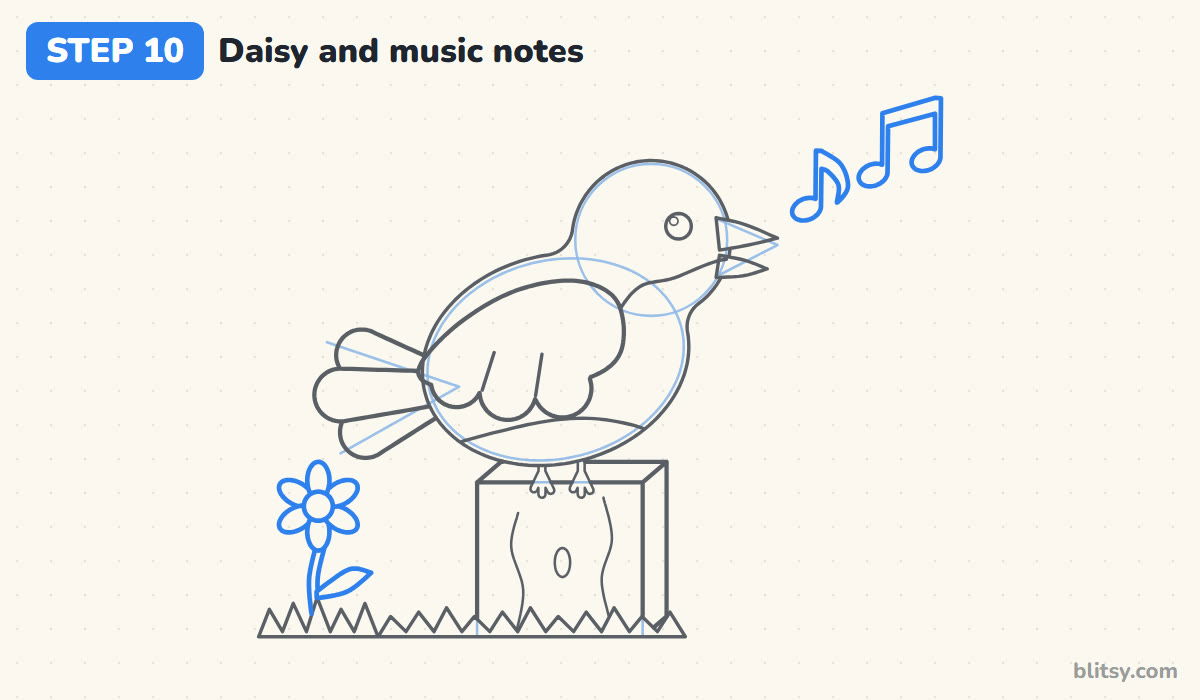
To the left of the post, draw a thin stem with one leaf, topped by a small circle and six oval petals around it. Then float two music notes near the open beak: a single note with a little flag and a pair joined by a thick bar. The notes tell everyone what the bird is doing.
💡 Tip: Tilt the notes slightly upward so they look like they're drifting away from the beak.
Step 11: Ink your lines and erase the guides
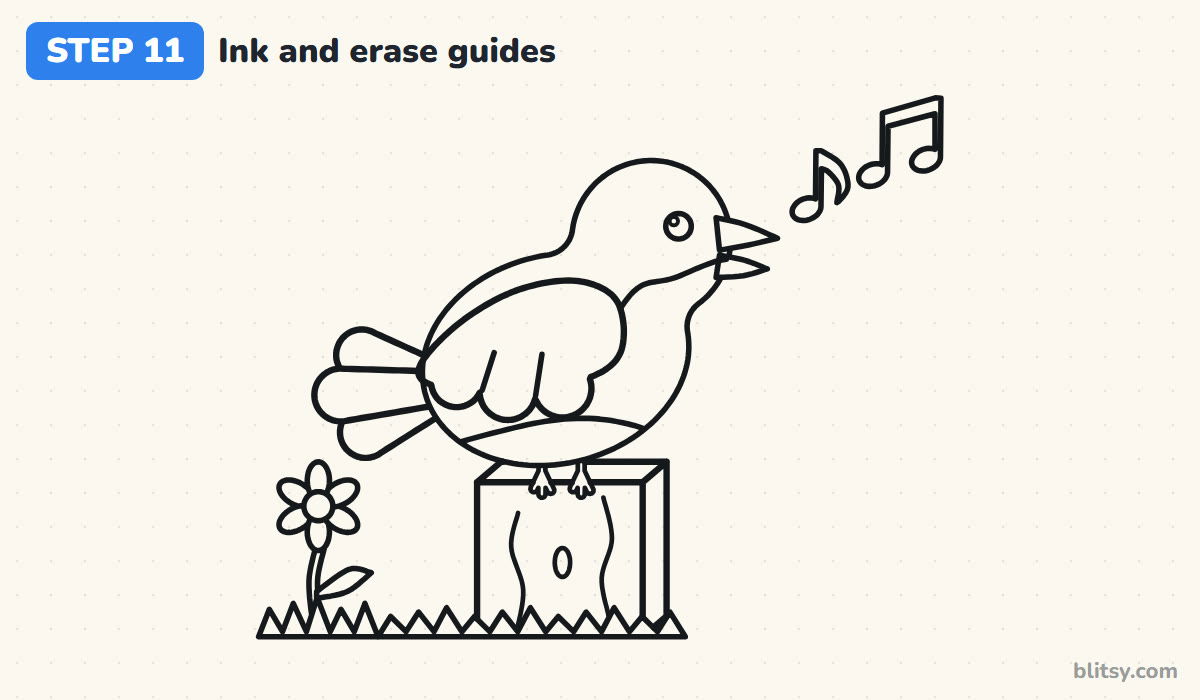
Go over every line you want to keep with the black marker. I start with the head and beak, because a smudge on the face is the hardest thing to hide. Leave the light circle, oval, box and guide lines alone. Give the ink a minute to dry, then erase all the guides.


💡 Tip: Rest your hand on a scrap of paper while you ink so you don't drag through wet lines.
Step 12: Color your bluebird
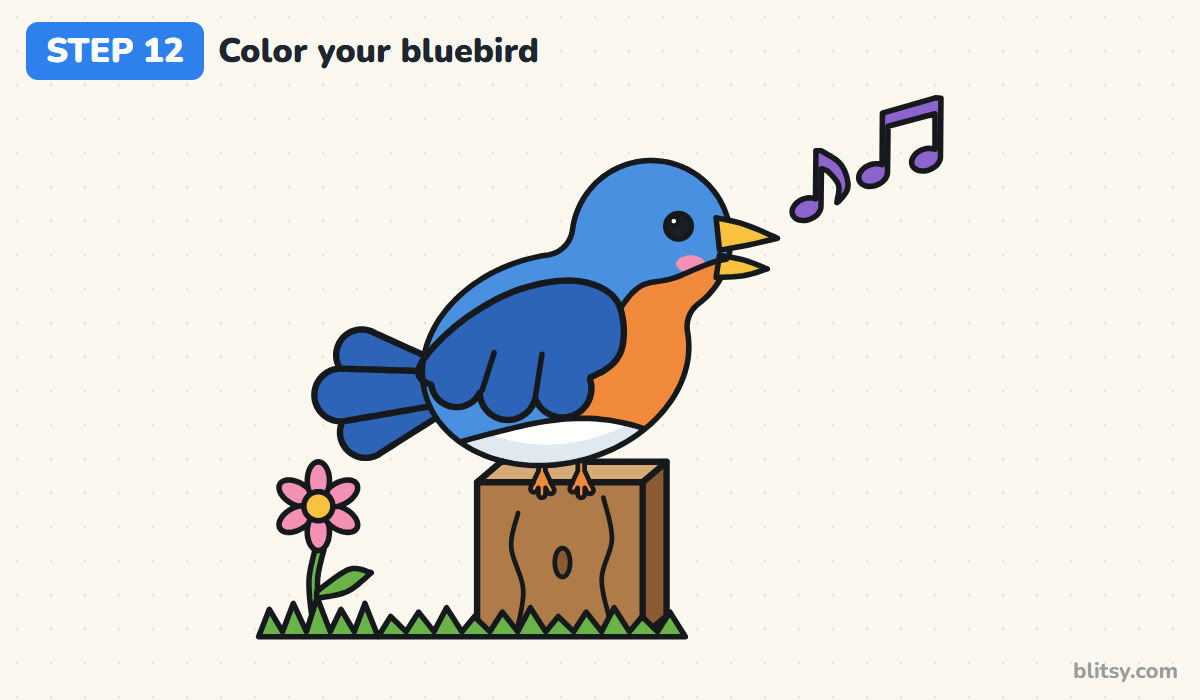
Color the head and back bright blue, then use a darker blue on the wing and tail so they stand out from the body. The chest and feet are orange, the beak is yellow, and the belly stays white with a touch of light gray at the bottom. Add a pink dot on the cheek, a brown post, green grass, a pink daisy and purple notes.
💡 Tip: Color the big blue areas first. Once they're done, the small parts go quickly.
Why a Little Bird Sometimes Looks Off
- A head that floats away from the body. Overlap the circle and the oval in step 1, so the neck forms on its own.
- A long, pointy beak. It makes a small songbird look like a heron. Keep it about twice as long as the eye is wide.
- Long, stiff legs. They turn a cute bird into a stork. Show only a short stub of leg below the belly.
- The wing drawn as a flat oval. It looks like a patch on the side. Give it round bumps along the bottom edge for feathers.
- Coloring the wing the same blue as the body. The wing disappears. Use a darker shade so it reads clearly.
Turning Your Bluebird Into Other Birds
The same circle-and-oval base works for nearly any small bird. Color it brown with a gray head and you have a sparrow, or go all red with a little crest for a robin-style friend. Swap the fence post for a mailbox or a branch, or trade the notes for a worm in the beak. Younger kids can leave out the post's side face and still end up with a clear drawing. If you'd like a bird with its wings open, the flying bird drawing tutorial is a good next step, and the cardinal drawing step by step lesson shows another bright songbird on a branch.
Bluebird Coloring Page and Step Guide PDF
If you'd rather work on paper, grab the free bird coloring page. A small colored example sits at the top with a key that names each color and where it goes, and the big outline below is ready for crayons or markers. The PDF drawing guide has all 12 steps and tips on a few printable pages, sized for Letter or A4.
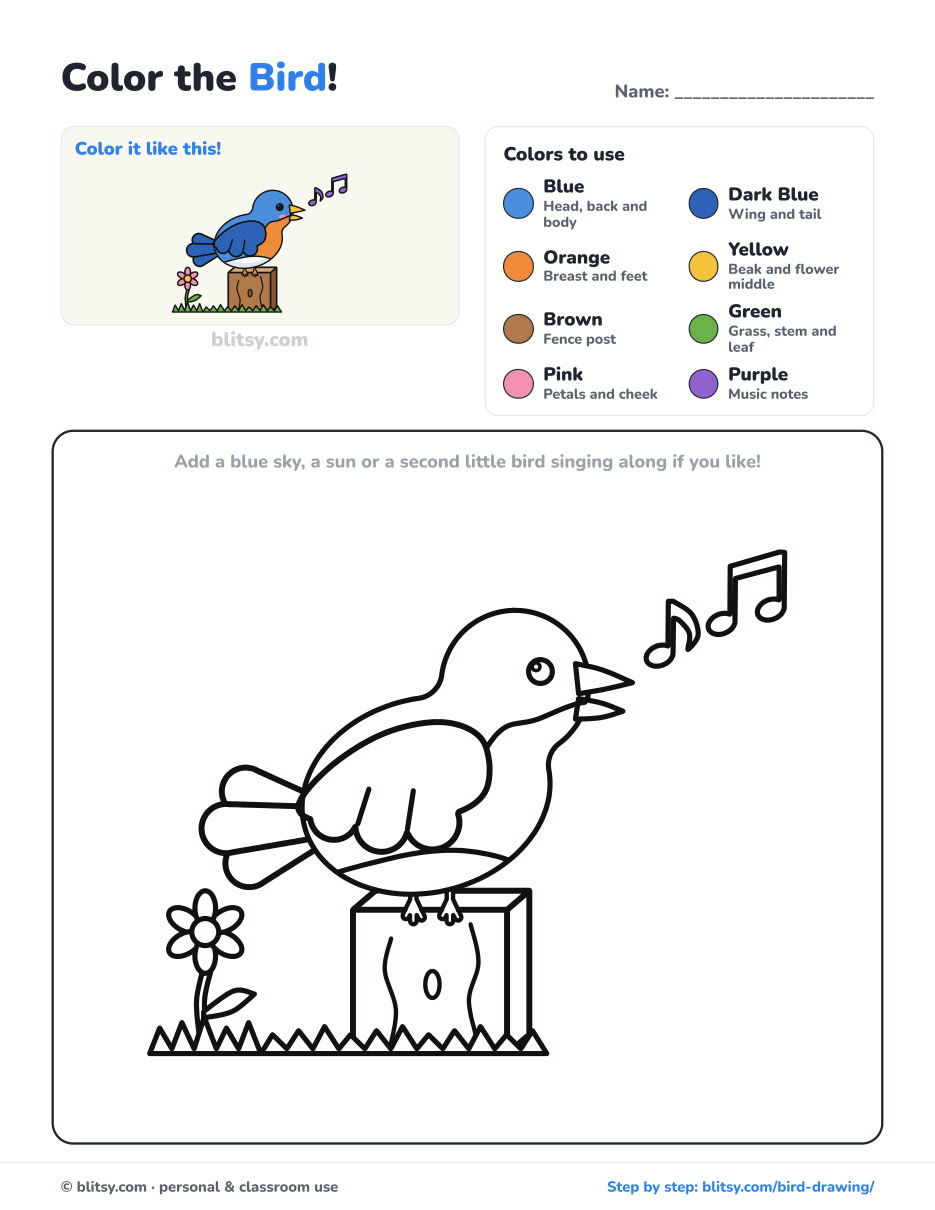
Black outlines with a colored example and the color names at the top. Ready to print and color.
⬇️ Download Coloring PageEvery step picture with its instructions and tips, to keep beside your paper while you draw.
⬇️ Download Drawing Guide📱 On a phone? Tap a download button, then open the file and choose Share → Save to Files or Print. On a computer, the PDF opens or saves straight to your Downloads folder.
Keep the Bluebird Steps Handy on Pinterest
What Beginners Wonder About Drawing Birds
What is the easiest way to draw a bird?
Draw a circle for the head and a larger oval for the body, overlapping a little. Add a small triangle beak, a dot eye, a wing shape on the body and a short tail. That covers almost every small bird.
How do you draw a bird for kids?
Keep it round and simple. Use big shapes, a short beak and tiny legs, and skip the feather details if they're tricky. Kids usually enjoy the coloring part most, so leave time for it.
How long does it take to draw this bird?
Around half an hour for most people, including coloring. The outline alone takes ten to fifteen minutes once the guides are down.
How do I make my bird look like it's singing?
Open the beak slightly by drawing the top and bottom parts with a gap between them, then add a few music notes floating nearby. Tilting the head up a little helps too.
Your turn now: sketch those two circles and give your bird a song of its own. I'd love to know which colors you picked. 🐦🎵
Related posts:
 How to Draw a Phoenix Step by Step (Easy Fire Bird)
 How to Draw a Flying Bird Step by Step (Easy Swallow)
 How to Draw a Whale Step by Step (Easy for Beginners)
 How to Draw Lungs Step by Step (Easy Science Diagram)
 How to Draw a Pineapple Step by Step (Easy Crown and Slice)
 How to Draw Iron Man Step by Step (Easy Chibi for Kids)
 How to Draw a Dress Step by Step (Easy Party Dress)
 How to Draw a Chicken Step by Step (Easy for Beginners)
 How to Draw a UFO Step by Step (Cute Alien Saucer)
 How to Draw Flames Step by Step (Easy Campfire Drawing)
 How to Draw a Crow Step by Step (Easy for Beginners)
 How to Draw a Tiger Step by Step (Easy Walking Pose)

