
Mountains look huge and complicated, yet on paper they start as three simple triangles. In this lesson you'll learn how to draw a mountain step by step: one tall front peak, two smaller peaks tucked behind it, zig-zag snow caps, a meadow with a little lake and a row of pine trees. Along the way you'll pick up the two tricks that give any landscape depth: overlapping shapes, plus a shadow side on every peak.
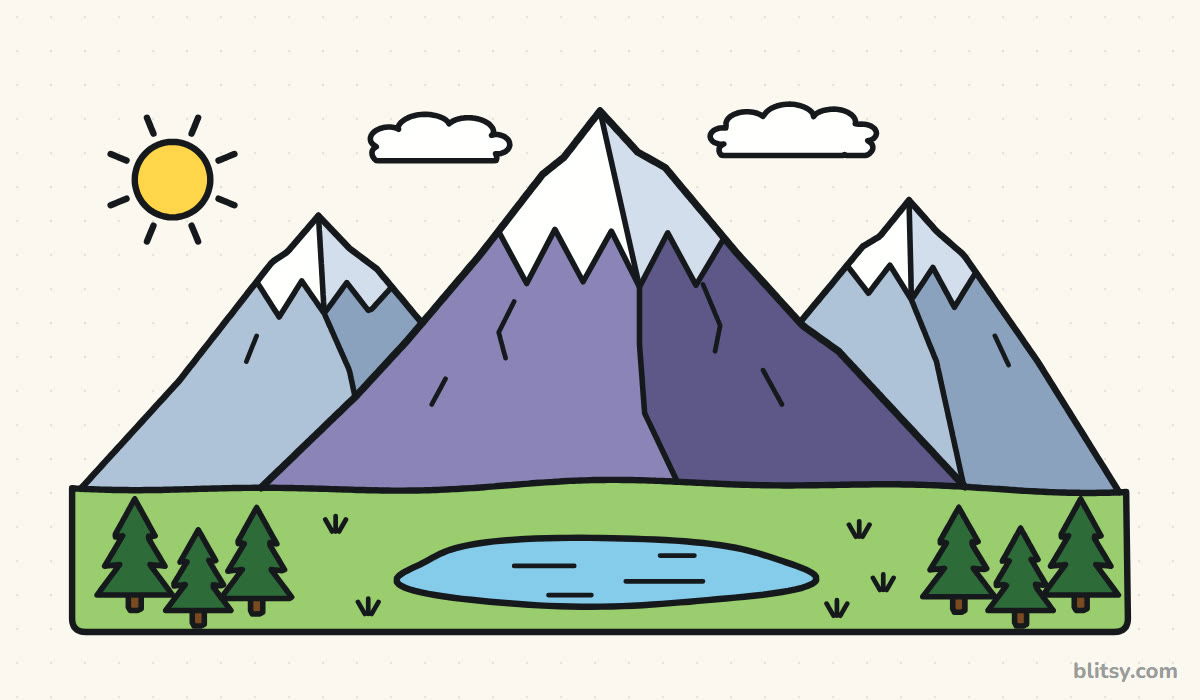
Blue lines in a step picture are the ones you add right then, and gray lines are from earlier. The pale blue helper guides should be very light, because you'll erase them in step 10.
Quick overview
⏱️ Time: around 30 minutes, plus 10 to 15 for coloring
🎯 Level: easy; kids from about 6 can follow it, and adults starting out will enjoy it too
✏️ Steps: 12
🏔️ You'll draw: a snowy front peak, two peaks behind it, a meadow, a lake, pine trees, a sun and two clouds
Supplies for a Snowy Peak Landscape
- A pencil you can press very softly for the guides
- A clean eraser
- A black marker or fineliner for the final lines
- Colored pencils in purple, dark purple, gray blue, light gray, two greens, light blue and yellow
- A sheet of paper turned sideways, so the peaks have room to spread out
A ruler is handy for the ground line, but the peaks look better drawn freehand.
How to Draw a Mountain Step by Step
Step 1: Draw a ground line and three triangles
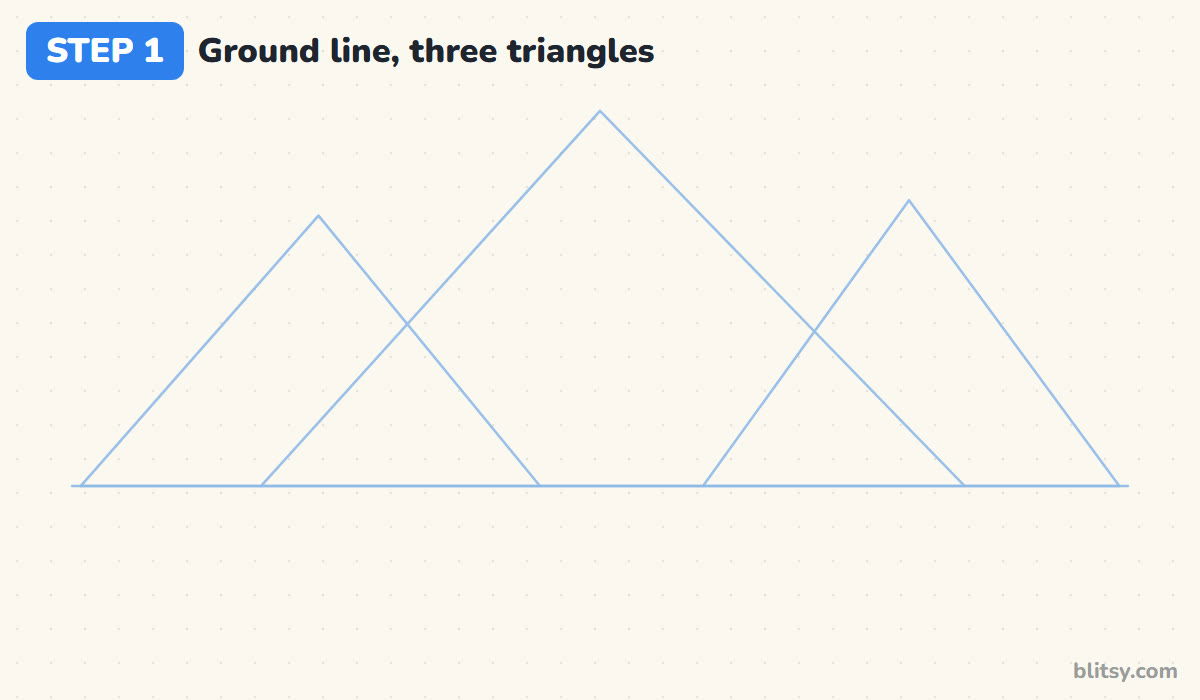
Turn the paper sideways. About two thirds of the way down, draw a long, level line across the page. On it, sketch three light triangles: a tall wide one in the middle and two shorter ones on each side, overlapping the big one. Their tops should land at different heights.
💡 Tip: If the middle triangle isn't clearly the tallest, the whole range looks flat. Redo it now while the lines are faint.
Step 2: Outline the big front peak
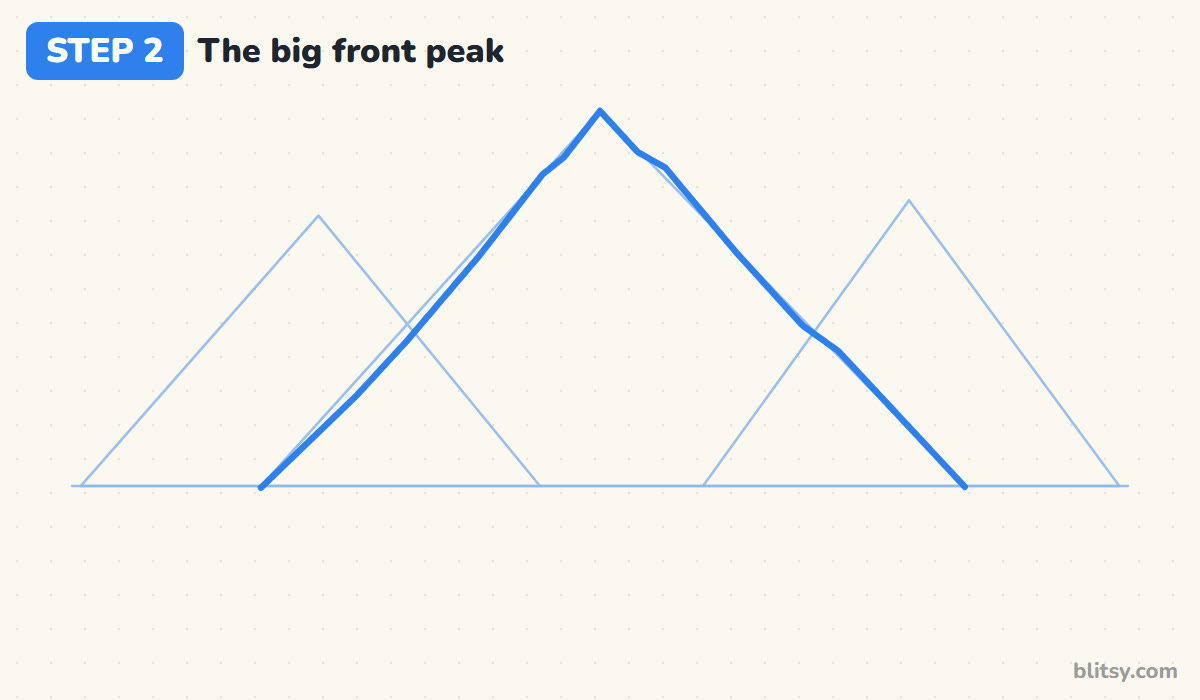
Go over the middle triangle with a firmer line, but don't trace it perfectly. Add a small bump on each slope near the top, where rock would break up the shape. Stop both slopes at the ground line. I always draw this peak first because it sits in front, so nothing will ever cross its outline.
💡 Tip: Slight wobbles are good here. A ruler-straight slope looks like a tent, not a mountain.
Step 3: Add the two smaller peaks behind
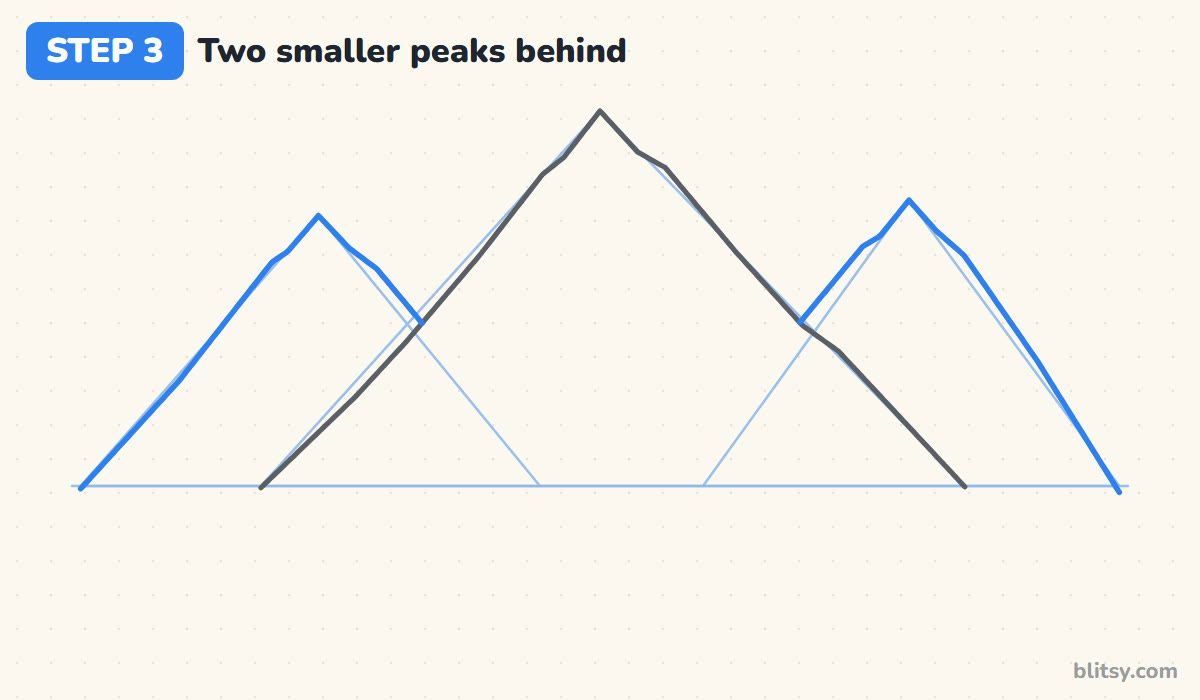
Now outline the two side triangles the same way. Here's the overlapping trick: each inside slope stops the moment it touches the big peak, as if it slides behind it. That one cut tells the viewer which mountain is closer. Smaller peaks also read as farther away, so keep them lower than the front one.




💡 Tip: Run your finger along a back slope first. Where it bumps into the front peak, that's where your pencil lifts.
Step 4: Draw the zig-zag snow caps
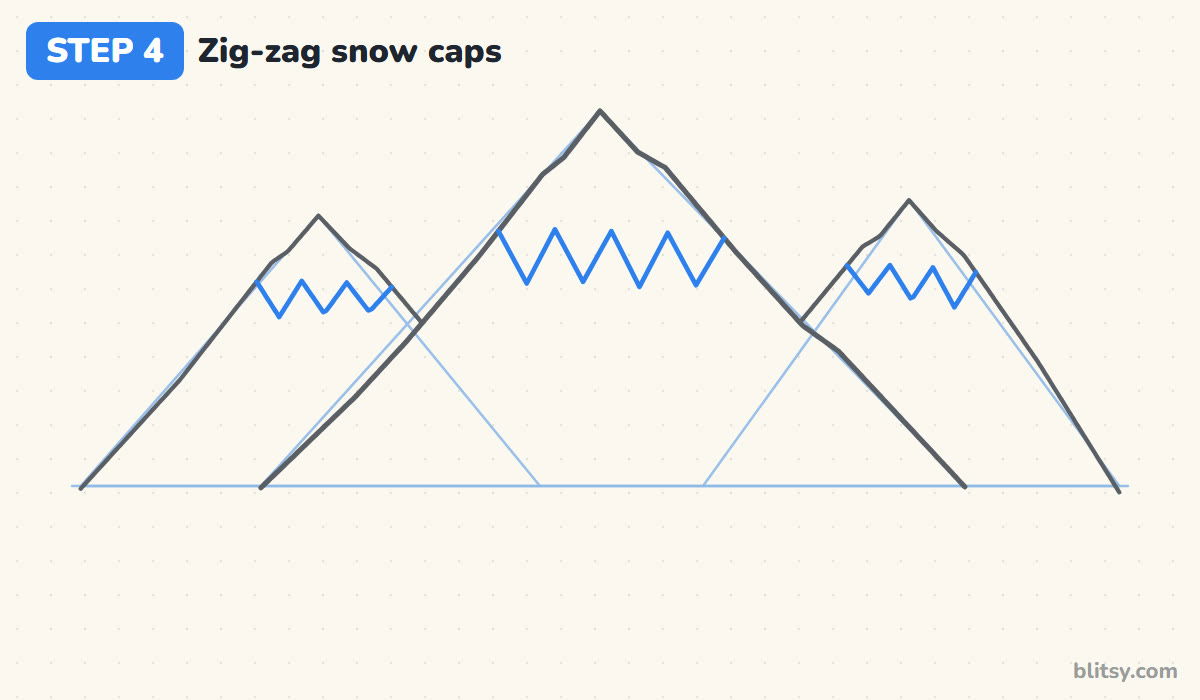
Near the top of each peak, draw a zig-zag line from one slope to the other. I make the points uneven on purpose, some deeper than others, the way real snow melts into rock. On the big peak the snow reaches about a third of the way down. The back peaks get smaller caps.
💡 Tip: Keep the zig-zag below the tip with some space to spare. A snow line too close to the top looks like a hat.
Step 5: Split each peak with a ridge line
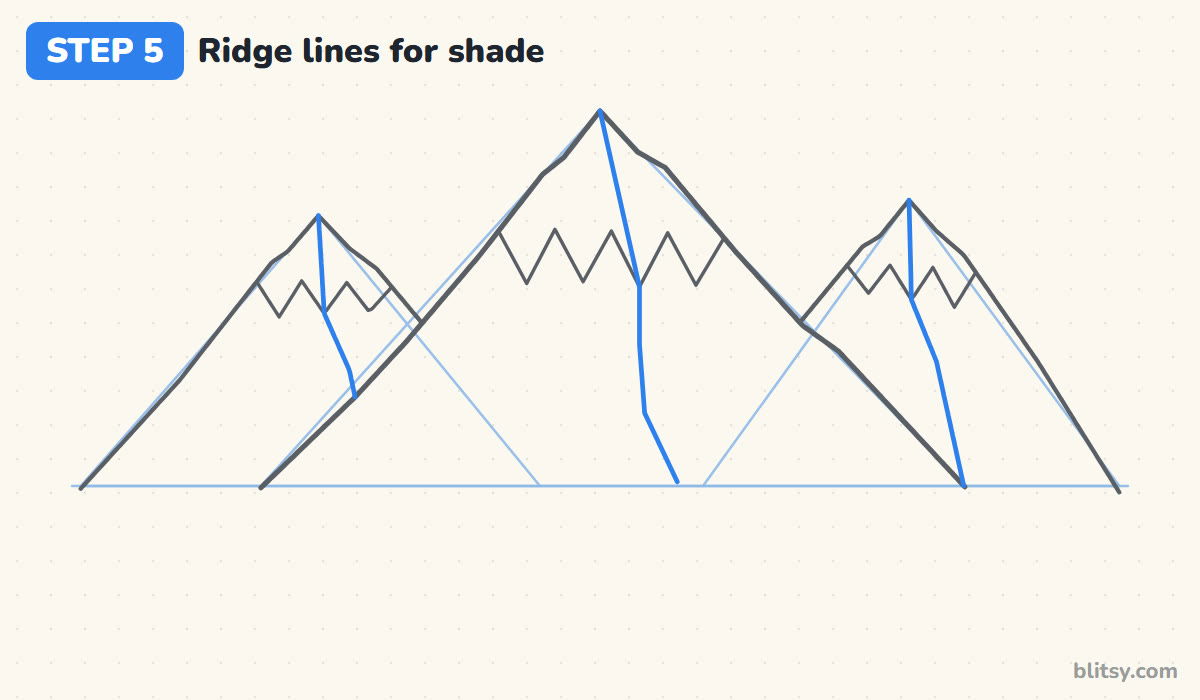
From the very top of each peak, draw a line down toward the ground, leaning a little to the right. It should pass through one of the snow points and bend once or twice on the way. This ridge divides the sunny side from the shadow side. With the sun on the left, the right side will be darker later.
💡 Tip: Decide where your sun will go before you draw the ridges. The shadow side always faces away from it.
Step 6: Add the meadow and a small lake
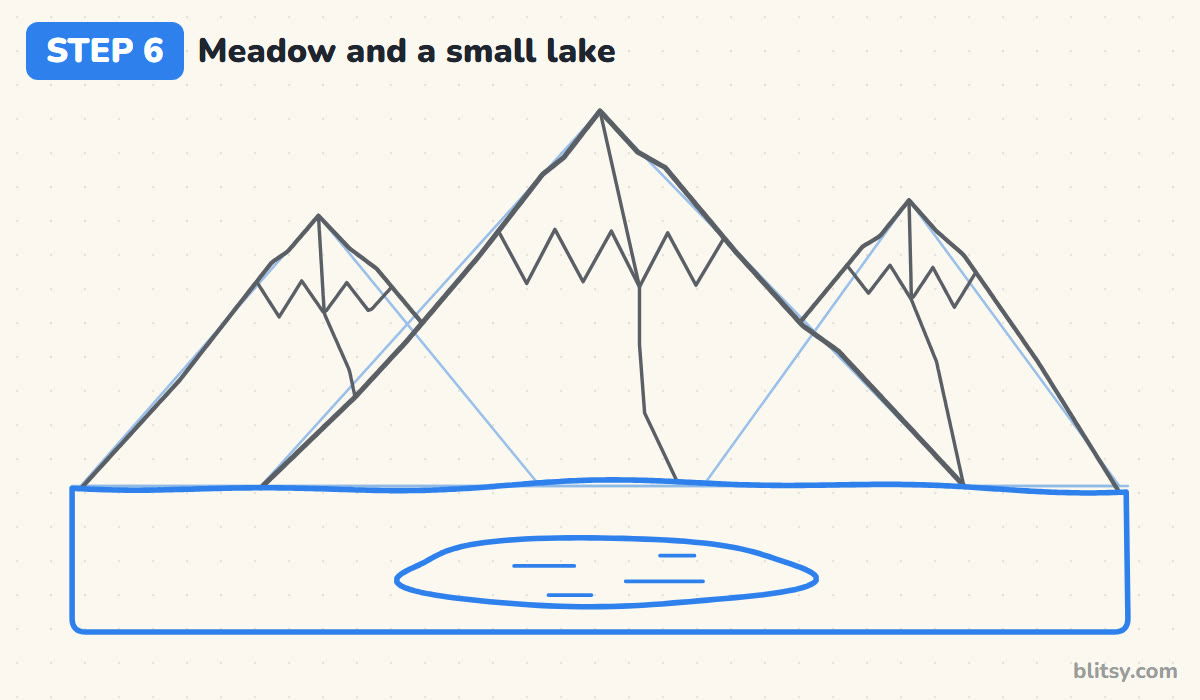
Trace the ground line with a gently wavy line, then close a band underneath it with straight sides and rounded bottom corners. In the middle of the band, draw a long, flat oval for the lake. I see beginners make lakes too round all the time. Seen from far away, water is wide and thin, so squash that oval a lot.
💡 Tip: Add three or four short flat dashes inside the lake. They read as ripples instantly.
Step 7: Draw a row of pine trees
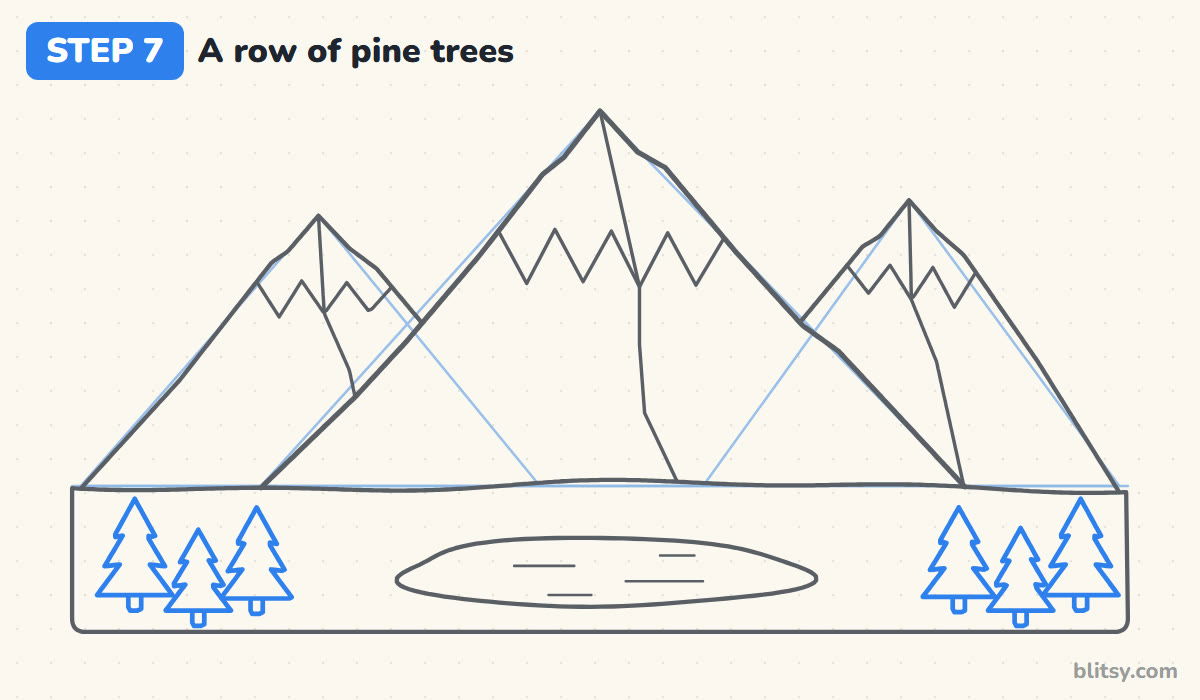
On each side of the lake, draw three small pines. Each one is three triangles stacked from small to big, with a tiny rectangle trunk at the bottom. Draw the lowest tree in each group first. It's the nearest, so the two trees behind it stop where they meet its branches.



💡 Tip: Little kids can draw each pine as one tall triangle on a stick. It still looks like a forest from a distance.
Step 8: Put a sun and two clouds in the sky
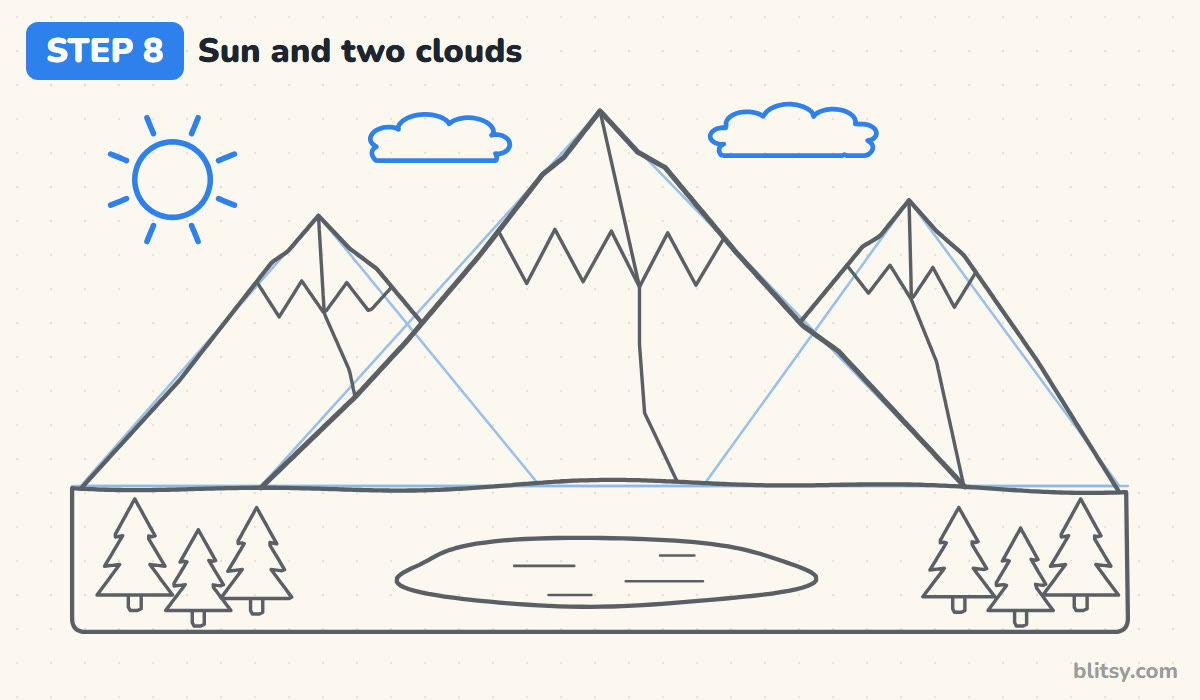
Place the sun in the top left corner, on the same side as the light slopes. Give it a circle and eight short rays. Then add two puffy clouds with flat bottoms on either side of the tall peak. Keep both clouds small so the mountains stay the main event.
💡 Tip: Leave a gap between the clouds and the peaks. When a cloud touches a summit, the picture starts to feel crowded.
Step 9: Add rock cracks and grass tufts
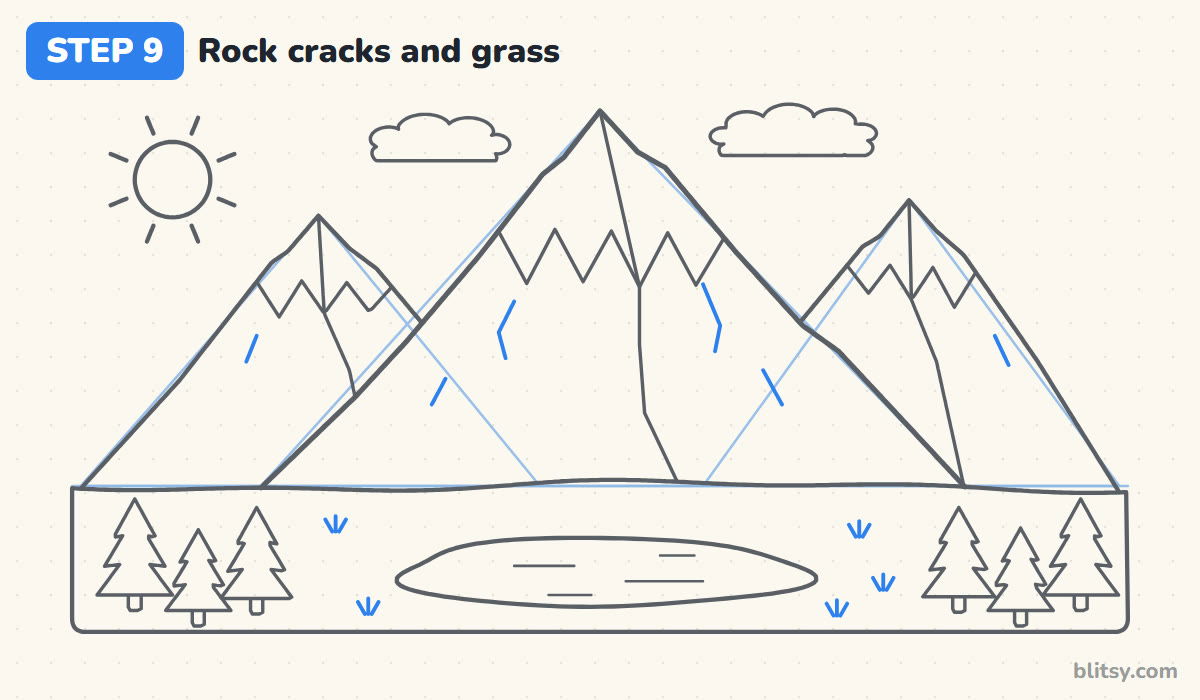
A few short broken lines on the slopes, just below the snow, turn smooth triangles into rock. Two or three per peak is enough. In the meadow, add little three-stroke grass tufts around the lake. These are tiny touches, yet they make the scene feel finished.
💡 Tip: Draw cracks in the same direction as the slope. Lines going across the slope look like scratches.
Step 10: Ink the lines and erase the guides
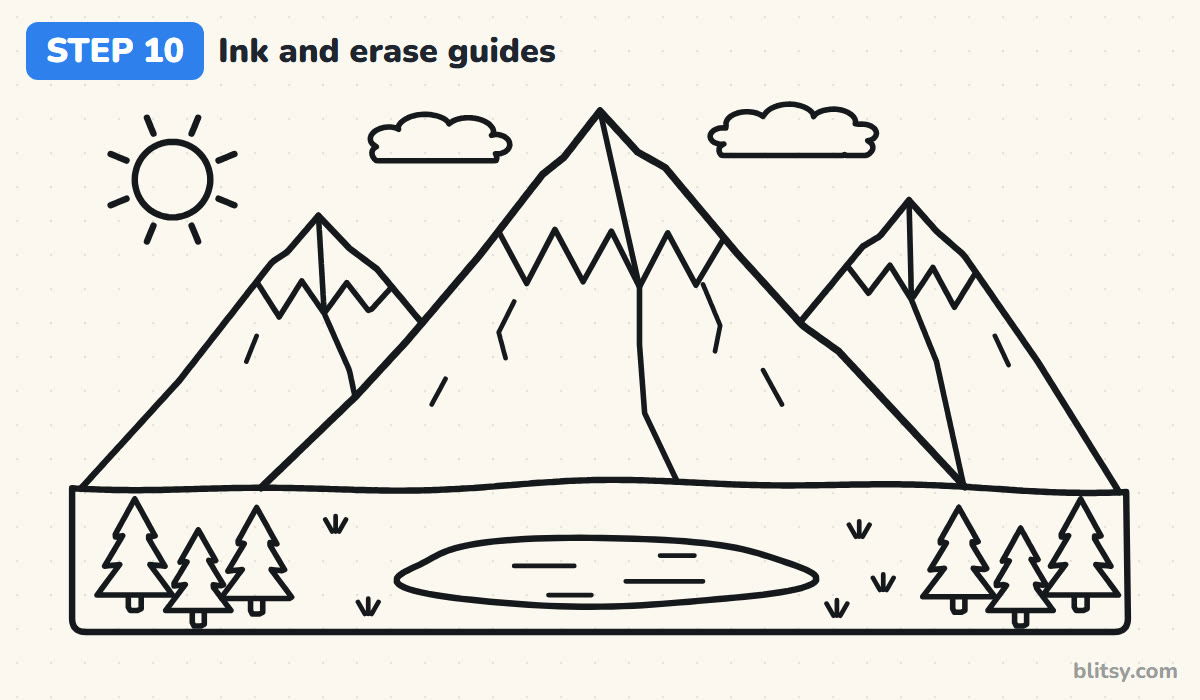
Trace every line you want to keep with the black marker. I start at the top and work down so my hand never drags across wet ink. Give it a minute to dry, then erase the ground line and the three helper triangles.
💡 Tip: Erase in one direction with light strokes. Scrubbing back and forth can smear marker that isn't fully dry.
Step 11: Color the peaks and the snow
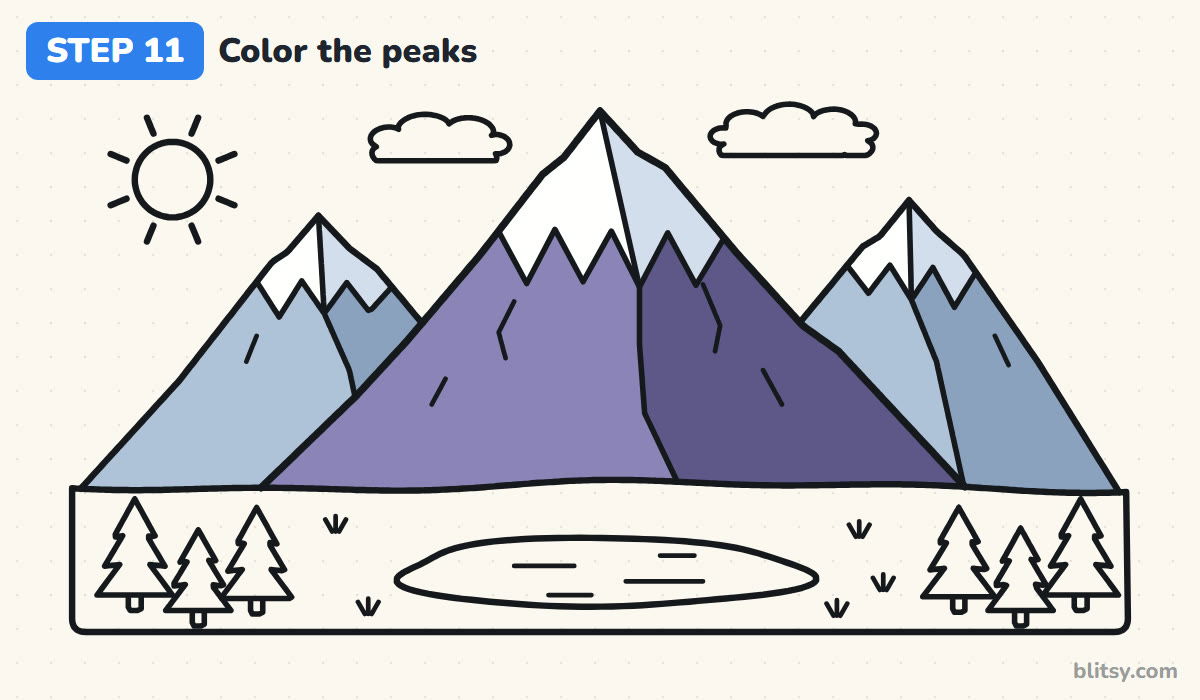
Color the sunny side of the front peak purple and the shadow side dark purple. Use gray blue on the back peaks, pressing harder on their right sides so they get a shadow too. Leave the snow white on the sunny side and give the shaded snow a whisper of light gray. In my experience, that pale gray is what makes snow look three-dimensional.




💡 Tip: Paler colors on the back peaks push them into the distance. Keep the strongest color for the front.
Step 12: Color the meadow, lake and sky
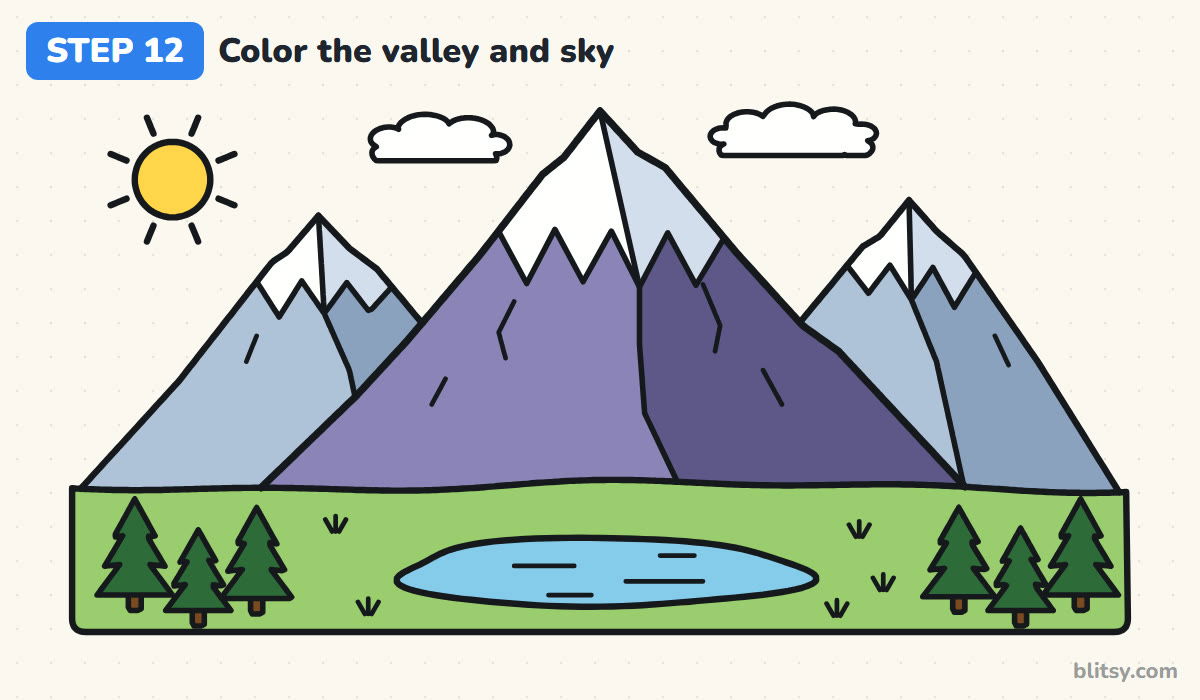
Fill the meadow with light green and the lake with light blue, leaving the ripple dashes alone. Pines get dark green with brown trunks. Finish with a yellow sun. The clouds can stay white, or you can shade the sky behind them very softly in blue.
💡 Tip: Color the big green meadow with small circles instead of back-and-forth strokes. It hides pencil marks.
Mountain Habits That Flatten the Scene
- All three peaks the same height. The row looks like a fence of triangles. Make one peak clearly the tallest and drop the others lower.
- Back slopes drawn through the front peak. Then nothing looks in front of anything. Stop each back slope where it meets the big peak.
- A neat, even snow line. Perfect zig-zags look like a crown. Vary the depth of each point so the snow seems to melt naturally.
- Shadows on both sides. Light comes from one direction. Pick the sun's side first and darken only the slopes facing away from it.
- A round lake. Far-away water looks long and thin. Squash it into a flat oval.
Changing the Season or the Weather on Your Peaks
Once the basic range feels easy, my favorite change is a sunset version: color the sky orange and pink and darken all three peaks into deep purple. In winter, cover the meadow with snow and keep only the pines green. You could also swap the lake for a winding path that disappears behind the trees. If your pines are the part you enjoy most, the tree drawing tutorial goes further, and the volcano drawing tutorial uses the same triangle start with a fiery twist.
Mountain Coloring Page Plus a Printable Lesson
Prefer to skip straight to coloring? Print the mountain coloring page. A small colored example at the top shows which color goes where, and the big outline below has thick lines that are easy for small hands. The step-by-step guide PDF holds all 12 steps with their tips, two per page, and prints on Letter or A4.
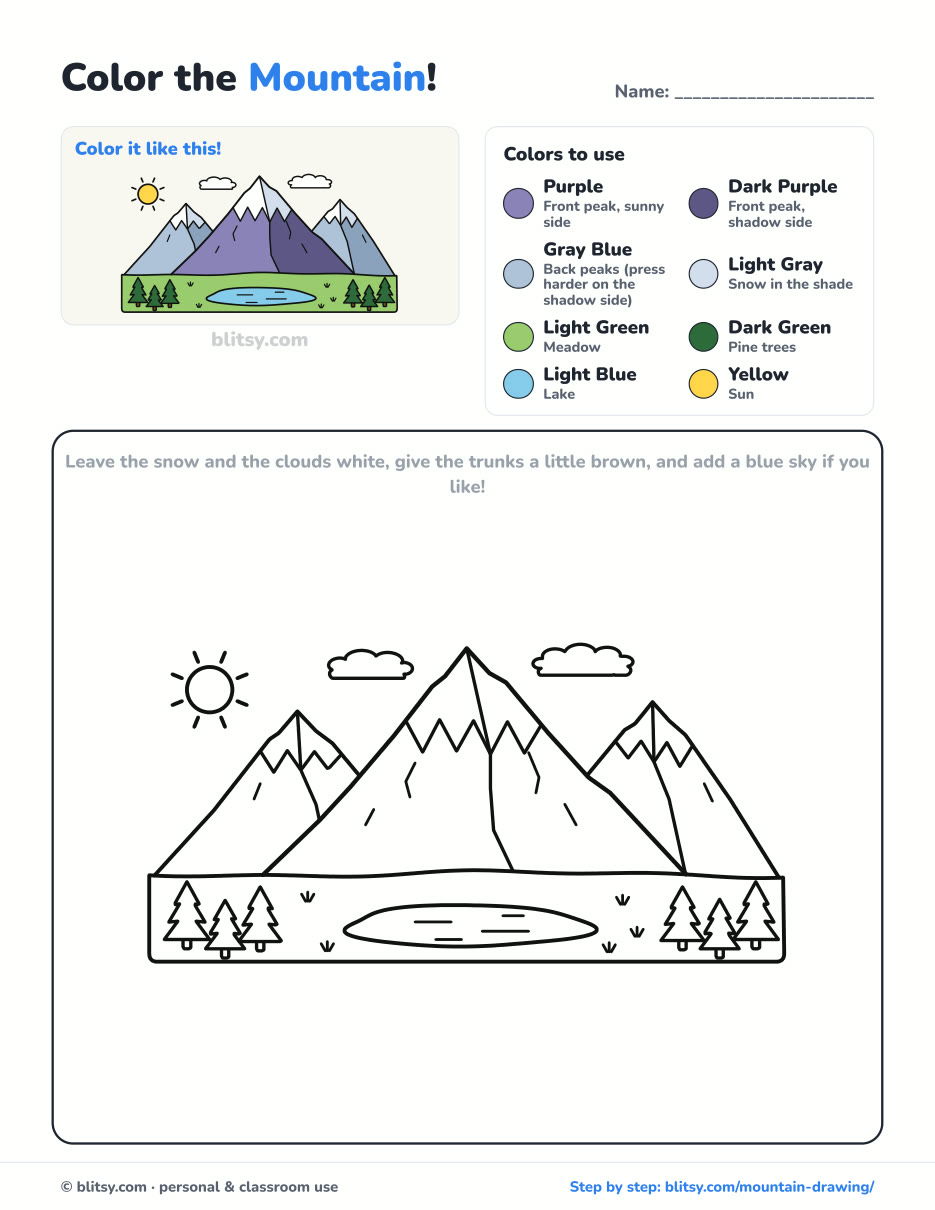
Black outlines with a colored example and the color names at the top. Ready to print and color.
⬇️ Download Coloring PageEvery step picture with its instructions and tips, to keep beside your paper while you draw.
⬇️ Download Drawing Guide📱 On a phone? Tap a download button, then open the file and choose Share → Save to Files or Print. On a computer, the PDF opens or saves straight to your Downloads folder.
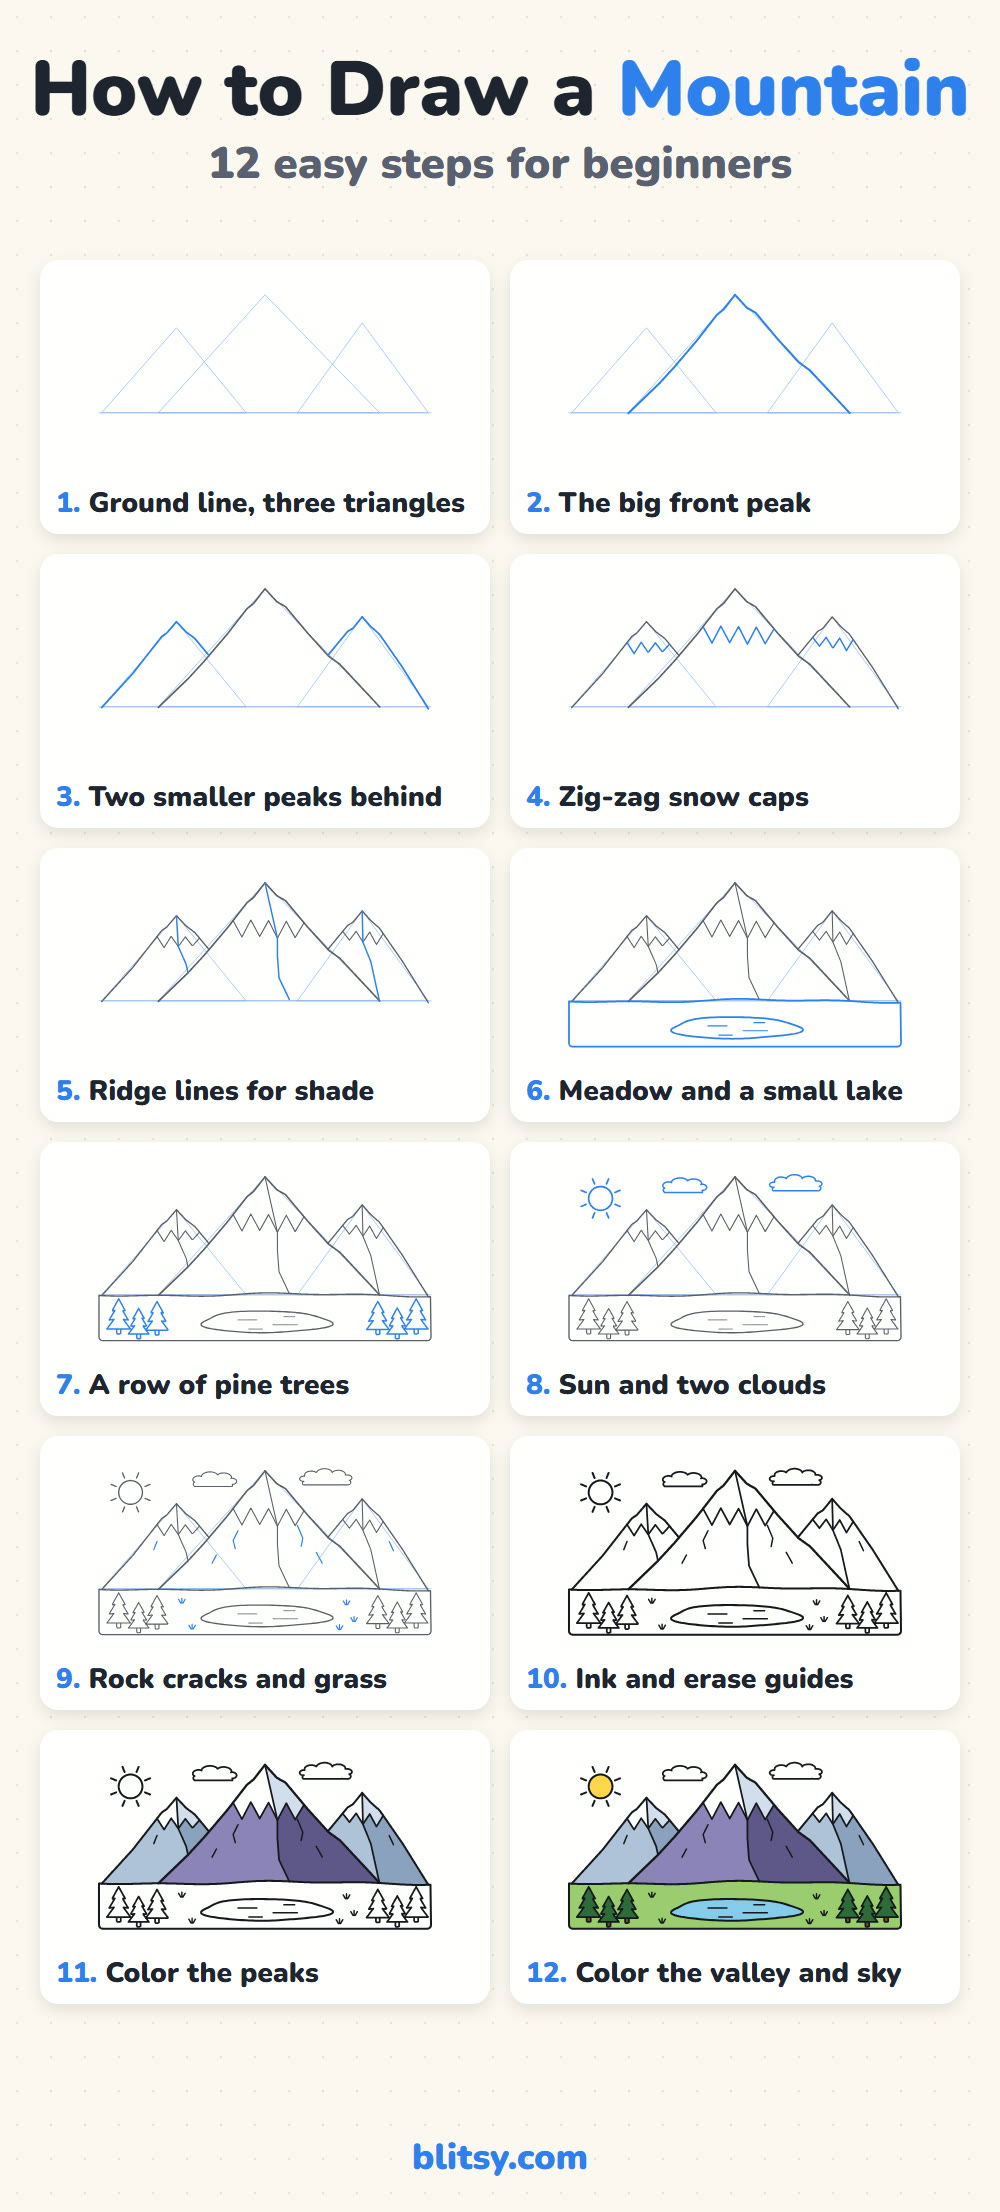
Every Peak Step on One Tall Pin
Outdoor Scenes and Everyday Objects to Draw Next
These are all step-by-step tutorials with a picture for every stage, so you can pick a subject and follow along.
- Wave Drawing: Keep the water theme going with the wave drawing tutorial: a curling blue wave, an aqua tube and a pale sun.
- Halloween Drawing: The Halloween drawing step by step lesson starts from one curved hill line and ends on a cute haunted house.
- Realistic Drawing: Shade one shiny apple with five kinds of light in this realistic drawing tutorial.
- School Drawing: Draw a brick schoolhouse with a clock and a bell tower in the how to draw a school tutorial.
- Light Bulb Drawing: A glowing bulb with rays and sparkles takes eleven calm steps in the light bulb drawing tutorial.
- Mandala Drawing: Six rings and eight repeats grow out from the center in this mandala drawing step by step guide.
- Flame Drawing: Learn how to draw flames for a crackling campfire, all from the same S-curve.
- Basketball Drawing: The basketball drawing tutorial puts a ball mid-flight next to a hoop and net.
- Snowman Drawing: For a winter scene, the how to draw a snowman tutorial builds a snowman with a hat and a flying scarf.
- Money Drawing: Bills, a money bag and a little coin tower fill the page in this money drawing step by step lesson.
Things Kids Wonder About Drawing Mountains
What is the easiest way to draw a mountain?
Start with a triangle on a ground line, then roughen the slopes a little and add a zig-zag snow cap. Adding a second, smaller triangle behind it already makes a scene.
How do you make mountains look far away?
Draw distant peaks smaller and lower, tuck them behind the front one and color them in paler, bluer shades. Faded color is the strongest distance trick.
How do you shade a mountain for beginners?
Draw a ridge line from the top down, then color one side darker than the other. The dark side always faces away from the sun.
How long does it take to draw a mountain landscape?
Around 30 minutes for the lines and another 10 to 15 for coloring. Younger kids can stop after step 6 and still have a complete picture.
Grab your pencil, pick where your sun sits, and build your own range one triangle at a time. 🏔️
Related posts:
 How to Draw a Whale Step by Step (Easy for Beginners)
 How to Draw Lungs Step by Step (Easy Science Diagram)
 How to Draw a Pineapple Step by Step (Easy Crown and Slice)
 How to Draw Iron Man Step by Step (Easy Chibi for Kids)
 How to Draw a Dress Step by Step (Easy Party Dress)
 How to Draw a Chicken Step by Step (Easy for Beginners)
 How to Draw a UFO Step by Step (Cute Alien Saucer)
 How to Draw a Volcano Step by Step (Easy Erupting Volcano)
 How to Draw a Crow Step by Step (Easy for Beginners)
 How to Draw a Tiger Step by Step (Easy Walking Pose)
 How to Draw a Heart Step by Step (Even, Symmetric Shape)
 How to Draw a Jellyfish Step by Step (Cute, Easy Guide)

