
Towers, flags, a gate with iron bars and a moat to keep out dragons: a castle looks complicated until you notice it's mostly boxes. In this lesson you'll learn how to draw a castle step by step, starting with a few light rectangles and triangles and finishing with a colorful fairy-tale fortress on a grassy hill. When I teach castles, the moment students see that battlements are just a row of square bumps, the drawing gets easier. You only need a ruler or a bit of patience for straight lines.
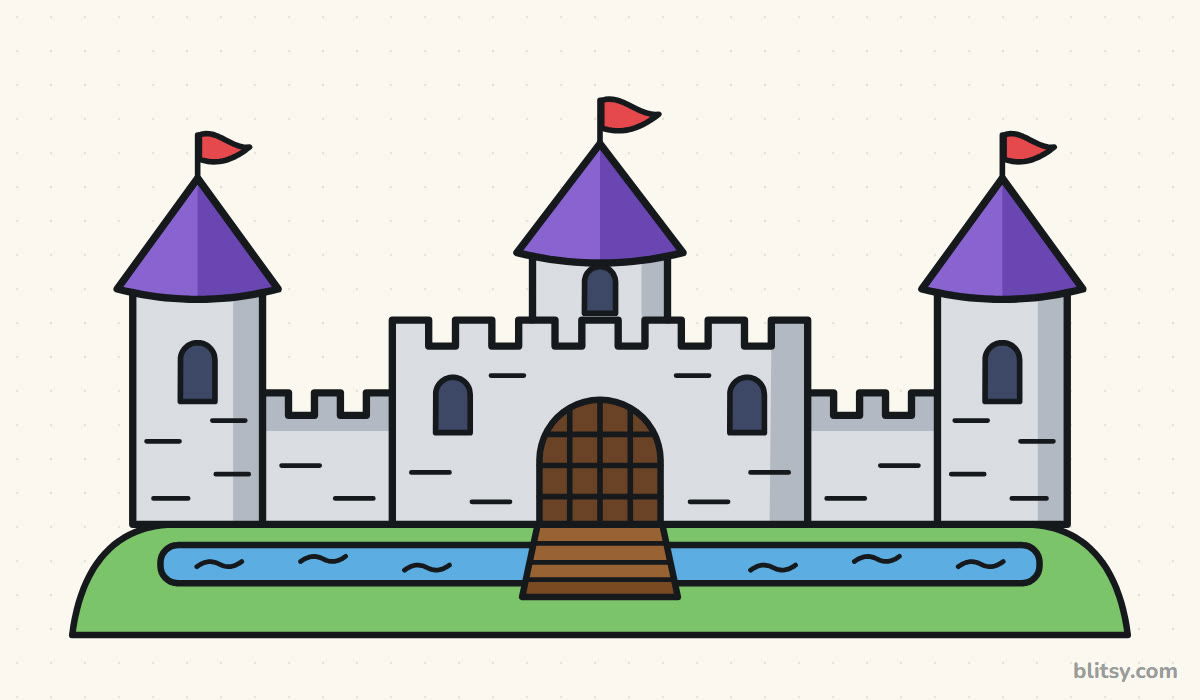
Castle pictures below change color as you go: this step's new lines are blue, earlier work is gray. Sketch the pale helper boxes and triangles softly, since step 11 erases them.
Quick overview
⏱️ Time: around 35 to 40 minutes with coloring
🎯 Level: easy, fine for kids from about 6
✏️ Steps: 12
🏰 You'll draw: a fairy-tale castle with three towers, a drawbridge and a moat
Pencil Box Basics for a Castle With Towers
- A regular pencil (HB is ideal)
- A soft eraser
- A ruler for the long, straight walls
- A black fineliner or thin marker
- Colored pencils or markers: light gray, gray, purple, red, brown, dark blue, blue and green
- Printer paper turned sideways
No ruler at home? The edge of a book or a cereal box works just as well for the walls.
How to Draw a Castle Step by Step
Step 1: Draw a ground line and two tower boxes
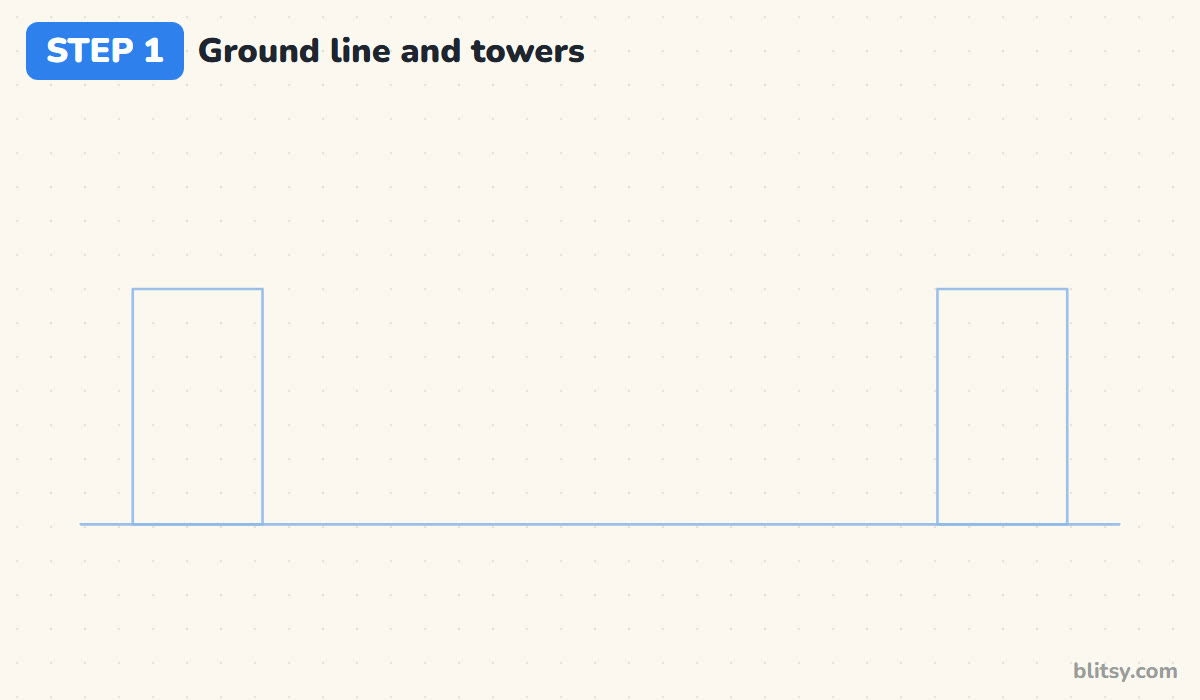
Turn your paper sideways and draw a long, light line about a third of the way up from the bottom. Stand a tall, narrow rectangle on it near each end. Make both the same size, roughly twice as tall as they are wide. These two boxes set the width of the whole castle, so leave a wide gap between them.
💡 Tip: Measure one box with your ruler, then copy the numbers for the other side.
Step 2: Add the keep box and the roof triangles
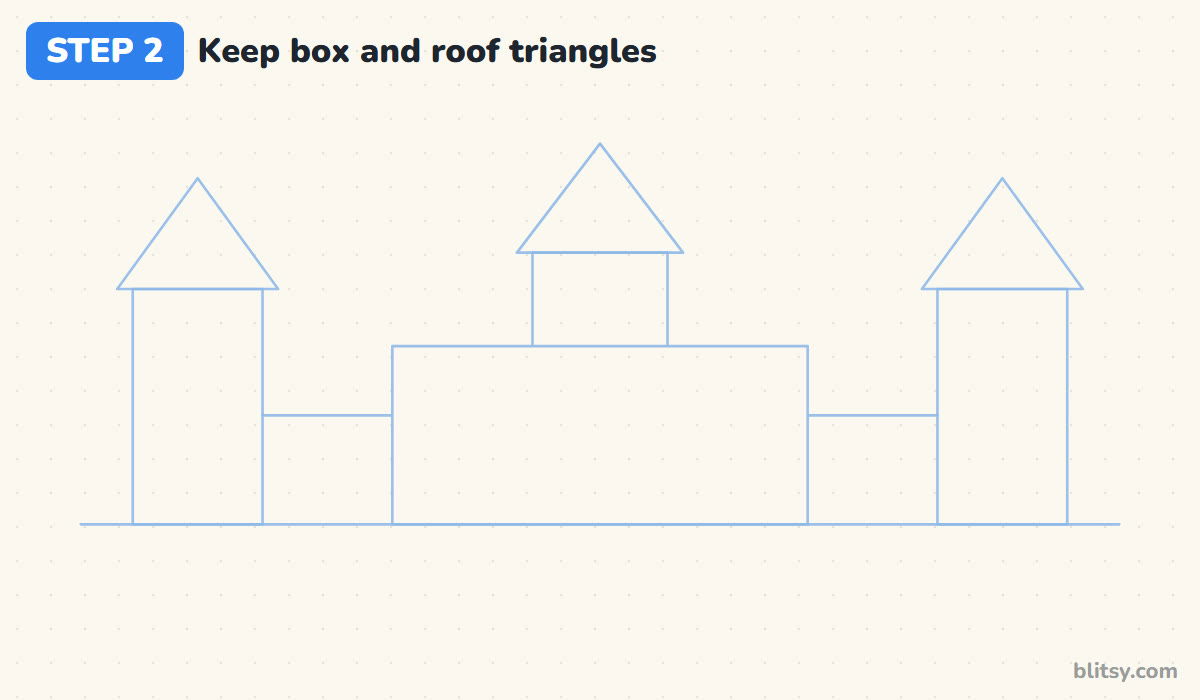
In the middle, draw a wide rectangle shorter than the towers. That's the keep, the main building. Put a small upright box on top of its center for the middle tower. Join the keep to each side tower with a flat line a little lower than the keep's top; those become the connecting walls. Then sit a triangle on each tower box, slightly wider than the box.
💡 Tip: Let every triangle hang a little past its box on both sides, like a hat brim.
Step 3: Outline the two side towers
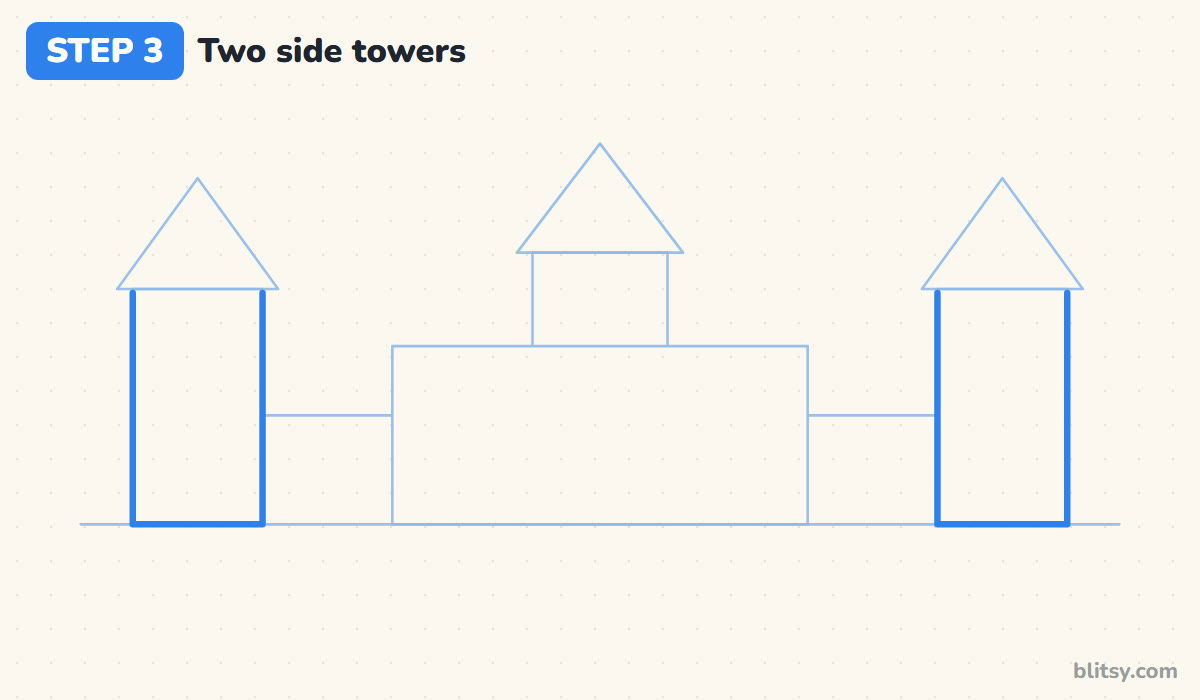
Go over the sides and bottom of both tower boxes with a firmer line. Leave the tops open. A cone roof will cover them later, and an extra line there would only show through. I like to draw the long sides with a ruler and the short bottom freehand.



💡 Tip: Press a little harder now, but still not as hard as you will with the marker.
Step 4: Cut the battlement notches into the keep
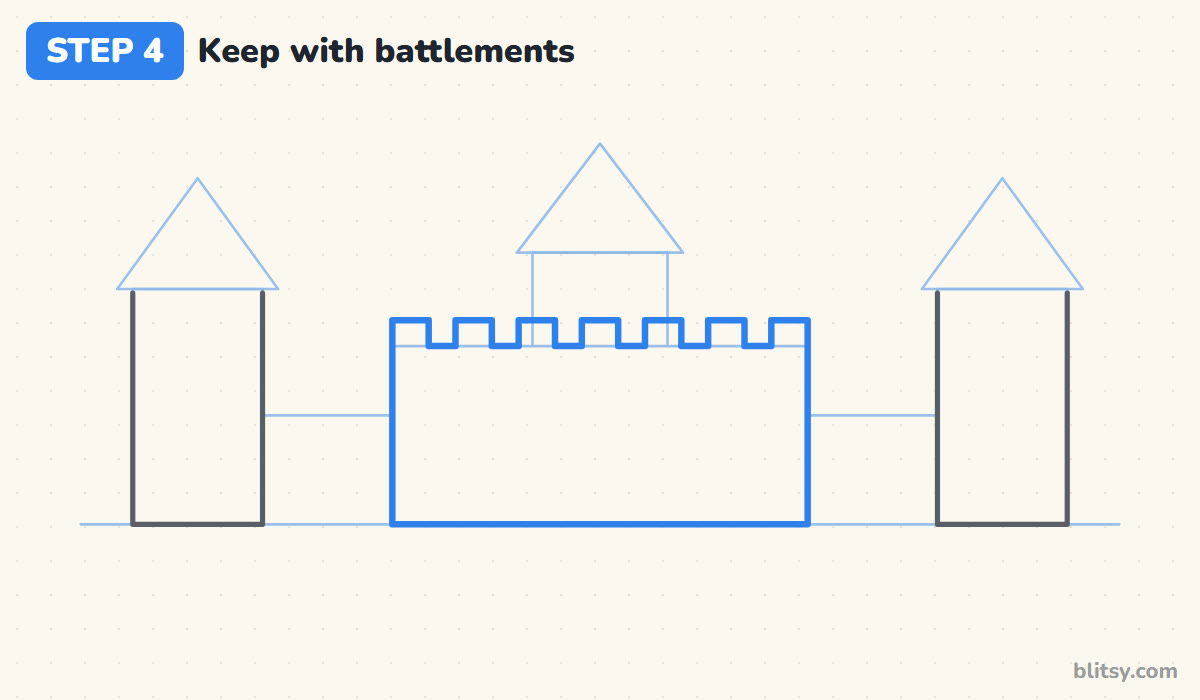
Here's the part that makes it a castle. Along the top of the keep, draw a row of square bumps with square gaps between them, like the top of a chess rook. Start and end with a bump at each corner and space the rest evenly; seven fit nicely. Draw the keep's sides and bottom too. Rushed notches come out lopsided, so take them one at a time.
💡 Tip: Mark all the bump positions with tiny dots before you draw a single square.
Step 5: Draw the walls and the middle tower
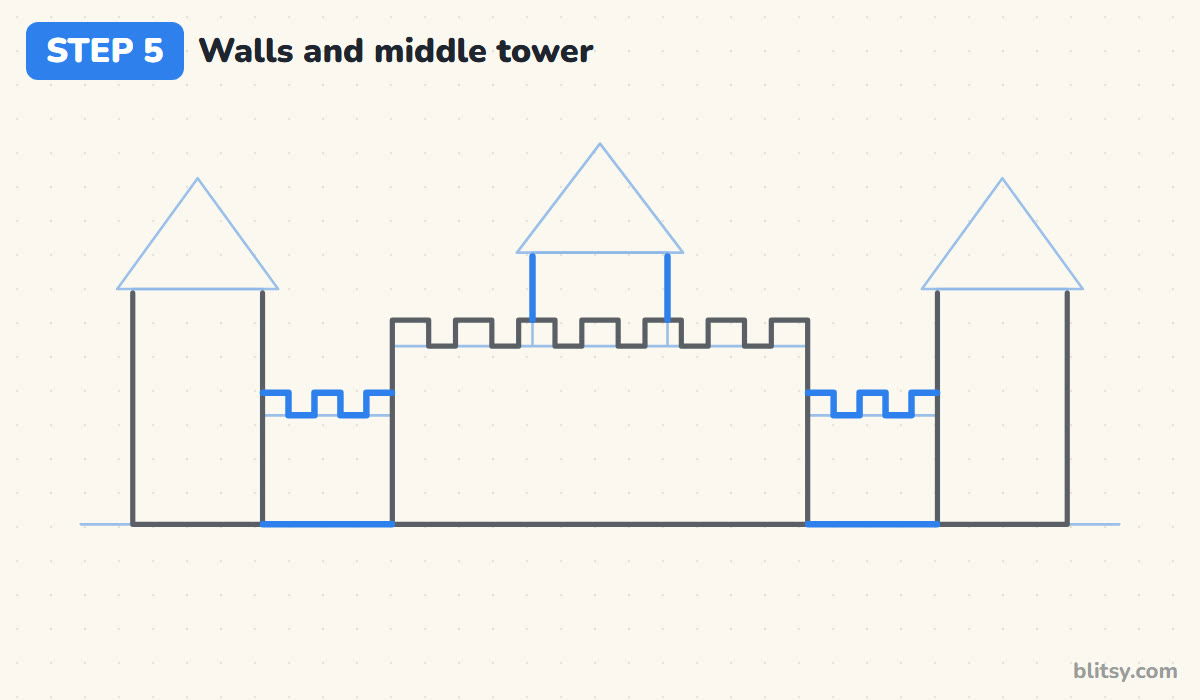
Each connecting wall gets the same notched top as the keep, only smaller: three bumps fit between a side tower and the keep. Their tops sit lower than the keep's, which gives the castle its stepped look. Then trace the two sides of the middle tower up to the roof triangle.
💡 Tip: Keep the wall bumps about half as wide as the keep's bumps.
Step 6: Shape three cone roofs
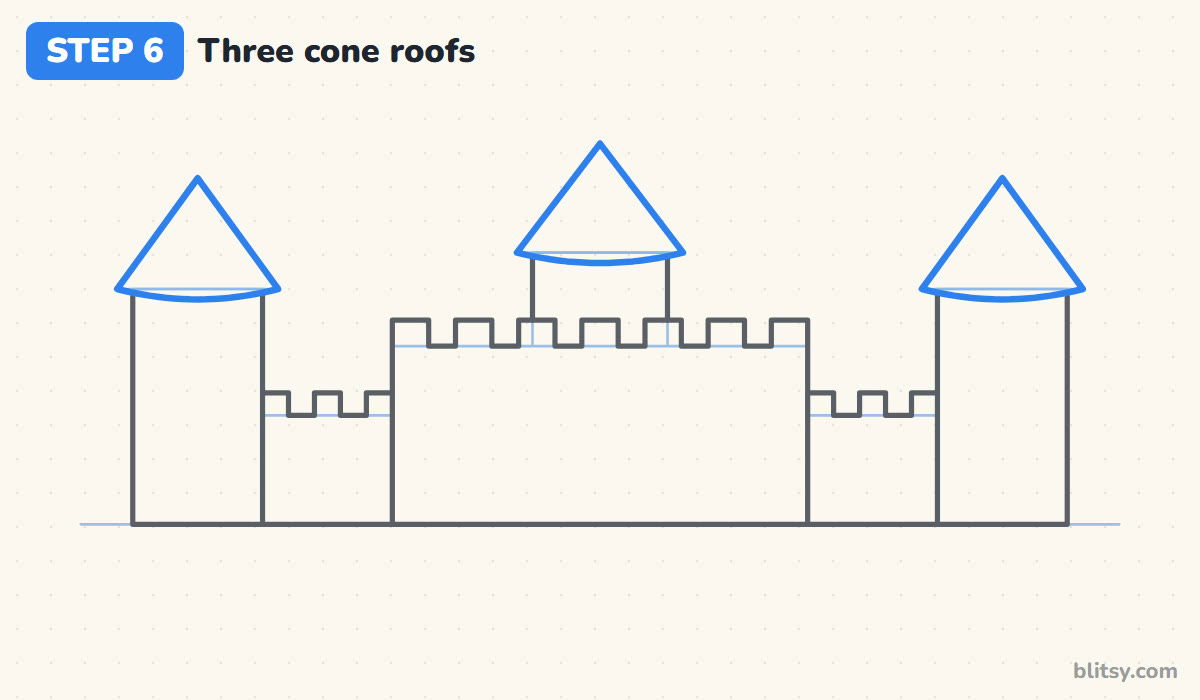
Trace each roof triangle, but curve the bottom edge down a little instead of drawing it straight. That small smile-shaped curve is the trick that turns a flat triangle into a round, cone-shaped roof. Let the curve cover the top of the tower. The middle roof is the tallest of the three, which pulls the eye to the center.
💡 Tip: Draw both slanted sides first and finish with the curved base.
Step 7: Put a flag on every roof
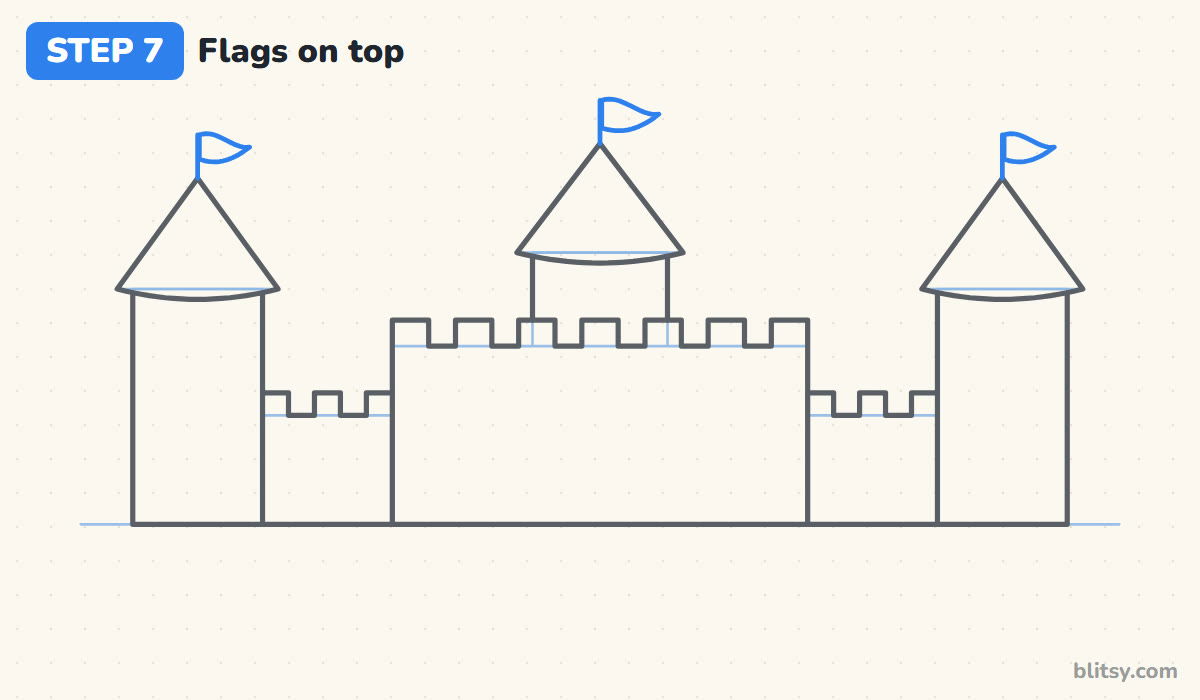
From the tip of each roof, draw a short upright pole. At the top, add a small pennant that points right and waves a little. All three flags face the same way because the same wind blows on all of them; flags pointing in different directions look oddly busy.




💡 Tip: Make the middle flag a touch bigger than the two side flags.
Step 8: Draw the arched gate and its portcullis
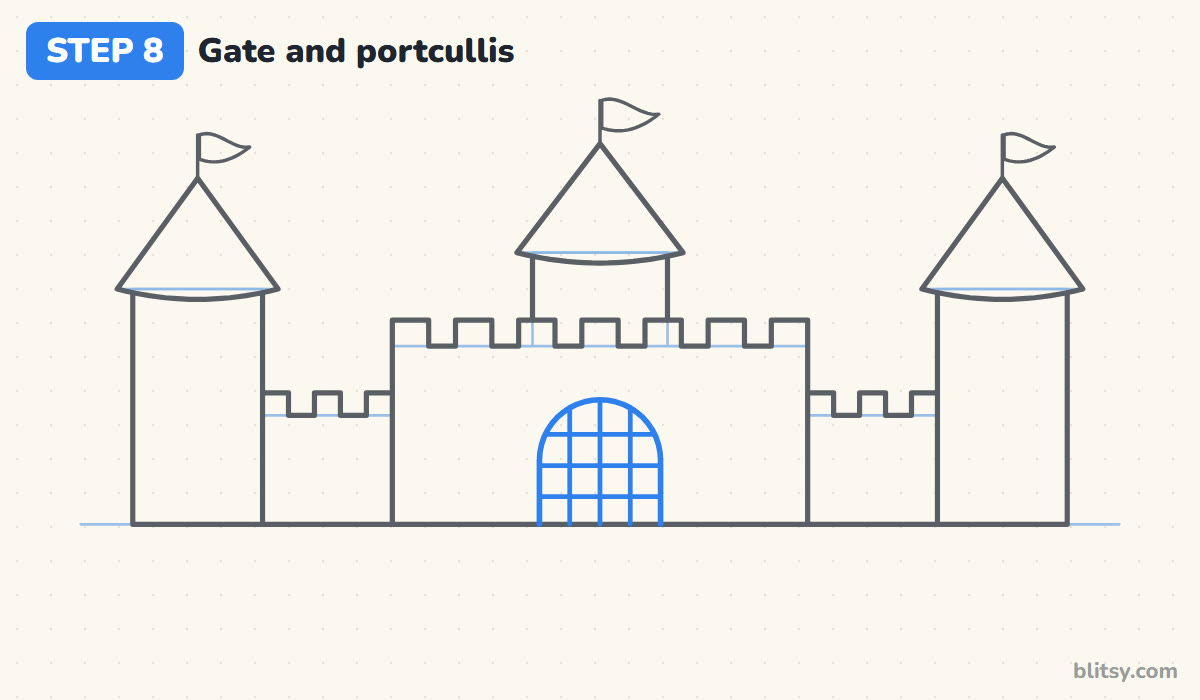
Centered at the bottom of the keep, draw a tall gate: two straight sides with a round arch on top. It should reach about halfway up the keep. Inside it, add three upright bars and three crossing ones to make the portcullis, the iron grid that drops down to block the entrance. Stop the grid lines exactly at the arch.
💡 Tip: Draw the middle bar first, then one on each side at equal distances.
Step 9: Add windows and a few stone blocks
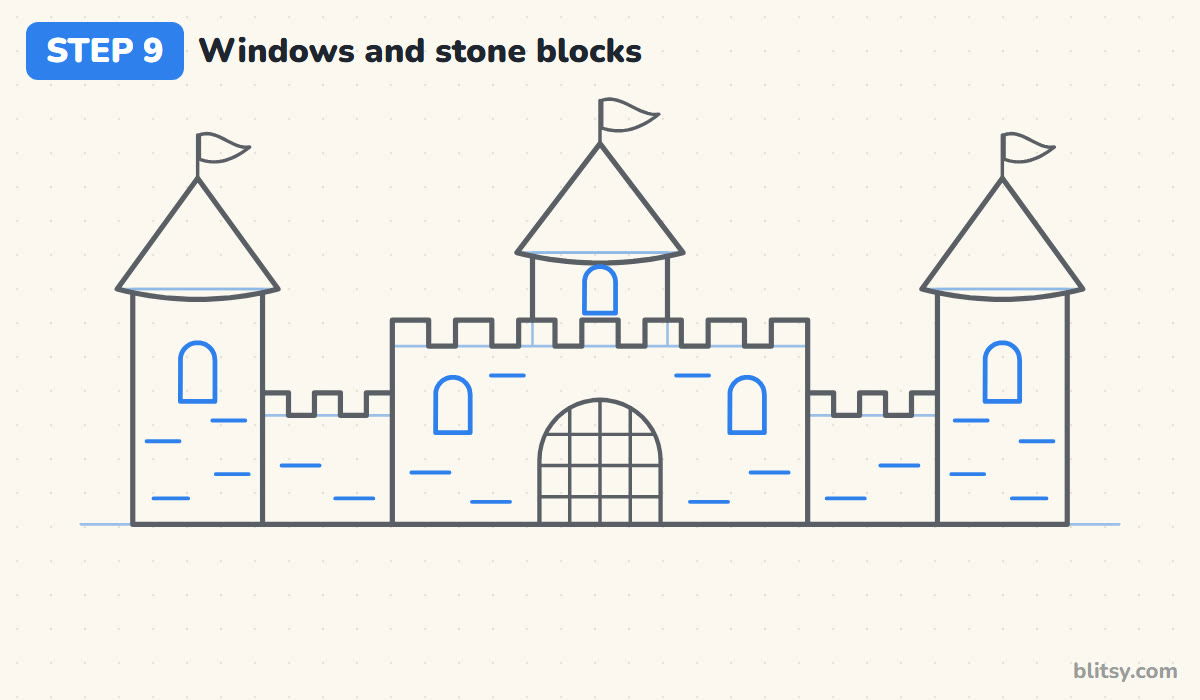
Give each side tower one arched window near the top, put two on the keep beside the gate, and fit a small one on the middle tower. Then sprinkle short dashes across the walls to suggest stone blocks. I stop at two or three per wall, because covering every inch with bricks makes the castle busy and hard to color.
💡 Tip: Stagger the stone dashes so no two sit straight above each other.
Step 10: Lay the drawbridge, moat and hill
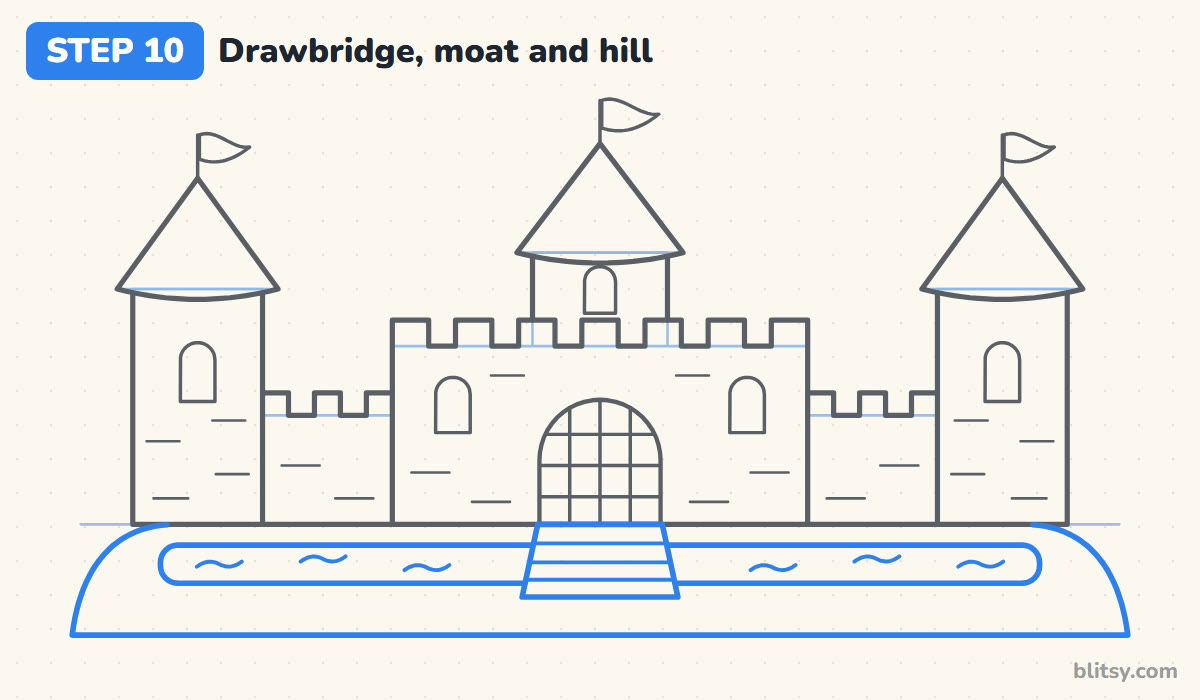
Under the gate, draw the lowered drawbridge as a shape that widens as it comes toward you, with three plank lines across it. Behind it, draw a long band with rounded ends for the moat and add a few wavy ripples. Last, curve a hill line down from each side tower and join the two ends with a straight line along the base.
💡 Tip: Draw the moat's ripples as tiny sideways S shapes.
Step 11: Ink the keepers and erase the guides
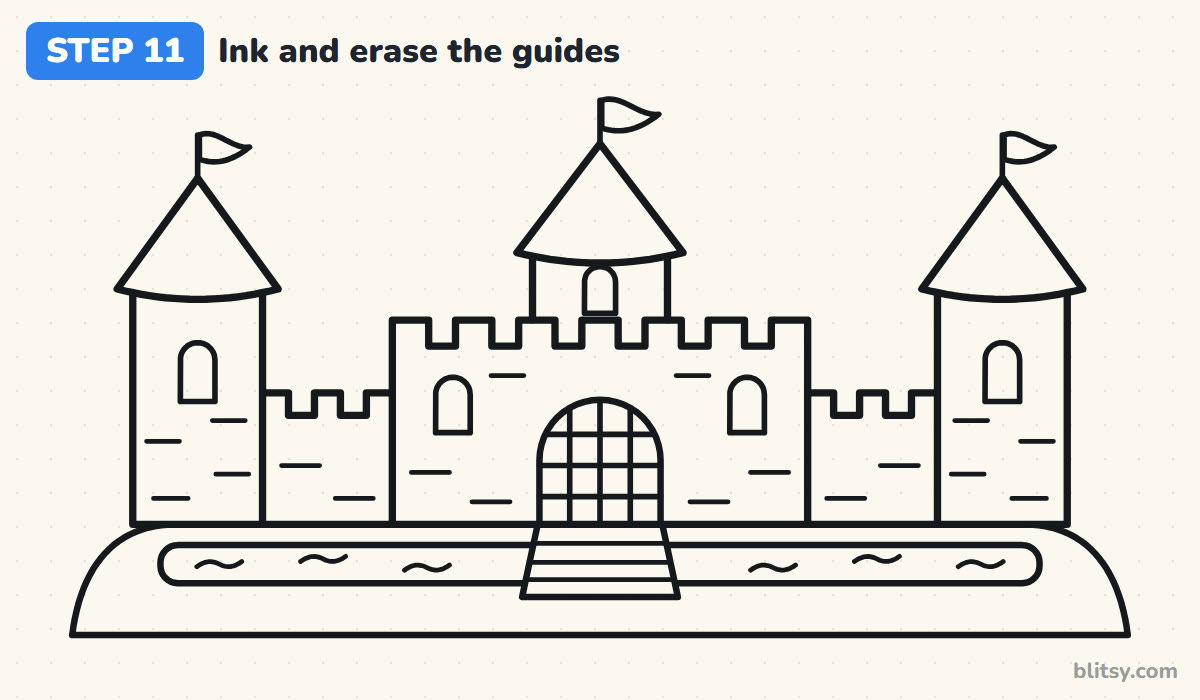
Trace every line you want to keep with the black fineliner, working from the top down so your hand doesn't drag across fresh ink. The battlement notches are the slowest bit; I turn the paper for them. Let the ink dry, then erase the ground line, the boxes and the roof triangles.




💡 Tip: Use a ruler for the inked walls too, but lift it straight up so it doesn't smear.
Step 12: Color your castle
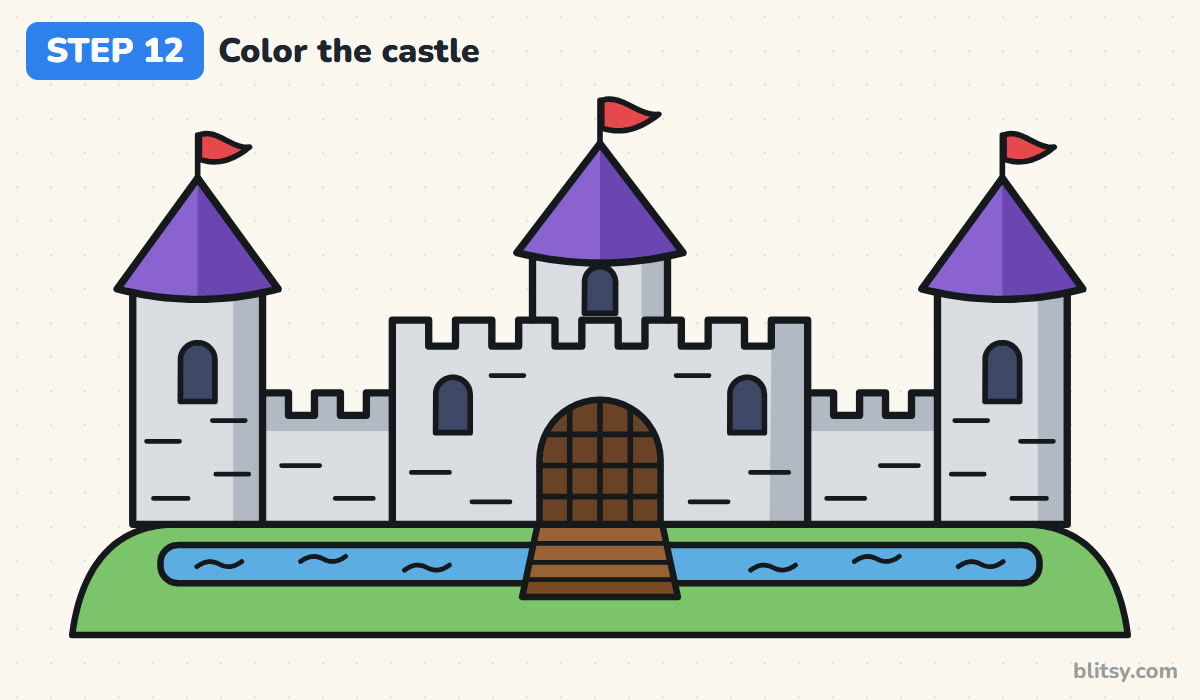
Shade the walls and towers light gray, then add darker gray down the right side of each tower and under the wall battlements, as if the sun shines from the left. Color the roofs purple with deeper purple on their right halves. Flags go red, windows dark blue, the gate and drawbridge brown. Finish with a blue moat and a green hill.
💡 Tip: Color the light gray first, then layer the darker gray right over it.
Castle Trouble Spots and How to Fix Them
- Battlements of every size. Uneven bumps make the castle look like it's crumbling. Dot the positions first and keep each bump and gap the same width.
- Flat triangle roofs. A straight base makes the roofs look like paper cutouts. Curve the bottom edge down slightly and they turn into cones.
- A tiny gate. A small door makes the walls feel enormous and empty. Let the arch reach about halfway up the keep.
- One side bigger than the other. Castles look best when they are balanced. Measure the side towers and walls with a ruler so both halves match.
- Bricks everywhere. Too many stone lines turn into a messy gray blur once colored. A few staggered dashes say stone just as clearly.
Turning Your Castle Into a Kingdom
Add a fourth tower behind the keep, swap the purple roofs for blue or pink ones, or pull the portcullis halfway up and draw a knight riding across the drawbridge. For a spooky version, color the stone dark gray, give the windows a yellow glow and hang a crescent moon above the middle tower. A castle story needs someone living in it, so the princess drawing tutorial pairs well with this lesson, and the dragon drawing tutorial gives your walls something to defend against.
Castle Coloring Page With a Printable Step Guide
For a rainy day or an art corner, there's a castle coloring page with a colored sample and a color key at the top, so kids can match the purple roofs and gray stone, plus a big outline with room to add a sky. The step-by-step PDF guide puts all 12 steps and tips on paper. Both print on Letter or A4.
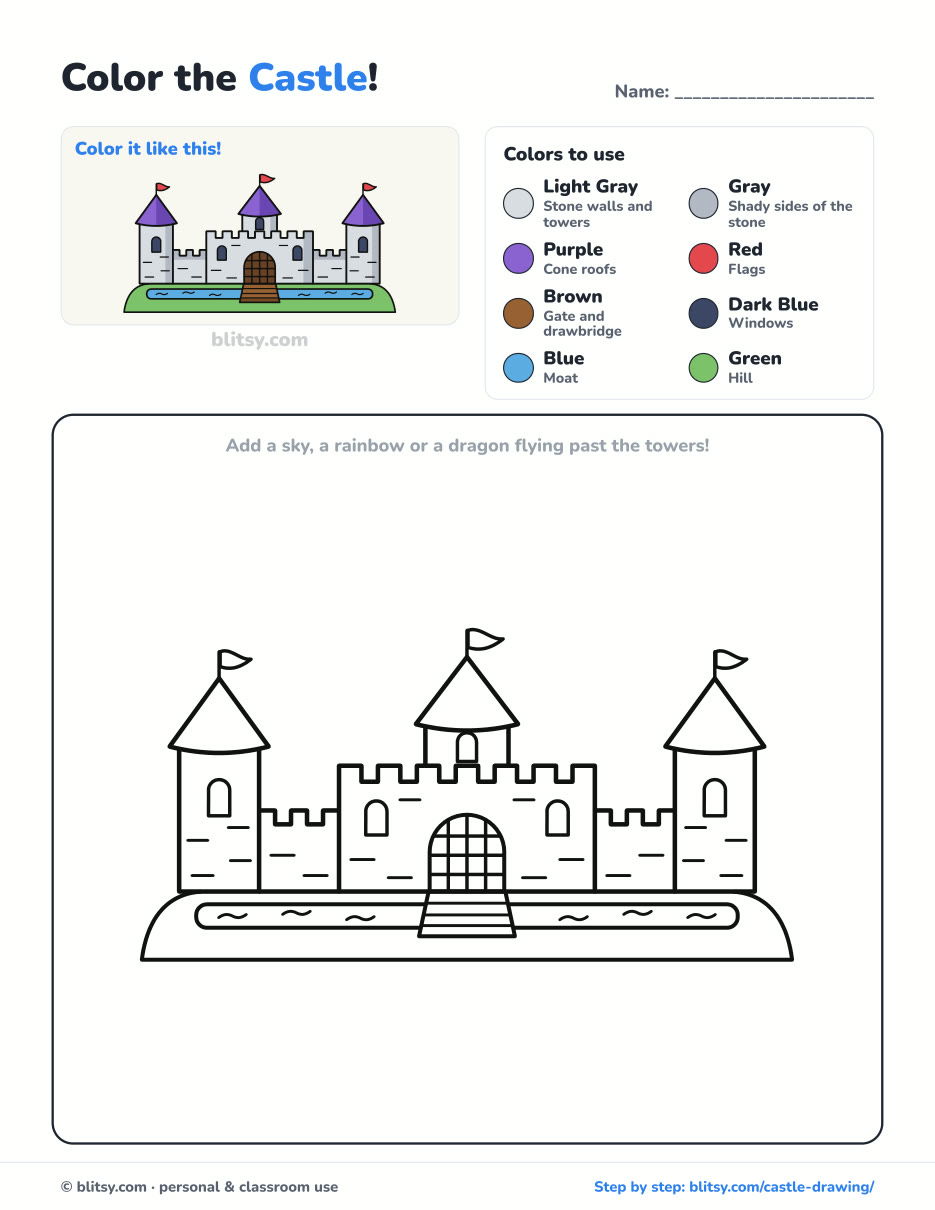
Black outlines with a colored example and the color names at the top. Ready to print and color.
⬇️ Download Coloring PageEvery step picture with its instructions and tips, to keep beside your paper while you draw.
⬇️ Download Drawing Guide📱 On a phone? Tap a download button, then open the file and choose Share → Save to Files or Print. On a computer, the PDF opens or saves straight to your Downloads folder.
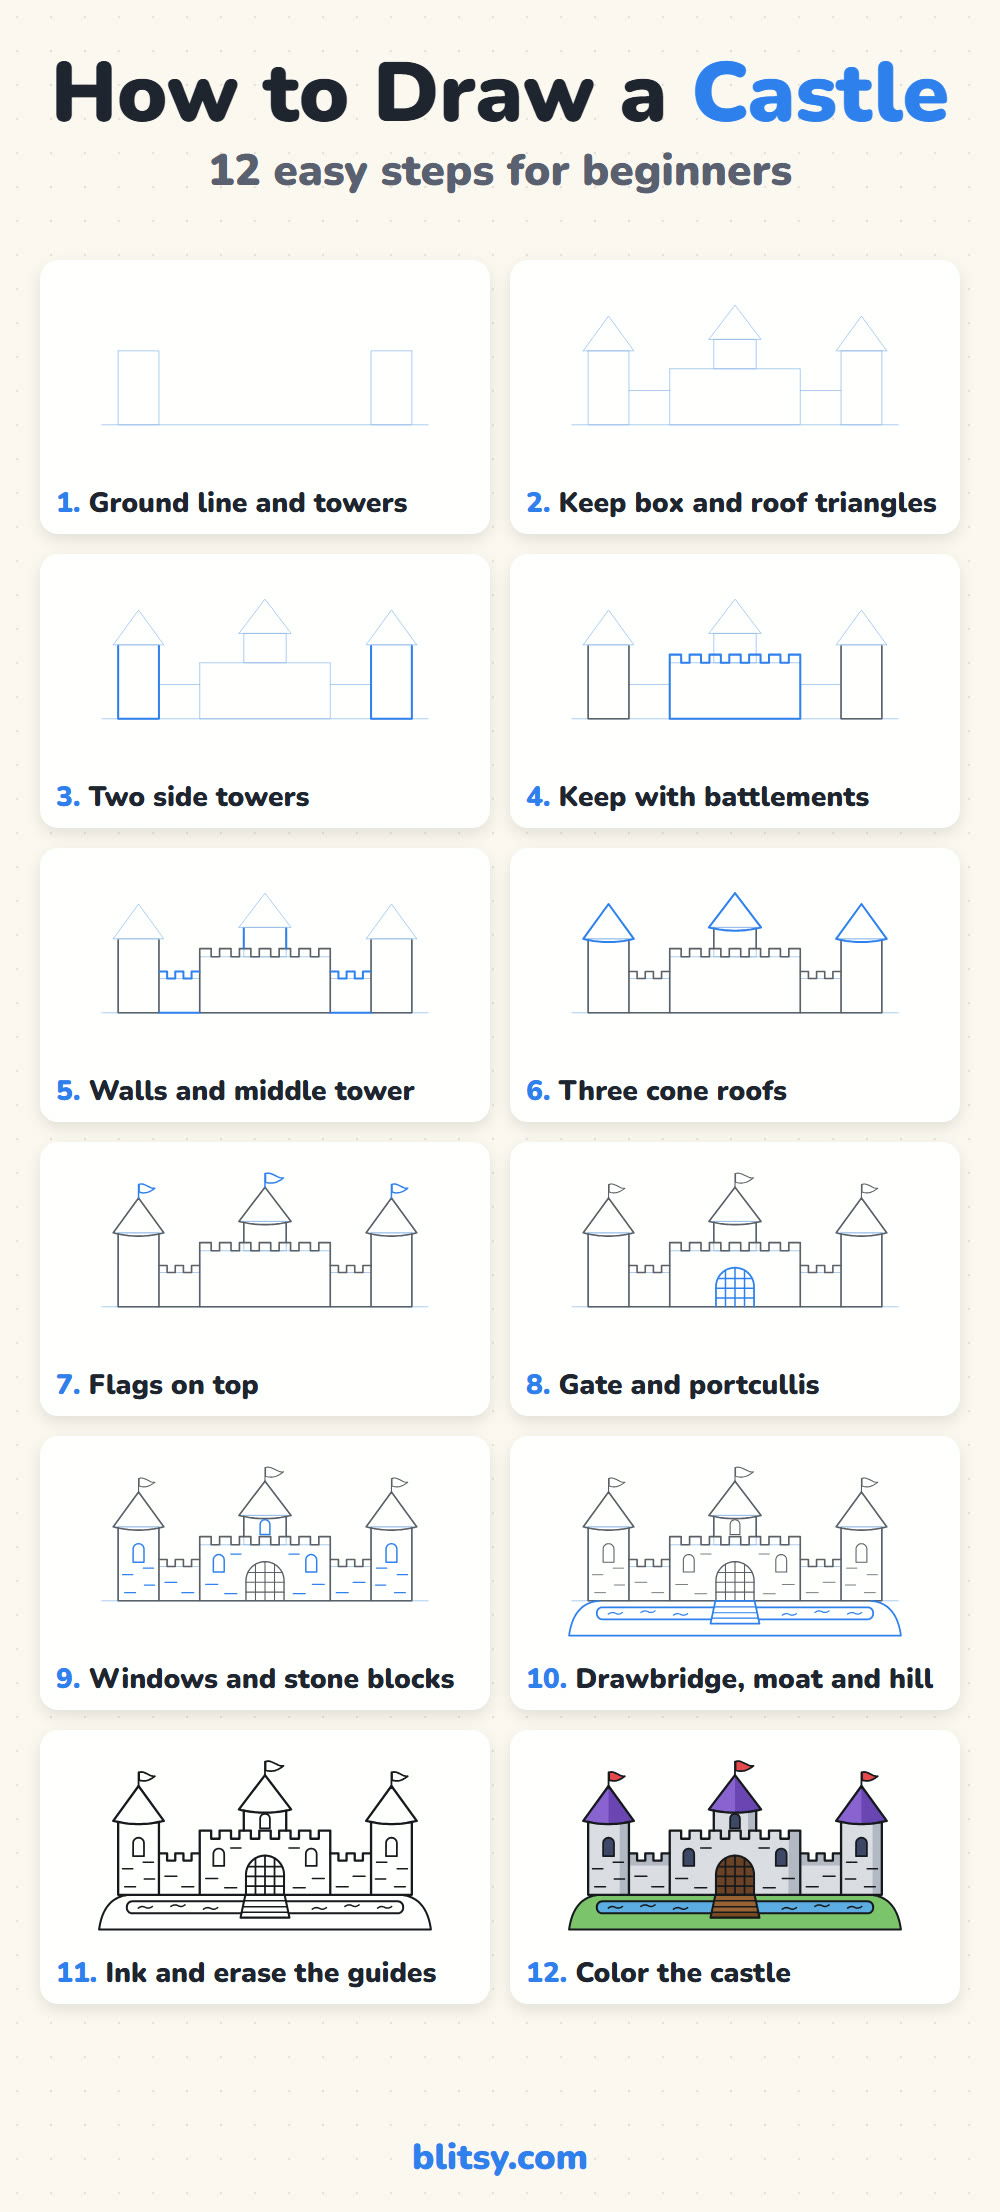
Keep the Castle Steps on a Pinterest Board
Fit for a Kingdom: More Things to Draw
Each link is one step-by-step tutorial, from vehicles and gems to the rocks your castle could sit on.
- Bed Drawing: The bed drawing tutorial draws a wooden bed in 3D, with pillows and a blue star duvet.
- Diamond Drawing: Learn how to draw a diamond and two smaller gems, a treasure for your castle.
- Train Drawing: A steam train with a blue cab and three puffs of steam fills the train drawing tutorial.
- Realistic Drawing: The realistic drawing step by step lesson shades a shiny apple under one lamp.
- UFO Drawing: Draw a flying saucer with an alien on board in this UFO drawing tutorial.
- Baseball Bat Drawing: For a break from stone walls, the baseball bat drawing tutorial sets a wooden bat on a slant with a glove resting behind the handle.
- Rock Drawing: The rocks drawing step by step lesson shows why the top of each stone is the palest part.
- Tank Drawing: An olive cartoon tank with five road wheels takes shape in the tank drawing tutorial.
- Monster Truck Drawing: Two circles grow into a flame-painted truck in the monster truck drawing tutorial.
- Rocket Drawing: Learn how to draw a rocket blasting off past a ringed planet.
Castle Drawing Questions Parents and Kids Ask
What is the easiest way to draw a castle?
Start with rectangles: two tall ones for towers and a wide one in the middle. Put a triangle on each tower, cut square notches along the middle box and add an arched door.
How do you draw castle battlements?
Draw a row of small square bumps with square gaps between them along the top edge of a wall. Mark their positions with dots first so the bumps come out even.
How long does it take to draw a castle?
Plan on about 35 to 40 minutes including coloring. The battlements and inking take the longest; the flags and windows are quick.
How can I make a castle drawing easier for young kids?
Skip the portcullis grid, the stone dashes and the middle tower. Two towers, a notched wall and a big door are plenty for a five or six year old.
Hang your finished fortress somewhere it can guard the room, and maybe draw a dragon circling it next time. 🏰
Related posts:
 How to Draw a Fairy Step by Step (Easy Toadstool Fairy)
 How to Draw a Whale Step by Step (Easy for Beginners)
 How to Draw Lungs Step by Step (Easy Science Diagram)
 How to Draw a Pineapple Step by Step (Easy Crown and Slice)
 How to Draw Iron Man Step by Step (Easy Chibi for Kids)
 How to Draw a Dress Step by Step (Easy Party Dress)
 How to Draw a Chicken Step by Step (Easy for Beginners)
 How to Draw a UFO Step by Step (Cute Alien Saucer)
 How to Draw a Volcano Step by Step (Easy Erupting Volcano)
 How to Draw a Crow Step by Step (Easy for Beginners)
 How to Draw a Tiger Step by Step (Easy Walking Pose)
 How to Draw a Heart Step by Step (Even, Symmetric Shape)

