
Real crystals look like they were cut with a ruler, and that's good news for anyone who can't draw curves well. Here you'll learn how to draw a crystal step by step as a small amethyst cluster: one tall point in the middle, a few shorter ones leaning out, all growing from a lumpy gray rock. Every point uses the same trick, a long column with parallel sides and a pyramid tip. After the first one, the rest go quickly.
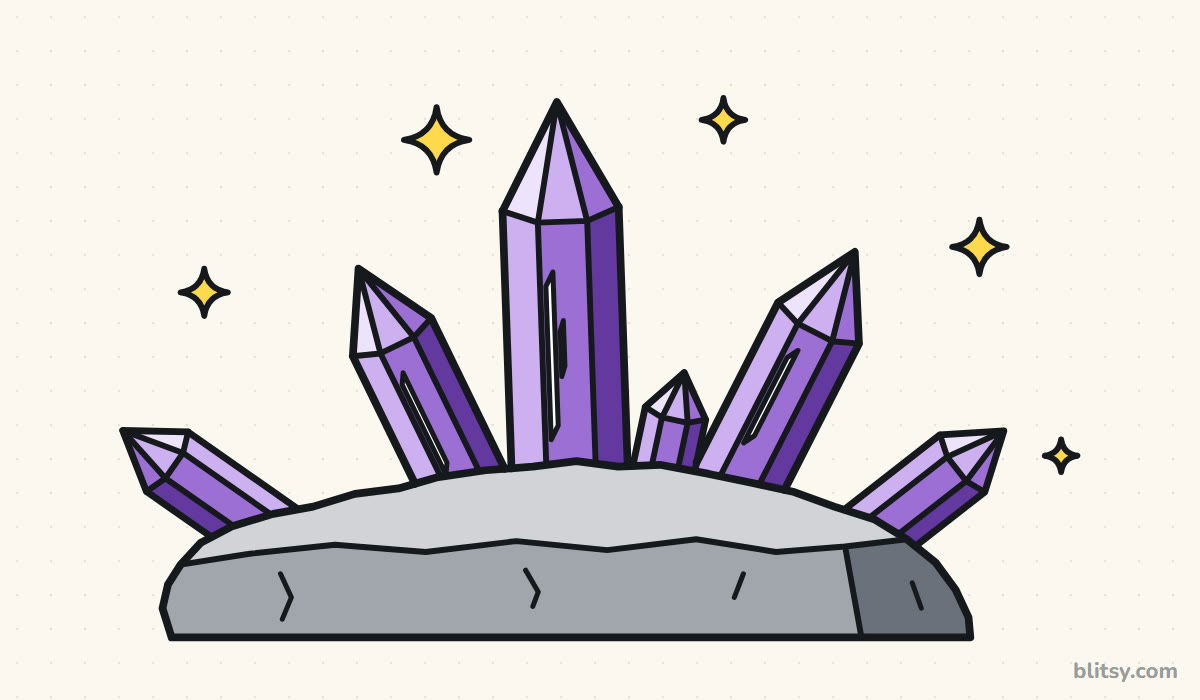
Every crystal picture below shows that step's new work in blue, with earlier lines in gray. The very light helper lines from step 1 disappear in step 11.
Quick overview
⏱️ Time: about 30 minutes
🎯 Level: easy to medium, good for kids from about 8
✏️ Steps: 12
🔮 You'll draw: an amethyst crystal cluster on a rock, with shine streaks and sparkles
Amethyst Supplies for Crisp Facets
- A sharp HB pencil
- A kneaded or soft eraser
- A ruler (optional, but it keeps the long edges straight)
- A black fineliner or thin marker
- Colored pencils: a very pale lilac, lavender, purple, dark purple, three grays and yellow
- Plain white paper, turned sideways
No pale lilac? Use your lavender pencil with almost no pressure and you'll get the same soft tint.
How to Draw a Crystal Step by Step
Step 1: Sketch the rock and the lean lines
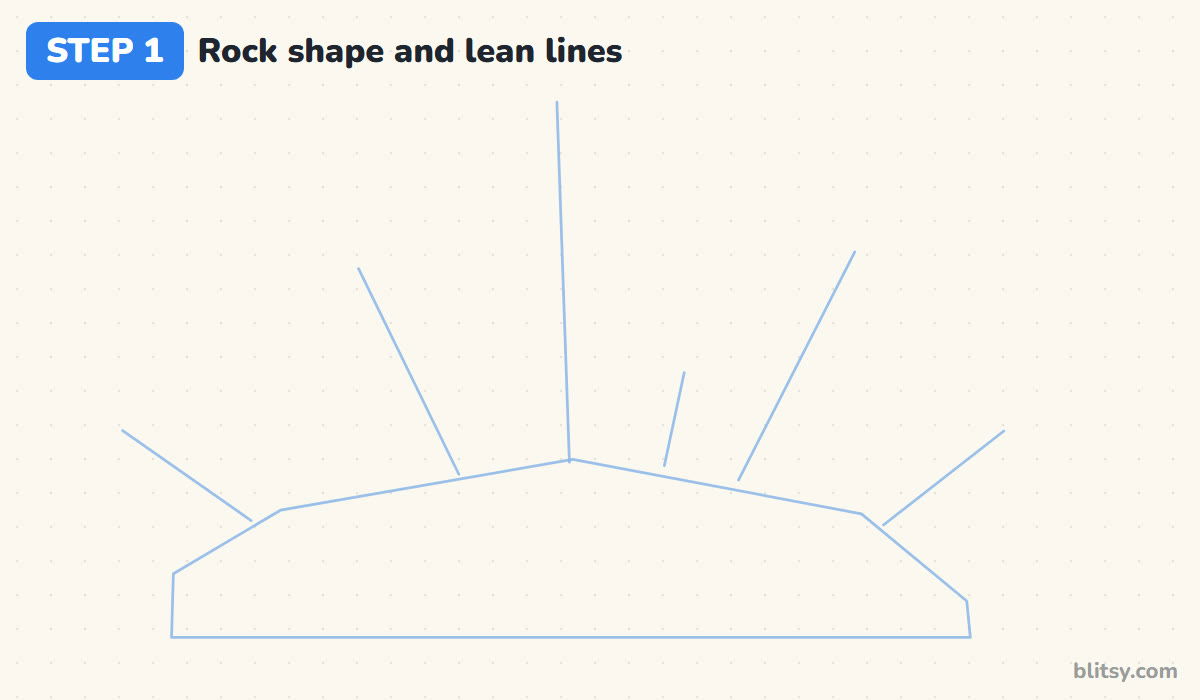
Draw a low, wide mound across the bottom half of the page with a flat base. Then add six light lines rising from its top: one straight up the middle, and the others fanning out to the sides at different angles. They set the direction of each point. I make the middle line the longest by far.
💡 Tip: Keep your pencil pressure feather light; these lines vanish later.
Step 2: Draw the rough rock outline
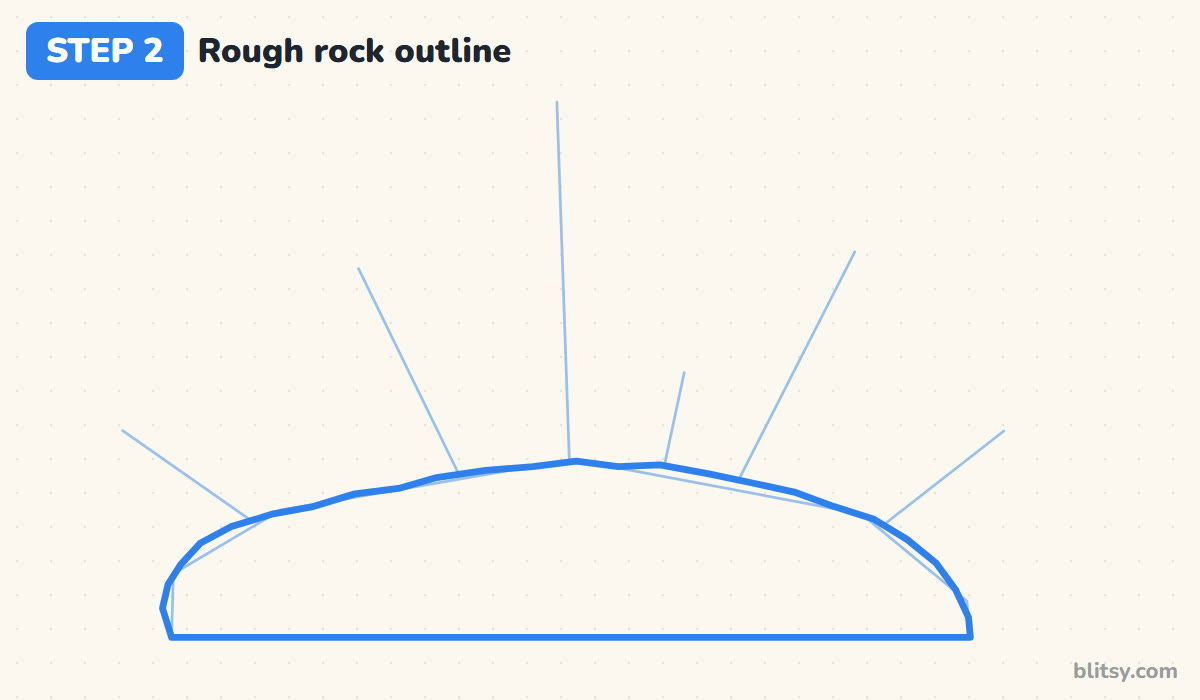
Go around the mound with a firmer, bumpy line. Real stone is never smooth, so let the top edge wobble in short straight bits instead of one curve. I draw the rock before any crystal on purpose. It sits in front of their bases, so every point can simply start at this line, and you never have to erase a hidden piece.
💡 Tip: Little dips and steps along the top make the rock look rough and natural.
Step 3: Draw a long central column
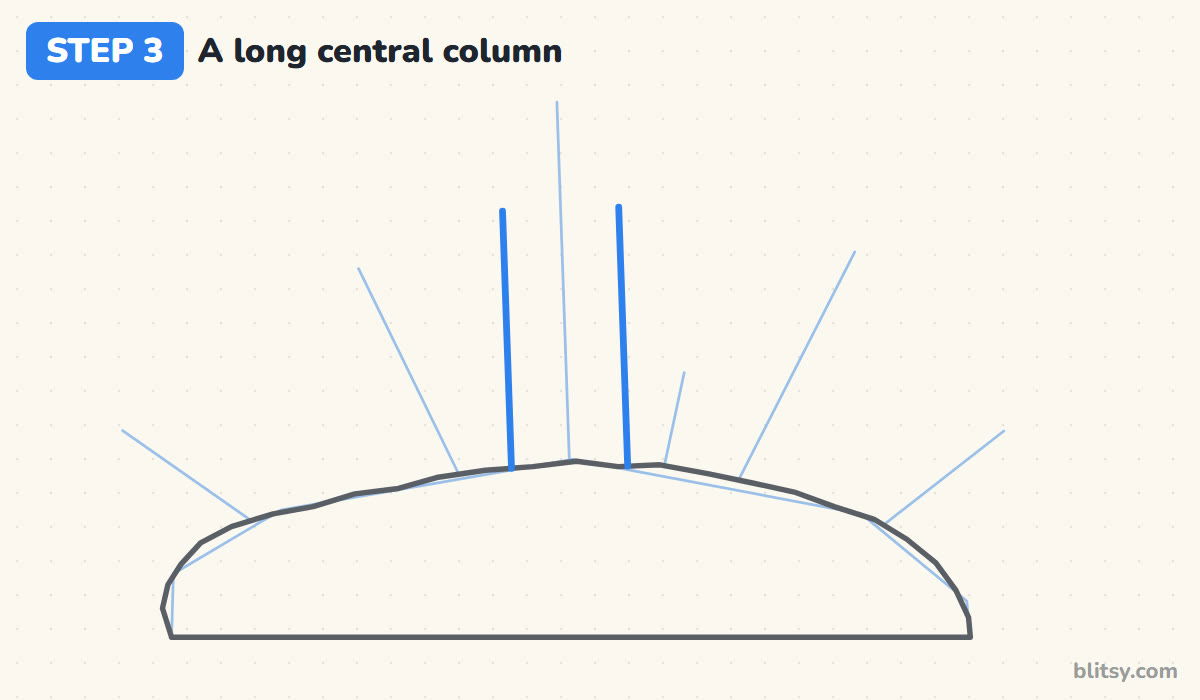
Along the middle lean line, draw two straight lines that run up from the rock. They must stay parallel, the same distance apart from bottom to top, because a quartz point is a six-sided prism and its long edges never get closer together. Stop both lines at the same height, roughly two thirds of the way up your guide.




💡 Tip: Lay a ruler along the guide and slide it sideways for each edge.
Step 4: Add a pointed tip on top
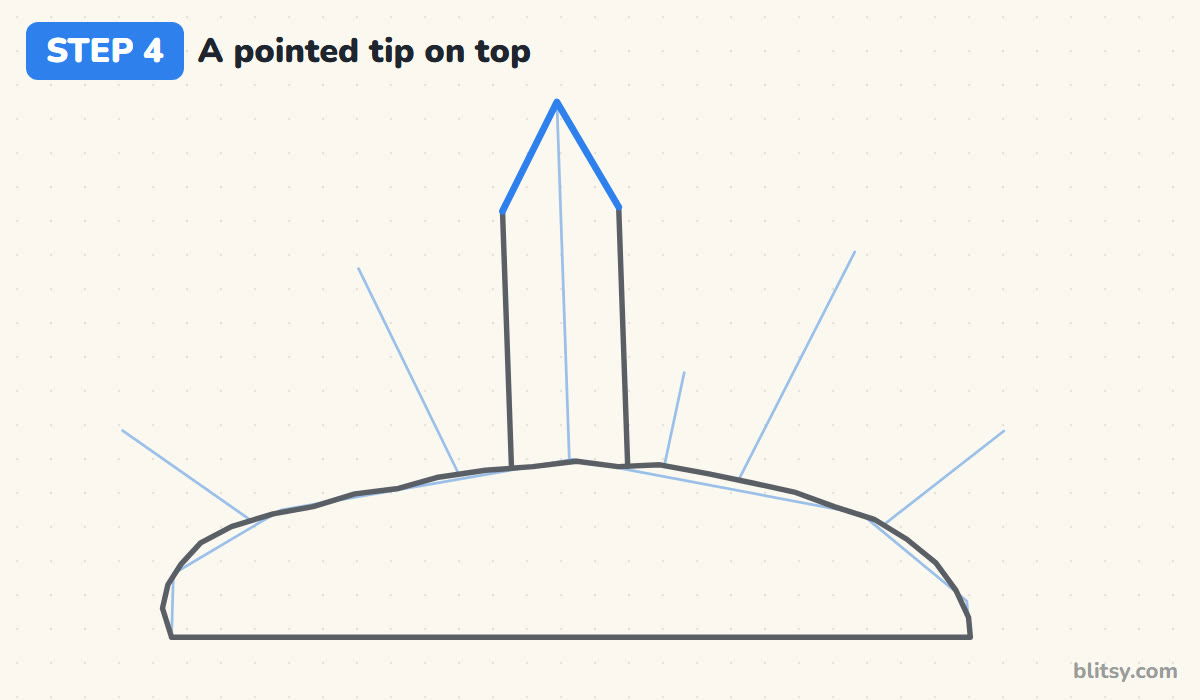
From the top of each side line, draw a slanted line up to a single point on the center guide. You've made a tall pencil shape. Keep the tip fairly short, about a third of the column's height or less. A long, needle-like tip is the most common reason a crystal looks like a rocket instead of a stone.
💡 Tip: Mark the tip point first, then aim both slanted lines at that dot.
Step 5: Split the column into faces
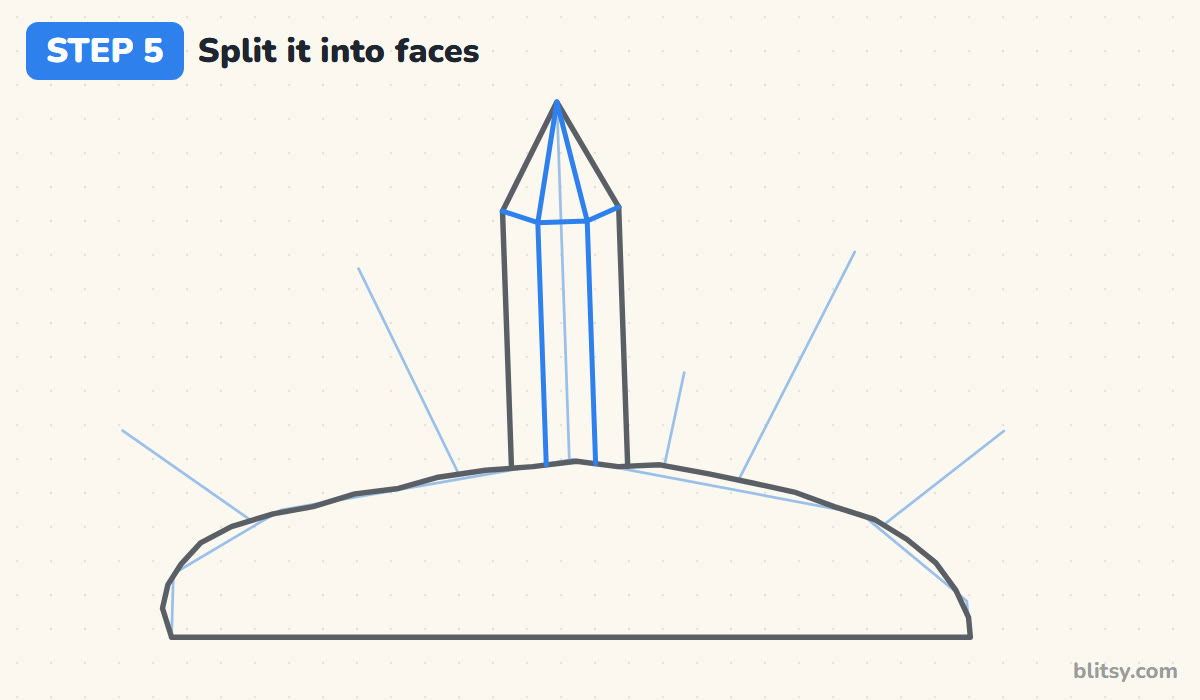
Draw two long lines inside the column, parallel to the outside edges: one close to the left side and one a little right of the middle. That gives you a narrow left face, a wide front face and a narrow right face. Carry both lines up to the tip point, then join the tops of all four edges with a shallow zigzag.
💡 Tip: If the front face is the widest of the three, it will look turned toward you.
Step 6: Draw a short point in front
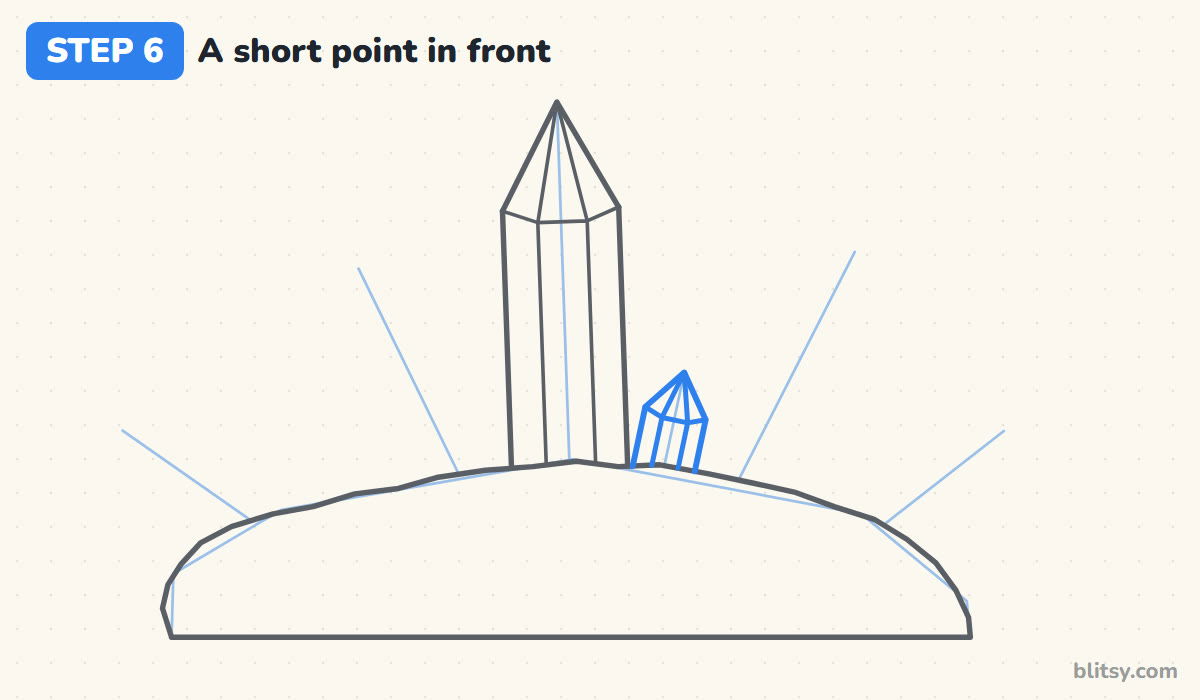
To the right of the tall column, draw a much smaller crystal leaning just slightly right. It uses the exact same recipe: two parallel sides, a short tip, two inner edges and the zigzag ring. Because this one stands in front, its lines are complete. The bigger points you add next will simply stop where they meet it.
💡 Tip: Small and simple wins here; fewer than ten lines is plenty.
Step 7: Add two leaning side points
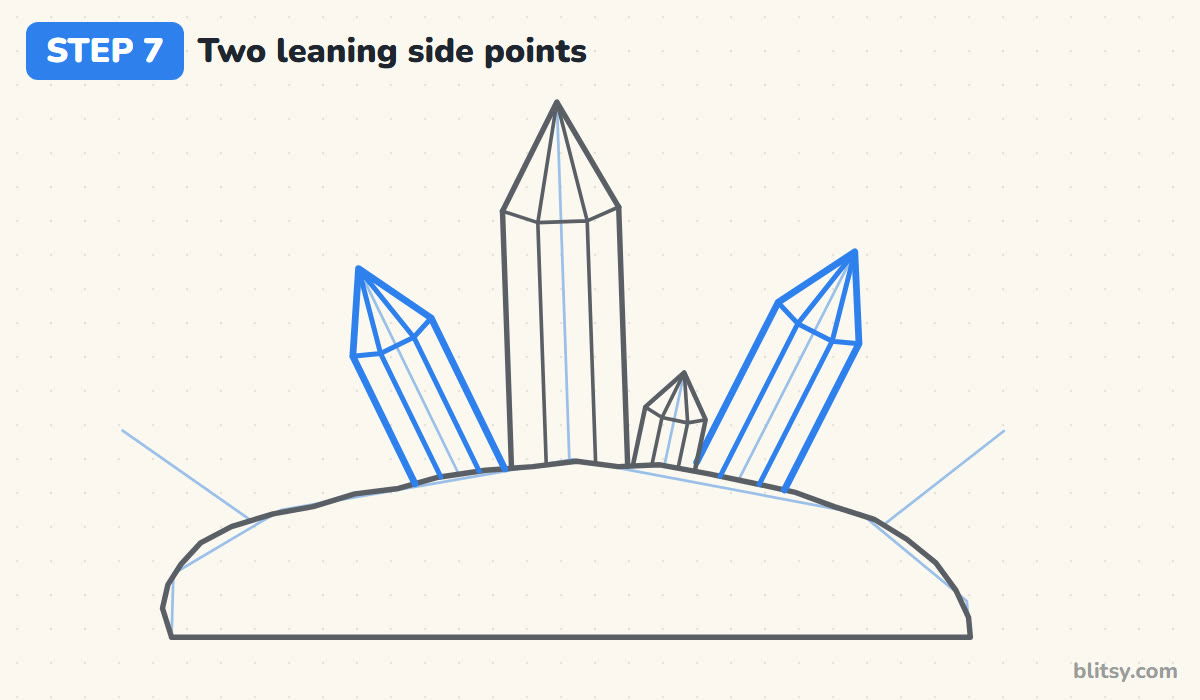
Follow the second and third lean lines to draw two medium crystals, one tipping left and one tipping right. Their sides still run parallel to their own lean line, not straight up. Make them clearly shorter than the middle point but taller than the little one in front, so your eye reads three different sizes. Add their faces and tips the same way.




💡 Tip: Turn the paper so each leaning point feels upright while you draw it.
Step 8: Draw small points at the edges
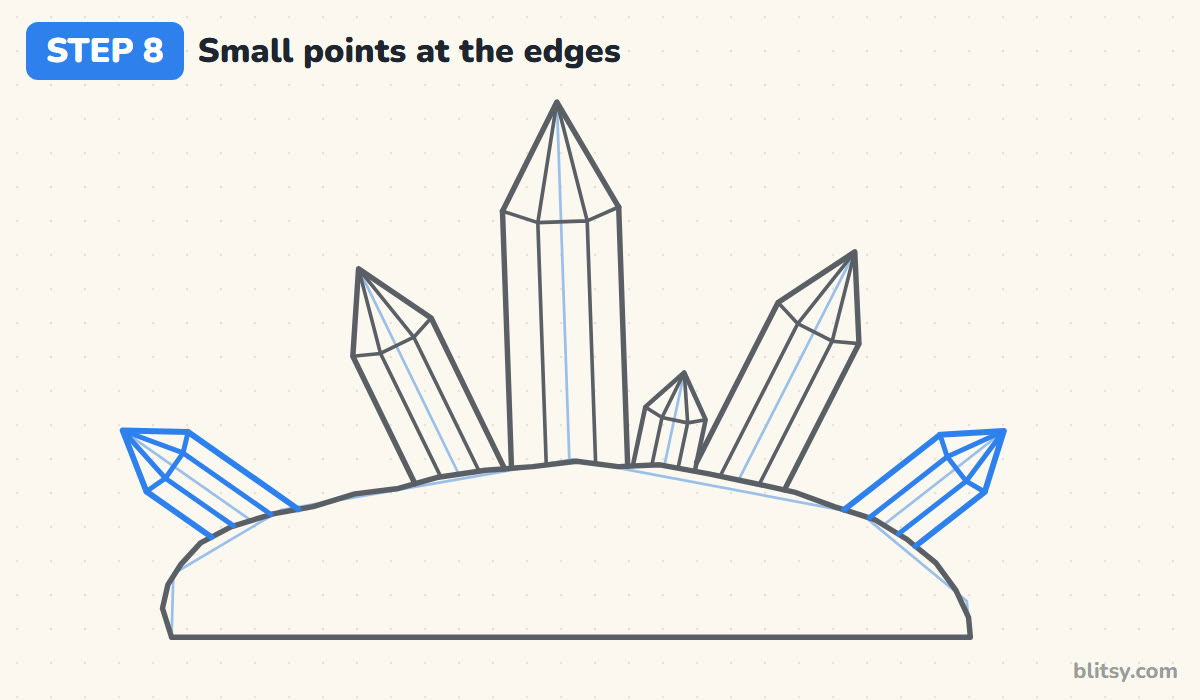
The last two crystals lean far out over the rock, almost lying down. Real clusters grow in many directions from the same base, which is why these steep ones make the drawing feel natural. I like the left one slightly bigger than the right; perfect symmetry looks stiff.
💡 Tip: Check that every tip still has its three facets meeting at one dot.
Step 9: Add shine streaks and sparkles
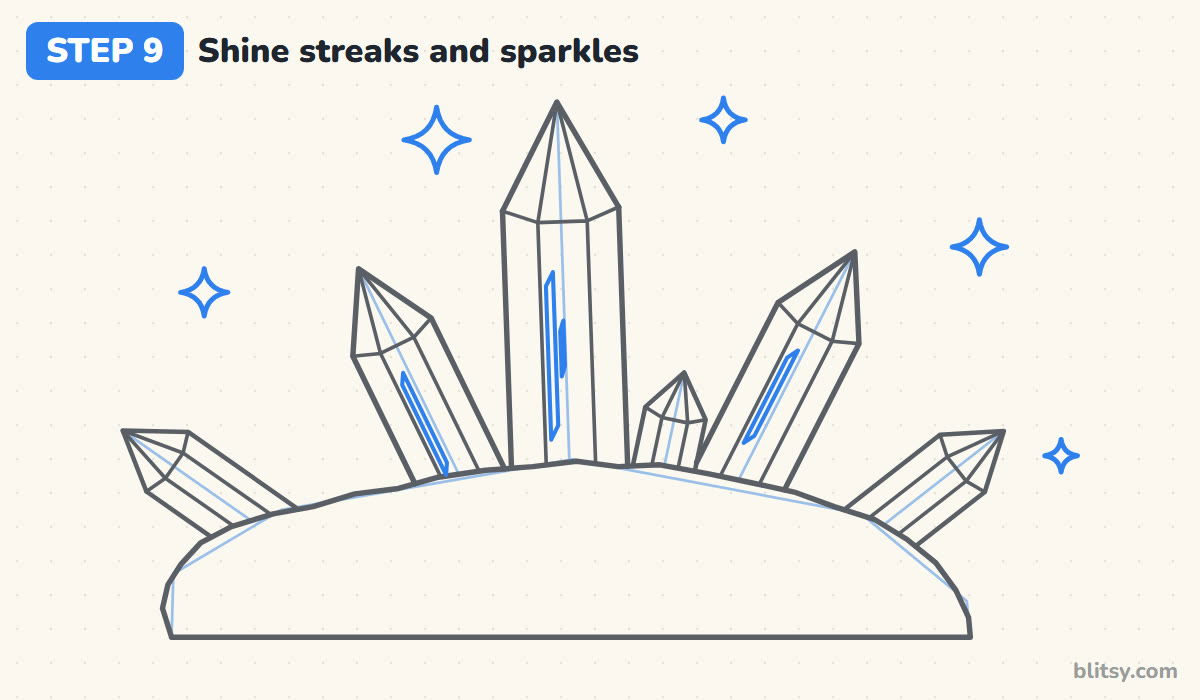
Inside the front faces of the three tallest points, draw thin slanted slivers running the same direction as the edges. These stay white to look like light bouncing off glassy stone. Around the cluster, add five four-point sparkles of mixed sizes in the empty spaces, each made of four points joined by inward curves.
💡 Tip: Put shine streaks on the left side of a face, nearest the light.
Step 10: Mark the rock planes and cracks
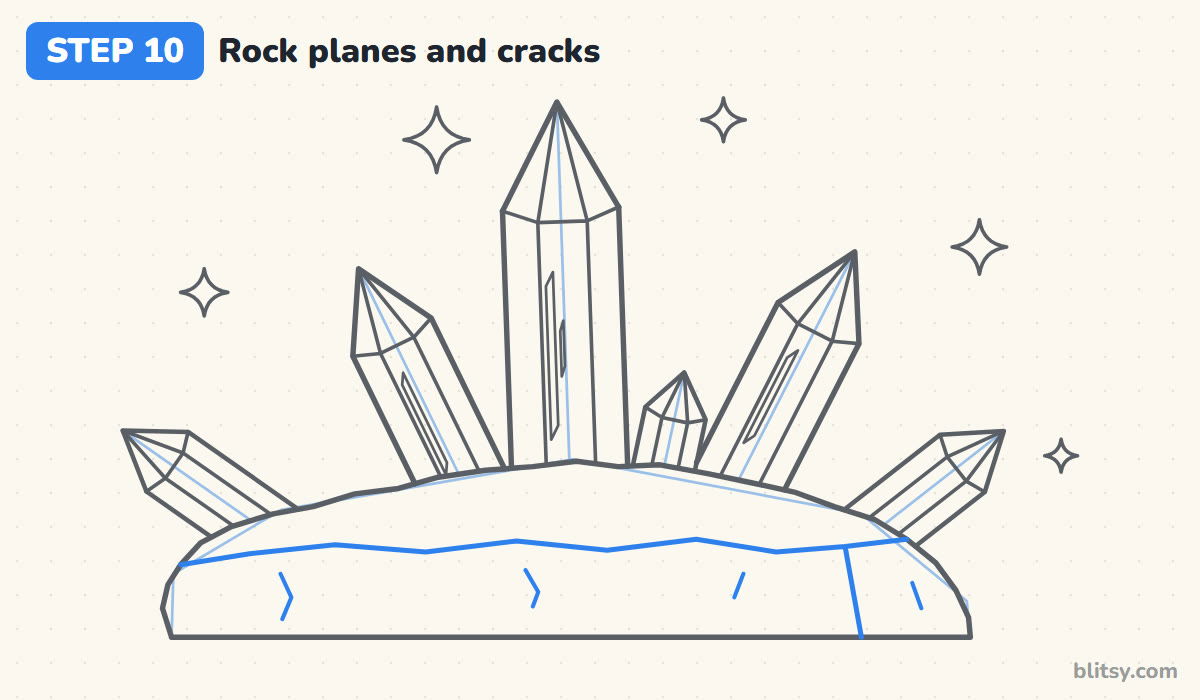
A rock looks solid when you split it into flat sides. Draw a wavy line across the rock below its top edge to separate the top plane from the front, then a short line near the right end going down to the base. That right section becomes the shadow side. Finish with four tiny crack marks on the front and side.
💡 Tip: Short cracks look real; long ones make the rock look broken in half.
Step 11: Ink the lines and erase the helpers
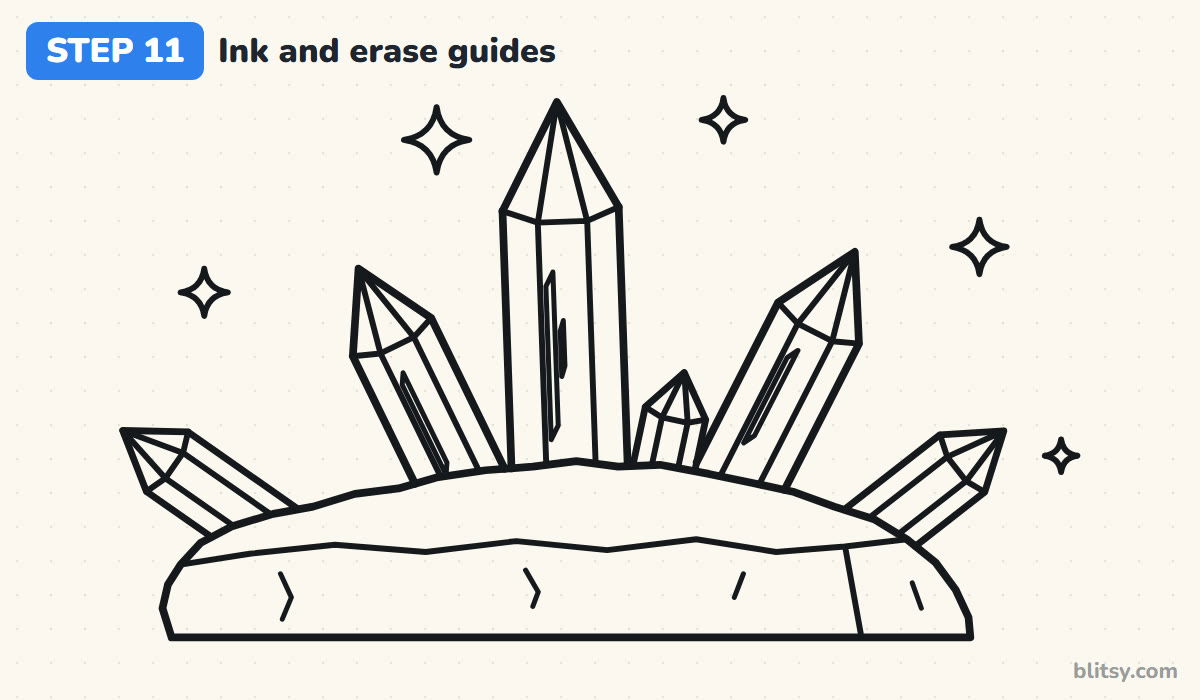
Trace the keeper lines with your black pen: the rock, its planes and cracks, every crystal edge, the shine slivers and the sparkles. Skip the lean lines and the first rock sketch. Let the ink dry for a minute, then erase every pencil guide.




💡 Tip: A slightly thicker pen on outside edges makes each point stand apart.
Step 12: Color the crystals and the rock
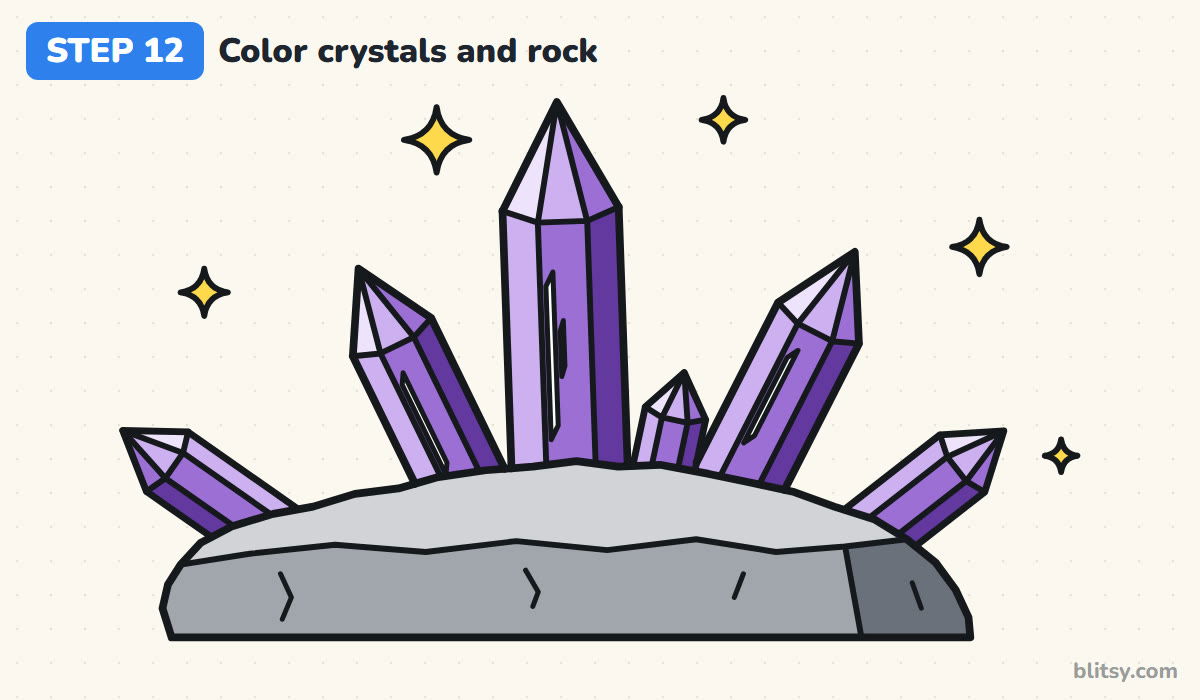
Pick one light direction, upper left, and stick to it. On every point, the face turned toward the light gets lavender, the front face purple and the face turned away dark purple. Give the tip facets one shade lighter than the face below each. Then color the rock top light gray, its front gray and the right side dark gray, and make the sparkles yellow.
💡 Tip: Leave the shine streaks as bare white paper; don't color over them.
Where Crystal Points Usually Go Wrong
- Sides that narrow toward the top. The column turns into a cone or a carrot. Keep the two long edges parallel all the way, and let only the tip slope inward.
- A tip that's far too tall. A long spike makes the point look like a pencil or a rocket. Keep the pyramid short compared with the column.
- Facet lines that miss the tip. If the inner edges stop beside the point, the tip looks smudged. Mark the tip dot first and aim every line at it.
- Light coming from two directions. When one point is dark on the left and the next is dark on the right, the cluster looks flat. Decide where the light is before you color.
- All points the same size. Equal crystals look like a fence. Mix one tall point, two medium ones and a few small ones.
Crystal Cluster Variations to Try
The same six-sided recipe works for any mineral. Color it in pale pinks for rose quartz, use icy blues and white for clear quartz, or try aqua with a soft green rock underneath. Younger kids can stop at the tall middle crystal and the rock, then color it; it still reads clearly as a crystal. If you'd like to compare a natural point with a cut gem, the diamond drawing tutorial is a good match, and the rock drawing tutorial will help you make that stone base even more convincing.
Amethyst Coloring Page and a Printable Crystal Guide
Prefer to color on paper? The crystal coloring page has a small colored example and the colors to use at the top, plus a large outline with thick lines underneath. The step-by-step PDF guide holds all 12 steps with their tips. Both print fine on Letter or A4 paper.
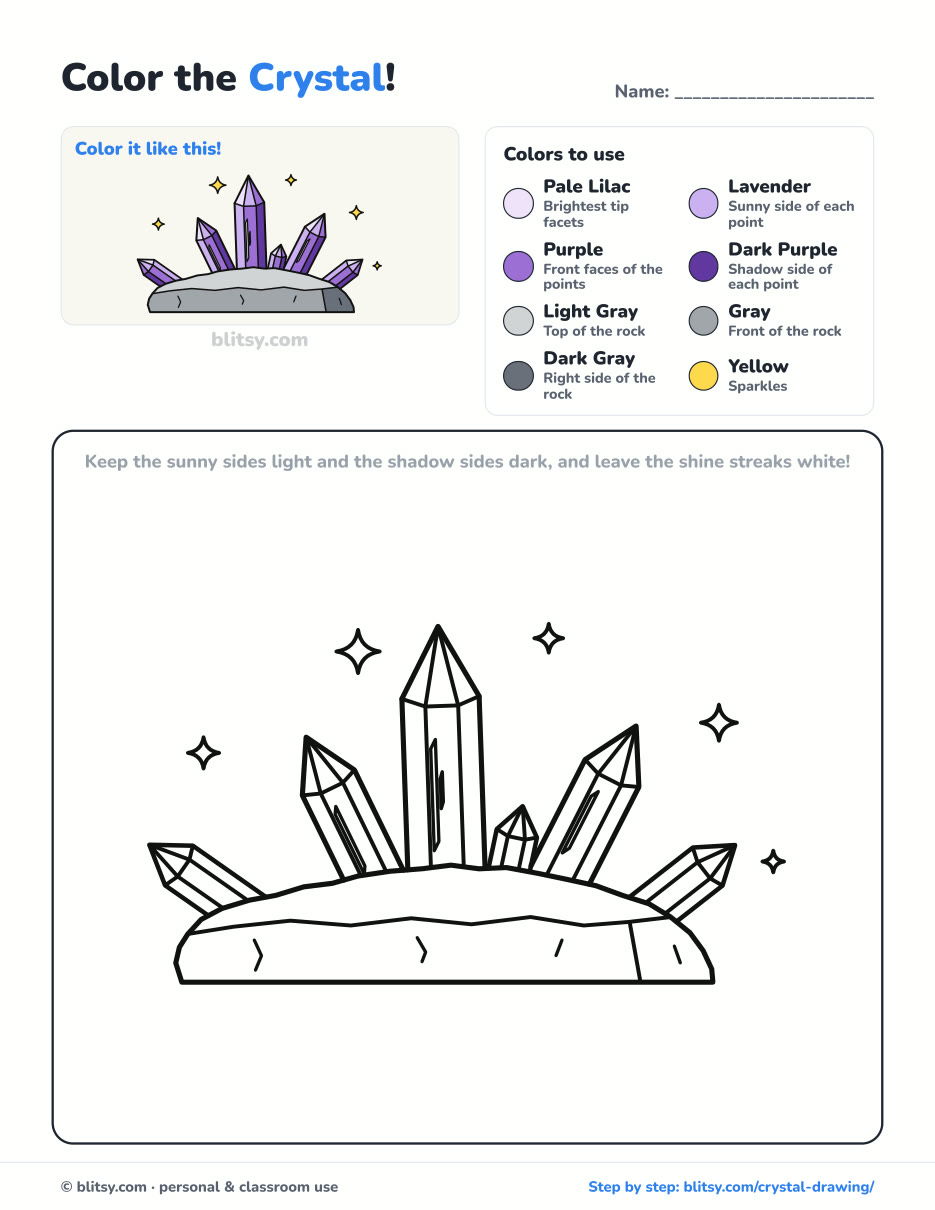
Black outlines with a colored example and the color names at the top. Ready to print and color.
⬇️ Download Coloring PageEvery step picture with its instructions and tips, to keep beside your paper while you draw.
⬇️ Download Drawing Guide📱 On a phone? Tap a download button, then open the file and choose Share → Save to Files or Print. On a computer, the PDF opens or saves straight to your Downloads folder.
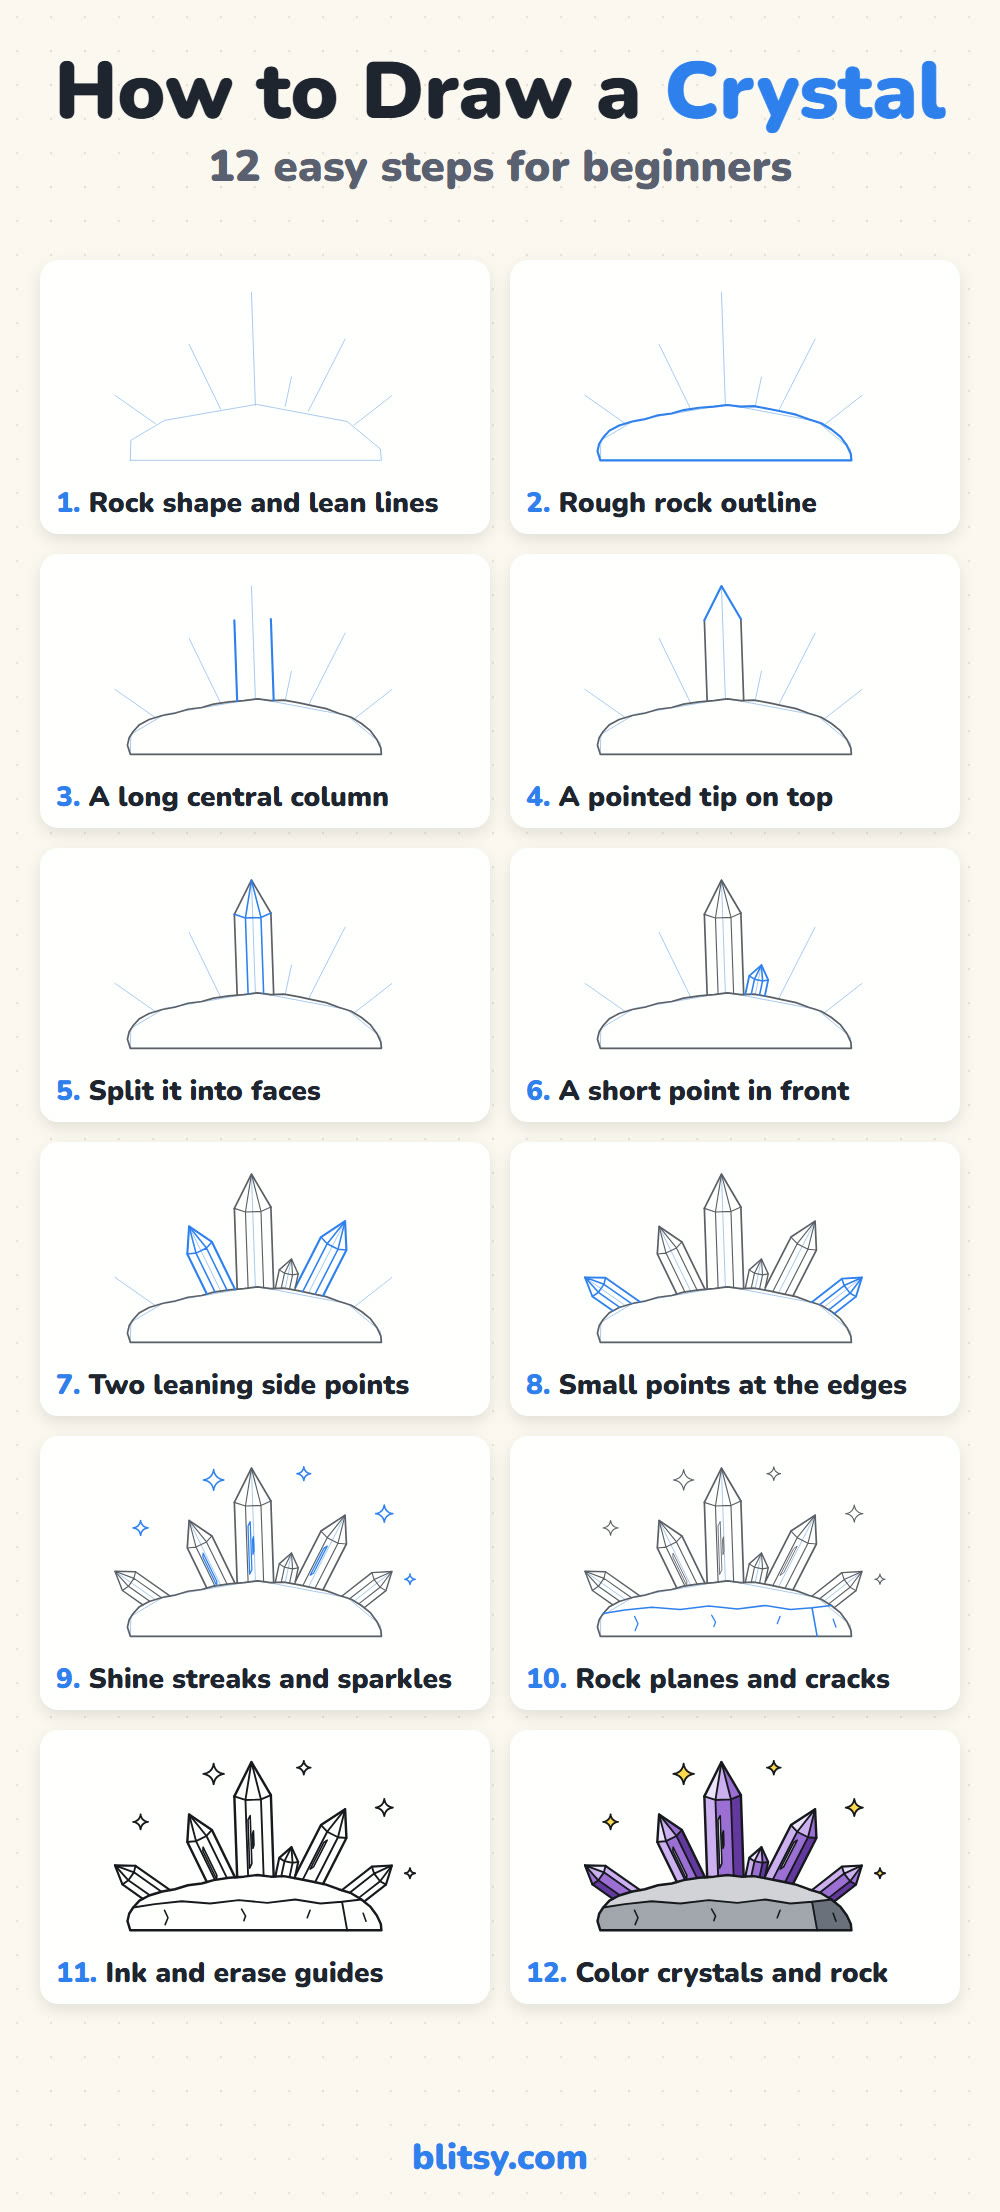
Pin the Amethyst Steps
Crystal Drawing Questions Beginners Ask
What is the easiest way to draw a crystal?
Draw two parallel lines for a column, add a short pointed tip on top, then split the column into three faces with two inner lines. That one shape is the base of every crystal in this cluster.
Why do crystals have six sides?
Quartz grows in a hexagonal pattern, so its natural points form six-sided prisms that end in a pyramid-shaped tip. From the side you usually see only two or three of those faces.
What color is an amethyst crystal?
Amethyst is purple quartz. Its color ranges from very pale lilac to deep violet, which is why three or four purple shades work so well for the different faces.
How do I make a crystal drawing look shiny?
Shade each point light on the side facing the light and dark on the opposite side, then leave a few thin white streaks uncolored. A couple of small sparkles around the cluster help too.
Grab your purples and grow a cluster of your own, then try the next one in rose pink. 🔮
Related posts:
 How to Draw a Whale Step by Step (Easy for Beginners)
 How to Draw Lungs Step by Step (Easy Science Diagram)
 How to Draw a Pineapple Step by Step (Easy Crown and Slice)
 How to Draw Iron Man Step by Step (Easy Chibi for Kids)
 How to Draw a Dress Step by Step (Easy Party Dress)
 How to Draw a Chicken Step by Step (Easy for Beginners)
 How to Draw a UFO Step by Step (Cute Alien Saucer)
 How to Draw Flames Step by Step (Easy Campfire Drawing)
 How to Draw a Moon Step by Step (Sleepy Crescent + Phases)
 How to Draw a Sunflower Step by Step (Big and Bright)
 How to Draw a Fall Leaf Step by Step (Maple, Oak and Birch)
 How to Draw a Jellyfish Step by Step (Cute, Easy Guide)

