
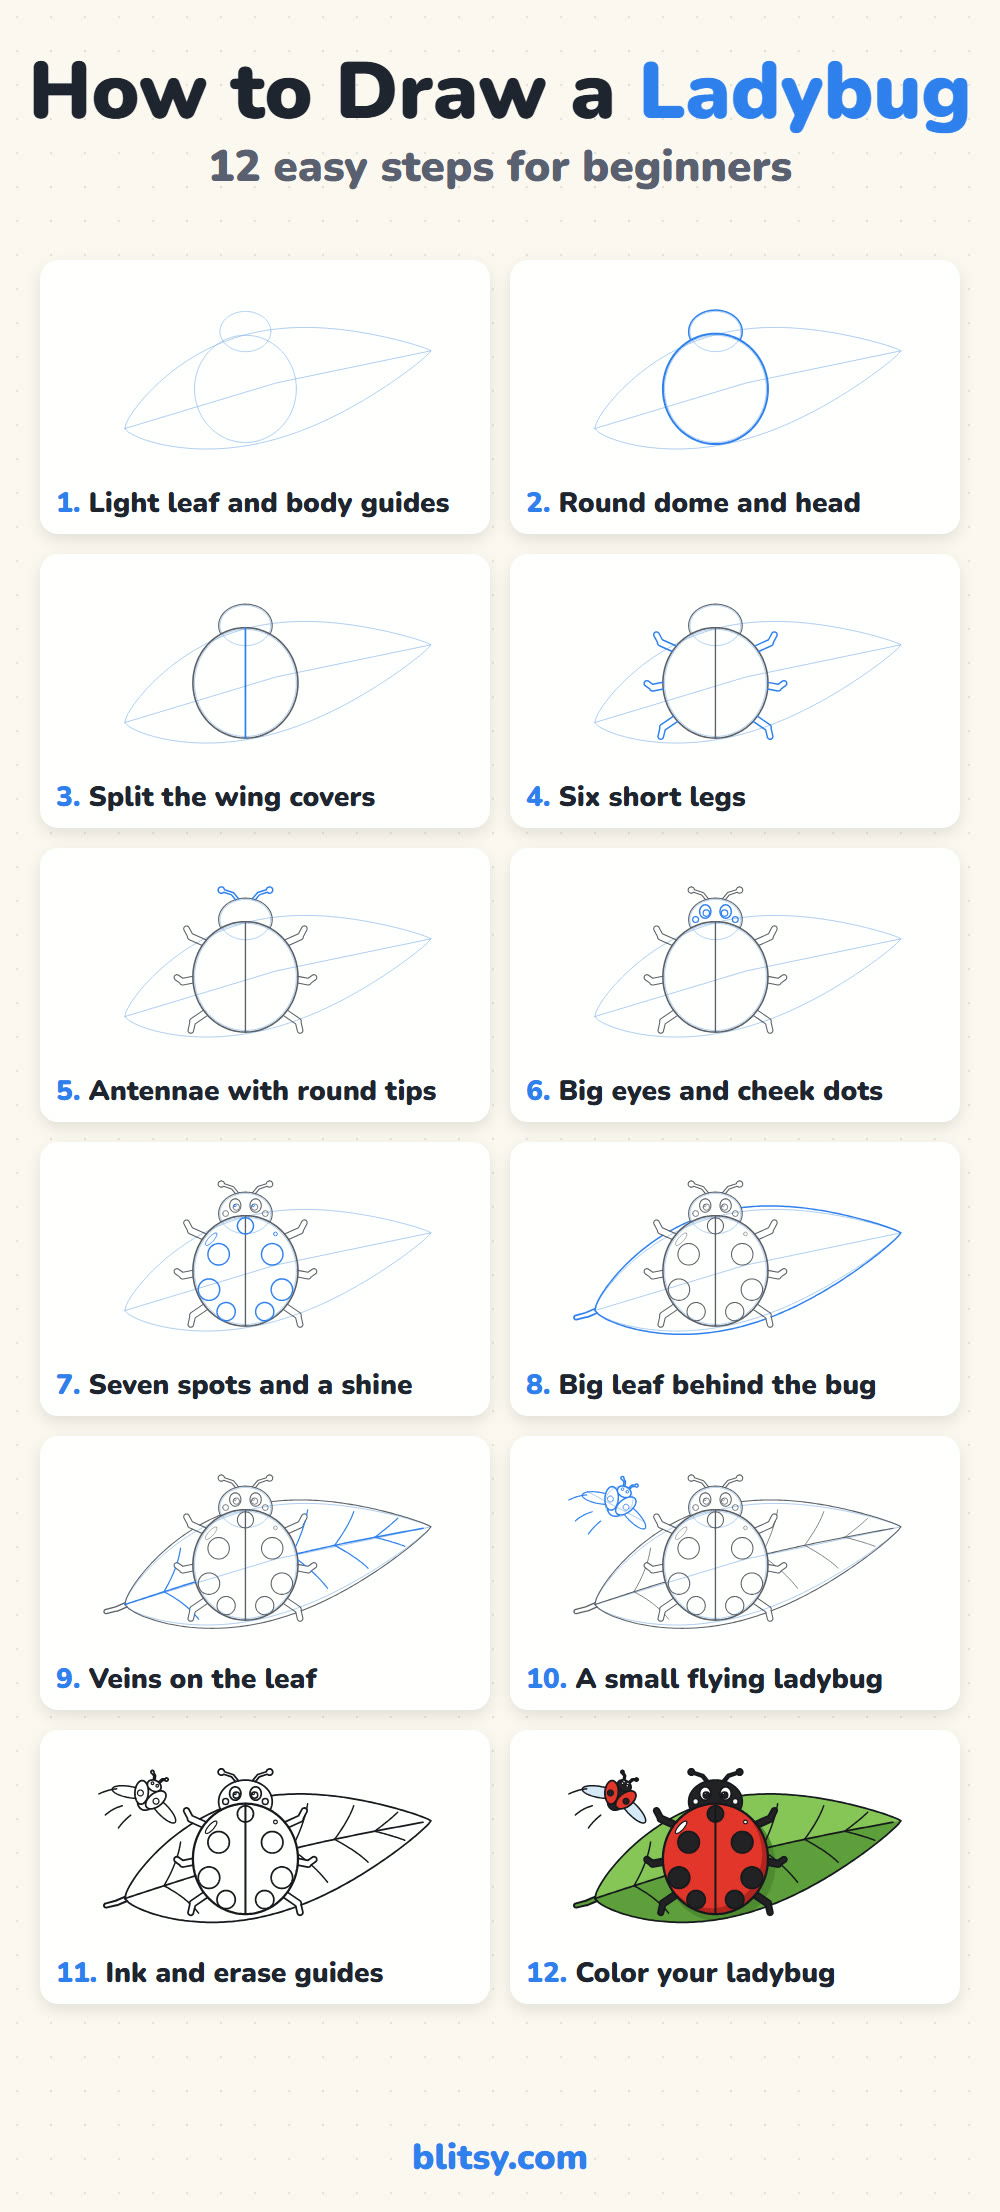
Few bugs are as friendly to draw as a ladybug, because almost all of it is one big circle. In this lesson I'll show you how to draw a ladybug step by step, seen from above and resting on a leaf, with a second little one buzzing past. We place the spots in matching pairs, so the shell looks even instead of random. All you need is a light hand for the first shapes.
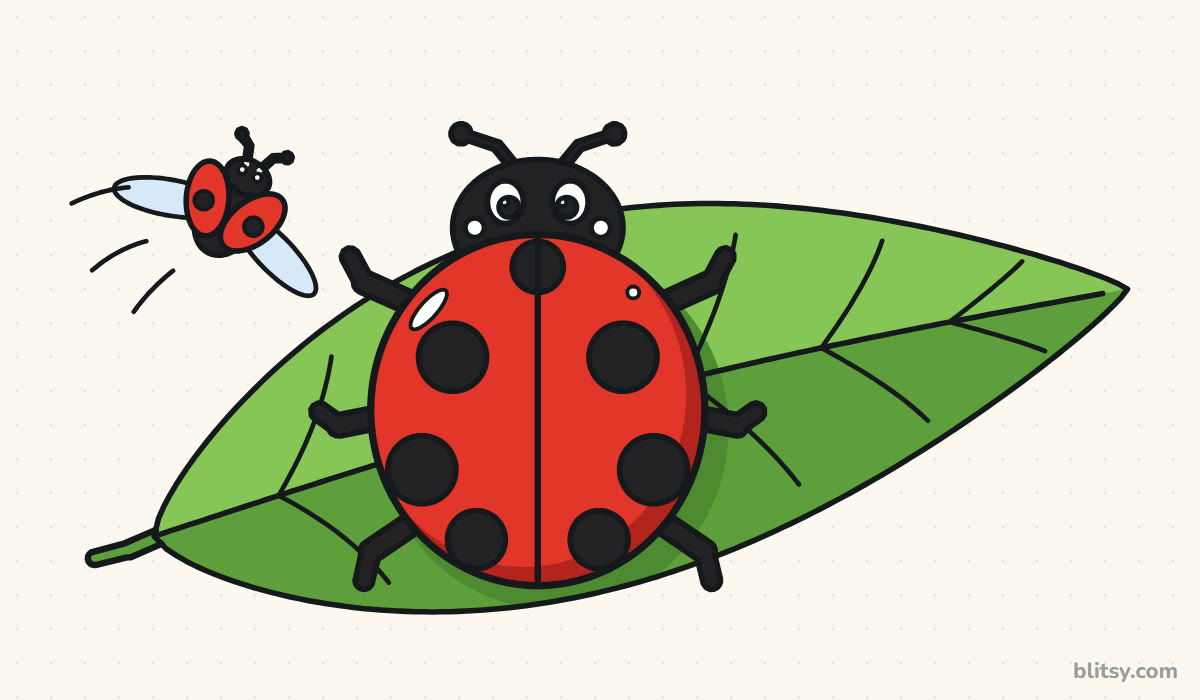
In each picture, the blue part is your job for that step. Anything gray was drawn earlier, which makes it easy to line up the new piece with what's already on your paper.
Quick overview
⏱️ Time: about 20 to 30 minutes with coloring
🎯 Level: easy, fine for kids from about 5
✏️ Steps: 12
🐞 You'll draw: a seven-spot ladybug on a leaf, with a flying friend
Ladybug Art Supplies, Red Crayon Included
- A regular pencil for light sketching
- A soft eraser
- A black marker or fineliner for the final lines
- A red crayon or colored pencil, plus a darker red
- Light green and dark green for the leaf
- A pale blue for the flying wings
- Plain paper, held sideways
A bottle cap can help with a round body, though a hand-drawn circle looks friendlier.
How to Draw a Ladybug Step by Step
Step 1: Sketch the leaf and body guides
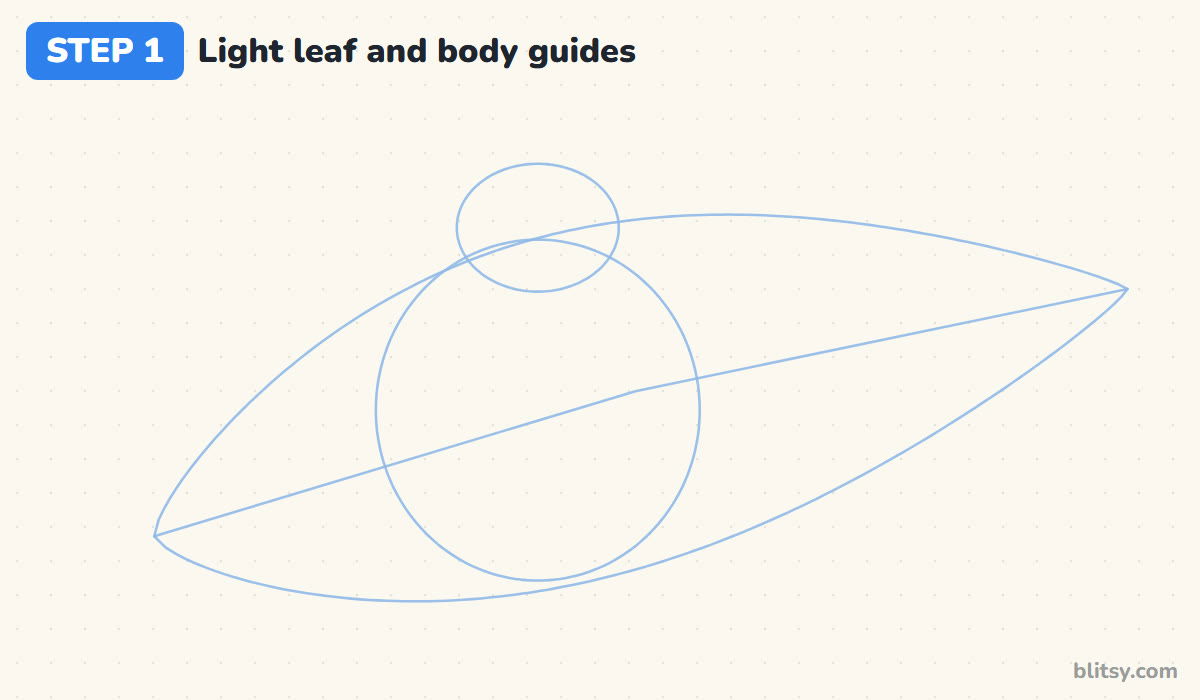
Turn your paper sideways. Draw a long, slanted line that climbs from the lower left to the upper right, then wrap a pointed leaf shape around it. In the middle of the leaf, sketch a big circle for the body and a smaller flat oval on top of it for the head. Press so lightly that you can barely see these lines.
💡 Tip: If you can hear your pencil scratching, you're pressing too hard for a guide.
Step 2: Draw the round dome and the head
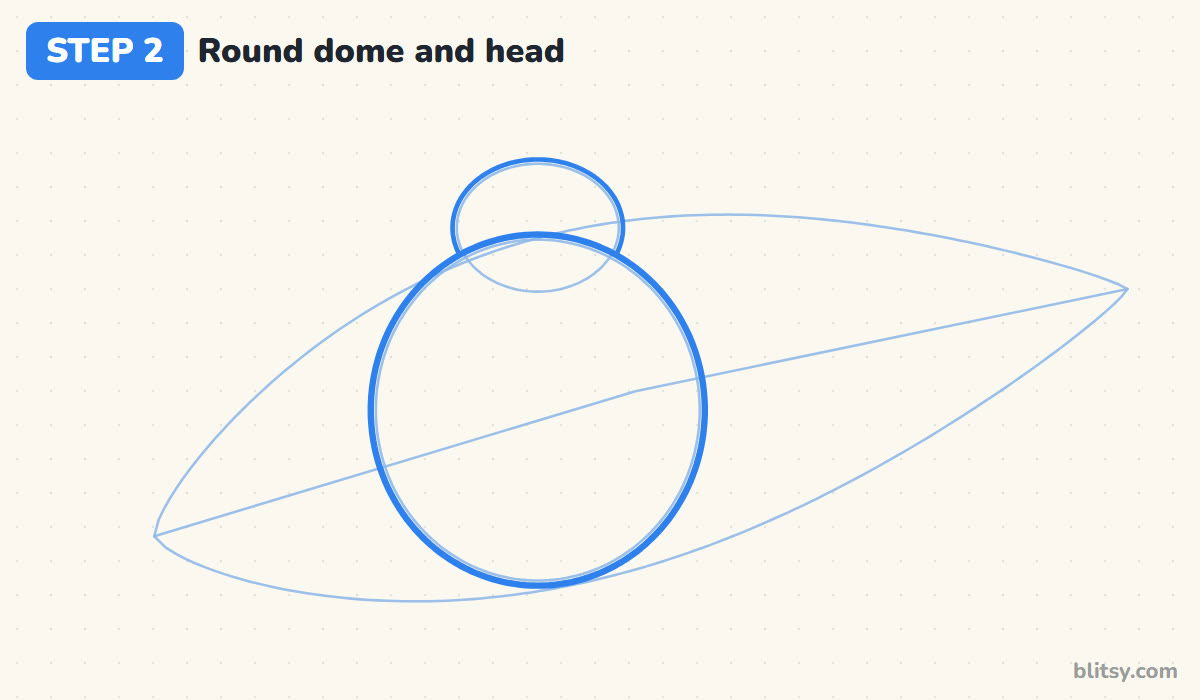
Trace over the big circle with a steadier line. This is the dome of the ladybug's back, so keep it full and round, only slightly taller than it is wide. Next, outline the top part of the head oval. Stop where it meets the body, because the shell sits in front and hides the rest of the head.
💡 Tip: Draw the circle in two halves, left side then right side. Joining two arcs is easier than one big loop.
Step 3: Split the wing covers
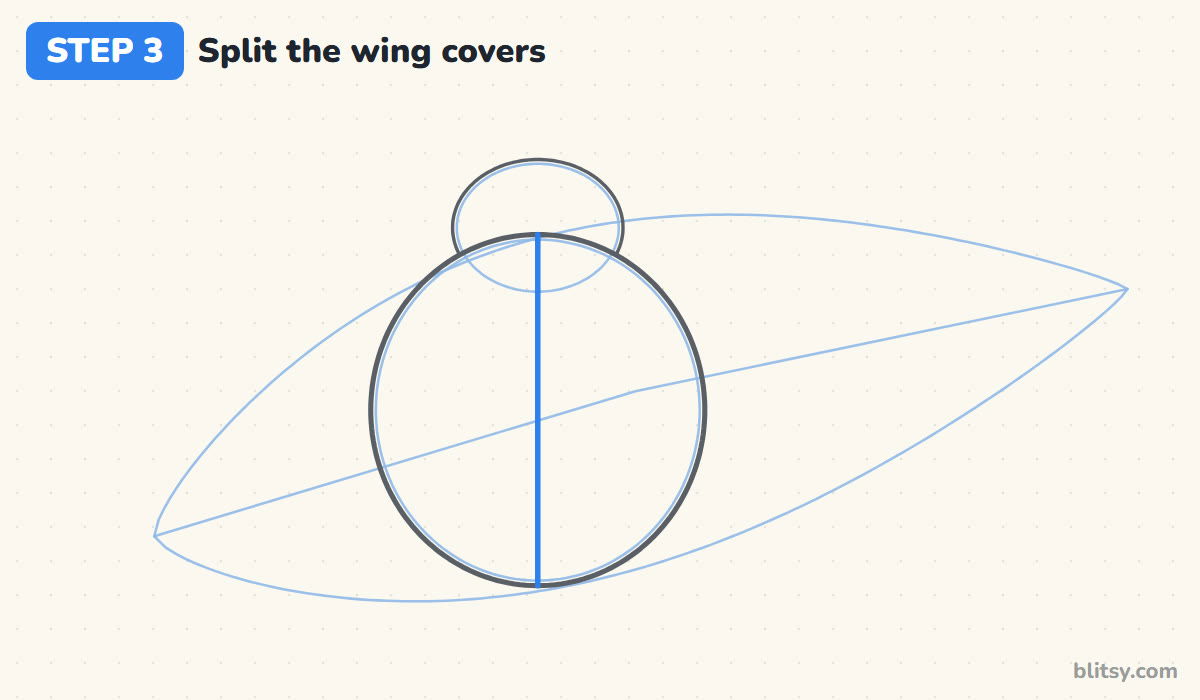
Draw one straight line from the top of the dome down to the bottom. That line is where the two hard wing covers meet. Keep it in the exact middle, since every spot later gets placed by looking at this line.




💡 Tip: Use the edge of a book or a ruler if your hand wobbles on long straight lines.
Step 4: Add six short legs
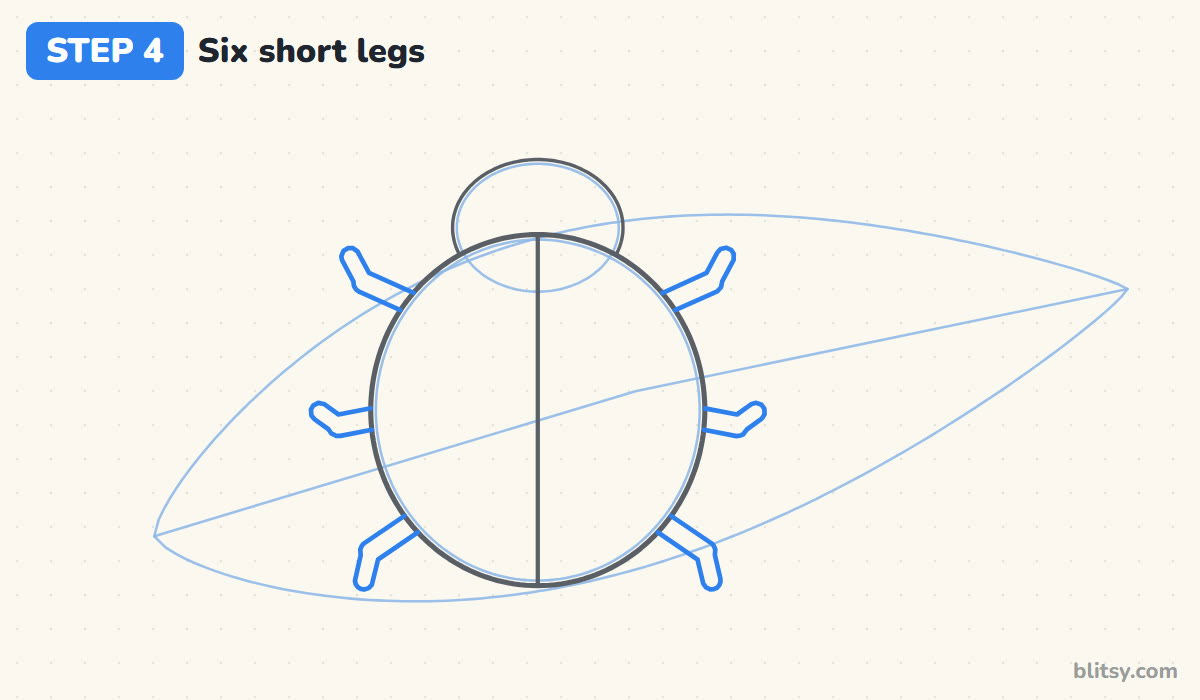
Ladybugs keep most of their legs tucked under the shell, so we only show the ends. Draw three small bent legs on each side: the top pair points forward, the middle pair sticks straight out, and the bottom pair points back. Each one starts at the body's edge and has a single bend, like a tiny elbow.
💡 Tip: Keep the legs short and chunky. Long thin legs turn a ladybug into a spider.
Step 5: Draw antennae with round tips
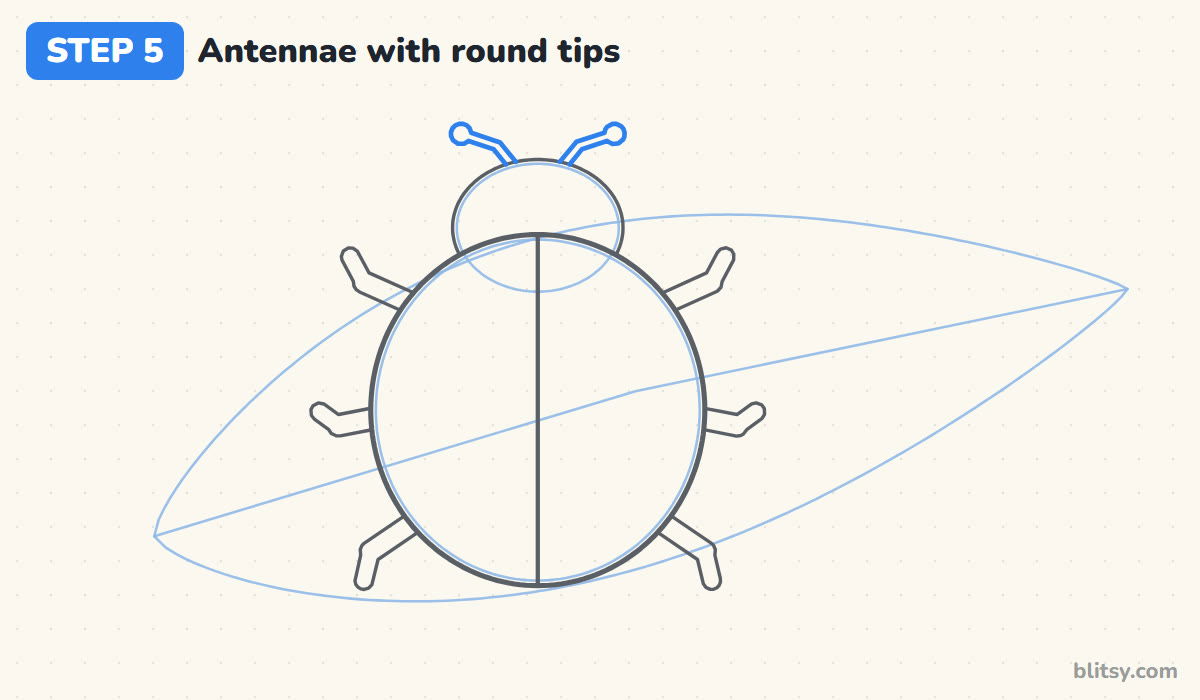
From the top of the head, draw two thin antennae that lean outward and bend gently to the sides. Finish each with a small ball. I keep them shorter than the head is wide, since long ones start to look like a snail's eye stalks.
💡 Tip: Make both balls the same size. Your eye notices a lopsided pair right away.
Step 6: Give it big eyes and cheek dots
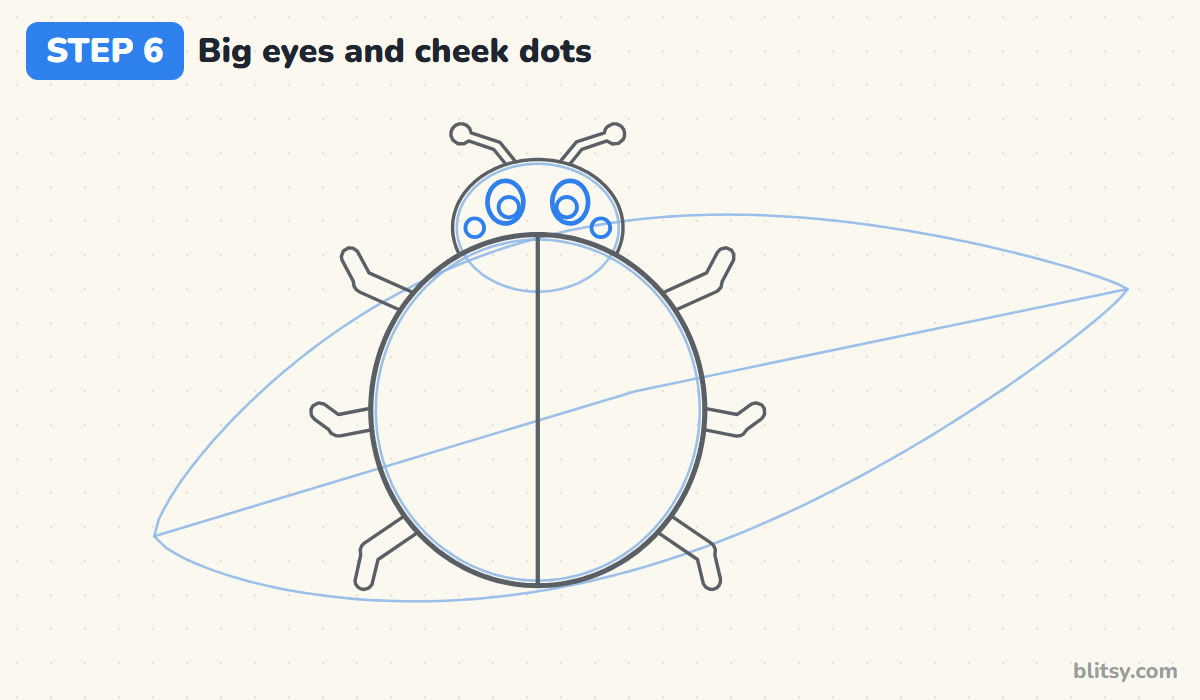
Inside the head, draw two tall ovals close to the middle for eyes. Add a round pupil in each one, set a little toward the bottom so the ladybug seems to look at you. Put a tiny circle inside each pupil for the shine. Near the outer edges of the head, draw two small circles. These become white cheek dots.
💡 Tip: Leave the shine circles empty when you color. That white speck is what makes the eyes look alive.
Step 7: Place seven spots and a shine
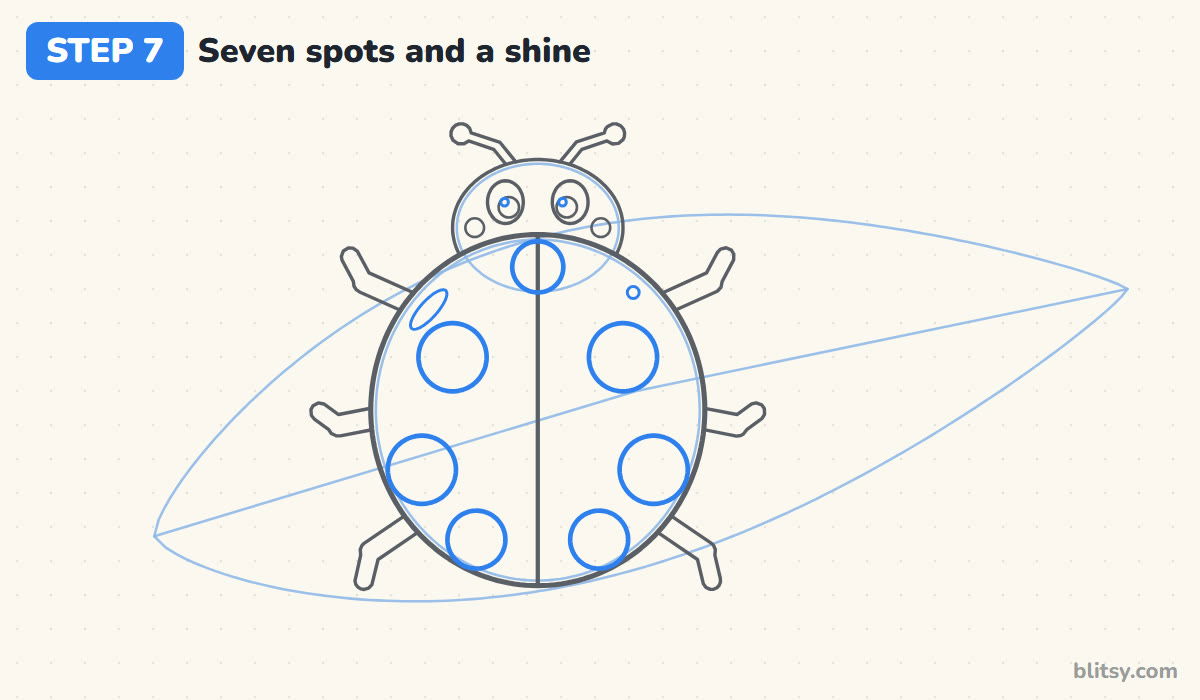
Start with one spot right on the centre line, just below the head. Then add three spots on each side, working in pairs: the left one first, then its twin at the same height on the right. Make the bottom pair a bit smaller. Last, draw a slim slanted oval near the upper left edge of the shell and a dot on the other side.



💡 Tip: Look at the gap between each spot and the edge. Matching gaps on both sides keep the pattern even.
Step 8: Draw the big leaf behind the bug
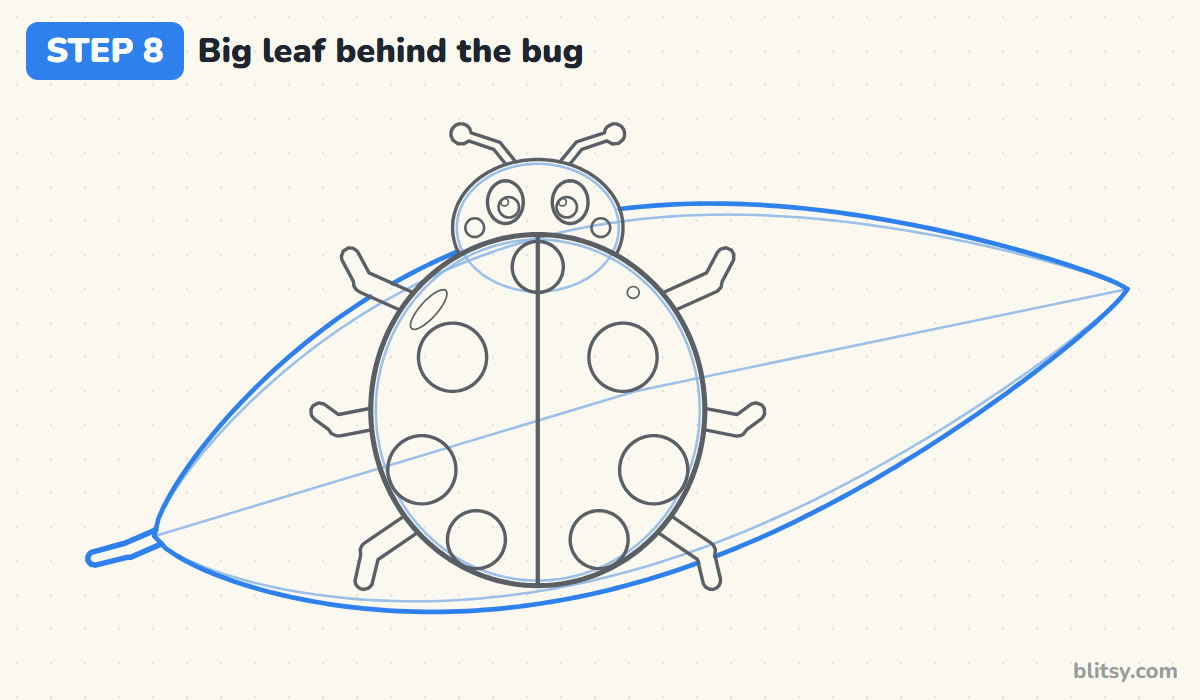
Now outline the leaf, following your guide shape. Most beginners draw the leaf first and then struggle to fit the bug on top. Doing it the other way around is simpler: wherever a leg or the body is in the way, just stop your line and start again on the other side. Add a short stem sticking out of the leaf's lower left end.
💡 Tip: Make the leaf tip sharp and the stem end soft. A leaf with two blunt ends looks like a canoe.
Step 9: Add the leaf veins
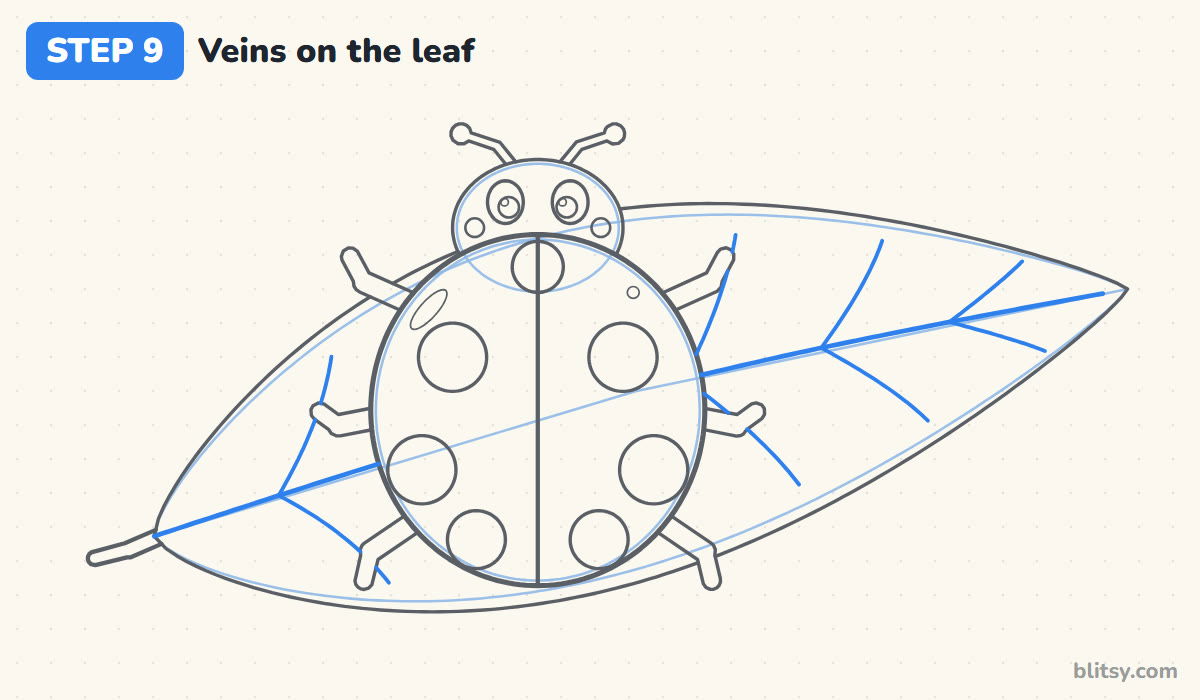
Draw a vein down the middle of the leaf, using your guide line. From it, add curved side veins that sweep toward the tip, about six on each side. They don't need to touch the leaf's edge. Where a vein reaches the ladybug, lift the pencil and pick it up again on the far side.
💡 Tip: Curve every side vein toward the tip, never back toward the stem.
Step 10: Draw a small flying ladybug
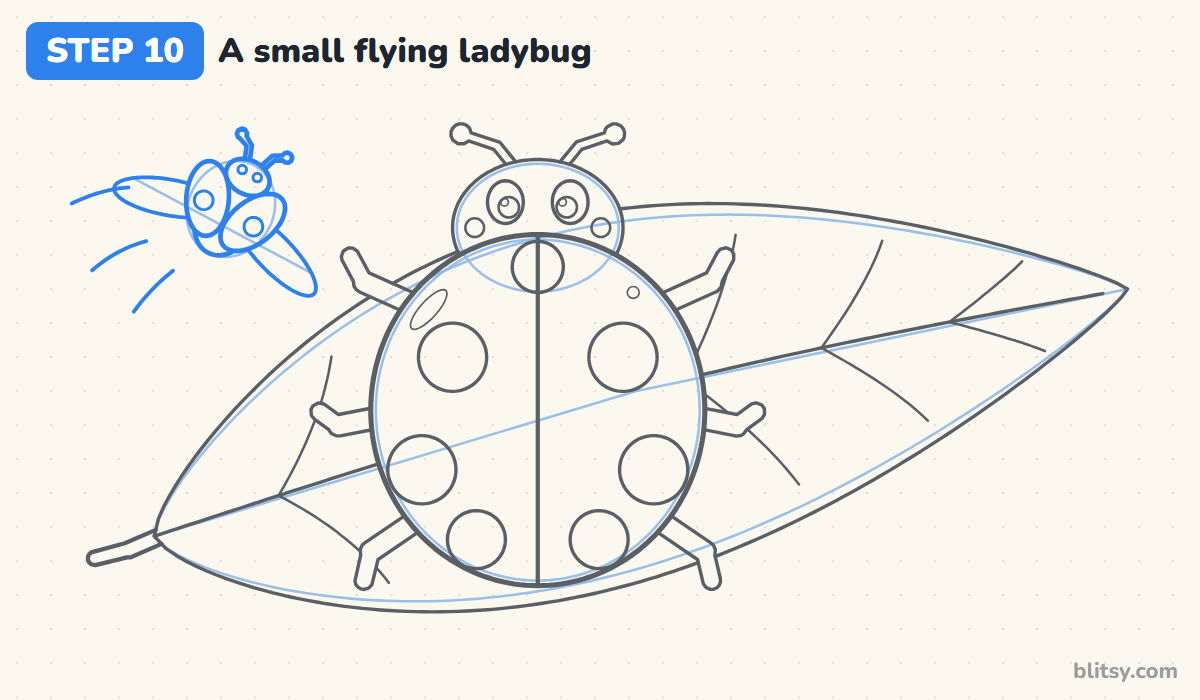
In the empty corner above the leaf, sketch a small circle tilted to the right. Around it, draw two long pale wings spreading out to the sides, and two red shell halves lifted up and apart, each with one spot. Add a little black head with two white eyes and two short antennae. A few curved lines behind it show that it's zooming along.
💡 Tip: Tilt the small ladybug. A straight-up flyer looks like it's hanging on a string.
Step 11: Ink the lines and erase the guides
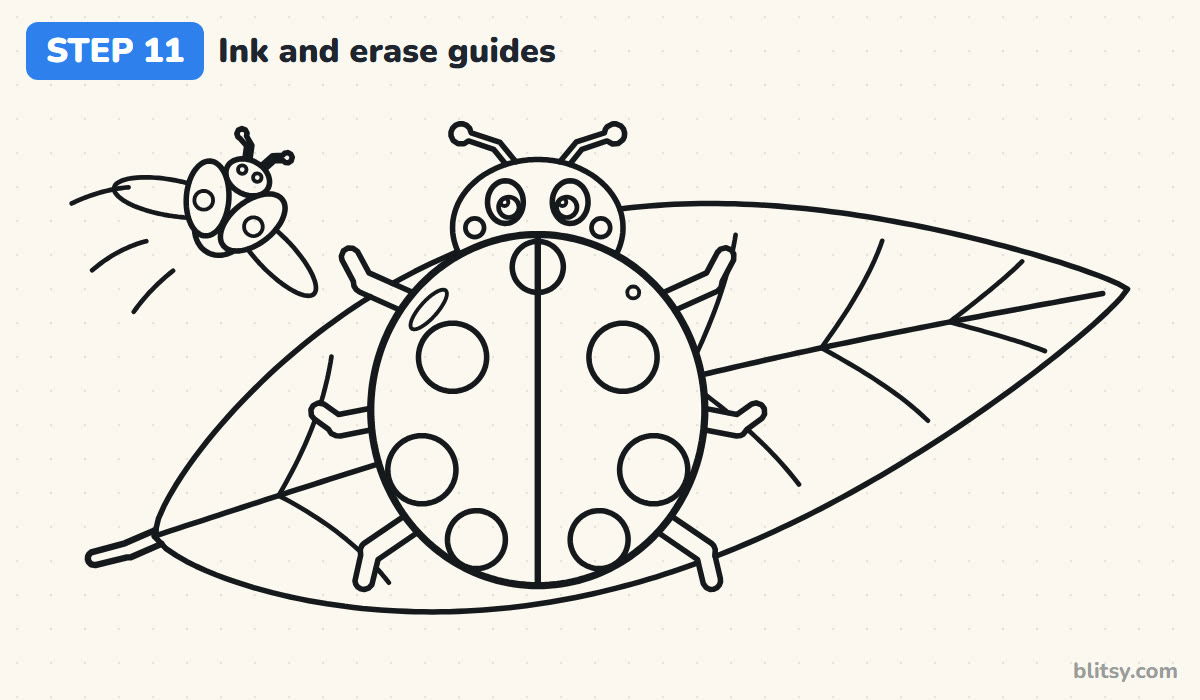
Trace every final line with your black marker, but skip the light guide shapes. Give the ink a minute to dry, then erase all the pencil underneath.


💡 Tip: Ink the spots with a slow, steady turn of the wrist instead of several short strokes.
Step 12: Color your ladybug
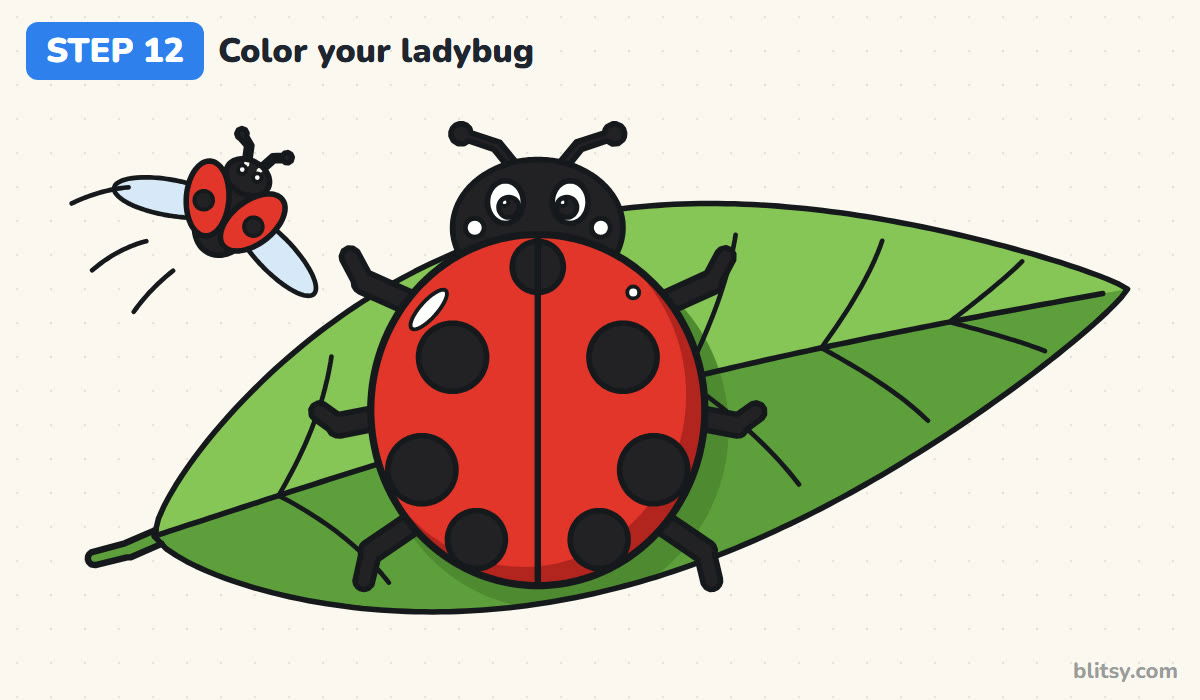
Color the shell bright red and add a darker red along its right and bottom edge, so the back looks rounded. Everything else on the bug is black, except the white eye shines, cheek dots and shell highlights. Use light green on the upper half of the leaf and dark green on the lower half, with a darker patch of green under the bug for a shadow. The flying wings get a pale blue.
💡 Tip: Color around the white shine marks first, then fill the rest of the red. It's easier than saving them later.
Ladybug Slip-Ups I See All the Time
- Spots scattered at random. Ladybug spots come in mirrored pairs. Place each spot, then put its twin at the same height on the other side of the centre line.
- A head that sits on top like a hat. The shell should overlap the head a little. Tuck the bottom of the head behind the dome.
- Legs that are too long. From above, you only see the ends of a ladybug's legs. Keep them short so they just peek out.
- Spots touching the edge. When spots run off the shell, the shape gets lost. Leave a ring of red all around.
- No white left in the eyes. Coloring the eyes solid black makes them look empty. Save the small shine dots.
Spot Patterns and Other Ladybug Variations
Once you've drawn one ladybug, try changing the spots: two big spots, ten tiny ones, or a heart-shaped spot for a card. Some ladybugs are yellow with black spots, which is fun to try. Small kids can leave out the leaf veins and the flying friend and still end up with a proper ladybug. If you'd like to keep drawing garden bugs, my cute bee drawing tutorial makes a good next lesson, and a ladybug looks right at home next to the orange wings in the butterfly drawing step by step guide.
Free Ladybug Coloring Page and a Printable Step PDF
The free ladybug coloring page has a finished, colored ladybug at the top to copy, a color key showing which crayon goes on which part, and a big outline to fill in below. The step-by-step PDF guide includes all 12 steps with pictures and tips, ready for Letter or A4 paper.
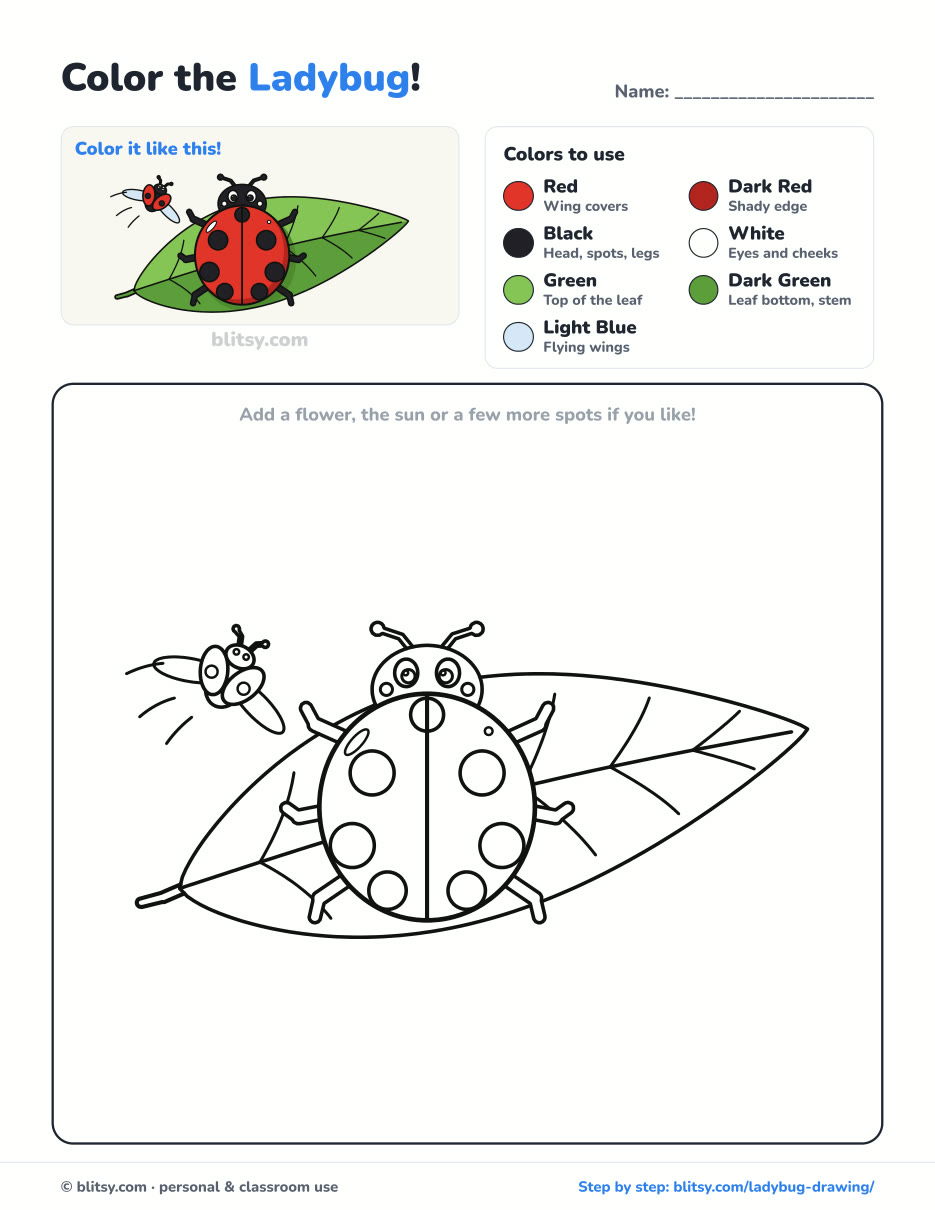
Black outlines with a colored example and the color names at the top. Ready to print and color.
⬇️ Download Coloring PageEvery step picture with its instructions and tips, to keep beside your paper while you draw.
⬇️ Download Drawing Guide📱 On a phone? Tap a download button, then open the file and choose Share → Save to Files or Print. On a computer, the PDF opens or saves straight to your Downloads folder.
Pin Every Ladybug Step on One Page
Ladybug Lovers, Try These Tutorials Too
Each link below leads to a step-by-step tutorial with pictures for every stage, from bugs and birds to clothes.
- Spider Drawing: Stay with small creatures in this how to draw a spider step by step lesson, where a friendly purple spider hangs next to its round web.
- Feather Drawing: One curved line and a leaf shape become a teal feather and an orange one in the feather drawing tutorial.
- Mask Drawing: Draw a purple masquerade mask with gold trim, pearls and three feathers using this mask drawing step by step guide.
- Hoodie Drawing: The hoodie drawing tutorial starts from a plain T-shape and shows the front and back of a sage hoodie.
- Shark Drawing: Build a smiling great white from one long oval with the how to draw a shark lesson.
- Elephant Drawing: A cheerful elephant with a pink-lined ear sprays water from its raised trunk in this elephant drawing step by step tutorial.
- Bear Drawing: Draw a brown bear walking through the grass, head low and one paw forward, with the easy bear drawing tutorial.
- Chicken Drawing: A brown hen and her yellow chick stand on a strip of grass in the chicken drawing step by step guide.
- Cardinal Drawing: The how to draw a cardinal tutorial perches a bright red bird with a black mask on a winter branch.
- Lion Drawing: Draw a sitting lion with a big scalloped mane and a tufted tail in this lion drawing tutorial.
- Suit Drawing: Like a page from a tailor's sketchbook, the suit drawing step by step lesson draws a navy jacket, tie and trousers flat.
- Shoe Drawing: Learn how to draw shoes from the sole up, with a red high-top and a low-top sneaker.
- Dog Drawing: Three circles and stick legs grow into a beagle-style dog in side view in the dog drawing tutorial.
- French Bulldog Drawing: The French bulldog drawing step by step guide gives a sitting Frenchie bat ears and a red bow tie.
- Fish Drawing: Draw a plump goldfish with a fan tail and rows of scales from one oval in this how to draw a fish tutorial.
Ladybug Drawing Questions From Parents and Kids
What is the easiest way to draw a ladybug?
Draw a big circle, add a half oval on top for the head, split the circle with a line down the middle, then add black spots in pairs and six short legs.
How many spots should a ladybug have?
The best-known kind has seven: one on the centre line and three on each side. Real ladybugs vary a lot, so any matching pattern works for a drawing.
How do you draw a cute ladybug for kids?
Give it big round eyes with white shine dots, short chunky legs and a large round body. Small kids can skip the leaf and draw the ladybug on its own.
How long does it take to draw a ladybug?
About 20 minutes for the drawing and a bit longer if you color the leaf. The spots and legs need the most care, so slow down there.
Grab a red crayon, give your ladybug its seven spots, and let it land on your fridge door. 🐞✏️
Related posts:
 How to Draw Miraculous Ladybug Step by Step (Cute Chibi)
 How to Draw a Car Step by Step (Easy Drawing for Beginners)
 How to Draw a Whale Step by Step (Easy for Beginners)
 How to Draw a Rat Step by Step (Easy for Beginners)
 How to Draw an Arctic Fox Step by Step (Easy for Beginners)
 How to Draw a Shark Step by Step (Easy for Beginners)
 How to Draw a Dog Step by Step (Easy Side View for Beginners)
 How to Draw a Butterfly Step by Step (Easy for Beginners)
 How to Draw a Leopard Step by Step (Easy for Beginners)
 How to Draw a Light Bulb Step by Step (Easy for Beginners)
 How to Draw a Crow Step by Step (Easy for Beginners)
 How to Draw an Eagle Step by Step (Easy for Beginners)

