
Red with black spots is one of the easiest color schemes to recognize from across a room, which is why Ladybug works so well as a first character drawing. Give her a big round head and a tiny body, and she turns into a chibi that fits on one page without any tricky anatomy. Here I'll show you how to draw Miraculous Ladybug step by step, starting from a circle and an oval and ending with a colored hero holding her yo-yo. This is my own simple fan-art version for practice, not official show art, so change anything you like.
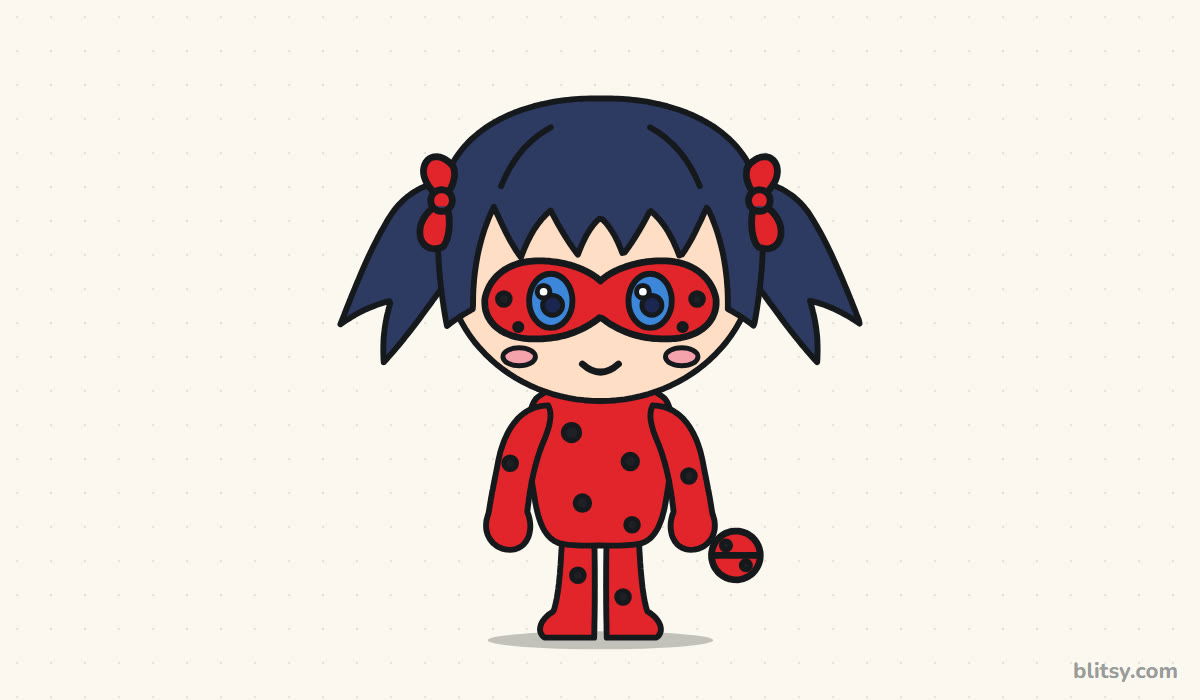
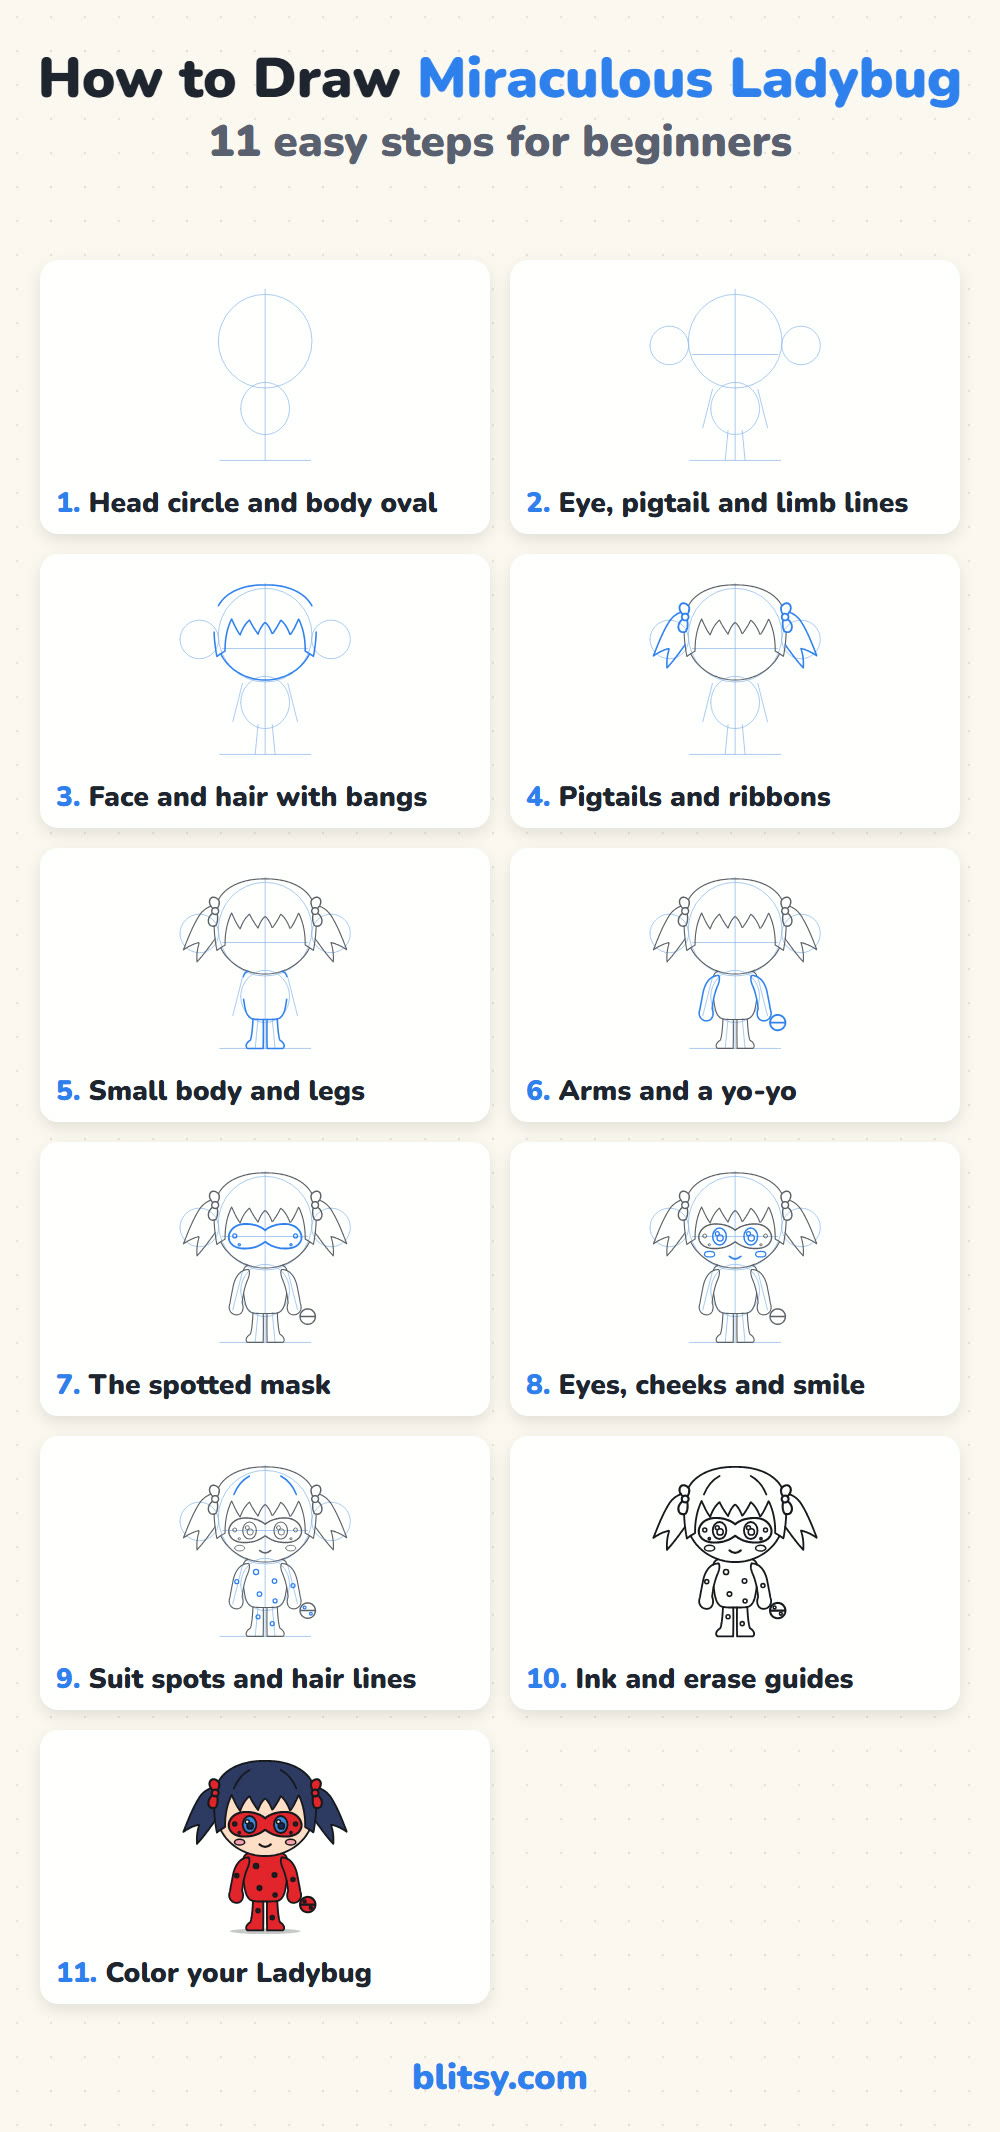
In each picture, the blue lines are the ones to add in that step, and the gray ones are already on your paper. The very light blue circles and lines at the start are helpers you draw faintly and rub out before coloring.
Quick overview
⏱️ Time: around 25 to 35 minutes with coloring
🎯 Level: easy, fine for kids from about 6
✏️ Steps: 11
🐞 You'll draw: a chibi Ladybug standing and facing you, yo-yo in hand
Pencils and Reds for a Spotted Hero
- A pencil you can press lightly with (HB or 2B)
- A soft eraser for the guide shapes
- A black fineliner or thin marker for the final lines
- A bright red, black, dark blue, peach, blue and pink to color
- A sheet of plain paper, held upright
One good red matters more than anything else on this list, since it covers most of the picture.
How to Draw Miraculous Ladybug Step by Step
Step 1: Start with a head circle and body oval
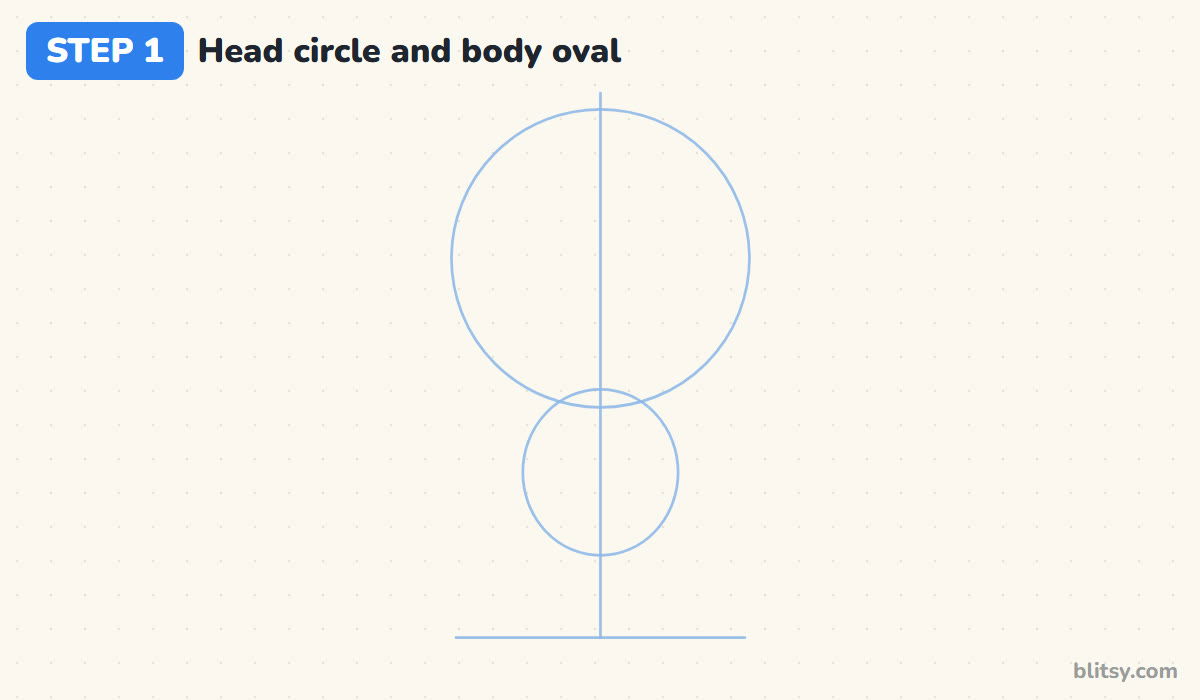
Draw a light vertical line down the middle of the page and a short ground line near the bottom. On the upper half of the center line, draw a big circle for the head, with a much smaller oval under it for the body. The head should be roughly twice as wide as the body. That oversized head is the whole chibi look, so don't shrink it.
💡 Tip: Leave a finger's width of paper above the circle. The hair will grow past it.
Step 2: Add the eye line, pigtail circles and limb lines
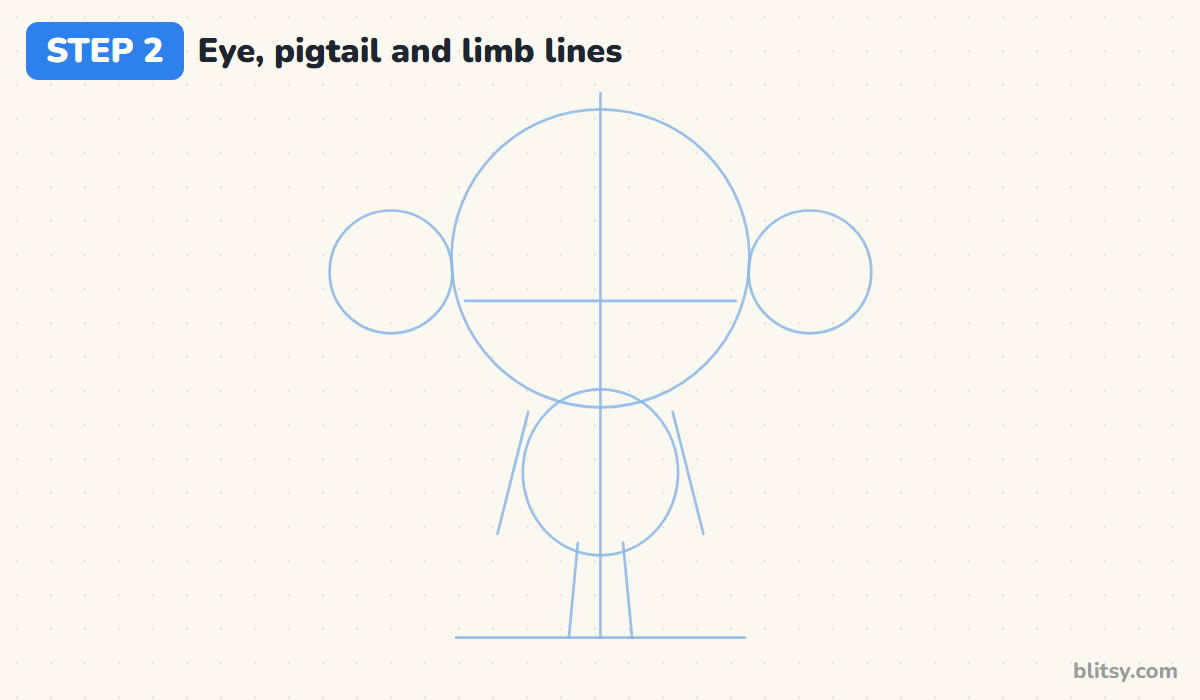
Cross the head circle with a level line a little below its middle for the eyes. On each side of the head, at about that height, draw a small circle overlapping the edge to mark the pigtails. Then add two slanted lines from the top of the oval for the arms and two short lines below it for the legs.
💡 Tip: Chibi eyes go lower than you'd expect. If the eye line sits above the middle, the forehead disappears under the bangs.
Step 3: Draw the face and the hair with bangs
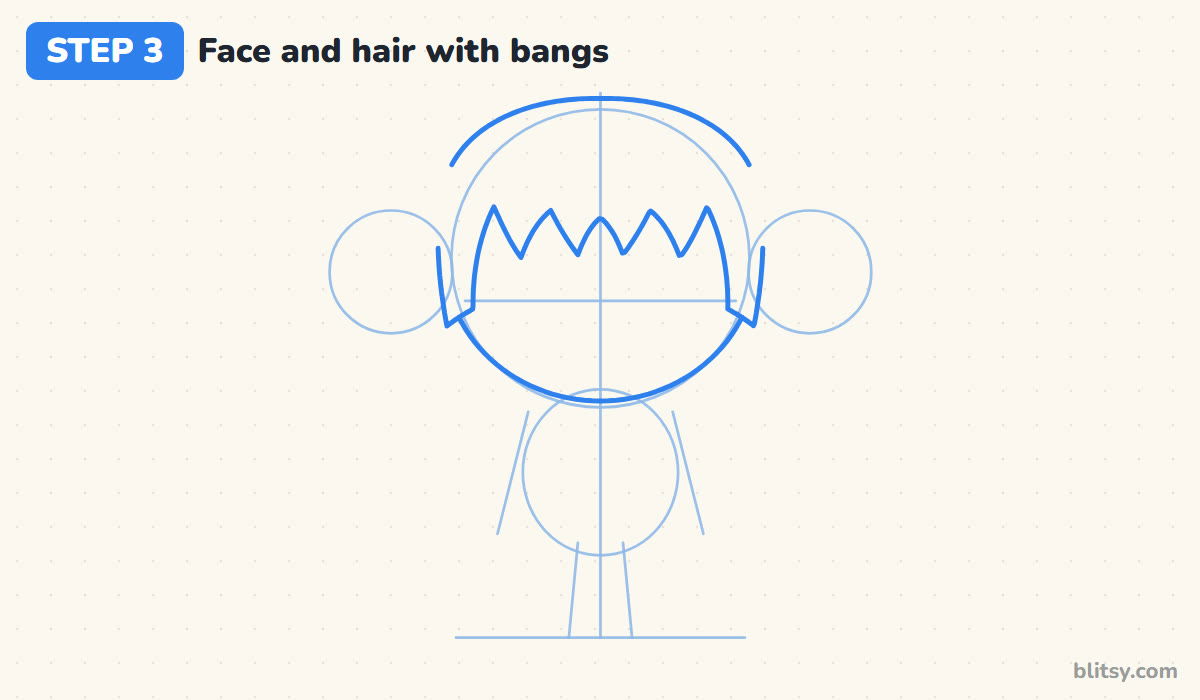
Go over the lower part of the circle for the cheeks and chin. For the hair, draw a rounded cap slightly above and outside the circle, then bring it down each side as a short lock beside the cheek. Across the forehead, draw a row of pointed bangs. I use five points, with the middle ones a bit shorter.



💡 Tip: Keep the bang points uneven by a hair. Perfectly matching spikes look like a crown.
Step 4: Draw the pigtails and red ribbons
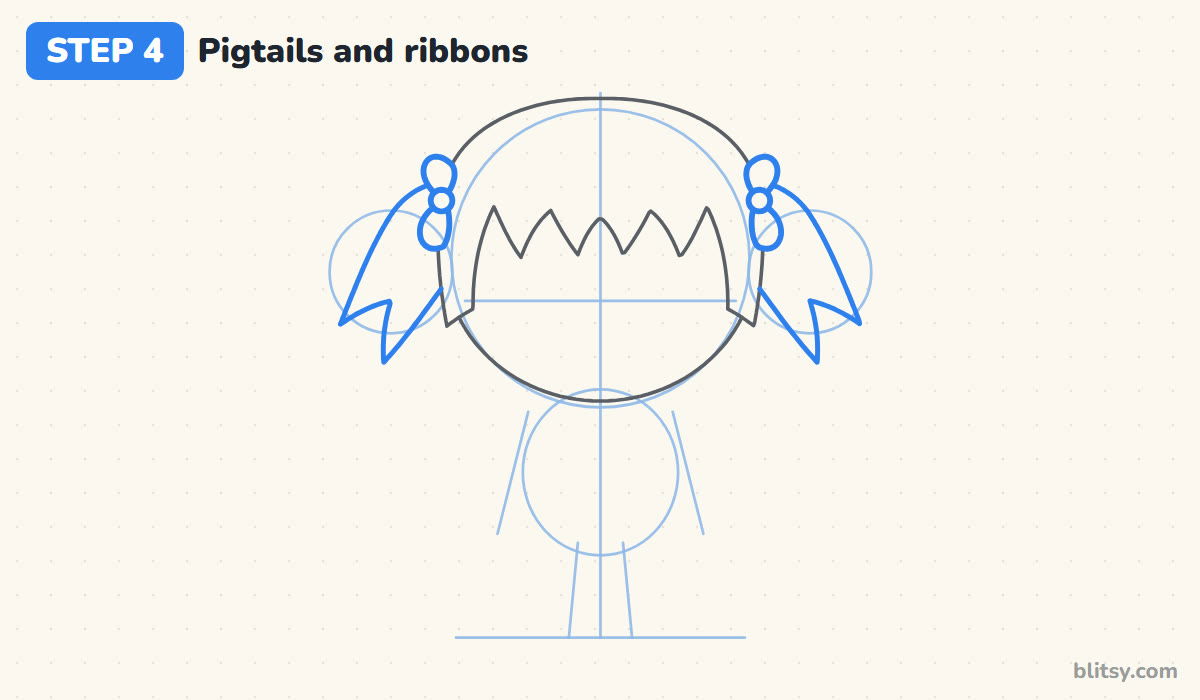
From each side of the hair, draw a pigtail that sweeps out and down. Give each one two pointed ends instead of one, so it reads as a bunch of hair. Where the pigtail meets the head, add a small bow: one loop above, one below, and a tiny circle for the knot.
💡 Tip: Tilt both pigtails the same way. A mismatched angle makes her look like she's tipping over.
Step 5: Draw the small body and short legs
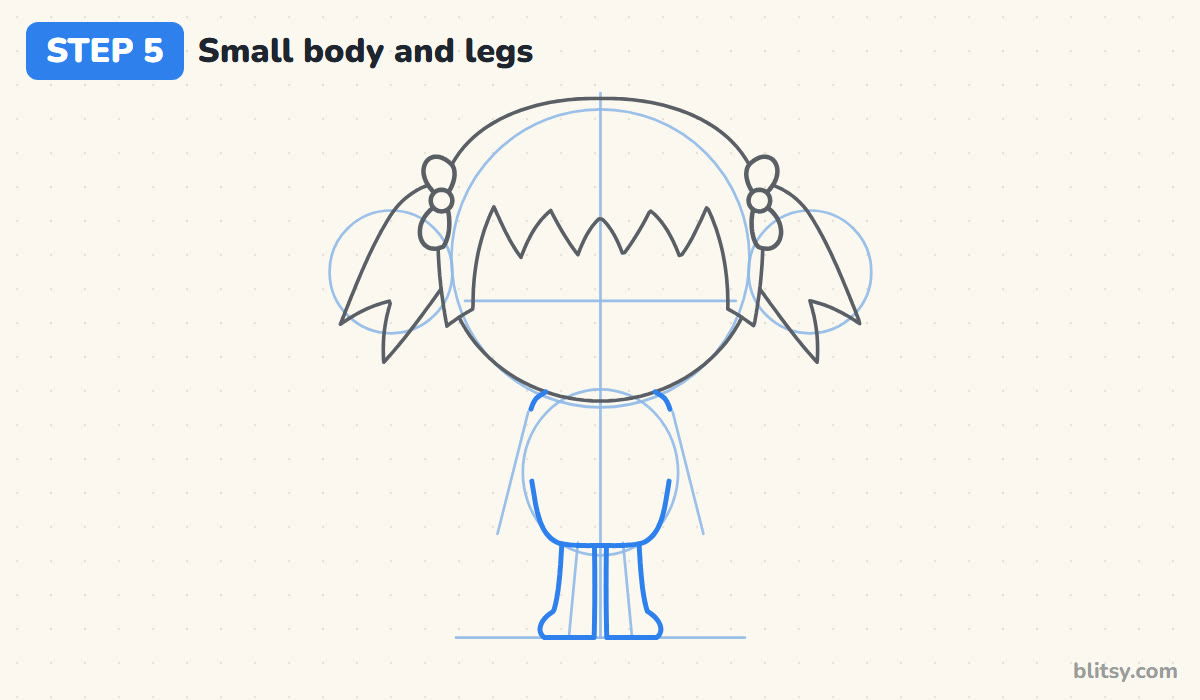
Follow the body oval for the torso, keeping the shoulders narrow and the bottom rounded. Below it, draw two short legs with a thin gap between them, each flaring out a little into a foot. The legs should be shorter than the head is tall; long legs pull the drawing away from chibi.
💡 Tip: Sit the feet flat on the ground line so she stands instead of floating.
Step 6: Add the arms and a yo-yo
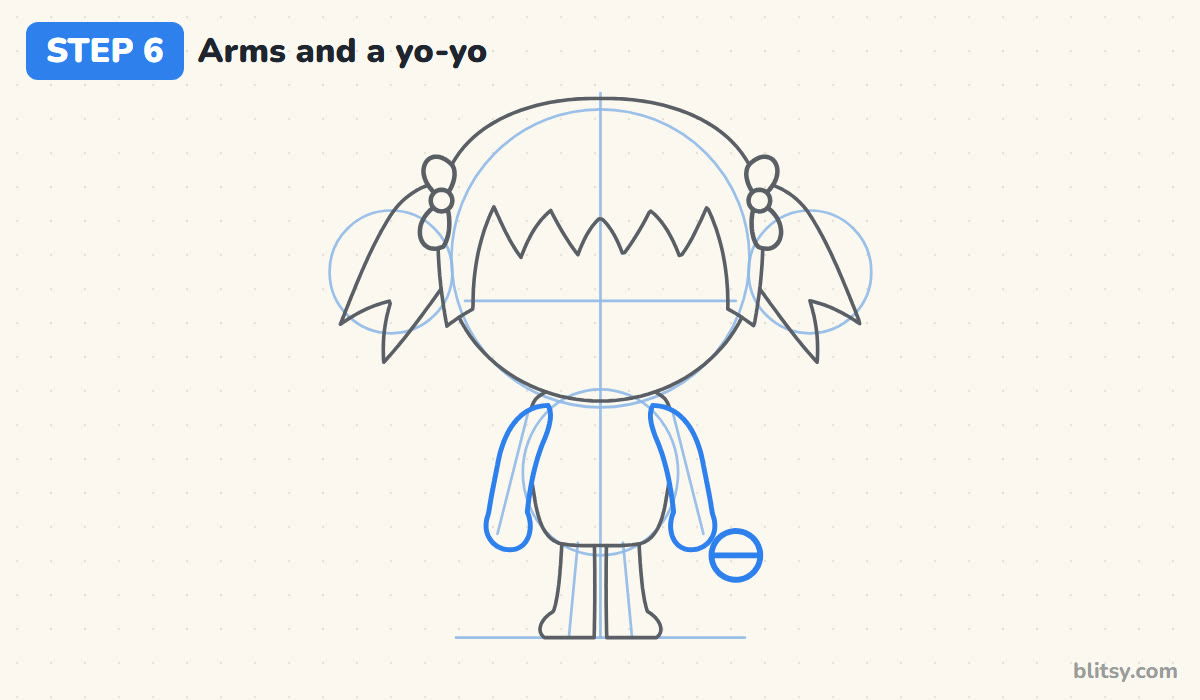
Use the slanted guides to draw two arms that hang close to the body and end in round, mitten-like hands. Her suit covers her hands, so skip the fingers. In the hand on the right side of the page, draw a circle for her yo-yo with a line across the middle, overlapping the hand slightly so she's clearly holding it.
💡 Tip: Stop the hands at about the hips. Arms that reach the knees look stretched on a chibi.
Step 7: Draw the spotted mask
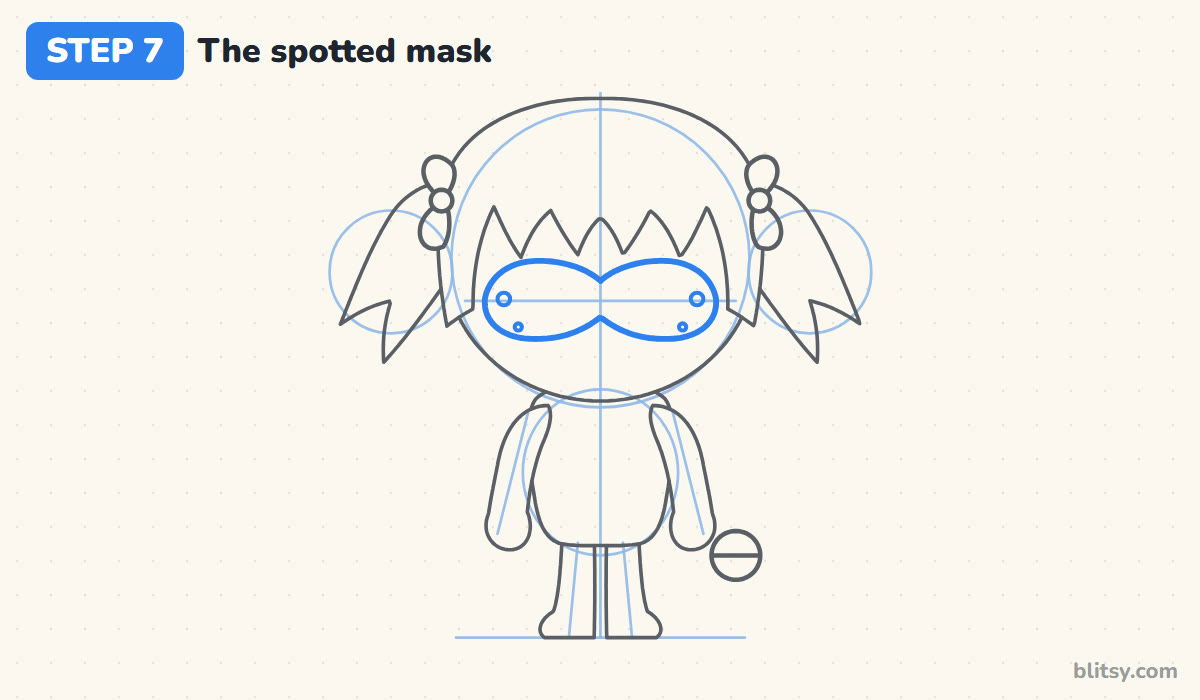
Her mask is the detail people recognize first. Draw it across the eye line as two rounded lobes joined by a narrow bridge over the nose, a bit like swimming goggles, stretching nearly from one side lock to the other. Add one larger and one tiny spot near the outer edge of each lobe.



💡 Tip: Draw the left lobe, then match the right one to it by checking against the center line.
Step 8: Add the eyes, blush and smile
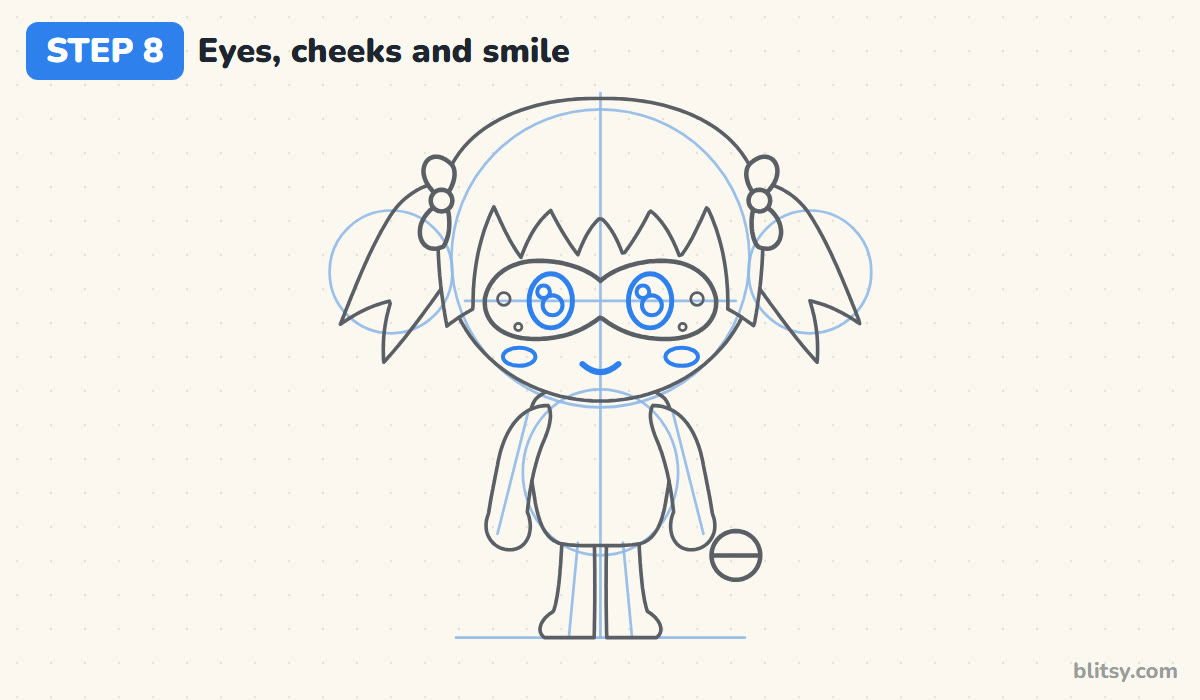
Inside each mask lobe, draw a tall oval eye. Put a round pupil inside it, then a small circle for the shine, placed toward the upper left on both eyes. Under the mask, draw two flat ovals for blush, and finish with a short curved smile on the center line. A small mouth keeps the face sweet.
💡 Tip: Make both shines face the same direction, as if one window is lighting her face.
Step 9: Draw the suit spots and hair lines
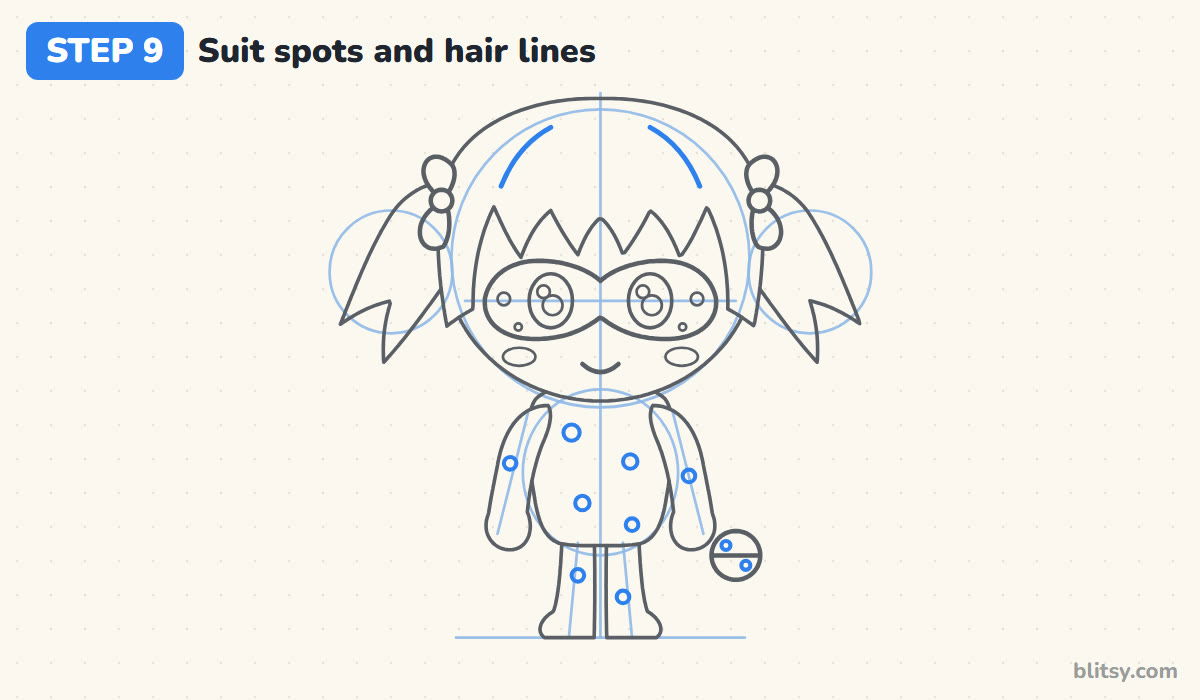
Scatter round spots over the torso, the arms and the legs. Vary their size a little and keep them away from the outlines, so each one is a full circle. Two more go on the yo-yo. Then add a curved line on each side of the hair cap to suggest strands.
💡 Tip: Eight to ten spots on the suit is plenty. Too many and she starts to look polka-dotted instead of ladybug-spotted.
Step 10: Ink the drawing and erase the guides
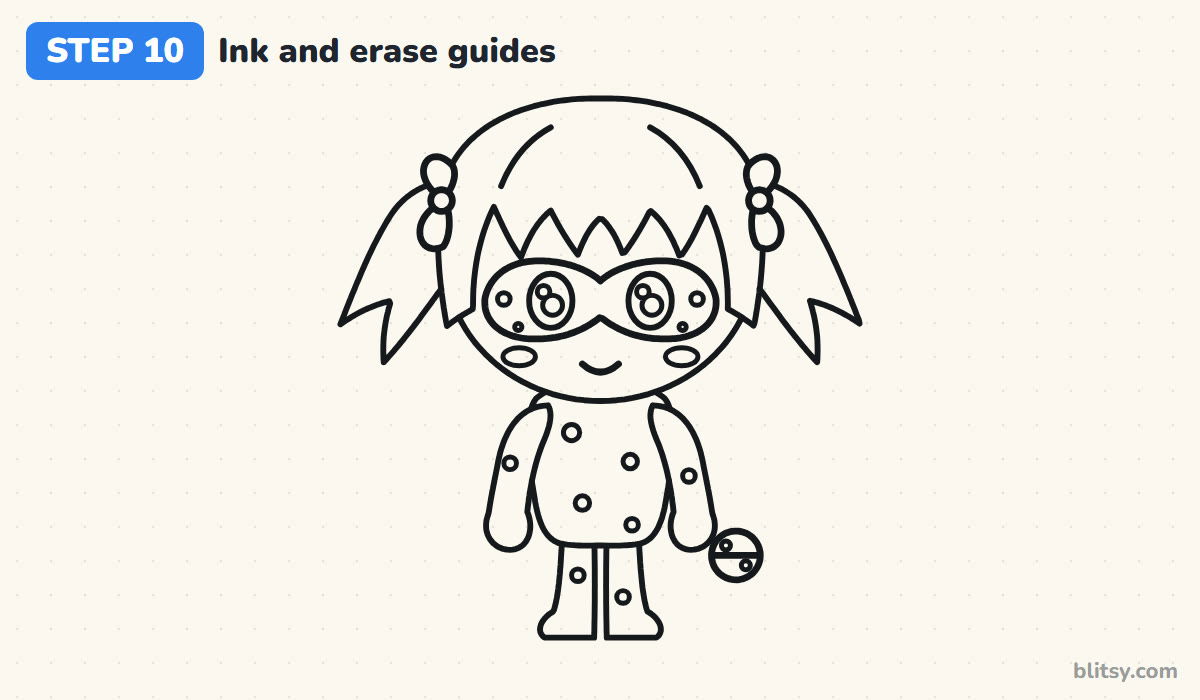
Trace every line you want to keep with a fineliner, from the hair and bows down to the feet and spots. Leave the circles, the oval and the helper lines alone. Once the ink is dry, erase all the pencil gently. Go slowly on the tiny eye circles, the easiest place to slip.
💡 Tip: Ink the spots last. Small circles are easier to close when your hand isn't resting on wet ink.
Step 11: Color your Ladybug
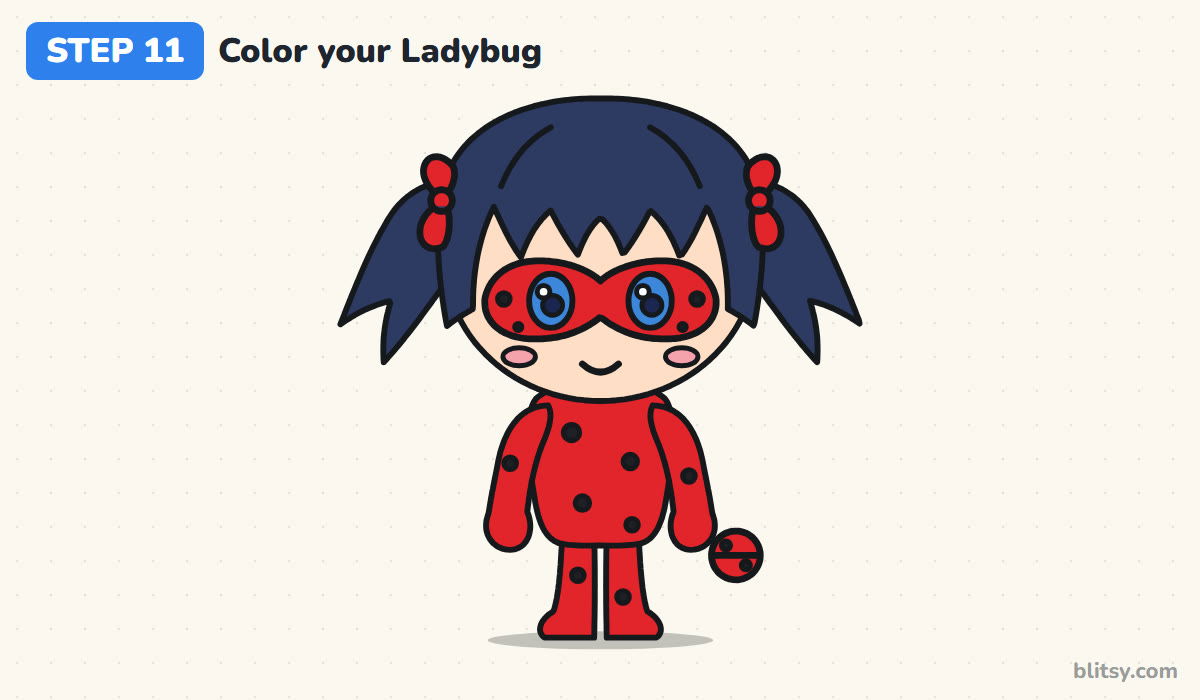
Use your brightest red on the suit, the mask, the ribbons and the yo-yo, then fill every spot with black. The hair and pigtails get a very dark blue. The face is peach and the eyes blue, with pink on the cheeks; leave the eye shines as white paper. I color the red parts before the spots, since black smudges into red but not the other way round.

💡 Tip: Press harder on the red than on the skin. A strong red is what makes her pop off the page.
Where a Chibi Ladybug Can Go Off Track
- A head that's too small. With a normal-sized head she reads as a girl in a costume. Keep the head about as tall as the body and legs together.
- A mask that's too thin. A narrow strip hides the eyes or looks like sunglasses. Make each lobe taller than the eye inside it.
- Spots touching the outline. Half-spots cut by the edge look messy once colored. Keep every spot a clear gap away from the lines.
- Pigtails stuck straight out sideways. They look like wings. Angle them down and out instead.
- Black hair. Pure black hair melts into the outline and the spots. A very dark blue keeps the hair shape visible.
Ladybug Ideas Beyond the Standing Pose
Once she feels easy, I'd change one thing at a time: swing the yo-yo out on a curved string as if she's about to throw it, give her a wink by turning one eye into a curved line, or put a row of Paris rooftops behind her feet. Younger kids can leave out the mask spots and the hair lines and still get a clear Ladybug. If you want a hands-on project with the same red and black spots, try this ladybug rock painting project, and since every hero needs a cat sidekick, the easy kitten drawing tutorial makes a fun companion page.
Free Ladybug Coloring Page and Step PDF
Prefer to color first and draw later? Print the free Miraculous Ladybug coloring page. It shows a small colored Ladybug at the top with a color key beside it, so kids know which crayon goes where. The step-by-step PDF guide holds all 11 steps and tips, two per page, on Letter or A4 paper.
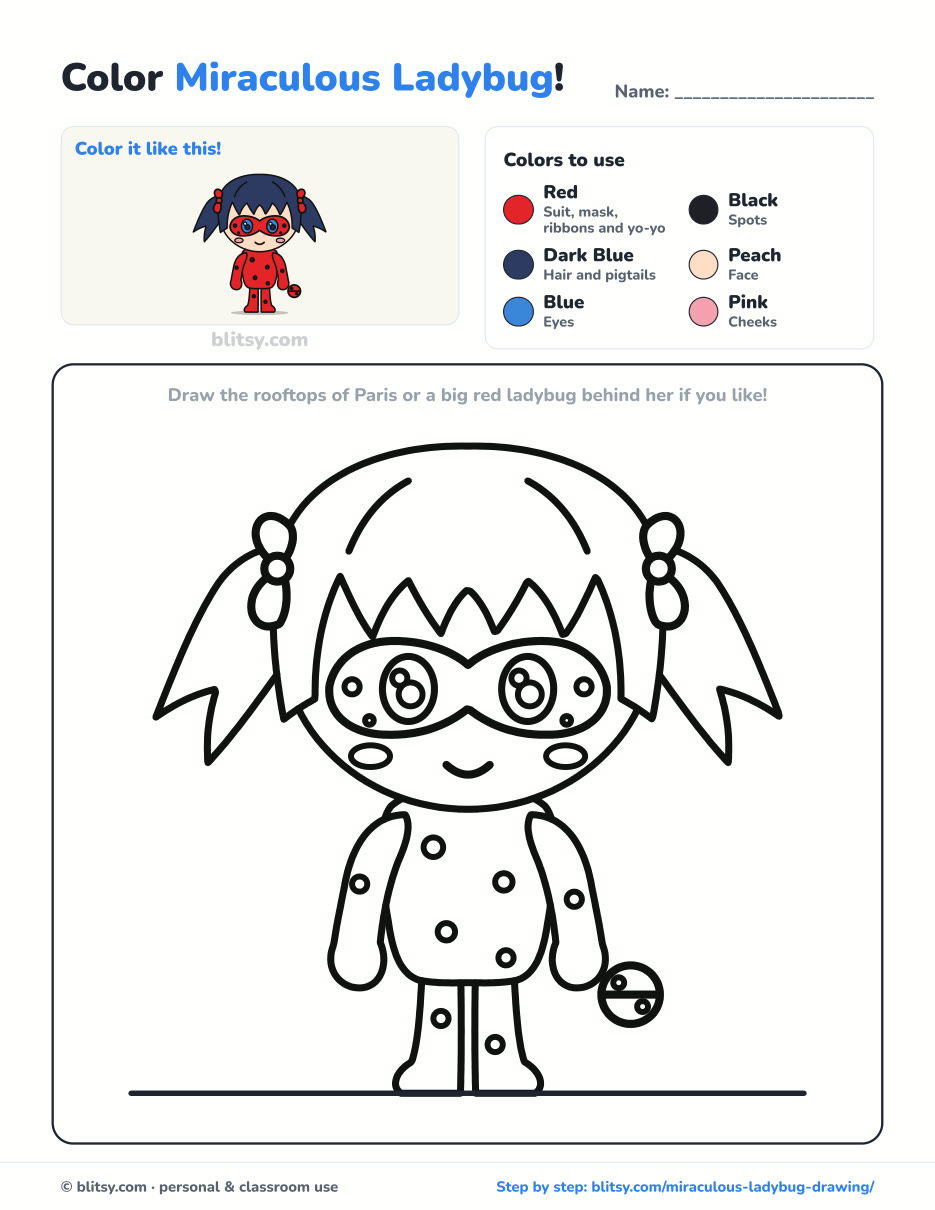
Black outlines with a colored example and the color names at the top. Ready to print and color.
⬇️ Download Coloring PageEvery step picture with its instructions and tips, to keep beside your paper while you draw.
⬇️ Download Drawing Guide📱 On a phone? Tap a download button, then open the file and choose Share → Save to Files or Print. On a computer, the PDF opens or saves straight to your Downloads folder.
One Tall Pin With Every Ladybug Step
Ladybug Fans Will Like These Step-by-Step Lessons
Each one is a complete tutorial with step pictures, so you can draw along at your own pace.
- Puppy Drawing: Draw a pup with its tongue out and collar on, ready for a walk, in this puppy drawing tutorial.
- Ant Drawing: Our how to draw an ant step by step lesson starts from three ovals and ends with a red ant standing on all six feet.
- King Kong Drawing: Fists down and mouth wide, the big gorilla takes eleven steps in the King Kong drawing tutorial.
- Whale Drawing: A cheerful blue whale with its spout takes just ten steps in this easy whale drawing tutorial.
- Sloth Drawing: Learn how to draw a sloth hanging around with a happy face, eleven short steps from start to finish.
- Arctic Fox Drawing: Follow the arctic fox drawing step by step guide for a sitting fox with fluffy cheek tufts.
- Dragonfly Drawing: Since Ladybug already loves bugs, try this dragonfly drawing tutorial with its wings spread and eyes wide open.
- Penguin Drawing: Ten steps give you a penguin with rosy cheeks and a tiny head tuft in the how to draw a penguin tutorial.
- Rat Drawing: Nose first, tail curled up behind: the easy rat drawing tutorial ends on a curious gray rat.
- Godzilla Drawing: Turn two plain ovals into a friendly kaiju with this Godzilla drawing step by step lesson.
- Narwhal Drawing: Our narwhal drawing tutorial takes the tusked whale from blank paper to swimming in eleven steps.
- Kitten Drawing: Pair her with a cat friend using the how to draw a kitten step by step guide, which ends on a ginger kitten sitting politely.
- Realistic Drawing: To practice real light and shadow, the realistic drawing tutorial shades one shiny apple under a single lamp.
- Paw Print Drawing: Draw a dog print, a cat print and a small heart in this quick paw print drawing tutorial.
Ladybug Drawing Questions From Young Fans
What is the easiest way to draw Miraculous Ladybug?
Draw her as a chibi from the front. A big circle for the head and a small oval for the body give you the whole layout, and the mask plus the red spotted suit make her recognisable even without fine detail.
How do you draw Ladybug for kids?
Use the same steps with a thick marker, skip the hair lines and the small mask spots, and keep the suit spots big. Leave plenty of time for coloring, since that's the part most kids enjoy.
What colors do I need to color Ladybug?
Red and black do most of the work. Add a very dark blue for the hair, peach for the face, blue for the eyes and a touch of pink for the cheeks.
How long does it take to draw Miraculous Ladybug?
Plan on 25 to 35 minutes, coloring included. The masked face takes the most care the first time.
Sketch that big head circle, tie on the red ribbons, and see how your own Ladybug turns out. 🐞✏️
Related posts:
 How to Draw Nezuko Step by Step (Cute Chibi for Beginners)
 How to Draw Springtrap Step by Step (Cute Chibi for Kids)
 How to Draw Freddy Krueger Step by Step (Cute Chibi Version)
 How to Draw Ariana Grande Step by Step (Cute Chibi Fan Art)
 How to Draw the Hulk Step by Step (Easy Chibi for Kids)
 How to Draw Kurama Step by Step (Easy Chibi Nine-Tails)
 How to Draw Cat Noir Step by Step (Easy Chibi Hero)
 How to Draw Master Chief Step by Step (Easy Chibi Armor)
 How to Draw Tinkerbell Step by Step (Easy Flying Chibi)
 How to Draw Tanjiro Step by Step (Easy Demon Slayer Chibi)
 How to Draw a Chibi Step by Step (Easy 2-Head Method)
 How to Draw Darth Vader Step by Step (Easy Chibi Version)

