
Elephants look hard because they are so big, but on paper they are one of the friendliest animals to start with. Almost everything is a soft, rounded shape. Here I'll show you how to draw an elephant step by step, starting from one oval and one circle and ending with a happy elephant lifting its trunk to spray a few water drops.
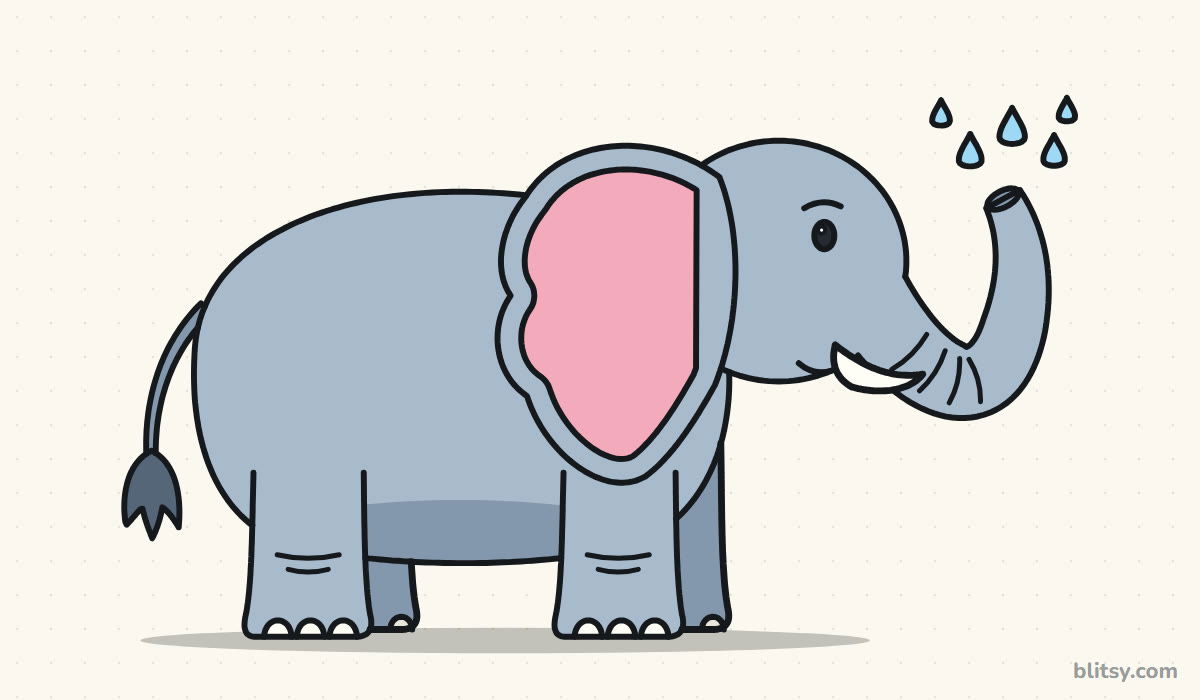
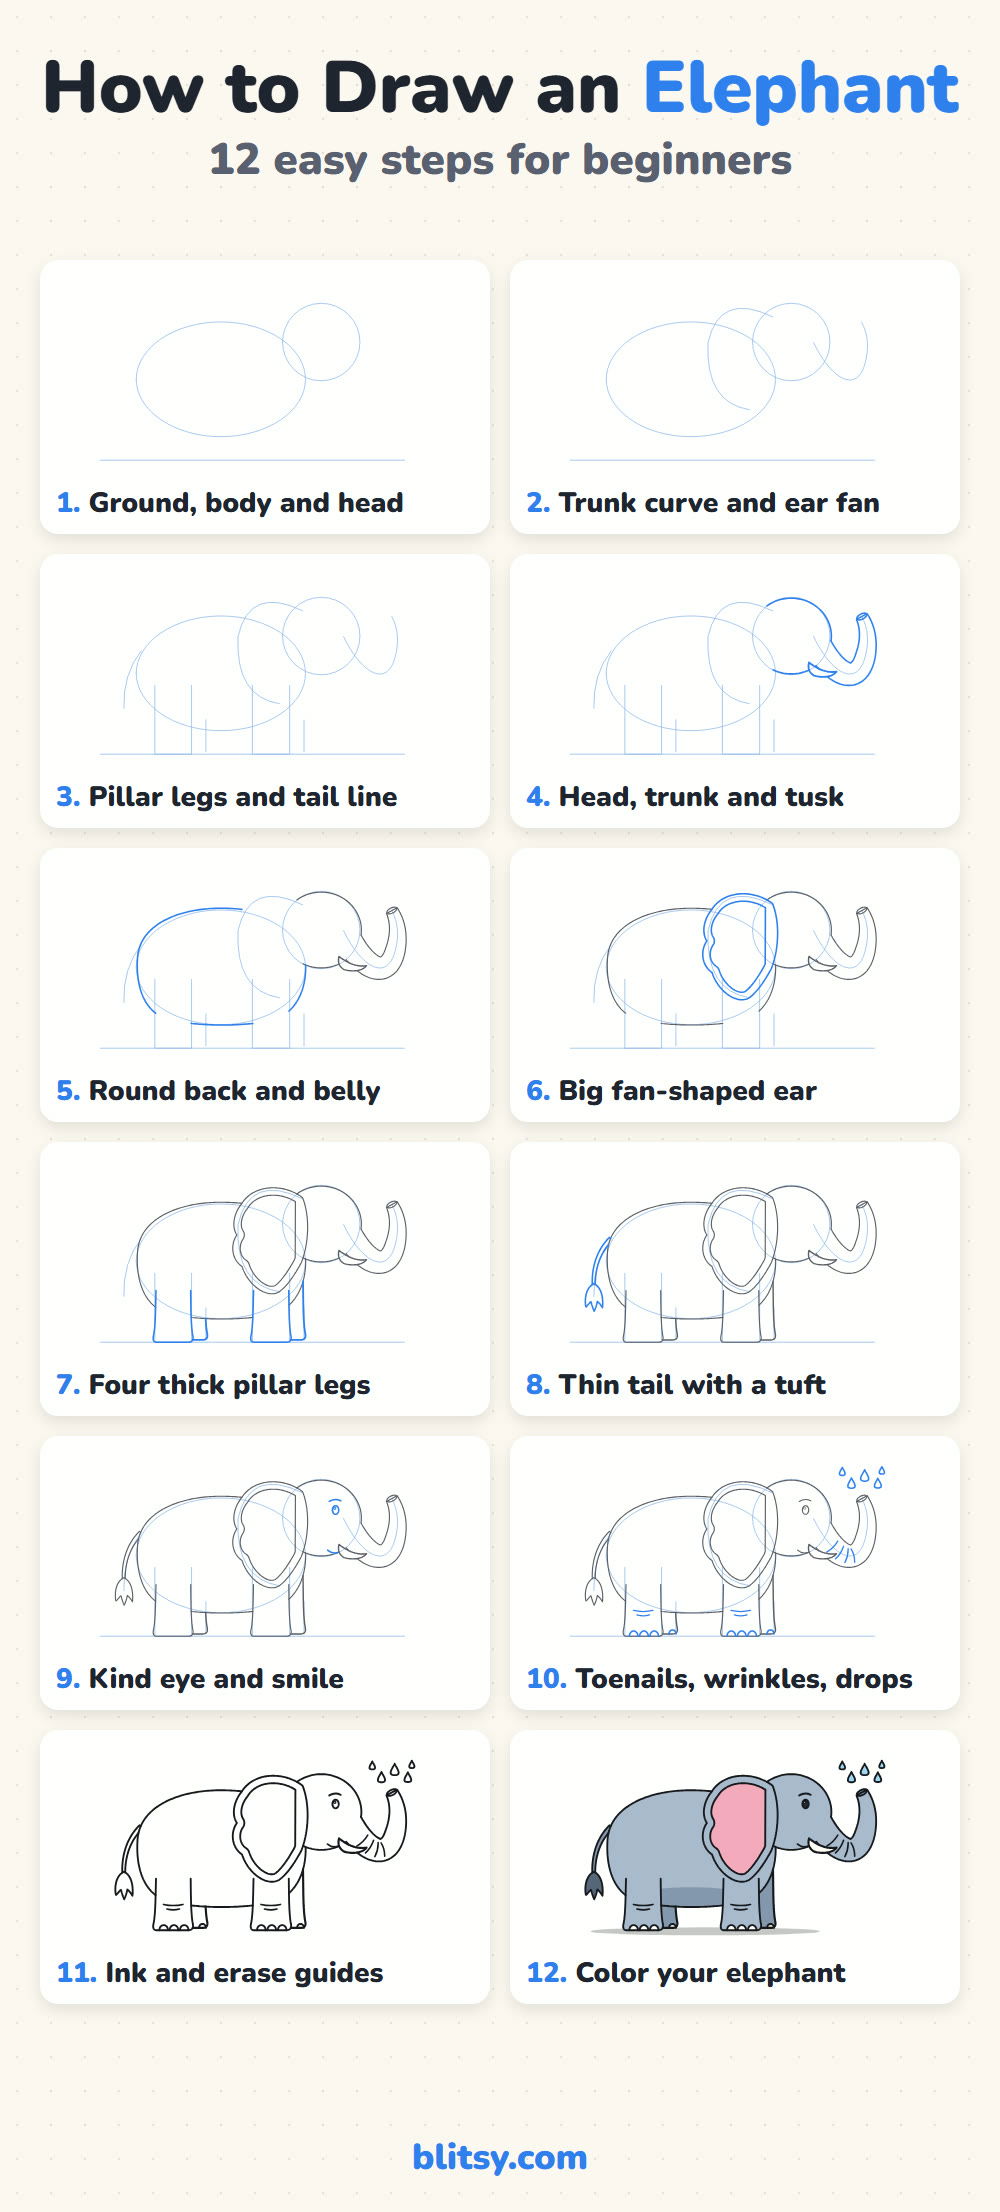
In every picture, the blue lines are the ones to add right now. Gray lines are from earlier steps, and the pale blue shapes are guides you'll erase once the ink is on.
Quick overview
⏱️ Time: about 30 to 40 minutes, coloring included
🎯 Level: easy, a good first animal for kids around 6 and up
✏️ Steps: 12
🐘 You'll draw: a standing elephant in side view, spraying water from its trunk
Gray Pencils and a Wide Sheet for Your Elephant
- A regular pencil for the light guide shapes
- An eraser that doesn't smear
- A black marker or fineliner for the final outline
- Colored pencils or crayons in two grays, plus pink and light blue
- A sheet of paper turned sideways
Two grays really help here: one light for the body and one a little darker for the shading and the far legs.
How to Draw an Elephant Step by Step
Step 1: Draw a ground line, a body oval and a head circle
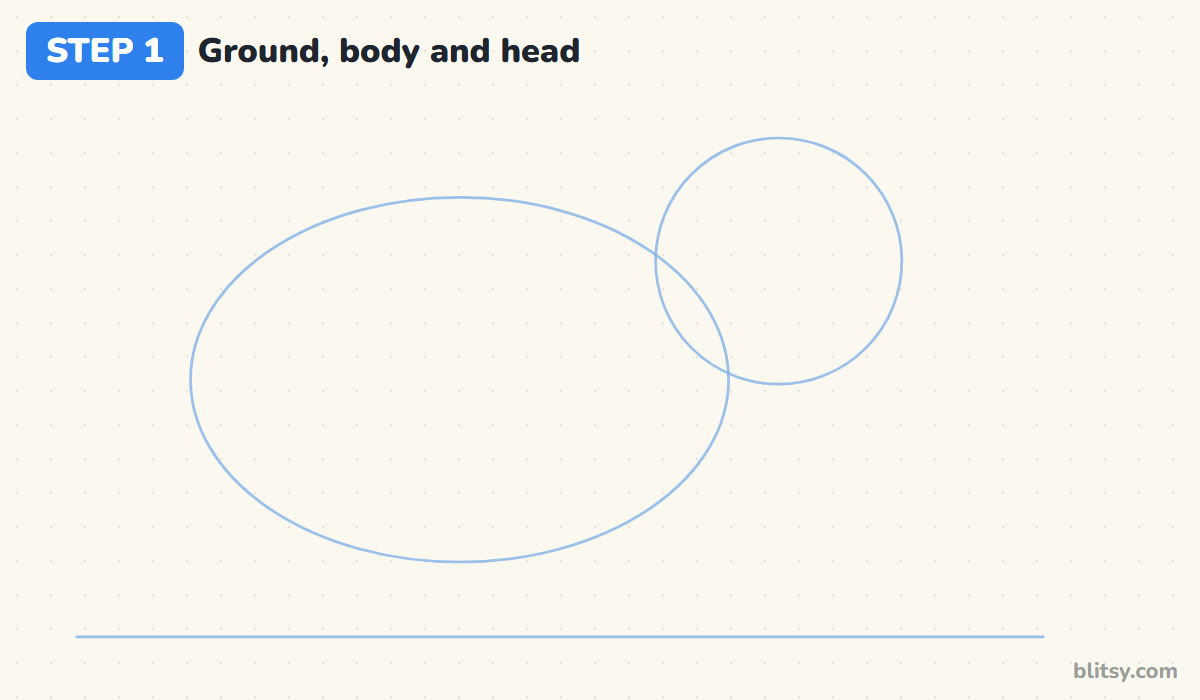
Start with a long ground line near the bottom of your paper. Above it, draw a big wide oval for the body, a bit left of center, and leave a gap under it for the legs. Then add a circle on the upper right that overlaps the front of the oval. Make it about half as wide as the oval, so the body still wins.
💡 Tip: Draw the oval with a few quick, loose passes instead of one careful line.
Step 2: Sketch a trunk curve and an ear guide
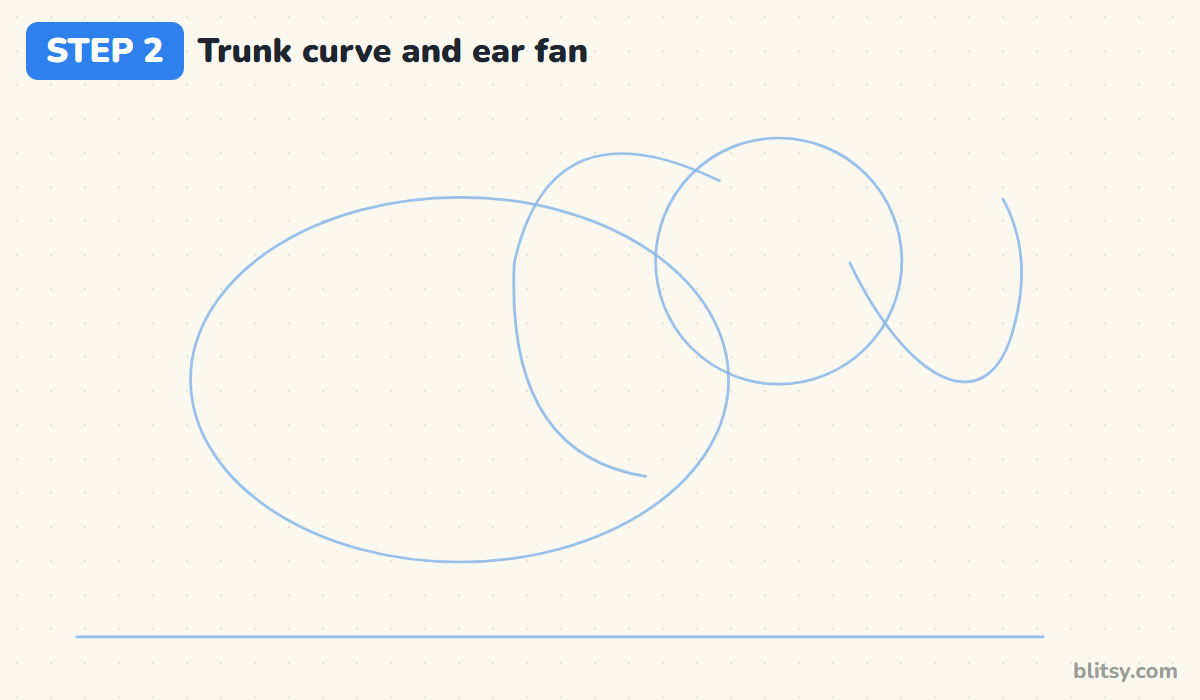
From the lower front of the head circle, pull a line down and forward, then let it swing back up like a hook. That curve sets the whole pose, so I place it first. Next, draw a big rounded arc that starts at the top of the head, swings back over the body and comes down to about the middle of the oval. This is where the ear will sit.
💡 Tip: If the trunk curve looks like the letter J lying on its side, you've got it.
Step 3: Add pillar guides for the legs and a tail line
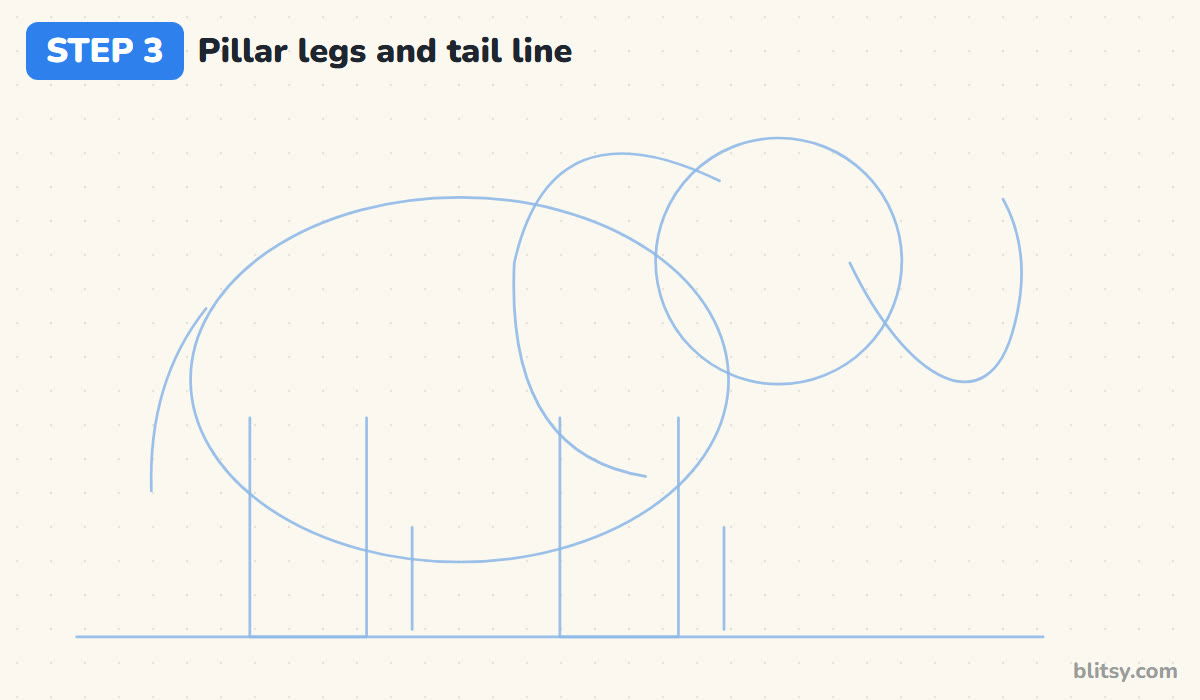
Elephant legs are thick and straight, so plain vertical lines work well as guides. Drop two parallel lines from the back of the oval down to the ground for the near back leg, and two more under the front of the body for the near front leg. Add one short line just to the right of each for the far legs. A thin curve off the rump marks the tail.



💡 Tip: Space the two near legs widely apart. Legs too close together make the body look like it's balancing.
Step 4: Outline the head, the trunk and the tusk
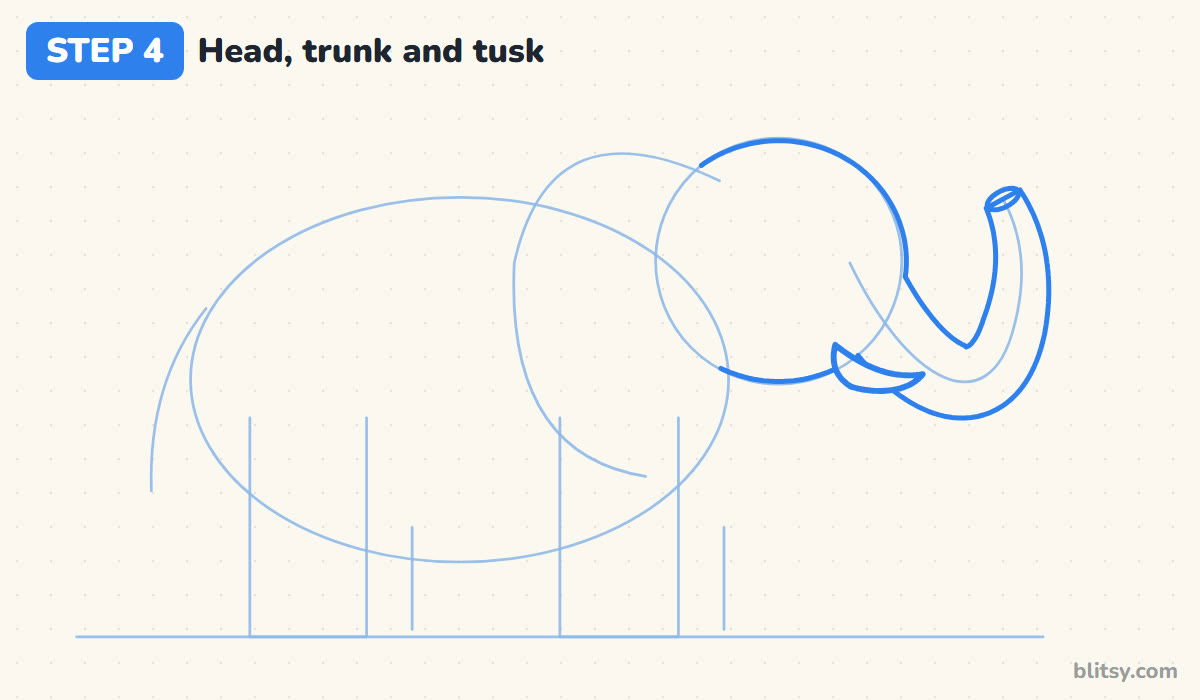
Go over the head circle with a firm line, but stop at the top where the ear will cover it. Now build the trunk around its curve: wide where it leaves the face, getting slimmer toward the tip. Finish the tip with a small oval opening. Tuck a short pointed tusk under the trunk, curving gently up, and let it overlap the trunk a little.
💡 Tip: Keep the trunk tip about half as wide as the base, or it turns into a hose.
Step 5: Shape the round back and belly
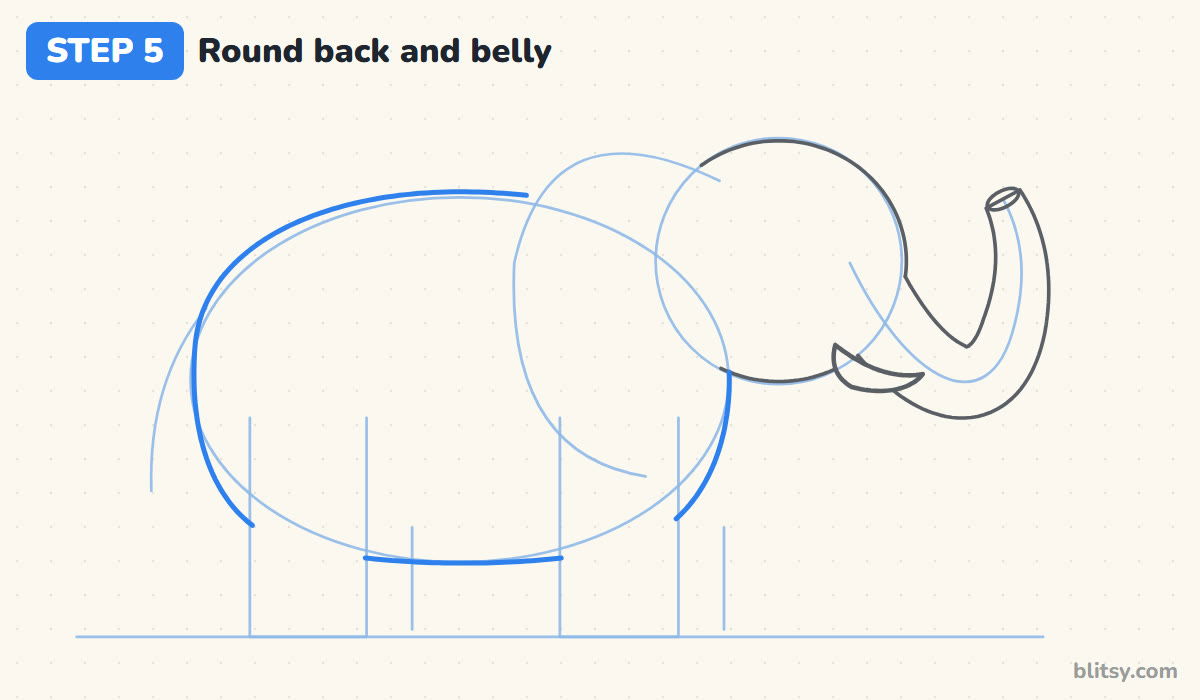
Trace around the body oval to make the real outline, lifting the back a little higher near the shoulders. The rump stays round. Along the bottom, draw just a shallow belly curve between where the legs will go. Skip the part behind the ear, since the ear will hide it.
💡 Tip: A slightly humped back near the head reads as elephant straight away.
Step 6: Draw the big fan-shaped ear
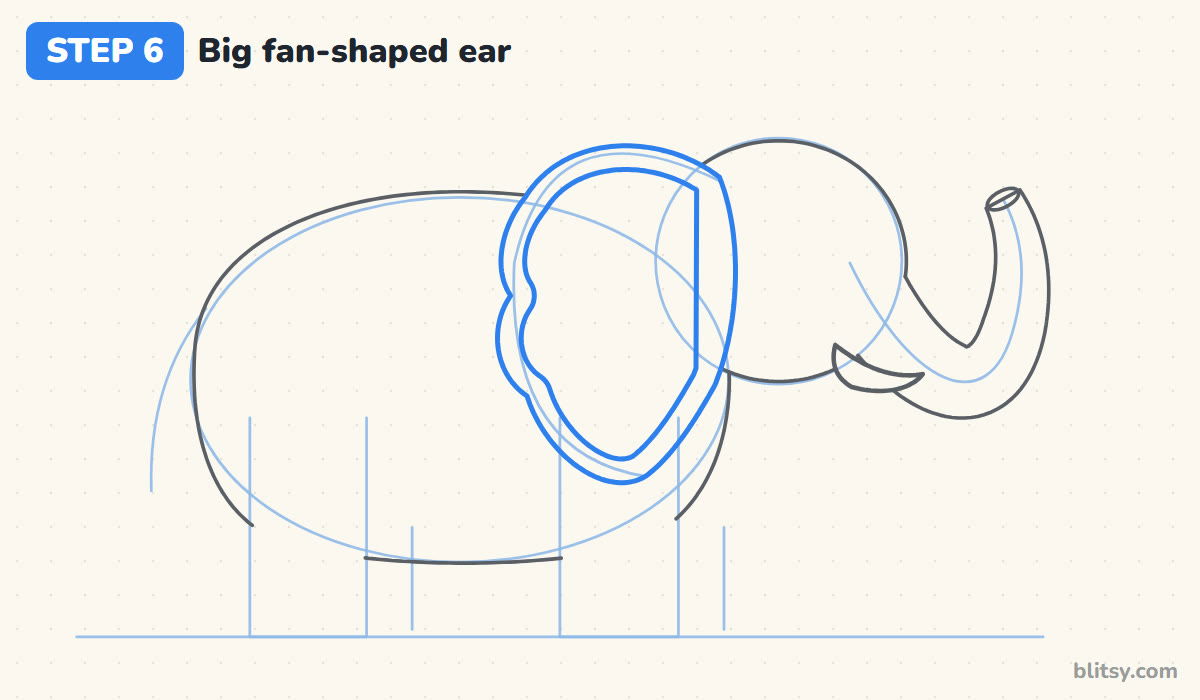
Start at the top of the head, sweep back over the body, and give the back edge two gentle waves before it rounds into a droopy lobe at the bottom. Bring the front edge up along the side of the head. Inside, draw a second line that follows the outside about a finger's width in, for the pink part.
💡 Tip: Go bigger than feels right. A small ear makes the elephant look like a mouse or a hippo.
Step 7: Build four thick pillar legs
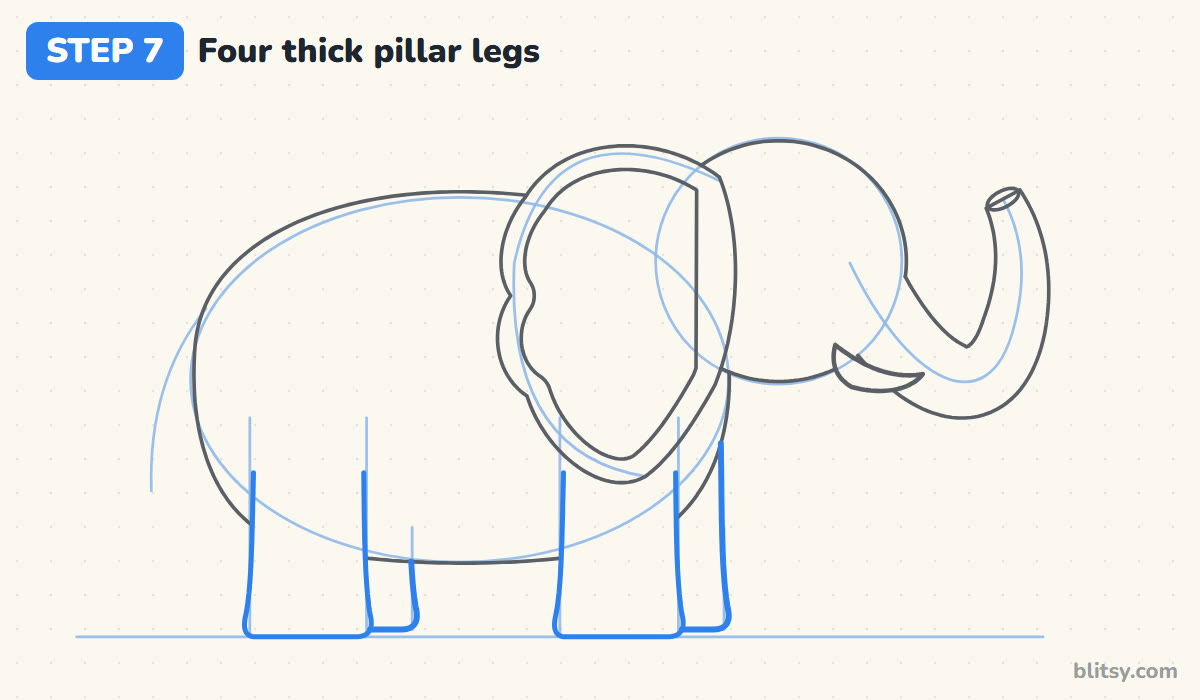
Use your guides to draw the two near legs as wide tubes, with the sides flaring out a touch at the feet and flat bottoms resting on the ground. Behind each near leg, draw only the slice of the far leg you can see, a bit shorter and slightly narrower.
💡 Tip: Round off the bottom corners of each foot so the legs look heavy, not like table legs.
Step 8: Add a thin tail with a tuft
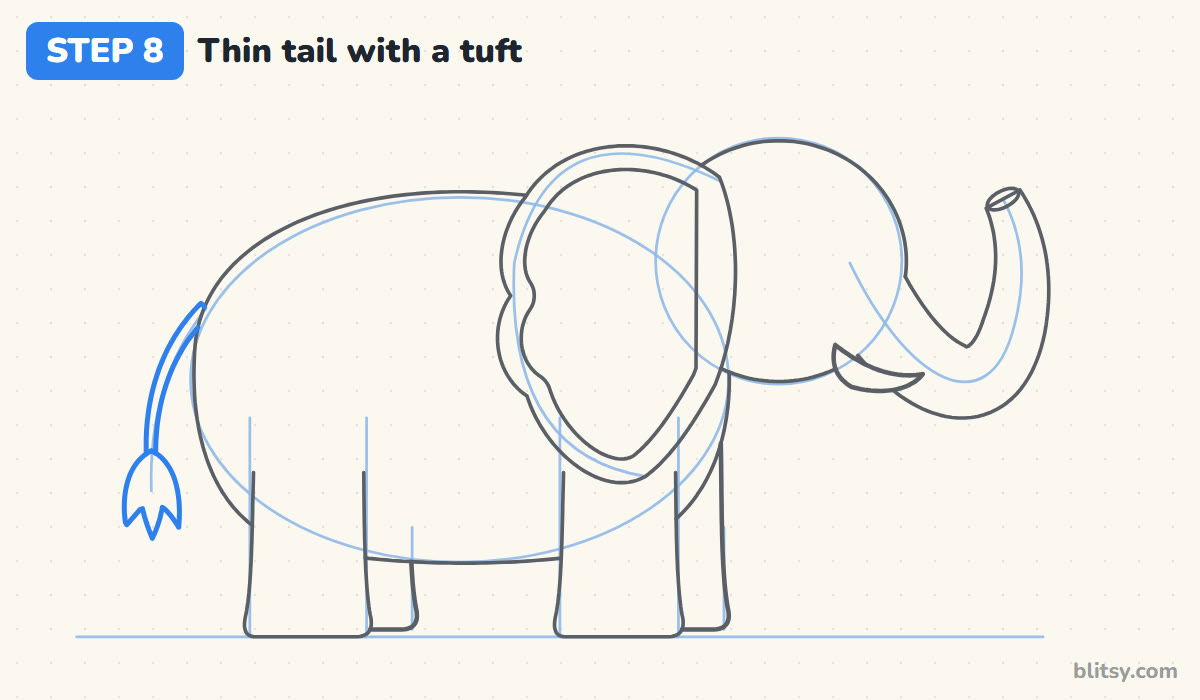
Elephant tails are surprisingly skinny, almost like a rope. Draw two close lines that follow your tail guide down from the rump. At the bottom, add a small tuft with three pointed tips, a bit like a paintbrush. Most beginners make it far too thick.
💡 Tip: Keep the two tail lines close together, then let the tuft be a little chunkier.
Step 9: Give it a kind eye and a smile
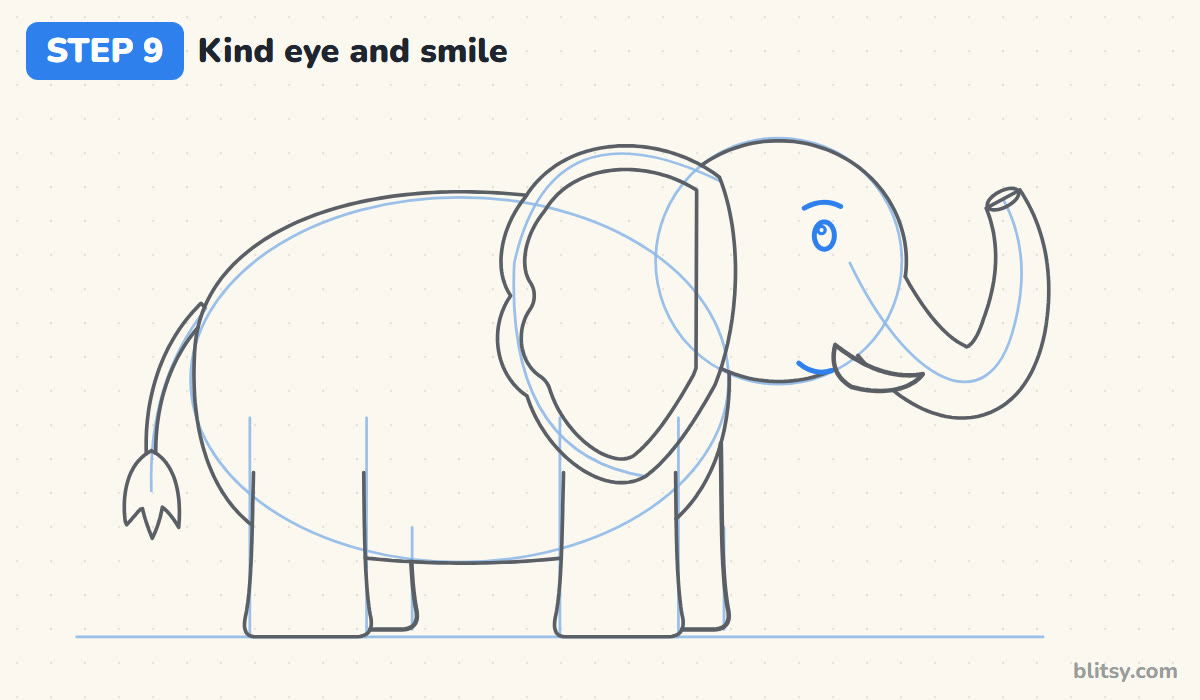
Place a small oval eye in the upper middle of the head, closer to the trunk than to the ear. Leave a white dot inside it for a shine and draw a soft brow curve above. Under the tusk, add a short smiling line. A small eye is what makes an elephant look gentle.
💡 Tip: Put the shine dot on the side facing the trunk so the elephant looks forward.
Step 10: Add toenails, wrinkles and water drops
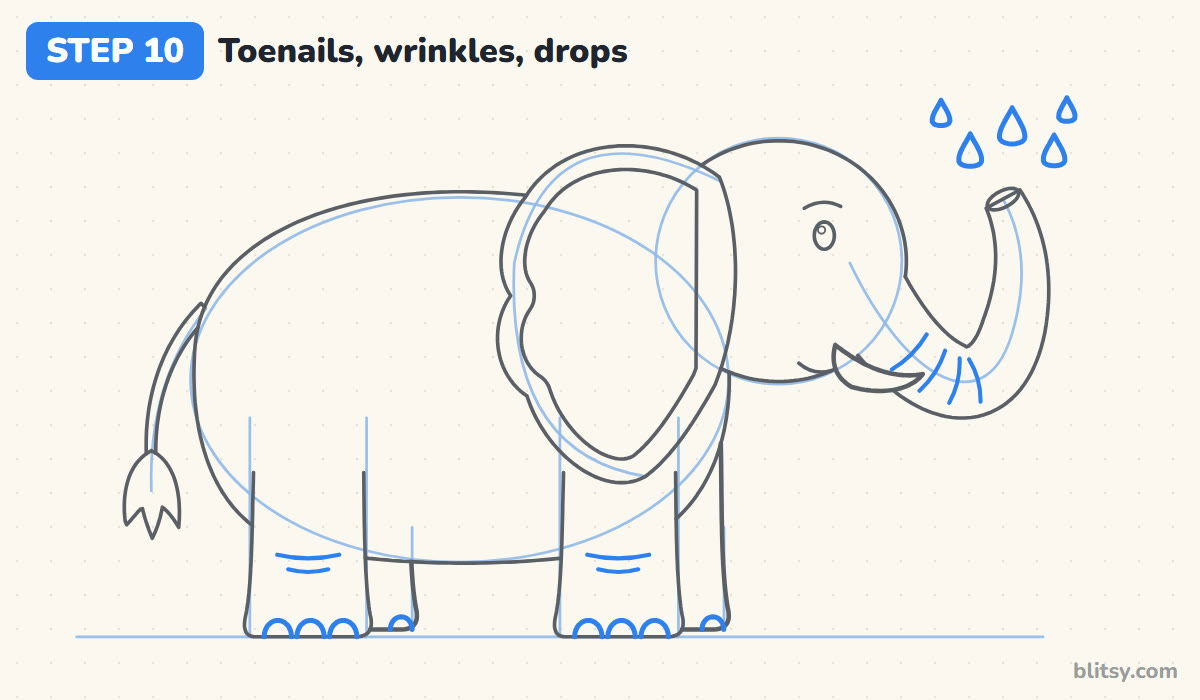
Elephants have big rounded toenails, so draw three little arches along the bottom of each near foot and one on each far foot. A few curved lines across the lower trunk and two short lines on each leg add wrinkles. Then, above the trunk tip, draw five small teardrops of different sizes, as if the elephant just sprayed water into the air.
💡 Tip: Stop at three or four wrinkle lines per spot. More starts to look like stripes.
Step 11: Ink the outline and erase the guides
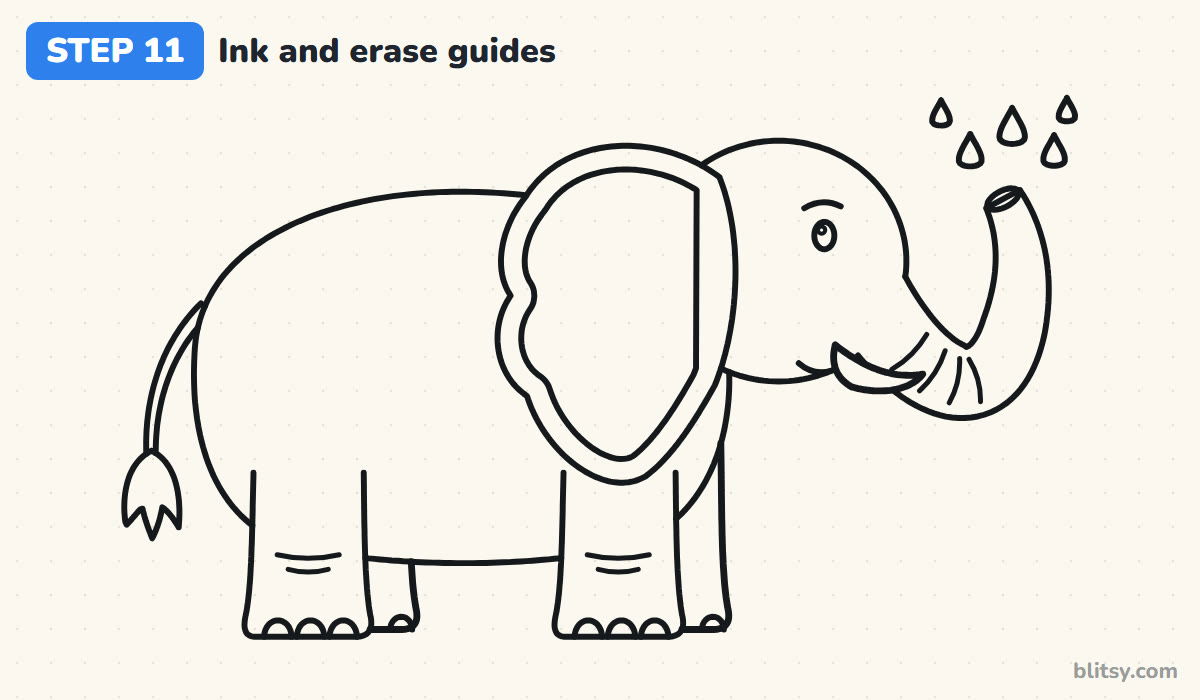
Trace every keeper line with a black marker. I start with the head and trunk, then the ear, then the body and legs, moving away from my drawing hand. Skip the oval, the circle and all the straight leg guides. Let the ink dry, then erase.
💡 Tip: Ink each trunk side in one long, steady stroke so the curve stays smooth.
Step 12: Color your elephant
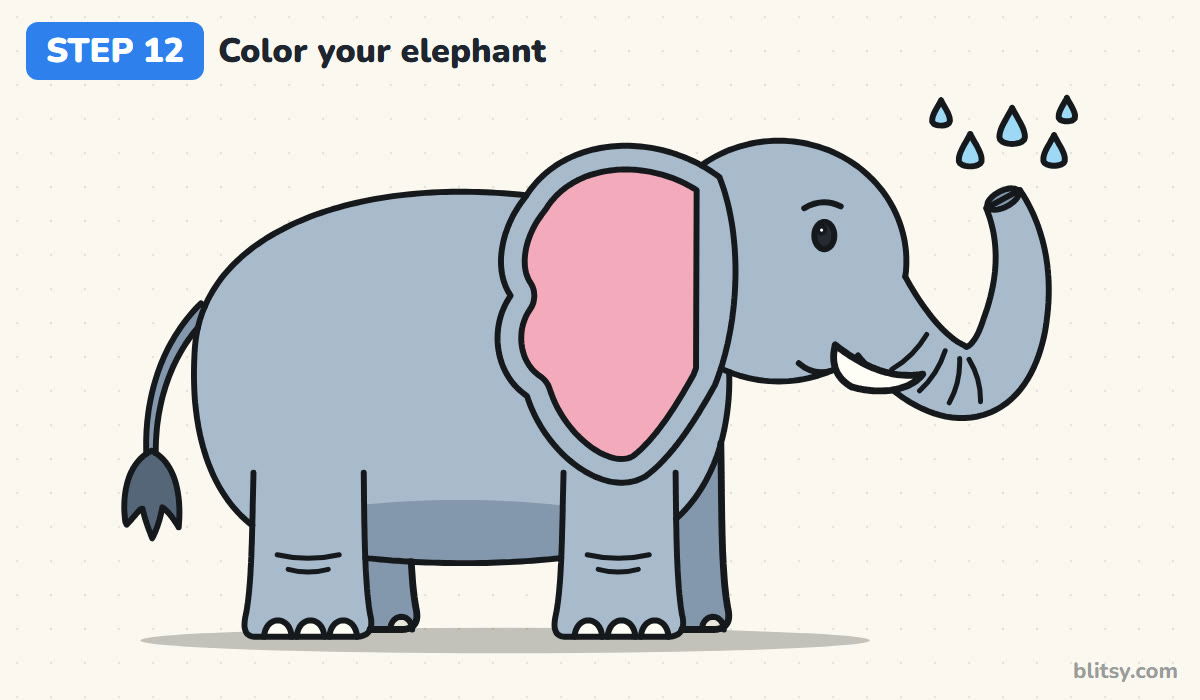
Light gray goes on the head, trunk, ear, body and near legs. With the darker gray, shade the bottom of the belly and fill the two far legs and the tail, which pushes them back and makes the body look round. Color the inner ear pink, keep the tusk and toenails white, and use dark gray for the tuft. Light blue on the drops finishes the splash.
💡 Tip: Press softly with the light gray and go over it twice. Big gray areas get streaky if you press hard.
Trunks, Ears and Legs That Shrink an Elephant
- A trunk that's the same width all the way down. Start it wide at the face and let it narrow toward the tip, like a carrot.
- A small, round ear. Elephant ears are huge. Let the ear cover a good part of the body and give its back edge a couple of waves.
- Skinny legs. These legs hold up a very heavy animal. Each one should be almost as wide as the gap between them.
- Legs that end in points or paws. Elephant feet are flat round pads. Square off the bottoms and add toenails instead of toes.
- A head floating away from the body. The head circle has to overlap the body oval, or the elephant ends up with a long neck it doesn't have.
Baby Elephants, Circus Hats and Other Trunk Ideas
Once the shapes feel easy, try a baby elephant: make the head circle bigger compared with the body and shorten the trunk. You can also point the trunk down to drink, or add a tiny party hat. For an African elephant, stretch the ear down past the chest. If you'd like to fill a whole safari page, the cute animal drawing tutorial turns one body into a cat, a bear and a bunny, and the lion drawing tutorial makes a good next challenge.
Elephant Coloring Page and a Printable 12-Step Guide
The free elephant coloring page shows a colored elephant at the top to copy, a color key for every part, and a big outline with room for a pond or some grass. The step-by-step PDF guide holds all 12 steps with pictures and tips. Both print on Letter or A4 paper.
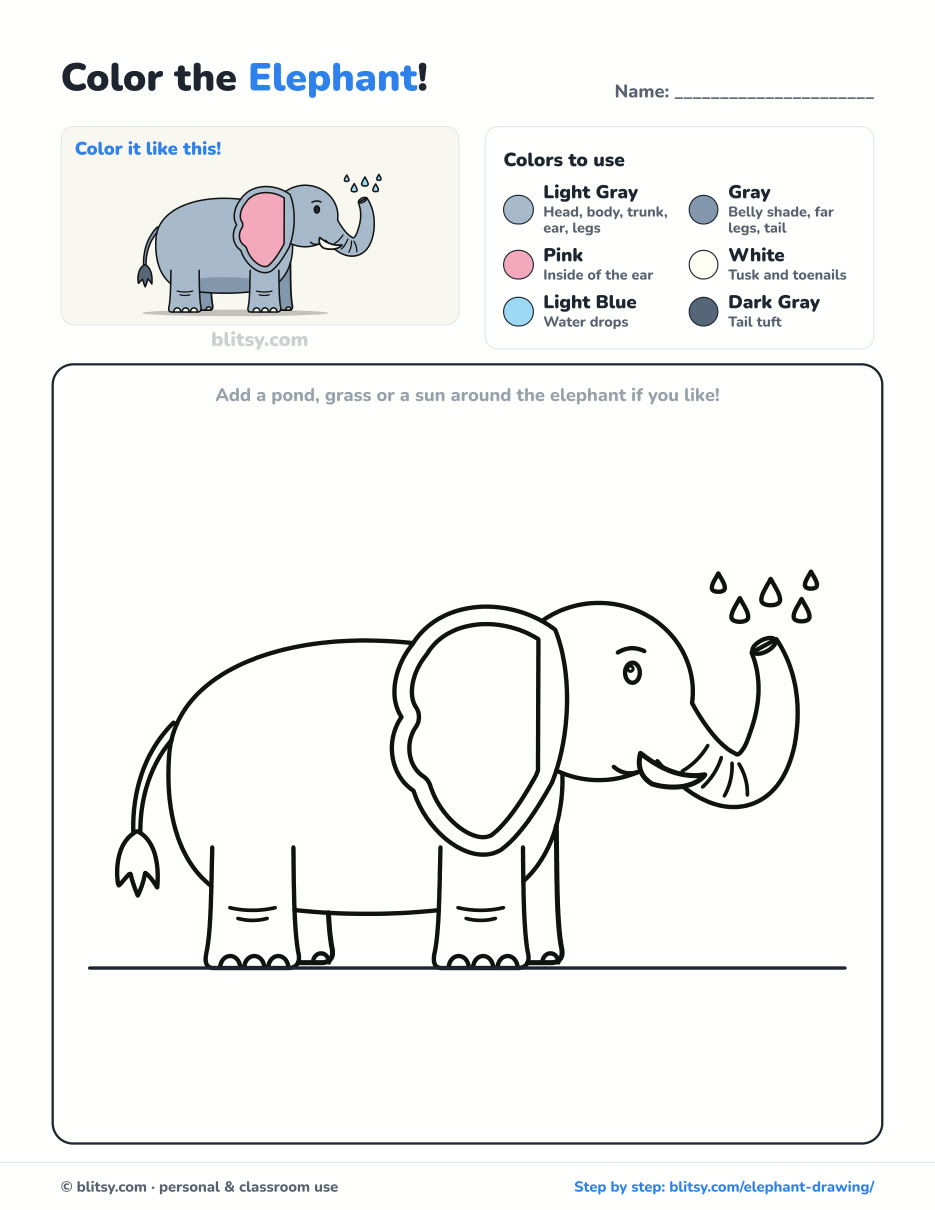
Black outlines with a colored example and the color names at the top. Ready to print and color.
⬇️ Download Coloring PageEvery step picture with its instructions and tips, to keep beside your paper while you draw.
⬇️ Download Drawing Guide📱 On a phone? Tap a download button, then open the file and choose Share → Save to Files or Print. On a computer, the PDF opens or saves straight to your Downloads folder.
Stash the Elephant Lesson on Your Pinterest Board
Elephant Friends from the Rest of the Animal World
Every link is a full step-by-step tutorial for one animal, so you can build a whole page of friends for your elephant.
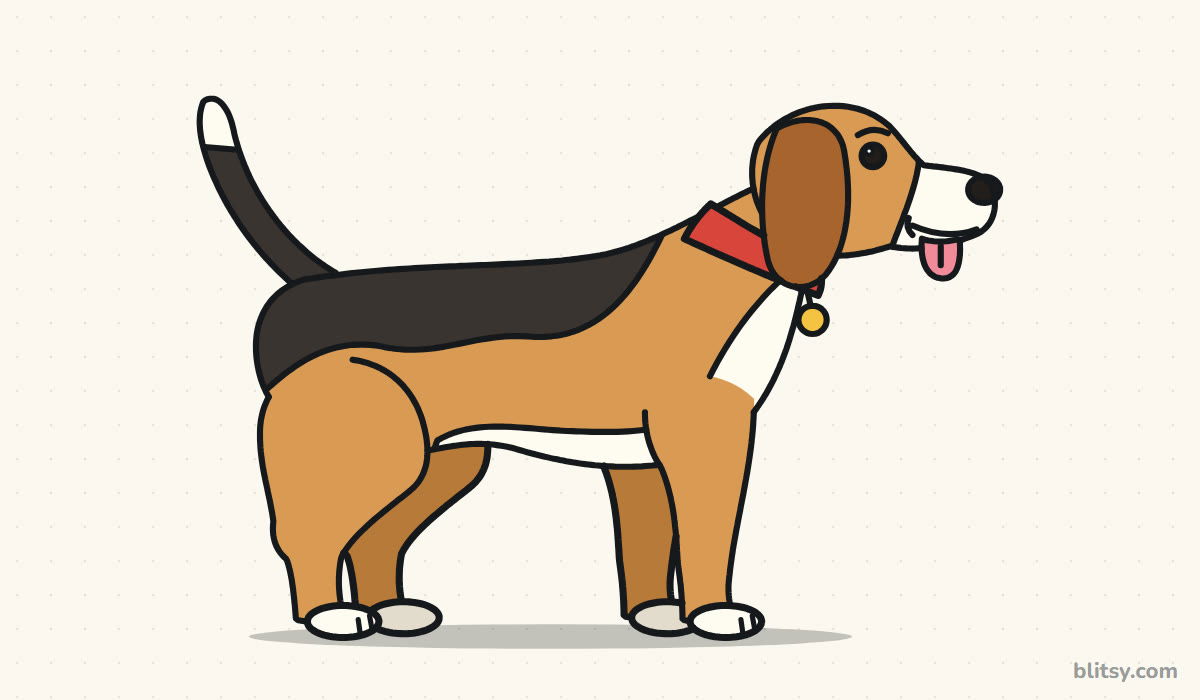
- Dog Drawing: The dog drawing step by step lesson builds a beagle-style pup from three circles.
- French Bulldog Drawing: Square head, flat nose and a bow tie: that is the French bulldog drawing tutorial.
- Dove Drawing: Learn how to draw a dove in flight, with an olive branch in its beak.
- Spider Drawing: A friendly spider hangs on one silk line in front of its web in this spider drawing tutorial.
- Ladybug Drawing: The easy ladybug drawing tutorial draws one ladybug on a leaf and a small one flying.
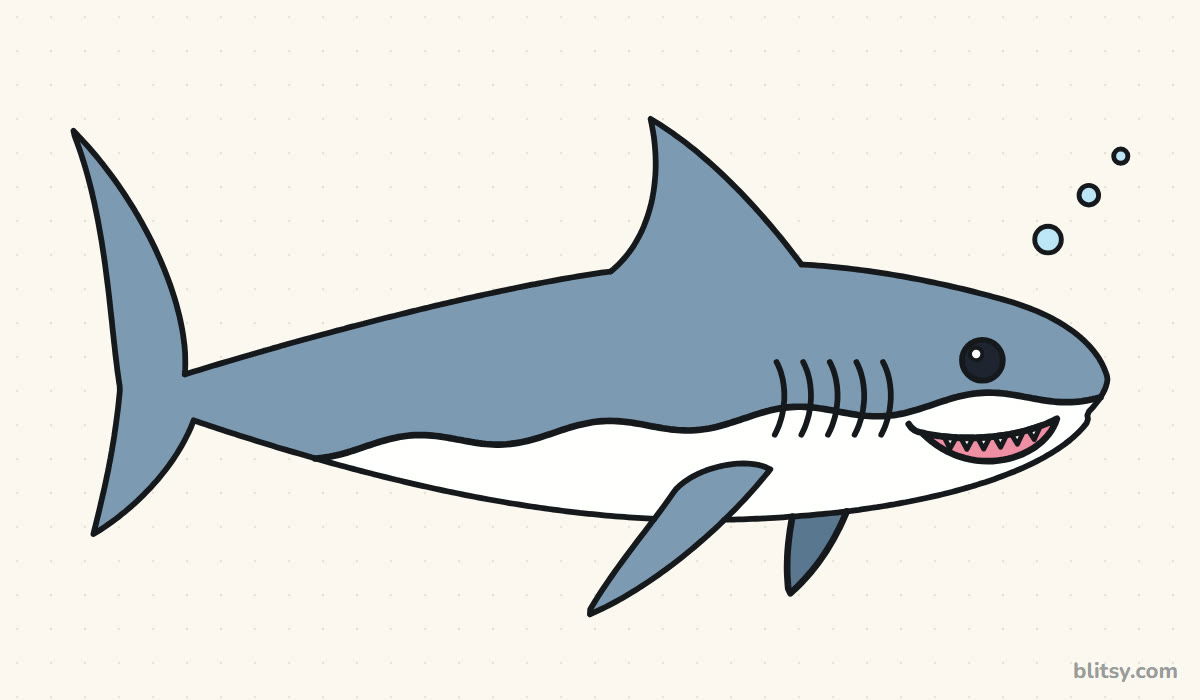
- Shark Drawing: Draw a smiling great white in twelve steps with the shark drawing tutorial.
- Cardinal Drawing: Red feathers, a black mask and an orange beak come together in the cardinal drawing tutorial.
- Bear Drawing: The how to draw a bear guide shows a walking brown bear with its head low and hump high.
- Chicken Drawing: A hen and her chick stand on the grass in this chicken drawing step by step lesson.
- Fish Drawing: The goldfish drawing tutorial starts from one oval and ends with a fan tail and scales.
- Lion Drawing: Give your elephant a safari neighbor with the lion drawing tutorial, mane and all.
Elephant Questions From Young Zoo Fans
What is the easiest way to draw an elephant?
Start with a big oval for the body and a circle for the head that overlaps it. Add a curved line for the trunk and straight lines for the legs, then draw around those shapes.
How do you draw an elephant trunk?
Draw one curved center line first, then two lines on either side of it that get closer together toward the tip. Finish with a small oval at the end and a few wrinkle lines across the bend.
How long does it take to draw an elephant?
Around 30 to 40 minutes with coloring. The ear and trunk take the most care.
Can young kids draw this elephant?
Yes. Children from about 6 can follow it, especially with a grown-up drawing the guides. Little ones can skip the wrinkles and the water drops.
Grab your grays and give your elephant a splash of its own. I'd love to know how high your trunk goes! 🐘💧
Related posts:
 How to Draw a Car Step by Step (Easy Drawing for Beginners)
 How to Draw Godzilla Step by Step (Easy Kaiju for Beginners)
 How to Draw a Whale Step by Step (Easy for Beginners)
 How to Draw a Rat Step by Step (Easy for Beginners)
 How to Draw an Arctic Fox Step by Step (Easy for Beginners)
 How to Draw a Shark Step by Step (Easy for Beginners)
 How to Draw a Dog Step by Step (Easy Side View for Beginners)
 How to Draw a Butterfly Step by Step (Easy for Beginners)
 How to Draw a Leopard Step by Step (Easy for Beginners)
 How to Draw a Light Bulb Step by Step (Easy for Beginners)
 How to Draw a Crow Step by Step (Easy for Beginners)
 How to Draw an Eagle Step by Step (Easy for Beginners)

