
Masks come in every shape you can think of, but the one kids ask me for most is the fancy masquerade kind with feathers on top. This lesson shows you how to draw a mask step by step, and the secret is a single straight line down the middle. Everything on one side gets copied onto the other, so you only invent half a mask.
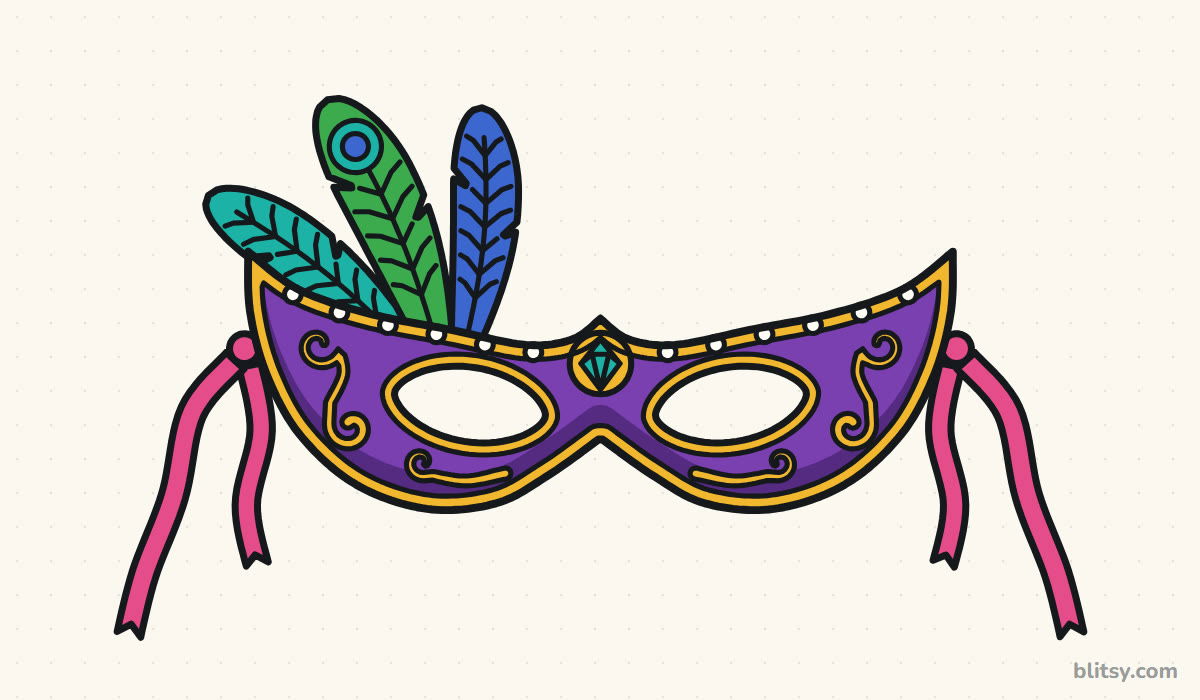
Blue marks the lines that are new in a step, and gray marks what you drew before. Keep your pencil light on the pale blue helpers (the center line, the oval and the two circles), because I erase them in step 10.
Quick overview
⏱️ Time: roughly 30 to 40 minutes, coloring included
🎯 Level: easy to medium, fine for kids from about 7
✏️ Steps: 12
🎭 You'll draw: a masquerade mask with almond eyes, gold swirls, a gem, a fan of feathers and ribbon ties
Supplies for a Party Mask Sketch
- An HB pencil with a sharp point
- A soft eraser
- A ruler for the center line
- A black fineliner or felt-tip pen
- Colored pencils or markers in purple, dark purple, gold, teal, green, blue and pink
- A sheet of plain paper turned sideways
No gold? A bright yellow with a little orange pressed lightly on top looks surprisingly close.
How to Draw a Mask Step by Step
Step 1: Draw a center line and three guides
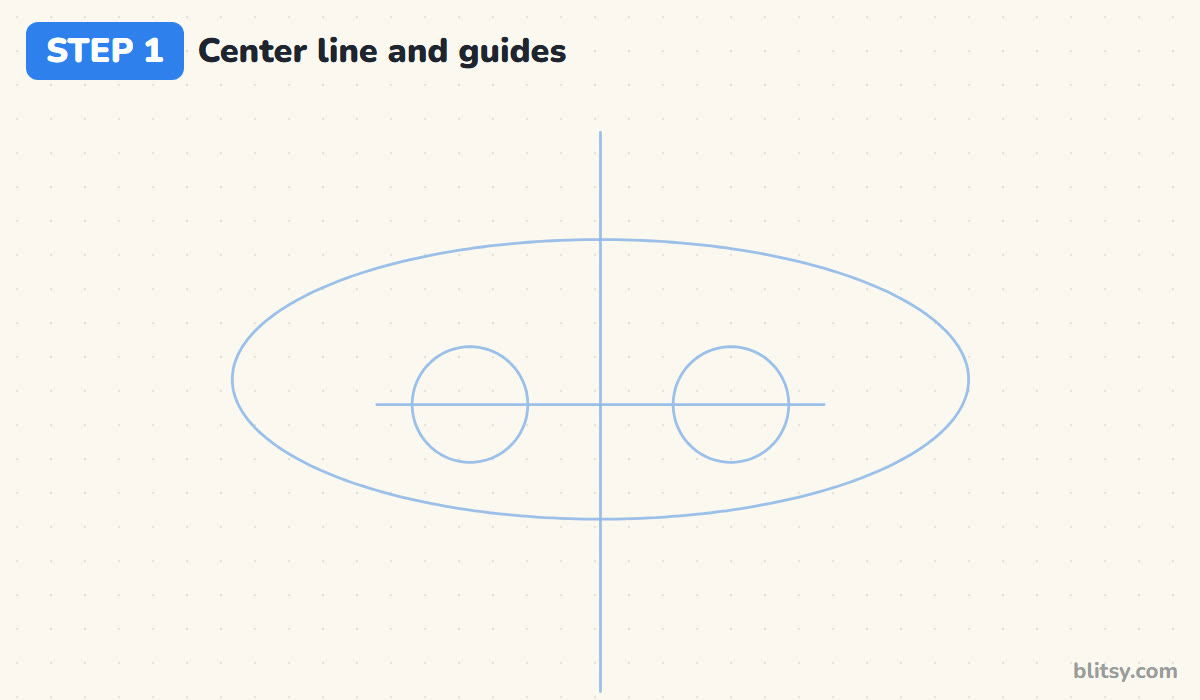
Turn the paper sideways and rule a light vertical line down the middle. Around it, sketch a wide, flat oval, then cross it with a short horizontal line a little below its middle. Place a small circle on that line on each side, the same distance from the center. The circles mark the eyes, and the center line is your mirror.
💡 Tip: Measure the gap from the center line to each circle with your pencil held flat against the paper.
Step 2: Draw the wing-shaped outline
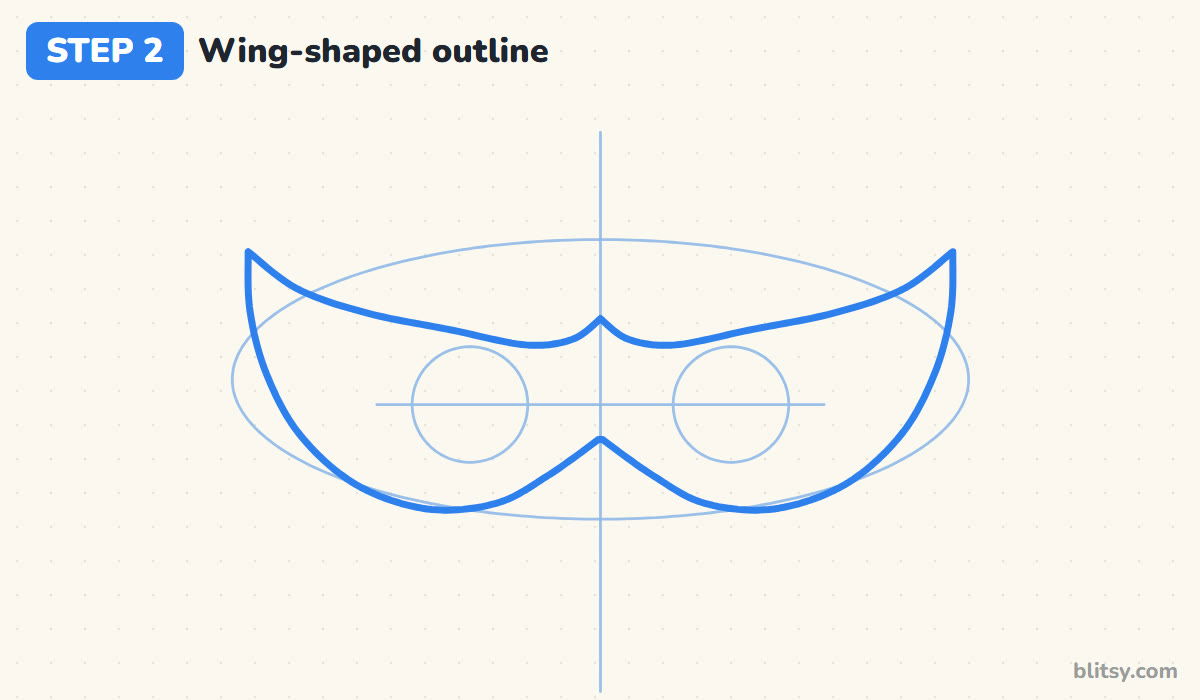
Start at the top of the center line with a tiny point. The top edge dips slightly, then sweeps up into a sharp wing tip on the right. Bring the lower edge down around the eye circle and back up into an upside-down V over the nose. Now copy that half on the left. I always finish one side before I start the other, because tracing both at once is how lopsided masks happen.
💡 Tip: Flip the drawing over and hold it up to a window; any uneven side jumps out right away.
Step 3: Add two almond eye holes
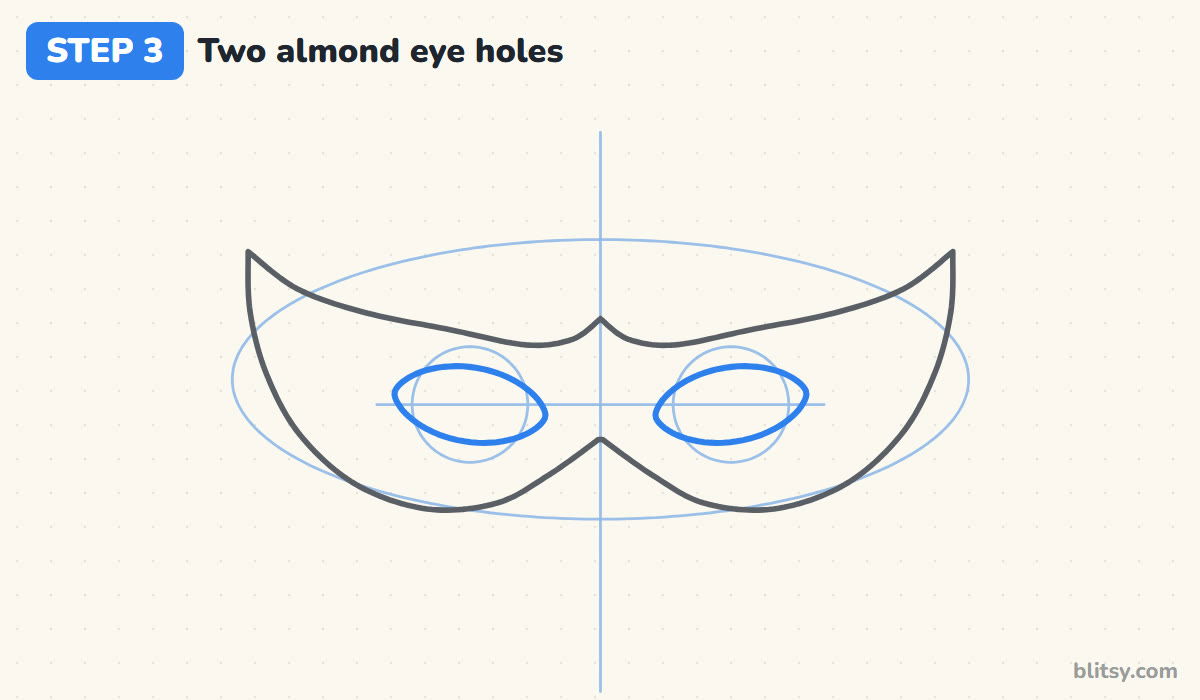
Inside each guide circle, draw an almond shape with pointed ends. Tilt the outer corner a little upward, toward the wing tip. That small slant gives the mask its sly, festive look; a flat eye hole makes it look sleepy. Keep both almonds the same size.




💡 Tip: Draw the top curve of each eye first, then the bottom curve to close it.
Step 4: Draw the trim and a row of pearls
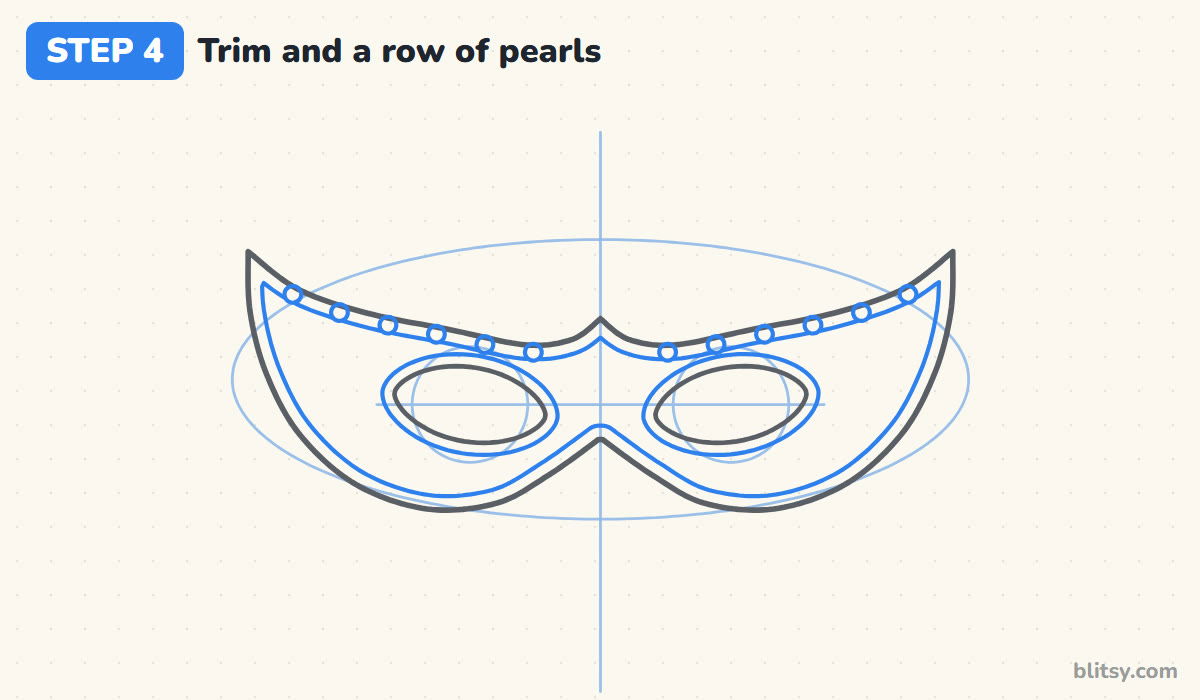
Trace a second line just inside the outline, all the way around, to make a narrow border, and do the same around each eye hole. These bands turn gold later, and they're what makes a plain shape read as a party mask. Along the top border, place six small circles on each side like a string of pearls.
💡 Tip: Keep the border thin and even. A wide one eats the room you need for the swirls.
Step 5: Put a gem in the middle
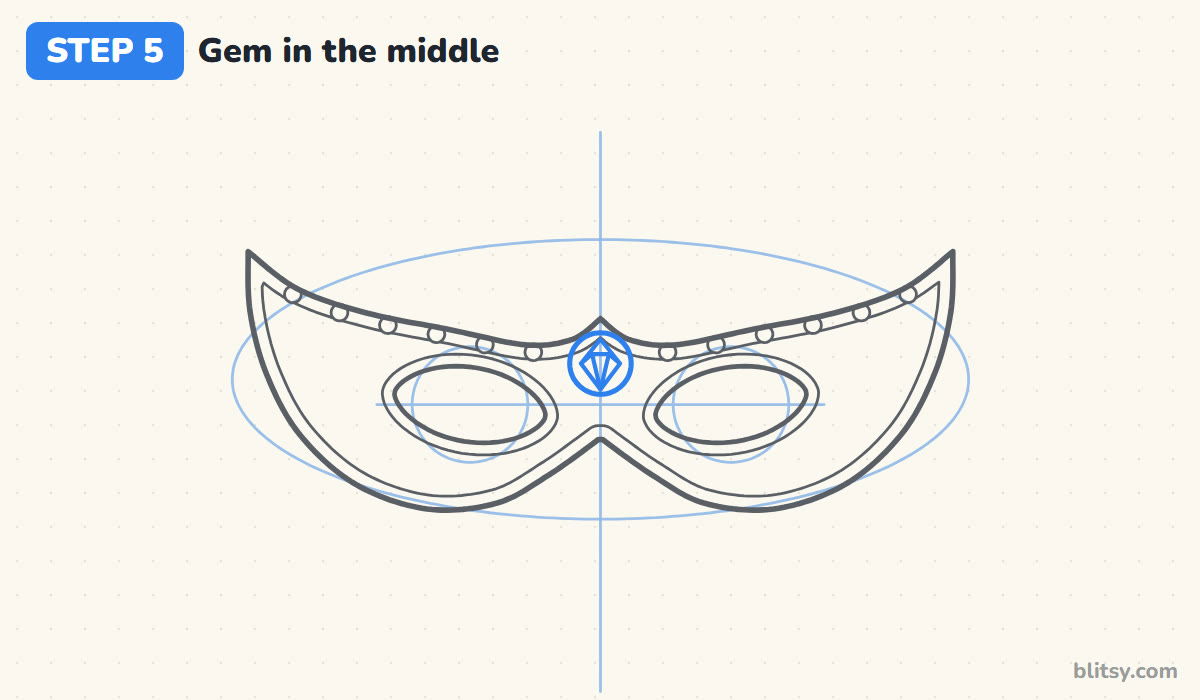
On the little point at the top center, draw a round setting about the size of a coin. Inside it, sketch a diamond and add a few short facet lines across its top. Because it sits right on the center line, the gem is the easiest part to keep symmetric.
💡 Tip: Draw the facets with the sharpest corner of your pencil so they stay crisp.
Step 6: Add mirrored swirls
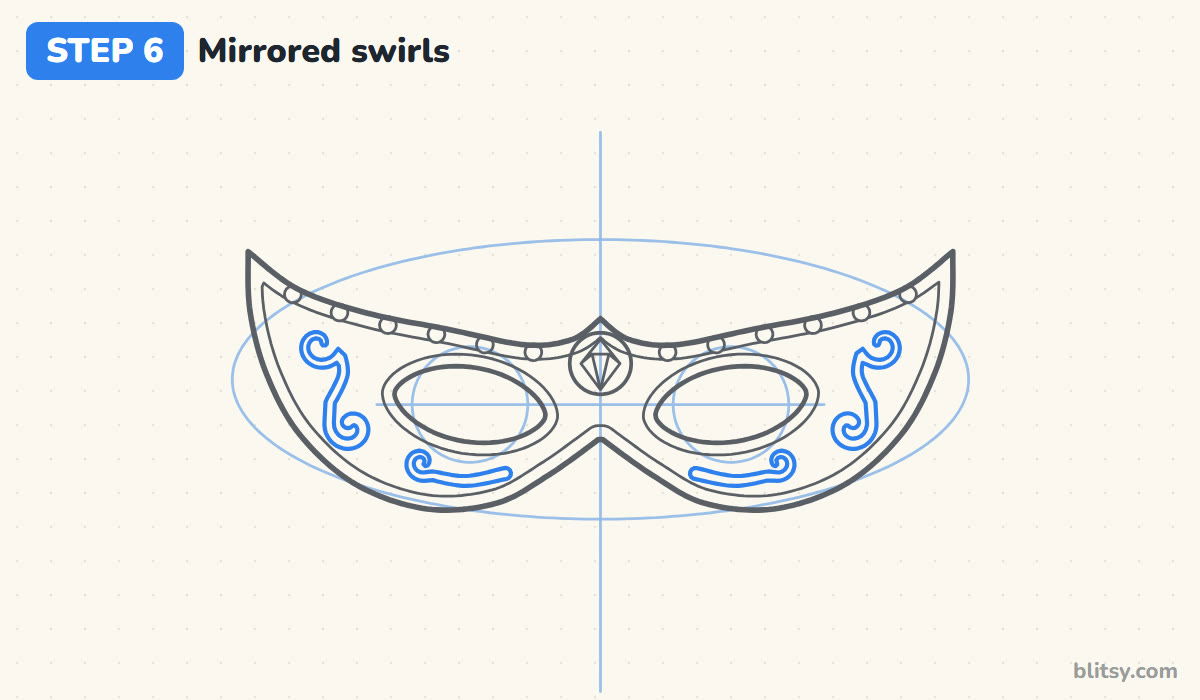
Beside each eye, on the wide part of the wing, draw an S-shaped scroll: a small curl at the top, a gentle stem, and a curl at the bottom turning the opposite way. Add a short curly line under each eye. Swirls are the trickiest part of this lesson, so I slow right down here. Smaller kids can swap them for a few dots.
💡 Tip: Draw the swirl on the left so it faces the opposite way, like a reflection, not a copy.
Step 7: Fan three feathers from the left wing
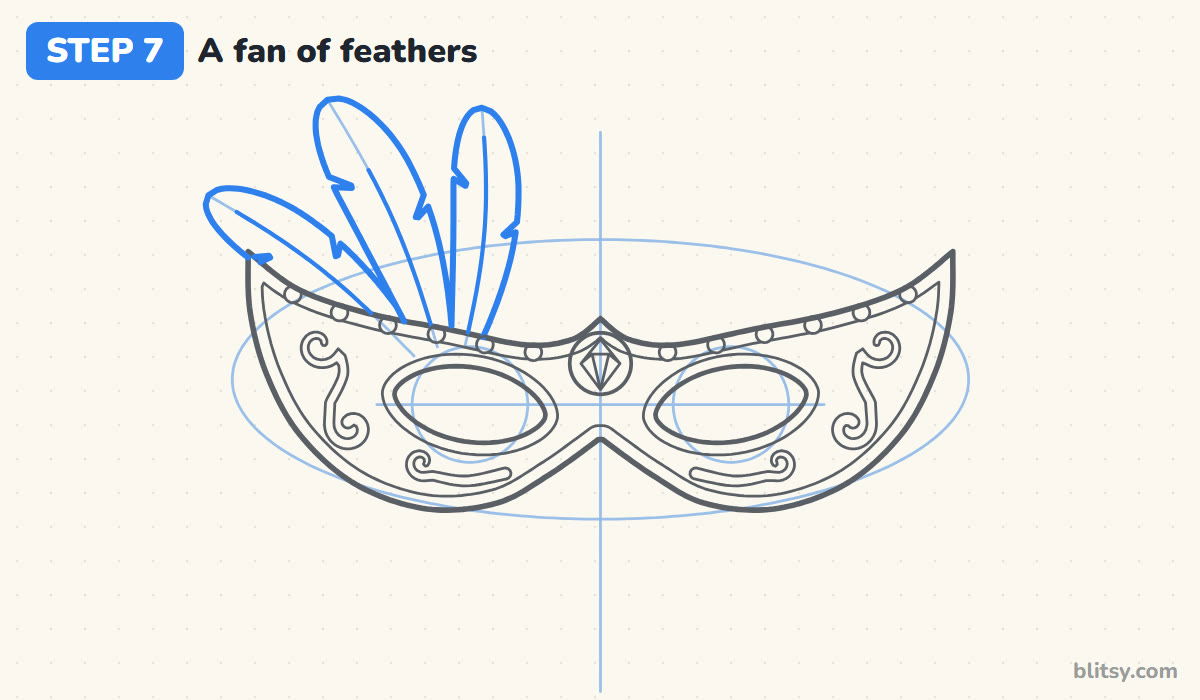
Sketch three light lines rising from behind the upper left of the mask, fanning from far left to almost straight up. Around each, draw a long feather that is narrow at the bottom, widest near the top and rounded at the tip. Cut a small V-shaped notch into the edges. Stop every feather where it meets the mask, because the mask sits in front.

💡 Tip: Make the middle feather the tallest so the fan has a clear peak.
Step 8: Hang the ribbon ties
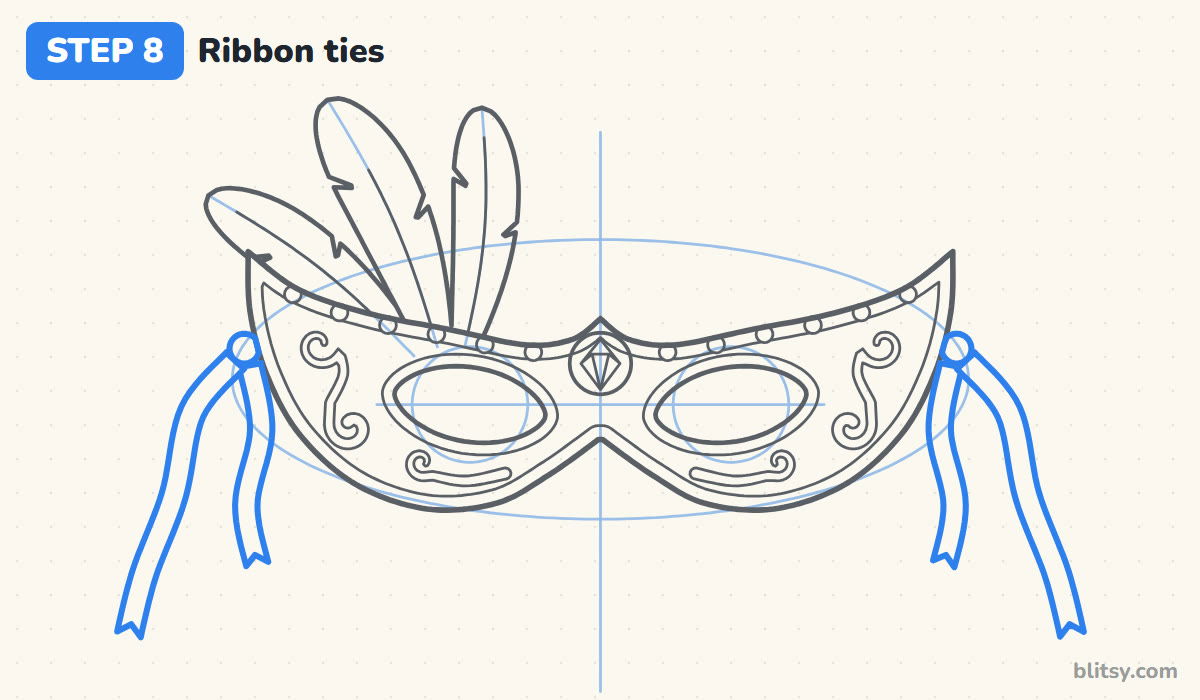
At the outer edge of each wing, draw a small round knot. From it, let two ribbons fall: a long one drifting outward and a shorter one hanging closer to the mask. Draw each ribbon as two wavy lines the same distance apart, and finish the ends with a V-shaped cut. On a real mask, these tie behind the head.
💡 Tip: Let the two ribbons on each side curve differently so they don't look like twins.
Step 9: Add the feather details
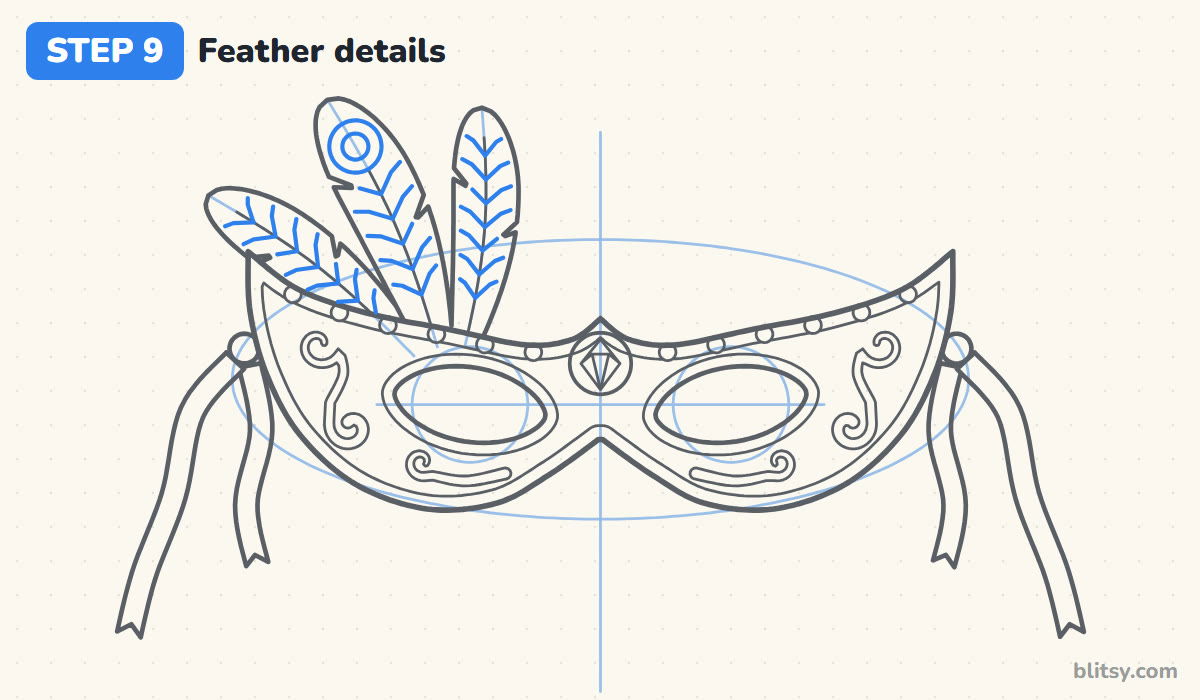
Draw short slanted lines from each feather's center line toward its edges, all leaning toward the tip. Stop them before they touch the outline. On the middle feather, add a round eye spot near the top: a circle with a smaller circle inside, borrowed from peacock feathers.
💡 Tip: Space the barb lines evenly by drawing the top and bottom ones first, then filling in between.
Step 10: Ink the lines and erase the guides
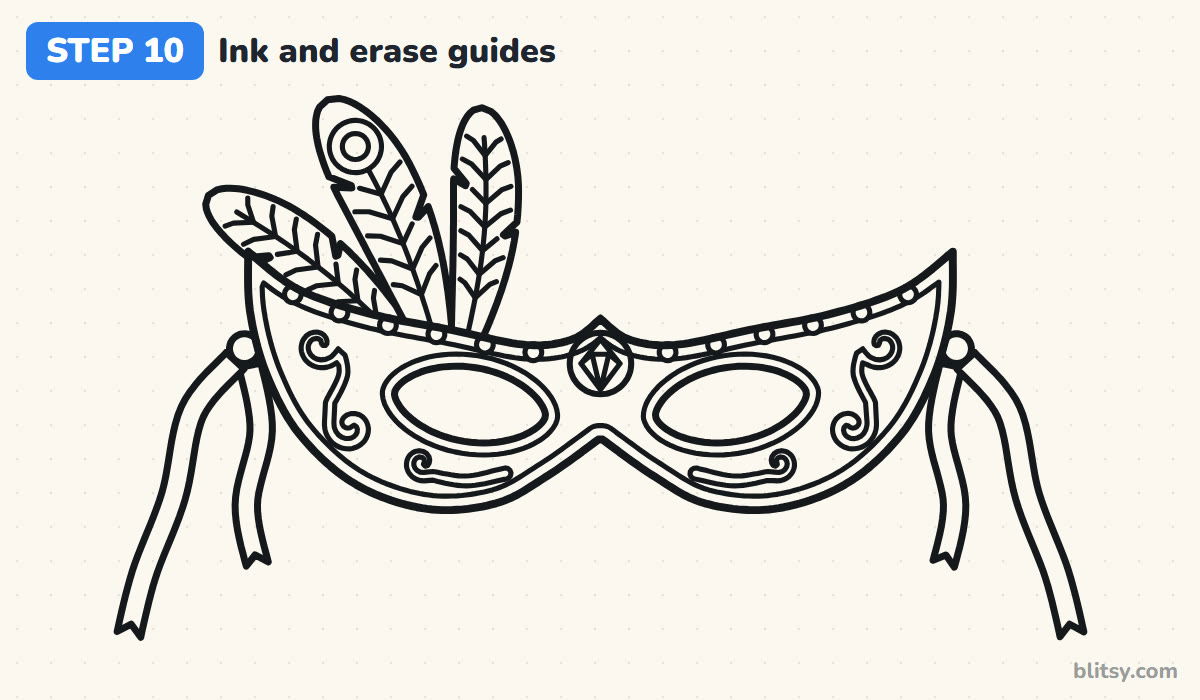
Go over every keeper line with the black pen. My habit is to ink the big outline first and the fussy swirls and feathers later, so the main shape is settled early. Skip the helper lines. Give the ink a minute to dry before you erase all the pencil marks.
💡 Tip: Turn the paper as you ink the swirls so your hand always pulls the pen toward you.
Step 11: Color the mask
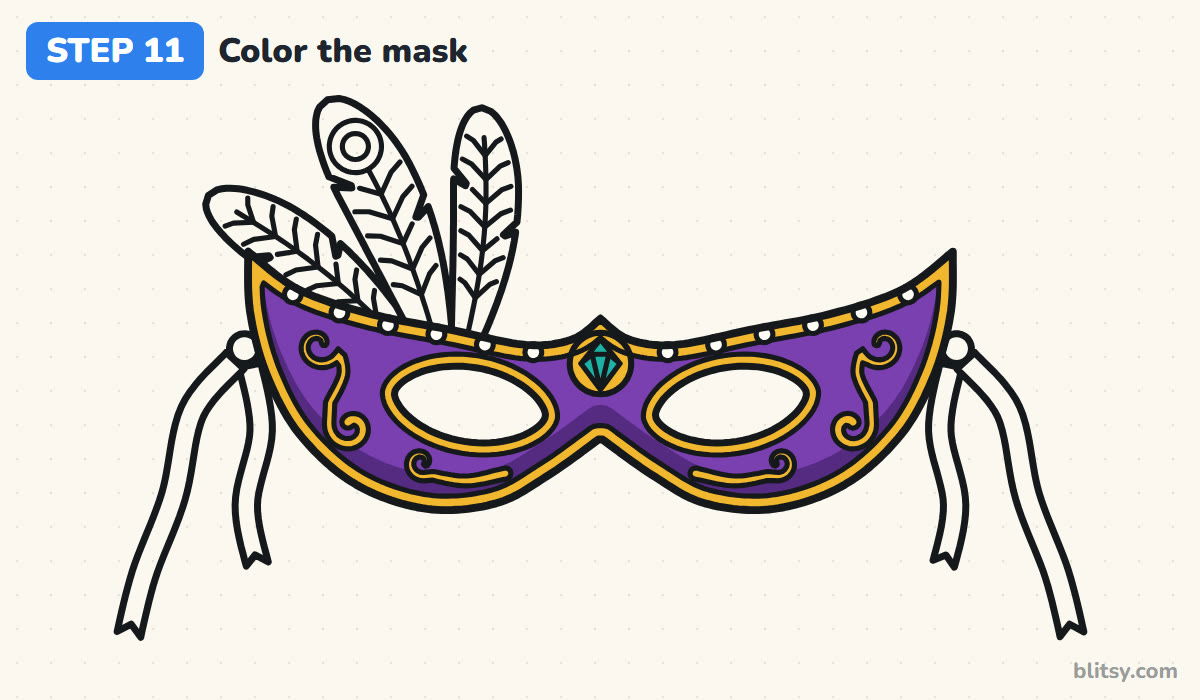
Fill the mask with purple, leaving the eye holes white. Along the lower edge, add dark purple for a soft shadow; it makes the mask look curved instead of flat. Then color the trim and swirls gold, the pearls white and the gem teal inside its gold setting.


💡 Tip: Color the gold parts last so the purple doesn't smudge into them.
Step 12: Color the feathers and ribbons
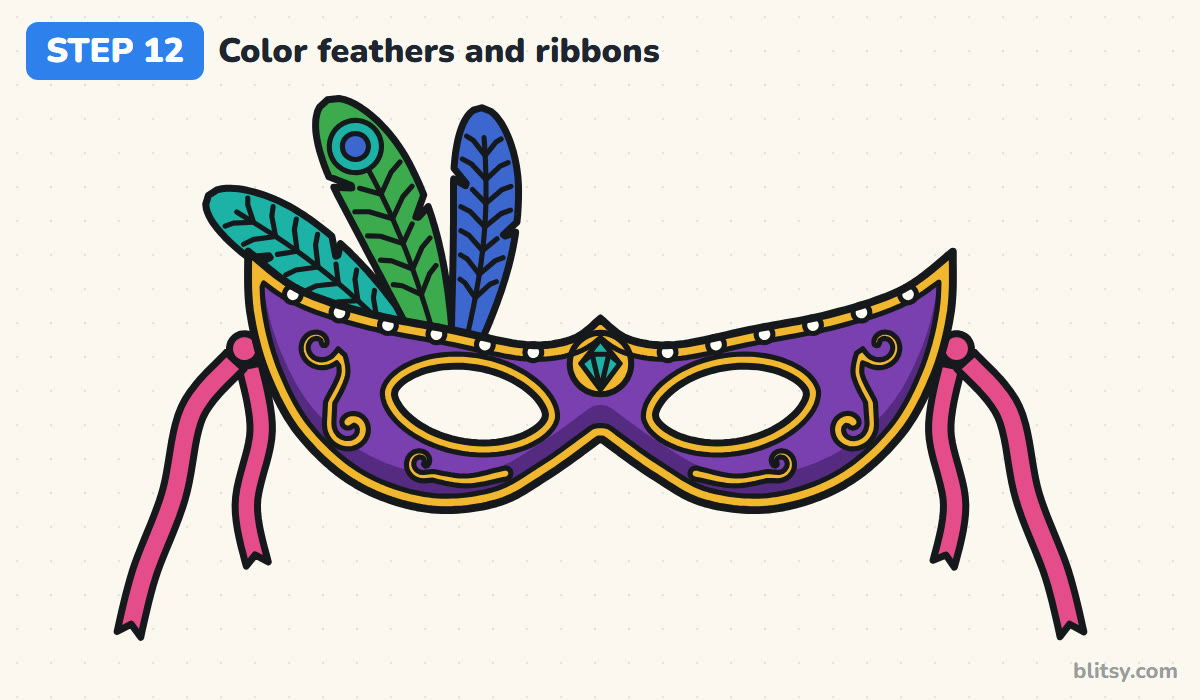
I use teal for the back feather, green for the middle one and blue for the front one, so the fan never melts into one blob. Color the eye spot teal with a blue center. Finish with pink ribbons and a pink knot on each side.
💡 Tip: Press harder near the base of each feather and lighter at the tip for a gentle fade.
Where Mask Symmetry Slips
- Skipping the center line. Without it, the two halves drift apart. Rule it first, even if you plan to erase it.
- Eye holes at different heights. Put both on the same horizontal guide before you draw them.
- Swirls copied instead of mirrored. Two curls facing the same way look off. The left swirl should face the opposite way.
- Feathers drawn over the mask. Lines that cross the mask's edge look pasted on. Stop them at the top border.
- A trim band that changes width. Thick in one spot and thin in another reads as a mistake. Keep the inner line evenly spaced.
Other Masks to Try Next
Once this mask feels easy, change the theme. Swap the purple for black and silver for an elegant ball mask, or use Mardi Gras colors with extra feathers on both sides. A cat mask only needs two pointed ears instead of feathers, and a stick on one side turns it into a handheld opera mask. If the feathers were your favorite part, the feather drawing tutorial goes deeper, and this Halloween drawing tutorial pairs nicely with a costume mask.
Masquerade Mask Coloring Page and PDF Guide
Prefer to skip straight to coloring? Print the free mask coloring page. A small colored version sits at the top next to a color key with each color word and the part it goes on, and the big outline below is ready for your own choices. The PDF drawing guide holds all 12 steps with their tips and prints on Letter or A4 paper.
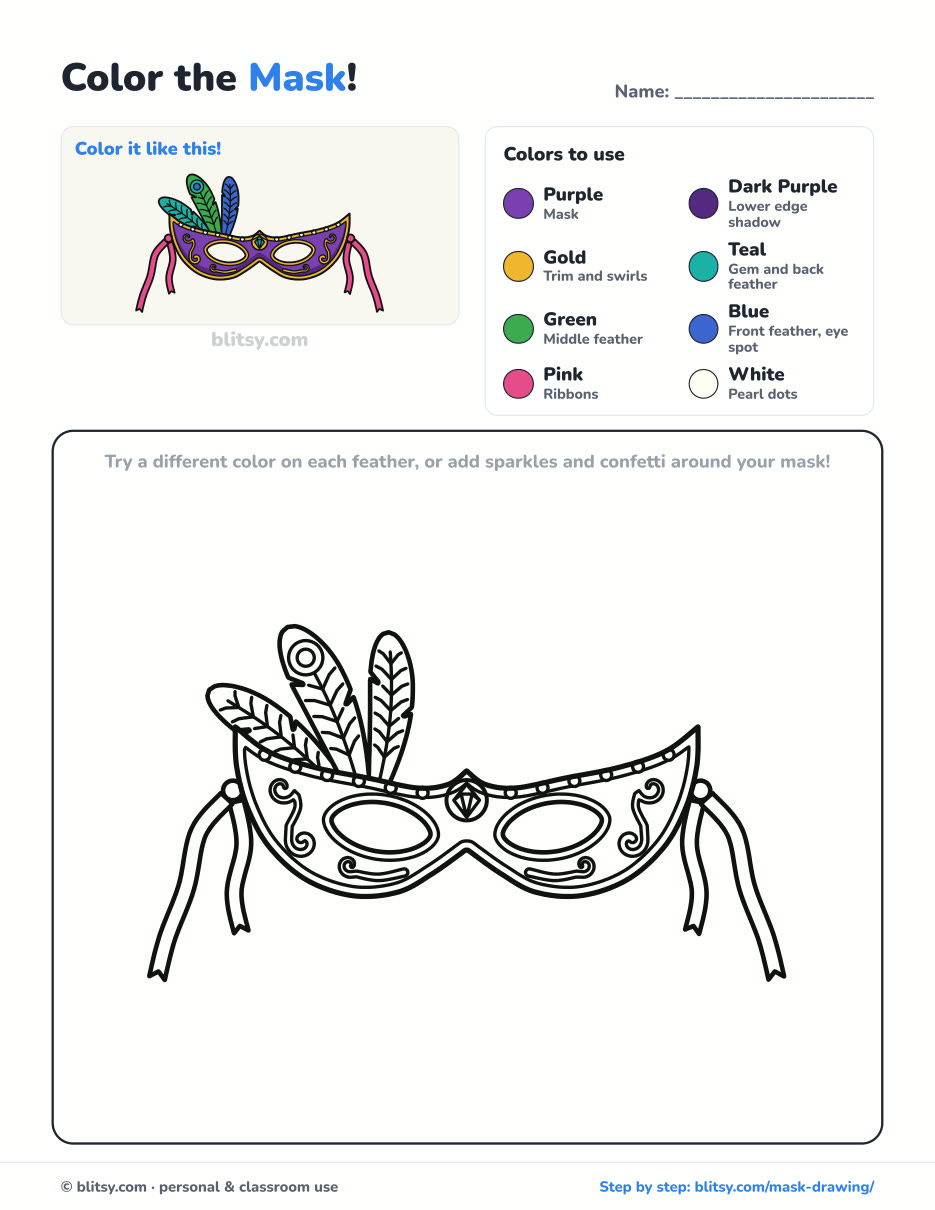
Black outlines with a colored example and the color names at the top. Ready to print and color.
⬇️ Download Coloring PageEvery step picture with its instructions and tips, to keep beside your paper while you draw.
⬇️ Download Drawing Guide📱 On a phone? Tap a download button, then open the file and choose Share → Save to Files or Print. On a computer, the PDF opens or saves straight to your Downloads folder.
Pin the Mask Steps
Masquerade Done? Try Clothing and Costume Tutorials
Here are more step-by-step tutorials, most of them about things people wear, so your mask can get a matching outfit.
- Shirt Drawing: Draw a coral tee and a plaid button-up side by side in this how to draw a shirt step by step lesson.
- Chalk Art: The chalk art tutorial takes you outside to a hopscotch grid and a rainbow on two clouds.
- Family Drawing: One body recipe draws four people and a puppy in the family drawing tutorial.
- Hoodie Drawing: Learn the front and back view of one sage green hoodie with the hoodie drawing step by step guide.
- Dress Drawing: A twirly party dress and a sundress on a hanger finish the dress drawing tutorial.
- Feather Drawing: If your mask feathers were fun, the how to draw a feather lesson goes further with a teal and an orange feather.
- Shoes Drawing: Draw a red high-top and a low-top sneaker in this shoe drawing tutorial.
- Suit Drawing: The suit drawing step by step lesson builds a navy jacket with a red striped tie.
- Realistic Drawing: For shading practice, this realistic drawing tutorial lights a single shiny apple.
Mask Drawing Questions From Beginners
What is the easiest way to draw a mask?
Draw a center line, sketch half the mask shape on one side and copy it onto the other. Add two almond eye holes on the same level, and you already have a mask you can decorate.
How do you draw a masquerade mask for kids?
Keep the outline, eye holes and feathers, add the gem, and leave out the swirls and pearls. Bright markers make it festive without the fiddly parts.
How do I make both sides of a mask look the same?
Use the center line as a mirror and measure each point from it. Holding the paper up to a window from the back also shows you where one side bulges.
How long does it take to draw a mask?
Plan on 30 to 40 minutes for the full mask with coloring. The outline and eye holes alone take about 10 minutes.
Pin your finished mask on the wall before the next party; it may inspire someone to make a real one out of card and glitter. 🎭
Related posts:
 How to Draw a Whale Step by Step (Easy for Beginners)
 How to Draw Lungs Step by Step (Easy Science Diagram)
 How to Draw a Pineapple Step by Step (Easy Crown and Slice)
 How to Draw Iron Man Step by Step (Easy Chibi for Kids)
 How to Draw a Dress Step by Step (Easy Party Dress)
 How to Draw a Parrot Step by Step (Easy Scarlet Macaw)
 How to Draw a Police Car Step by Step (Easy for Kids)
 How to Draw a Volcano Step by Step (Easy Erupting Volcano)
 How to Draw a Crow Step by Step (Easy for Beginners)
 How to Draw a Tiger Step by Step (Easy Walking Pose)
 How to Draw a Heart Step by Step (Even, Symmetric Shape)
 How to Draw a Jellyfish Step by Step (Cute, Easy Guide)

