
Bats look tricky because of those wings, but each wing is really just one curved arm with three scoops cut out of the bottom. Get that idea and the rest is a round fuzzy ball with ears. This lesson shows you how to draw a bat step by step, from a couple of light circles to a smiling purple bat spreading its wings in front of a big yellow moon. It's a favorite around Halloween, though a friendly bat like this one works all year.
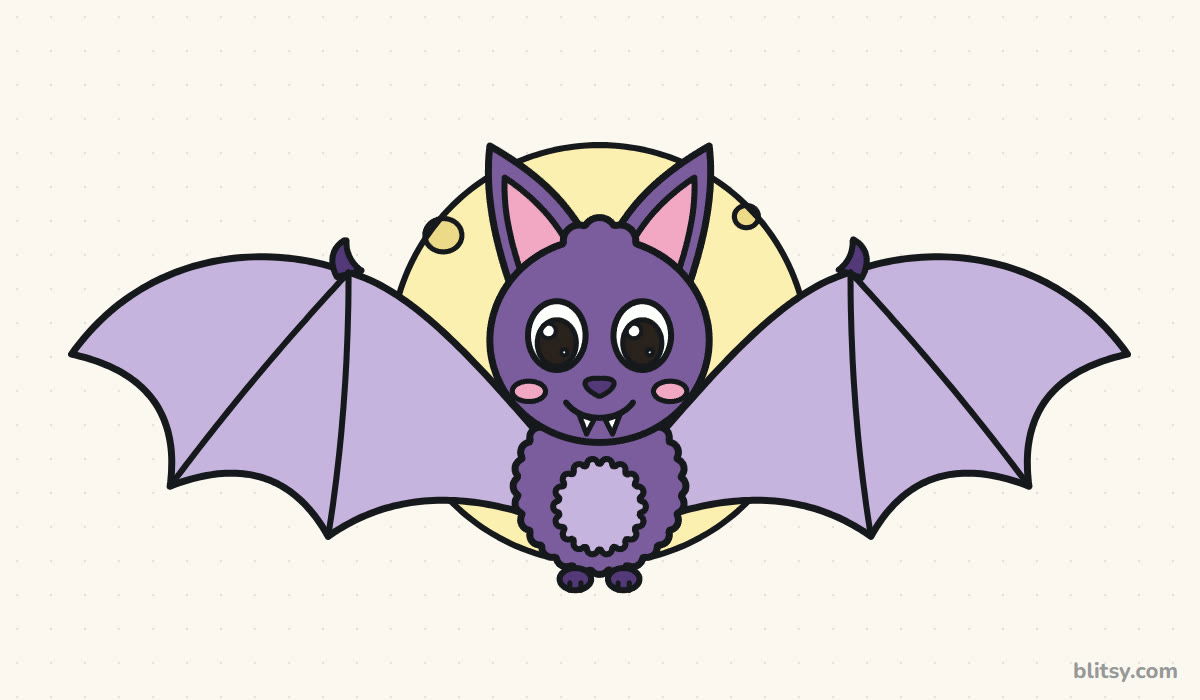
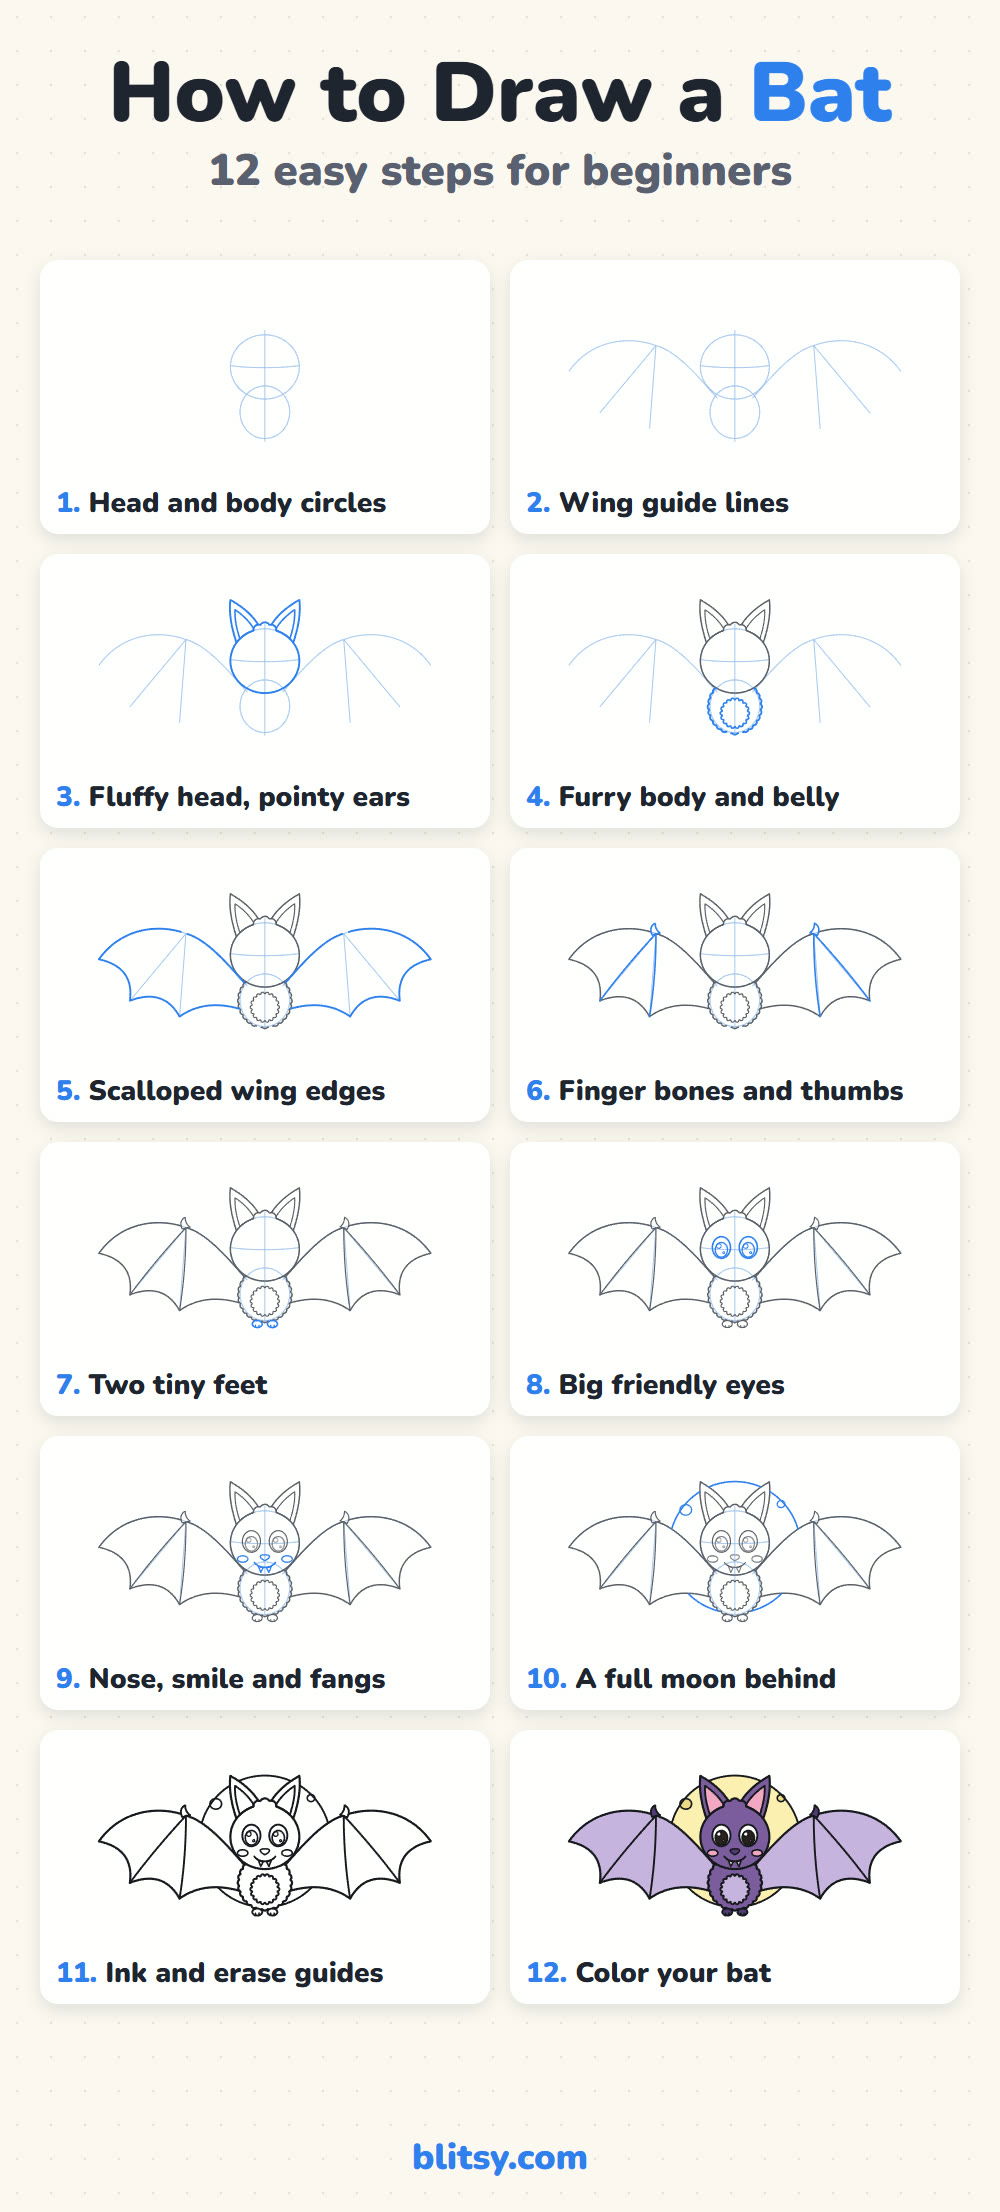
Copy only what is blue in each picture; that is the new part. Anything gray you already drew in an earlier step, and it is there so you can see where the new lines connect.
Quick overview
⏱️ Time: around 30 minutes, plus coloring
🎯 Level: easy, fine for kids from about 6 up
✏️ Steps: 12
🦇 You'll draw: a cute cartoon bat with open wings and a full moon
Supplies for a Night Sky Bat
- A pencil you can press lightly with
- An eraser that doesn't smudge
- A black marker or fineliner
- Colored pencils or crayons in a few shades of purple, plus pink and pale yellow
- A sheet of plain paper turned sideways
Sideways paper matters here, because the wings are almost three times wider than the body.
How to Draw a Bat Step by Step
Step 1: Sketch the head and body circles
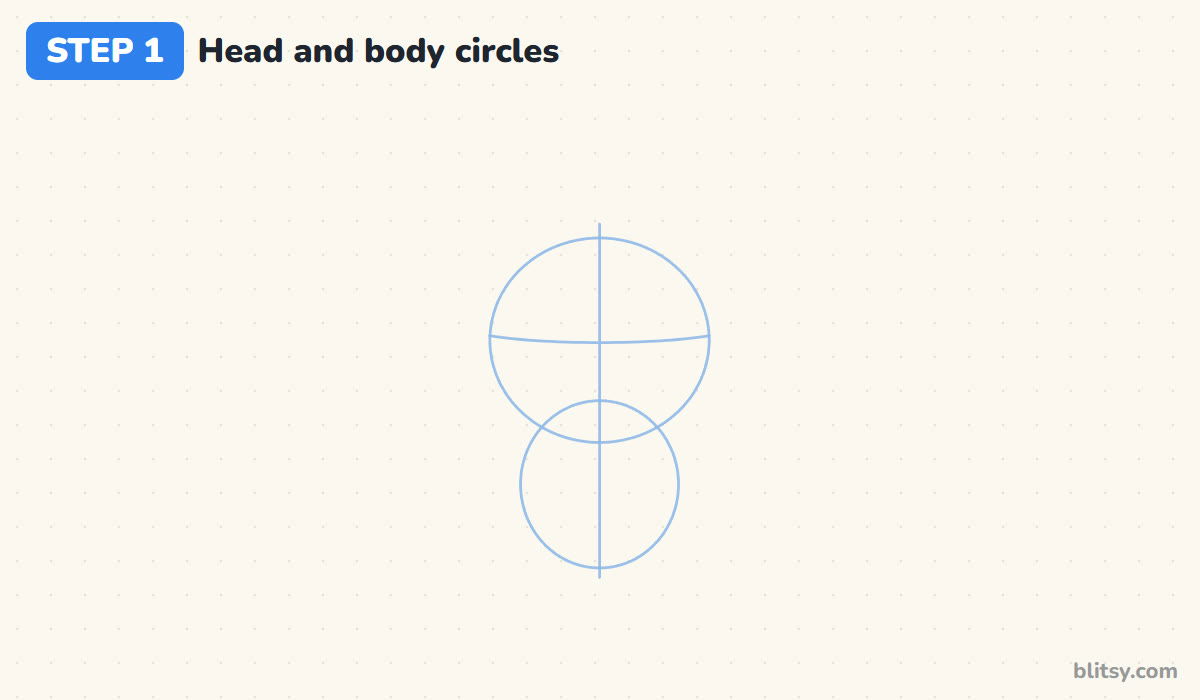
Near the middle of your page, draw a big circle for the head. Under it, overlapping a little, draw a smaller oval for the body. Add a line straight down through both, and a gentle curve across the head just above its middle. The eyes will sit on that curve.
💡 Tip: The head should be clearly bigger than the body. That big-head look is what makes a cartoon bat cute instead of creepy.
Step 2: Add wing guide lines
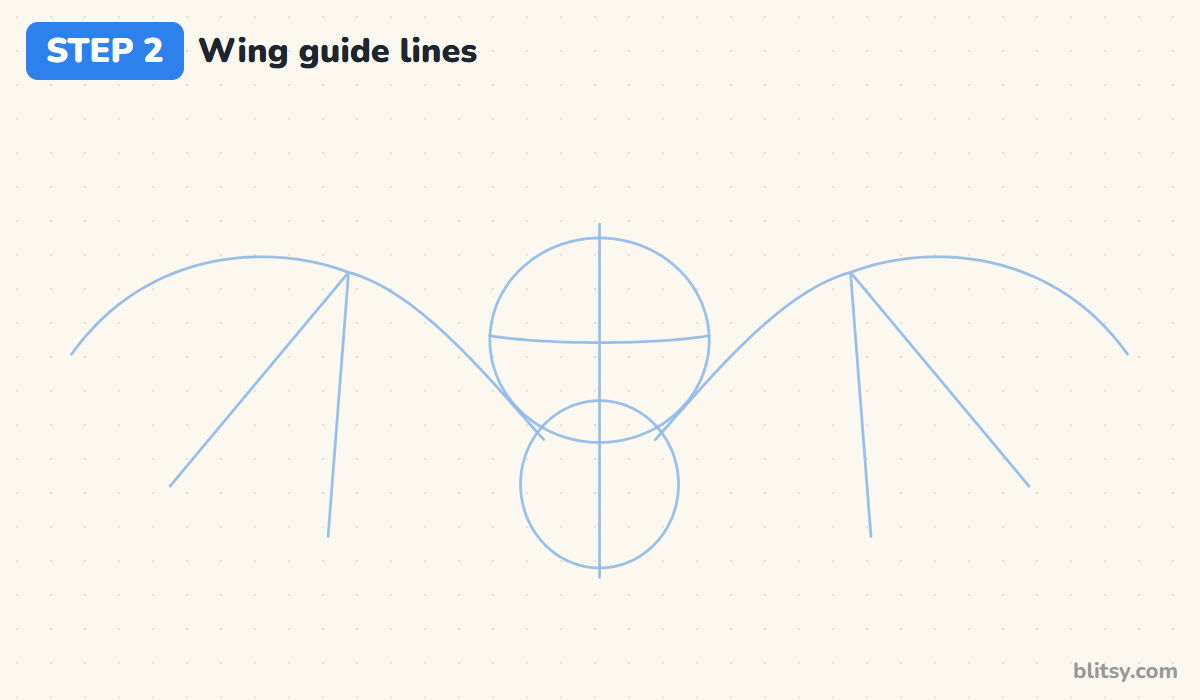
From the side of the body, draw a curved line up and out to a point, then keep going in a wide arch down to the wing tip. That bent line is the bat's arm. From the bend, where the wrist is, draw two straight lines fanning down. Do the same on the other side so both wings match. I usually draw the left wing, then the right one while glancing back at the first.
💡 Tip: Put both wrists at the same height. Compare them before you move on, since uneven wings are hard to fix later.
Step 3: Draw a fluffy head and big pointy ears
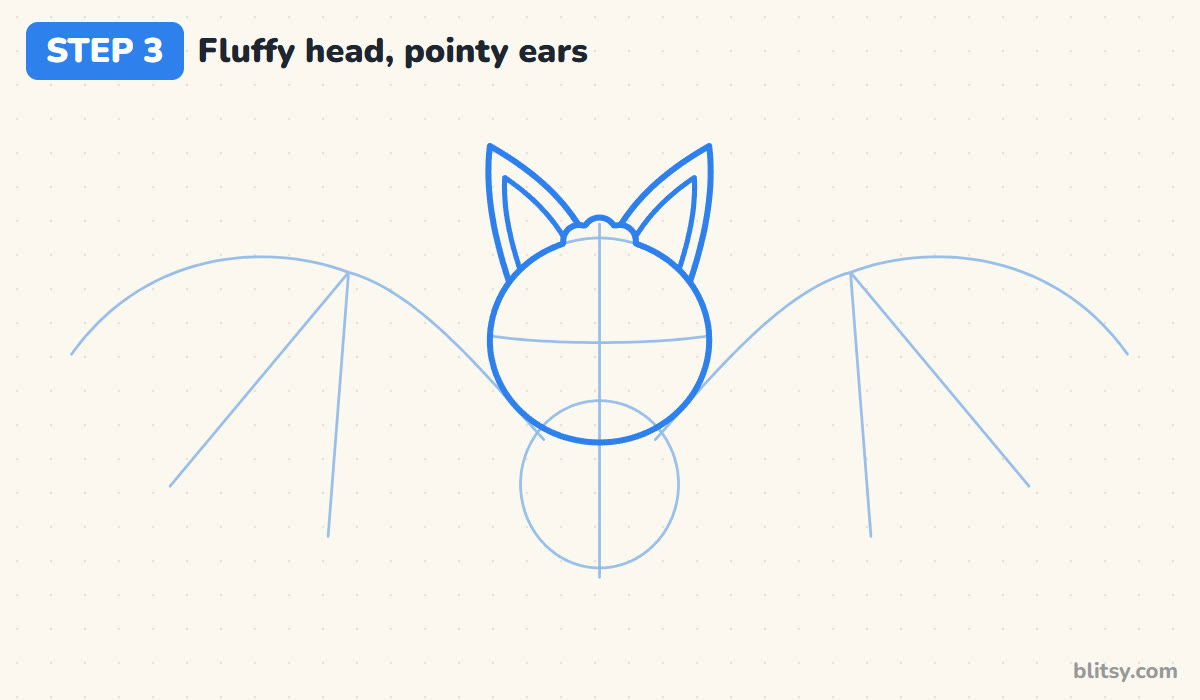
Trace the head circle with a firm line, adding three small bumps at the top for a tuft of fur. Then draw two tall ears that lean outward, with sharp tips and wide bases tucked behind the head. Inside each ear, draw a smaller copy of the same shape.
💡 Tip: Make the ears tall. Bats hear their way around in the dark, and big ears tell everyone what animal this is.



Step 4: Outline the furry body and belly
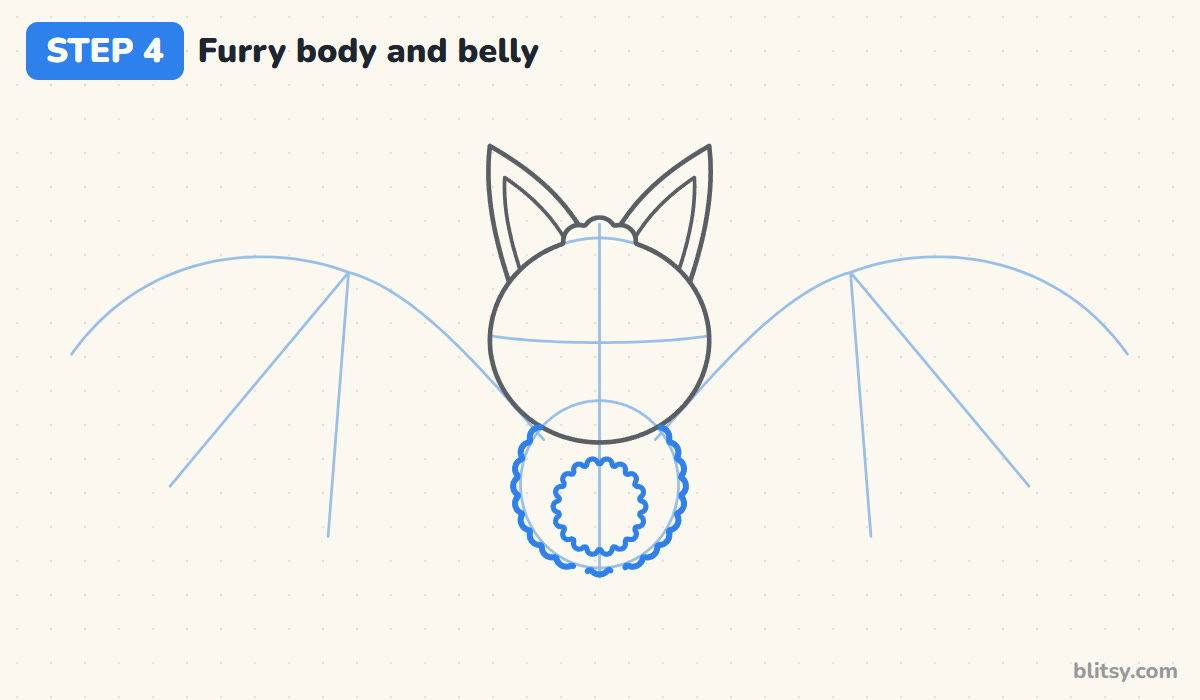
Go around the body oval with lots of small bumps so it looks fuzzy, and stop where it meets the head. In the lower middle, draw a smaller round patch with tinier bumps. That's the light belly fur. I keep the bumps small on purpose, since big ones start to look like a sheep.
💡 Tip: Draw the bumps in short, quick strokes. Slow strokes make them wobbly and uneven.
Step 5: Draw the scalloped wing edges
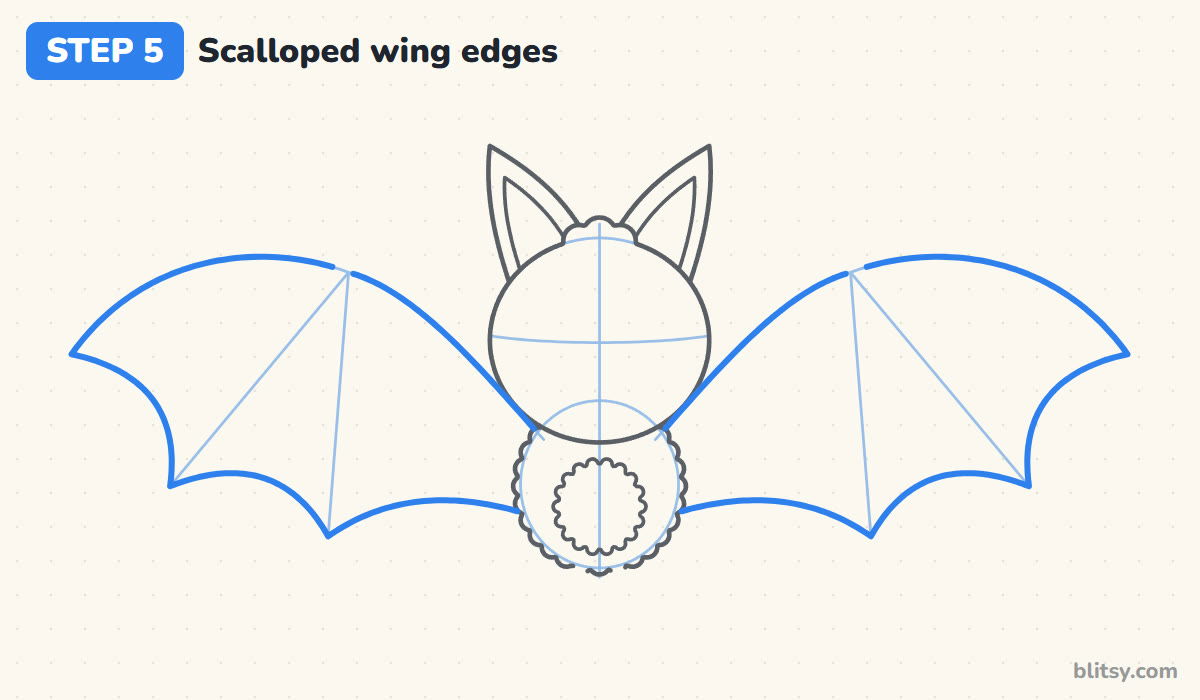
Go over the arm guide with a firm line, from the body to the wrist and out to the tip. Now connect the wing tip to the ends of your two guide lines, and then back to the body, with curves that dip inward like the bottom of a bowl. You end up with three scoops on each wing.
💡 Tip: Every scoop should curve toward the wrist. If one bulges outward, the wing looks like a leaf.
Step 6: Add finger bones and thumbs
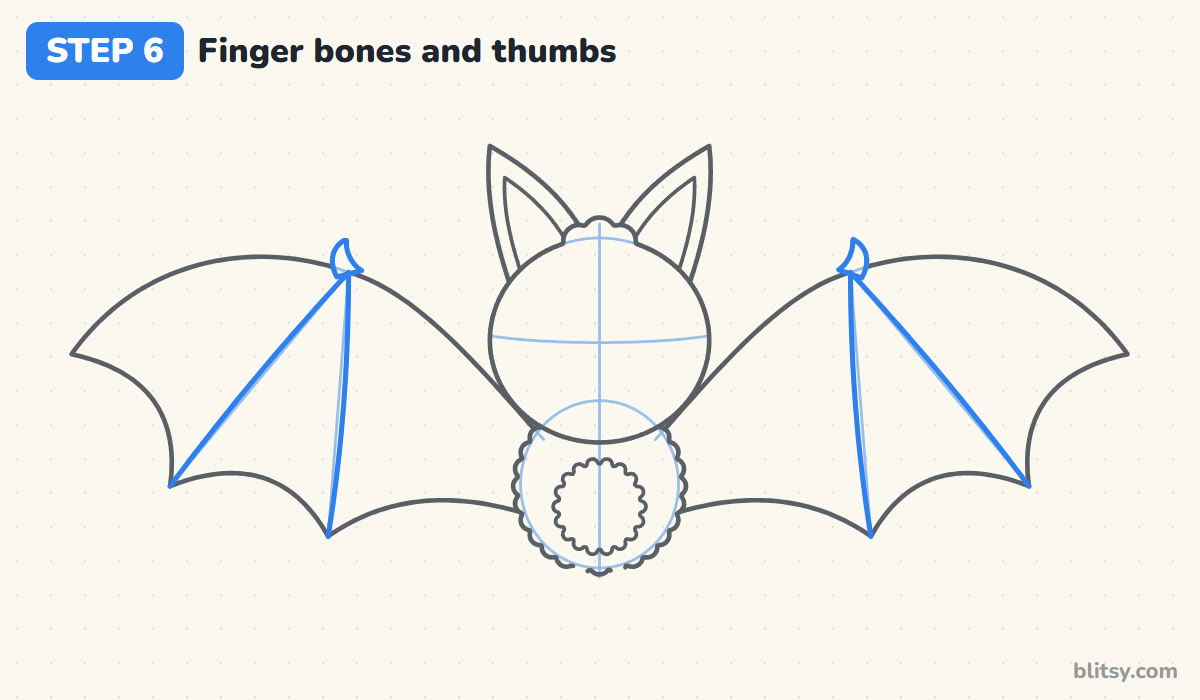
Trace the two fanned guide lines from the wrist down to the points between the scoops. These are the finger bones that hold the wing open, and I find kids love learning that a bat wing is really a hand. On top of each wrist, draw a tiny hooked thumb. Real bats have a little claw there, and it's a nice detail that takes two seconds.
💡 Tip: Bend the bone lines very slightly. Perfectly straight lines look stiff, like a kite frame.
Step 7: Give it two tiny feet
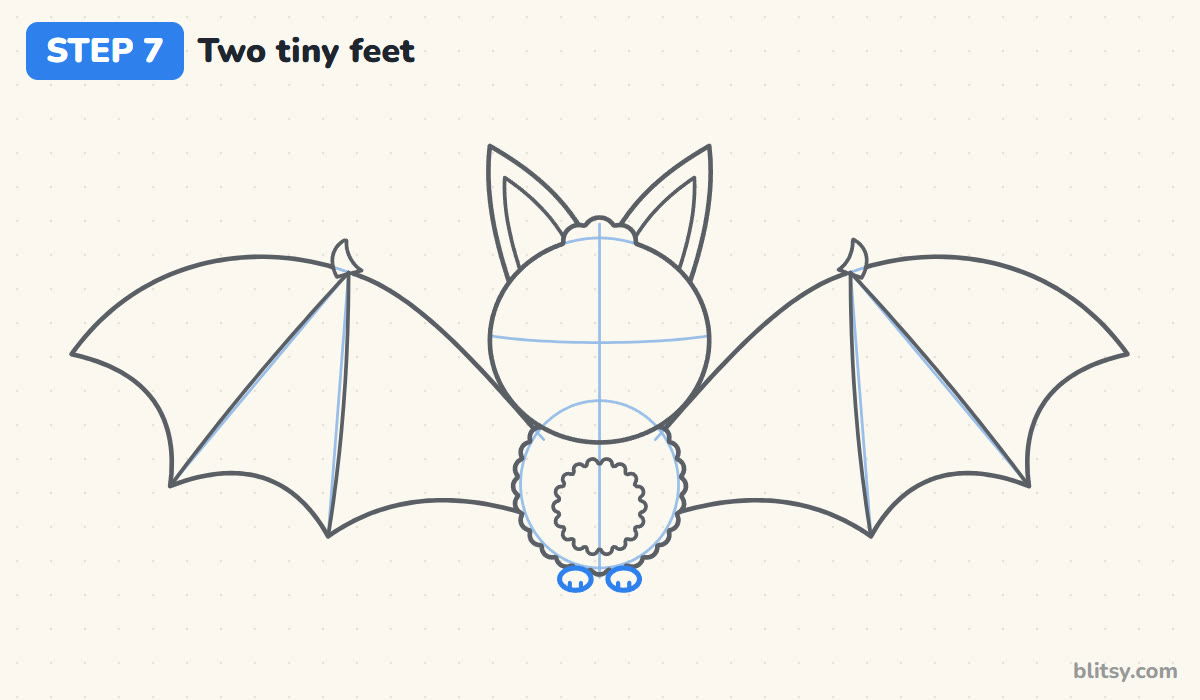
Under the furry body, draw two small ovals side by side and add two short toe lines on each. Keep them close together and small. A bat's feet are tiny compared to its wings, and that contrast looks right.
💡 Tip: Overlap the tops of the feet with the fur a little so they look attached.

Step 8: Draw big friendly eyes
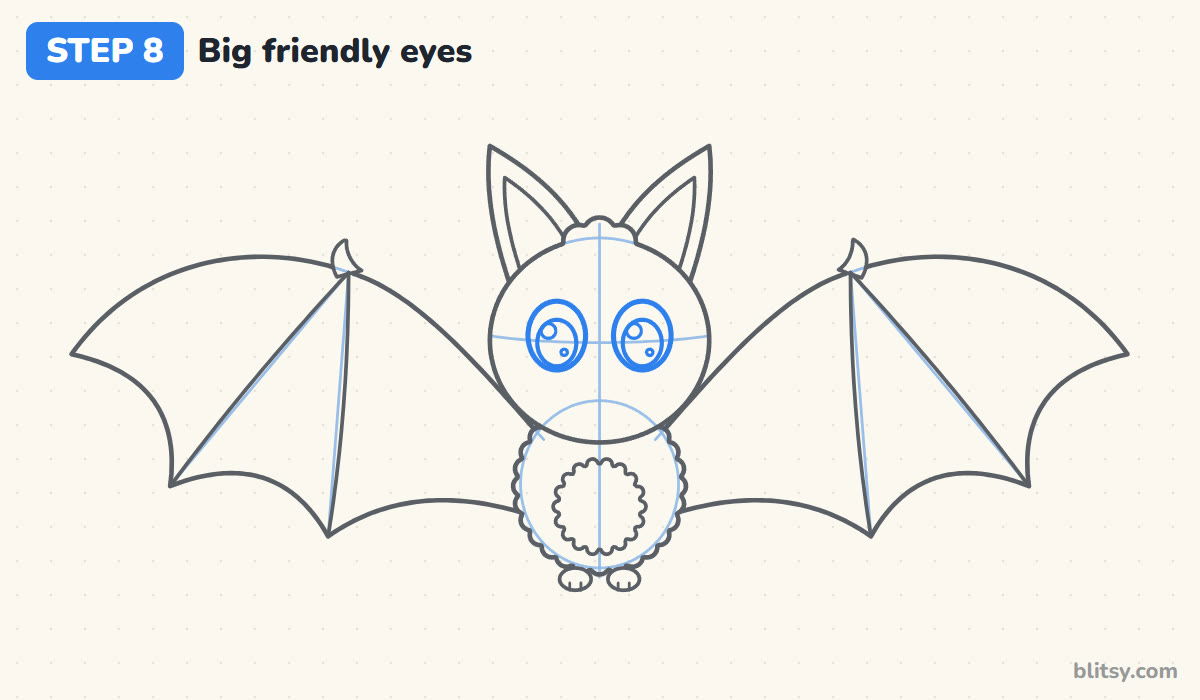
When I teach this, I always point out that the eyes do most of the work. Sitting on the curved guide line, draw two tall ovals with a small gap between them. Inside each one, draw a big dark pupil that fills most of the oval, then two shine circles in the upper left of each pupil, one big and one small.
💡 Tip: Put the shine on the same side in both eyes. It makes the eyes look like they're catching moonlight.
Step 9: Add the nose, smile and fangs
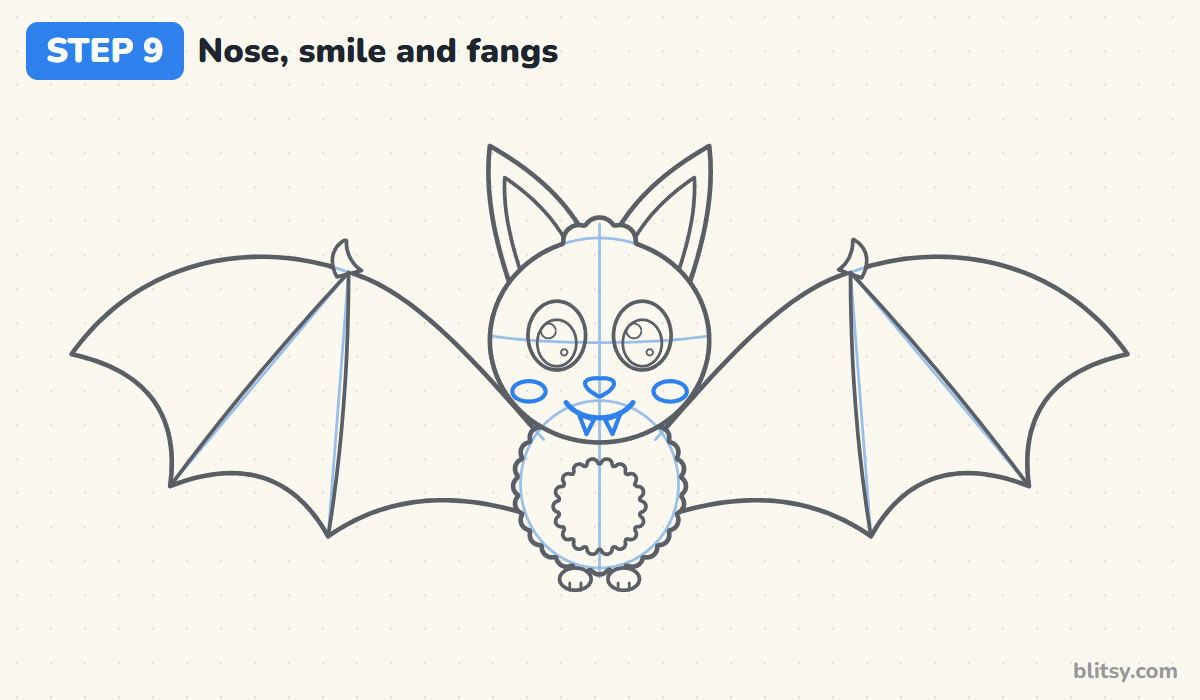
Below the eyes, draw a small rounded triangle for the nose. Under it, a wide curved smile. Hang two tiny triangle fangs from the smile, one on each side of the middle. Finish with a small oval on each cheek for blush.
💡 Tip: Keep the fangs small and short. Little fangs read as playful, while long ones turn the bat into a vampire.
Step 10: Draw a full moon behind it
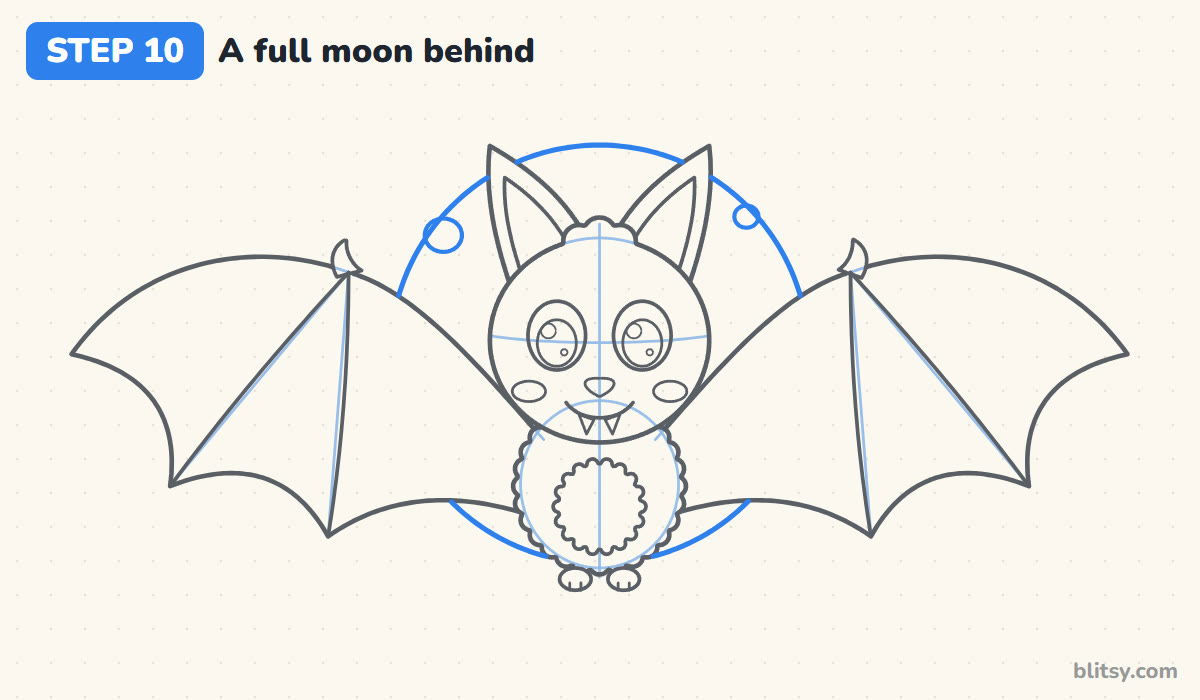
I like to add the moon last, after the bat is done. Draw a big circle behind the bat, centered on its body, so it peeks out between the ears and above the wings. Only draw the parts you can see and stop wherever the bat is in front. Add two or three small circles in the open moon areas for craters.
💡 Tip: You can skip the moon if you want a plain bat, but it frames the ears and makes the picture feel finished.
Step 11: Ink the lines and erase the guides
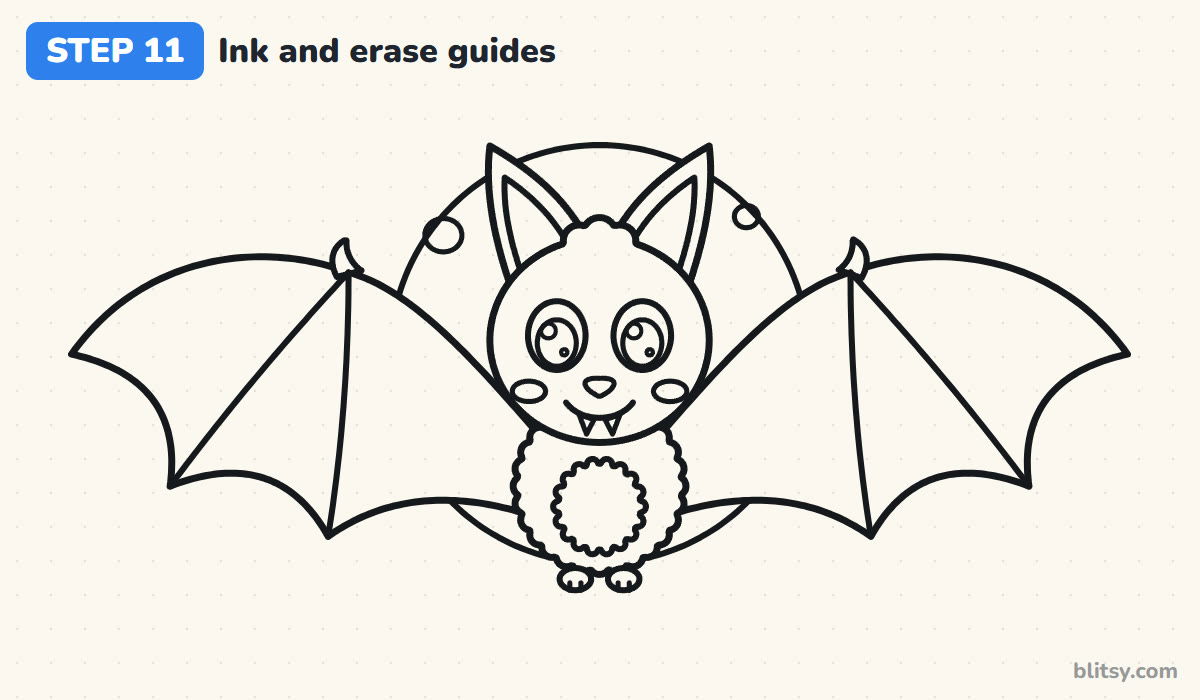
Trace every keeper line with a black marker or fineliner. Wait a minute for the ink to dry, then erase all the light pencil guides, including the cross lines on the head and the old circles. Your bat should look clean and crisp now.
💡 Tip: Ink the wings with long smooth strokes, turning the paper so your hand always pulls toward you.

Step 12: Color your bat
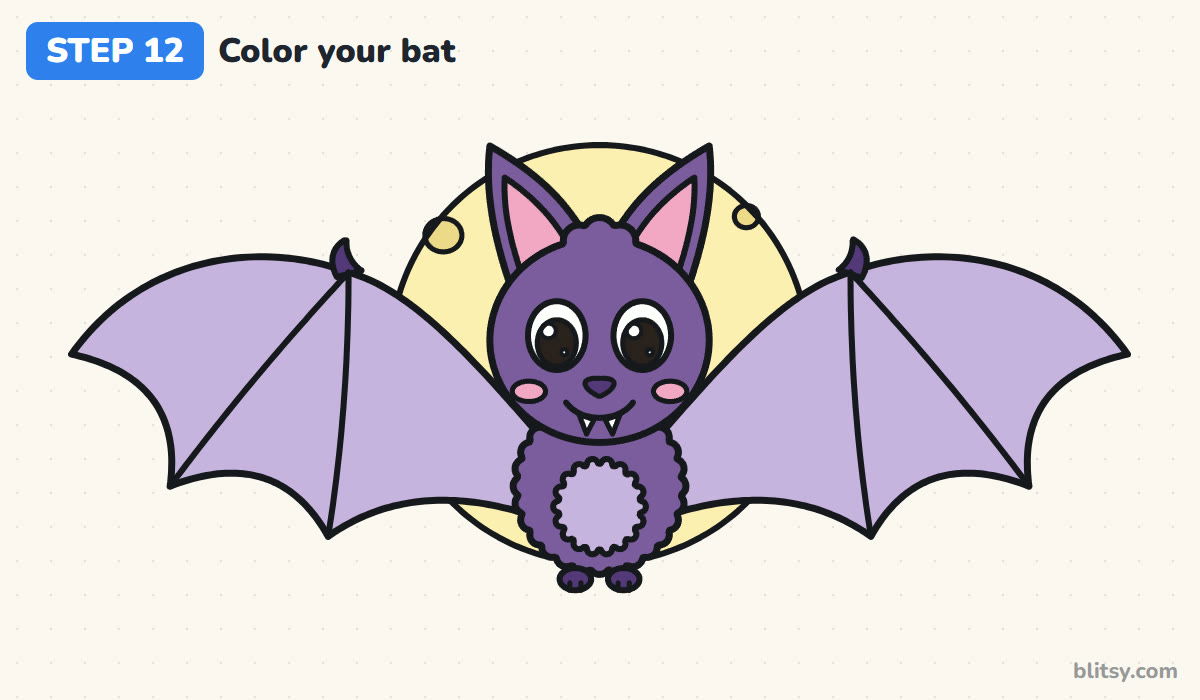
I color the whole head and body purple first. Then use light purple for the wings and belly, so the body stands out against them. The small dark parts (feet, thumbs, nose) get dark purple. Pink goes inside the ears and on the cheeks, and the moon is pale yellow. Leave the eye shines and fangs white.
💡 Tip: Color the light wings first, then the darker body. Dark color smudges into light much more easily than the other way round.
Where Bat Wings Usually Go Wrong
- Wings that bulge outward. The bottom edge should scoop inward between the finger tips. Outward curves turn the wings into leaves or clouds.
- Wings too small for the body. A bat's wingspan is huge. Stretch each wing at least as wide as two heads.
- Short, round ears. Small round ears make it look like a mouse with wings. Keep them tall and pointed.
- Long sharp fangs. For a cute bat, the fangs should be tiny. Long fangs make it look scary.
- Body and wings in the same color. Use a lighter color for the wings so the body and face don't disappear.
Giving Your Bat a New Look
Try folding the wings in and hanging the bat upside down from a branch. Make a brown fruit bat with a fox-like face, or add a tiny witch hat for Halloween. Younger kids can leave out the finger bones and belly patch and it still looks like a bat. For another night animal with big eyes, the owl drawing step by step lesson pairs well with this one. A cute ghost drawing tutorial makes a good friend for your bat in a spooky scene. And if you came here for the sports kind of bat, the baseball bat drawing tutorial covers that one.
Free Bat Coloring Page and Step Guide PDF
The free bat coloring page shows the finished colored bat at the top as a model, with a color key for each part, and a big outline below for kids to color. The step-by-step PDF guide holds all 12 steps with pictures and tips, so you can draw away from the screen. Both print on Letter or A4 paper.
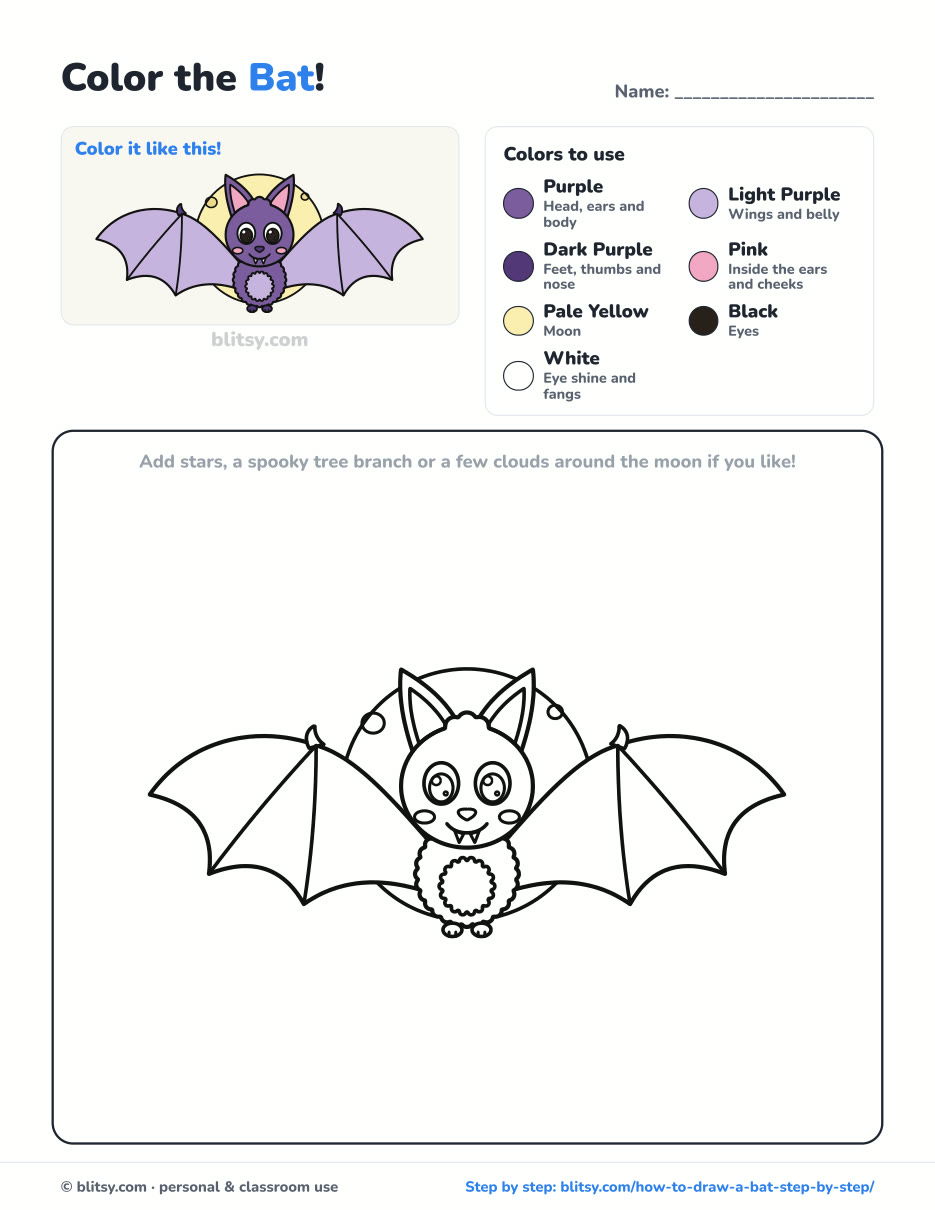
Black outlines with a colored example and the color names at the top. Ready to print and color.
⬇️ Download Coloring PageEvery step picture with its instructions and tips, to keep beside your paper while you draw.
⬇️ Download Drawing Guide📱 On a phone? Tap a download button, then open the file and choose Share → Save to Files or Print. On a computer, the PDF opens or saves straight to your Downloads folder.
Keep the Bat Steps Handy
More Spooky and Winged Drawings to Try
Each tutorial below has a picture for every step and a free coloring page at the end, just like this bat.
- Halloween Drawing: Draw a cute haunted house with a pumpkin and a little ghost in this Halloween drawing step by step lesson.
- Moon Drawing: Learn a sleepy crescent moon plus the moon phases with this moon drawing tutorial.
- Pumpkin Drawing: Three round pumpkins sit on a bed of hay in this pumpkin drawing tutorial.
- Dragon Drawing: Bat-style wings show up again on this friendly dragon in the how to draw a dragon step by step guide.
- Witch Drawing: Draw a cute witch with a pointed hat and broom using this witch drawing tutorial.
Bat Drawing Questions, Answered
What is the easiest way to draw a bat?
Start with a round head and a small body, then draw each wing as one curved arm with three inward scoops along the bottom. Add tall ears, eyes and a smile, and you have a bat.
How do you draw bat wings for kids?
Draw a bent line from the body to a wrist point and out to the tip, then join the tip back to the body with three curves that dip inward. Two lines from the wrist split the scoops.
What colors are bats?
Real bats are mostly brown, gray or black. For a cartoon bat, purple with lighter wings is popular, but brown and tan or black and gray look great too.
How long does it take to draw a bat?
About 30 minutes for the drawing and another 10 to 15 for coloring. The wings take the most time.
Once the ink is dry and the moon is glowing, your little bat is ready to hang on the fridge or tape to the window for Halloween night. 🦇🌕
Related posts:
 How to Draw a Mermaid Step by Step (Easy Cartoon for Kids)
 How to Draw a Baseball Bat Step by Step (With Ball and Glove)
 How to Draw Bart Simpson Step by Step (Easy Cartoon)
 How to Draw a Tank Step by Step (Easy Cartoon Tank)
 How to Draw a Bee Step by Step (Easy Cartoon Bee)
 How to Draw a Boy Step by Step (Easy Full-Body Cartoon)
 How to Draw a Family Step by Step (Easy Cartoon Portrait)
 How to Draw a Princess Step by Step (Easy Ball Gown Cartoon)
 How to Draw a Cowboy Step by Step (Easy Cartoon Kid)
 How to Draw a Girl Step by Step (Easy Full-Body Cartoon)
 How to Draw a Tooth Step by Step (Cute and Easy for Kids)
 How to Draw a Care Bear Step by Step (Cute Fan Art for Kids)

