
Give a kid a wide hat, a pair of pointy boots and a coil of rope, and everyone knows straight away that he's a cowboy. This lesson shows how to draw a cowboy step by step, starting from a stick figure measured in head lengths and finishing with a red bandana, a leather vest and a gold sheriff star. The hat gets a whole step of its own, because it's the part people worry about. No guns here: our cowboy carries a lasso and waves hello.
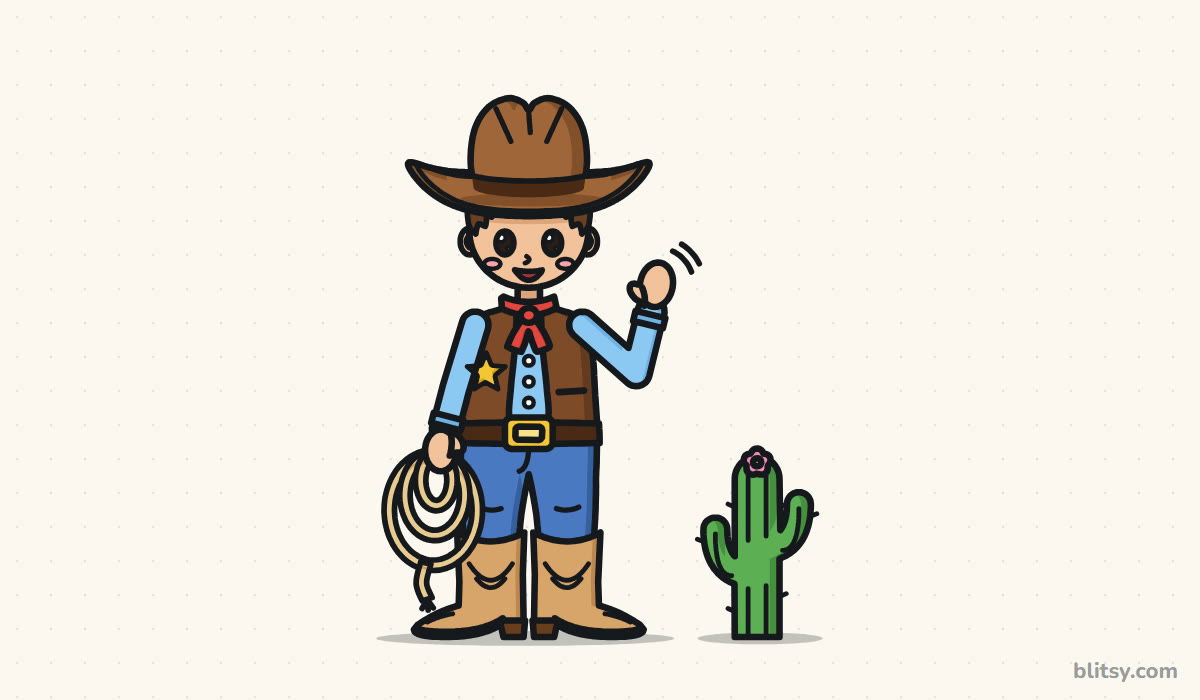
Blue in a picture means draw this now; gray means you've already done it. The faint blue guide shapes go away when you ink in step 11.
Quick overview
⏱️ Time: about 35 to 45 minutes, coloring included
🎯 Level: beginner, a good next drawing after a simple stick figure
✏️ Steps: 12
🤠 You'll draw: a smiling kid cowboy with a curled hat, a bandana, a vest with a star, boots, a lasso and a cactus
What to Pack for This Western Sketch
- A pencil for light guide lines (HB is fine)
- A soft eraser
- A black marker or fineliner for the final lines
- Colored pencils or markers, with brown, two blues, red, yellow and green among them
- Plain paper held upright, because he's taller than he is wide
Short on colors? Brown and blue alone cover most of him.
How to Draw a Cowboy Step by Step
Step 1: Draw head marks and a stick body
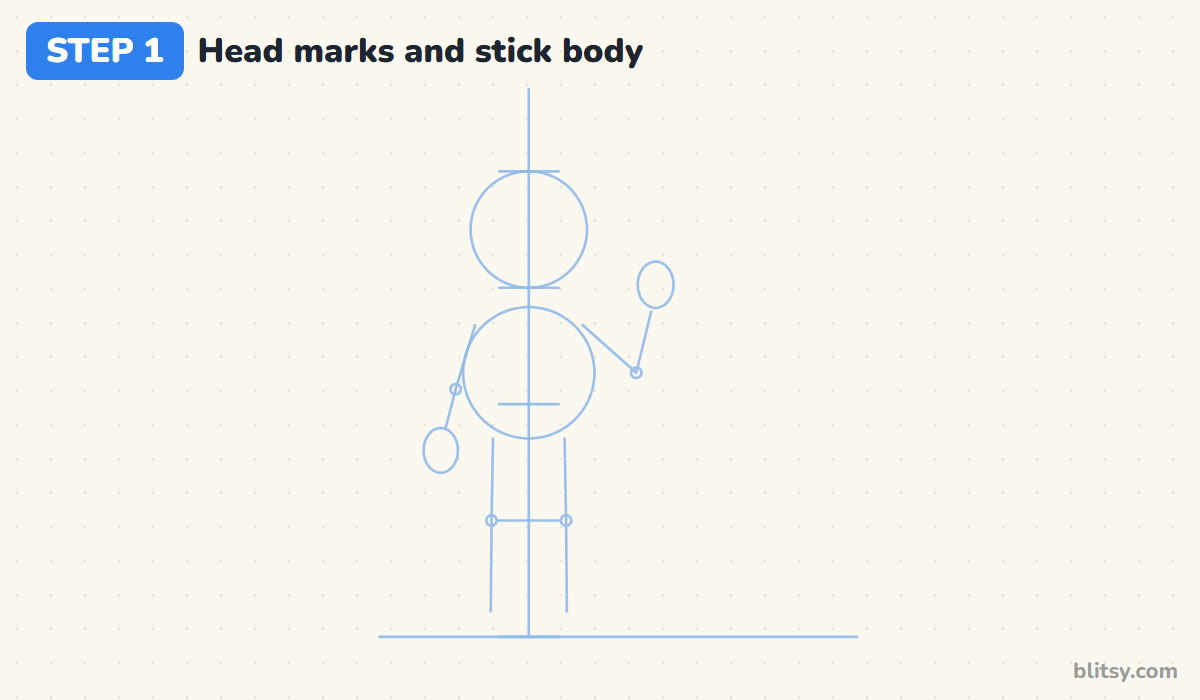
Start with a line down the middle of the page and a ground line at the bottom. Draw a head circle near the top, then make short marks below it, each one head apart, until you reach the ground. Add an oval for the chest, a stick arm hanging down, another bent up for the wave, and two straight legs with small knee circles.
💡 Tip: Leave a good gap above the head circle, since the hat will stand up quite a bit higher than the head.
Step 2: Shape the face, the ears and the neck
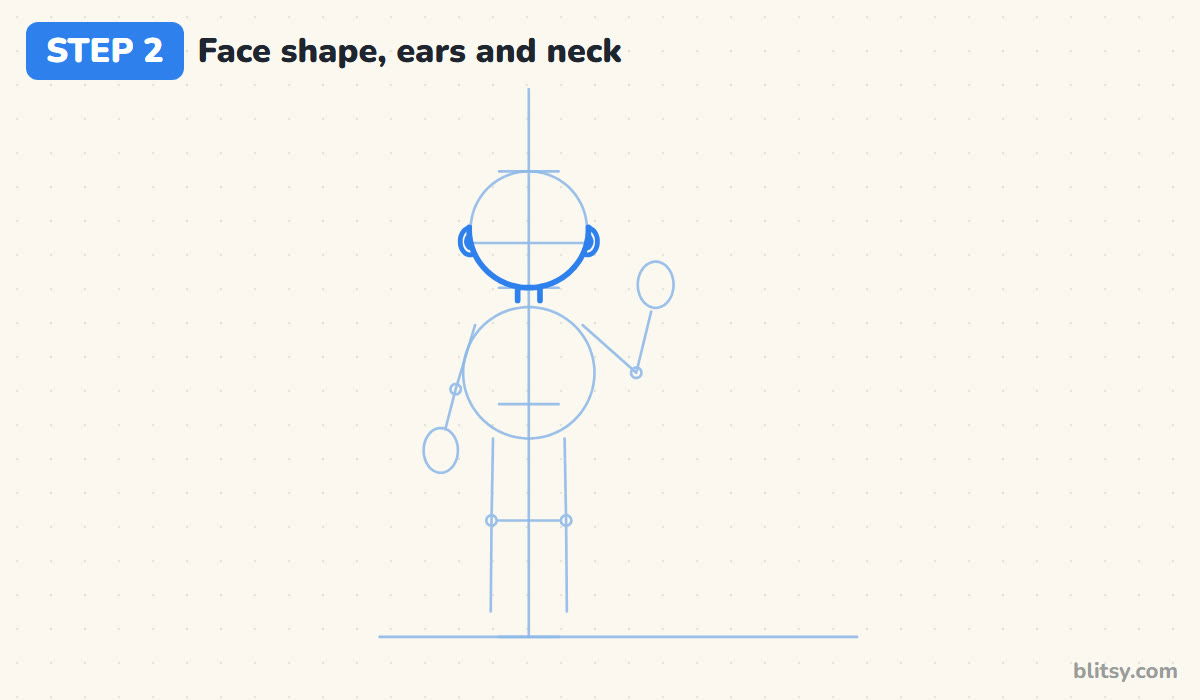
Draw a soft line across the middle of the head for the eyes. Trace the lower half of the head circle firmly for the chin; the hat will cover the top. Add a C-shaped ear on each side at eye level and two short neck lines.
💡 Tip: Keep the neck short and about as wide as the gap between the eyes, so the head doesn't look like it's floating.
Step 3: Draw the curled brim and the tall crown
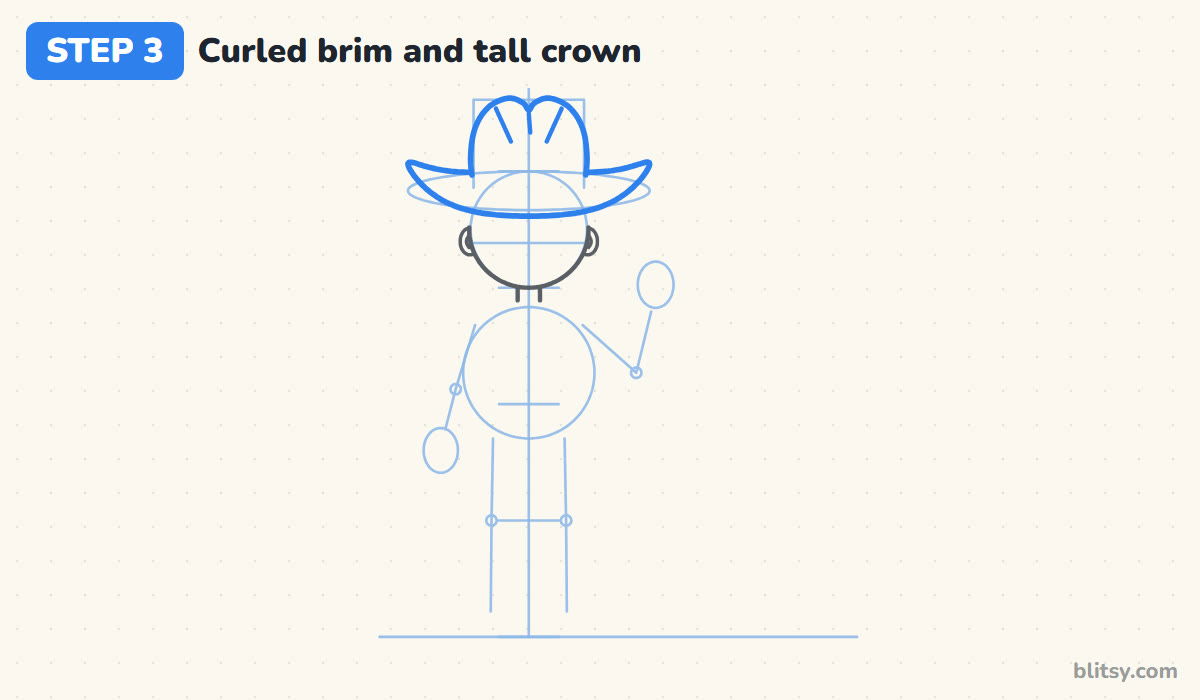
This is where I slow down. Sketch a flat oval across the forehead, roughly twice as wide as the head, and a light box on top for the crown. Now draw the real brim over that oval, but lift both ends upward into curls and let the front edge dip a little toward the eyes. The crown rises from the middle with two bumps on top and two short dent lines.
💡 Tip: Curl both brim ends to the same height; one tip higher than the other makes the hat look tipped over by accident.
Step 4: Add the hatband, the hair and the bandana
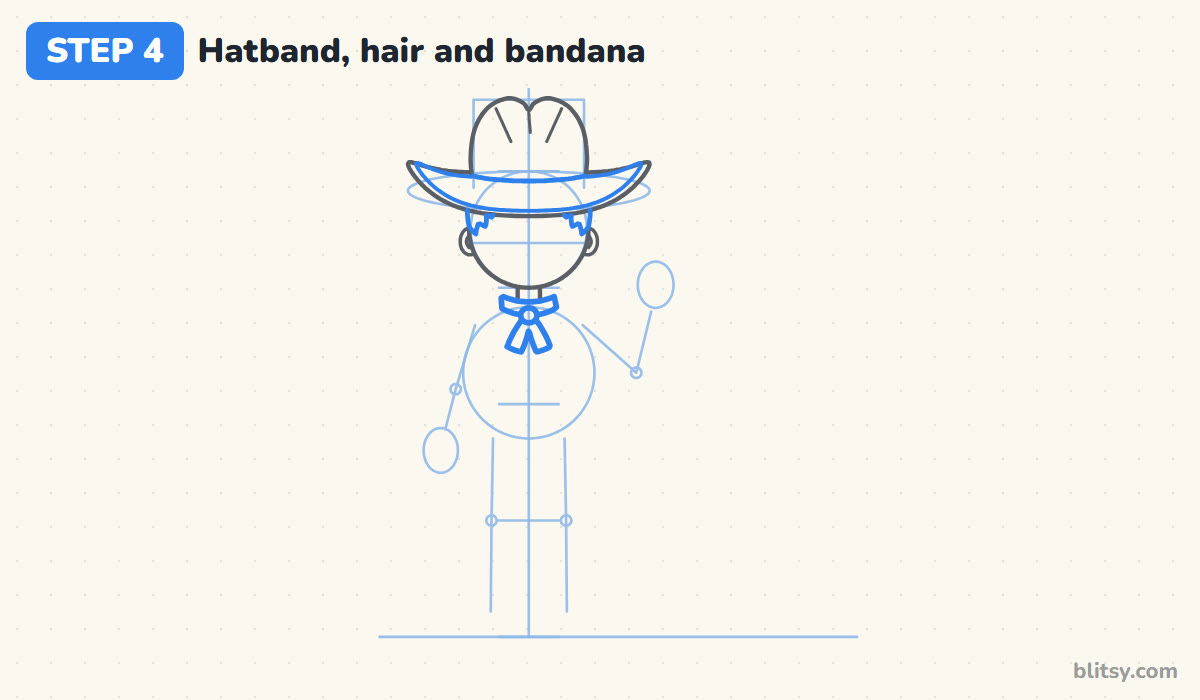
Run a curved line around the base of the crown to make a band, and add a thin second line just inside the brim edge. A couple of short, spiky hair tufts peek out under the brim beside each ear. For the bandana, draw a band hugging the neck, a small round knot at the front and two tails hanging down.
💡 Tip: Curve the bandana band downward in the middle like a smile; a straight band looks like a stiff collar.
Step 5: Draw the sleeves, the cuffs and the hands
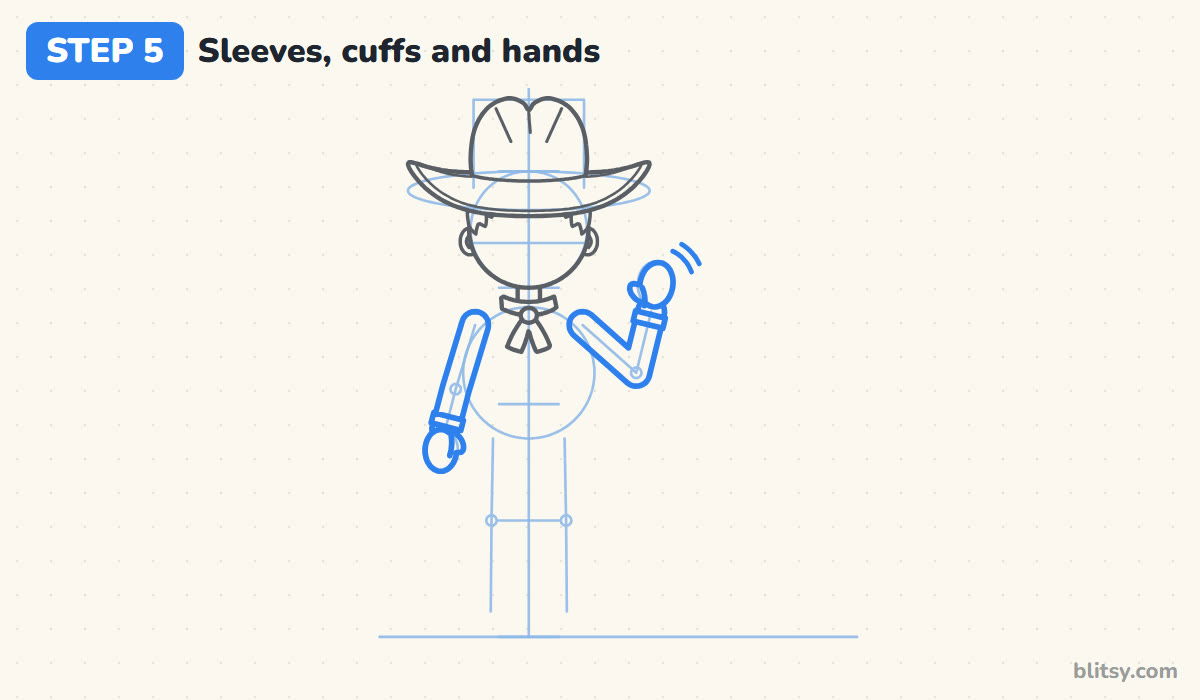
Follow each stick arm with two lines for a long sleeve, and add a slightly wider cuff at the wrist. Hands are mittens with a thumb bump: the lower one rests at hip level for the rope, the raised one opens toward his hat. Two short curved lines beside it show the wave.
💡 Tip: Give the arms real width, about a third of the head, so they look soft and cartoony instead of like sticks.
Step 6: Add the open vest and the star badge
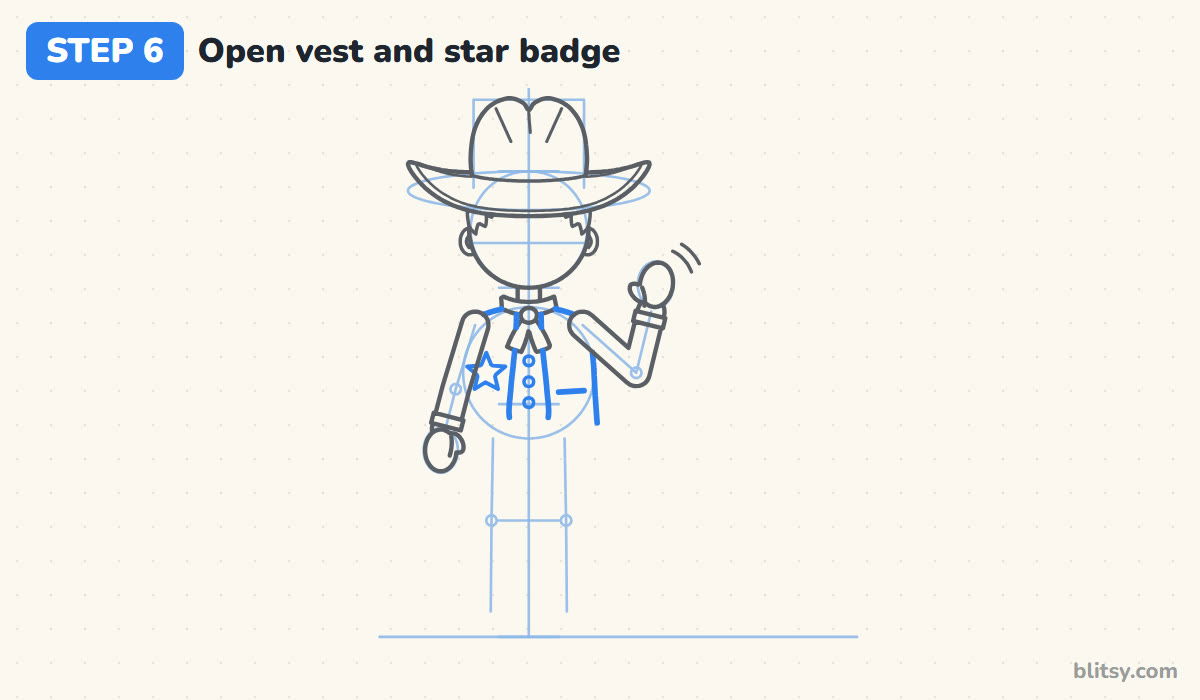
The vest is two panels with a strip of shirt showing between them. Draw each inner edge from the bandana down to the waist, curving out slightly at the bottom. Put three small round buttons on the shirt strip, a pocket line on one panel and a five-point star on the other.
💡 Tip: Place the star high on the chest, level with the elbows, where a real badge would be pinned.
Step 7: Draw a coiled rope lasso
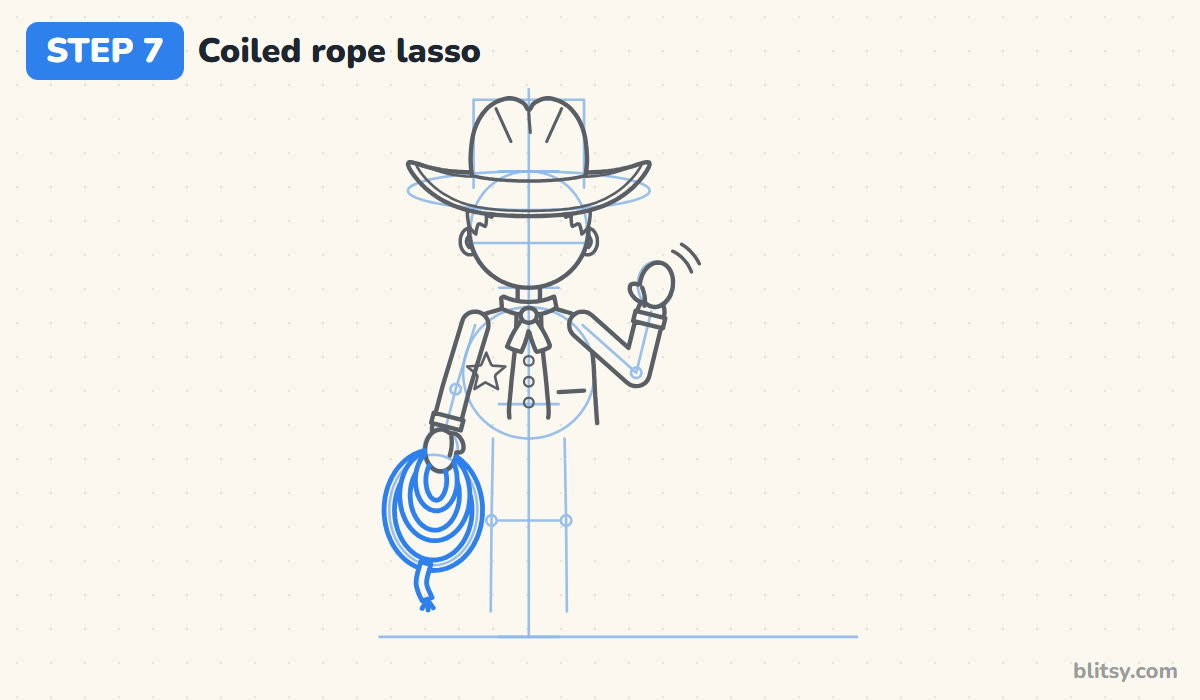
Lightly sketch a tall oval hanging from the lower hand as a size guide. Inside it, draw three rope loops that all start at the hand and drop to different depths, smallest in front. Rope has thickness, so each loop gets two close lines. Finish with a short tail hanging from the bottom and a few frayed strands at its end.
💡 Tip: Draw the smallest loop first and the bigger ones around it; that way you never have to erase a line that should be hidden.
Step 8: Add the belt, the buckle and the jeans
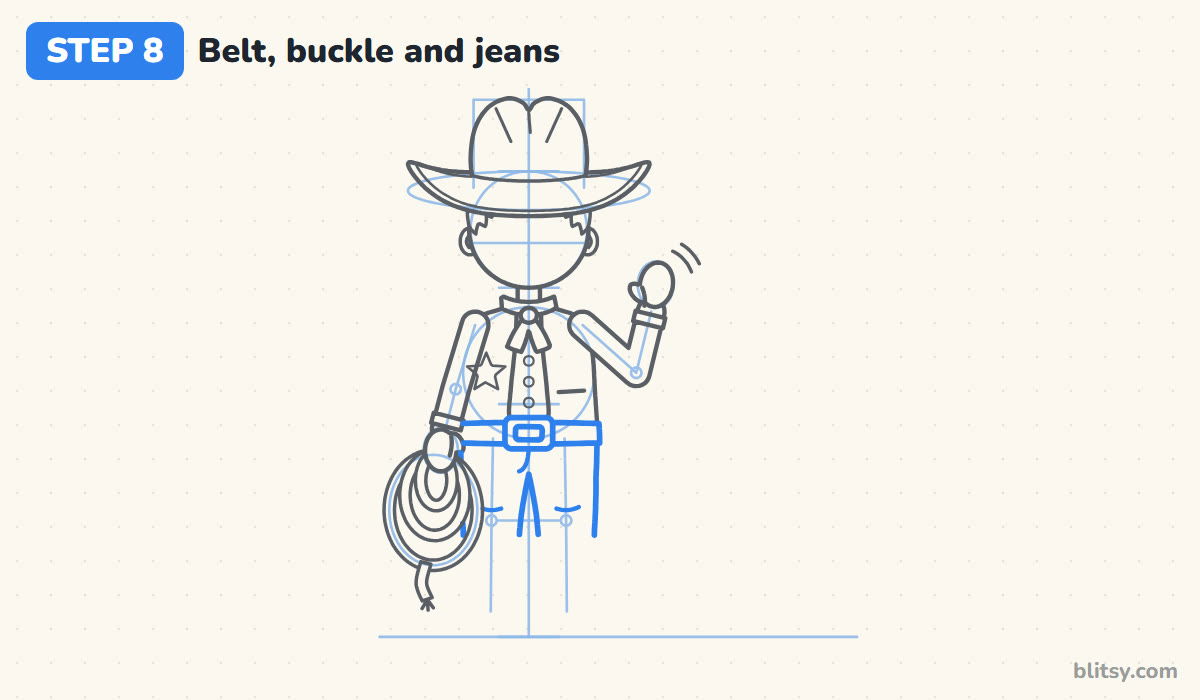
The belt runs across the waist below the vest. Cowboy buckles are big, so make yours a rounded rectangle wider than the belt is tall, with a smaller rectangle inside. Under the belt, draw each jean leg down to around the third head mark, with a narrow gap between them. Leave the bottoms open for the boots. Add a short fly line and two knee creases.
💡 Tip: Let the inner leg lines meet a little under the buckle, not right at the belt, so his legs don't look too short.
Step 9: Draw the boots, the heels and a cactus
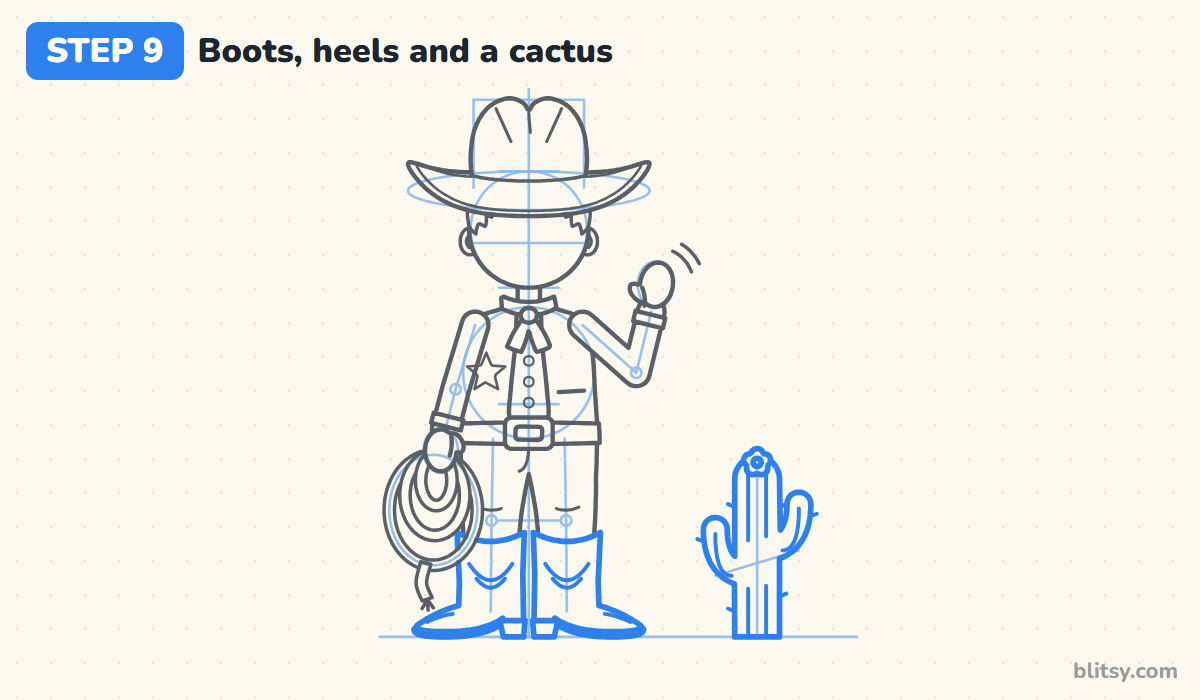
Each boot starts as a tall shaft with a V-shaped dip at the top. At the bottom, the foot turns outward into a long pointed toe, and a small block heel sits under the back. Add a sole line and a few curved stitch lines. Beside him, add a cactus: a rounded trunk with an arm on each side and a flower on top.
💡 Tip: Point the toes away from each other; boots pointing straight at you are tricky and look stubby.
Step 10: Give him eyes, a nose and a smile
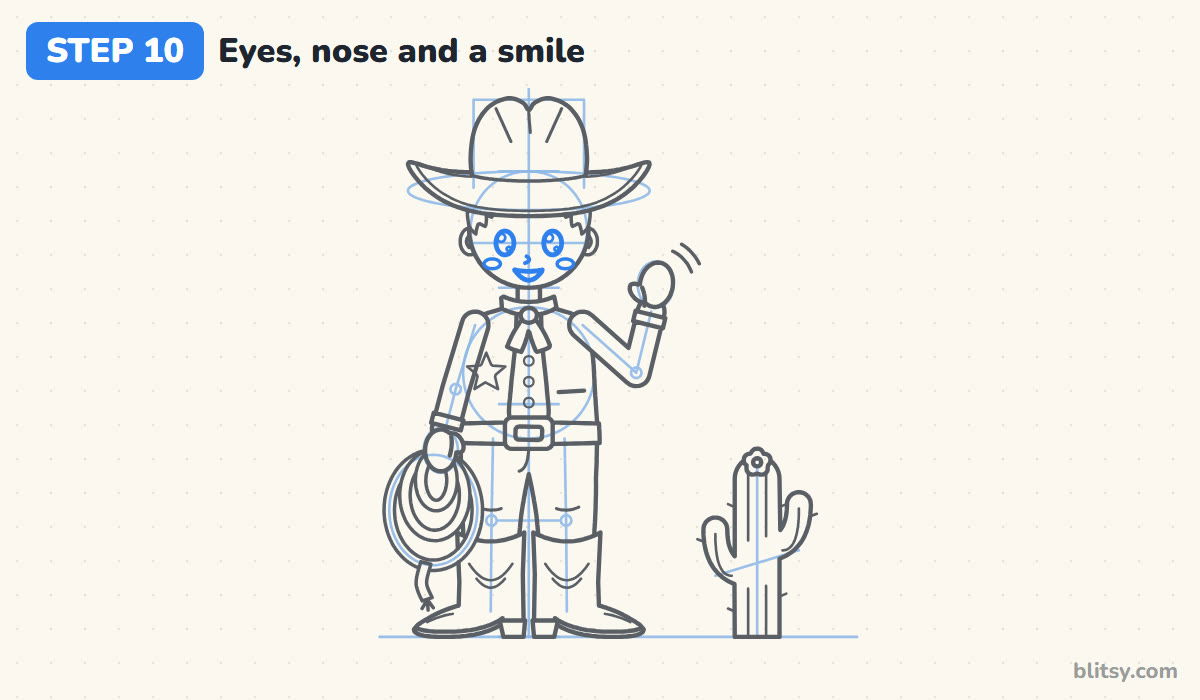
Two tall ovals go on the eye line, spaced about one eye apart. Draw a big shine circle near the top of each and a tiny one below it. A small hook is enough for the nose. For the mouth, I like a small open smile with a flat top and a round bottom and a little tongue inside. Flat cheek ovals finish the face.
💡 Tip: Keep the eyes just under the brim shadow but not touching it; that little gap lets the face breathe.
Step 11: Ink the lines and erase the guides
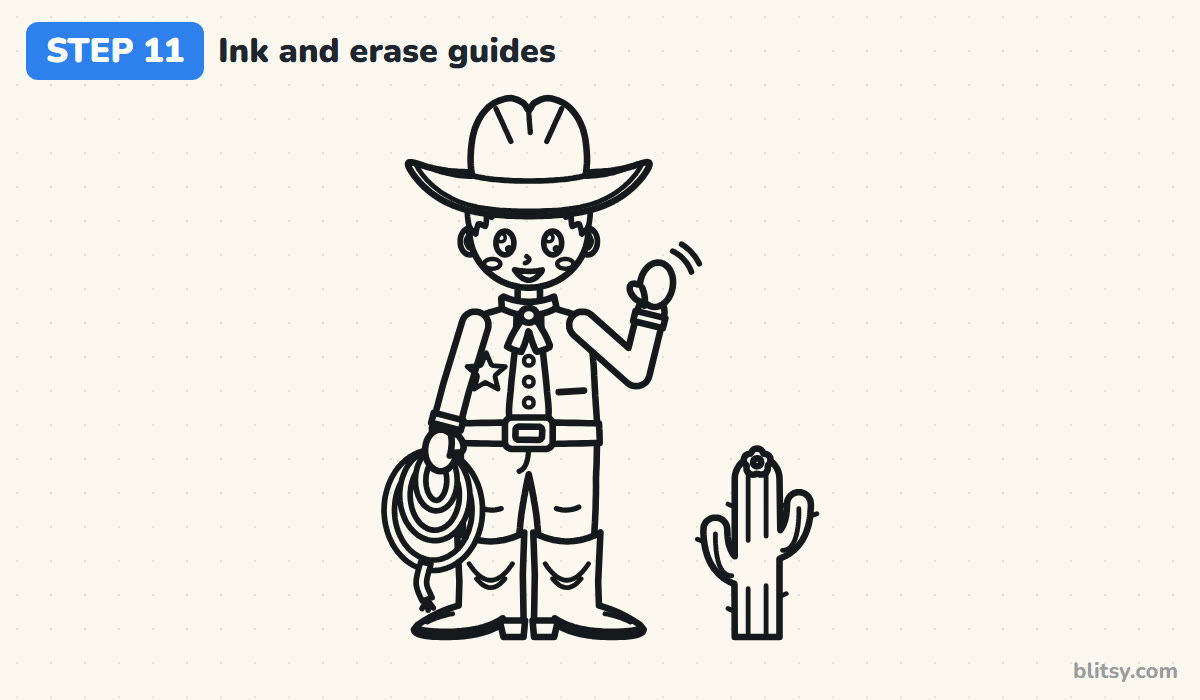
Go over every keeper line with your marker. Leave the head circle, the stick limbs, the marks and the guide ovals alone. I ink from the top down so my hand never smears fresh ink. Let it dry, then erase the pencil.


💡 Tip: Ink the rope loops slowly in one pass each; stopping halfway leaves a bump that shows.
Step 12: Color your cowboy
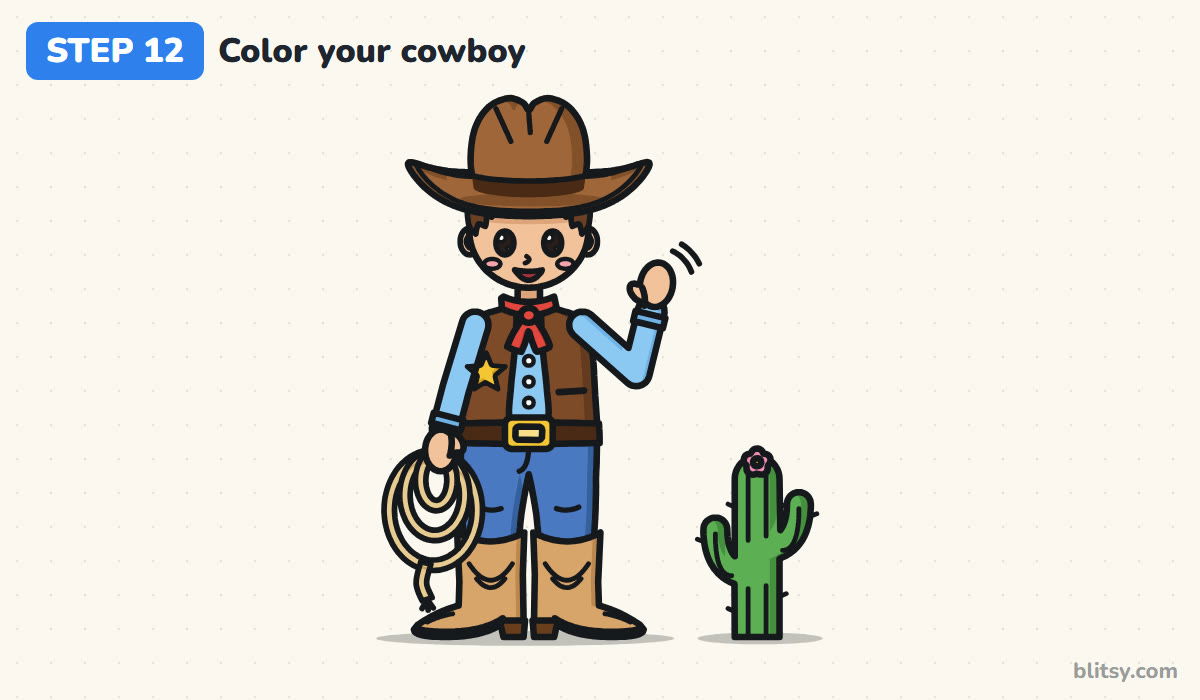
Use brown for the hat, the vest and the belt, with a darker hatband. Color the bandana red, the shirt light blue and the jeans a deeper blue. The star and buckle are yellow, the boots and rope tan, and the cactus green with a pink flower. A darker strip down the right side of the crown and jeans adds shape.
💡 Tip: Use a darker skin shade just under the brim; it tells the eye the hat is really shading his face.
Where Cowboy Drawings Tend to Wobble
- A brim no wider than the head. It reads as a cap. Make the brim about twice the width of the face.
- Hat sitting on top of the head like a lid. A real hat sinks down to the forehead. Draw the brim across the forehead, just above the eyes.
- Flat-bottomed boots. Without a heel they look like rain boots. Add the little block under the back of each foot.
- A rope drawn with single lines. It looks like string. Use two close lines for every loop.
- Arms as thin as the guide sticks. They look stiff and bony. Give each sleeve a soft, even width.
Dressing Your Cowboy a New Way
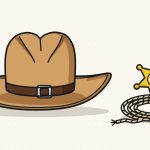
Once the stick figure is in place, swapping parts is easy. Try a cowgirl with braids under the hat, or let the lasso spin over his head. You can practice the hat on its own with the cowboy hat drawing tutorial, and the horse drawing tutorial will help when he needs something to ride.
Printable Cowboy Coloring Page and Step PDF
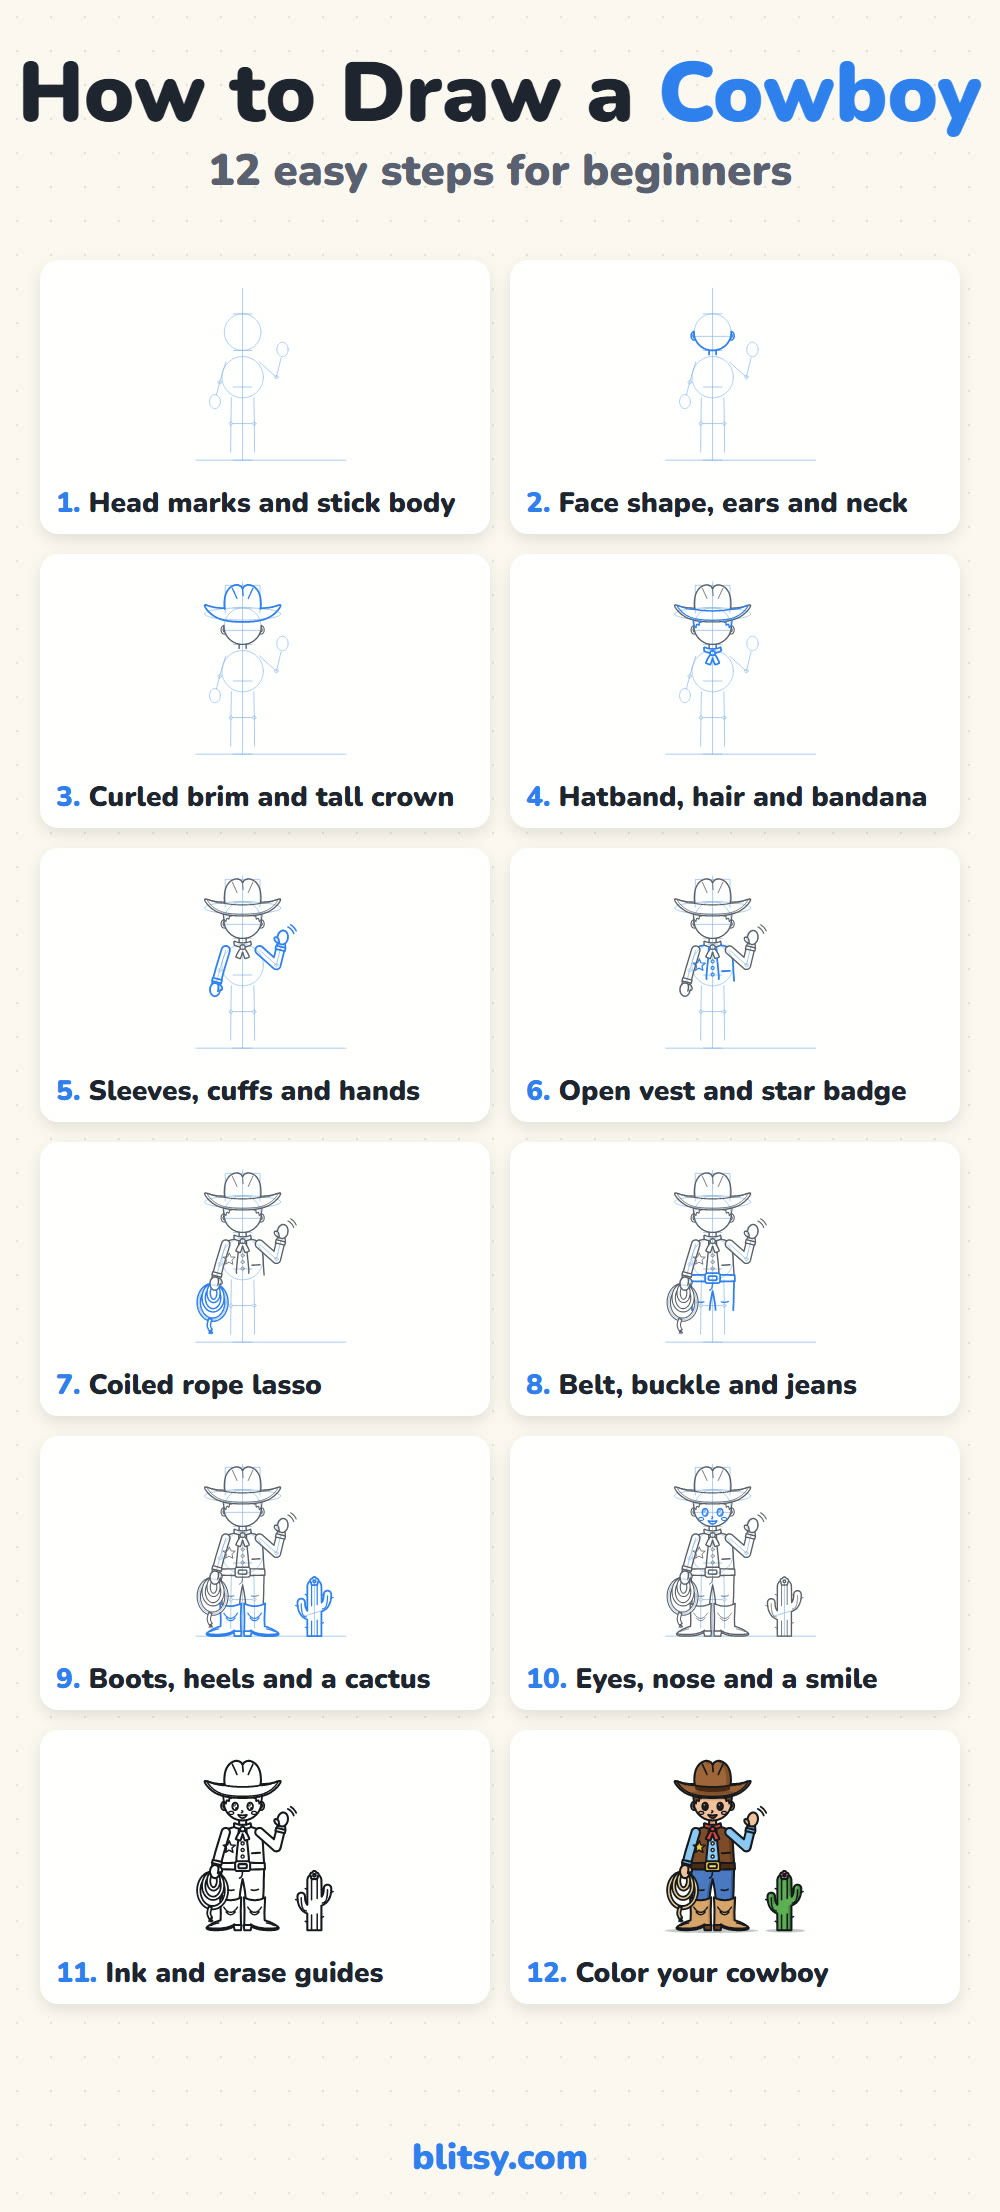
Prefer to color right away? The free cowboy coloring page has the clean outline, a small colored example and a key showing which color goes where. The step-by-step guide PDF puts all 12 steps and tips on a few pages that print on Letter or A4.
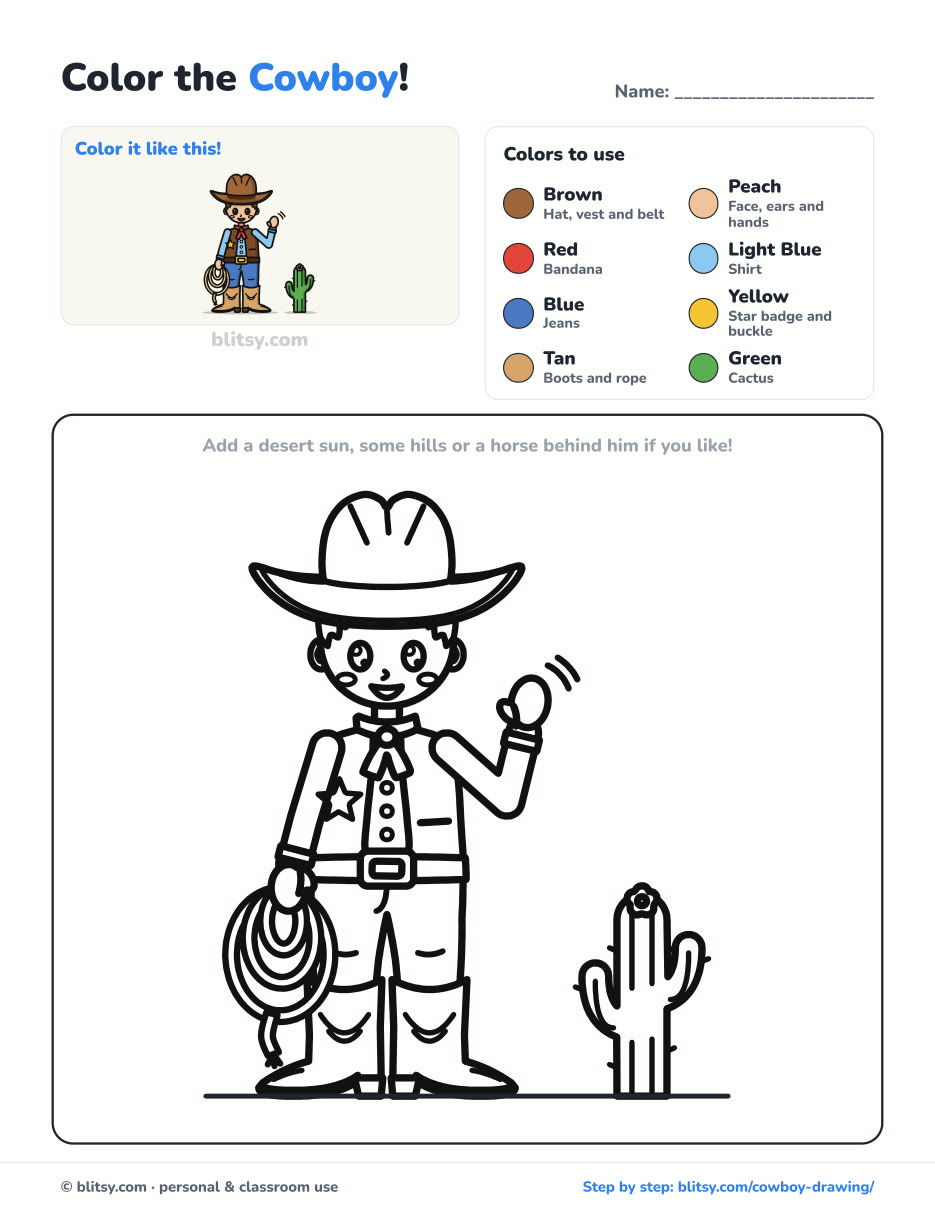
Black outlines with a colored example and the color names at the top. Ready to print and color.
⬇️ Download Coloring PageEvery step picture with its instructions and tips, to keep beside your paper while you draw.
⬇️ Download Drawing Guide📱 On a phone? Tap a download button, then open the file and choose Share → Save to Files or Print. On a computer, the PDF opens or saves straight to your Downloads folder.
Save the Cowboy Steps to Pinterest
Saddle Up for These Character Tutorials
These are full step-by-step tutorials as well, mostly costumed characters, with numbered pictures to follow.
- Cat Noir Drawing: Draw the chibi hero with his staff in hand and tail curled using the how to draw Cat Noir tutorial.
- Abraham Lincoln Drawing: A tall black hat and a dark chin beard frame a thoughtful face in the Abraham Lincoln drawing step by step portrait.
- Monster Drawing: Our monster drawing tutorial turns plain ovals into a furry cyclops and a little jelly buddy.
- Tinkerbell Drawing: One reaching hand and four slim wings make Tinkerbell fly in this Tinkerbell drawing tutorial.
- Astronaut Drawing: Swap the cowboy hat for a helmet with the how to draw an astronaut step by step lesson.
- Darth Vader Drawing: The Darth Vader drawing tutorial shrinks the Sith lord into a chibi with a red glow.
- Balloon Drawing: Five balloons, a pink heart among them, are tied under a red bow in the balloon drawing tutorial.
Cowboy Drawing Questions From Young Artists
What is the easiest way to draw a cowboy?
Draw a plain stick figure first, then dress it. Clothes placed over a stick figure keep the body in proportion.
Why do cowboys wear such big hats?
A wide brim kept the sun and rain off their faces and necks during long days outdoors. That's also why the brim is the biggest shape in the drawing.
What is a cowboy's bandana for?
Cowboys pulled it over the nose and mouth to keep dust out on dry, windy trails.
Can younger kids draw this cowboy?
Yes, children from about 6 can follow it with a grown-up helping on the head marks. Little ones can skip the stitching and draw the lasso as one loop.
Saddle up your pencil and give your cowboy a name worthy of the Wild West. 🤠✏️
Related posts:
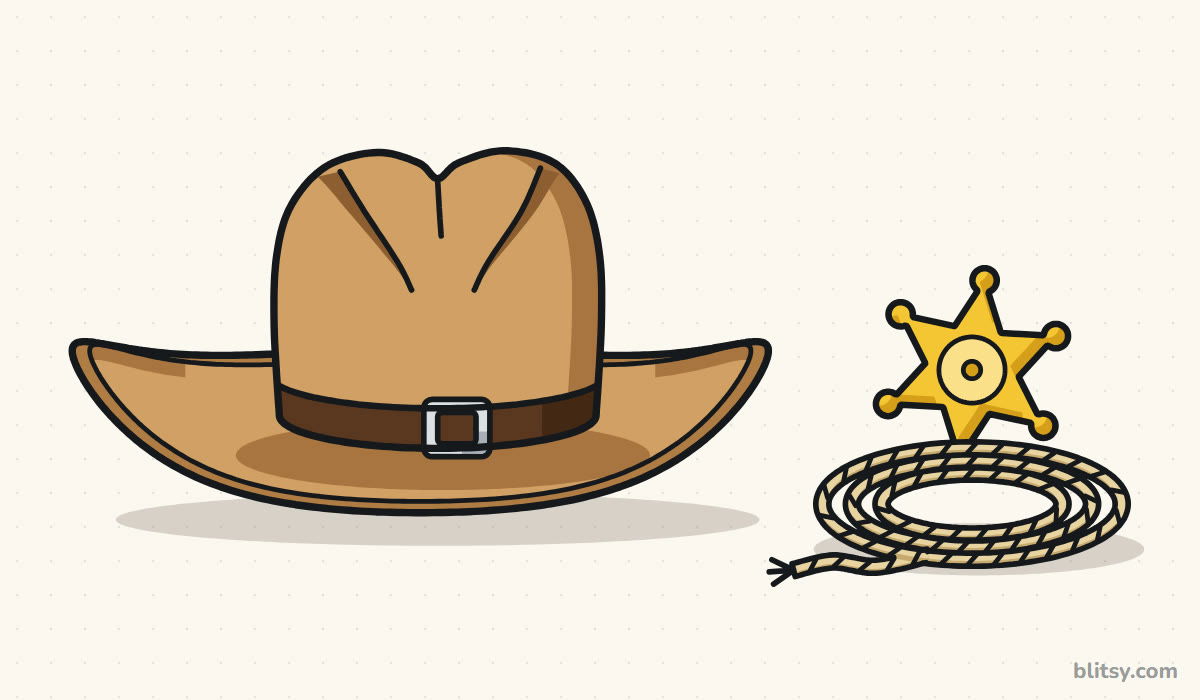 How to Draw a Cowboy Hat Step by Step (Easy Western Sketch)
 How to Draw Bart Simpson Step by Step (Easy Cartoon)
 How to Draw a Tank Step by Step (Easy Cartoon Tank)
 How to Draw a Bee Step by Step (Easy Cartoon Bee)
 How to Draw a Boy Step by Step (Easy Full-Body Cartoon)
 How to Draw a Mermaid Step by Step (Easy Cartoon for Kids)
 How to Draw a Family Step by Step (Easy Cartoon Portrait)
 How to Draw a Princess Step by Step (Easy Ball Gown Cartoon)
 How to Draw a Whale Step by Step (Easy for Beginners)
 How to Draw a Mushroom Step by Step (Easy Storybook Toadstool)
 How to Draw a Door Step by Step (Cozy Cottage Door)
 How to Draw a Taco Step by Step (Easy Kawaii Taco)

