
Owls are mostly eyes, and that's good news for anyone who thinks they can't draw. Strip away the feathers and you're left with an egg, two circles and a tiny beak. Below I'll walk you through how to draw an owl step by step, from those first light shapes to a finished night scene with a moon and stars. Keep your pencil light at the start and the rest falls into place.
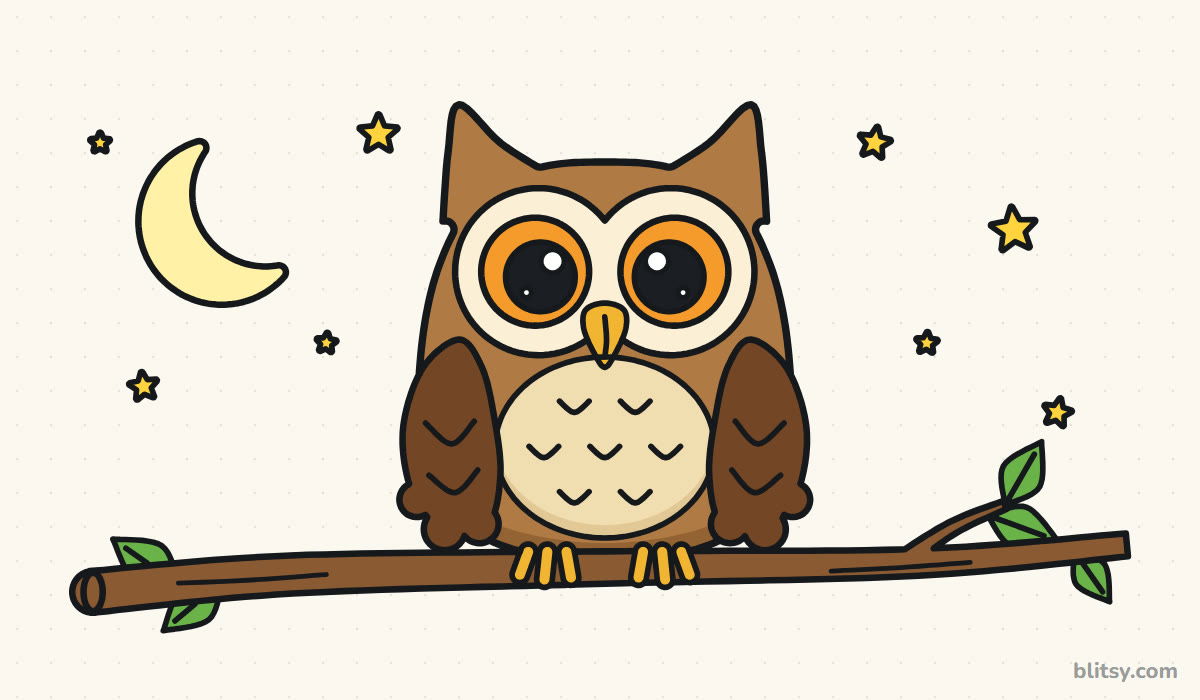
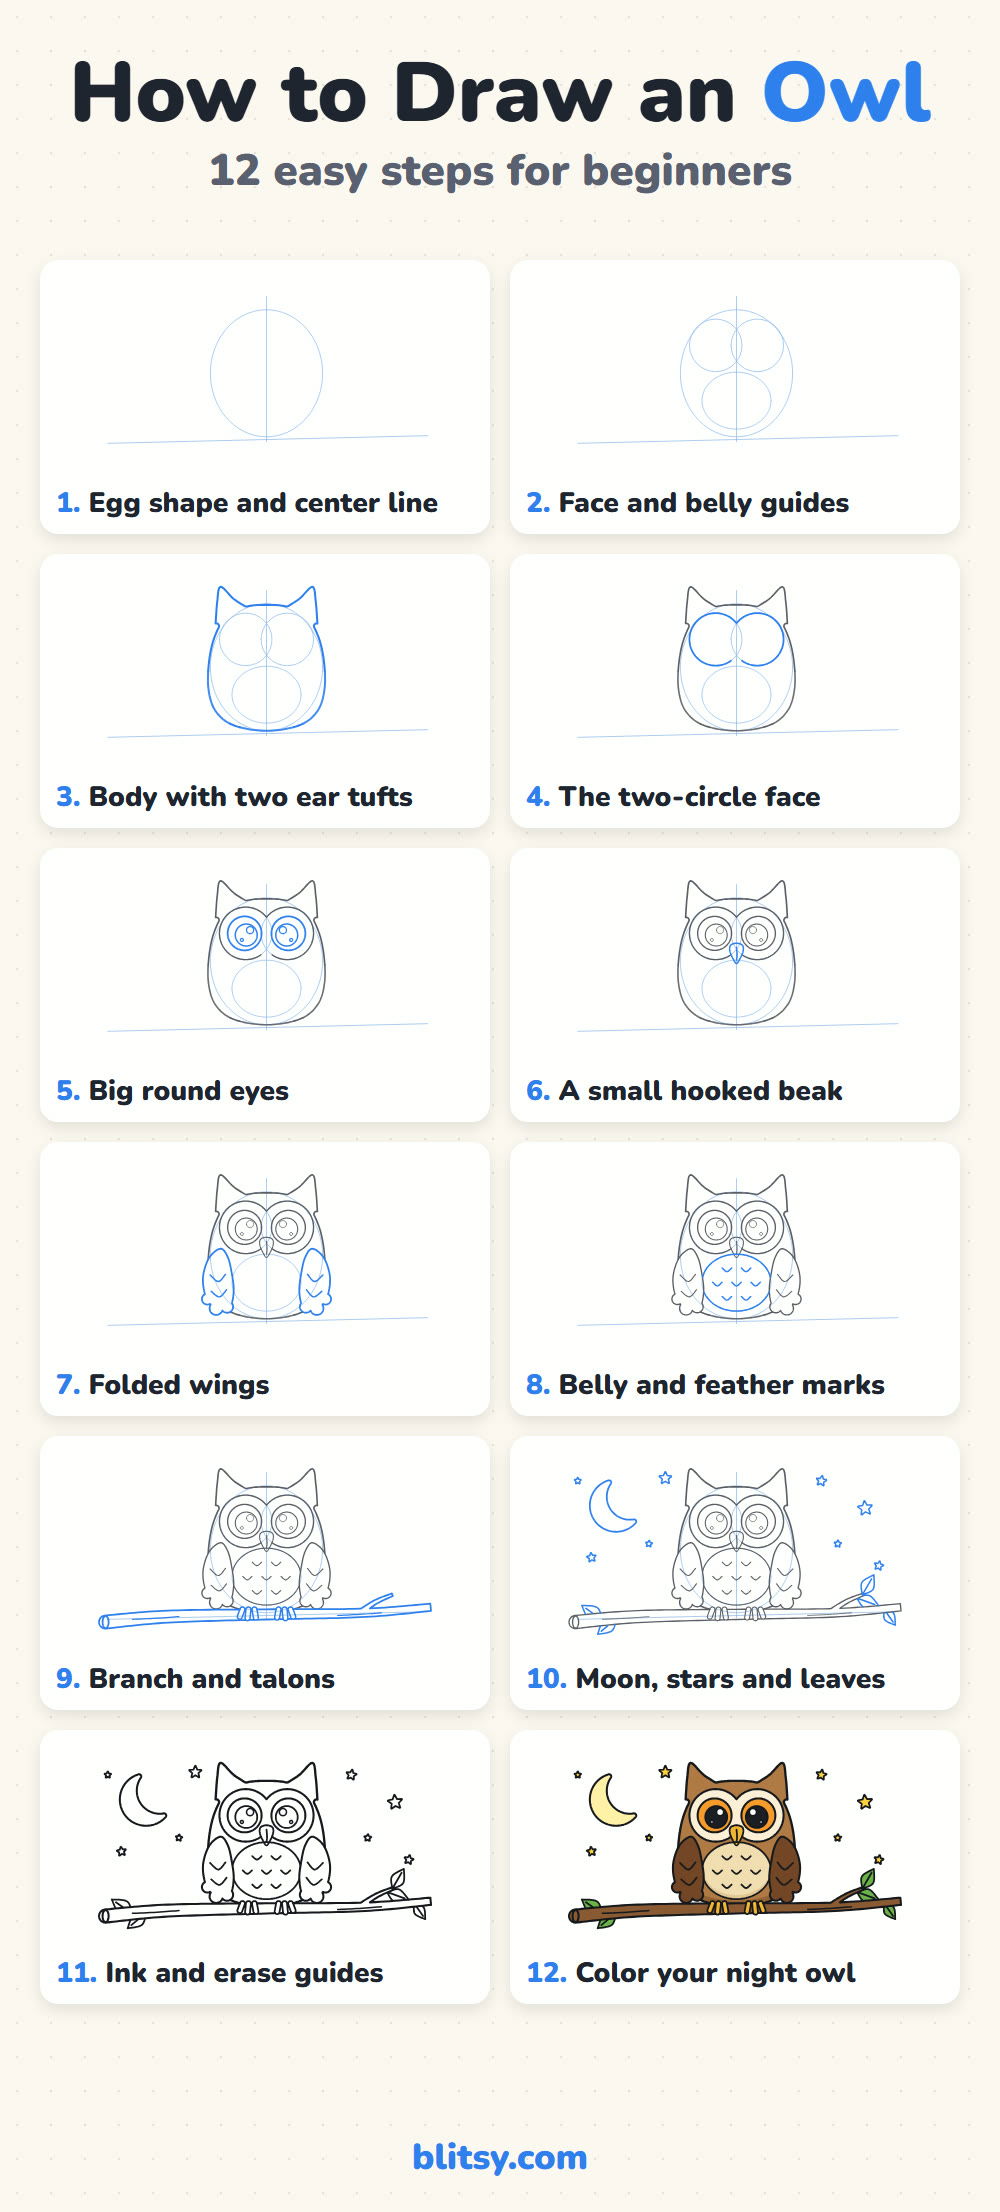
Follow the owl's growth picture by picture: fresh lines show up in blue, finished parts turn gray, and the faint light-blue shapes are guides you'll rub out near the end.
Quick overview
⏱️ Time: roughly 30 to 40 minutes with coloring
🎯 Level: easy, good for kids from about 6
✏️ Steps: 12
🦉 You'll draw: a brown owl with big orange eyes, perched on a branch at night
Night Owl Sketch Supplies
- An HB pencil for the light guide shapes
- A soft eraser
- A black fineliner or thin marker for inking
- Colored pencils or markers in brown, dark brown, cream, orange, gold, black, green and pale yellow
- Plain paper turned sideways, so the branch has room
Missing a color? A gray owl with yellow eyes looks just as good, so use what's in your box.
How to Draw an Owl Step by Step
Step 1: Sketch an egg shape and a center line
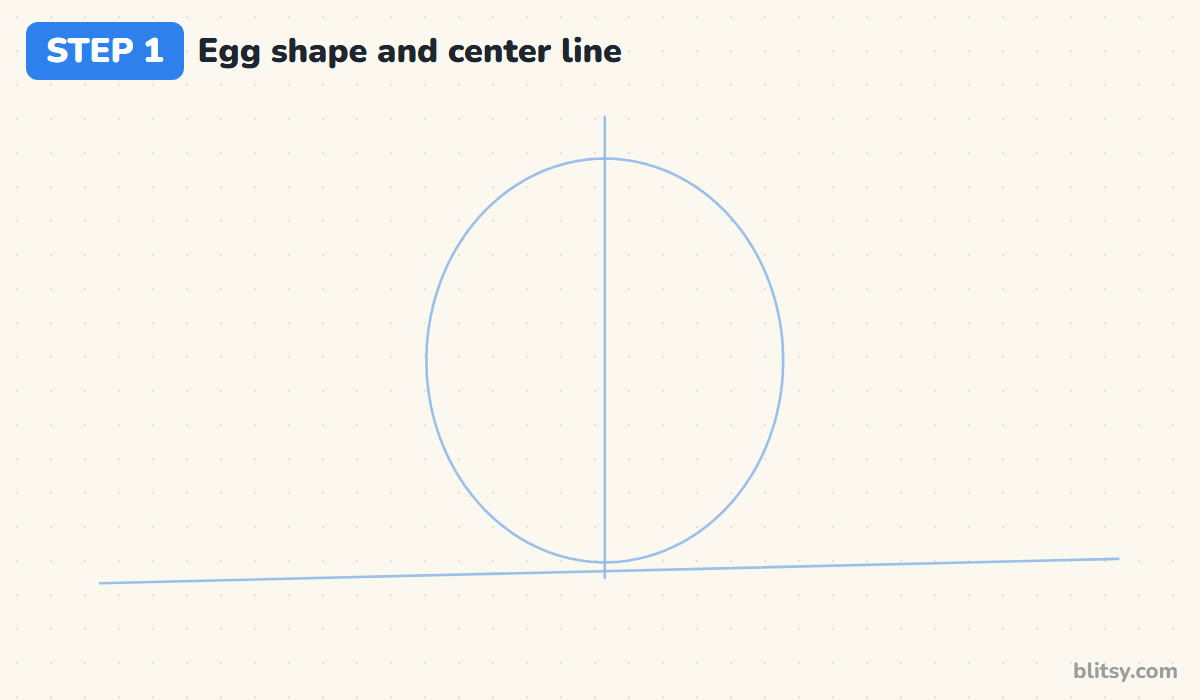
In the middle of the page, draw a tall egg shape with the wider end at the bottom. Run a straight line down through its middle, top to bottom. Then add a long, almost flat line under the egg for the branch. An owl seen from the front matches on both sides, and this line keeps you honest.
💡 Tip: Press so lightly that you can barely see the lines. They're only there to help you.
Step 2: Add the face and belly guides
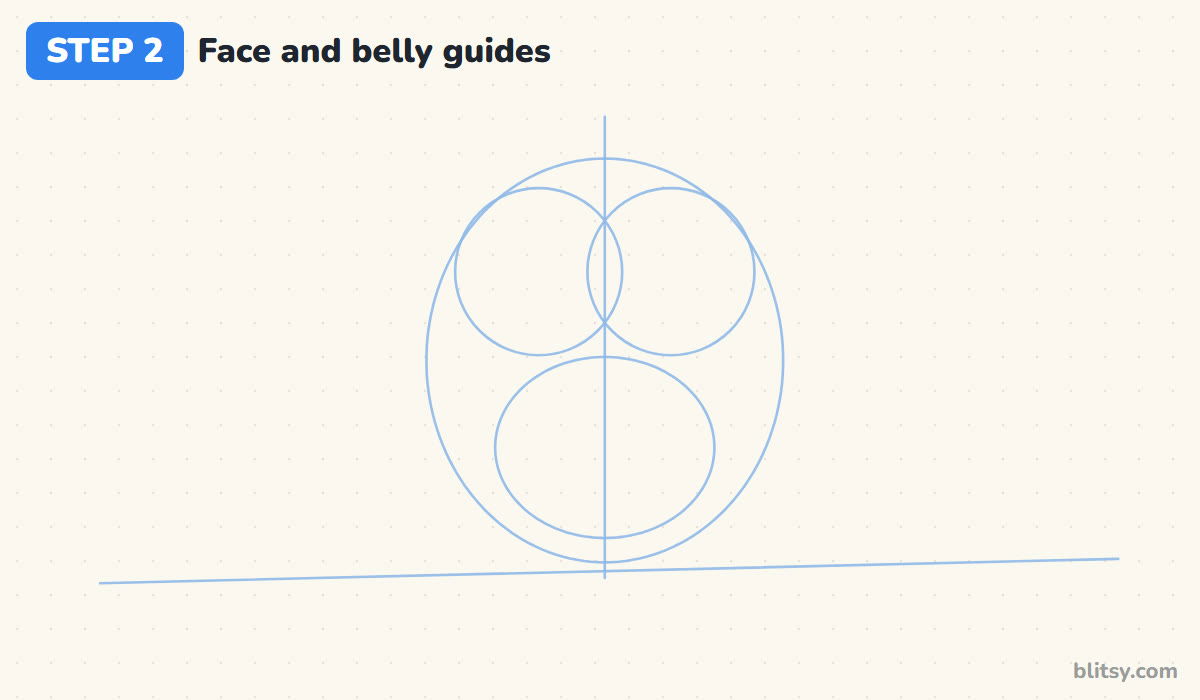
Near the top of the egg, draw two circles side by side that overlap a little on the center line. Together they cover most of the upper half. Below them, sketch an oval for the belly, leaving a small gap under the circles. I always check that both circles match before going on.
💡 Tip: Turn your paper upside down for a second. Uneven circles jump out when you see them flipped.
Step 3: Draw the body with two ear tufts
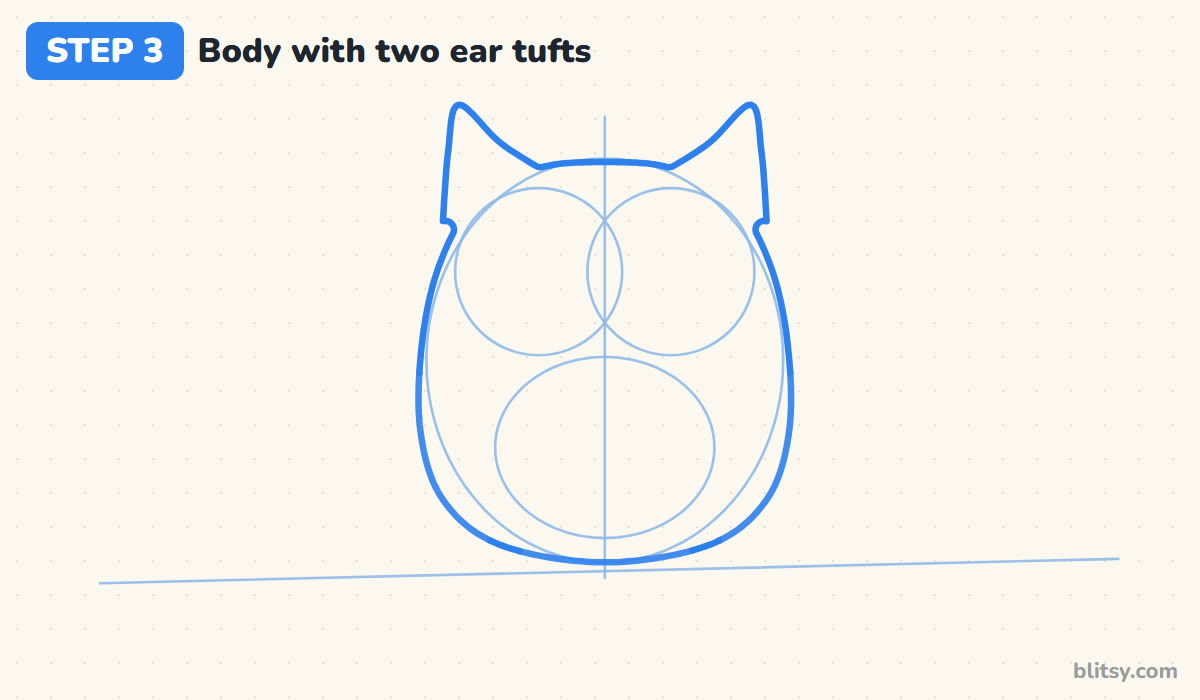
Trace around the egg with a smooth, darker line, but flatten the top a little. At each top corner, pull the line up into a pointed tuft, then bring it back down the side. These tufts look like ears, but on real owls they're just feathers. Keep the bottom wide and round so the owl looks heavy and settled on its perch.
💡 Tip: Draw one tuft, then copy the other to match it. Check them against the center line.
Step 4: Outline the two-circle face
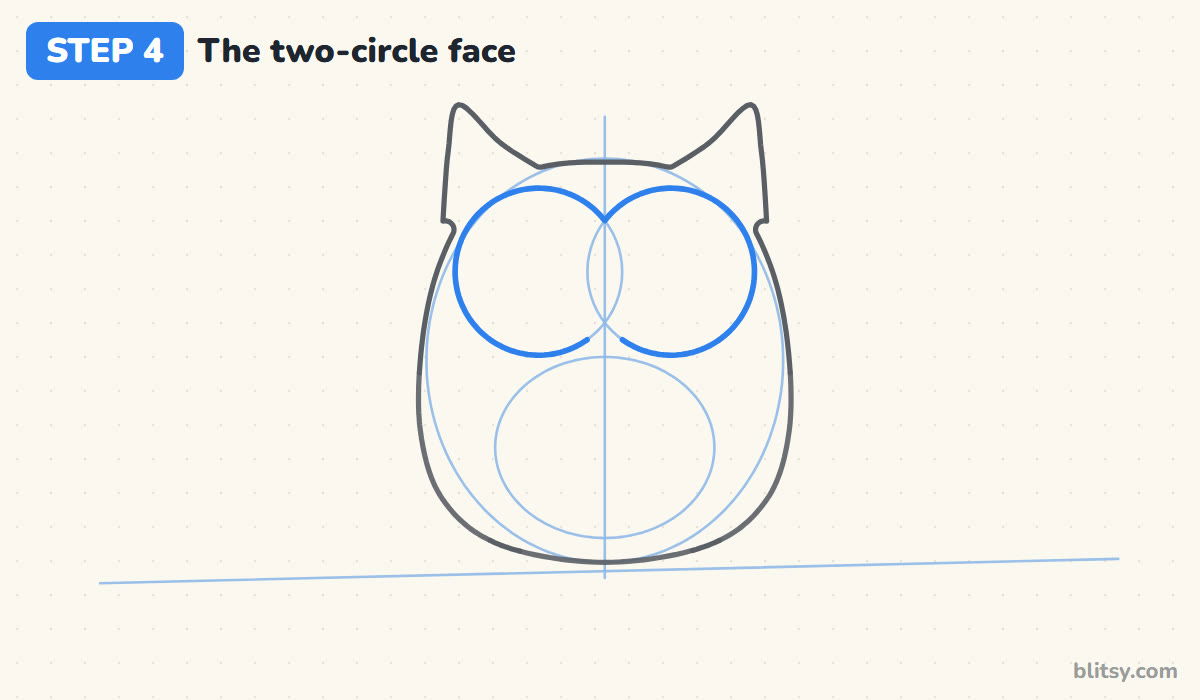
Go over the two face circles with a clear line, skipping the small part where they overlap in the middle. What's left is a wide shape with a dip at the top and bottom, like a pair of glasses. Owls really do have a flat, round face like this. It's called a facial disc, and it helps steer sounds toward their ears.
💡 Tip: If the circles drift apart, fix them now while everything is still pencil.
Step 5: Draw big round eyes
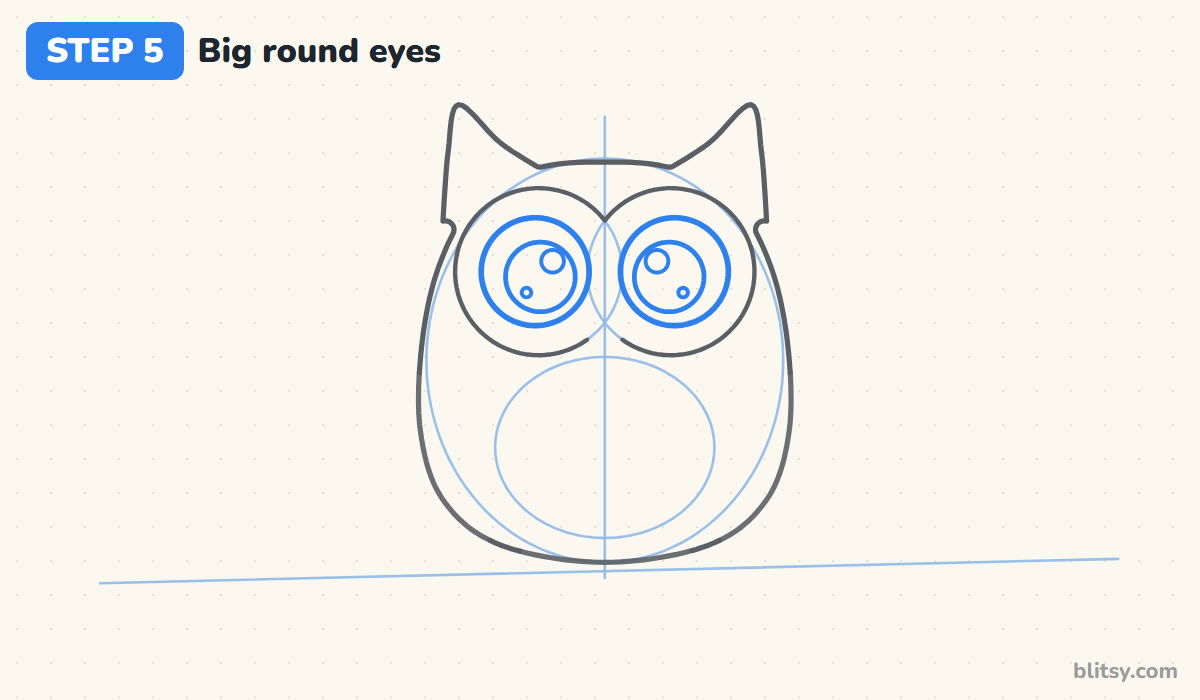
Inside each face circle, draw a slightly smaller circle for the eye. Then add a large pupil in each one, nearly filling it, and two tiny shine circles: a bigger one up and to the left, a small one lower down. Put the shines in the same spot in both eyes. Matching sparkles make the owl look alive.
💡 Tip: Big pupils look cute and sleepy-soft. Small pupils make the owl look surprised.
Step 6: Add a small hooked beak
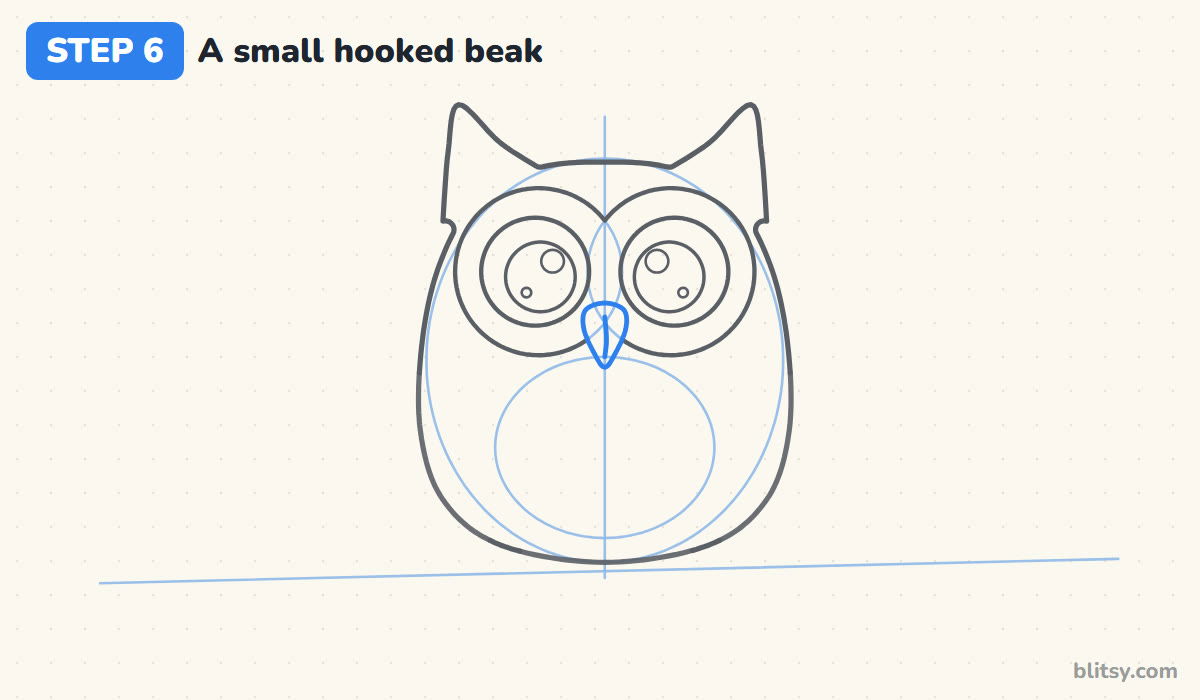
Right between the eyes, where the two face circles meet at the bottom, draw a small rounded shape that narrows to a point facing down. Add a short line down its middle. Most beginners draw this beak far too big. On an owl it's tucked into the feathers, so it should be no wider than the gap between the eyes.
💡 Tip: A beak pointing down reads as an owl. One pointing sideways turns it into a parrot.
Step 7: Draw the folded wings
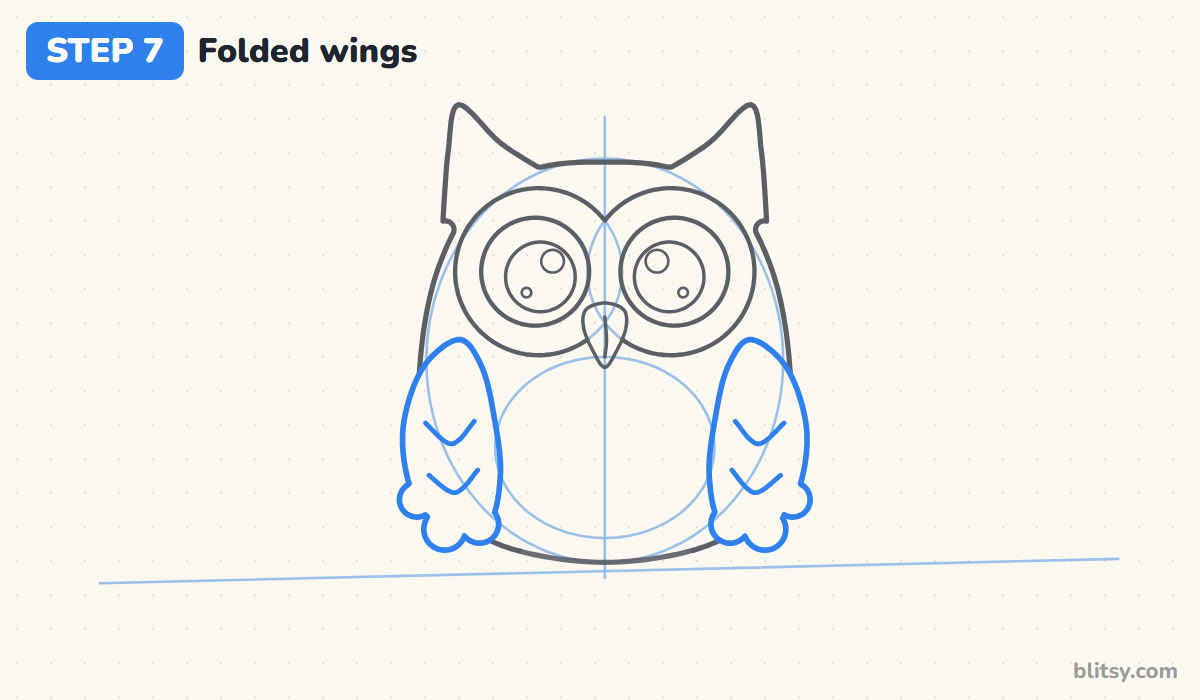
On each side of the body, below the face, draw a long wing shape that bulges slightly past the body edge. Finish the bottom of each wing with three round bumps, the folded feather tips. Inside, add two shallow V lines for layered feathers. Where a wing covers the body, the body line underneath simply stops.
💡 Tip: Finish one wing first, then draw its twin. Doing both at once usually makes them uneven.
Step 8: Draw the belly and feather marks
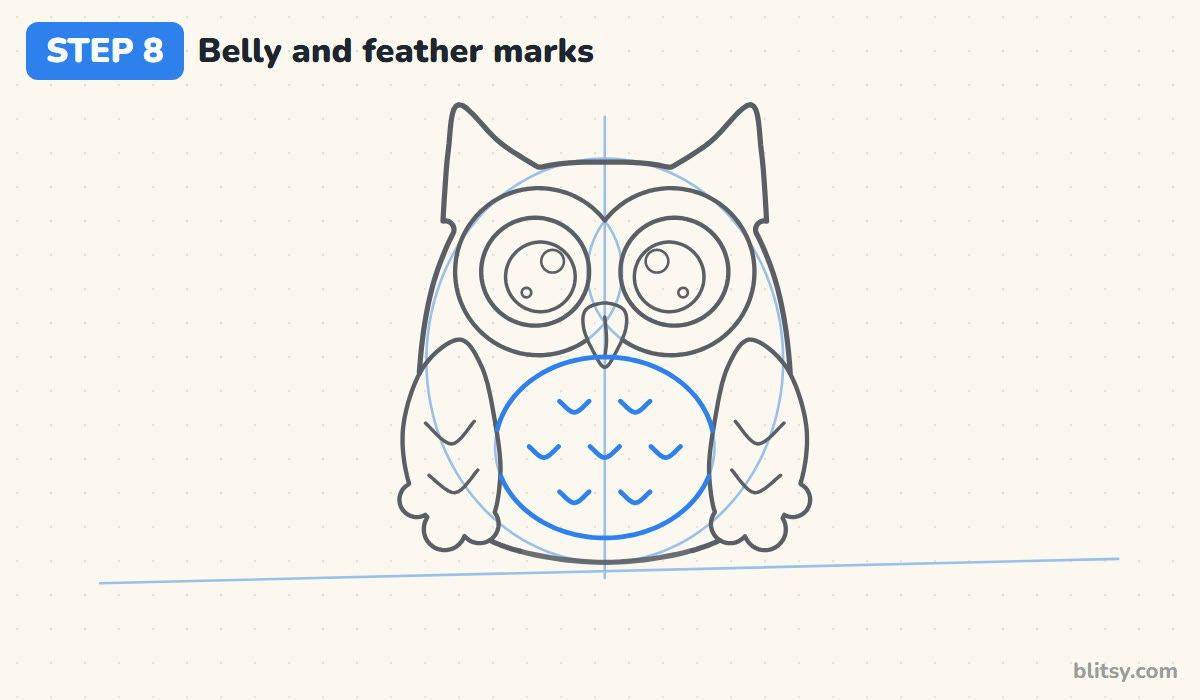
Trace the belly oval between the wings. Its sides tuck behind the wings, so stop the line where they meet. Fill the belly with small U shapes in three rows: two, three, then two. These little marks hint at soft feathers without you drawing every single one.
💡 Tip: Space the U marks out like bricks in a wall. Neat rows look stiff; staggered ones look fluffy.
Step 9: Add the branch and talons
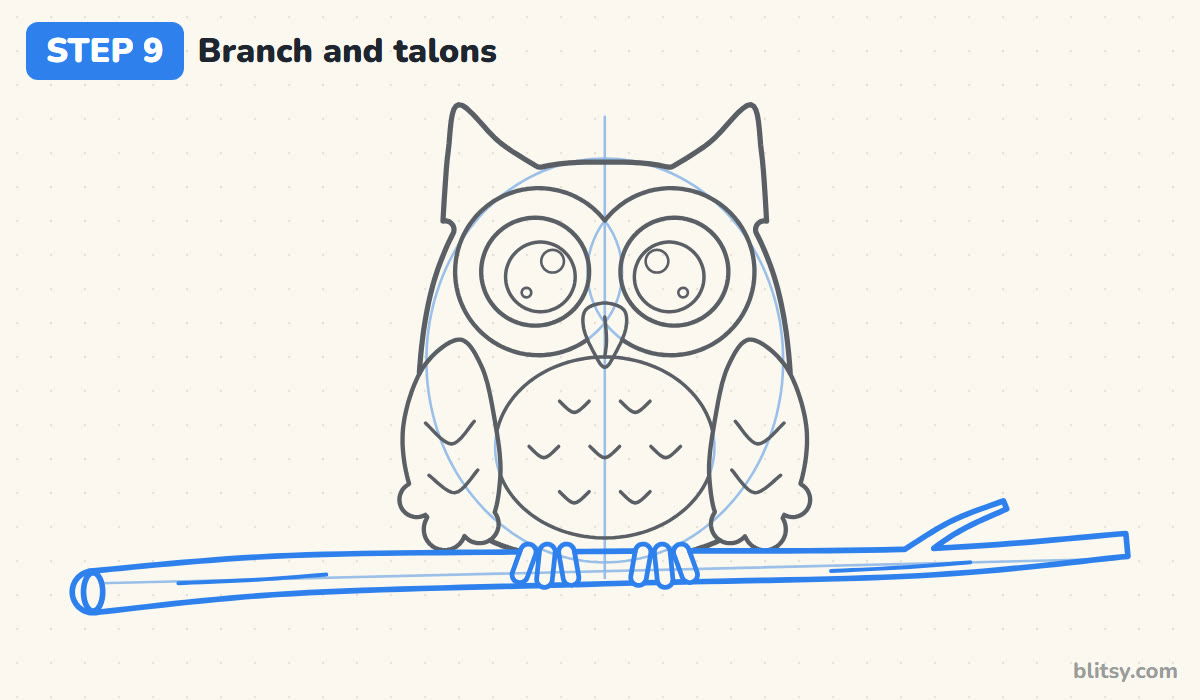
Over the branch guide, draw two long lines that come closer together toward the right end. Close the left end with a small oval so it looks like a cut branch, and add a short twig on the right. Then draw the talons: three short, rounded toes on each foot, curling over the front of the branch. They should sit under the belly, a little apart.
💡 Tip: Draw the toes over the branch line, not behind it, so the owl really grips the wood.
Step 10: Draw the moon, stars and leaves
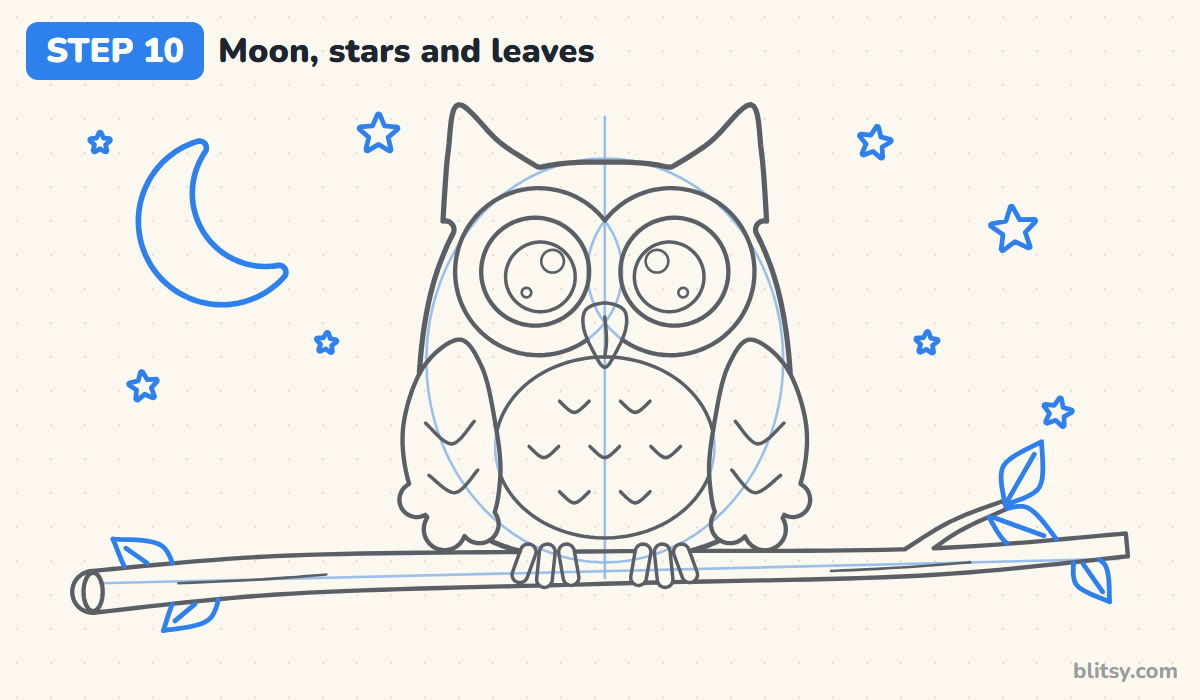
In the upper left corner, draw a crescent moon by sketching a circle and cutting a bite out of its right side. Scatter small five-point stars around the owl, keeping clear of the ear tufts. Finish with a few pointed leaves near both ends of the branch, each with one vein line down its middle.
💡 Tip: Mix big and tiny stars. All the same size starts to look like wallpaper.
Step 11: Ink the lines and erase the guides
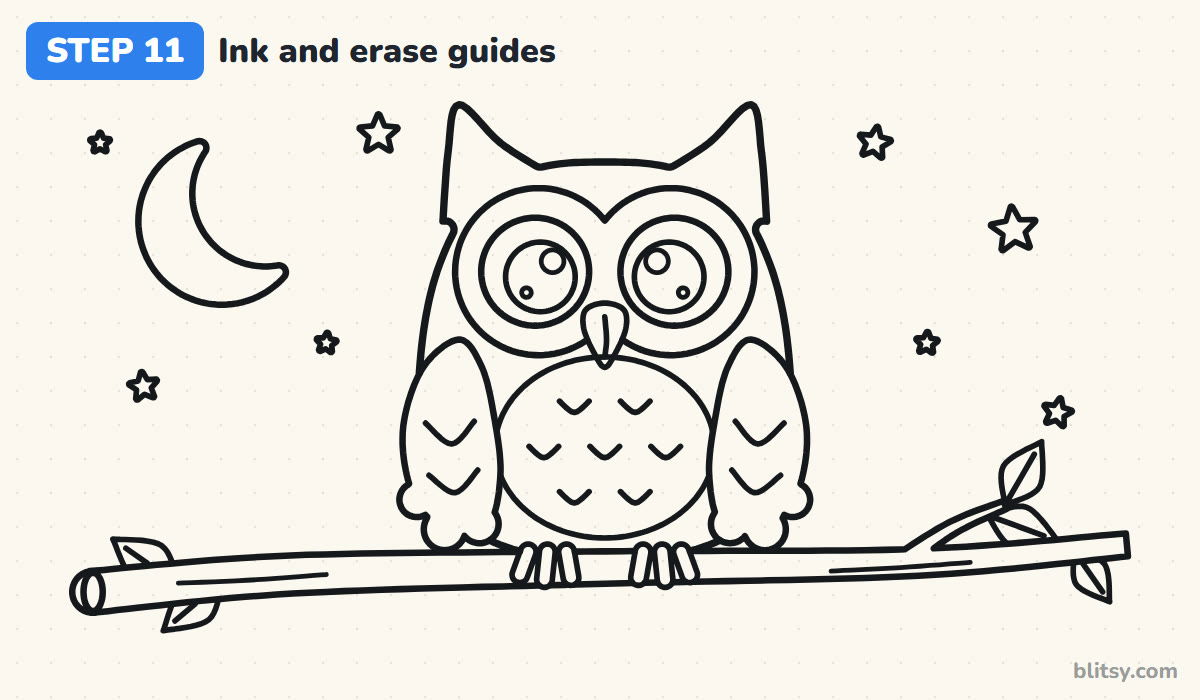
With the fineliner, trace every line you plan to keep. I work from the face outward, because the eyes are where a shaky line shows most. Skip the egg, the center line and the guide circles. When the ink is fully dry, erase all the pencil guides gently.
💡 Tip: Before erasing, touch a corner of the ink with a clean fingertip. No smear means it's ready.
Step 12: Color your night owl
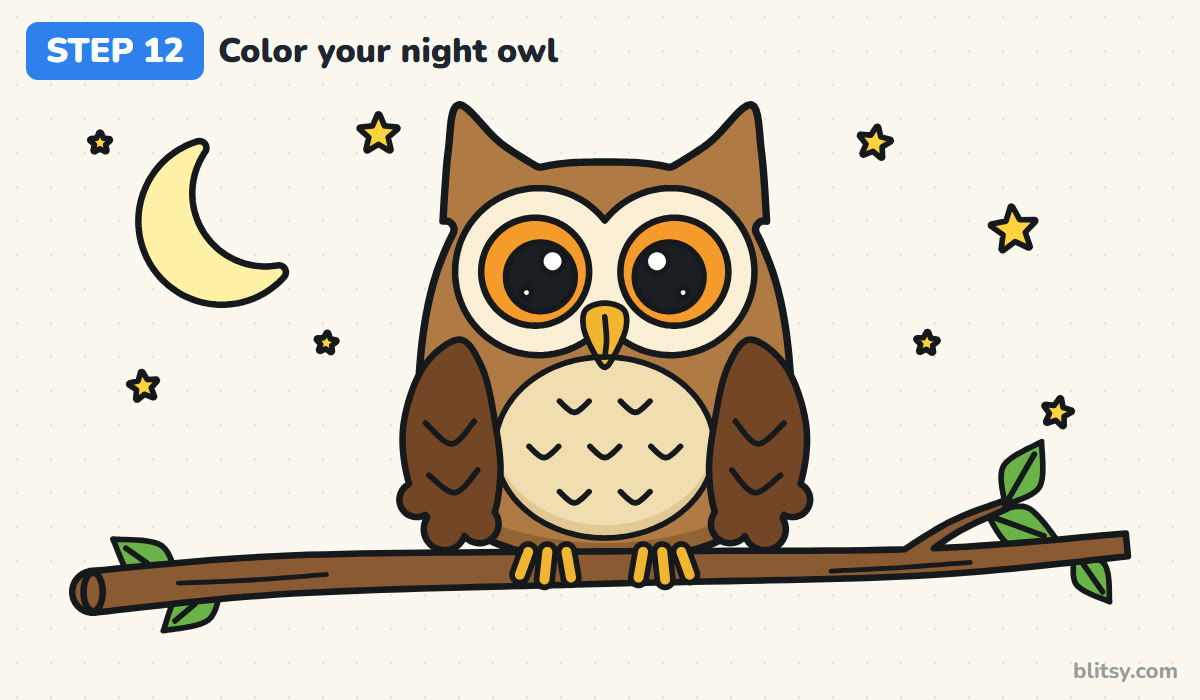
Color the head and body warm brown, then use dark brown on the wings so they stand out. The face and belly are cream, the eyes orange and the pupils black, with the white shines left uncolored. Make the beak and talons gold. Finish the scene with a brown branch, green leaves, a pale yellow moon and golden stars.
💡 Tip: Leave the eye shines as plain white paper. Coloring over them is very hard to undo.
Where Owl Faces Tend to Slip
- Eyes that are different sizes. It makes the owl look dizzy. Use the center line and draw both face circles before adding any detail.
- A huge beak. The face gets crowded and the eyes lose their pull. Keep it narrow and tuck it between the eyes.
- Ear tufts that are too tall. They start to look like horns. Short pointed tufts are plenty.
- Shines in different places. The owl seems to look two ways at once. Put both sparkles in the same corner of each eye.
- Wings colored the same brown as the body. They melt into the owl. Pick a darker shade so they read as separate parts.
Giving Your Owl a New Personality
Once the egg and two circles feel easy, change the details. Make the owl white with gray marks for a snowy owl, or round off the face into a heart shape like a barn owl's. Half-closed eyelids give you a sleepy owl. Younger kids can skip the feather marks and the leaves and still end up with a clear, cheerful owl. If you'd like another bird next, the bird drawing tutorial starts with the same round shapes, and how to draw a moon will help you build a bigger night sky behind your owl.
Owl Coloring Page and Printable Step Guide
Prefer paper? Print the free owl coloring page. A small colored owl at the top shows which color goes where, with a key that names each one, and the large outline below is ready for crayons. The PDF drawing guide puts all 12 steps and tips on a few pages that fit Letter or A4.
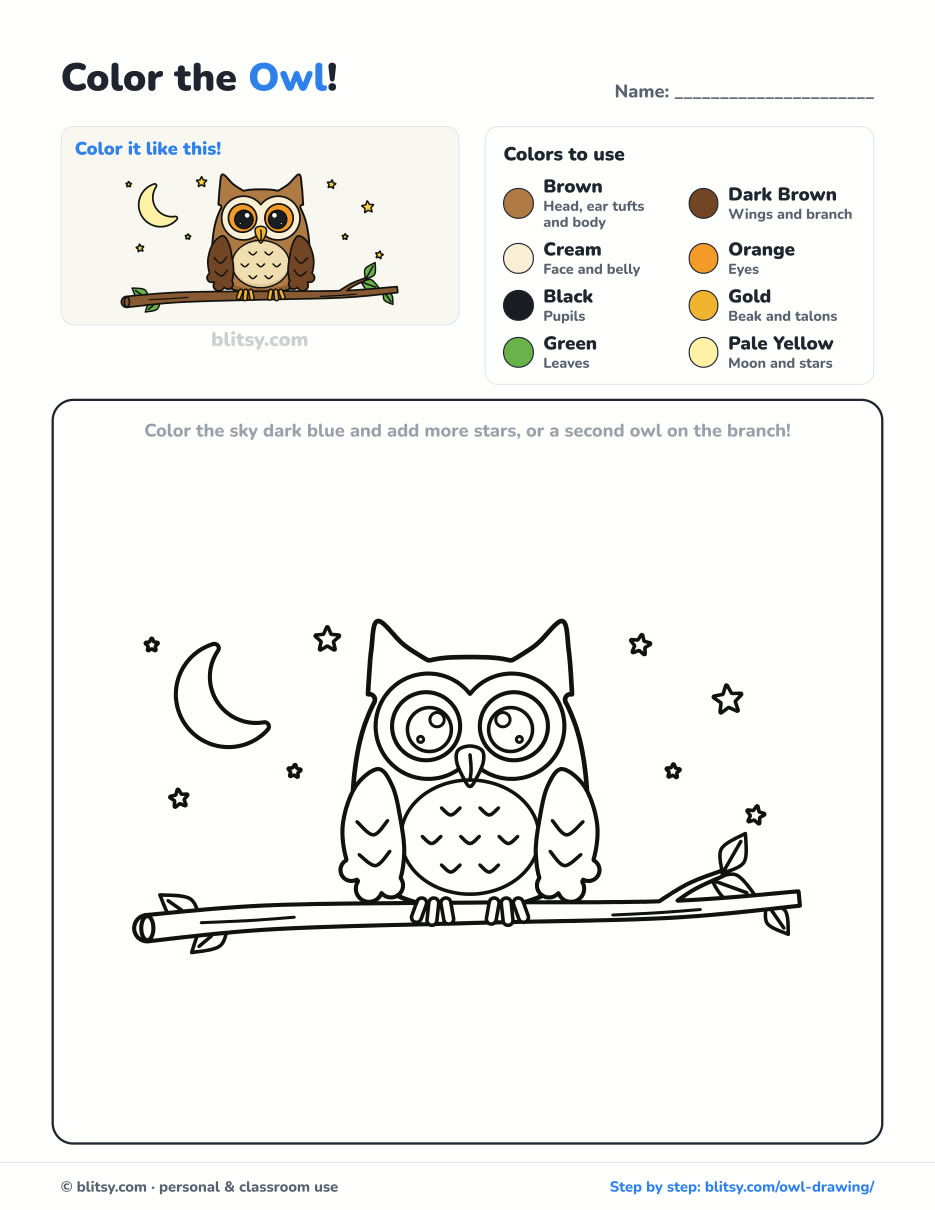
Black outlines with a colored example and the color names at the top. Ready to print and color.
⬇️ Download Coloring PageEvery step picture with its instructions and tips, to keep beside your paper while you draw.
⬇️ Download Drawing Guide📱 On a phone? Tap a download button, then open the file and choose Share → Save to Files or Print. On a computer, the PDF opens or saves straight to your Downloads folder.
Hoot-Worthy Pin for Your Art Board
Owl Drawing Questions From Curious Kids
What is the easiest way to draw an owl?
Start with an egg for the body and two overlapping circles for the face. Add round eyes inside the circles, a small beak between them, two ear tufts and a wing on each side. That's the whole owl.
Can owls really turn their heads all the way around?
Not all the way, but close. An owl can turn its head about 270 degrees. It needs to, because its eyes are fixed in place and can't roll around like ours.
How long does it take to draw this owl?
Most people finish in 30 to 40 minutes, coloring included. The pencil outline usually takes about 15 minutes once the guide shapes are down.
How do I make my owl drawing look cute?
Make the eyes big with large pupils and a bright shine, keep the beak small, and give the body a wide, round bottom. Short ear tufts and a soft color like warm brown help too.
Your owl is waiting on that branch: start with one light egg shape and see who looks back at you. Which color did you give its eyes? 🦉🌙
Related posts:
 How to Draw a Tooth Step by Step (Cute and Easy for Kids)
 How to Draw a UFO Step by Step (Cute Alien Saucer)
 How to Draw an Astronaut Step by Step (Cute and Easy)
 How to Draw an Axolotl Step by Step (Cute and Easy)
 How to Draw Cute Animals Step by Step (Cat, Bear & Bunny)
 How to Draw an Octopus Step by Step (Cute and Easy)
 How to Draw a Frog Step by Step (Cute Frog on a Log)
 How to Draw a Jellyfish Step by Step (Cute, Easy Guide)
 How to Draw a Grim Reaper Step by Step (Cute Halloween)
 How to Draw a Care Bear Step by Step (Cute Fan Art for Kids)
 How to Draw Cerberus Step by Step (Cute and Easy)
 How to Draw a Monster Step by Step (Cute and Easy)

