
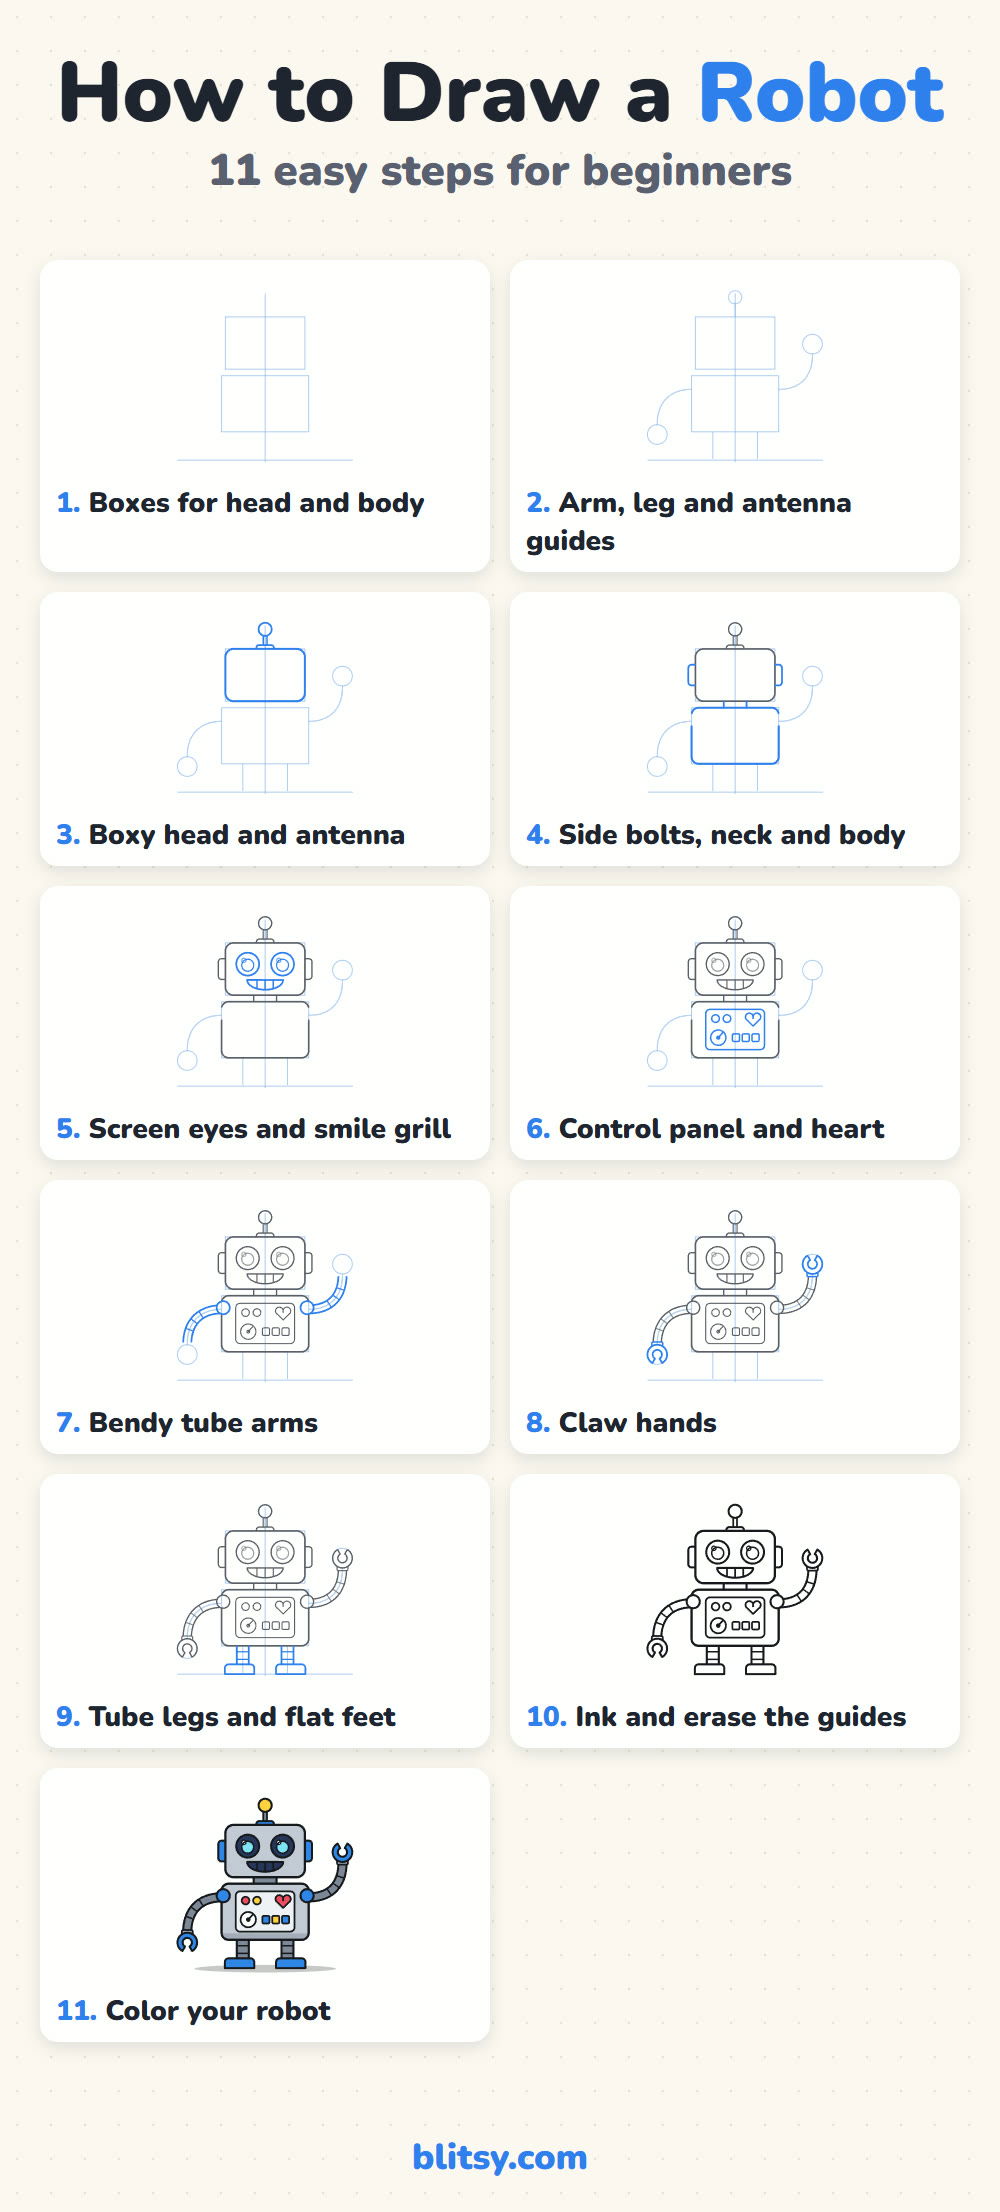
Robots are secretly the easiest characters to draw, because they're made of shapes you already know: boxes and circles, plus a few tubes. In this lesson you'll learn how to draw a robot step by step, starting from two plain rectangles and ending with a cheerful little bot that waves hello. He's my own original design, with a glowing antenna, screen eyes and a heart light on his chest. If you can draw a square, you can draw him.

Think of the pictures as a robot's instruction manual. The lines in blue are the new ones for that step, and the gray lines are what you drew before. Draw only the blue part, check it against the picture, then move on.
Quick overview
⏱️ Time: about 25 minutes, plus coloring
🎯 Level: easy, good for kids from about 5 up
✏️ Steps: 11
🤖 You'll draw: a friendly cartoon robot waving hello
Parts List for Your Robot Workshop
- A pencil for light sketching (HB is fine)
- A soft eraser
- A ruler, if you like crisp box edges
- A coin or bottle cap for tracing round eyes
- A black marker or fineliner
- Colored pencils or markers: gray, light gray, blue, navy, light blue, yellow and red
- Plain white paper
The ruler is optional: a slightly wobbly robot looks homemade in a good way, and lots of cartoon robots are drawn freehand.
How to Draw a Robot Step by Step
Step 1: Sketch two boxes for the head and body
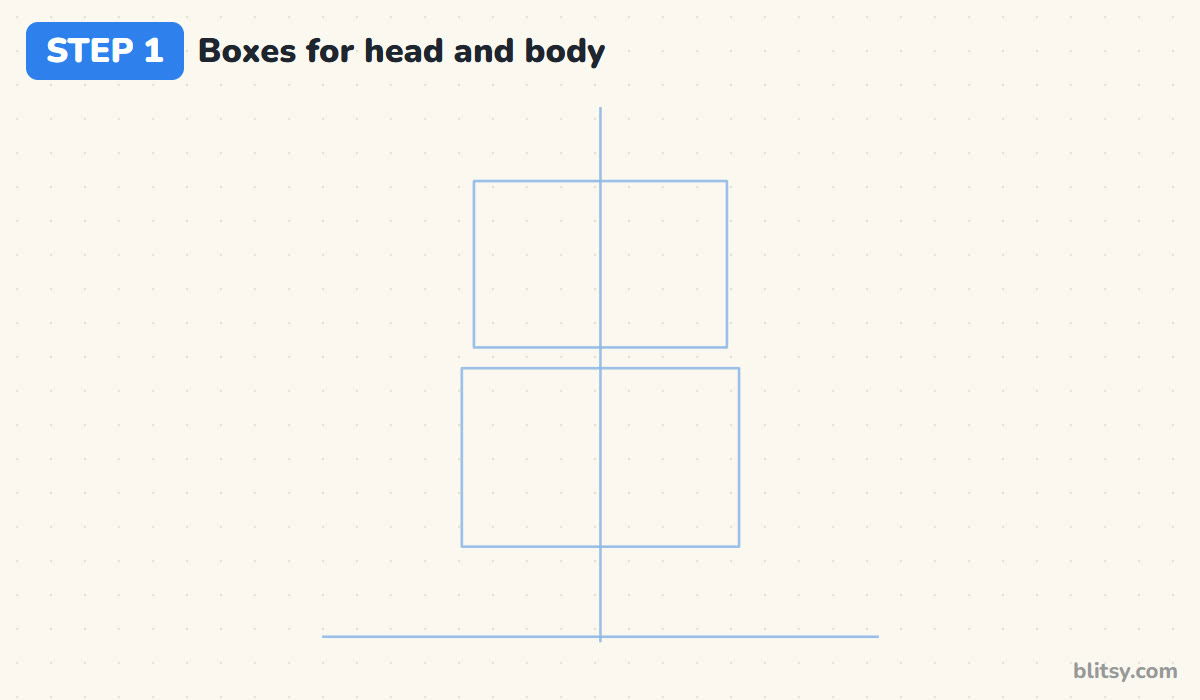
I always start with a light vertical line down the middle of the page. Draw a wide rectangle near the top for the head, then a slightly bigger rectangle below it for the body, leaving a small gap between them for the neck. Finish with a ground line near the bottom. Those two boxes decide the whole size of your robot, so take a moment to center them.
💡 Tip: Press lightly. These boxes are only a map, and you'll erase them later.
Step 2: Add guides for the limbs and the antenna
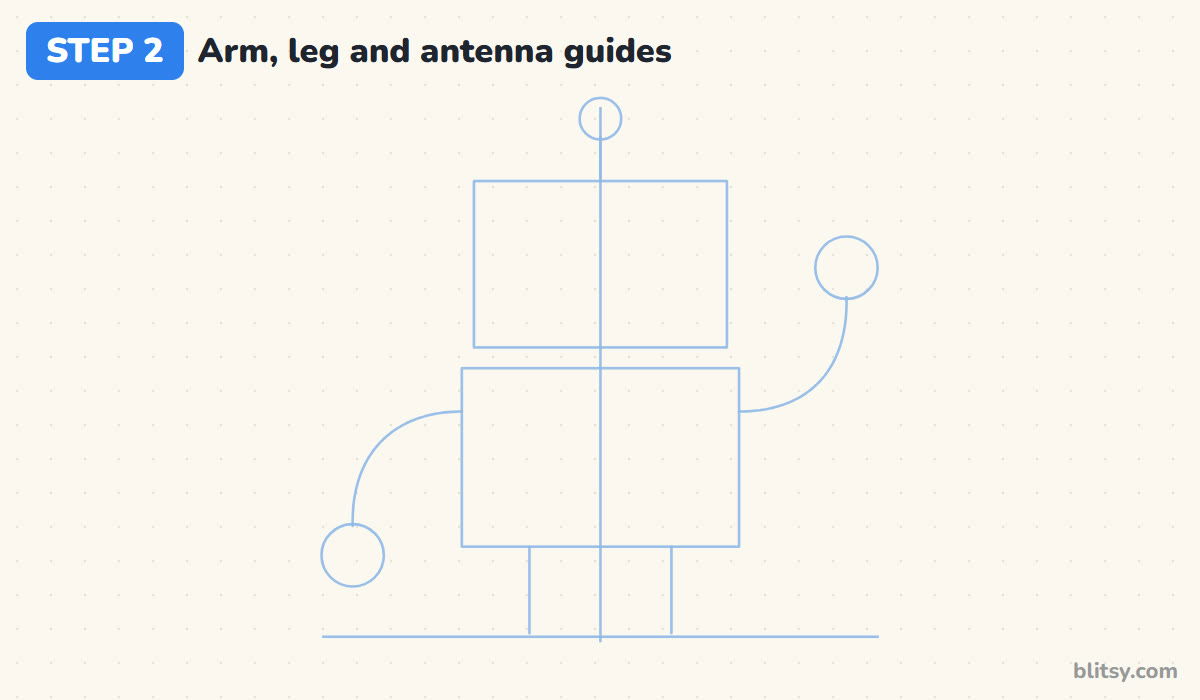
From the left side of the body, curve a line out and down, and end it with a small circle for the hand. From the right side, curve a line out and then up, with another circle at the top; that's the waving arm. Draw two short lines down from the body to the ground for the legs, plus a line and a circle above the head for the antenna.
💡 Tip: Make the arm curves gentle and rounded, like a garden hose, so the tubes look bendy instead of stiff.
Step 3: Draw the boxy head and the antenna
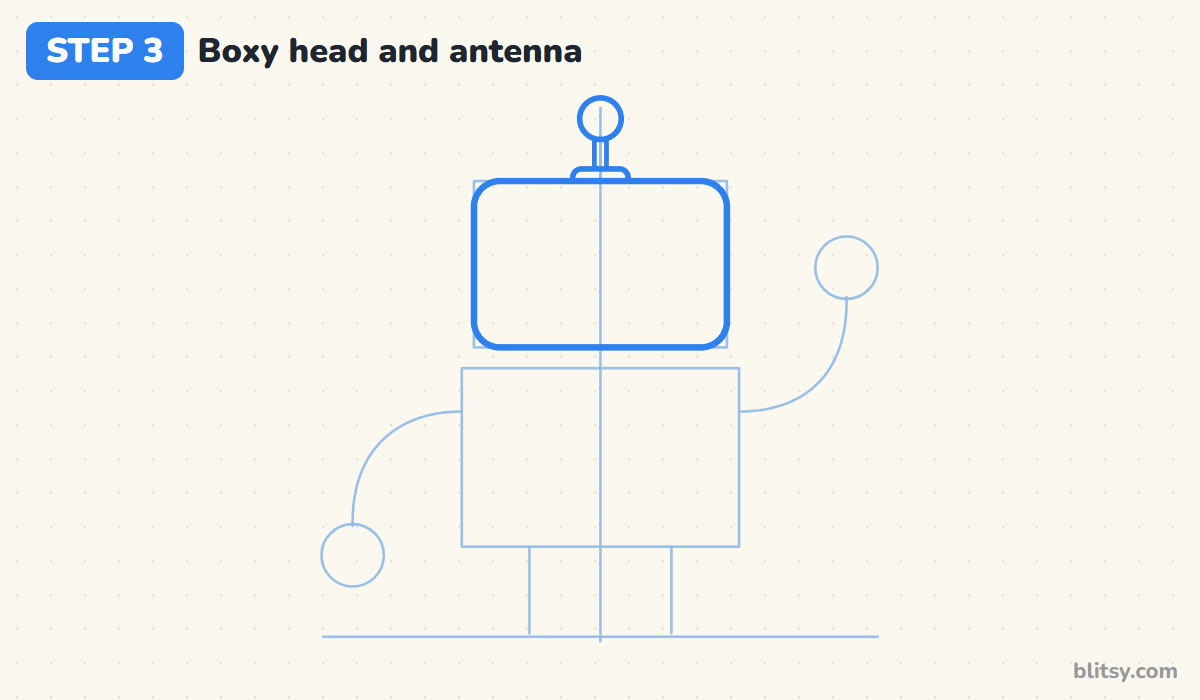
Trace over the head box with rounded corners. I round them quite a lot, because sharp corners make a robot look serious and soft ones make it friendly. On top, add a short flat cap, a thin stick and a round bulb at the very tip.
💡 Tip: Keep the antenna stick thin. A thick one looks like a chimney.




Step 4: Add the side bolts, the neck and the body
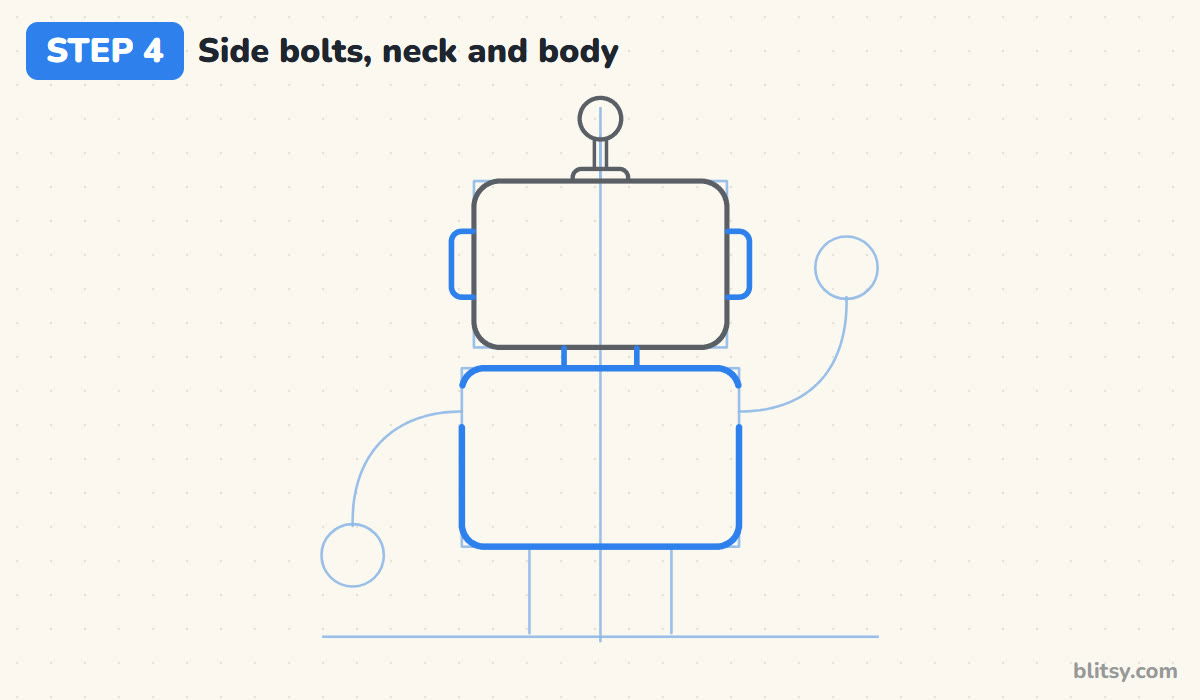
Draw a small rounded rectangle on each side of the head, half hidden behind it, like ears. Connect head and body with a short, narrow neck. Then go around the body box with rounded corners, just as you did for the head.
💡 Tip: Make the neck much narrower than the head. That little pinch is what makes the head look like it sits on top.
Step 5: Give it screen eyes and a smiling grill
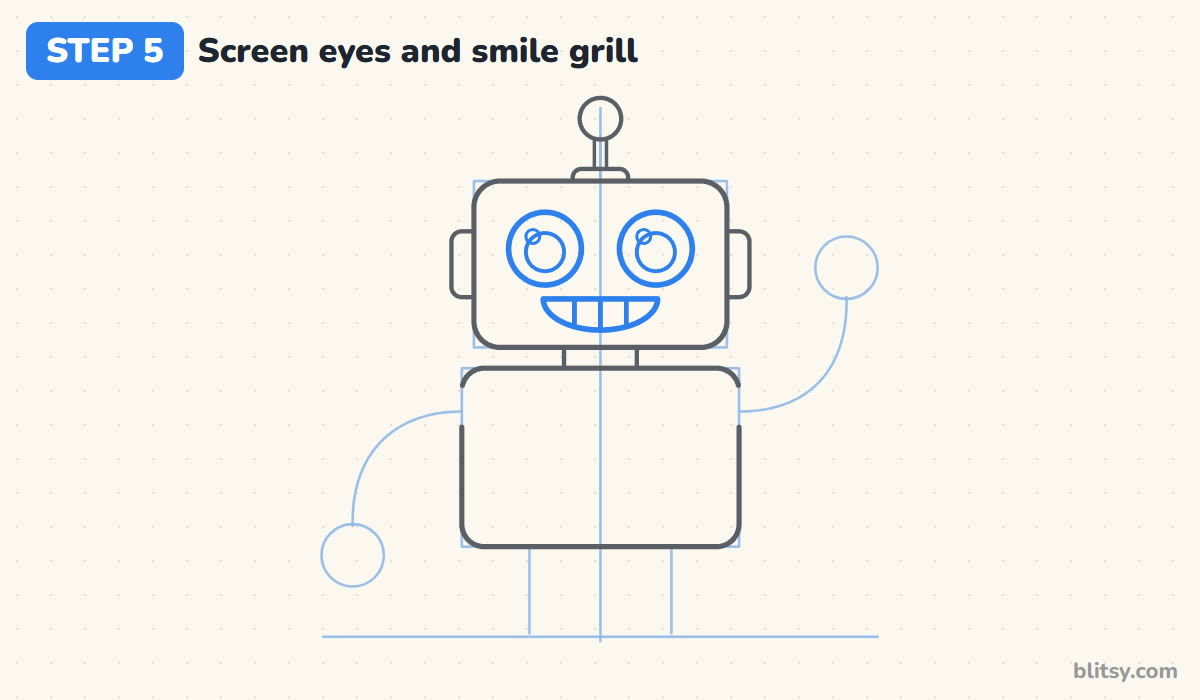
Draw two big circles in the upper half of the head (I trace a coin for these), with a smaller circle inside each and a tiny shine circle near the top left. Below the eyes, draw a flat line and hang a half circle under it for the mouth. Split the mouth with three short lines so it looks like a grill. Big eyes set close together are the secret to a cute robot face.
💡 Tip: Put both shine dots on the same side of each eye, or the robot will look cross-eyed.
Step 6: Draw the control panel with a heart light

Inside the body, draw a smaller rounded rectangle for the panel. Leave an even border all the way around it. In the top row add two little round buttons on the left and a heart on the right. Underneath, draw a round dial with a short needle, and a row of three small square buttons beside it.
💡 Tip: Draw the heart as two bumps and a point, and keep it about the size of the two buttons together.
Step 7: Build the bendy tube arms
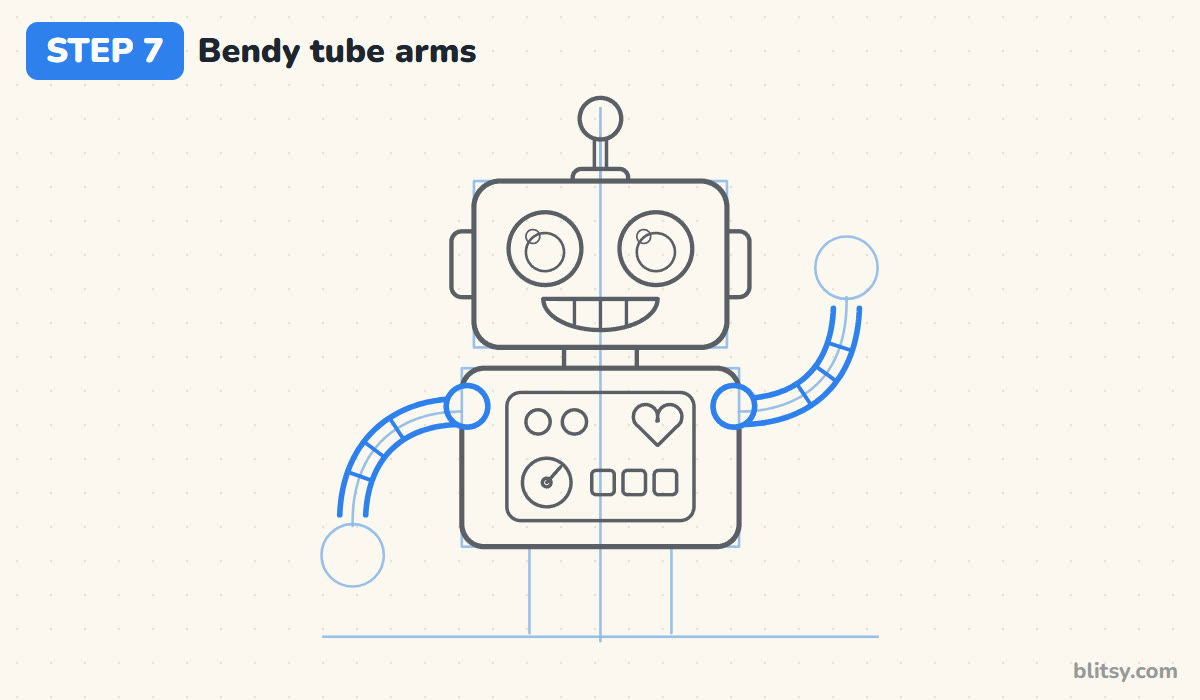
Draw a round shoulder joint on each side of the body. Then go along each arm guide with two parallel lines, the same distance apart the whole way, to make a tube. Add three short lines across each tube so it looks like a bendy, ribbed pipe.
💡 Tip: If your two lines drift apart, the arm gets fat at one end. Check the gap every few centimeters.



Step 8: Add the claw hands

At the end of each arm, draw a small band for the wrist. Then turn each hand circle into a claw: a thick ring with a notch cut out of it. The left claw opens downward, and the waving claw on the right opens up toward the sky. That notch is what turns a plain circle into a robot hand.
💡 Tip: Younger kids can skip the notch and draw a simple ball hand. It still works.
Step 9: Draw tube legs and flat feet
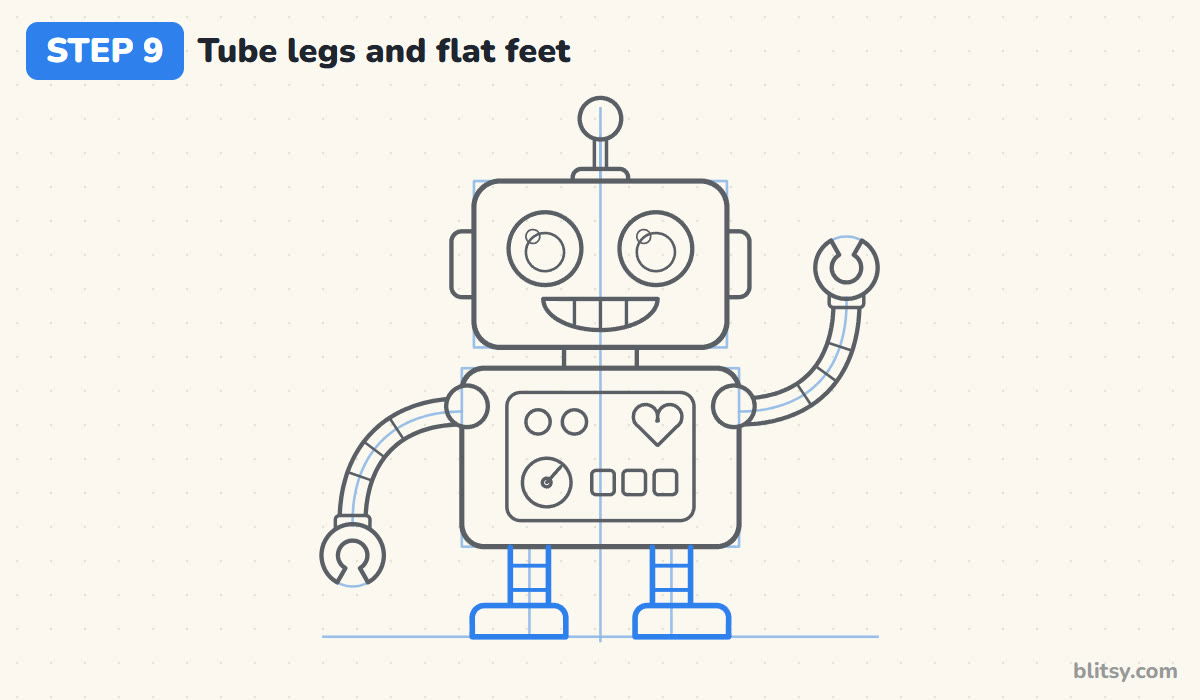
Draw two short, straight legs from the body down toward the ground, with two lines across each for joints. Finish each leg with a long, flat foot that sits right on the ground line. Wide feet make the robot look steady, as if it could stand there all day.
💡 Tip: Let each foot stick out a little on both sides of its leg, more on the outside.
Step 10: Ink the lines and erase the guides
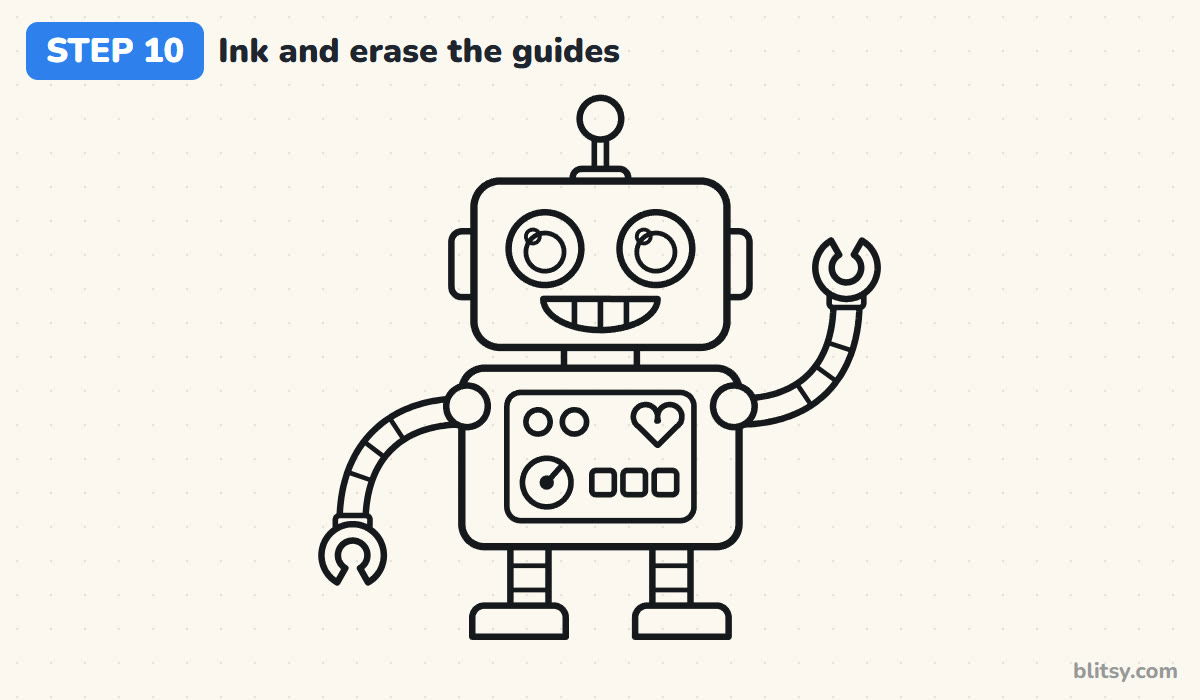
Trace every line you want to keep with the black marker. Most beginners press too hard here and wobble, so go slowly on the long box edges and turn the paper for the round eyes. Wait for the ink to dry, then erase the boxes, the middle line and all the curved guides.
💡 Tip: Ink the big outer shapes first, then the small panel details last, when your hand is warmed up.
Step 11: Color your robot

Color the head and body silver gray, with a darker band along the bottom of the body for shading. Arms and legs are dark gray, and so are the neck and the antenna stick. Use blue for the claws, feet, side bolts, shoulder joints and antenna cap. Fill the eye screens and mouth navy, the eye glow light blue, the bulb and one button yellow, and the heart and other button red.
💡 Tip: Leave the little shine circles in the eyes white. They make the screens look like they're glowing.


Robot Glitches and How to Fix Them
- A tiny head on a big body. The robot looks like a fridge. Draw the head almost as wide as the body.
- Eyes placed far apart. The face looks blank. Keep them close to the middle line.
- Stick arms. One single line reads as a wire, not an arm. Use two parallel lines so the tube has width.
- Sharp corners everywhere. The robot ends up looking cold and grumpy. Round off every box corner.
- Feet floating above the ground. Then he looks like he's hovering. Sit both flat feet right on the line.
Upgrade Ideas for Your Robot
Once the basic bot is easy, start swapping parts; that's my favorite part of drawing robots. Trade the legs for a single wheel or tank treads, give it a jetpack, or change the heart for a lightning bolt or a little screen with a face on it. You can paint it red, green or gold, too. A robot fits nicely into a space scene, so try parking it next to a flying saucer from the UFO drawing step by step lesson. The glowing antenna bulb is the same idea as this light bulb drawing tutorial, and your robot could also ride along in the rocket drawing tutorial.
Free Robot Coloring Page and Step Guide
The free robot coloring page shows a small colored robot at the top to copy, a key that names each color and the part it belongs to, and a big outline below with room for a background. The step-by-step PDF guide has all 11 steps with pictures and tips, which is handy for a classroom or a screen-free afternoon. Both print on Letter or A4 paper.
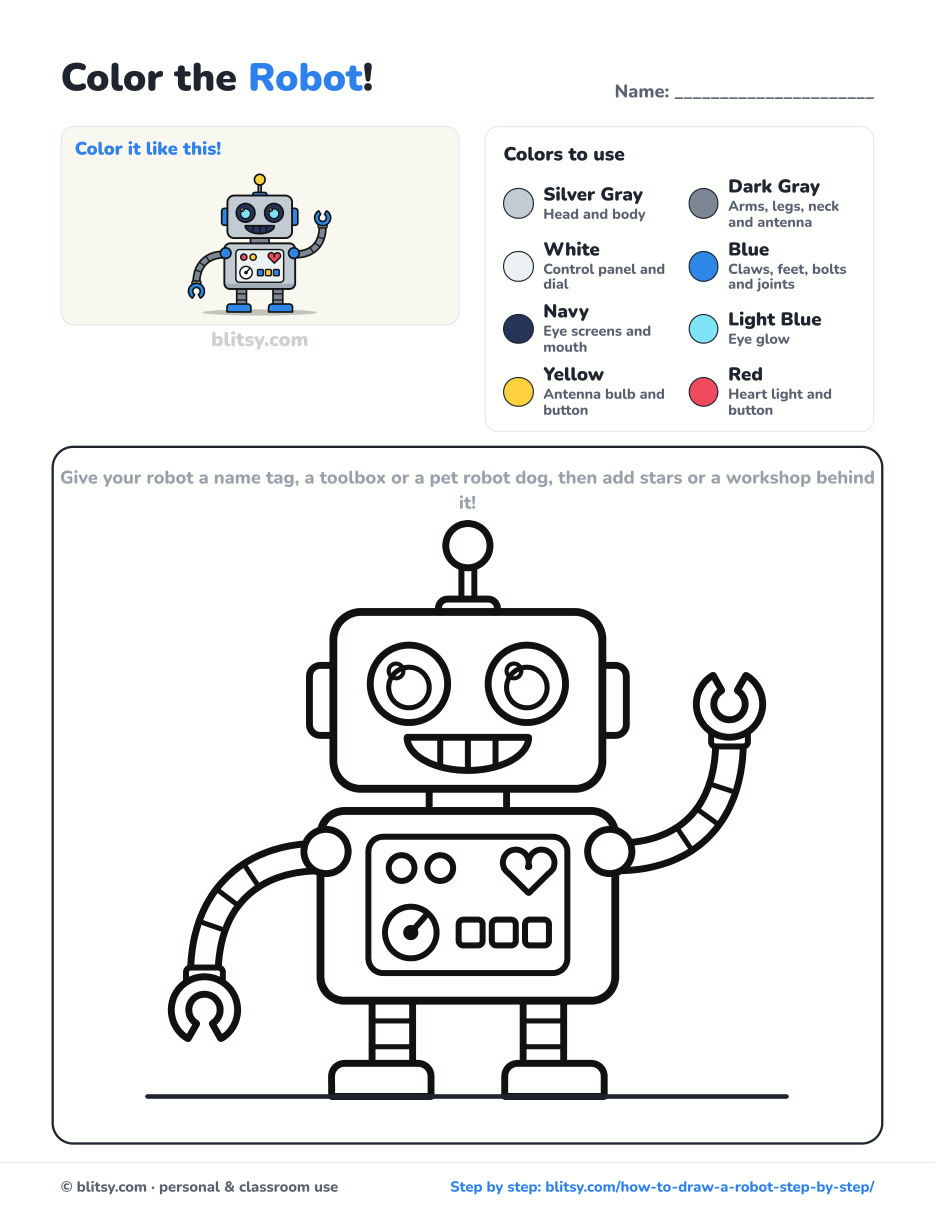
Black outlines with a colored example and the color names at the top. Ready to print and color.
⬇️ Download Coloring PageEvery step picture with its instructions and tips, to keep beside your paper while you draw.
⬇️ Download Drawing Guide📱 On a phone? Tap a download button, then open the file and choose Share → Save to Files or Print. On a computer, the PDF opens or saves straight to your Downloads folder.
Pin the Robot Steps for Later
More Space and Gadget Drawings to Try
Each of these is a full step-by-step tutorial with a picture for every stage, so you can keep practicing with the same shape-first method.
- UFO: A flying saucer with a glass dome and a beam of light, drawn from a simple oval in this UFO drawing step by step lesson.
- Rocket: Build a classic rocket with fins, a round window and a fiery tail in this rocket drawing tutorial.
- Astronaut: Draw a cute astronaut in a puffy suit and a round helmet with this astronaut drawing step by step guide.
- Light Bulb: A glowing bulb with a screw base and shine lines, great practice for round shapes, in this light bulb drawing tutorial.
- Iron Man: A chibi hero in a red and gold armored suit, built from simple shapes, in this Iron Man drawing tutorial.
Robot Drawing Questions, Answered
What is the easiest way to draw a robot?
Start with two rectangles, one for the head and one for the body. Add circles for the eyes, tubes for the arms and legs, and small shapes for buttons. Almost every robot part is a box or a circle.
How do you draw a cute robot?
Round the corners, make the eyes big and close together, and give it a smile. A small detail like a heart light or a wave also makes it feel friendly.
How long does it take to draw a robot?
Most beginners need about 25 minutes for the drawing and another 10 to 15 for coloring. The panel buttons take the most patience.
What colors should I use for a robot?
Silver gray is the classic body color, with bright accents to make it fun. This one uses blue claws and feet, navy screen eyes, a yellow bulb and a red heart, but any color works.
Draw two boxes, add a smile, and your new robot friend is ready to wave back at you. 🤖✏️
Related posts:
 How to Draw a Mermaid Step by Step (Easy Cartoon for Kids)
 How to Draw a Bat Step by Step (Cute Cartoon Bat for Kids)
 How to Draw Bart Simpson Step by Step (Easy Cartoon)
 How to Draw a Tank Step by Step (Easy Cartoon Tank)
 How to Draw a Bee Step by Step (Easy Cartoon Bee)
 How to Draw a Boy Step by Step (Easy Full-Body Cartoon)
 How to Draw a Family Step by Step (Easy Cartoon Portrait)
 How to Draw a Princess Step by Step (Easy Ball Gown Cartoon)
 How to Draw a Cowboy Step by Step (Easy Cartoon Kid)
 How to Draw a Girl Step by Step (Easy Full-Body Cartoon)
 How to Draw a Knight Step by Step (Easy Cartoon Knight)
 How to Draw Iron Man Step by Step (Easy Chibi for Kids)

