
Armor scares a lot of beginners off, because it looks like a hundred metal pieces. In a cartoon it's really just a handful of rounded shapes stacked on top of each other. This lesson shows you how to draw a knight step by step, from a stick-figure plan to a finished, colored hero. My knight is a friendly one: his visor is up so you can see his smile, he has a red feather plume, a sword resting point down and a shield with a gold cross.
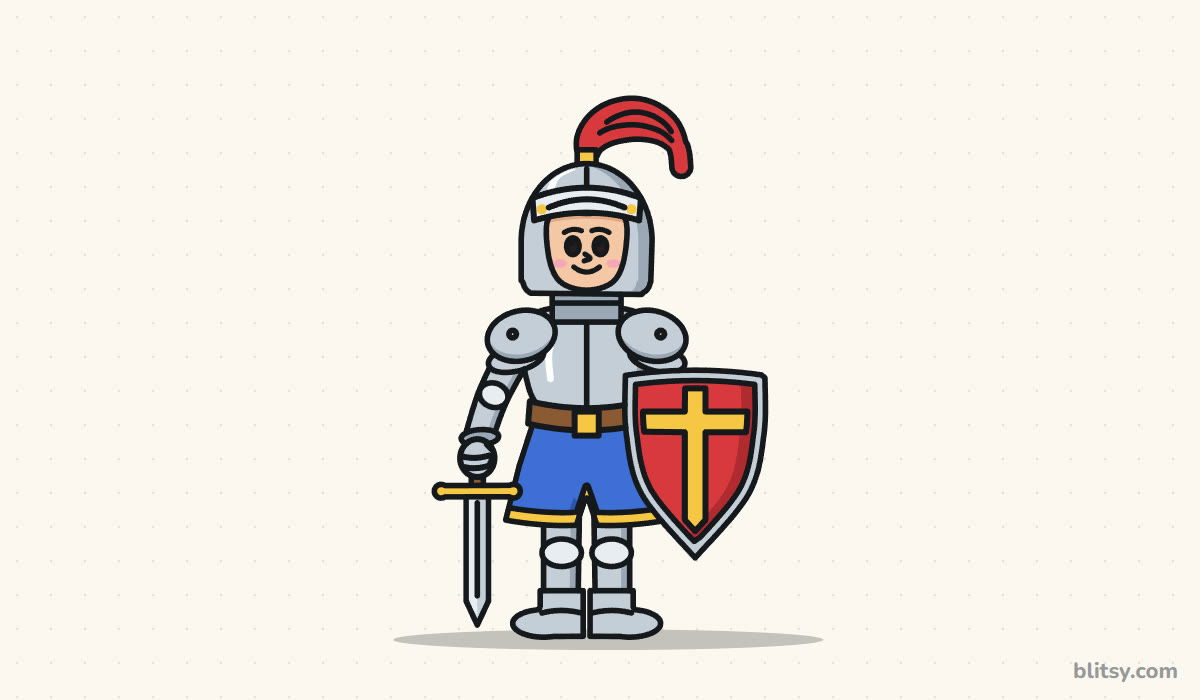
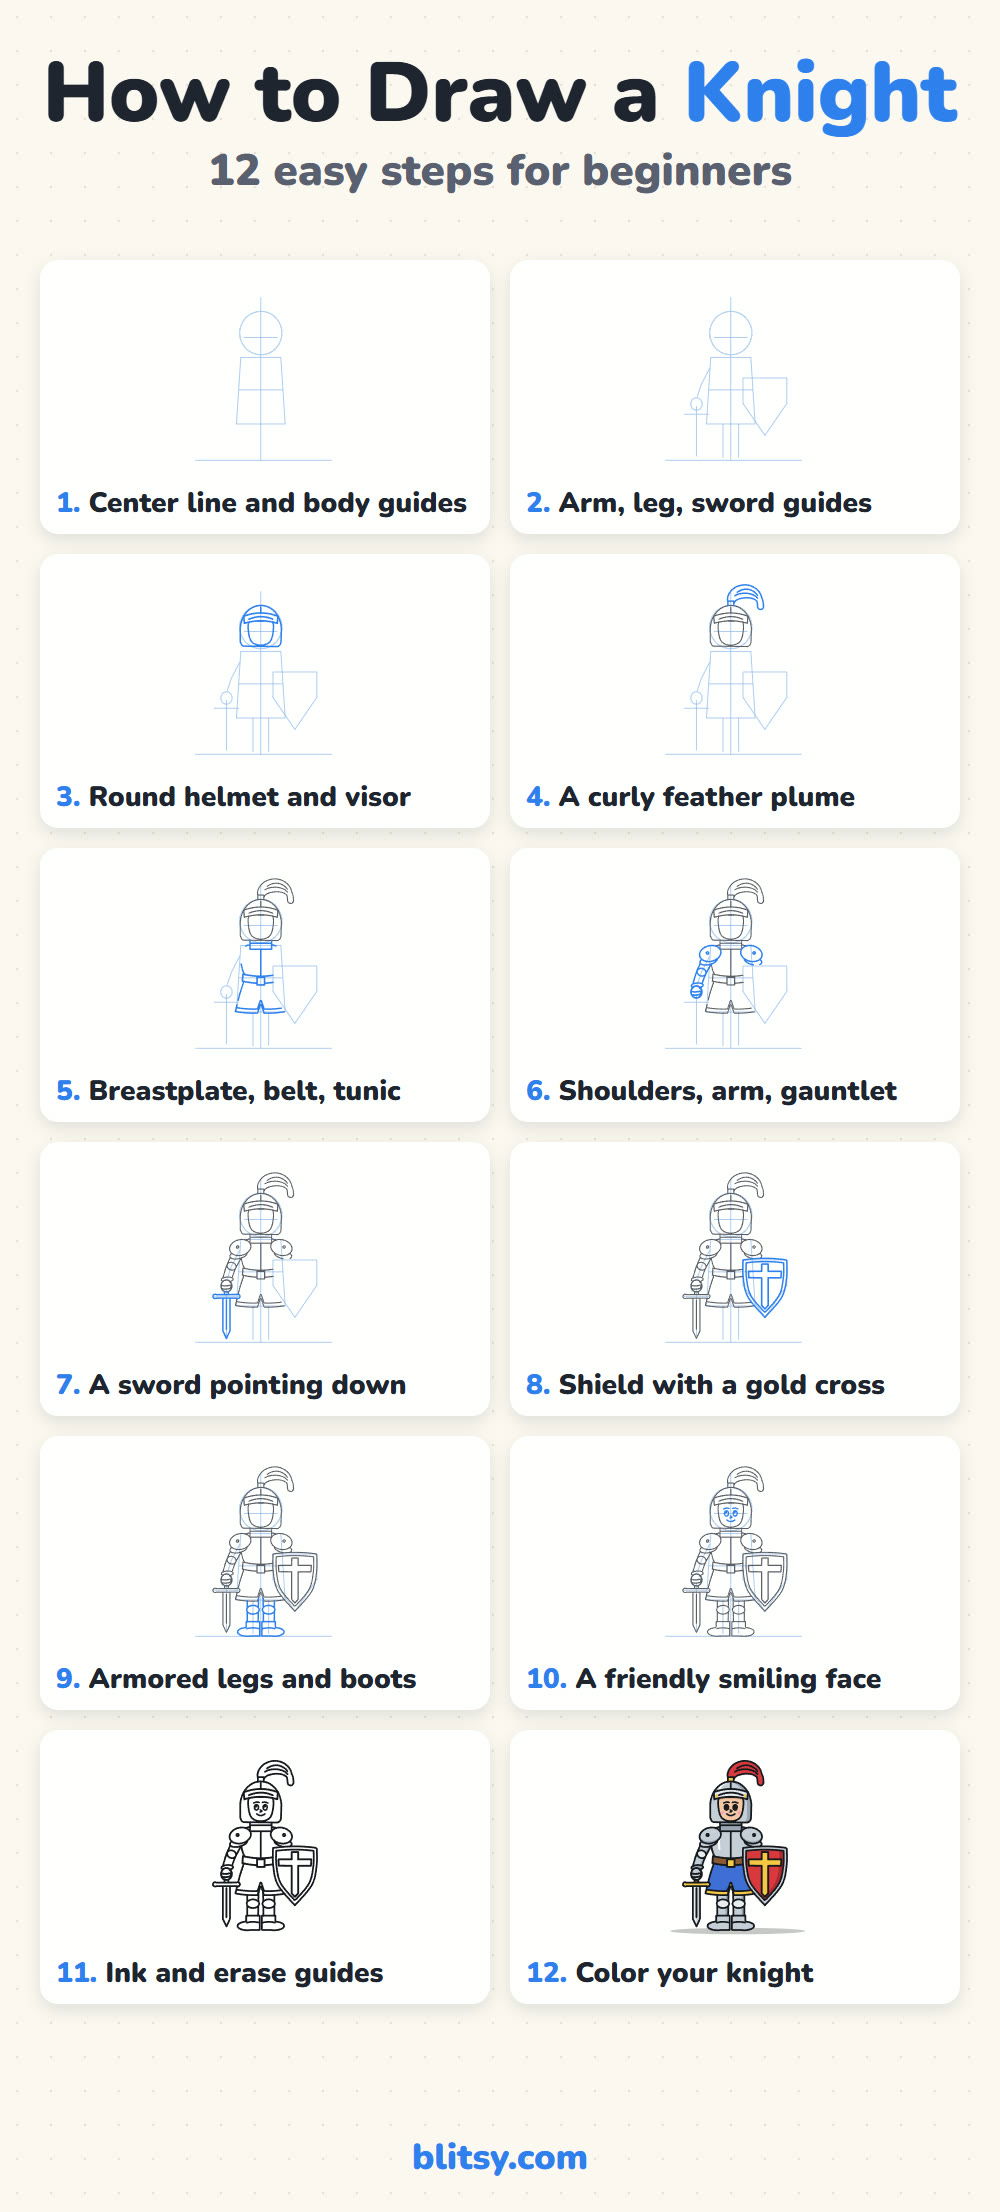
Each picture marks the new work in blue. Gray lines are the parts you drew in earlier steps.
Quick overview
⏱️ Time: about 30 to 40 minutes with coloring
🎯 Level: easy to medium, a good fit for kids around 7 and up
✏️ Steps: 12
🛡️ You'll draw: a standing cartoon knight with a plumed helmet, a sword and a shield
Gear Up Before the Knight Sketch
- A pencil for soft guide lines
- An eraser that doesn't smudge
- A black marker or fineliner for the final lines
- Crayons or colored pencils in gray, blue, red, yellow, brown, peach plus pink
- A sheet of paper turned the tall way
A ruler is handy for the sword, but a careful freehand line works just as well.
How to Draw a Knight Step by Step
Step 1: Draw a center line, the head circle and a body box
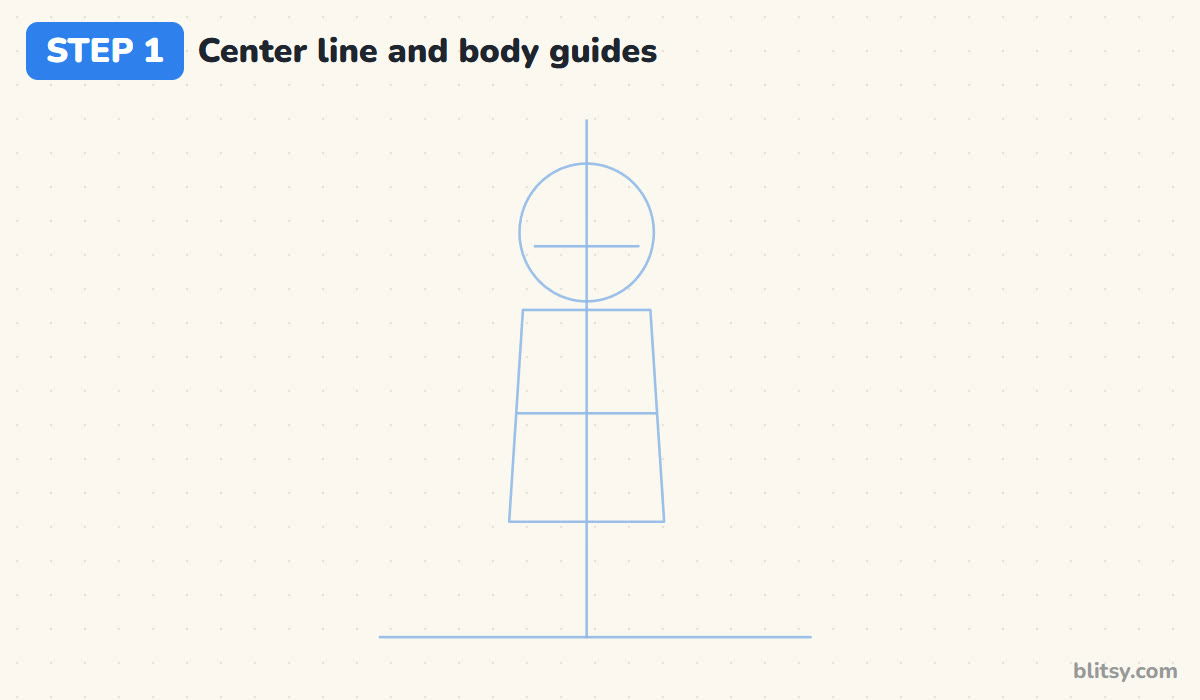
When I teach this, I start with a light ground line near the bottom and a straight line up through the middle of the page. Near the top, draw a big circle for the head with a short cross line just under its middle for the eyes. Below it, sketch a box that gets a little wider at the bottom, and split it with a line across the middle for the waist.
💡 Tip: Make the head circle big. A large head is what keeps a cartoon knight friendly instead of stiff.
Step 2: Add guides for the arm, the legs, the sword and the shield
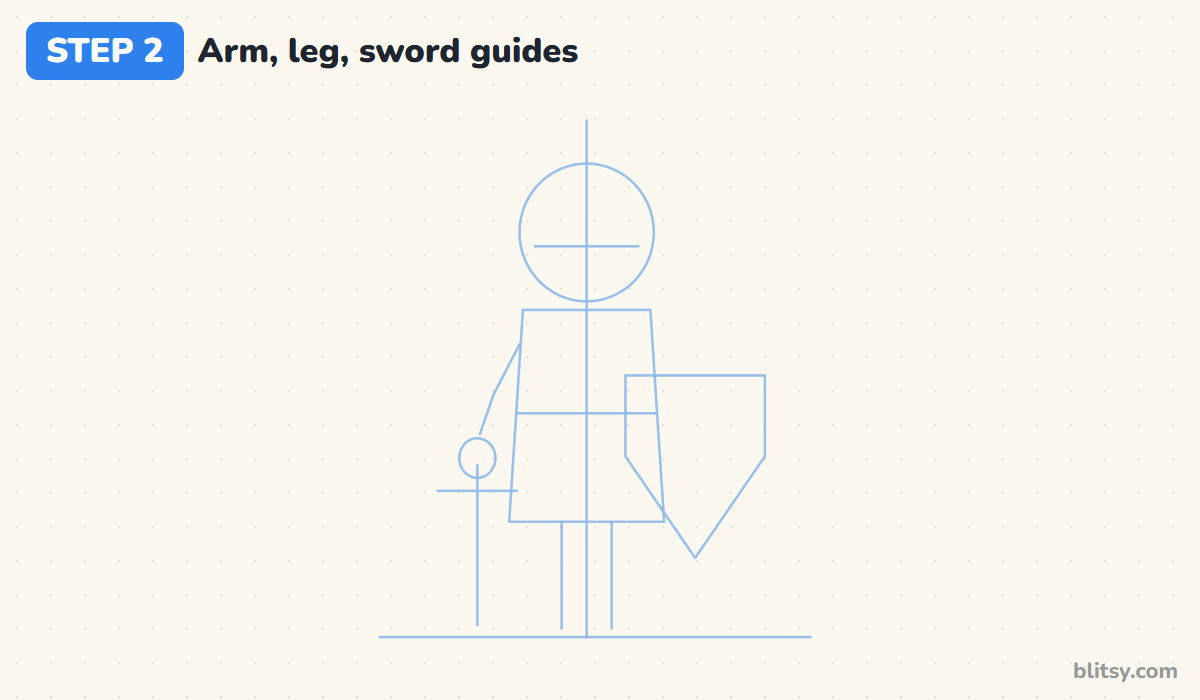
On the left, draw a bent stick arm from the shoulder down to a small hand circle at hip height. Right under that hand, a long vertical line with a short cross line becomes the sword. Two straight lines under the box mark the legs. On the right side, sketch a shield shape: a box with a pointed bottom that overlaps the body.
💡 Tip: Let the sword line stop just above the ground, so the tip looks like it rests on the grass.
Step 3: Draw the round helmet and the raised visor
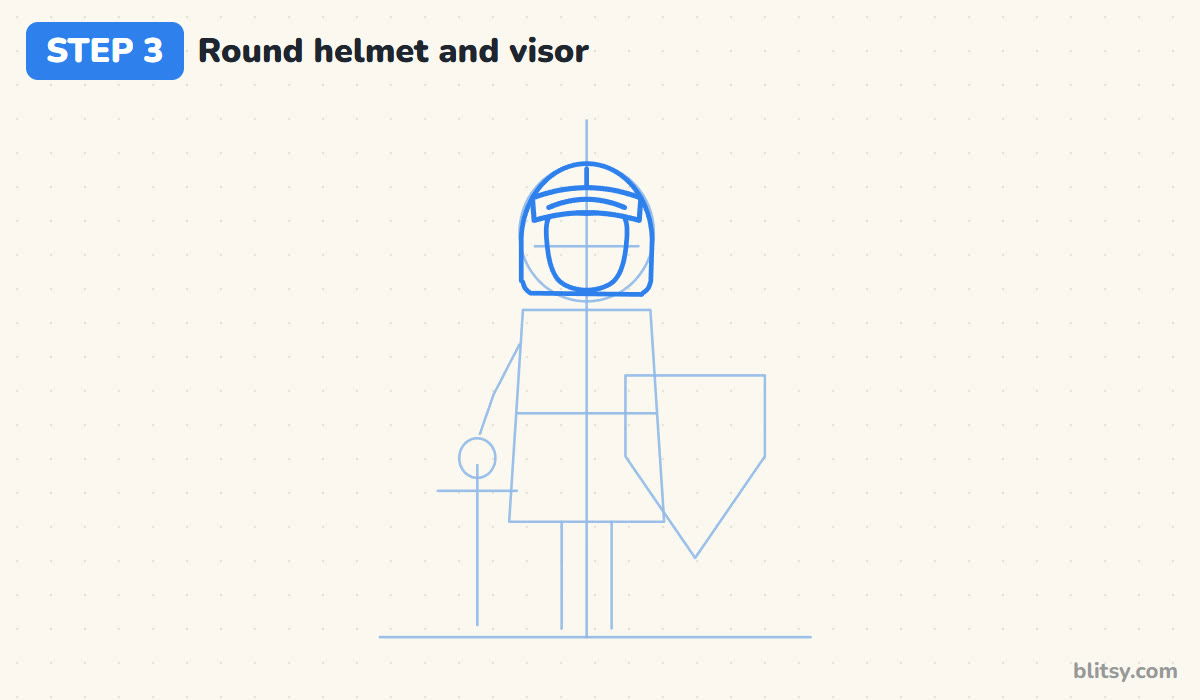
Trace around the head circle to make a rounded helmet that comes down past the chin and ends with a flat bottom edge. Inside it, draw a U shape for the face opening. Across the forehead, add a curved band for the visor, pushed up and open, with one long slit line in it. A short line on top of the dome marks the ridge.
💡 Tip: Keep the face opening wide. If it gets too small, there's no room left for his eyes and smile.

Step 4: Add a curly feather plume
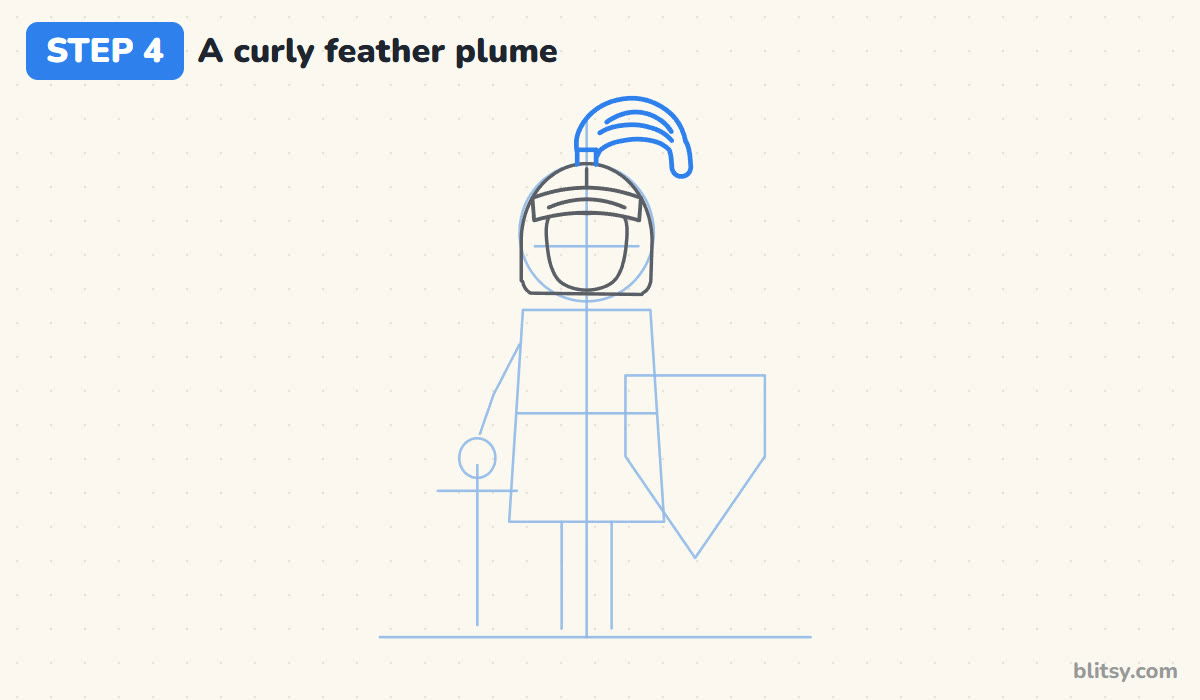
Draw a little square socket on the very top of the helmet. From there, a feather curls up and over to the right, fat in the middle and thin at both ends, with a round tip that hangs down. Two curved lines inside it follow the same direction as the feather.
💡 Tip: I let the plume lean to one side. A plume that sticks straight up looks like a paintbrush.
Step 5: Draw the neck guard, breastplate, belt plus tunic
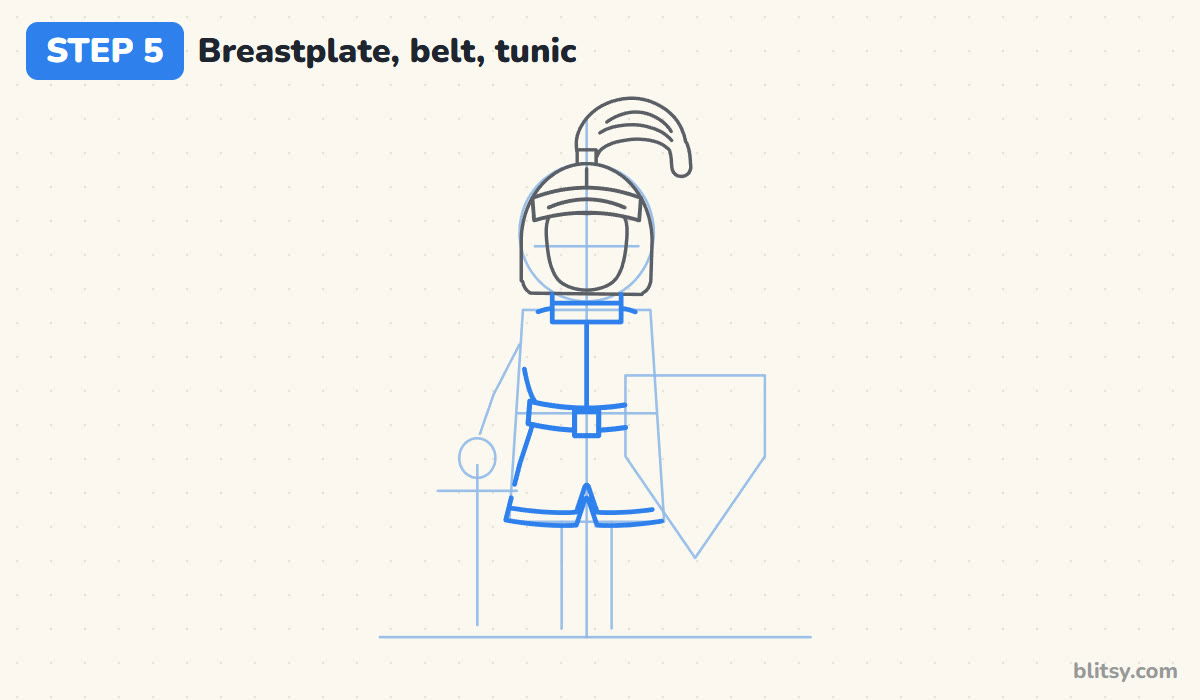
Under the helmet, a short rounded box makes the neck guard. The breastplate is a rounded barrel shape with one line down the center. Across the waist line goes a curved belt with a square buckle. Below the belt, the blue tunic flares out to just above the knees, with a small split in the middle and a trim line along the bottom.
💡 Tip: Curve the belt slightly downward in the middle. It makes the body look round, not flat like paper.
Step 6: Add the shoulder plates, the arm and a mitten gauntlet
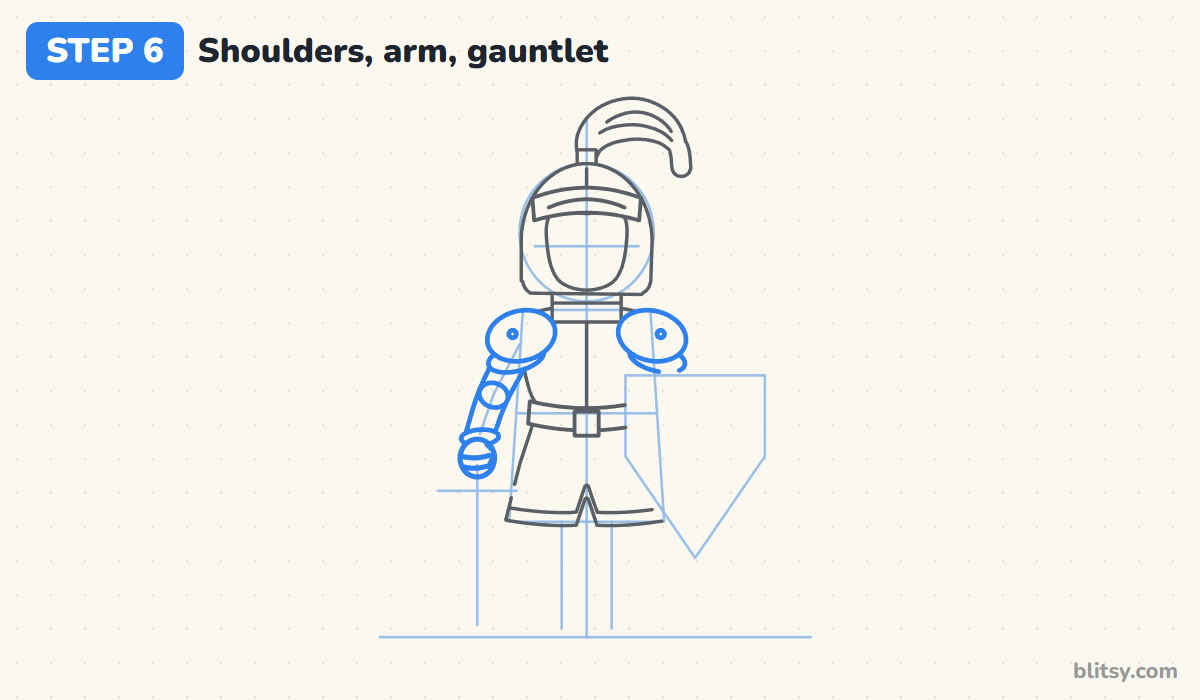
Each shoulder gets a round plate shaped like half a pancake, with a smaller curved plate peeking out underneath and a little rivet dot on top. Follow the stick arm with two lines so it has real width, and put a round elbow plate at the bend. At the end, draw a cuff and a big mitten-shaped gauntlet with two finger lines and a thumb.
💡 Tip: Draw the arm as wide as a thumb on your paper. Thin stick arms make armor look empty.
Step 7: Draw a sword pointing down
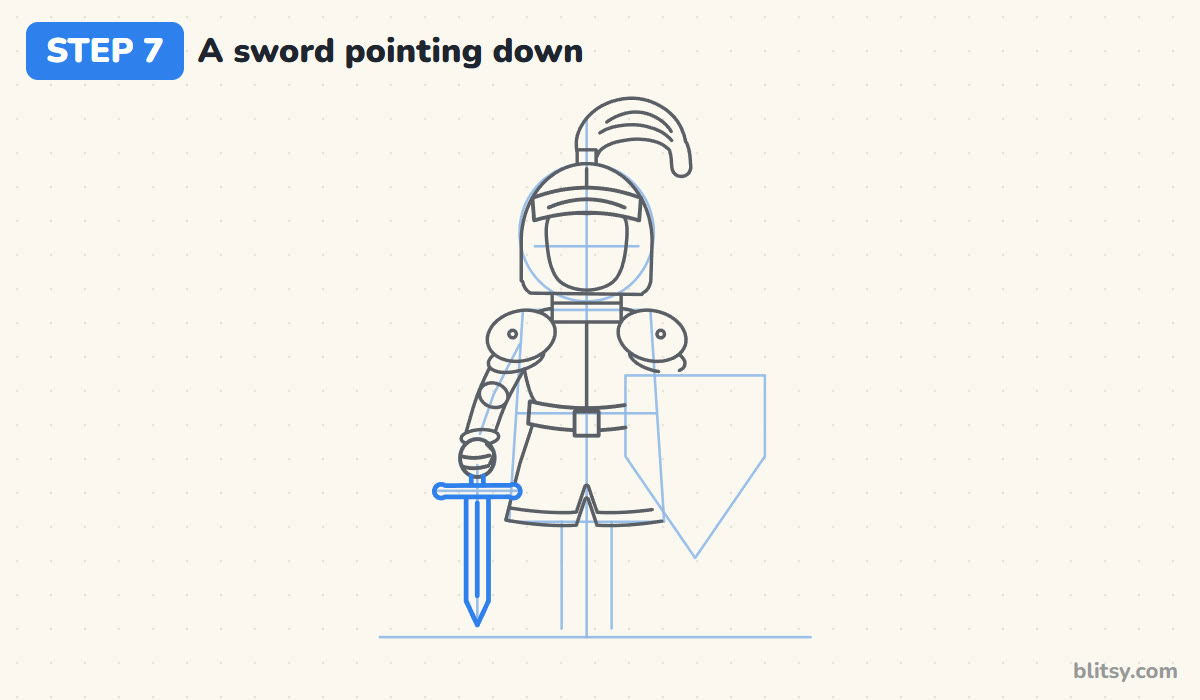
Under the gauntlet, show a short bit of handle. Then draw the crossguard, a long bar with rounded ends. The blade hangs below it as two straight lines that meet in a point near the ground, with one thin line down the middle. His hand rests on top, so the sword looks calm.
💡 Tip: Use the edge of a book or ruler for the two blade lines. Wobbly blade edges are hard to hide later.


Step 8: Draw the shield with a gold cross
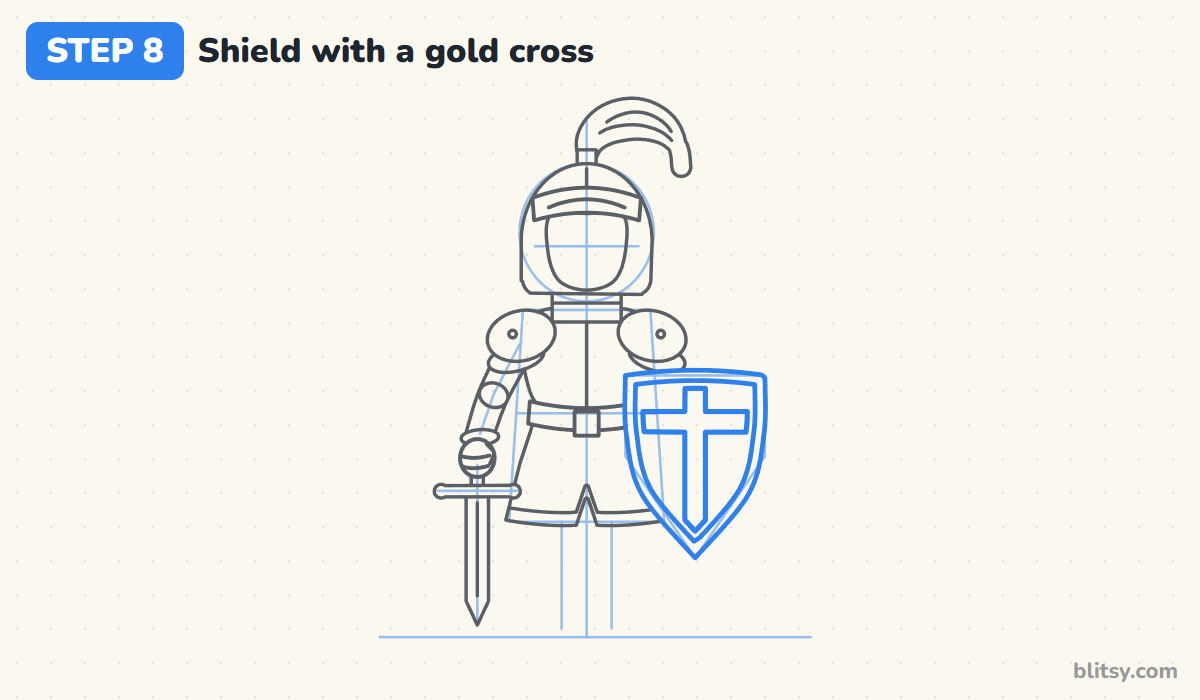
Go over the shield guide with a smooth outline: a slightly curved top, straight sides and soft curves down to a point. Draw a second outline just inside the first to make the metal rim. In the middle, add a wide cross whose arms stop at the rim.
💡 Tip: The rim should be about the same width all the way around, even down at the pointy bottom.
Step 9: Add armored legs and round boots
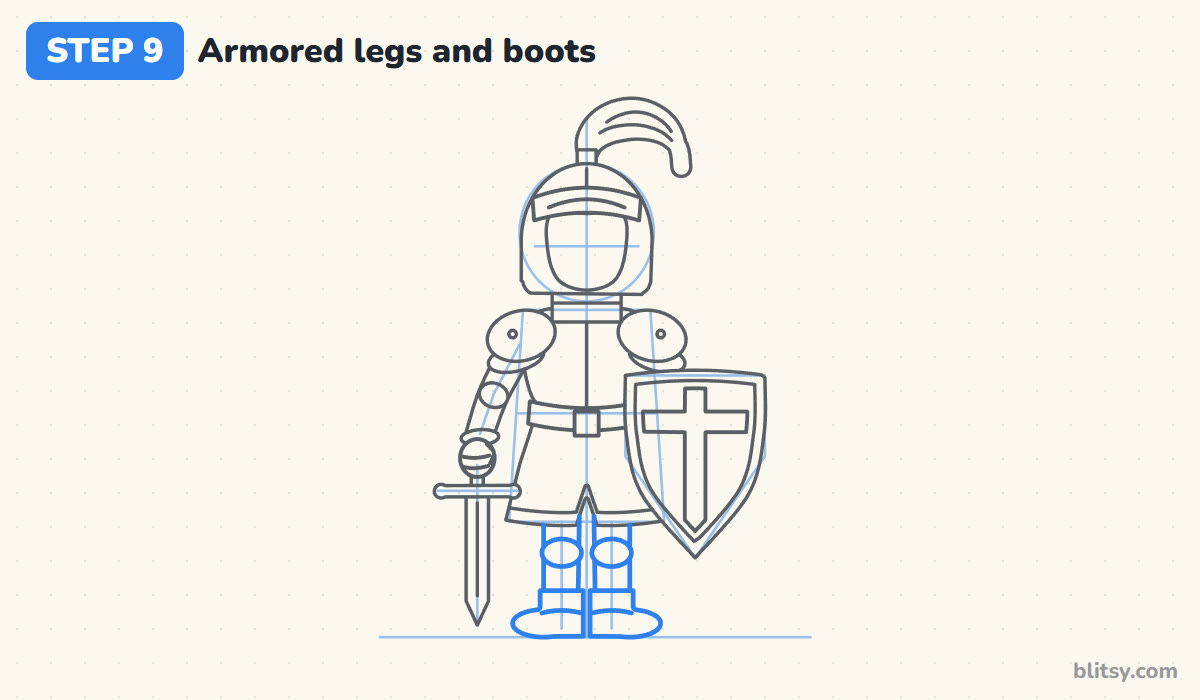
Below the tunic, draw two wide legs, each with an oval knee plate halfway down. The metal boots are rounded at the toes and point a little outward, sitting flat on the ground line. One curved line across each boot shows where the plates overlap.
💡 Tip: Leave a small gap between the legs, so they don't melt into one wide block.
Step 10: Give him a friendly smiling face
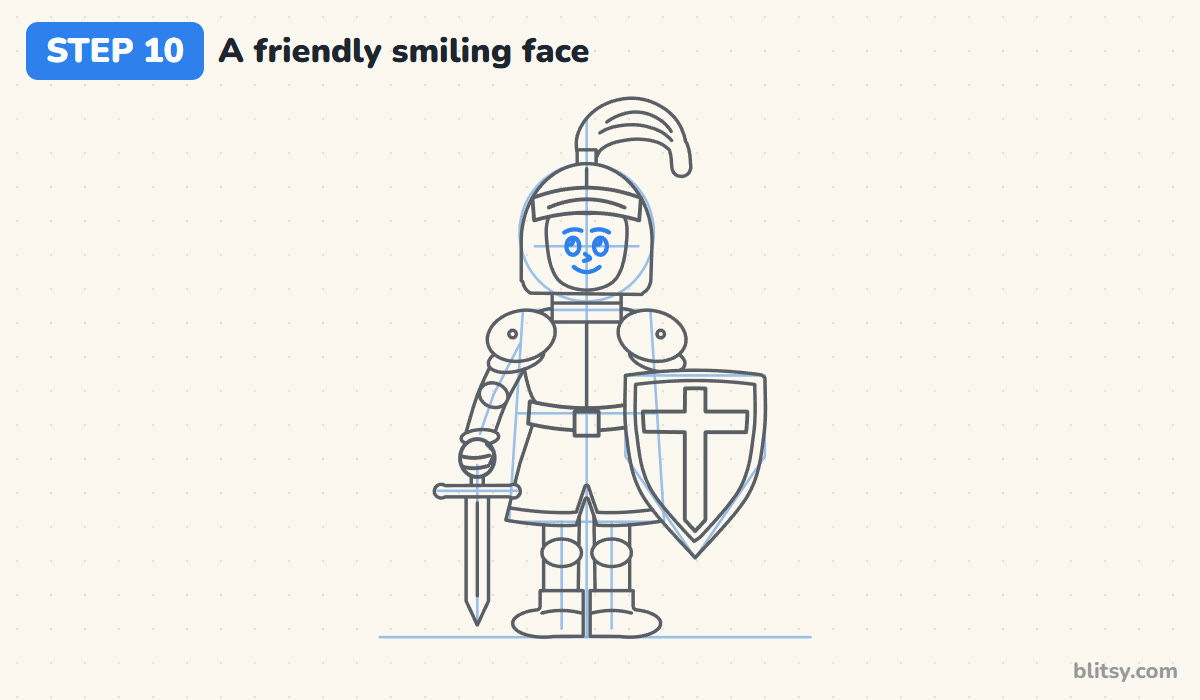
Put two oval eyes on the eye line, each with a white shine dot, and short curved brows above them. A tiny hook makes the nose, and a simple curved line is the smile. I stop there, because the helmet already frames the face.
💡 Tip: Keep the eyes close together in the opening. Wide-set eyes can make him look surprised.
Step 11: Ink your lines and erase the guides
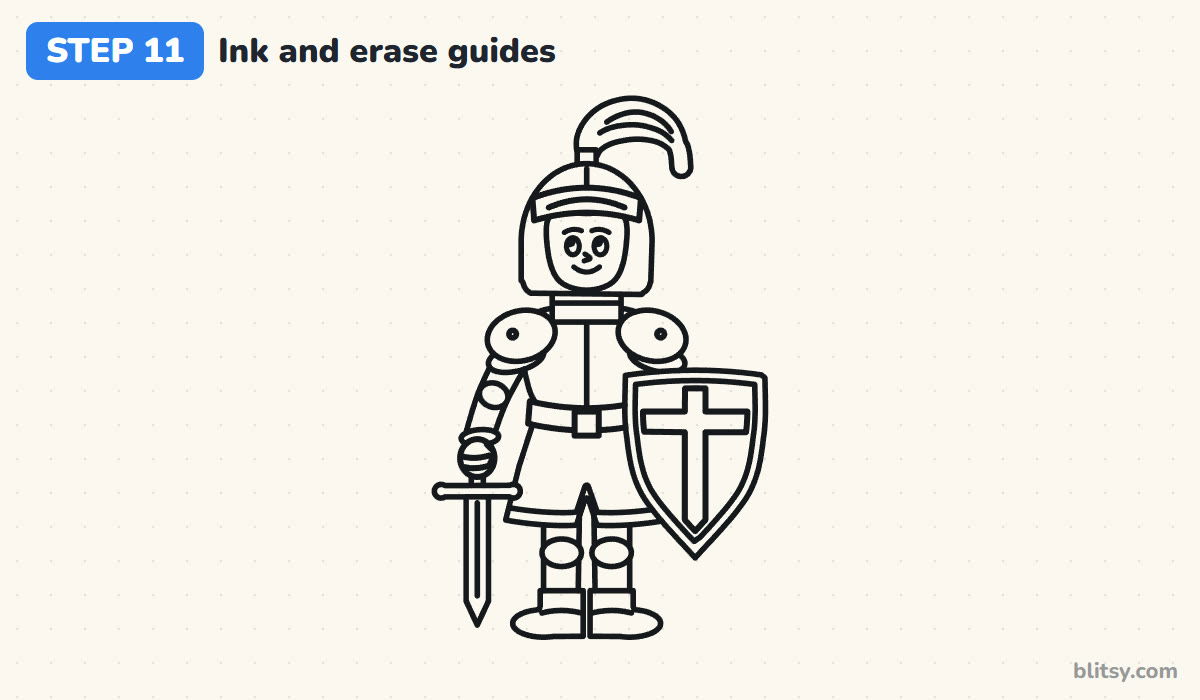
Trace every keeper line with the black marker. Most beginners press too hard here, so go slowly and let the pen do the work. When the ink is dry, erase all the light pencil guides.
💡 Tip: Ink the small face first while your hand is steady, then move on to the long shield and sword lines.


Step 12: Color your knight
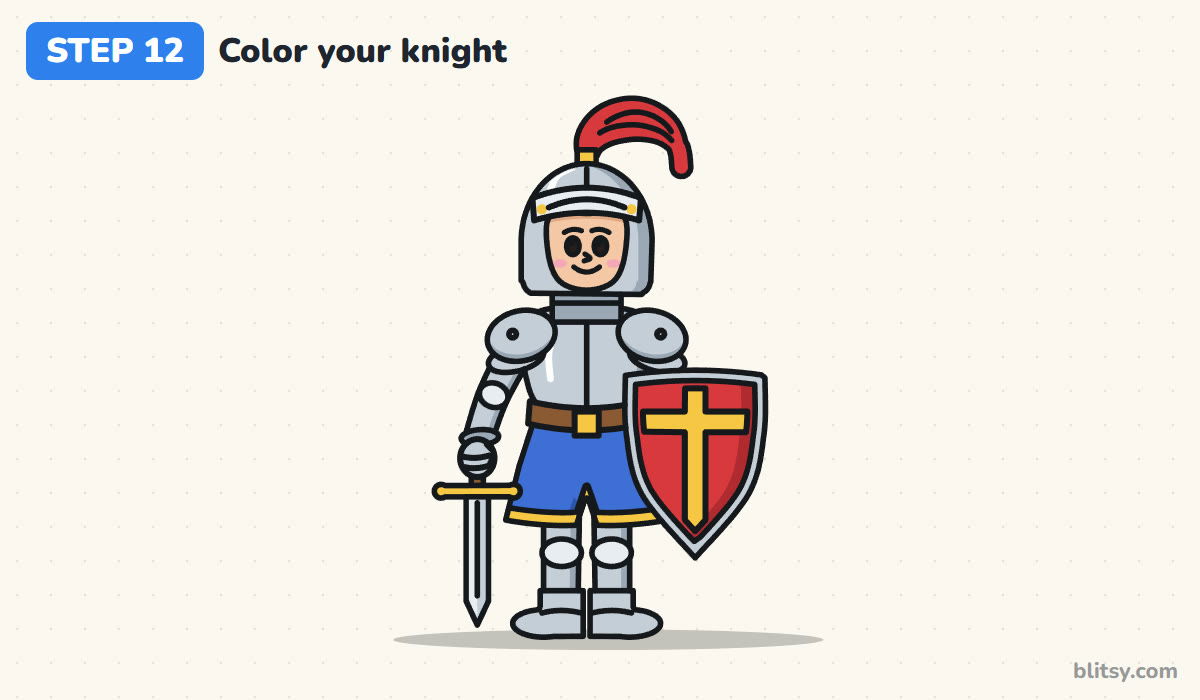
I color all the metal gray first, the sword blade too. The tunic is blue, the plume and shield red, and the cross, the crossguard plus the trim yellow. Use brown for the belt and handle, peach for the face and a touch of pink on the cheeks.
💡 Tip: Press harder with the gray on one side of each armor piece. That darker edge makes the metal look round and shiny.
Knight Mistakes That Turn Him Into a Robot
- A tiny face opening. If the helmet swallows the face, he looks like a robot. Make the opening almost as wide as the helmet's middle.
- Square armor everywhere. Boxy shapes look like a fridge. Round the shoulders, the breastplate and the knee plates.
- Stick arms and legs. One line per limb looks unfinished next to all that armor. Give every arm and leg two sides.
- A shield that floats. When it sits away from the body, it looks pasted on. Let it overlap his side and hide that arm.
- No color difference in the metal. Plain gray everywhere looks flat. A darker edge on one side makes every plate pop.
Swap Colors and Crests on Your Knight
Once the shapes feel easy, each new knight can belong to a different castle. Try a green tunic with a white shield, a purple plume, or a lion, a star or a dragon on the shield instead of the cross. If you want his sword in more detail, my how to draw a sword step by step lesson shows a knight's longsword up close. A knight needs a home to guard, and the castle drawing tutorial gives him towers and a drawbridge. For a friendly foe, add a dragon from the dragon drawing step by step guide.
Free Knight Coloring Page and Printable Steps
The free knight coloring page has a colored example at the top and a key that matches each color to a part of the armor, with a big outline below for coloring. The step-by-step PDF guide holds all 12 steps with pictures and tips, so you can draw away from the screen. Both print on Letter or A4 paper.
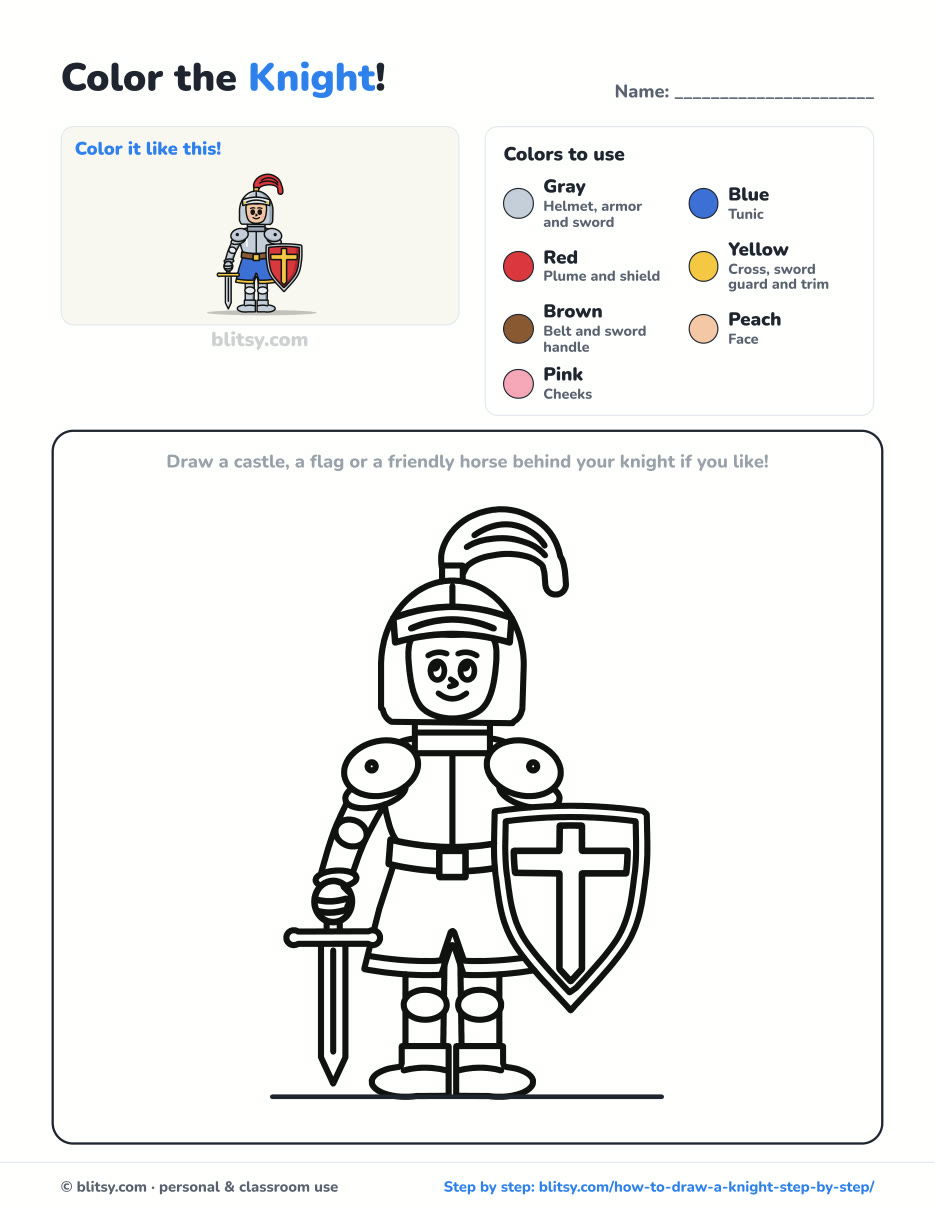
Black outlines with a colored example and the color names at the top. Ready to print and color.
⬇️ Download Coloring PageEvery step picture with its instructions and tips, to keep beside your paper while you draw.
⬇️ Download Drawing Guide📱 On a phone? Tap a download button, then open the file and choose Share → Save to Files or Print. On a computer, the PDF opens or saves straight to your Downloads folder.
Keep the Knight Steps on Your Pinterest Board
More Castle-Time Drawings to Try
Each of these lessons has a picture for every step too, so you can build a whole adventure around your knight.
- Sword Drawing: A classic longsword with a gold crossguard and a shiny blade in this how to draw a sword step by step lesson.
- Castle Drawing: Towers, battlements and a drawbridge over a moat in this castle drawing tutorial.
- Dragon Drawing: A friendly green dragon with wings and spikes in this dragon drawing step by step guide.
- Horse Drawing: Every knight needs a ride, and this horse drawing tutorial builds one from three circles.
- Princess Drawing: A cartoon princess in a ball gown for your castle story in this how to draw a princess step by step lesson.
Knight Drawing Questions From Young Artists
How do you draw a knight easy for kids?
Start with a big circle for the head and a box for the body. Turn the circle into a round helmet with a face opening, then add a shield, a sword and two wide legs. Rounded shapes keep it simple.
How do you draw knight armor?
Break it into a few plates: a round helmet, a barrel-shaped breastplate, round shoulder plates, an elbow plate and knee plates. Darker gray on one side of each plate makes it look like metal.
How do you draw a knight's helmet?
Draw a dome that comes down past the chin with a flat bottom. Cut a U-shaped opening for the face and add a curved visor band across the forehead with a slit in it.
How long does it take to draw a knight?
Most kids finish in 30 to 40 minutes, coloring included. The shoulder plates and the shield take the longest.
Grab your pencil, raise that visor and give your brave knight a smile of his own. 🛡️✏️
Related posts:
 How to Draw a Sword Step by Step (Easy Knight's Longsword)
 How to Draw Bart Simpson Step by Step (Easy Cartoon)
 How to Draw a Tank Step by Step (Easy Cartoon Tank)
 How to Draw a Bee Step by Step (Easy Cartoon Bee)
 How to Draw a Boy Step by Step (Easy Full-Body Cartoon)
 How to Draw a Mermaid Step by Step (Easy Cartoon for Kids)
 How to Draw a Family Step by Step (Easy Cartoon Portrait)
 How to Draw a Princess Step by Step (Easy Ball Gown Cartoon)
 How to Draw a Cowboy Step by Step (Easy Cartoon Kid)
 How to Draw a Girl Step by Step (Easy Full-Body Cartoon)
 How to Draw a Bat Step by Step (Cute Cartoon Bat for Kids)
 How to Draw a Whale Step by Step (Easy for Beginners)

