
A crescent moon looks tricky until you see the secret: it's just one circle with a bite taken out by a second circle. Here you'll learn how to draw a moon step by step, from two light circles to a sleepy moon napping on a cloud, with stars around it and a row of phases showing how the real Moon changes. You only need to be able to draw a circle.
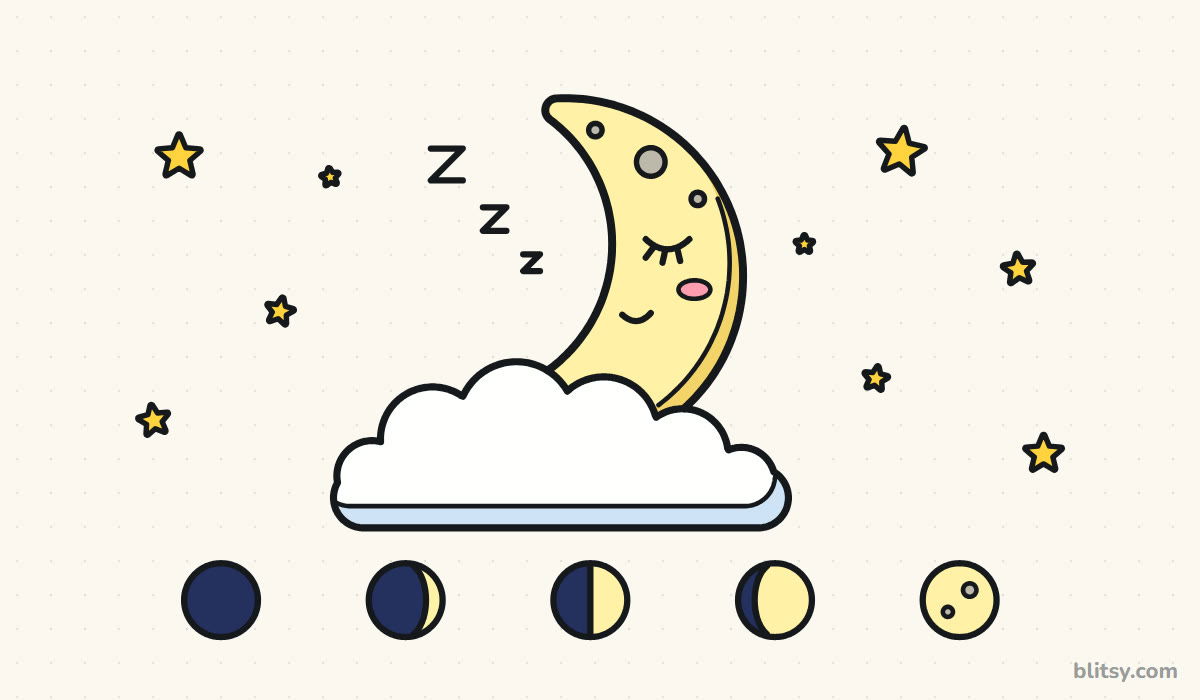
Moonbeam blue picks out whatever you add in each picture, while gray lines were drawn in earlier steps. The pale blue circles are temporary helpers; draw them faintly so the eraser lifts them in one pass.
Quick overview
⏱️ Time: about 25 minutes
🎯 Level: easy, good for kids around 6 and up
✏️ Steps: 11
🌙 You'll draw: a sleepy crescent moon on a cloud above five moon phases
Bedtime Kit for a Moon Sketch
- A pencil that makes soft, light lines
- An eraser (a kneaded one is great for guide circles)
- A black marker or fineliner
- Coloring pencils in pale yellow, dark yellow, gray, pink, light blue, navy plus a brighter yellow
- Plain paper, turned sideways
- Two round things of different sizes to trace, like a bowl and a big lid (optional)
Navy can be swapped for dark blue or even a soft black if that's what your box has.
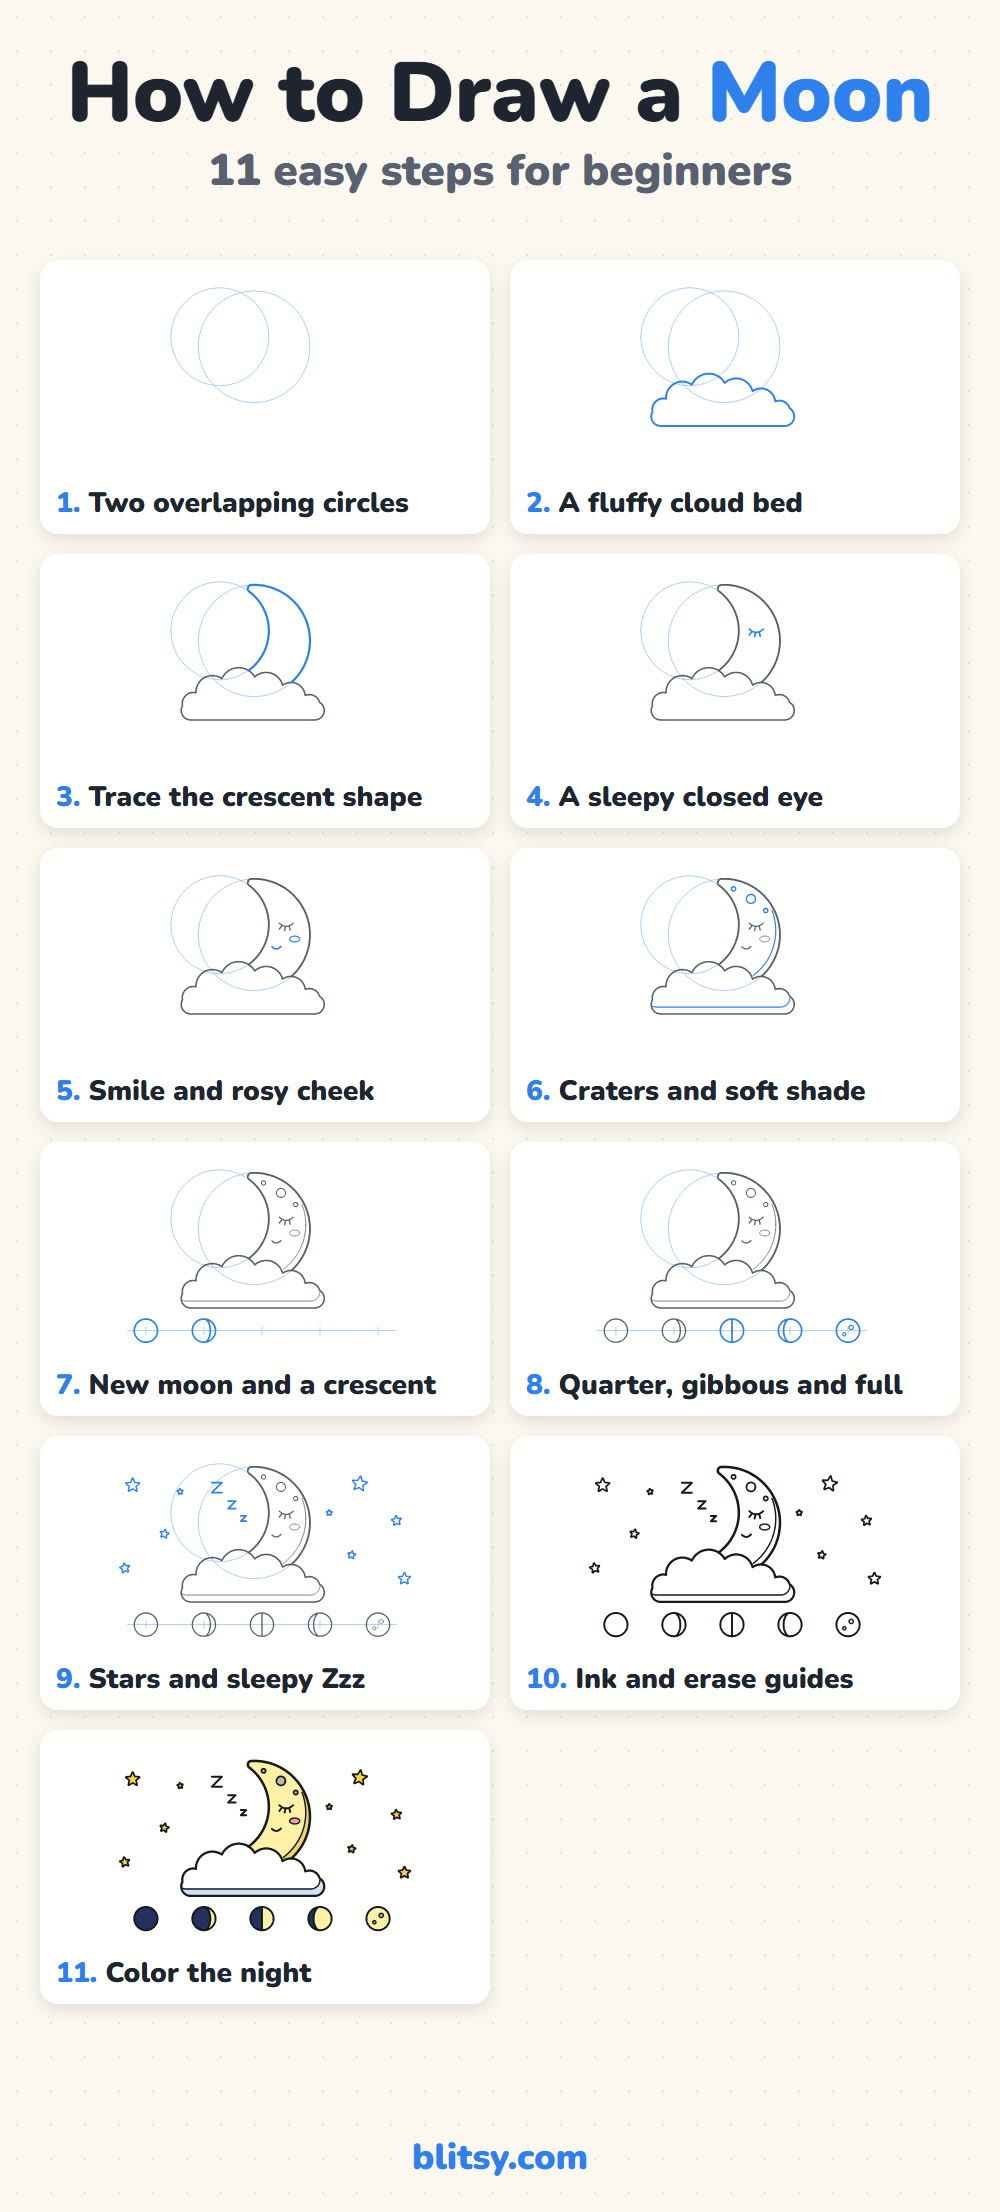
How to Draw a Moon Step by Step
Step 1: Draw two overlapping circles
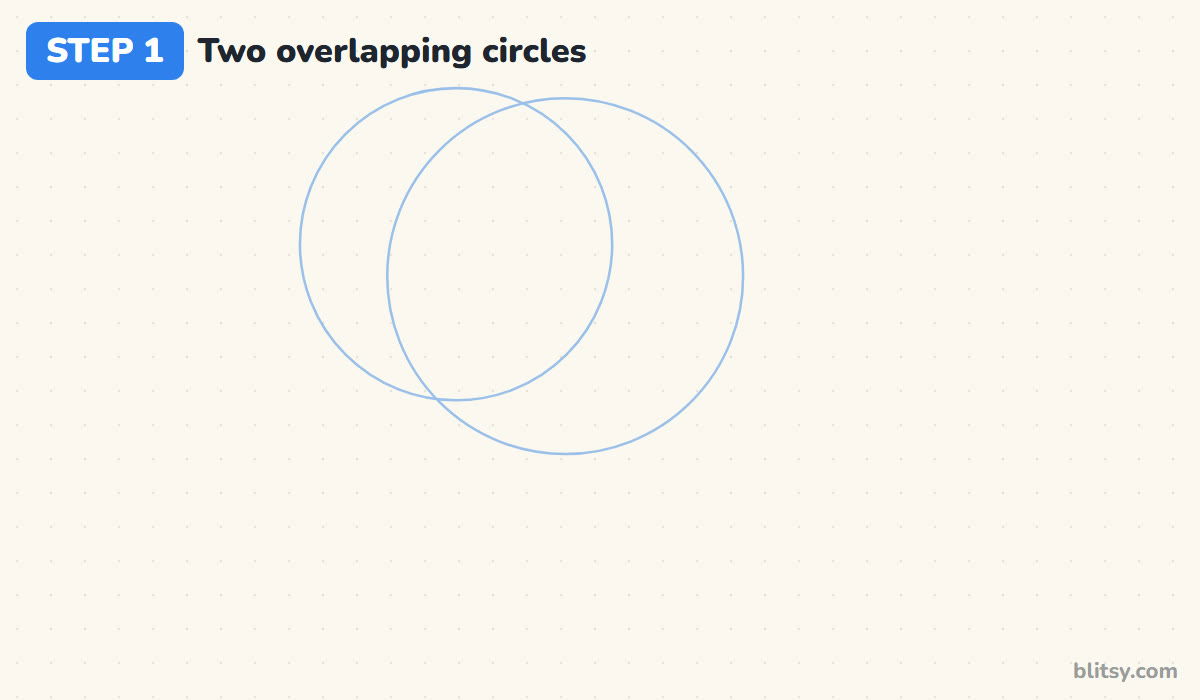
Draw one big circle a little right of the middle of your paper. Then draw a second, slightly smaller circle that overlaps it, shifted up and to the left. The space that belongs only to the big circle is your crescent. The further you shift the second circle, the fatter the moon gets, so I aim for roughly half the big circle's width.
💡 Tip: Leave space below the circles; a cloud and a row of small moons still have to fit.
Step 2: Sketch a fluffy cloud bed
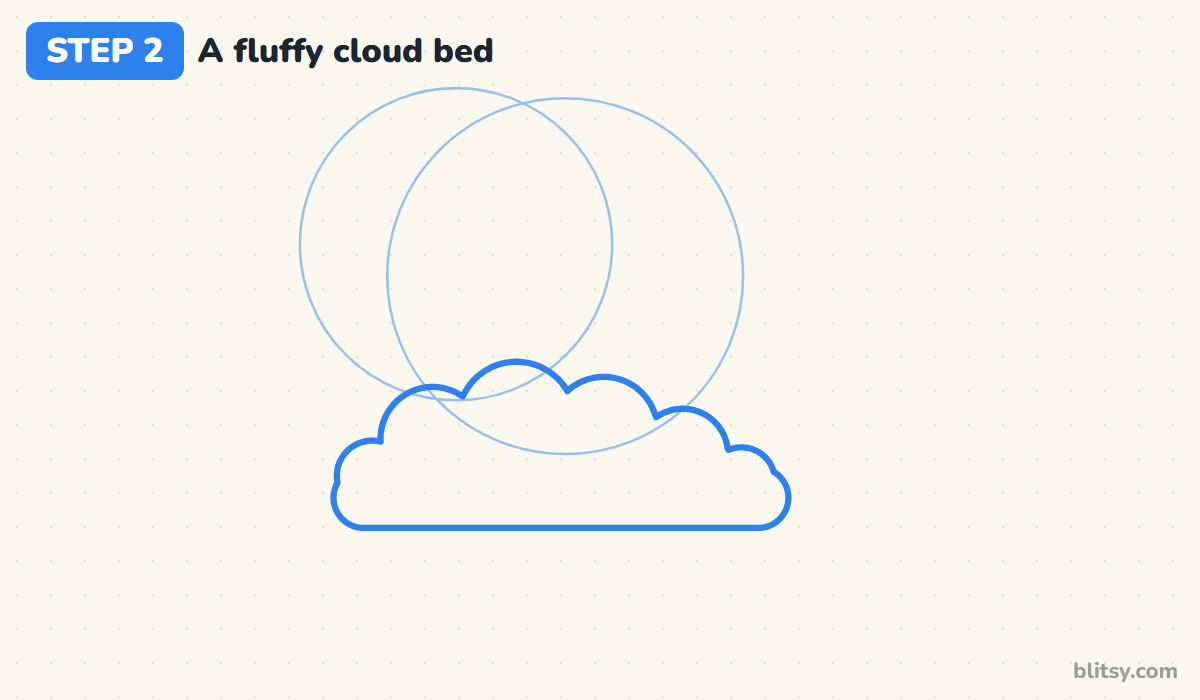
Under the circles, draw a long cloud with a flat, rounded bottom and five or six bumps on top. Let the middle bumps rise high enough to hide the bottom of the moon. I draw the cloud before the moon on purpose: the cloud sits in front, so later the moon line can simply stop wherever it touches a bump.
💡 Tip: Make the bumps different sizes, biggest in the middle, smaller toward the ends.
Step 3: Trace the crescent shape
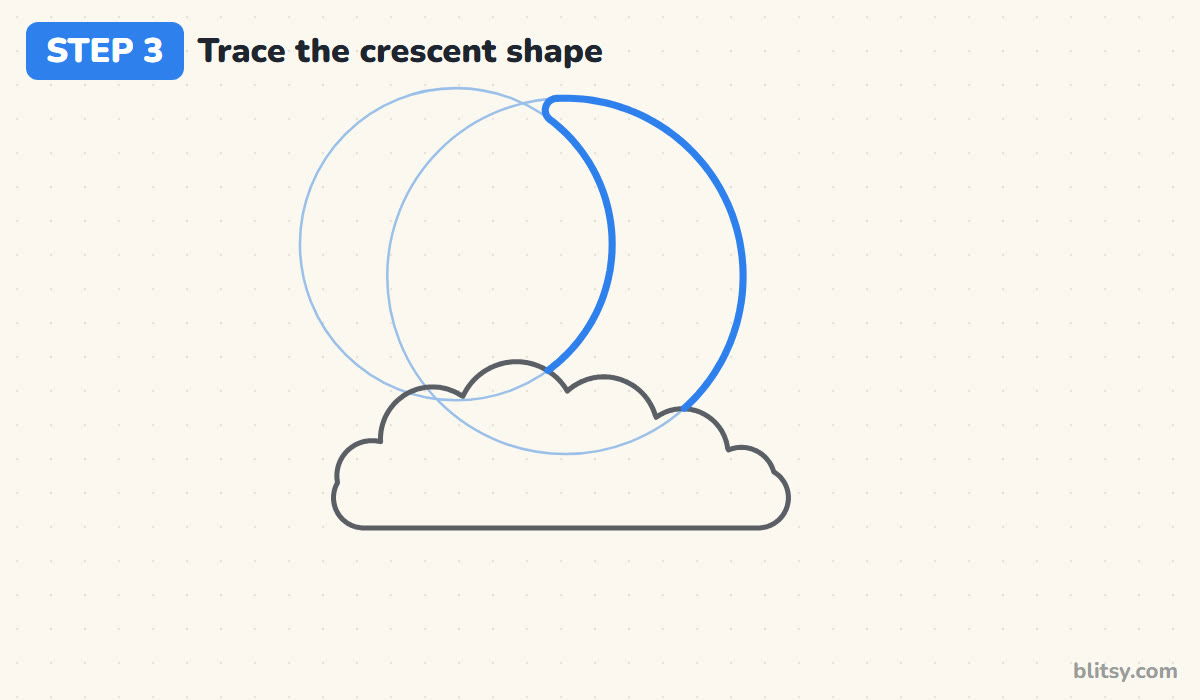
Now go over the outer edge of the big circle, from where the two circles cross at the top, around the right side, down to the cloud. Then trace the inside curve, which is the edge of the smaller circle. Round off the top tip a little instead of leaving a needle point. Kids find rounded tips much easier to ink, and they look friendlier.



💡 Tip: Trace in short strokes along the guide instead of one long sweep; small joins hide well.
Step 4: Add a sleepy closed eye
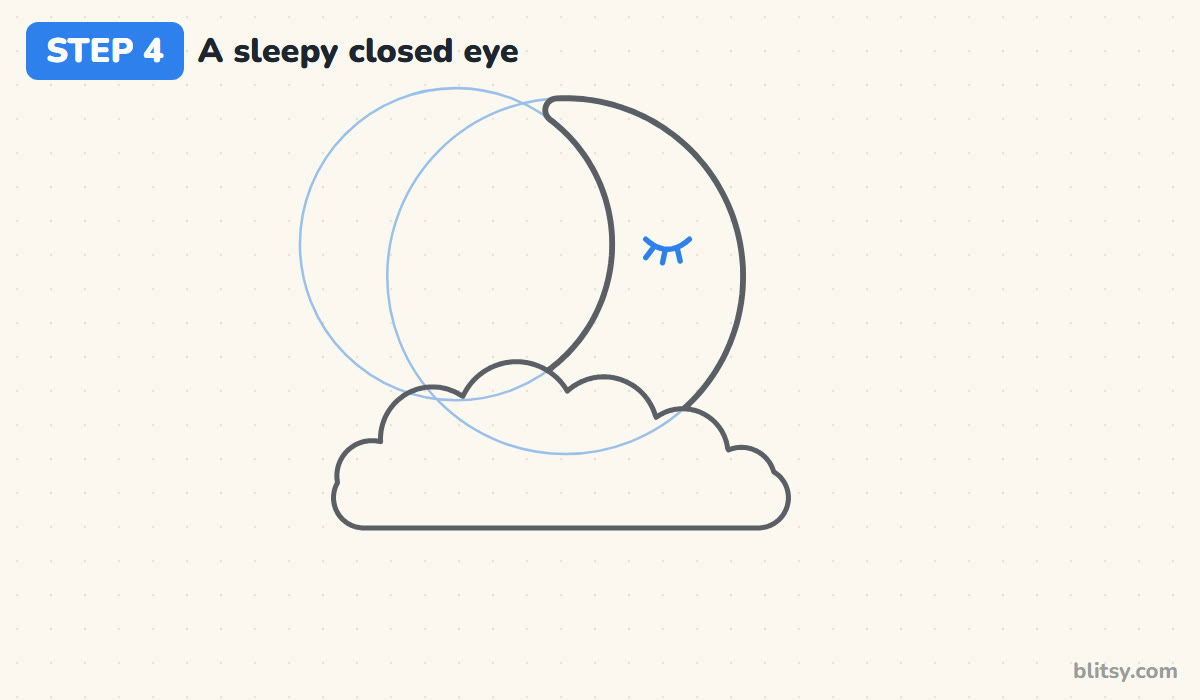
Find the thickest part of the crescent, on the right side. About halfway up, draw a small curve shaped like a smile; that's a closed eye. Add three short lashes hanging down from it. Placing the eye in the thick part matters, because a thin horn has no room for a face and the features would crowd the edge.
💡 Tip: Tilt the lashes slightly outward, like a fan, so they don't look like a fence.
Step 5: Give it a smile and a rosy cheek
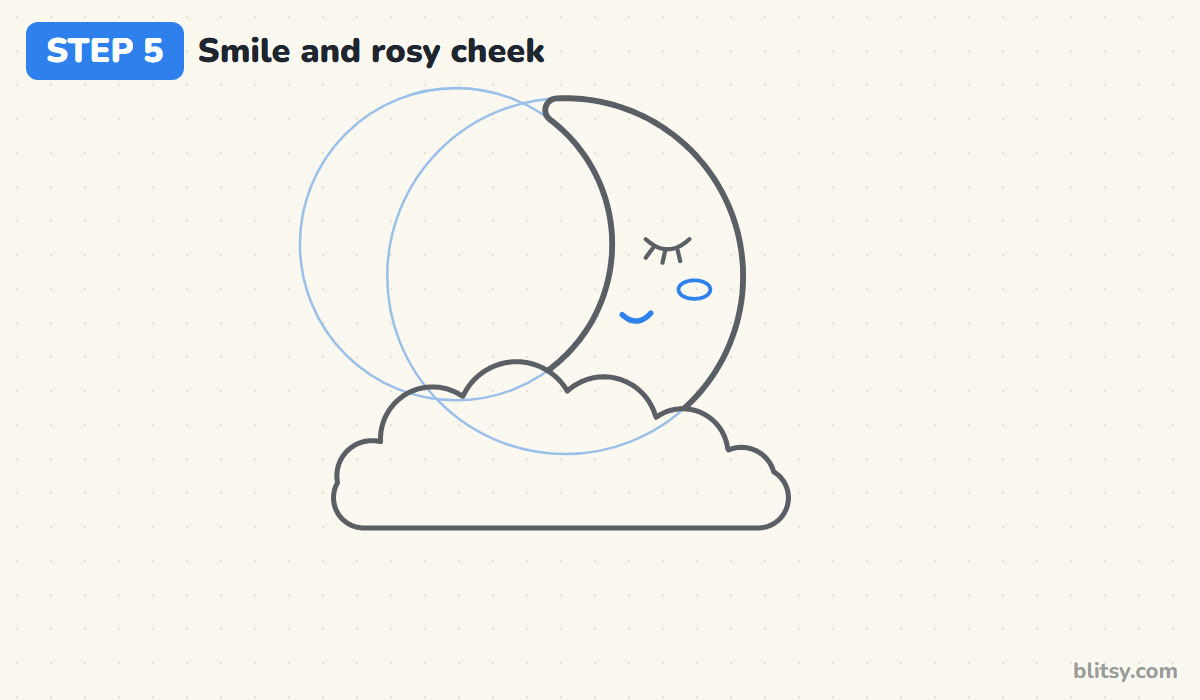
Below and a little left of the eye, near the inside curve, draw a tiny smile. Keep it small, about half the width of the eye. Then add a flat oval cheek to the right of the smile, under the eye. The moon is facing left in profile, which is why the mouth sits close to the inner edge.
💡 Tip: A smaller smile reads as sleepy; a big grin makes the moon look wide awake.
Step 6: Draw craters and soft shade
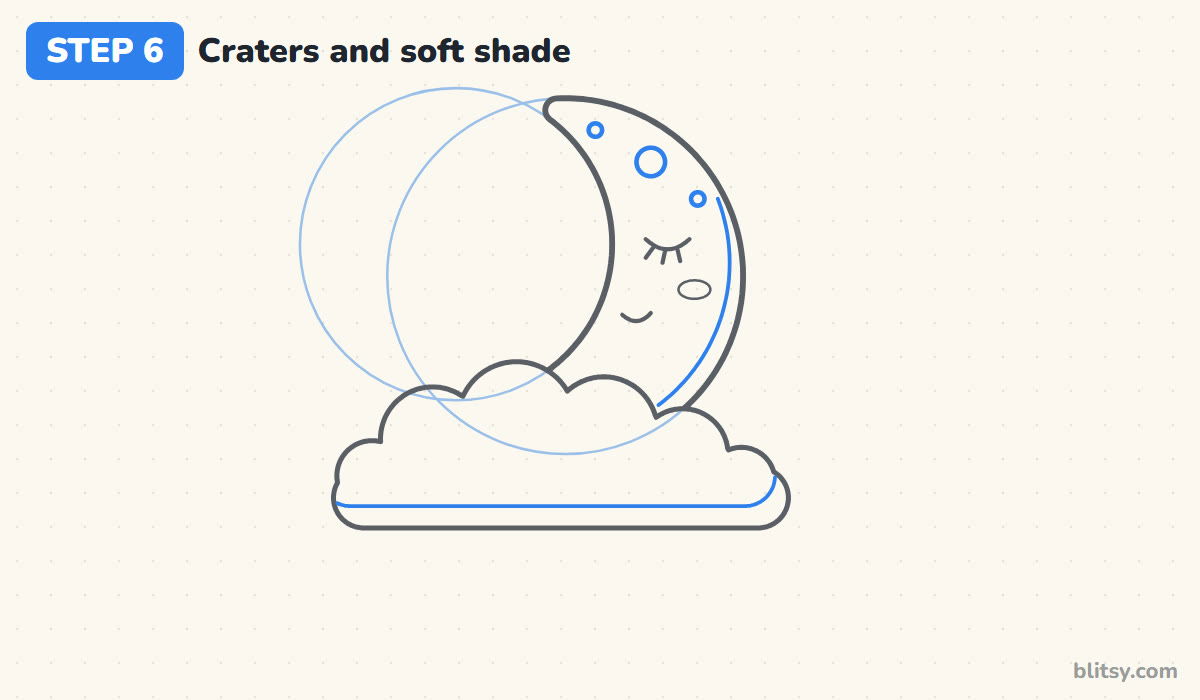
Put three craters in the empty top part of the moon: one medium circle and two little ones. I keep them away from the face so it stays easy to read. Next, draw a long curve just inside the outer right edge, running down toward the cloud. Last, add a line along the bottom of the cloud for its shadow.
💡 Tip: Odd numbers of craters look more natural than pairs.
Step 7: Start the phases: new moon and crescent
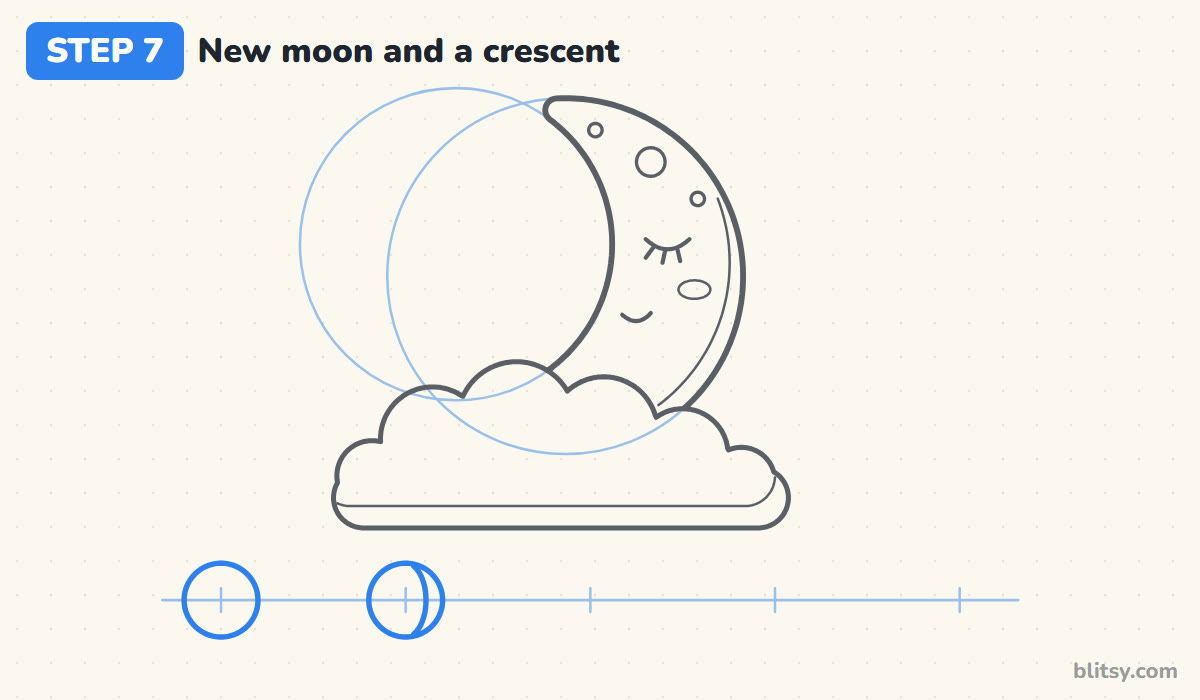
Lightly rule a long line under the cloud and mark five evenly spaced ticks on it. On the first tick, draw a circle for the new moon, which will be colored dark. On the second tick, draw a circle and add a curve inside it near the right edge. That thin right-hand sliver is the waxing crescent, the same shape as your big moon.



💡 Tip: I use a ruler for the ticks; uneven gaps are the first thing people notice in a row.
Step 8: Add the quarter, gibbous and full moon
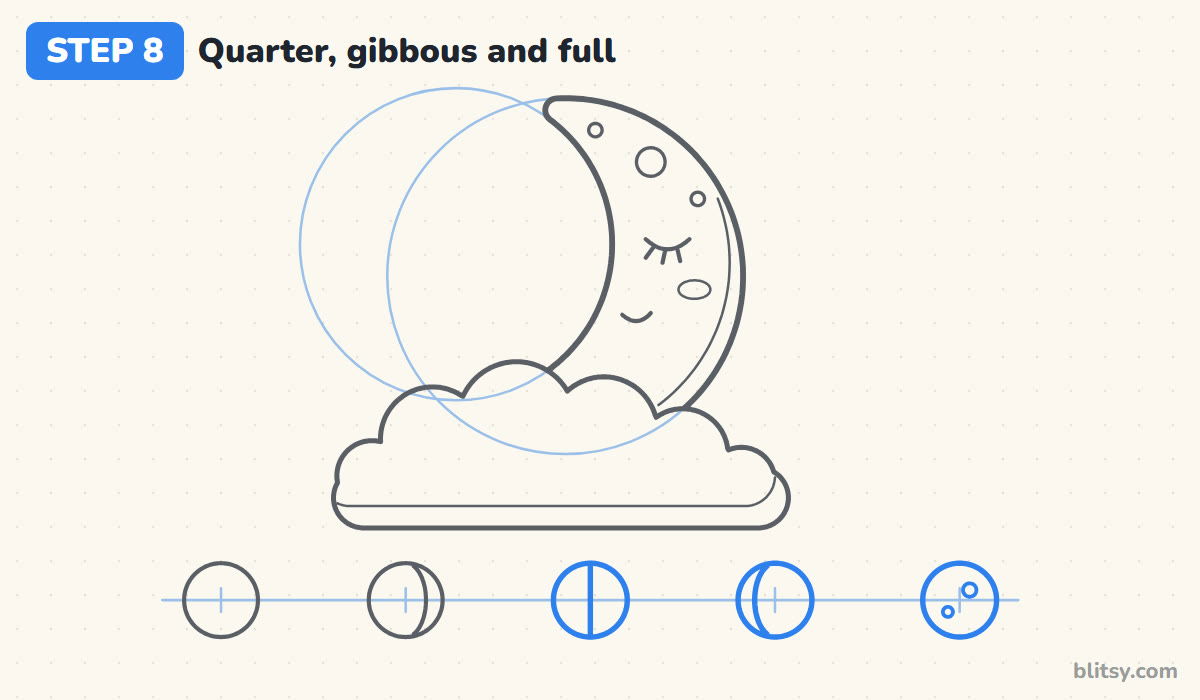
On the third tick, draw a circle split straight down the middle: that's the first quarter, half lit. On the fourth, draw a circle with a curve bulging toward the left side, so most of it will be bright. That's the waxing gibbous. The last circle is the full moon, with two small craters. Notice how the bright part grows from the right each time.
💡 Tip: Keep the lit side on the right for all of them, or the order stops making sense.
Step 9: Sprinkle stars and a sleepy Zzz
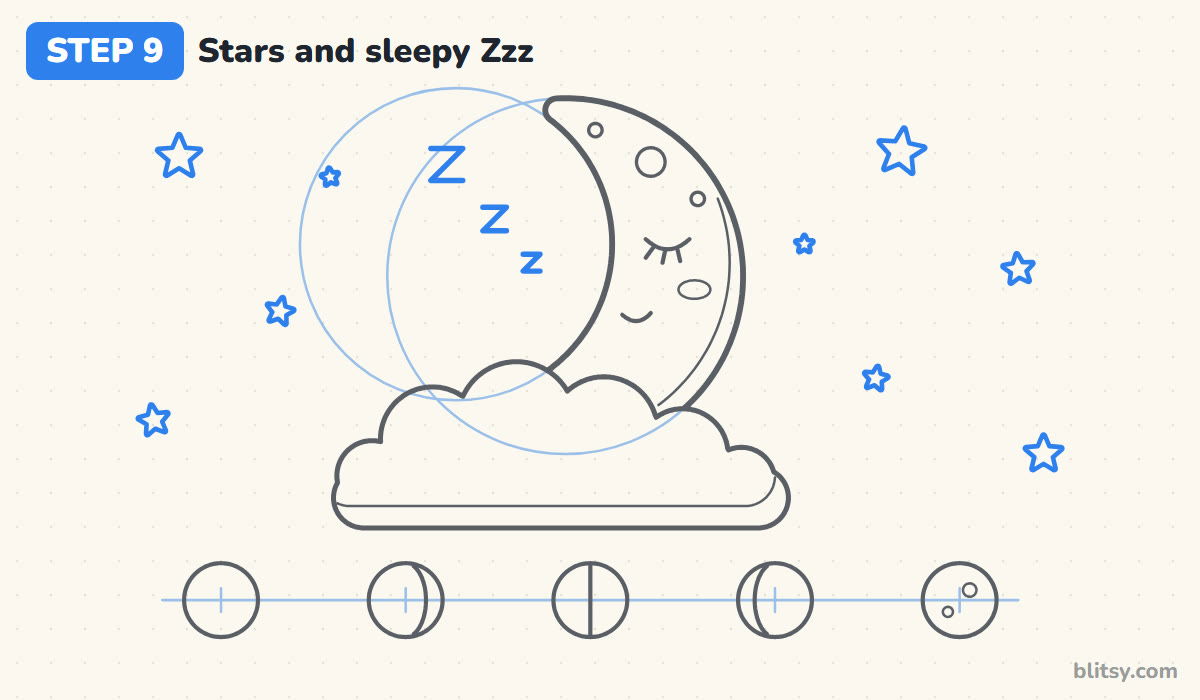
Fill the empty sky with five-pointed stars, a few big and several small, scattered on both sides of the moon. Then write three Z letters in the hollow of the crescent, small near the face and growing larger as they float up and away. Those letters do a lot of work: they tell everyone at once that the moon is asleep.
💡 Tip: Draw each star in one continuous zigzag so the five points come out even.
Step 10: Ink the drawing and erase the guides
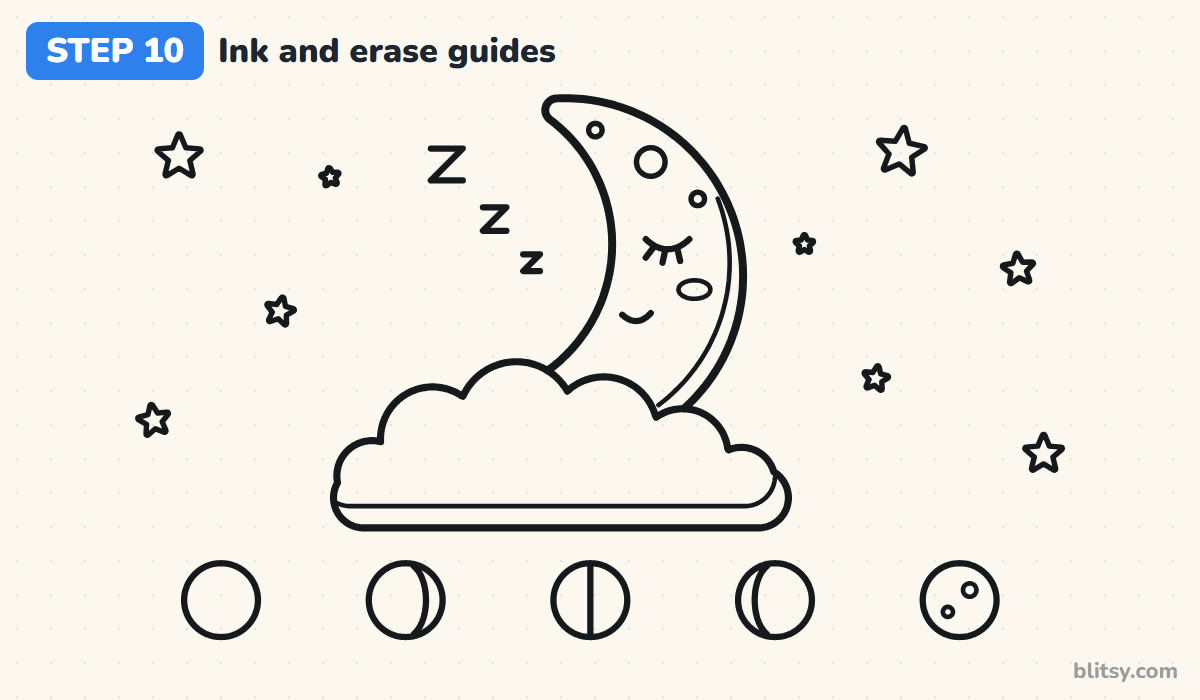
With a black marker, trace every keeper line: the moon, its face, the craters, the cloud, the phases, the stars and the Zzz. Wait a minute for the ink to dry. Then erase both big guide circles and the phase line. The crescent suddenly looks clean, because the circle it was cut from is gone.
💡 Tip: Ink the long moon curves first while your hand is fresh, and the tiny stars last.
Step 11: Color the night scene
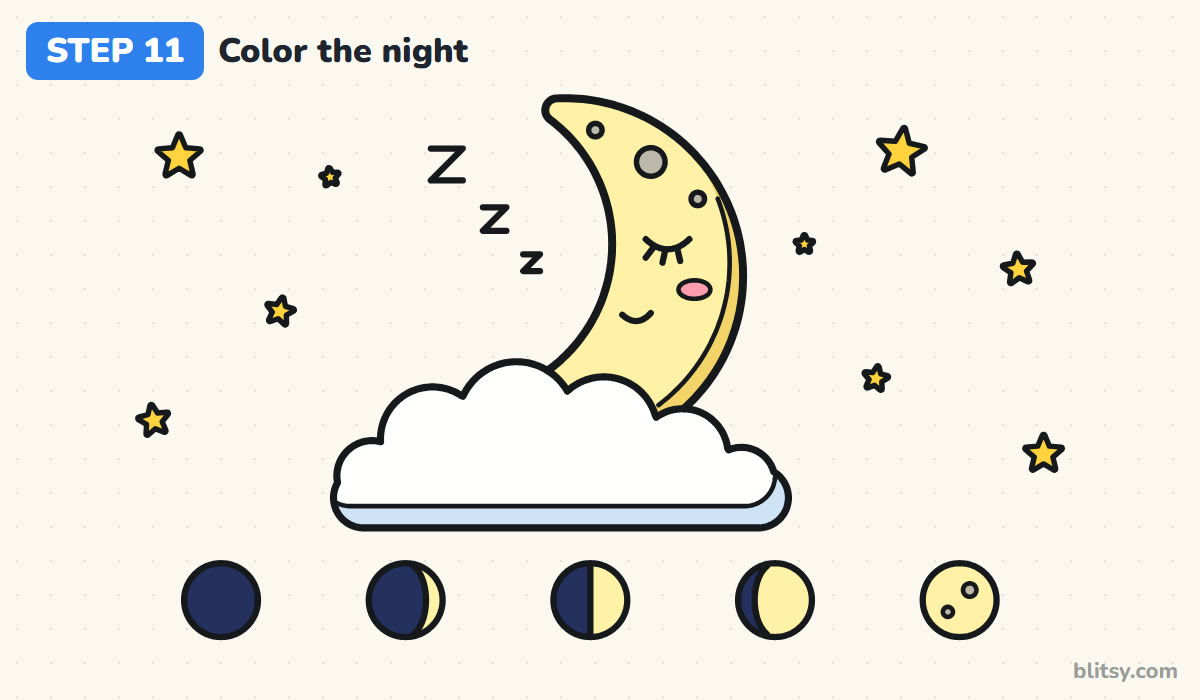
Color the moon pale yellow and the strip along its outer edge a darker yellow. Craters go gray, and the cheek gets a touch of pink. Leave the cloud white with a light blue base. For the phases, fill the dark parts navy and the lit parts pale yellow, then make the stars a brighter yellow than the moon so they twinkle.




💡 Tip: I press lightly for the pale moon; you can always add more yellow, but you can't take it away.
Why Crescents End Up Looking Like Bananas
- Drawing the crescent freehand. Two curves drawn separately rarely match, and the moon turns lumpy. Start with the two overlapping circles every time.
- Shifting the second circle too little. You get a thread-thin moon with no room for a face. Move the cutting circle about half the moon's width.
- Squeezing the face into a horn. The features bump into the outline. Keep every feature in the thick middle part.
- Mixing up the phase directions. If the lit side jumps from right to left, the row stops showing a real cycle. For waxing phases, light grows from the right.
- Coloring the moon bright yellow. It looks like a banana again. A pale, creamy yellow with gray craters feels like moonlight.
Nightcaps, Owls and More Moonlit Twists
Once the two-circle trick feels easy, change one thing and see what happens. Slip a striped nightcap over the top horn, let an owl perch on the tip, or flip the crescent so it faces right and add the waning phases to finish the cycle. A bigger offset gives a chubby moon; a tiny one makes a delicate sliver for a night sky poster. To fill your sky, practice with the star drawing tutorial, and borrow a few fluffy shapes from the cute cloud drawing tutorial.
Sleepy Moon Coloring Page and Printable Step Guide
For a quiet activity before bed, print the moon coloring page. A small colored example and a color key sit at the top, so kids can match the pale yellow, the gray craters and the navy phases, with a big outline below and plenty of sky to fill. The step-by-step guide PDF has all 11 steps with tips. Both fit Letter or A4 paper.
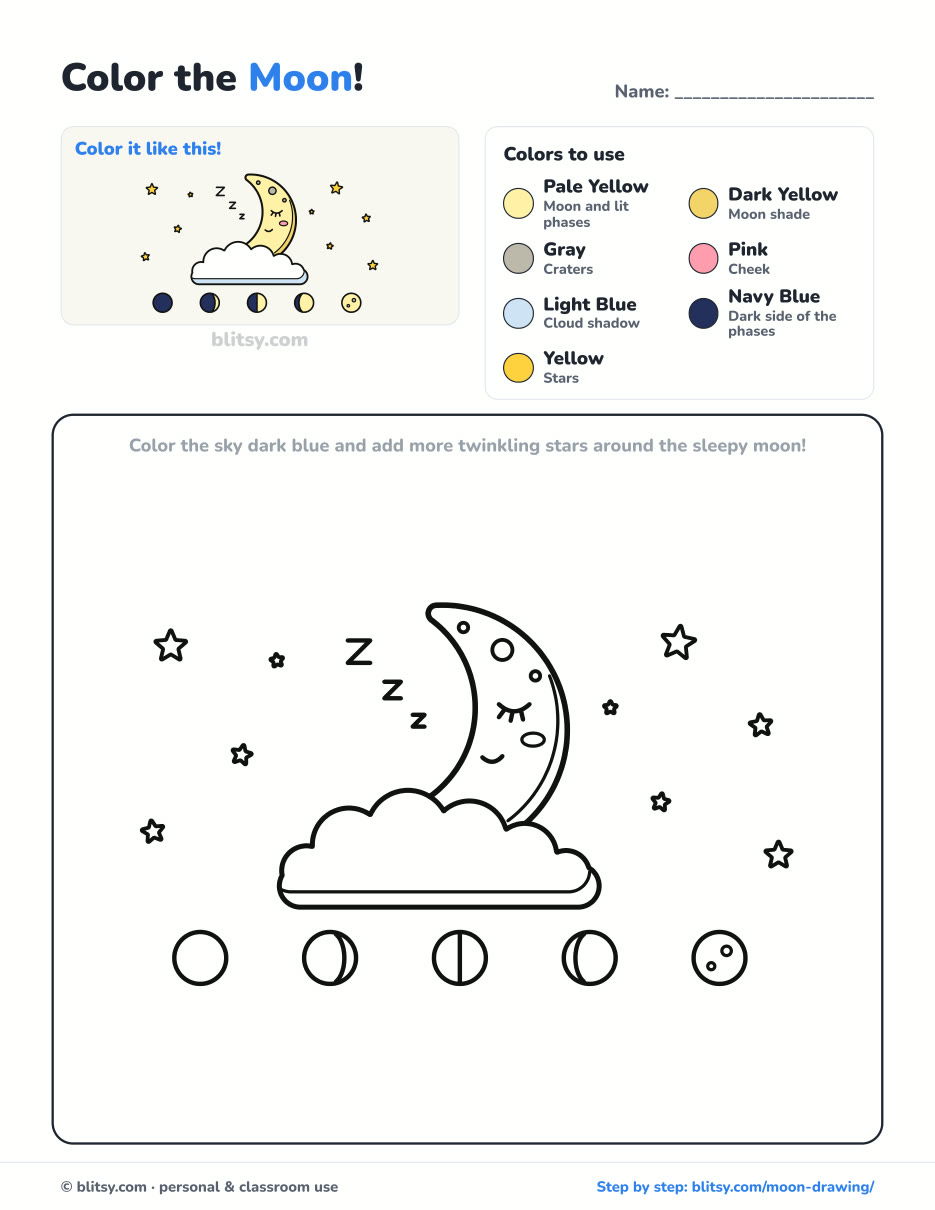
Black outlines with a colored example and the color names at the top. Ready to print and color.
⬇️ Download Coloring PageEvery step picture with its instructions and tips, to keep beside your paper while you draw.
⬇️ Download Drawing Guide📱 On a phone? Tap a download button, then open the file and choose Share → Save to Files or Print. On a computer, the PDF opens or saves straight to your Downloads folder.
Pin the Moon Phases Lesson for Bedtime
Moon Drawing Questions Kids Often Ask
What is the easiest way to draw a crescent moon?
Draw a circle, then draw a second circle overlapping it and shifted to one side. Trace only the part of the first circle the second one doesn't cover, and erase the rest.
Why does the Moon change shape?
The Moon doesn't make its own light; it reflects sunlight. As it travels around Earth, we see different amounts of its sunlit half, from none at new moon to all of it at full moon.
How long does it take the Moon to go through all its phases?
About 29.5 days, a little under a month, from one new moon to the next.
Which side of the moon is lit when it's growing?
Seen from the northern hemisphere, a waxing (growing) moon is lit on the right. In the southern hemisphere it's the other way around, lit on the left.
Tape your sleepy moon above the bed, and next clear night, peek outside to see which phase the real one is in. 🌙
Related posts:
 How to Draw a Wolf Step by Step (Howling at the Moon)
 How to Draw a Whale Step by Step (Easy for Beginners)
 How to Draw Lungs Step by Step (Easy Science Diagram)
 How to Draw a Pineapple Step by Step (Easy Crown and Slice)
 How to Draw Iron Man Step by Step (Easy Chibi for Kids)
 How to Draw a Dress Step by Step (Easy Party Dress)
 How to Draw a Chicken Step by Step (Easy for Beginners)
 How to Draw a UFO Step by Step (Cute Alien Saucer)
 How to Draw Flames Step by Step (Easy Campfire Drawing)
 How to Draw a Crow Step by Step (Easy for Beginners)
 How to Draw a Tiger Step by Step (Easy Walking Pose)
 How to Draw a Heart Step by Step (Even, Symmetric Shape)

