
Kids love drawing kids, and a boy waving hello ends up on fridges everywhere. Here I'll show you how to draw a boy step by step with one trick that fixes most body problems: you measure everything with his own head. Once you know where the elbows, hands and knees land, the rest is tracing simple shapes over a stick figure.
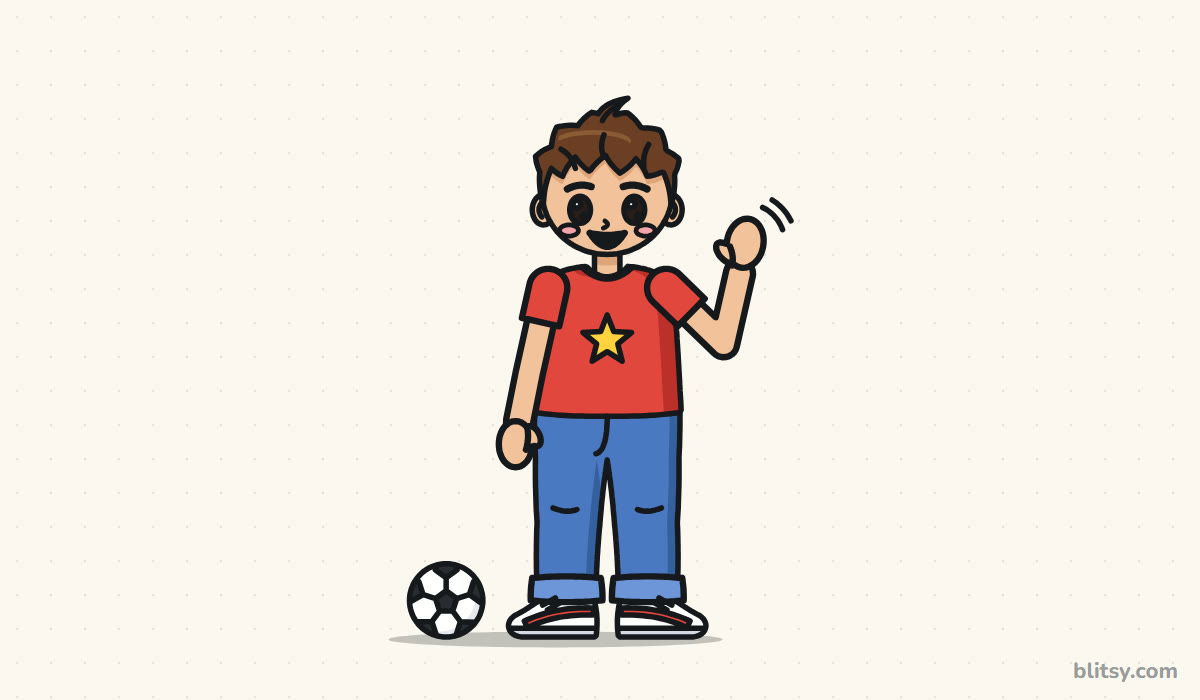
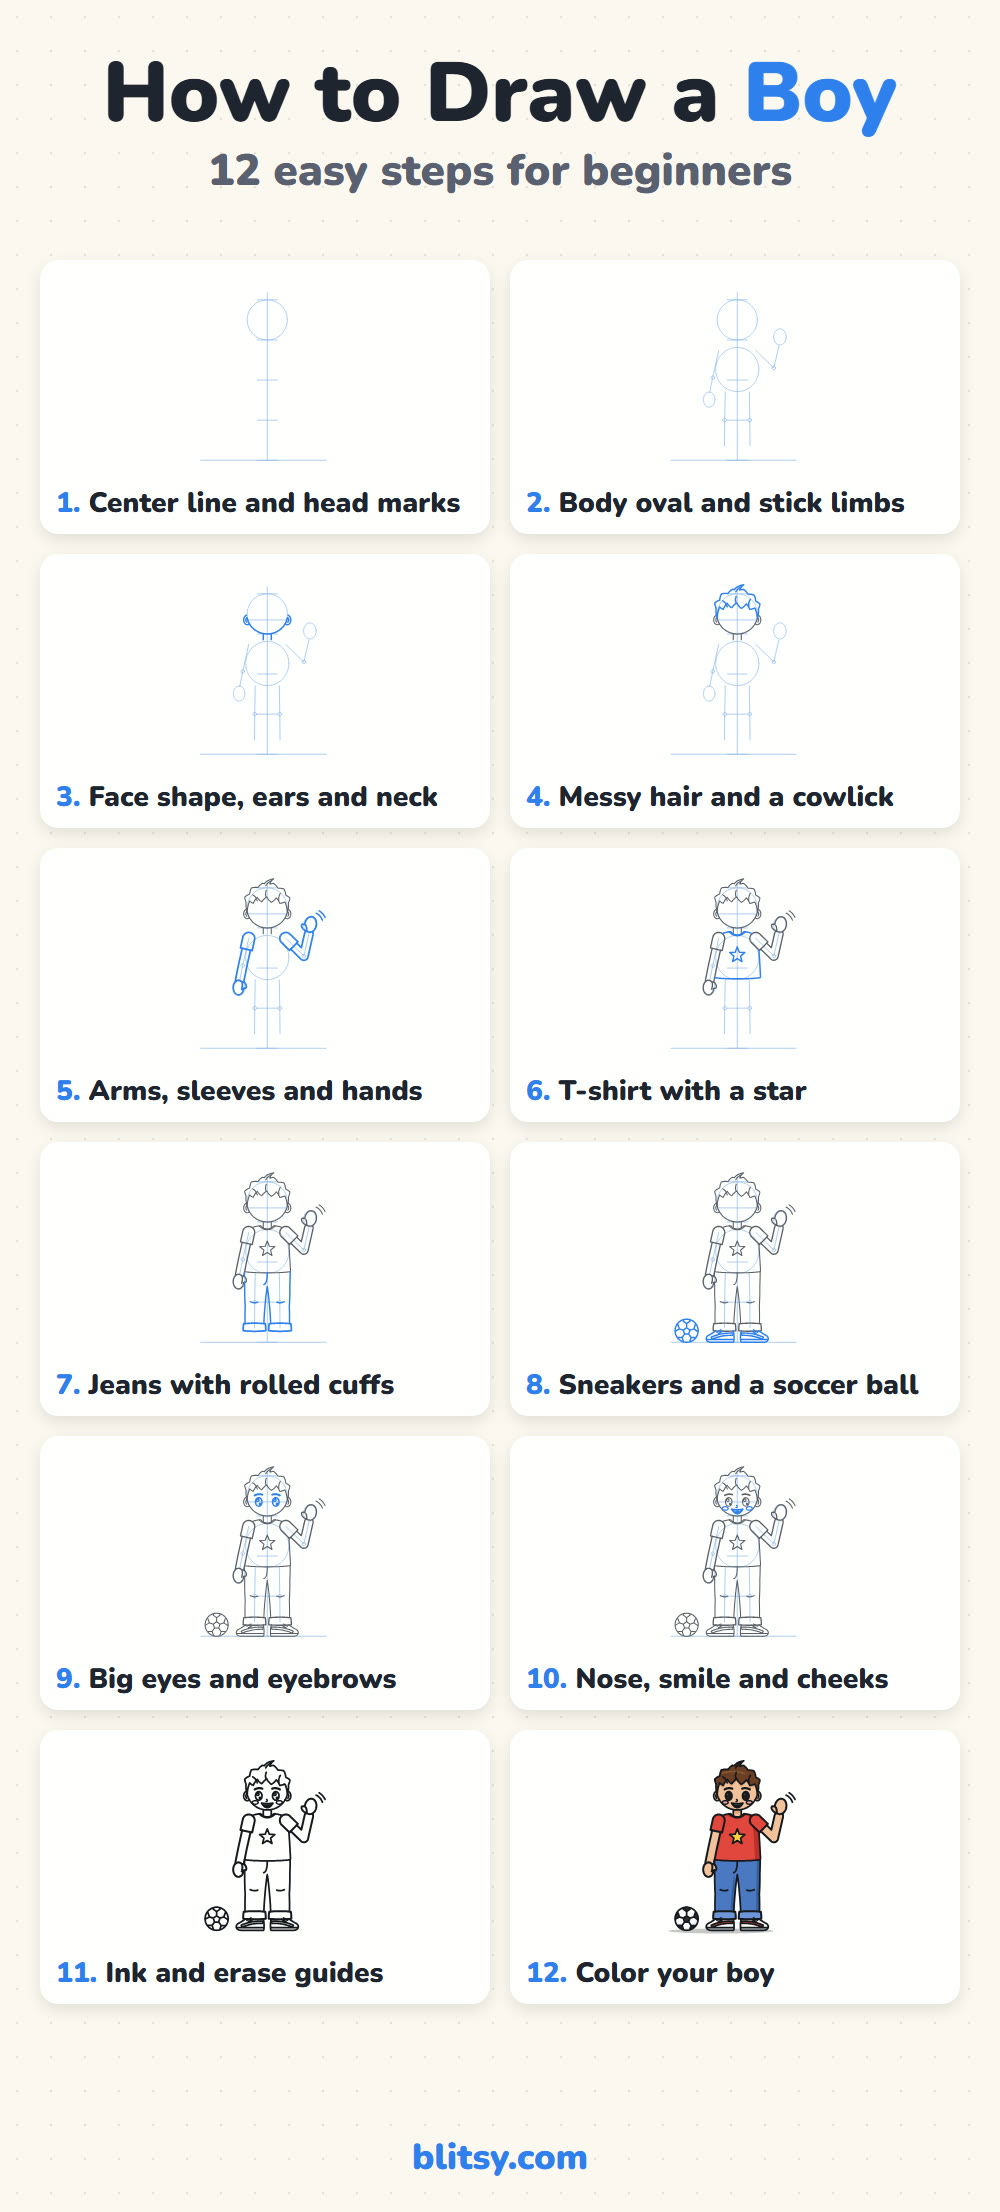
Watch the colors in every step picture: whatever you're adding right now is blue, older lines are gray, and the pale blue measuring lines vanish in step 11.
Quick overview
⏱️ Time: around 30 to 40 minutes with coloring
🎯 Level: beginner, good practice for body proportions
✏️ Steps: 12
👦 You'll draw: a smiling boy in a star T-shirt and jeans, waving, with a soccer ball at his feet
Gear for a Smiling Boy Sketch
- A pencil you can press lightly, like an HB
- An eraser that won't smudge
- A black fineliner or marker for the outline
- Colored pencils or markers in brown, red, yellow, blue and a skin tone
- A ruler for the center line (optional)
- Paper turned upright, since a standing figure is tall and narrow
Pick any skin tone and hair color you like; the steps work the same for every kid you want to draw.
How to Draw a Boy Step by Step
Step 1: Draw a center line, the head and four head marks
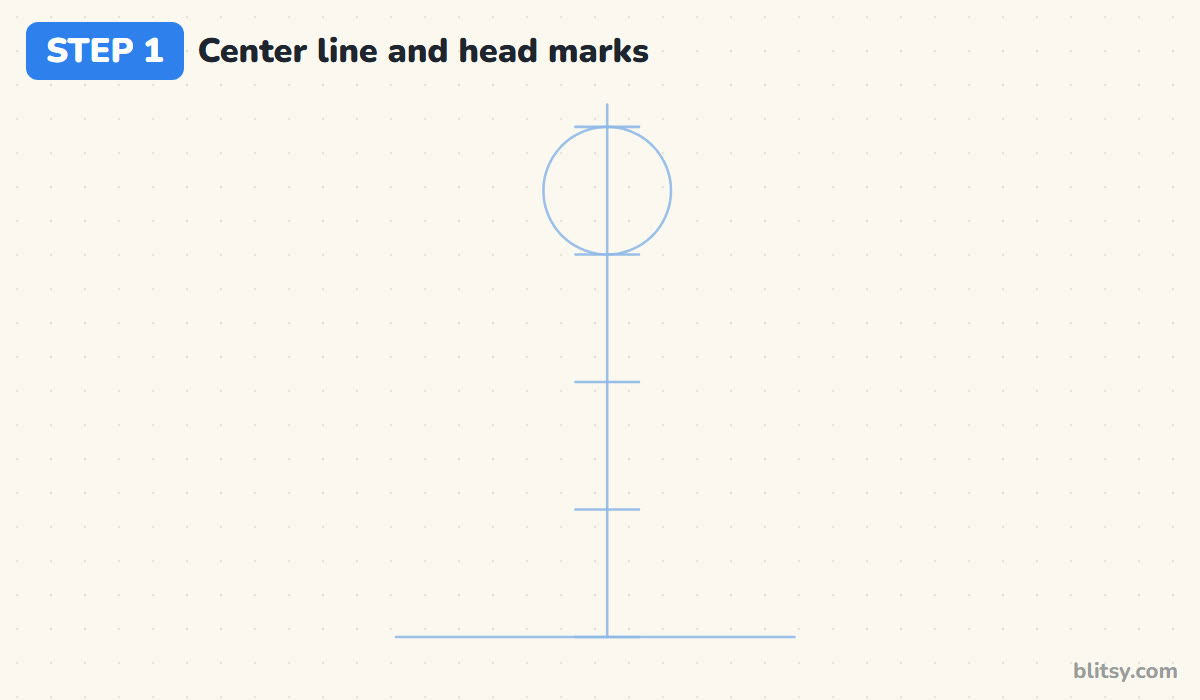
Draw a tall line down the middle of your paper and a flat ground line at the bottom. Near the top, draw a circle for the head. The height of that circle is one head. Mark the chin, then make three more marks below it, each one head apart. The last mark sits right on the ground line, so this boy is about four heads tall.
💡 Tip: Make the head small enough that four of it fit on the page; a huge first circle leaves no room for the feet.
Step 2: Sketch a body oval and stick arms and legs
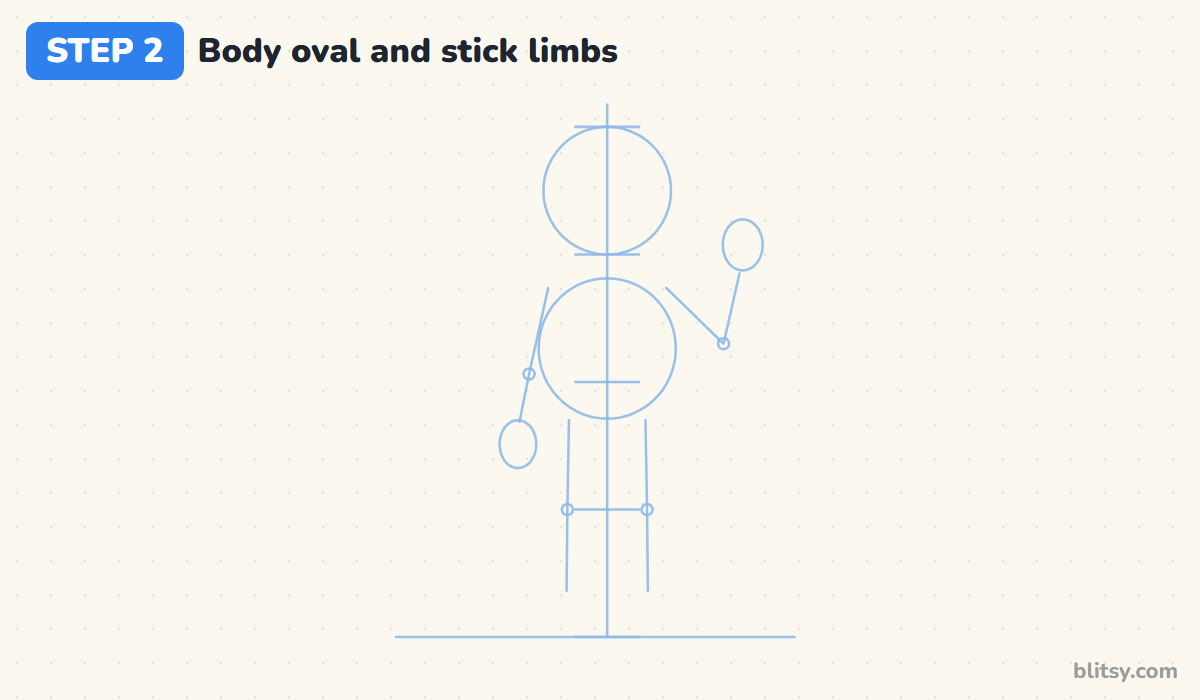
Hang an oval for the chest and tummy from just under the chin to a little past the second mark. Then add stick lines: one arm goes down with the elbow beside the second mark, and the other bends up so the hand sits next to his head. Two leg lines drop to the ground, with small knee circles on the third mark.
💡 Tip: Put tiny circles at the elbows and knees; they remind you where the arms and legs bend.
Step 3: Draw the face shape, the ears and the neck
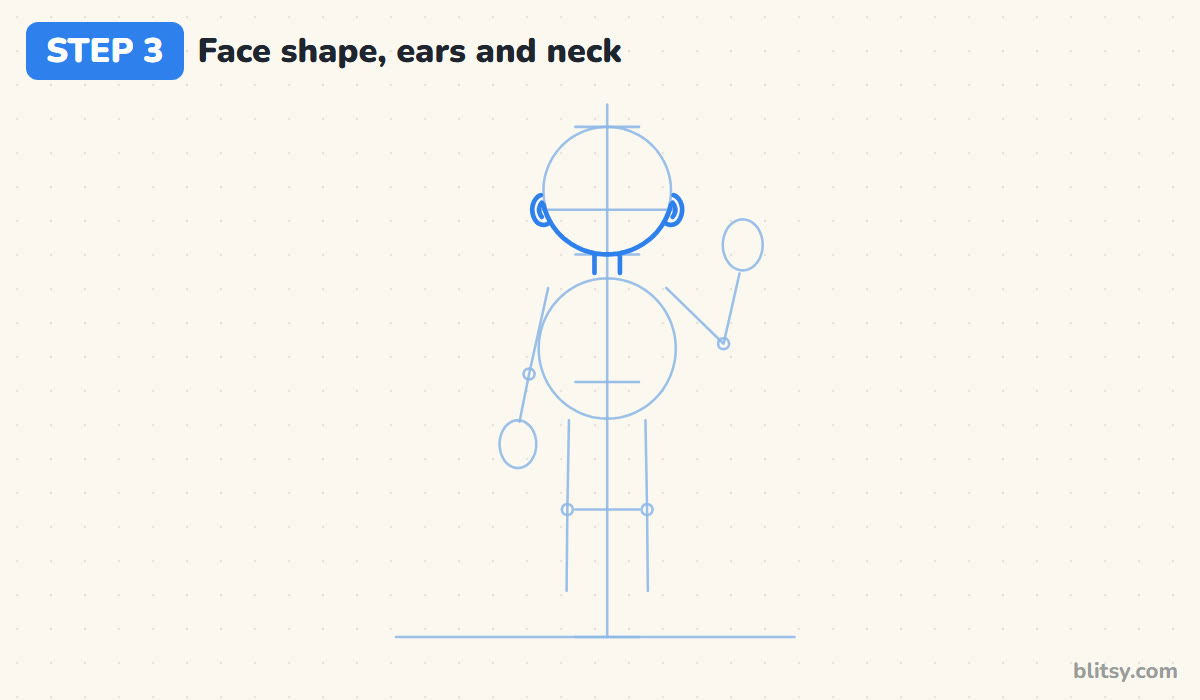
Trace the lower half of the head circle with a firmer line for the cheeks and chin. The top can wait, because the hair will cover it. Draw a level eye line across the middle, put a C-shaped ear on each side, and add two short lines under the chin for the neck.




💡 Tip: Line the ears up with the eye line; ears placed higher make the head look squashed.
Step 4: Add messy hair and a cowlick
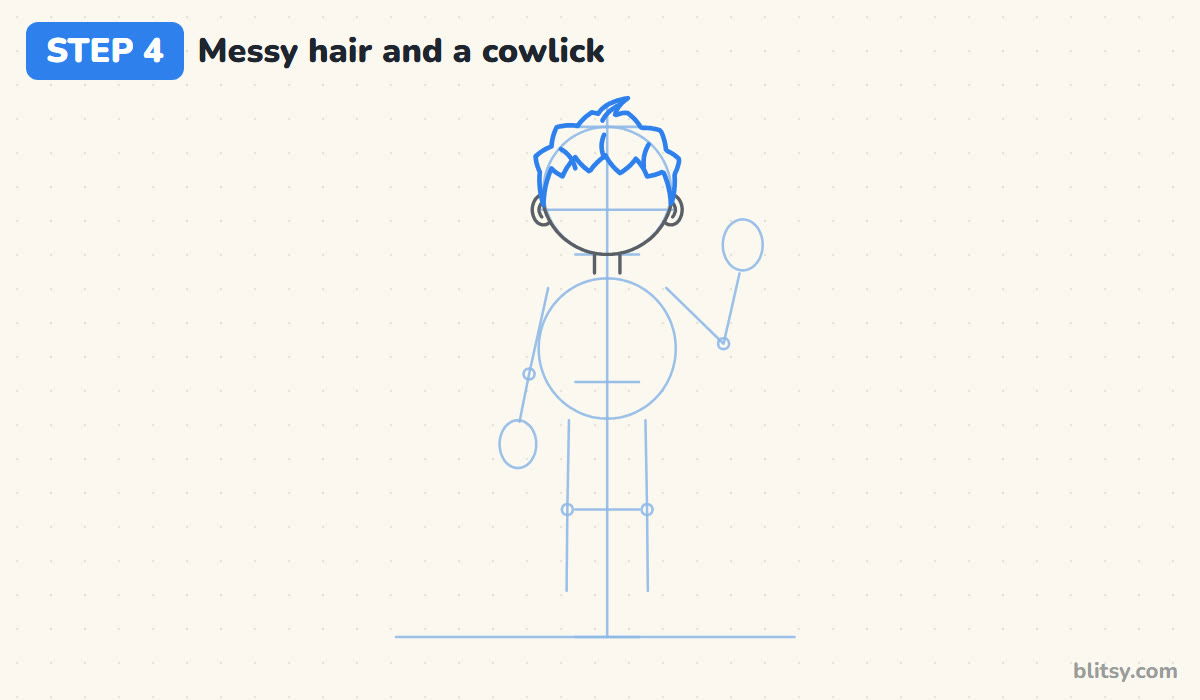
Short hair on a kid looks best when it sits a little above the head circle, like a soft helmet. Draw a bumpy line around the top, made of small clumps pointing different ways. Add a few uneven bangs across the forehead, one curly tuft on top for the cowlick, and two or three short lines inside.
💡 Tip: Leave a little space between the hair line and the head circle so the hair looks fluffy, not painted on.
Step 5: Draw the arms, the sleeves and the mitten hands
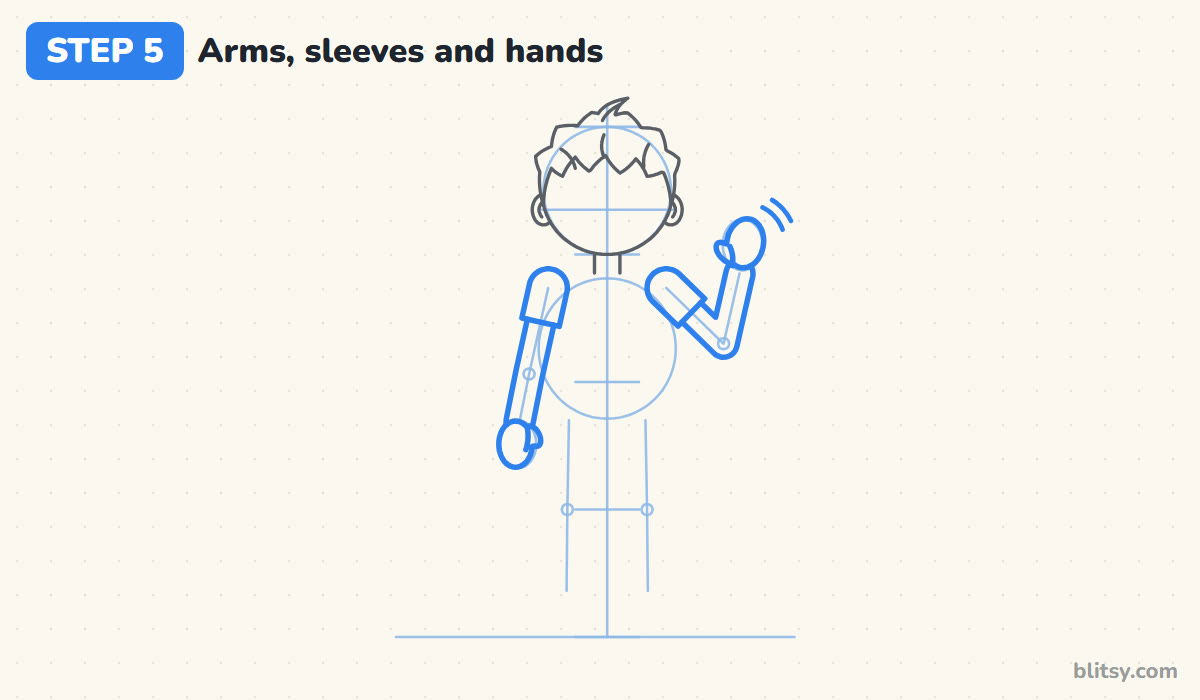
Each sleeve is a short rounded tube at the shoulder. Below it, draw the arm as two lines that follow your stick. For the hands, I use mittens: a rounded oval with a small thumb bump. The lowered hand ends near the top of the legs, and the raised one is open with the thumb toward his face. Two little curves beside it show he's waving.
💡 Tip: Keep the hands about as long as the eye-to-chin distance; tiny hands make the arms look like noodles.
Step 6: Draw the T-shirt and the star
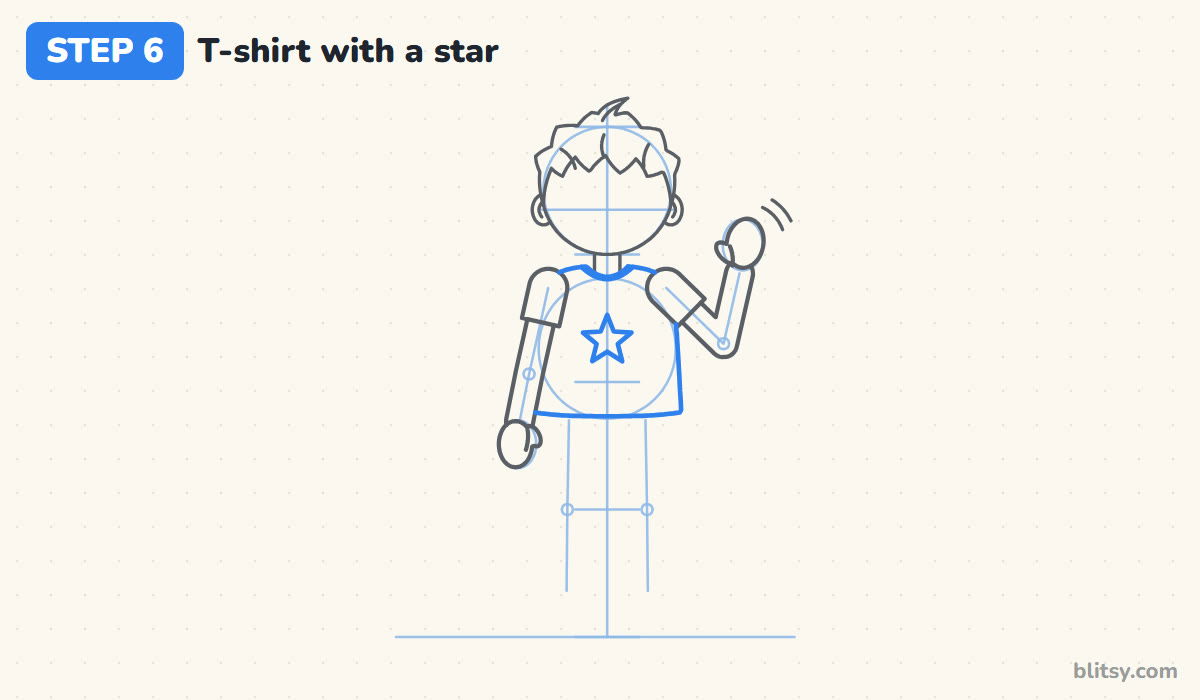
Connect the sleeves with a curved collar under the neck, then run the sides of the shirt straight down behind the arms. The hem lands a bit below the second head mark. Draw a second curve inside the collar for the ribbing, and a five-point star in the middle of the chest.
💡 Tip: Draw the star in one go as a five-line zigzag, then tidy the points; it's quicker than drawing ten separate edges.
Step 7: Add jeans with rolled cuffs
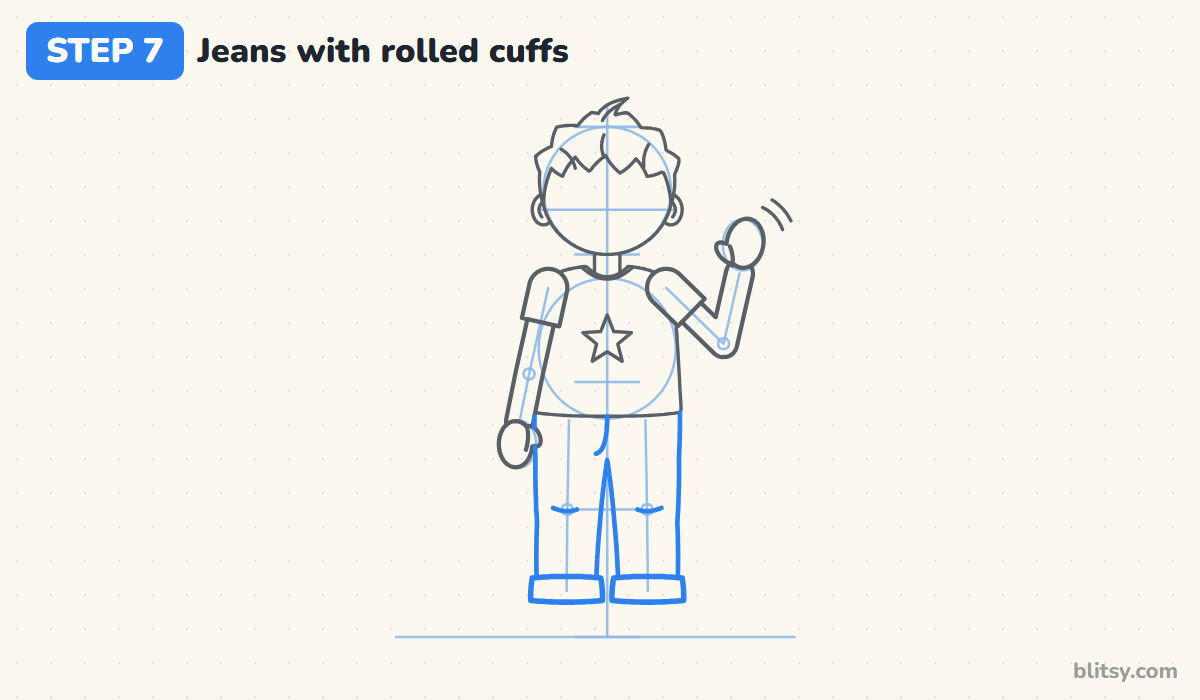
Start the jeans under the shirt hem and draw the outside of each leg down to just above the ground. The inside lines meet under the middle of the shirt, then split into two legs with a narrow gap. At the bottom, draw a wide band on each leg for a rolled cuff. A short fly line and a crease at each knee finish them.
💡 Tip: Draw the knee creases on the third head mark, the same spot as your knee circles.
Step 8: Draw the sneakers and the soccer ball
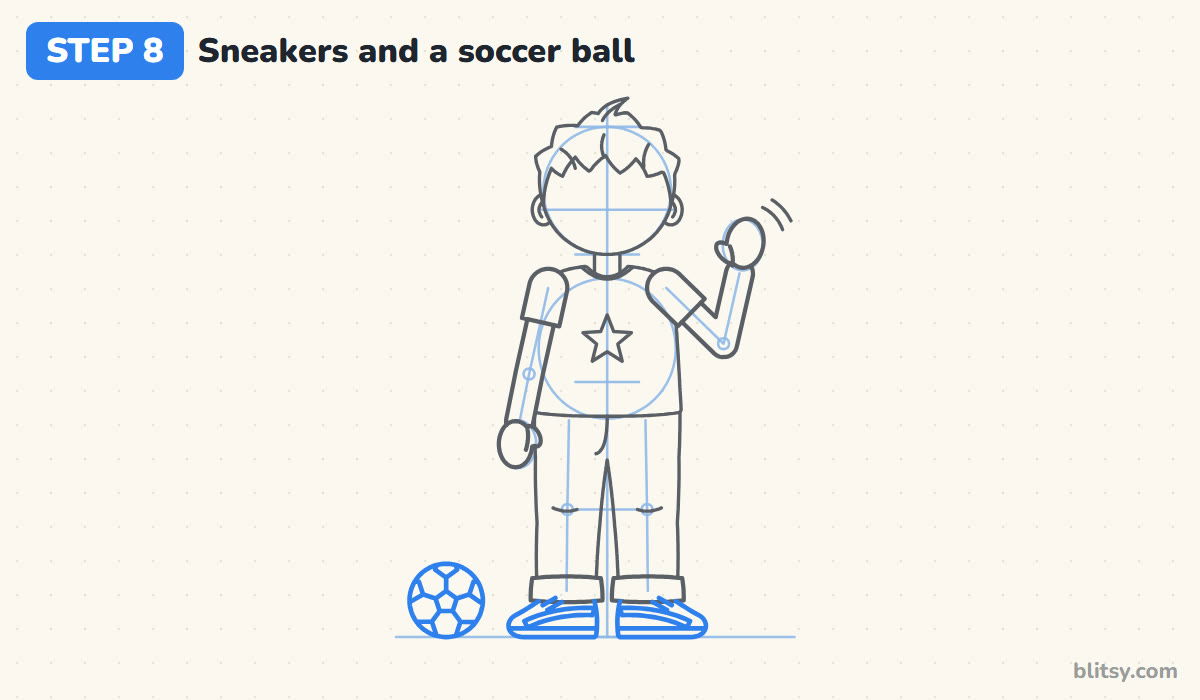
Under each cuff, draw a sneaker pointing a little outward, with a rounded toe and a flat bottom. Add a sole line, a curved stripe and two short lace marks. For the ball, draw a circle by his foot with a small pentagon in the middle, lines going out from its corners and partial patches around the edge.
💡 Tip: Turn the toes slightly away from each other; feet pointing straight at you are much harder to draw well.
Step 9: Give him big eyes and eyebrows
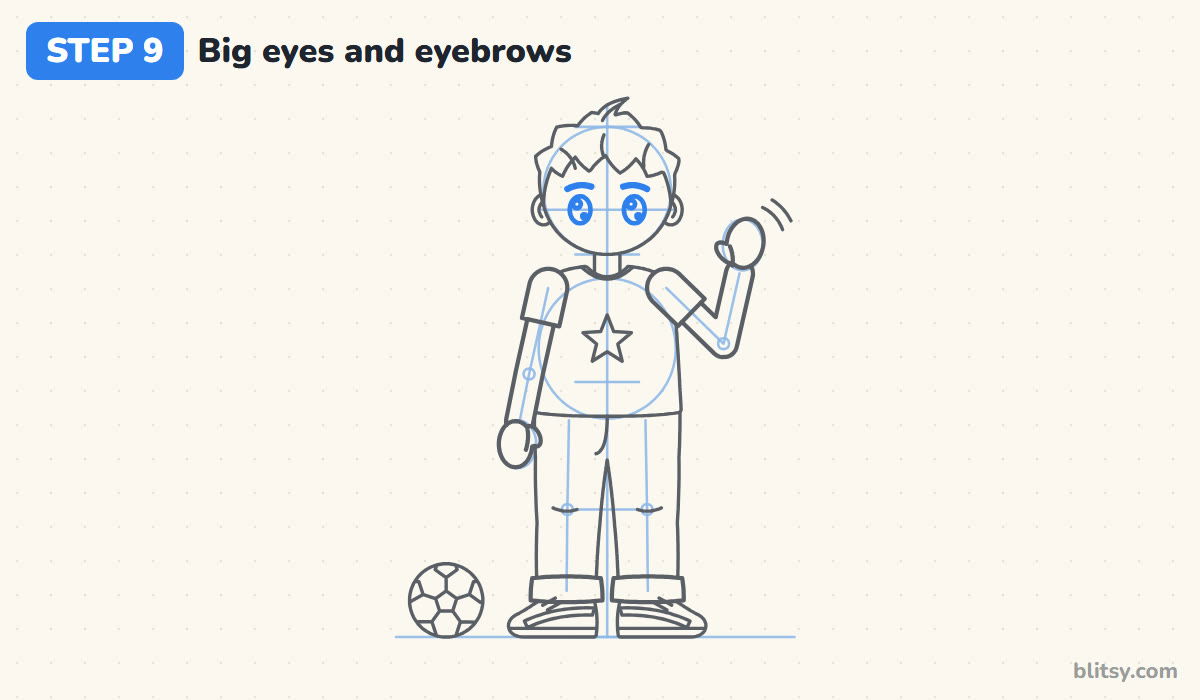
Place two tall ovals on the eye line, a little more than one eye-width apart. Kids' features sit low on the face, so the eyes belong on that middle line, never higher. Leave a round shine near the top of each eye and a tiny one lower down. Short eyebrows go above, tucked under the bangs.
💡 Tip: Keep both shines on the same side of the eyes so he looks at you instead of cross-eyed.
Step 10: Draw the nose, the smile and the cheeks
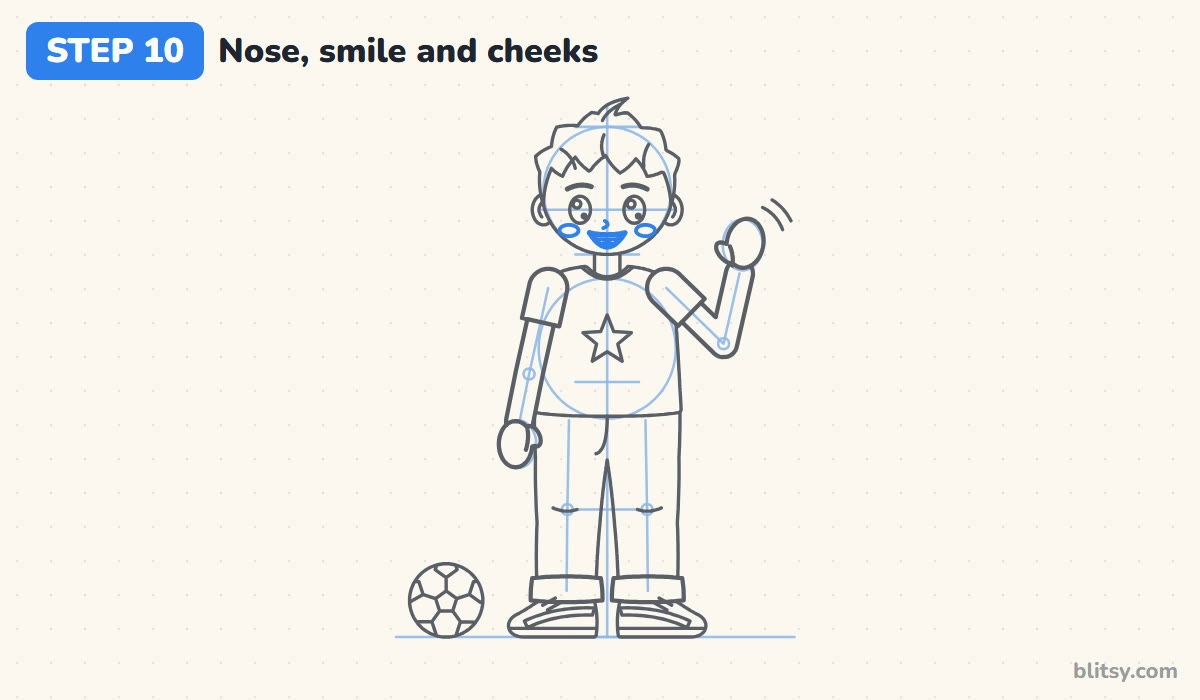
A small hook between the eyes and the chin is enough for the nose. Under it, draw an open smile with a nearly flat top and a round bottom, a thin strip of teeth along the top and a little tongue below. Two flat ovals on the cheeks make him look happy.
💡 Tip: Keep the smile no wider than the gap between the eyes; a mouth that runs ear to ear looks like a cartoon frog.
Step 11: Ink your drawing and erase the guides
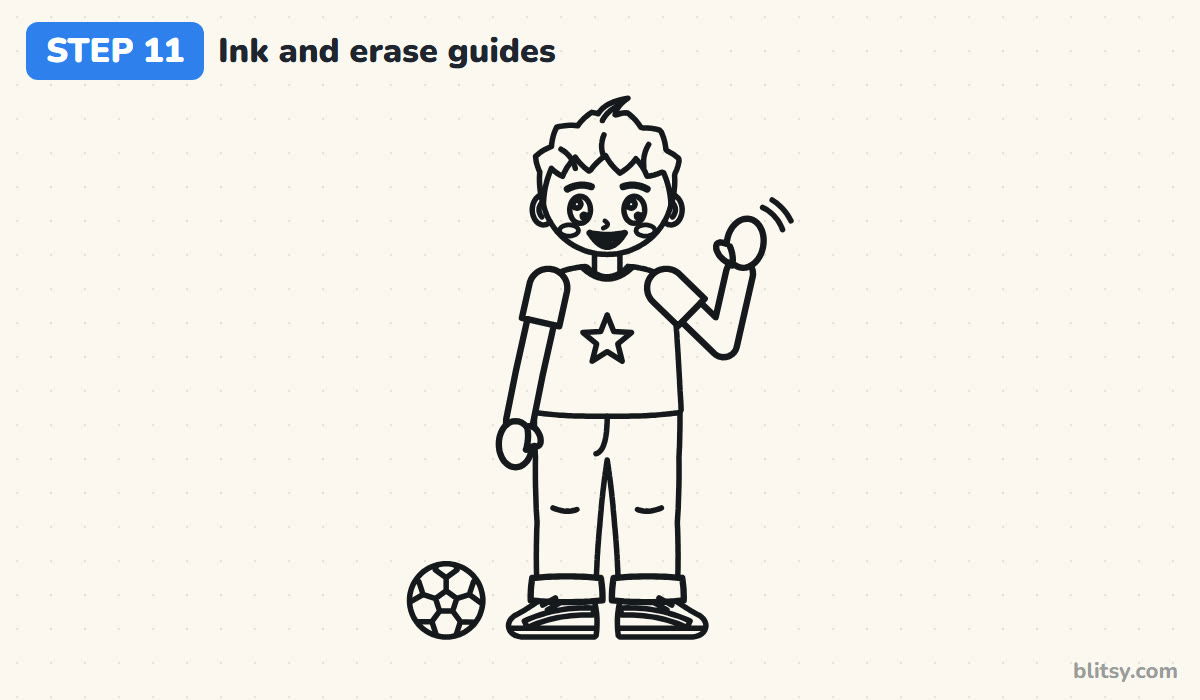
Trace every line you want to keep with your black pen, but skip the center line, the circles, the sticks and the head marks. When I ink a figure, I start at the face and work down, so my hand never rests on wet ink. Let it dry for a minute, then erase all the pencil.



💡 Tip: Ink the long lines like the jeans in one smooth pull rather than many short dashes.
Step 12: Color your boy
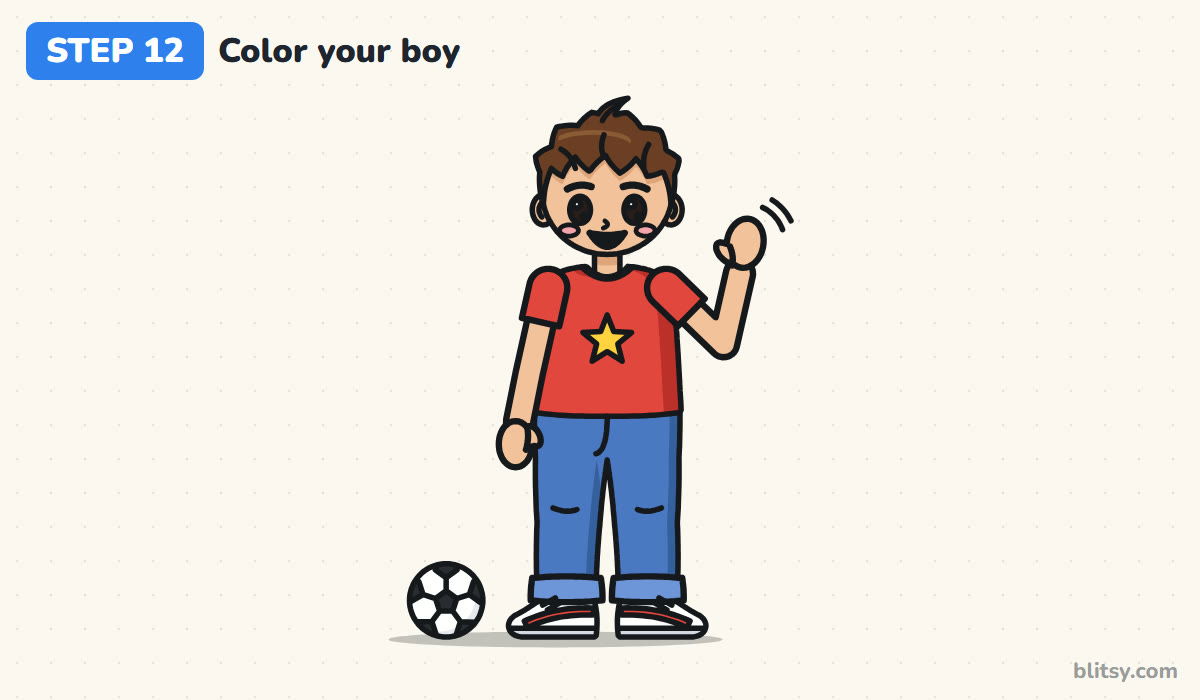
Color the hair brown with a lighter streak on top and the skin a warm tan, a little darker under the hair. The T-shirt is red with a darker strip on one side and a yellow star. Jeans are blue with lighter cuffs. Sneakers stay white with red stripes and gray soles, and the ball gets black patches.
💡 Tip: Shade the same side of the shirt, the jeans and the ball so the light seems to come from one place.
Proportion Problems When Drawing Kids
- Arms that stop at the waist. Short arms make him look like a toy. Let the hanging hand reach the top of the legs.
- Eyes placed high on the head. That makes a kid look grown-up. Keep them on the middle line.
- A tiny head on a long body. Kids are only a few heads tall. Stick to four head marks for a young look.
- Legs stuck together. Without a little gap he seems to wear a skirt or a sack. Split the jeans into two legs.
- Knees in the wrong place. Knees drawn too low make the legs look broken. Line them up with the third mark.
New Outfits and Poses for Your Boy Drawing
The same head marks work for any outfit. Swap the jeans for shorts, add a cap over the messy hair, or move the ball under his arm. The face drawing tutorial helps with new expressions, and how to draw a family lets you put him next to his parents and siblings.
Free Boy Coloring Page and Step Guide PDF
Want to color first? The free boy coloring page has the clean outline, a small colored example and a key that shows which color goes where. The step-by-step guide PDF puts all 12 steps and tips on a few pages for Letter or A4 paper.
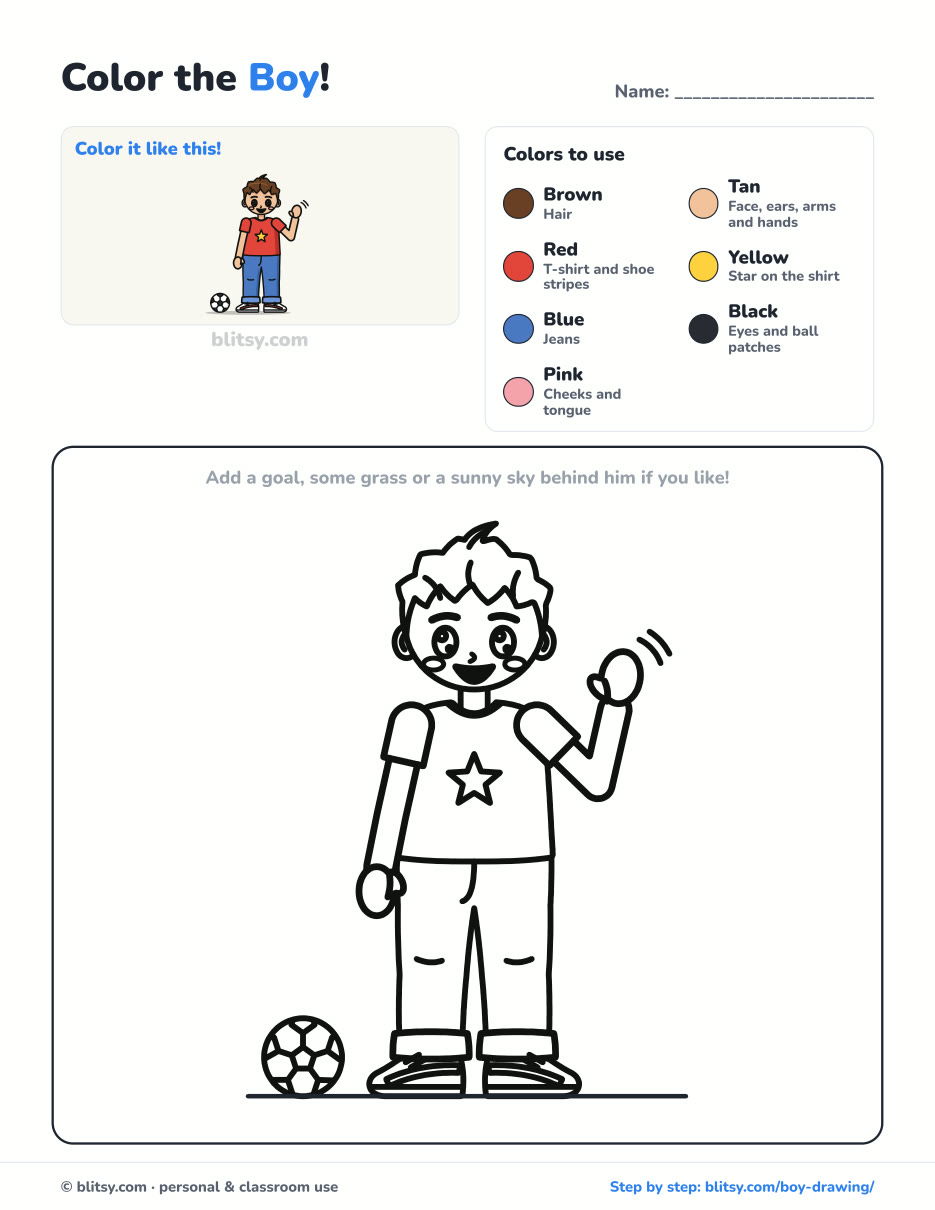
Black outlines with a colored example and the color names at the top. Ready to print and color.
⬇️ Download Coloring PageEvery step picture with its instructions and tips, to keep beside your paper while you draw.
⬇️ Download Drawing Guide📱 On a phone? Tap a download button, then open the file and choose Share → Save to Files or Print. On a computer, the PDF opens or saves straight to your Downloads folder.
Keep the Boy Steps on Pinterest
Kid Figure Drawing: Your Questions Answered
What is the easiest way to draw a boy?
Start with a stick figure and a head circle, then measure the body in heads. Clothes drawn over a good stick figure are much easier than trying to draw the outline in one go.
How many heads tall should a boy drawing be?
For a young cartoon kid, about four heads works well. A teenager is closer to six or seven, so add marks if you want him older.
How do you draw hands on a cartoon boy?
Draw a mitten: an oval with a small thumb bump, about as long as the space from his eyes to his chin. Finger lines can come later.
Is this drawing easy enough for kids?
Yes, most children from about 6 can follow it. A grown-up can help with the head marks in step one, and younger kids can skip the ball pattern.
Now he just needs a name, so draw him, color him and choose one. 👦✏️
Related posts:
 How to Draw Anime Step by Step (Easy Anime Boy Face)
 How to Draw a Woman Step by Step (Easy Body Proportions)
 How to Draw Bart Simpson Step by Step (Easy Cartoon)
 How to Draw a Tank Step by Step (Easy Cartoon Tank)
 How to Draw a Bee Step by Step (Easy Cartoon Bee)
 How to Draw a Mermaid Step by Step (Easy Cartoon for Kids)
 How to Draw a Family Step by Step (Easy Cartoon Portrait)
 How to Draw a Princess Step by Step (Easy Ball Gown Cartoon)
 How to Draw a Cowboy Step by Step (Easy Cartoon Kid)
 How to Draw a Jellyfish Step by Step (Cute, Easy Guide)
 How to Draw Cerberus Step by Step (Cute and Easy)
 How to Draw a Taco Step by Step (Easy Kawaii Taco)

